Xero for WooCommerce allows you to create invoices in Xero for all sales on your WooCommerce site, and also tracks and sends data on items, shipping, discounts, and tax to your Xero records to keep everything in balance.
Requirements
↑ Back to top- cURL and curlSSL need to be installed on your server. Ask your host if they have these modules installed
- A valid SSL certificate
- Ensure that strong customer authentication is enabled. Recommended minimum is two step authentication
- Ensure your host follows industry accepted security standards including, but not limited to: ensuring sensitive data is properly encrypted; data isn’t hosted in high risk areas; proper security monitoring and reporting is in place
- WooCommerce version 6.0 or higher
- WordPress version 5.6 or higher
- PHP version 7.0 or higher
Installation
↑ Back to top- Download the .zip file from your WooCommerce account.
- Go to: WordPress Admin > Plugins > Add New, click Upload Plugin, select the file you downloaded and click Choose File.
- Install Now and Activate the extension.
More information at: Install and Activate Plugins/Extensions.
Setup and Configuration
↑ Back to topThere are two main steps to set up the connection between your WooCommerce store and Xero account:
- Create a private Xero application in your Xero developer portal
- Connect your WooCommerce store to your Xero application
Note: Per limits set by Xero, a single Xero app will only support a maximum of 25 OAuth connections, and each organisation is limited to connecting a maximum of two Xero apps.
Step 1: Create a new application in the Xero developer portal
↑ Back to topGo to the Xero developer portal’s My Apps section (you may need to log in using your xero.com credentials) and click on the “New app” button:
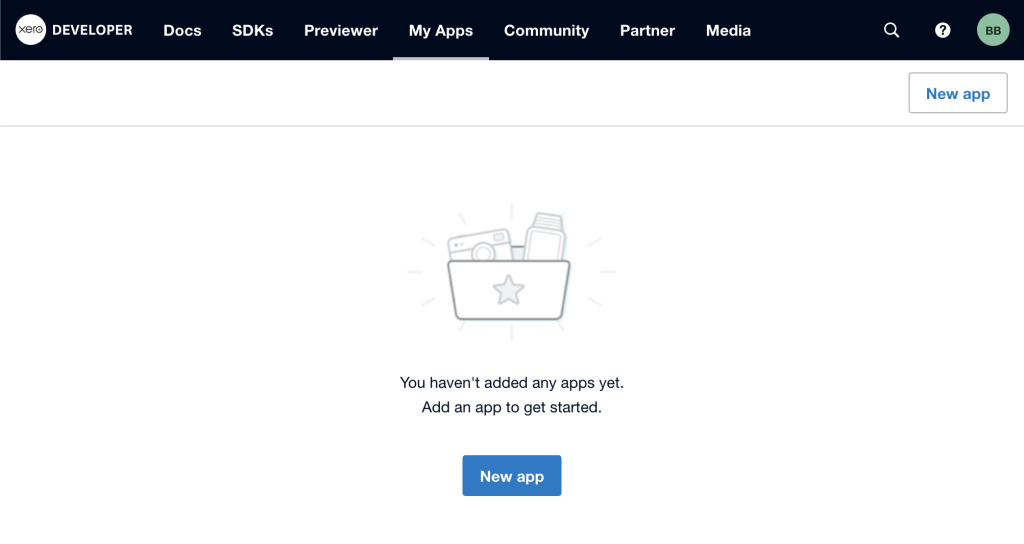
You’ll be presented with the following screen and fields to fill in:

- App name – this is the name of your application, choose an easy-to-remember name
Note: Do not include a symbol in the app name or the connection may fail - Integration type – this should be set to Web app
- Company or application URL – website address of your shop or main page
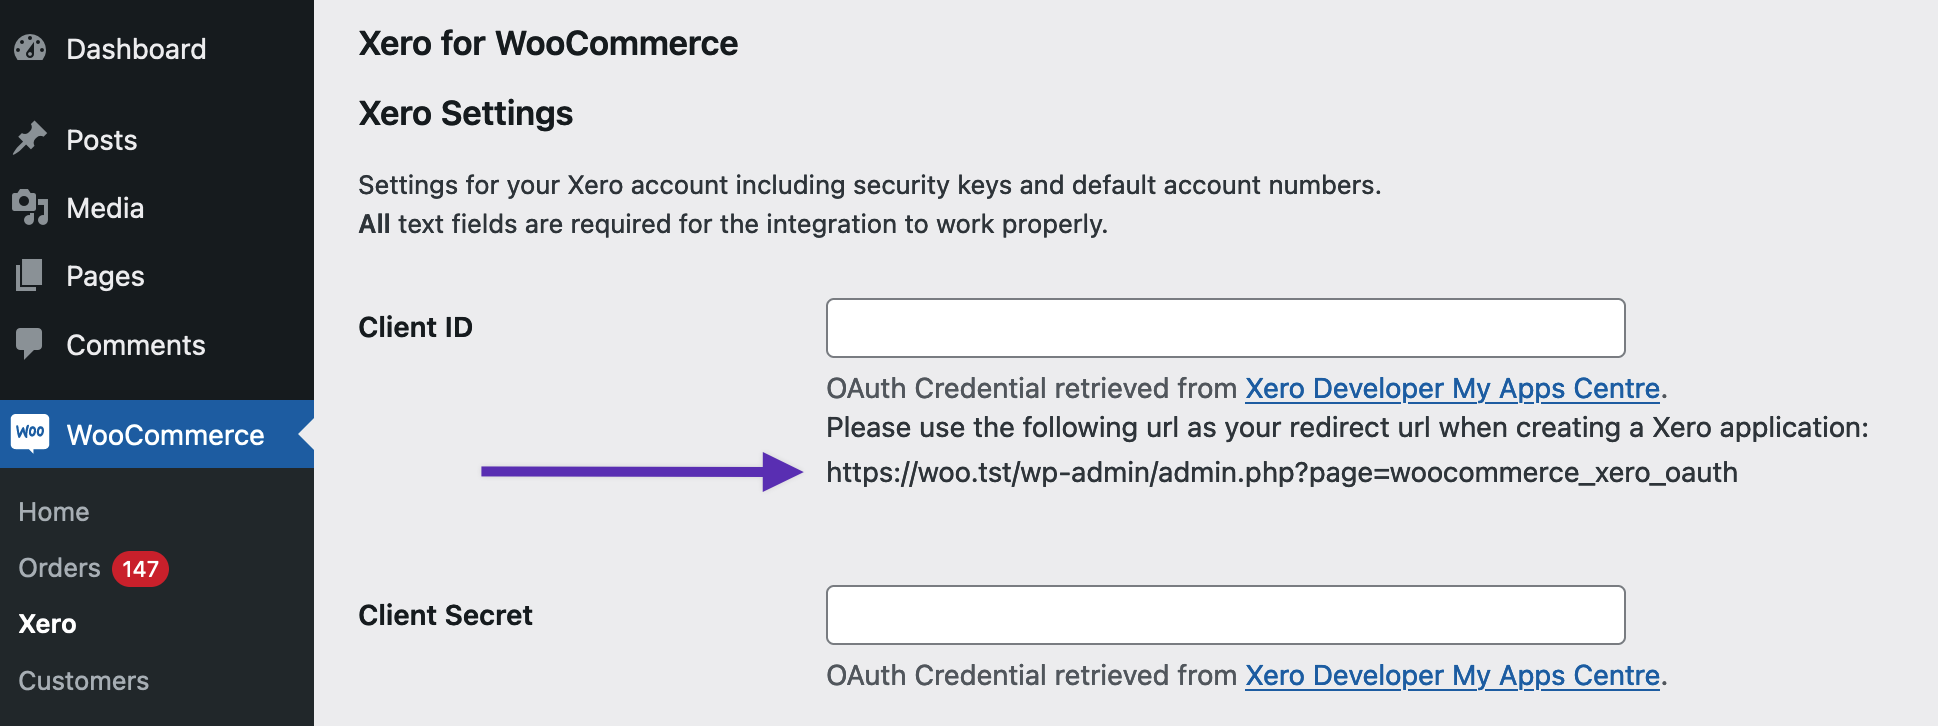
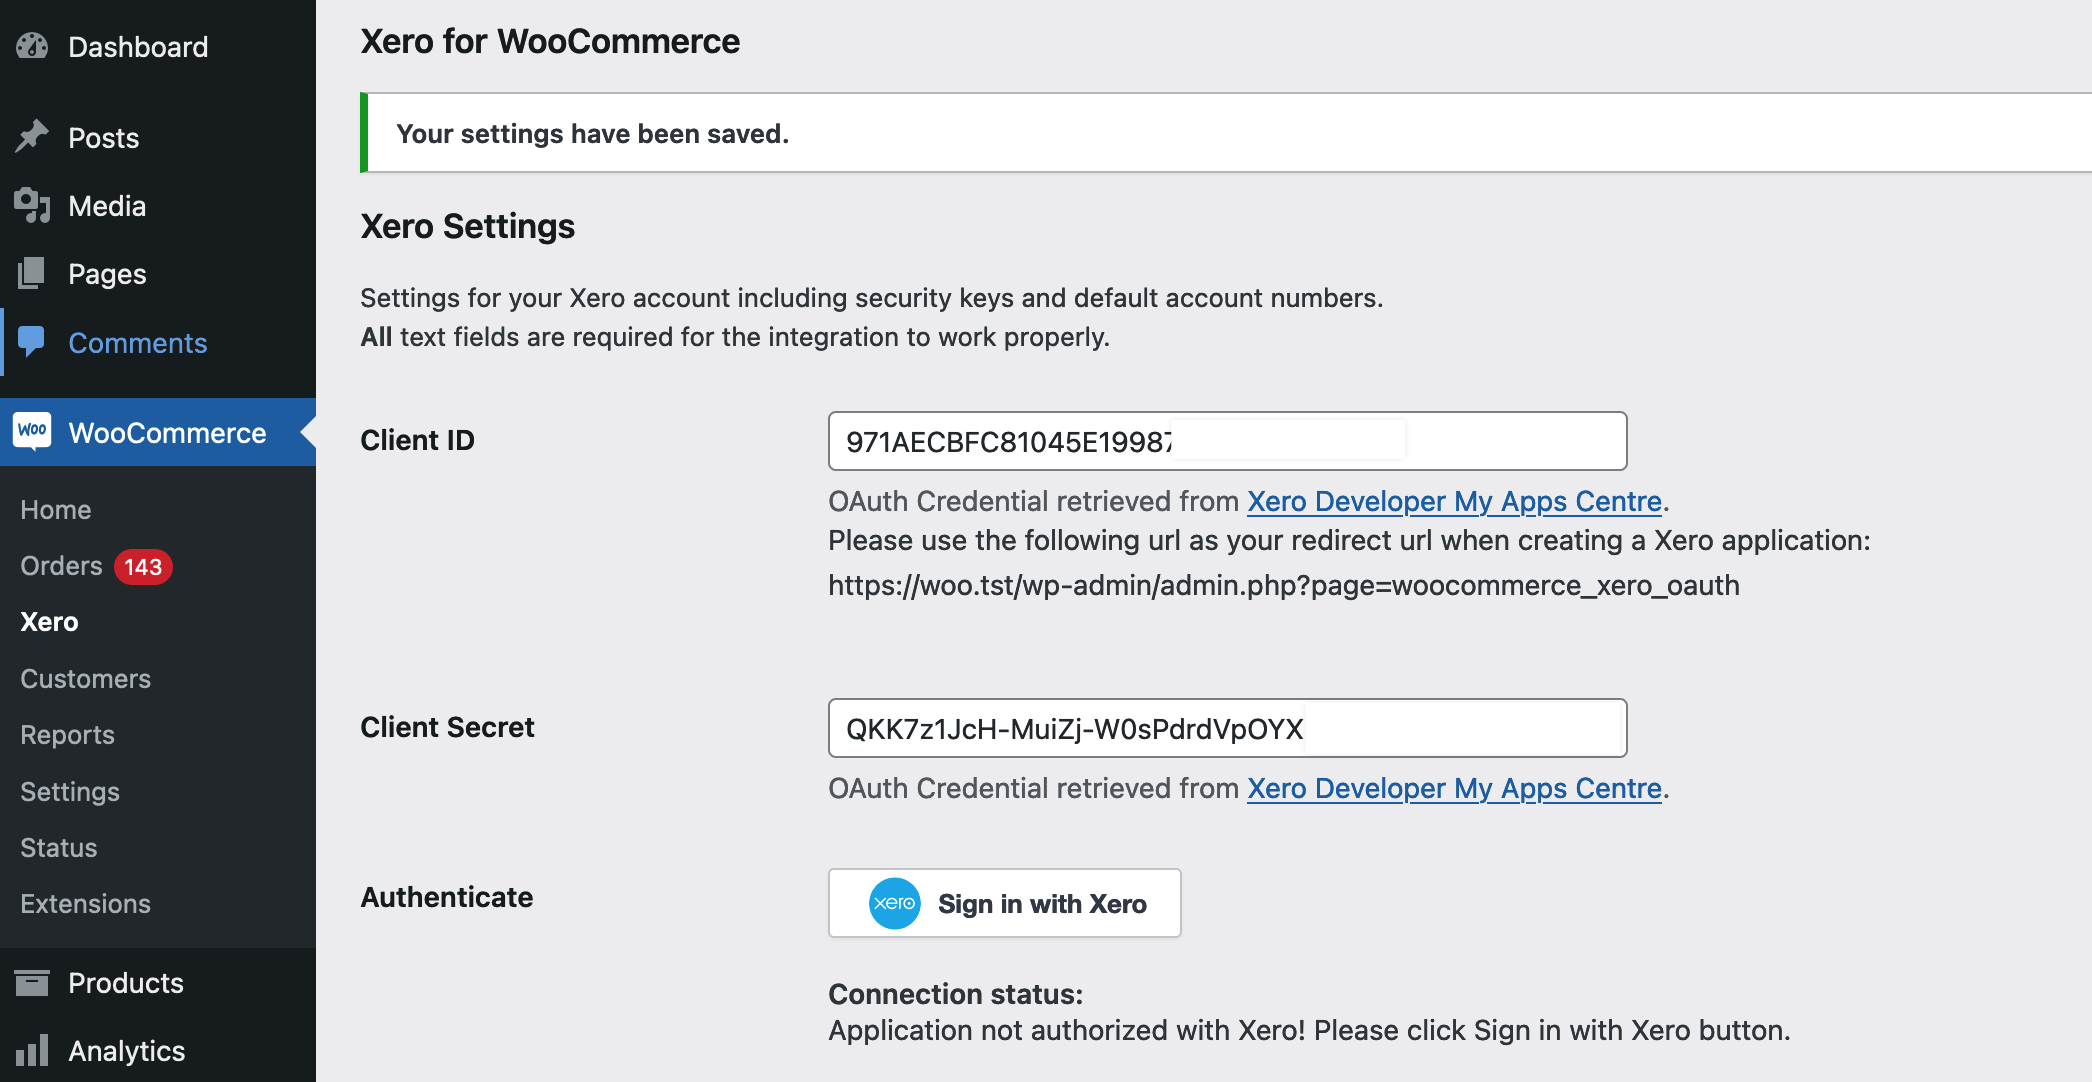
- Redirect URI – can be copied from your site’s WooCommerce > Xero settings (pictured below), or copy this address and replace
example.comwith your site’s domain name:https://example.com/wp-admin/admin.php?page=woocommerce_xero_oauth
Note: if you’re doing a fresh install your WooComemerce Xero settings will appear similar to the next screenshot. If you previously had a WooCommerce Xero integration set up you should still see the old settings fields – they will be removed during the course of finishing this setup guide.
When you’re done configuring the settings, click the Create app button. You’ll be taken to the next screen to optionally add your site’s Privacy Policy and Terms and conditions URLs.
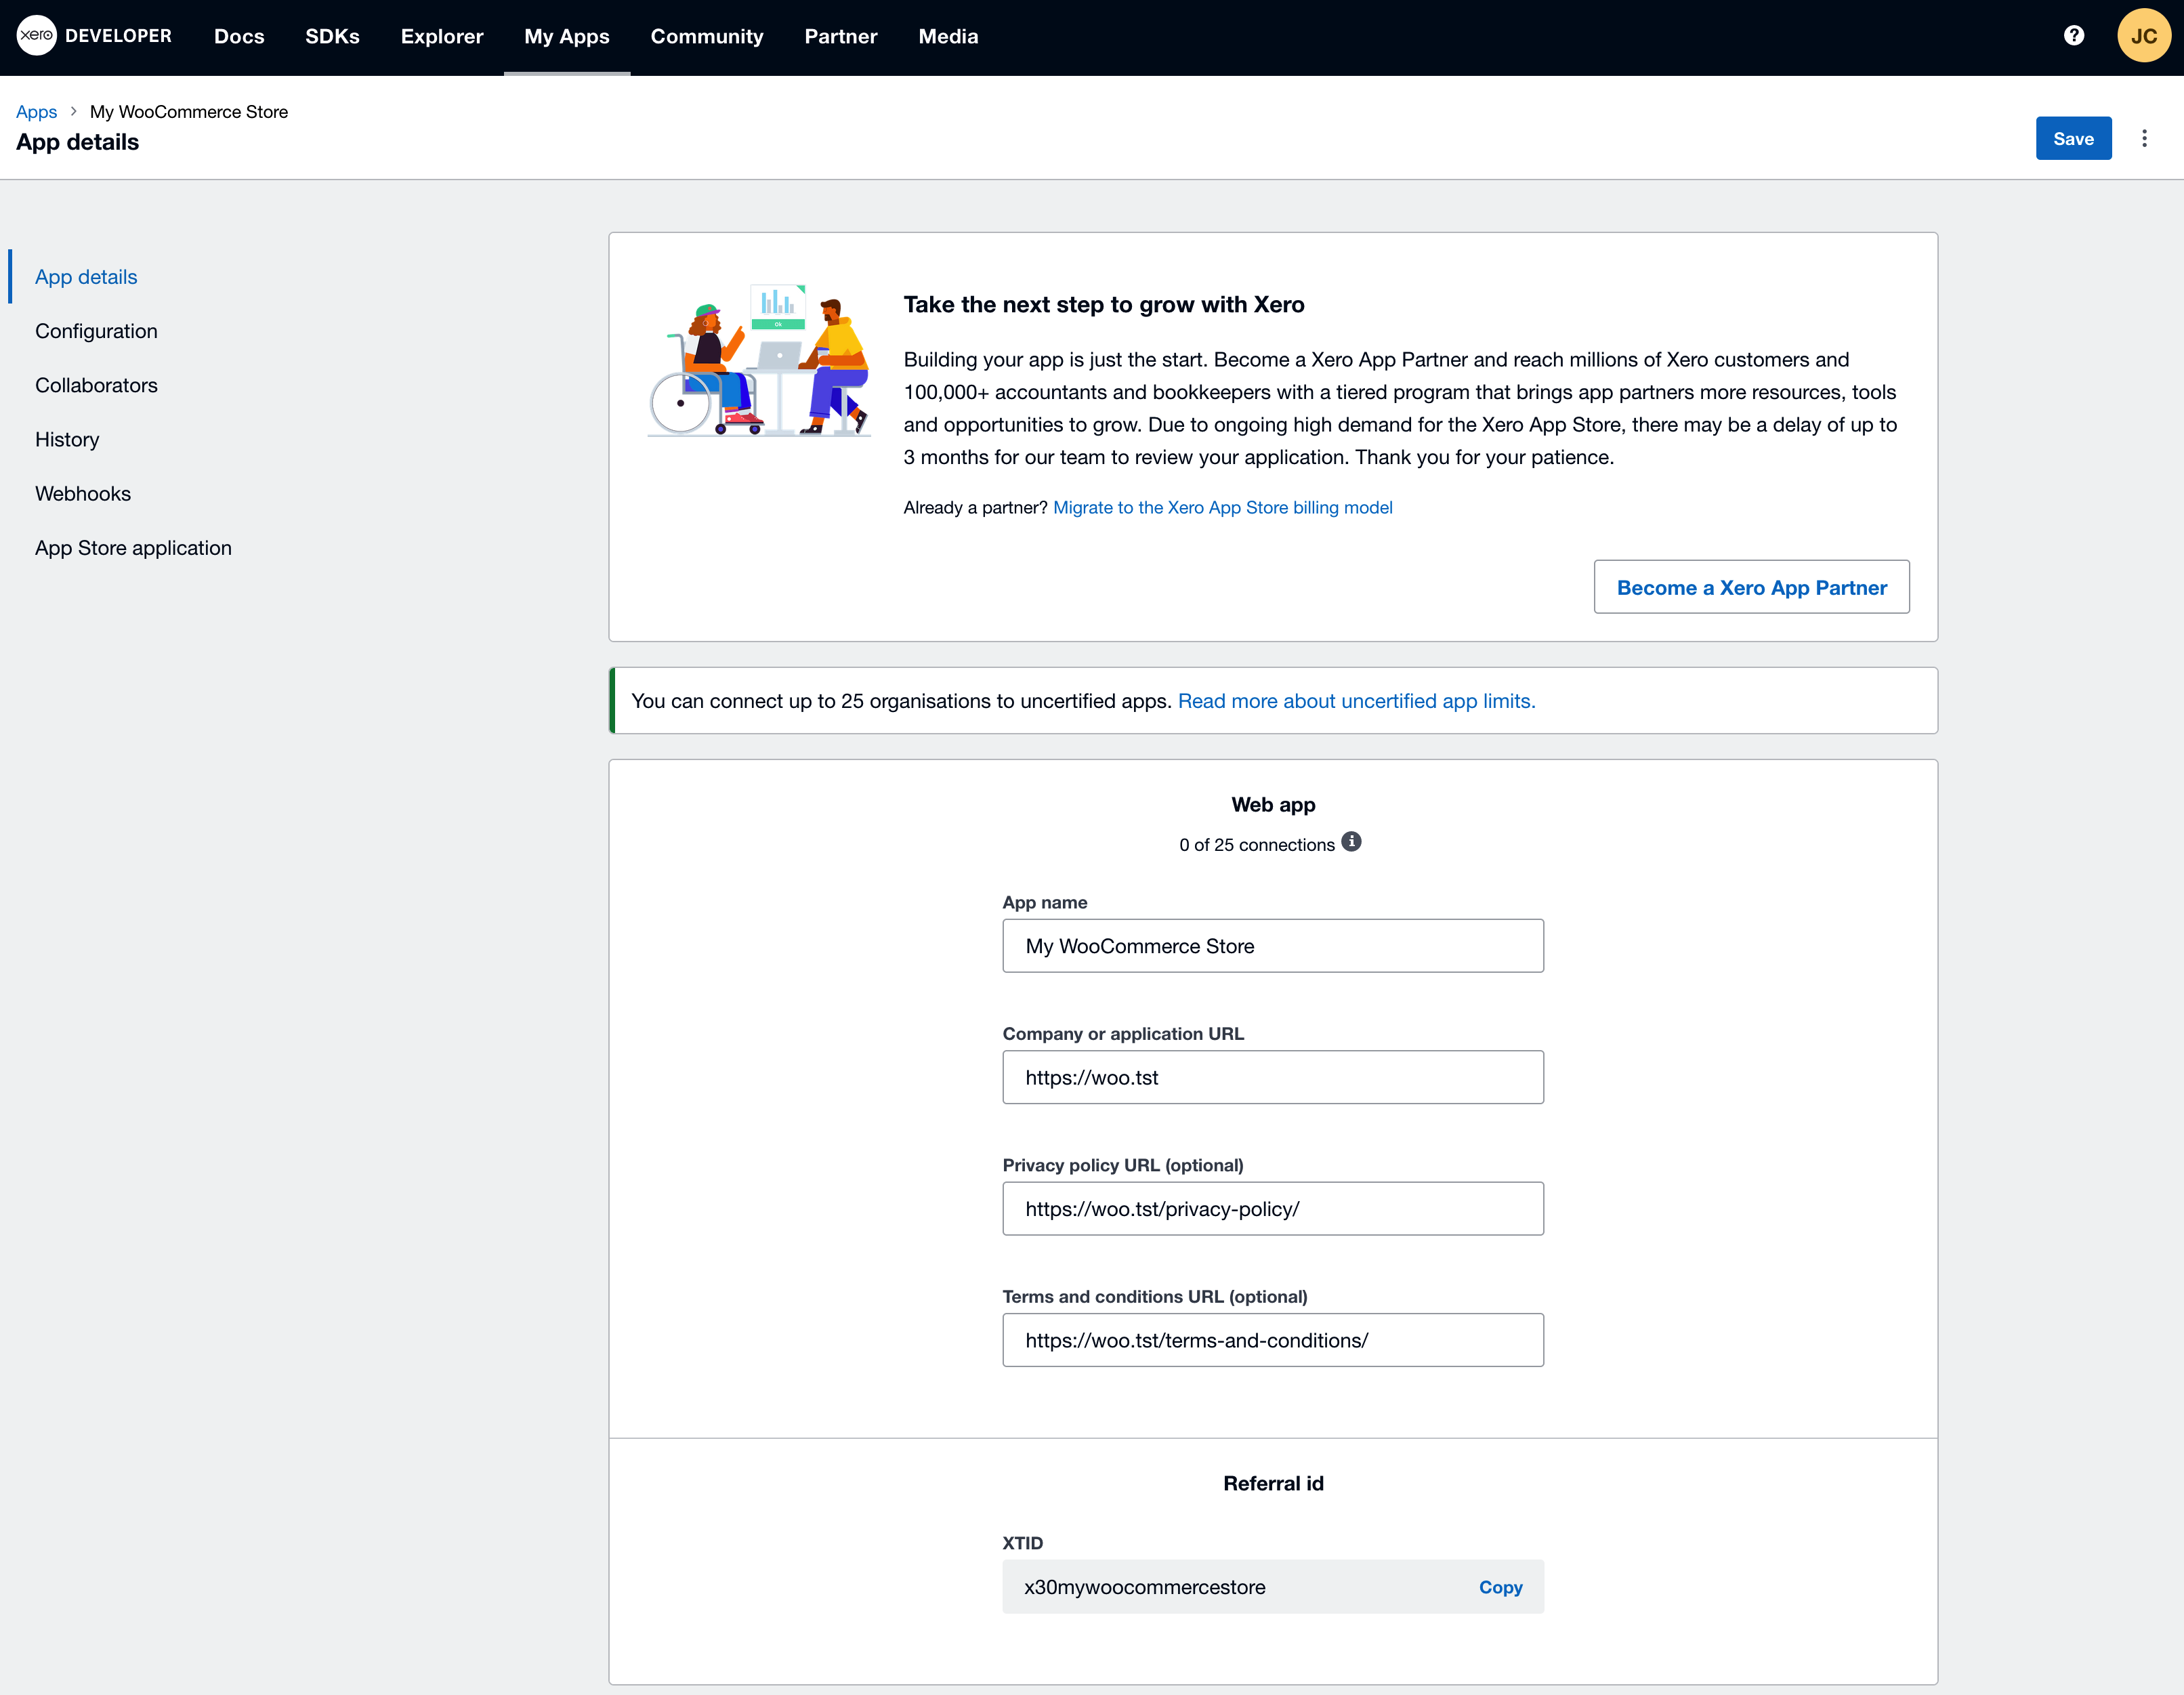
Your Xero application is now created.
Step 2: Connect your WooCommerce store to your Xero application
Click on the Configuration tab from the menu to the left.
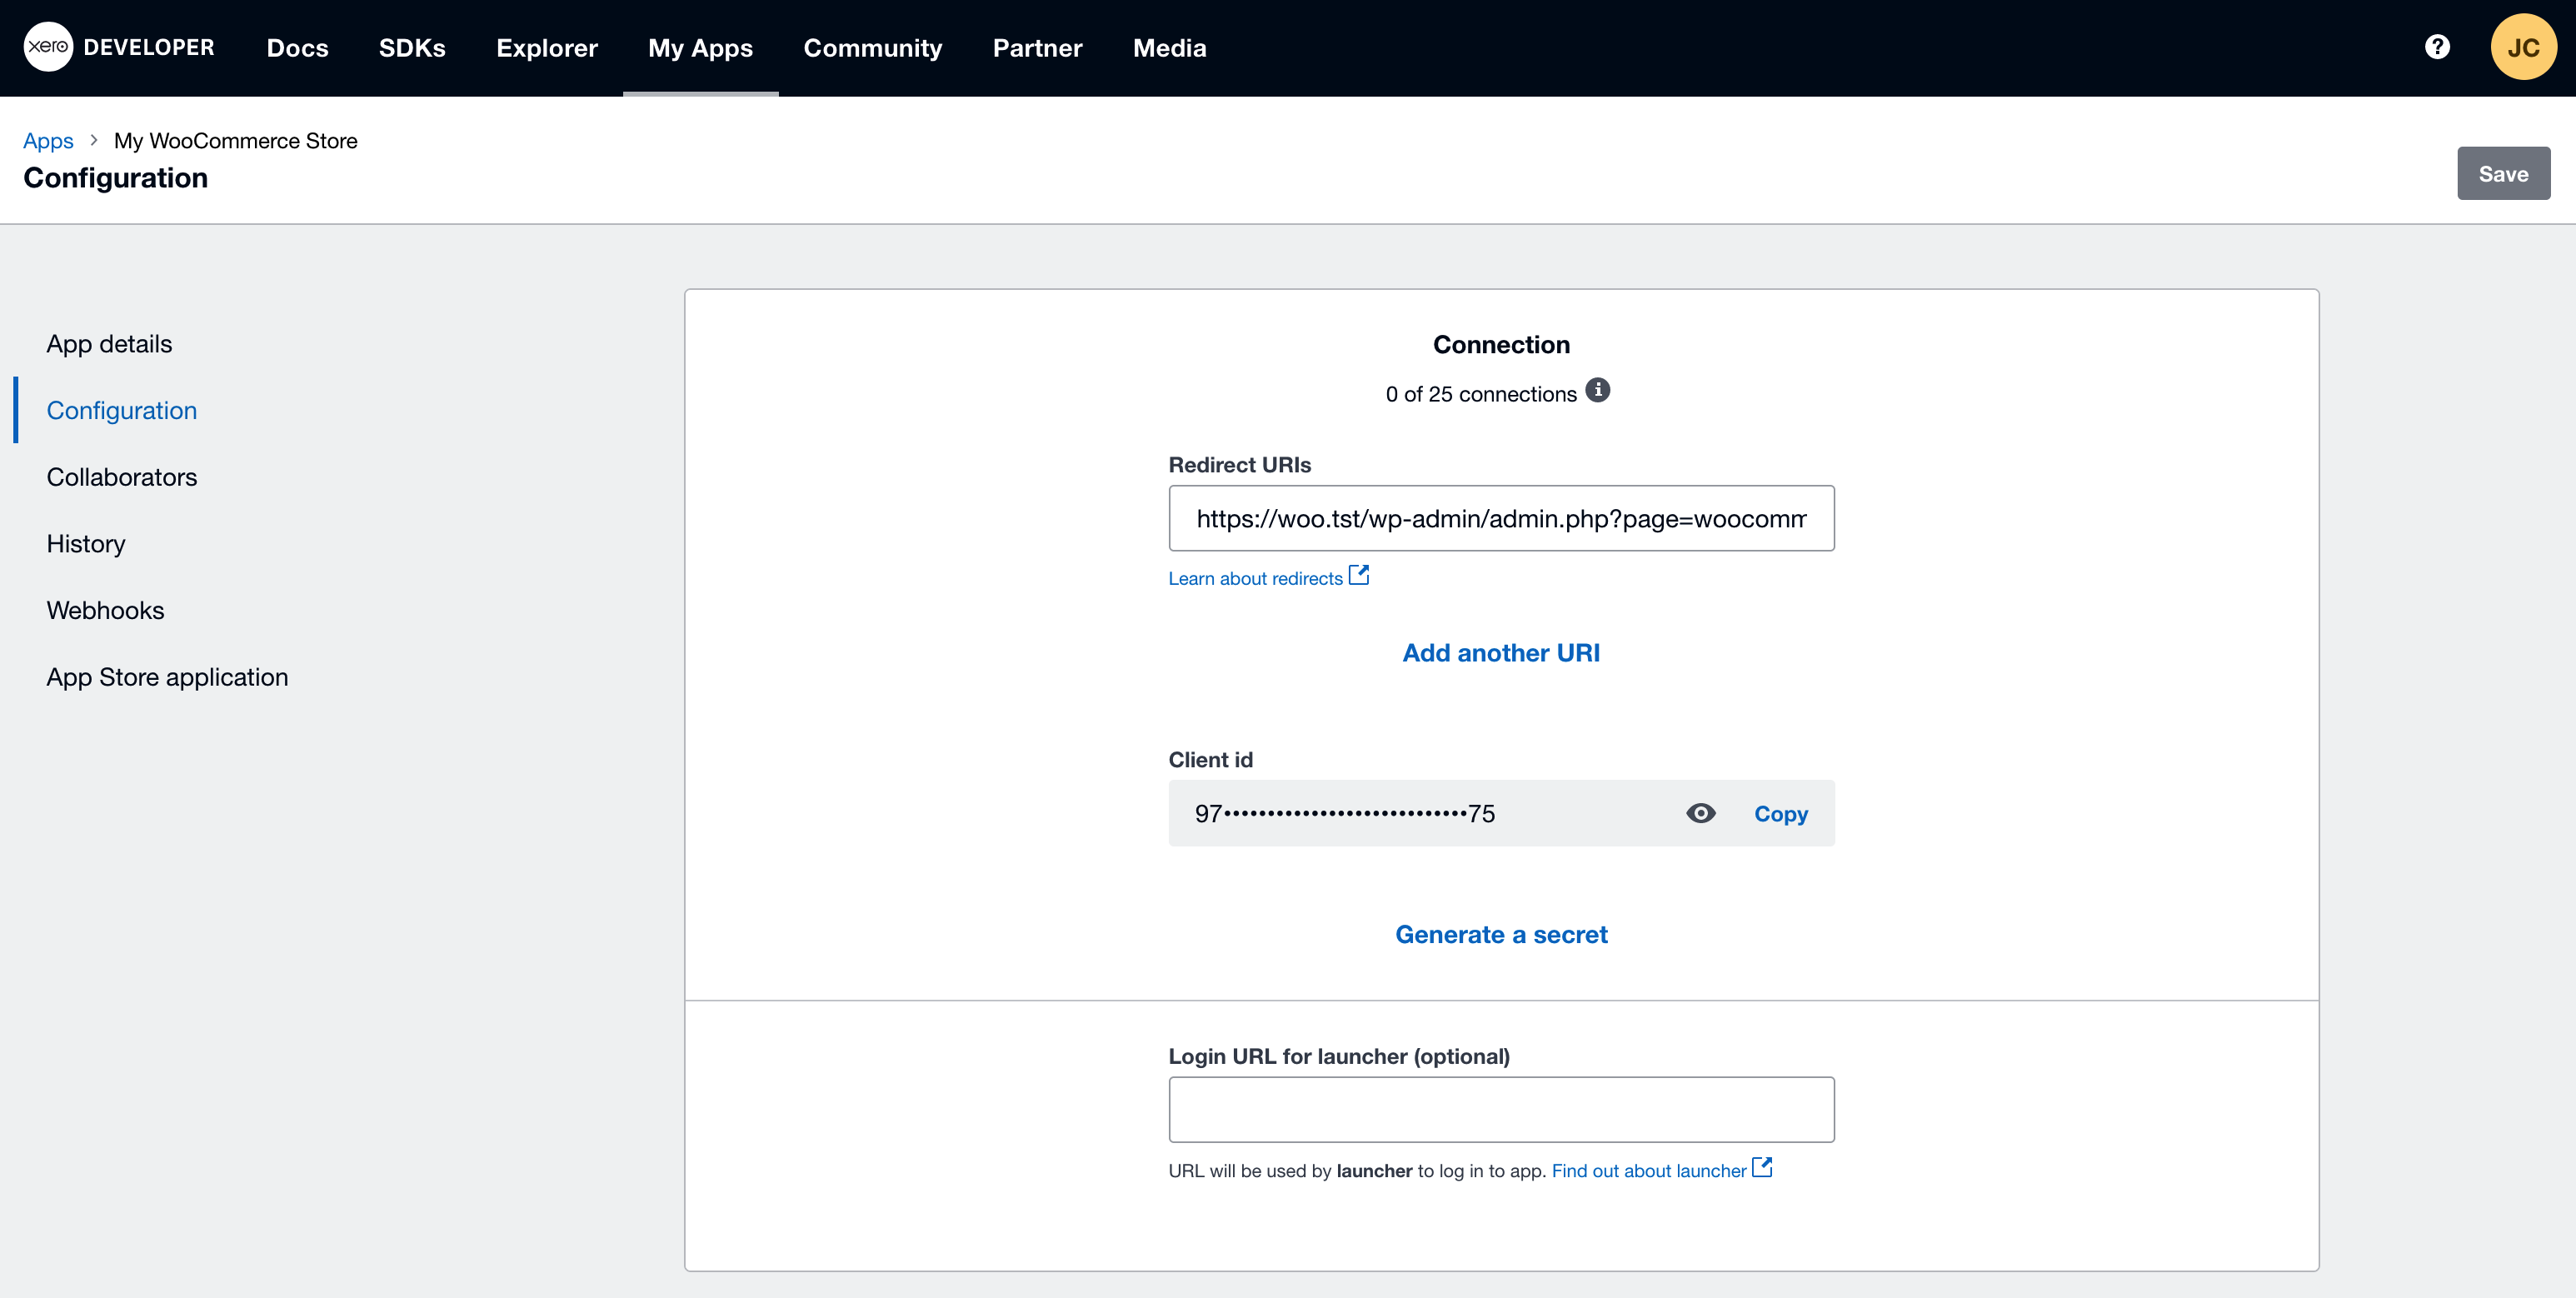
- Copy the Client id, then go to your WooCommerce Xero admin settings page, and paste it into the Client id field
- Next, go back to the Xero application settings and click Generate a secret. Copy the secret and paste it into the Client Secret field of the WooCommerce Xero settings.
Note: The client secret key is visible only once so if you lose it you will need to generate it again.
- Go back to your Xero Application and click Save (your secret will then no longer be visible in the Xero application). Go to your WooCommerce Xero settings page and also click Save there.
You should now see that the “Sign in with Xero” button is now Active:
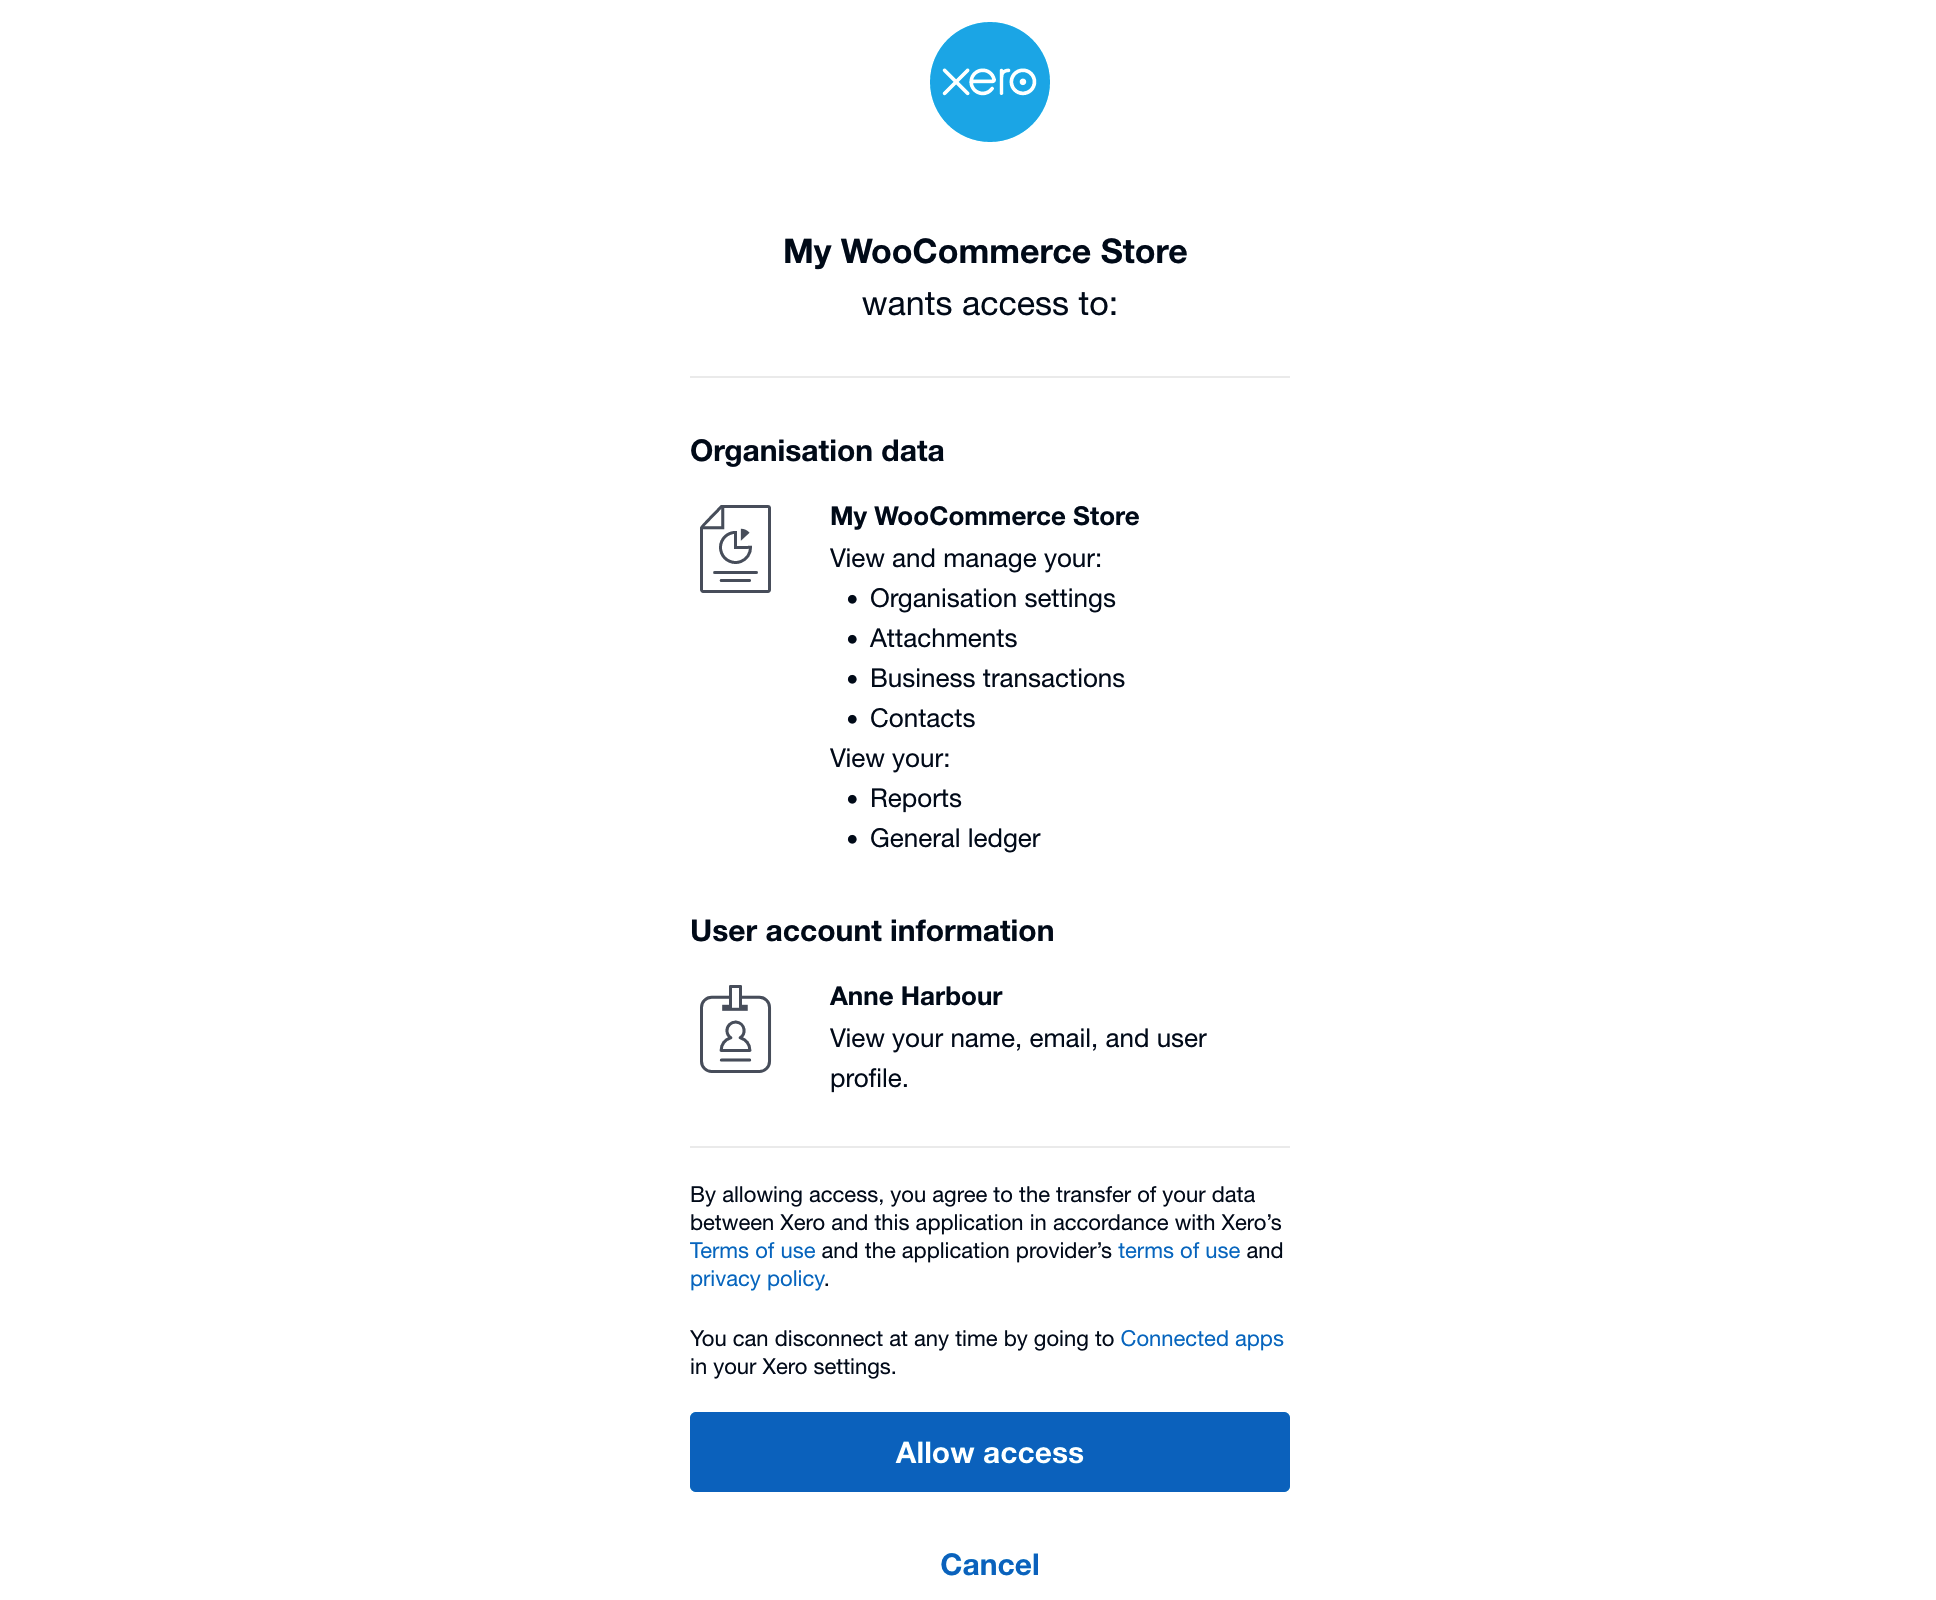
Once that button is it clicked, it opens the login.xero.com site where granting access to the application is requested. It informs about the scope of required permissions that needs to be accepted. If you have more than one organization defined in the Xero portal, you can choose which one you want to connect (note: Xero’s default Demo Company organization doesn’t appear on this list, so cannot be used for this purpose):
After clicking connect it returns to the WooCommerce Xero page where the status of the connection is shown.
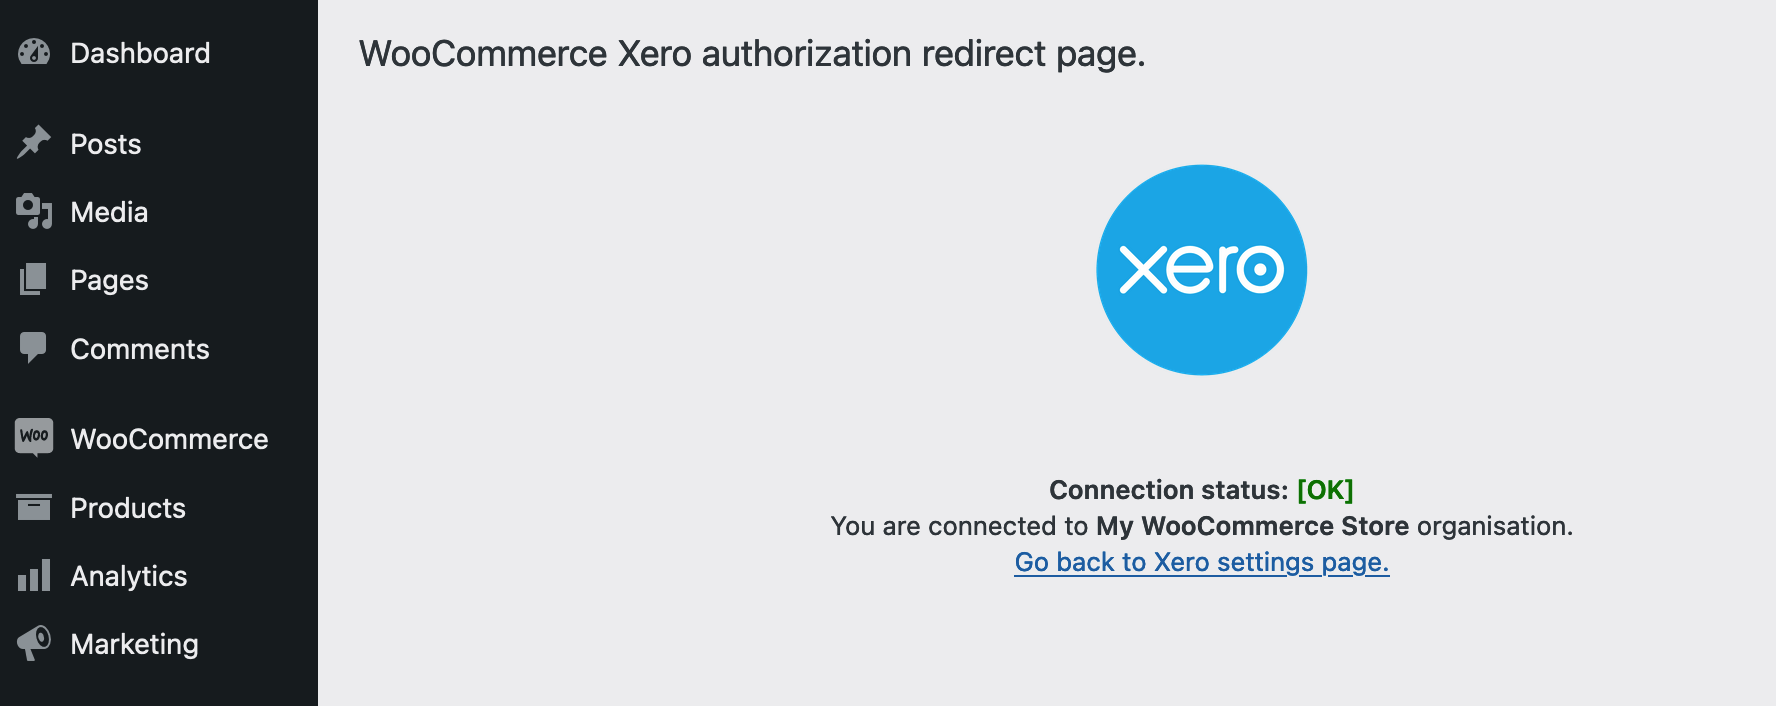
If the above is shown, your WooCommerce store is connected and you can complete the rest of the setup..
Set Up Default Account Codes
↑ Back to topInvoices and payments sent to Xero must be associated with account codes in your company’s Chart of Accounts. This is a required part of the setup. Find the Chart of Accounts via Accounting > Chart of Accounts or Accounting > Advanced in your Xero dashboard:

Xero provides a standard set of account codes that you can modify as necessary (default codes will vary by country). You can also add additional accounts as required. :
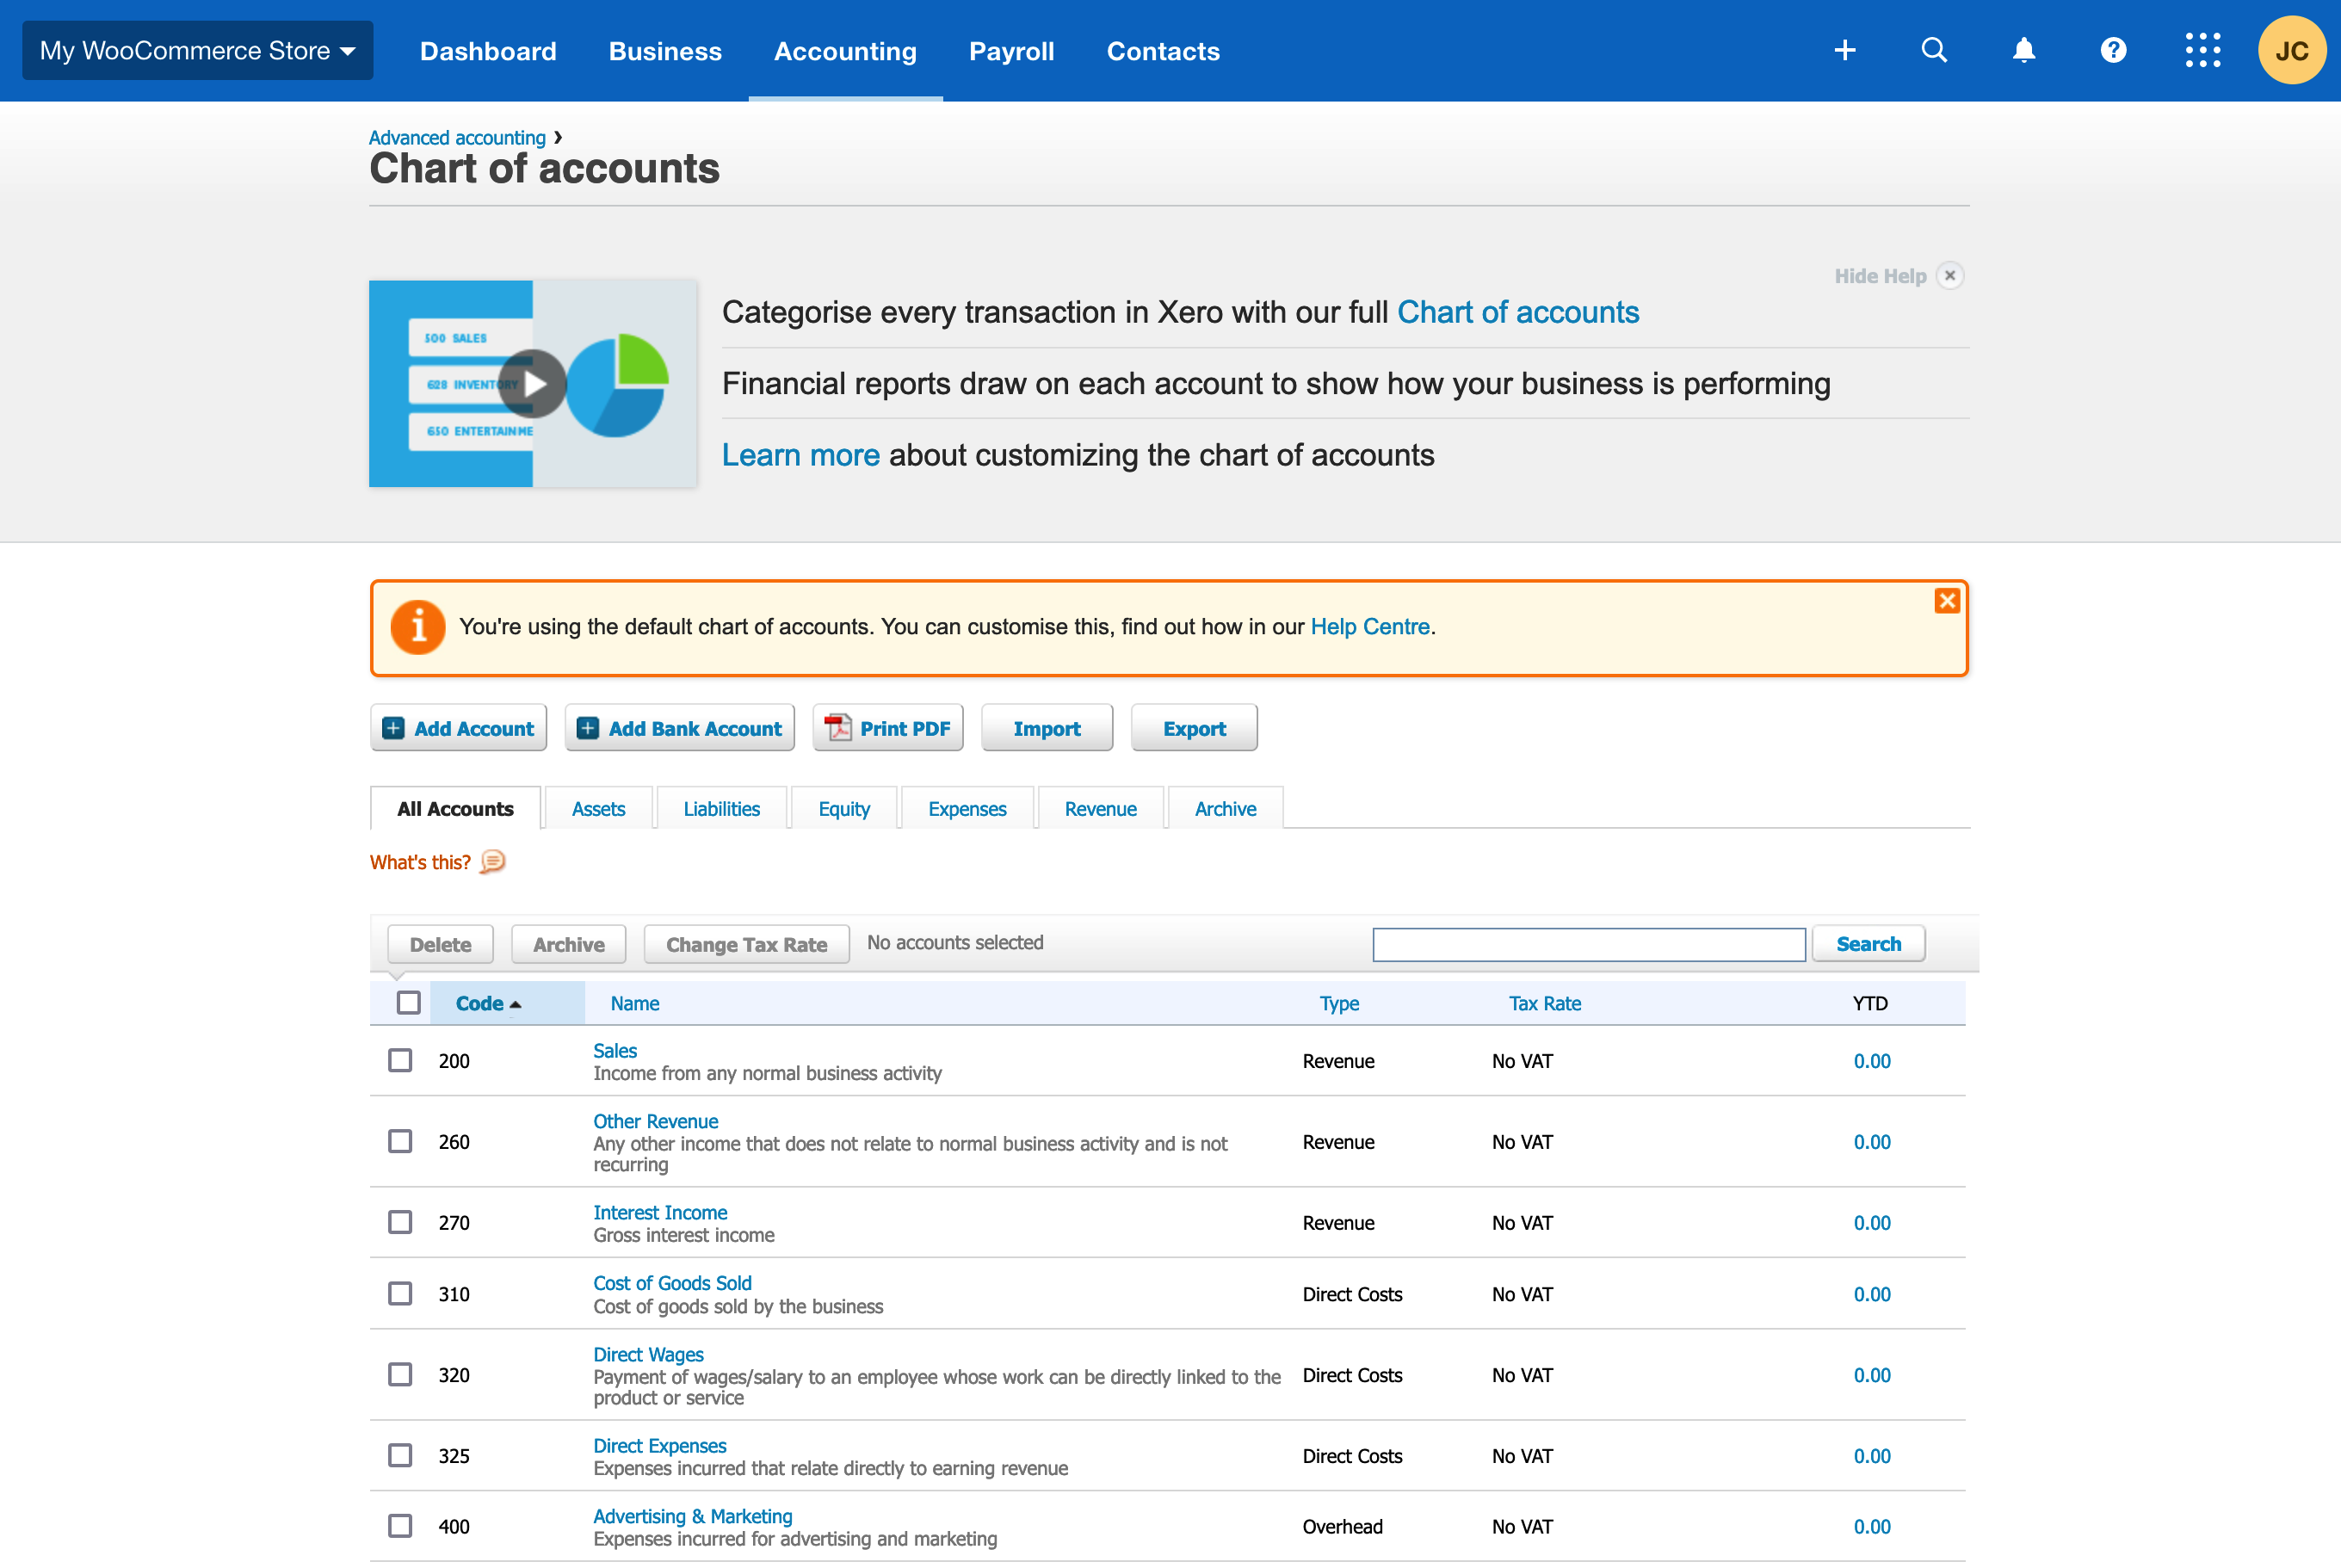
Note: The Tax Rate associated with the Xero account needs to match the tax rate setup in WooCommerce.
- Sales Account – This account collects all sales of items in your store.
- Shipping Account – This account collects all shipping charges.
- Fees Account – This account represents the fees created by the WooCommerce Fees API.
- Payment Account – This account collects all payments made. It doesn’t exist in Xero by default, so must be created (needs to be either Account Type > Bank or have Enable Payments to this account checked in the Edit Account Details popup – example).
- Rounding Account – This account collects all the rounding corrections.
Account codes must be entered at WooCommerce > Xero within your site (below are sample codes for each account which may differ from the codes in your Xero account):
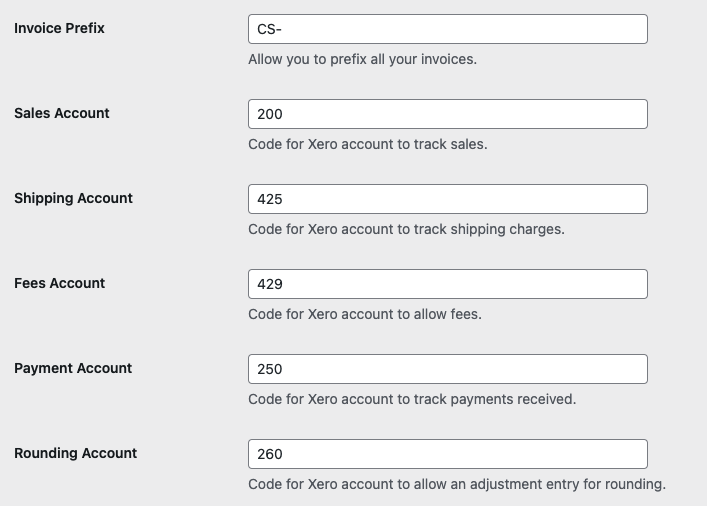
Important: All Account Code fields must be entered in order to send invoices to Xero. Read more about setting up account codes at: Settings: Chart of Accounts.
Miscellaneous Settings
↑ Back to topSend Invoices
This controls when the invoice is created or updated in Xero.
- Manual – merchant will send the invoice manually using the Order Actions menu
- On creation – as soon as the order is created, the invoice is created in Xero
- Payment completion – once the payment clears, the invoice will be created in Xero
- On order completion – once the order is set to status Completed, the invoice will be created/updated
Recommended: Payment Completion.
Send Payments
Xero marks the associated invoice as Paid based on this setting.
- Manual: merchant will update the invoice
- Payment completion: invoice updated with payment once payment is received in WooCommerce
- Order completion: invoice updated with payment information once order status is changed to ‘Completed’
You may need to send payments manually if you synchronize payments in another way, such as the PayPal to Xero integration.
Important: once a payment is sent for an invoice and the invoice is marked PAID in Xero, it can no longer be modified via the API. This means that WooCommerce cannot make any changes to the invoice. Once the invoice is marked PAID in Xero, all changes must be made manually in Xero.
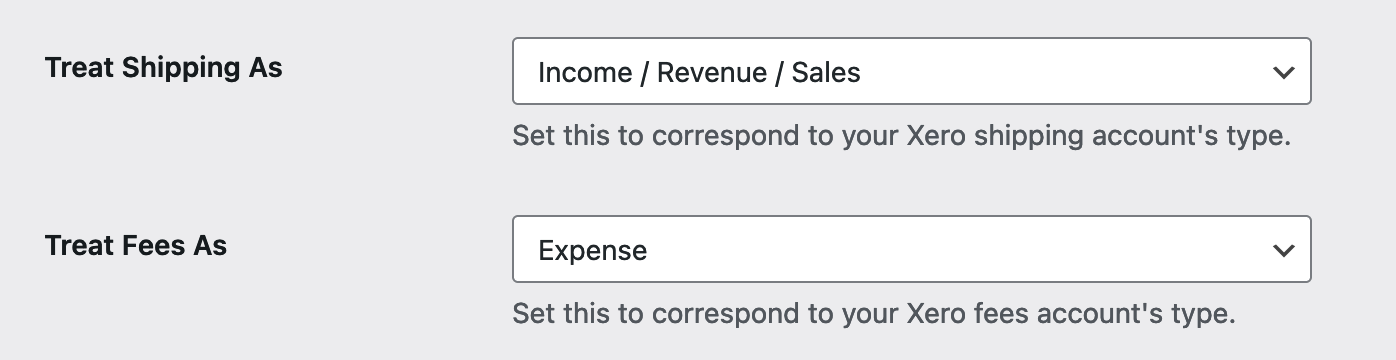
Treat Shipping As
The costs associated with shipping line items in your WooCommerce orders can be treated either as Revenue or Expenses. To avoid errors, this setting needs to match the account type as per your Xero Chart of Accounts.
Treat Fees As
The costs associated with any additional fee on your WooCommerce orders can be treated either as Income or Expenses. To avoid errors, this setting needs to match the account type as per your Xero Chart of Accounts.
Xero Branding theme
Select which branding theme to use as the default theme for Xero invoices. Learn more about adding branding themes within Xero.
You will have this setting only if you are using the version 1.7.46+
Match Zero Value Tax Rates
This allows you to explicitly match up a WooCommerce tax-exempt (0%) tax rate with a Xero tax-exempt (0%) tax rate. This helps avoid issues like tax-exempt line items showing up as Zero Rated EC Services.
Orders with zero total
Tick the box for Orders with zero total to enable the export of invoices for orders that have a grand total of zero.
Send Inventory Items
- Tick the box to send the WooCommerce product SKU to Xero as an Item Code field. This allows you to reduce inventory numbers defined in Xero when each item is sold.
- You must have a corresponding Inventory Item Setup in Xero for this to work properly.
- Note that this is not an “Inventory Sync” as this will only reduce the existing quantity of inventory items in Xero when a corresponding item is sold. It will not synchronize your Xero and WooCommerce inventories if the inventory quantity is adjusted in either system.
Use customer email in contact name
Append customer email to contact name to ensure uniqueness and prevent duplicates. The email will be appended only if a contact with the same name exists in Xero.
When this option is enabled, if a contact exists in Xero with the same company name or email address extension [eg: John Doe (johndoe@woocommerce.com)] and another person Aurthur Doe (arthurdoe@woocommerce.com) places an order. Then, a new contact will be created for Aurthur Doe (arthurdoe@woocommerce.com). If this option is disabled, the contact of John Doe will be overwritten by Arthur Doe’s detail.
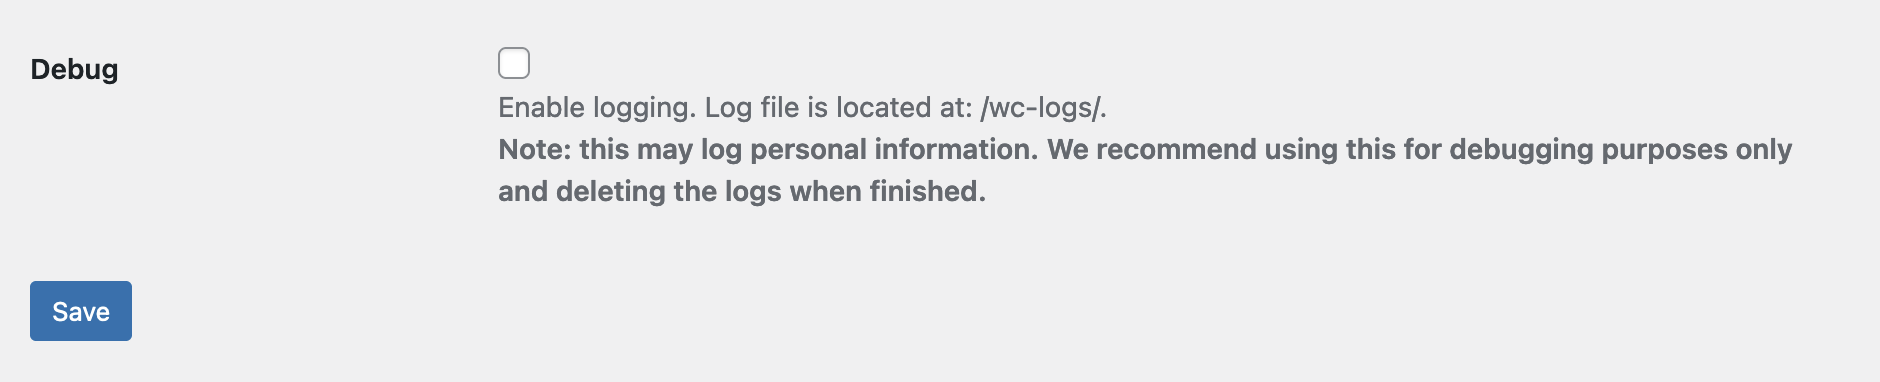
Debug
- Tick the box for the Debug option to enable logging for this extension.
- Log file is located at:
/wc-logs/
Usage
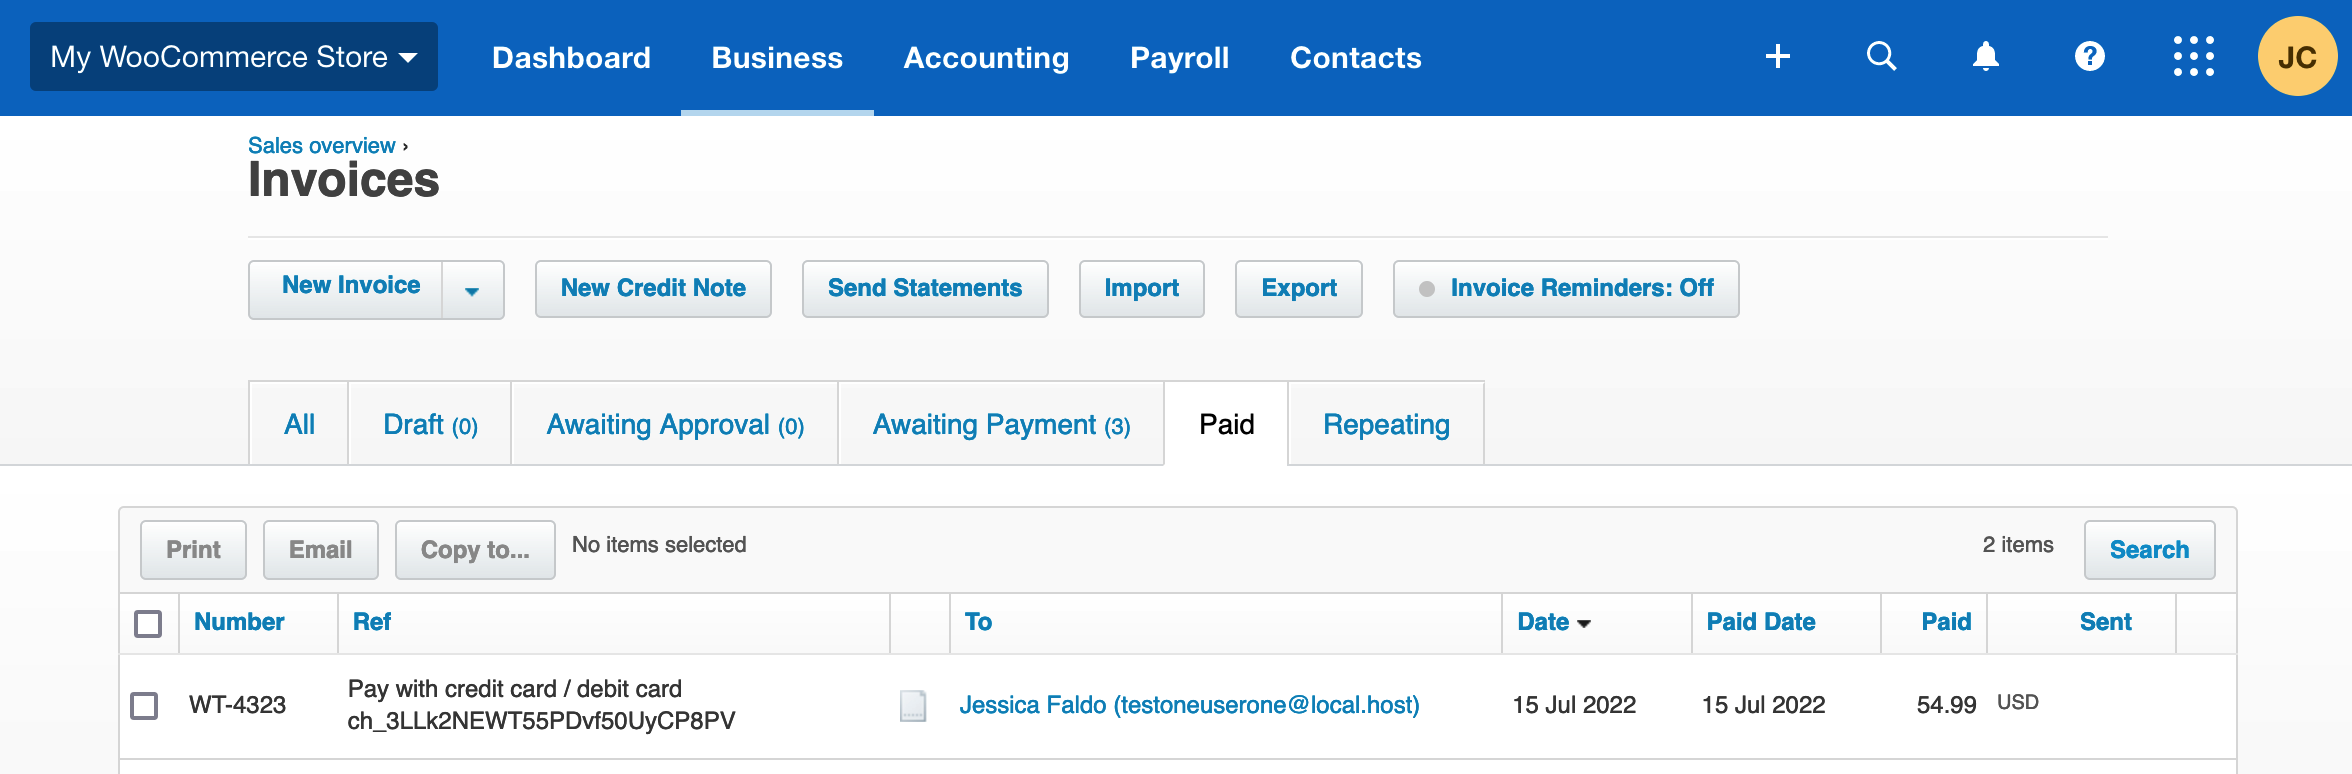
↑ Back to topOrders placed in your WooCommerce store are copied to your Xero account as an Awaiting Payment invoice. When payment is completed (normally immediately), the invoice is updated and marked as a Paid invoice. Invoices can be found under Business > Invoices.
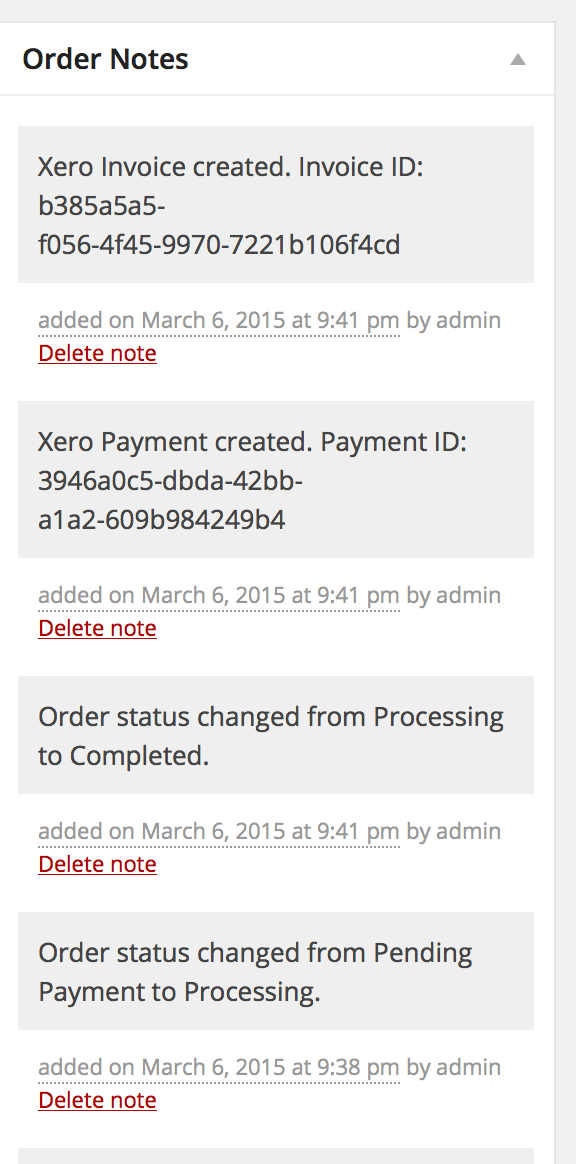
A note is added to each order in WooCommerce for the invoice including the Xero invoice reference number (Invoice ID). Here is an example Xero invoice with payment.
WooCommerce Order Fields Sent to Xero
↑ Back to topThese are the WooCommerce Order fields that are sent to the Xero invoice. Note: If the Billing Company field is used, it will be the main name on the invoice. Otherwise, Billing First Name and Billing Last Name are used.
- Billing First Name
- Billing Last Name
- Billing Email
- Billing Company
- Billing Address 1
- Billing Address 2
- Billing City
- Billing State
- Billing Postal Code
- Billing Country
- Billing Phone
- Order Date
- Order Number
- Order Item Data: Product name
- Order Item Data: Quantity purchased
- Order Item Data: SKU (if Send Inventory is enabled)
- Order Item Data: Product price
- Order Shipping Charge (Optional)
- Order Discount (Optional)
- Order Tax Total
- Order Total
Invoice Status is always AUTHORIZED. Tax Type depends on the WooCommerce setting.
Frequently asked questions
↑ Back to topWhen are orders sent to Xero?
↑ Back to topInvoices are created within Xero based on the Send Invoices setting found at WooCommerce >Xero.
When are payments sent to Xero?
↑ Back to topPayments are sent to Xero based on the Send Payments setting found at WooCommerce >Xero. Note: when a payment is applied to a Xero invoice the order is marked PAID in Xero and cannot be modified any longer through the API.
Can I synchronize existing orders?
↑ Back to top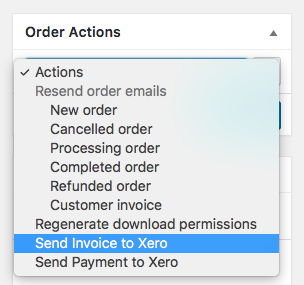
Yes, you can, but it’s a manual process. To achieve this, go to WooCommerce > Orders and select the order you want to sync. Select Actions and choose Send Invoice to Xero. Then select the “>” button on the right.
There are two methods to do this in bulk:
1. You can use Zapier and create a transfer for the existing orders.
2. Using AutomateWoo, you can create a manual workflow, and use the ‘Action’: Trigger Order Action → Send Invoice to Xero.
How do I know if an invoice has been sent to Xero?
↑ Back to topEntries are added to the Order Notes area of the order page. There is one message for the invoice and one for payment.
What happens if the tax rate is not set up correctly?
↑ Back to topIn order for your tax rates in your Xero invoices to be as accurate as possible, it is essential that your tax rates and names in WooCommerce match the tax rates and labels in Xero. If these two tax rates differ you may receive errors when trying to generate invoices/payments.
Why does the Xero Invoice tax rate not match the tax rates in the WooCommerce order?
↑ Back to topIn order for your tax rates in your Xero invoices to be as accurate as possible, it is essential that your tax rates and names in WooCommerce match the tax rates and labels in Xero as suggested above.
If you see the incorrect tax still showing up within the Xero Invoice, then it might be due to the old transients saved in the database.
Xero tax rates are cached and saved in transient with the key wc_xero_tax_rates . They are not fetched with every request. In order to fetch the new tax rates created in Xero, please try to resend the invoice after clearing transients using a free plugin like Transient Manager OR after 1 hour (It will be expired in 1 hour).
If you do not see the transient with the key wc_xero_tax_rates under Tools > Transients with the transients manager plugin in place, it is likely because of the persistent object cache. You can use the below snippet to clear the transient:
/* Clear WooCommerce Xero Tax rates saves in Transient */

add_action( 'init', function() {
	$transient_key = 'wc_xero_tax_rates';

	// Clear transient
	delete_transient( $transient_key );
});
Xero simply omits the tax rate in my invoices if items are tax exempt.
↑ Back to topThe default behavior of WooCommerce is to completely omit taxes from sending per line-item if the tax is either 0% or the item is not taxable. If you want the Xero line items to show a zero tax rate(0.000%) you can do the following:
- Make sure the Xero plugin is updated to at least version 1.7.17.
- Create a new WooCommerce 0% tax rate with a name that exactly matches your 0% rate in Xero. Xero creates a 0% tax rate upon account setup named Tax Exempt so it’s recommended to copy the name exactly.

- Enable the Match zero value tax rates setting on the WooCommerce > Xero settings page.
- Edit your tax-exempt products and make sure they’re set to Taxable as well as linked to the zero-rated tax class (or wherever you have the 0% tax rate setup).
- Go to WooCommerce > Settings > Tax and for the option Calculate Tax Based On, choose Customer Billing Address.
What happens if an invoice fails?
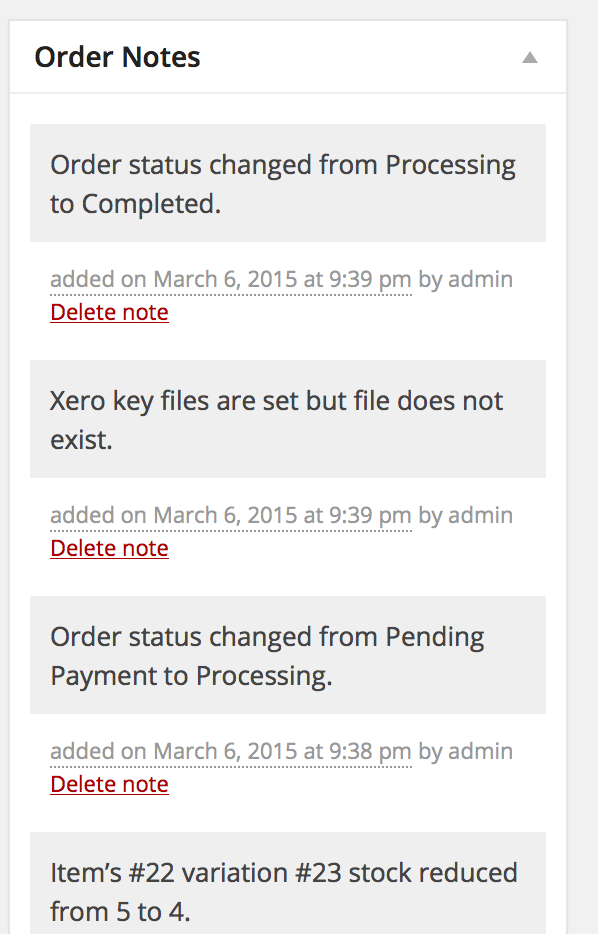
↑ Back to topIf creating the Xero invoice fails for any reason there will be a note added to the Order Notes section with the error message. Typical causes of failure:
- Missing account codes on WooCommerce > Xero settings page. Every account code field needs to be filled out there and matched up with an account from your Xero Chart of Accounts.
- The Xero keys set on the WooCommerce > Xero settings page do not match the ones corresponding to your app.
Can I use Xero with my multi-currency store?
↑ Back to topYes, if you have a Xero account with multi-currency capability(this usually requires an upgrade). If you receive an error in the Order Notes related to the currency not being supported, add additional currencies in Xero by going to Organization Settings, click on Currencies and add the currencies available in the store.
Can Stripe fees be synced to Xero?
↑ Back to topStripe fees do not sync to Xero with this extension at this time. However, it’s possible to sync Stripe fees with the Stripe + Xero integration provided by Xero.
Is the MOSS sales tax type supported?
↑ Back to topYes, as of version 1.7.39 the MOSS sales tax type is correctly matched for stores that use it. Note: you must add the string “Moss” to any tax label which is of that tax type in order for it to be recognized.
Why aren’t all my branding themes listed under Xero settings?
↑ Back to topVersion 1.7.46 of Xero introduces a new setting to select a Xero Branded Theme template to attach with invoices. If you’ve created a new branding theme within Xero and it is not showing up under WooCommerce > Xero > Xero Branding theme. Then, please try to reconnect your Xero account.
The Branding themes are fetched and saved to the database with every page load of the WC > Xero setting. However, sometimes, a re-connection is necessary to ensure the Xero account is connected correctly such that the details can be fetched.
How are coupons sent from WooCommerce and represented in Xero?
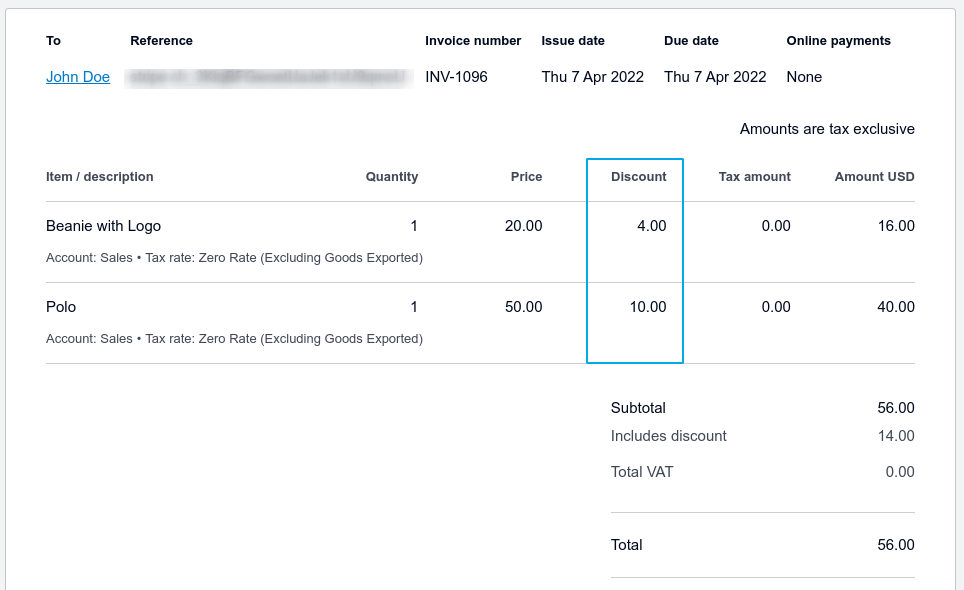
↑ Back to topThe extension sends a line-item wise coupon discount amount from WooCommerce to Xero and Xero shows it on each line item in the discount column of the invoice. Only discount amount information is sent to Xero, not coupon code information. So, while you’ll see the discount amount on each product in Xero, coupon code info won’t be visible there.
A few scenarios for coupons are mentioned below to give an idea of how coupon discounts get applied to the items and how they display in Xero.
Note: the screenshots below are of the new Xero invoice. On the classic Xero invoice, discount are represented in percentage (%) instead of the amount.
Percentage discount
For the given scenario, the coupon 20OFF is applied for a 20% discount.
WooCommerce Order:
Xero Invoice:
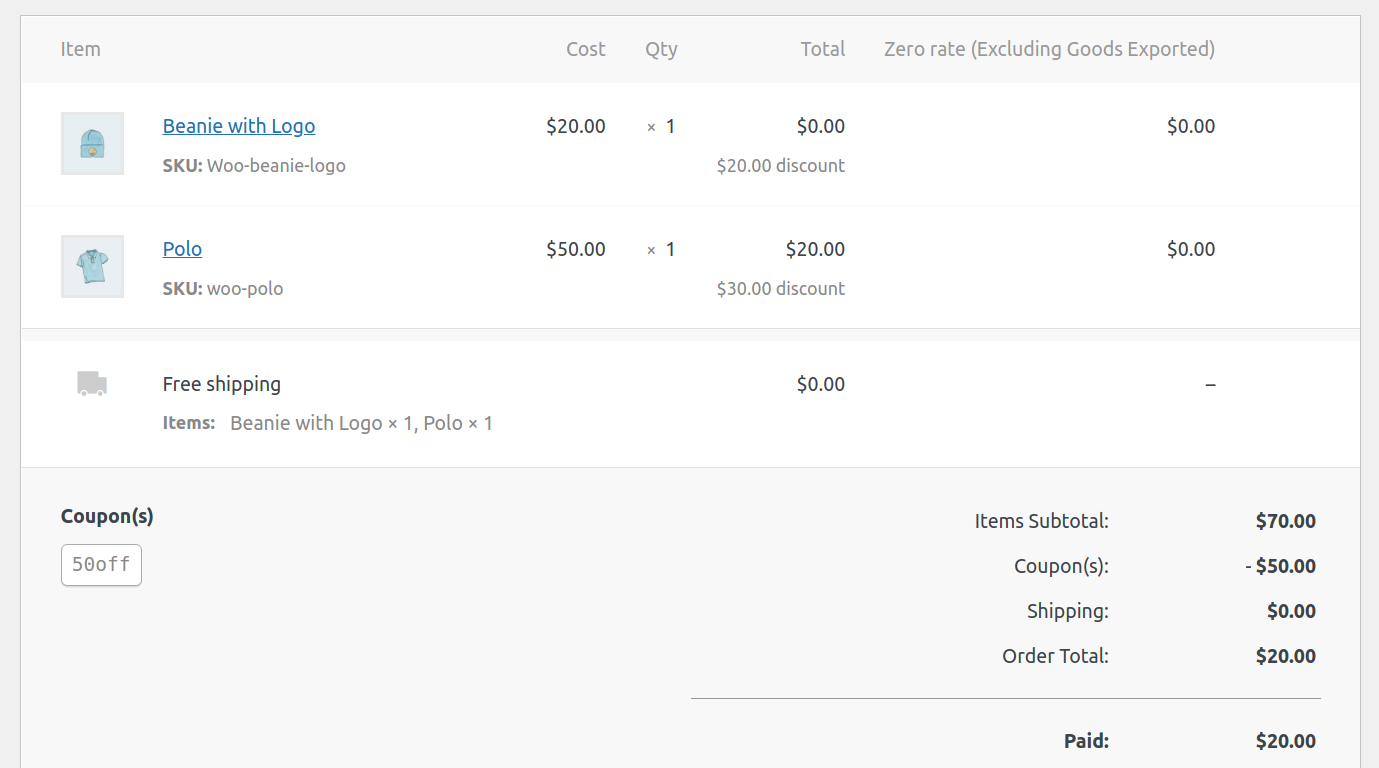
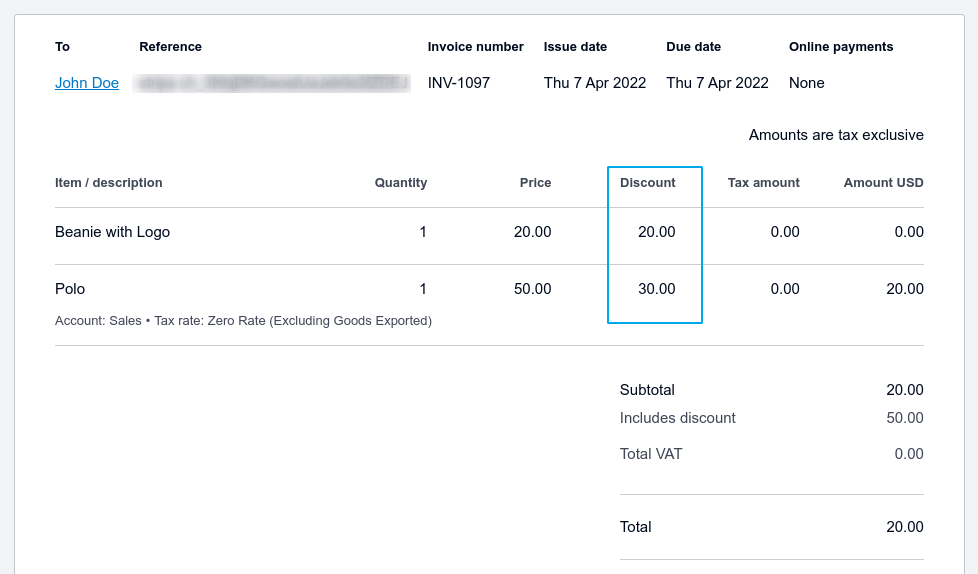
Fixed cart discount
For the given scenario, the coupon 50OFF is applied for a fixed $50 discount on the cart.
WooCommerce order:
Xero Invoice:
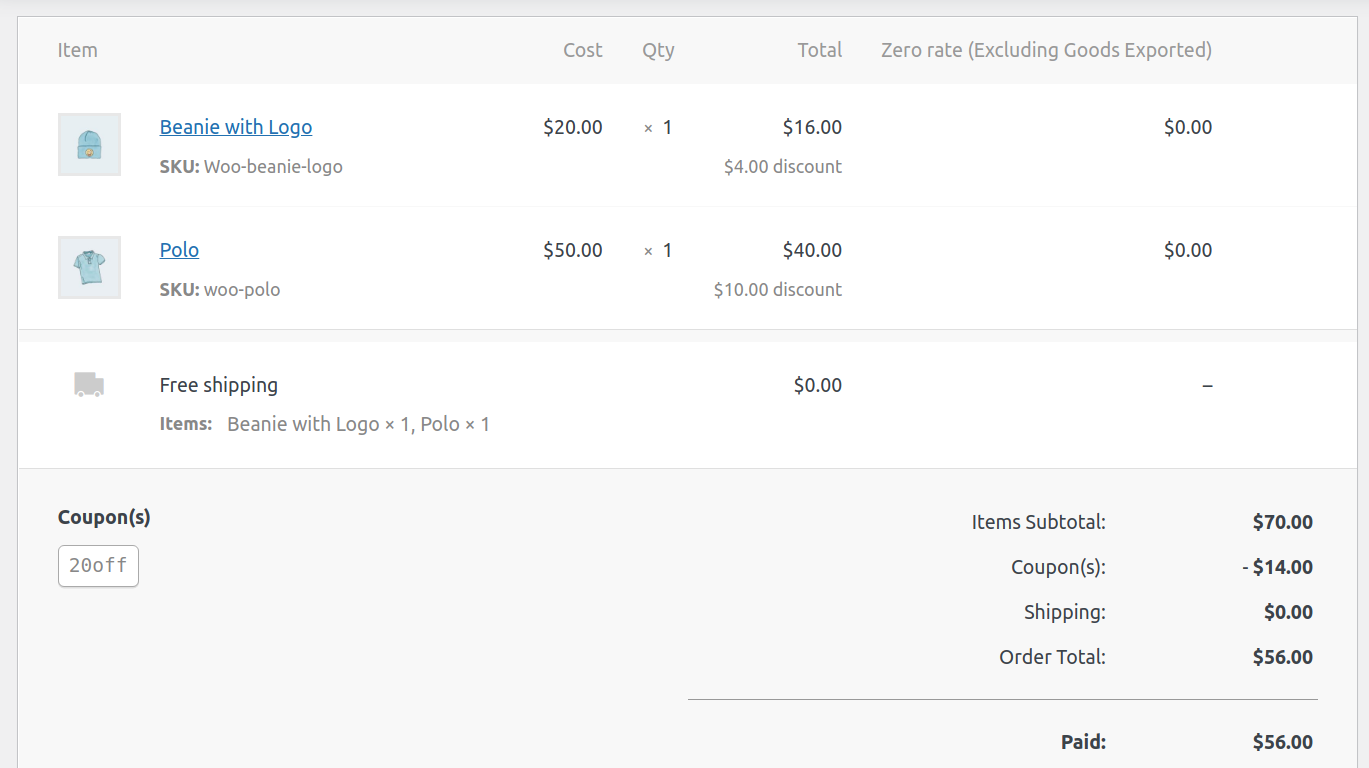
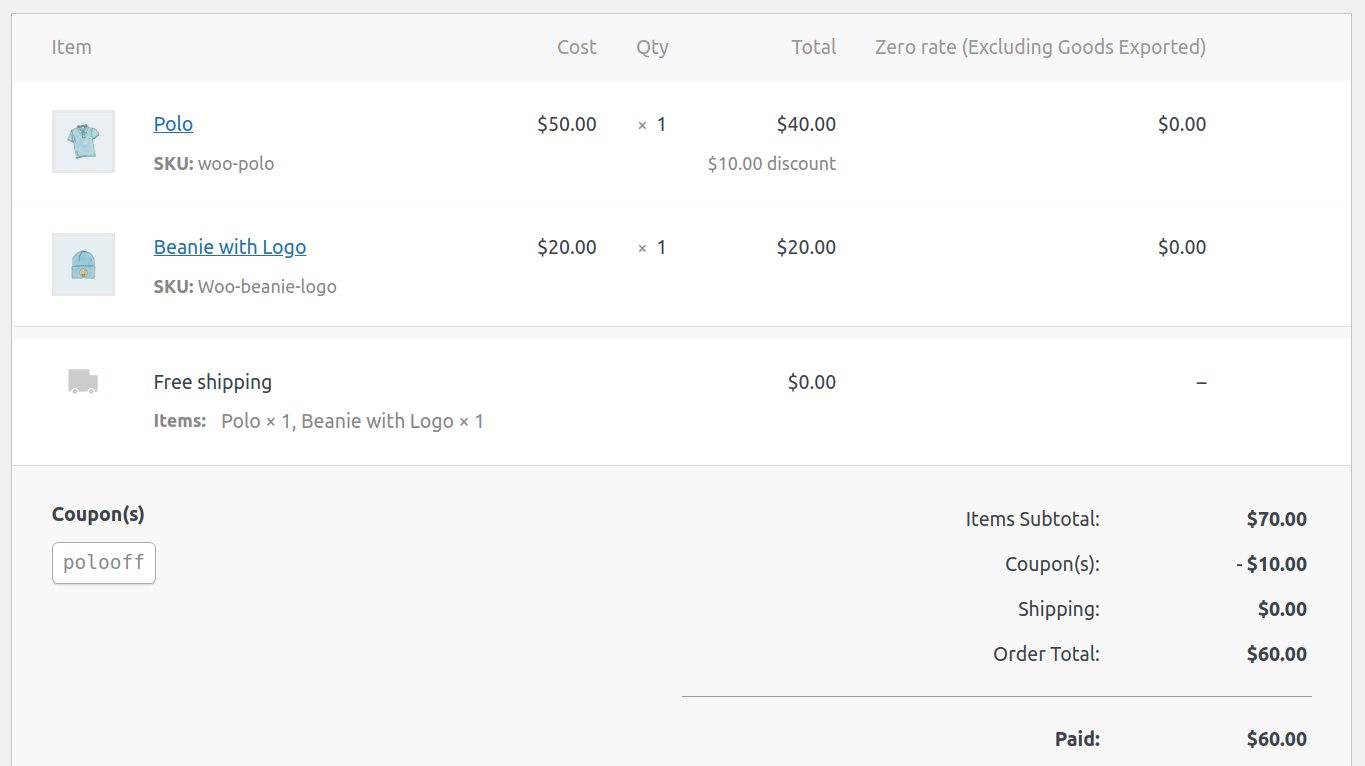
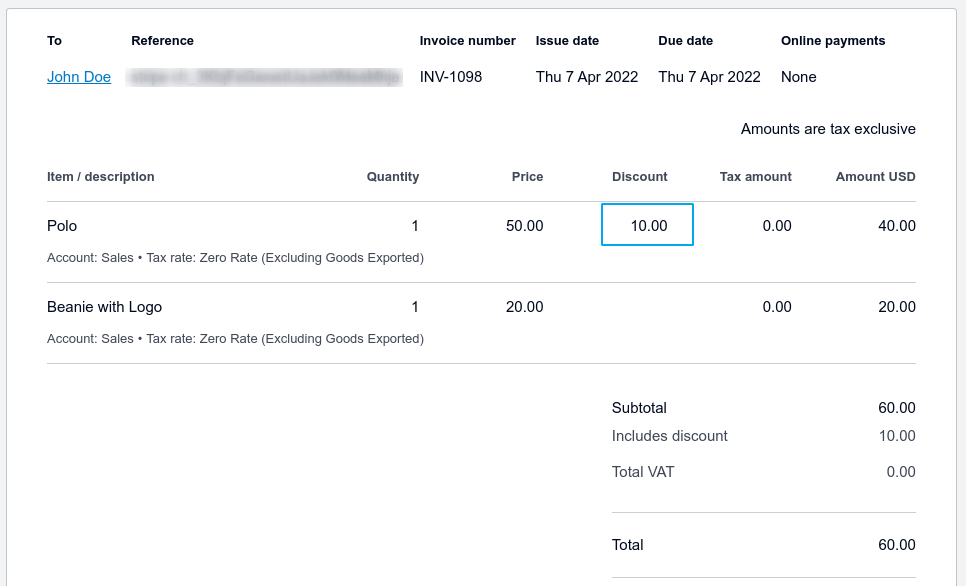
Fixed product discount
For the given scenario, the coupon POLOOFF is applied for a fixed $10 discount on a “Polo” product only, which is reflected on the Xero invoice for a specific product only.
WooCommerce Order:
Xero Invoice:
Multiple coupons
Multiple coupons are used in conjunction here. 2 coupons are applied.
- POLOOFF for a fixed $10 discount on a “Polo” product
- 20OFF for 20% discount on each product.
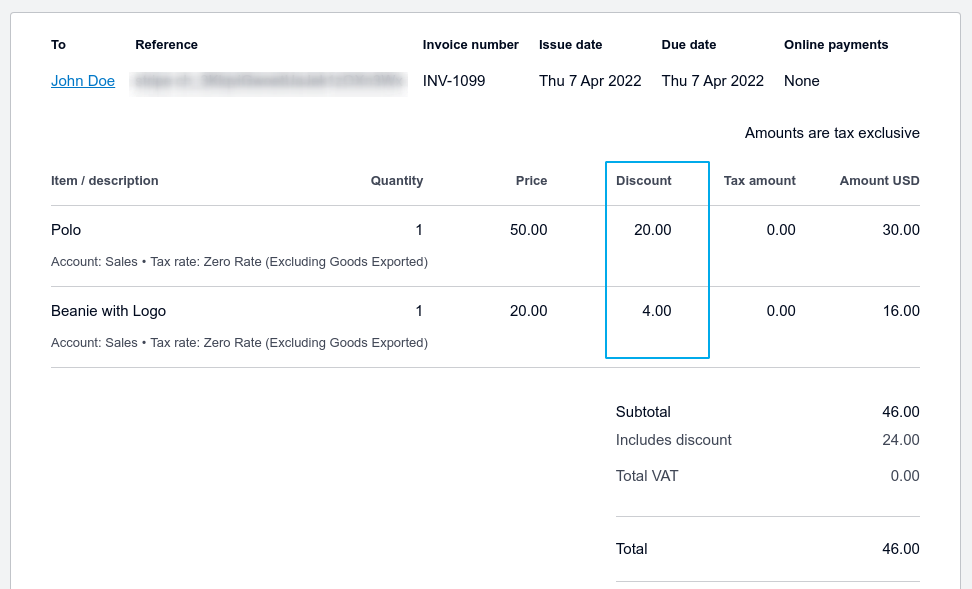
Xero Invoice will show to the total discount applied on each product separately.
WooCommerce Order:
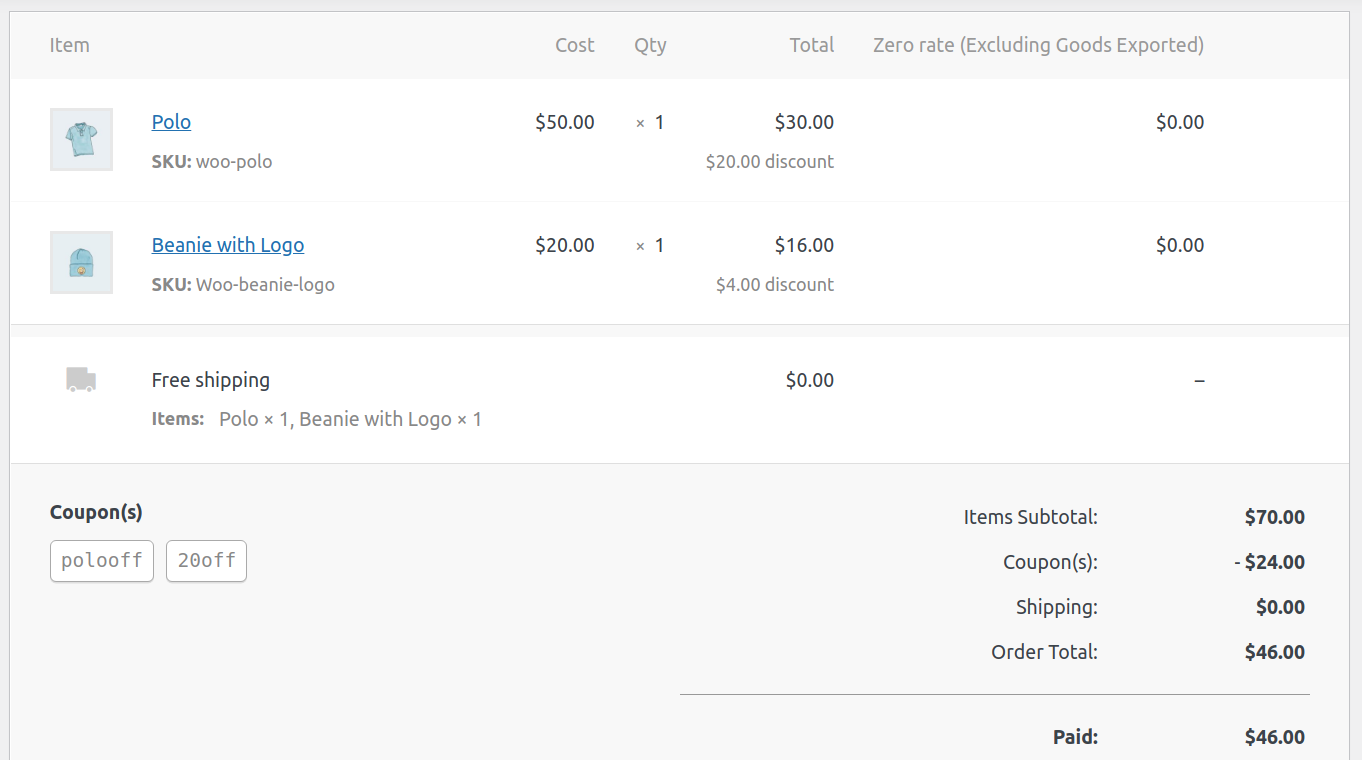
Xero Invoice:
Code Snippets
↑ Back to topCustomizations are not covered under our support policy, so this isn’t something we can help implement or troubleshoot on your site.
Change the default invoice and payment due dates
↑ Back to topInvoices created in Xero will use the Order Created date as a default for the invoice and payment due dates. This snippet changes that to “today’s date” instead. “Today” is the date the shop sends the invoice data to Xero.
wc-xero-change-default-invoice-date-to-today.php content:
<?php

add_filter('woocommerce_xero_invoice_date', 'change_xero_invoice_date_to_current_date', 10, 1);
add_filter('woocommerce_xero_invoice_due_date', 'change_xero_invoice_date_to_current_date', 10, 1);

function change_xero_invoice_date_to_current_date($date) {
    // Get today's date in YYYY-MM-DD format
    $today = date('Y-m-d');

    // Return today's date instead of the original invoice/payment due date
    return $today;
}
What happens to the invoice when the associated order is refunded?
↑ Back to topBy default, the Xero integration will attempt to void the invoice once the order is totally refunded(when the order status changes to Refunded). Invoices which are marked PAID cannot be modified via the API and thus would have to be voided/modified manually at Xero.com.
If you wish to disable the automatic voiding of invoices when the associated WooCommerce order is refunded, add the following one-line code snippet to your child theme’s functions.php file or using a code snippets plugin:
add_filter( 'woocommerce_xero_disable_auto_void_invoices', '__return_true' );
How do I match the tax rate label to what is on Xero?
↑ Back to topBy default, a new tax rate label will be created on Xero during invoice creation. However, in some countries, this may or may not be the desired outcome. If you need to match the tax rate label from what you have entered in WooCommerce to what Xero already has in the system, you can use the following filter. Add the filter to your child theme’s functions.php file or using a code snippets plugin:
add_filter( 'woocommerce_xero_create_unique_tax_label', '__return_false' );
Once you have done this, whatever you have set in as your tax rate label in WooCommerce will match what is already existing in your Xero account.
Can I map products or product categories to different Xero account codes?
↑ Back to topThis is not yet an option in the Xero plugin, however, it is theoretically possible by creating a custom function that hooks into the woocommerce_xero_line_item_account_code filter. Your custom function would need to check the category ID or product ID and return an integer representing the Xero sales account code(must be a Revenue/Sales account type). See the WooCommerce hooks documentation for help with utilizing WooCommerce hooks.
Troubleshooting
↑ Back to topHow do I see debug information?
↑ Back to topTo view debug information make sure the Debug checkbox option is checked in the Xero settings page. You can find Xero logs at WooCommerce > Status > Logs.
Why aren’t payments being exported?
↑ Back to topIf invoices are being created, but payments are not being created, make sure that the Xero account that is used for “Payment Account” has “Enable payments to this account” checked in the Edit Account Details popup.
I am getting an “invalid_grant” error while sending invoices
↑ Back to topThis usually happens due to a broken connection to Xero. It can also happen if the token from your Xero app expires, which is possible if your store does not communicate with Xero for 60 consecutive days.
To fix this issue, navigate to WooCommerce > Xero and reconnect your site to Xero.
Line items without VAT applied appear as Zero Rated EC Services in Xero invoices
↑ Back to topSee the section named Xero simply omits the tax rate in my invoices if items are tax-exempt for information on how you can force the Xero integration to match up with a specific tax rate for zero-rated line items.
ERROR creating Xero invoice: A validation exception occurred Detail: Item code ‘XXXX′ is not valid
↑ Back to topIf you get this error in the order notes related to “Item Code”: please check your Xero configuration and make sure the inventory item is set up correctly. Notably, compare the WooCommerce product’s SKU to the Xero inventory item’s Item Code to ensure they match exactly. Here’s a doc on how to set up inventory items in Xero.
ERROR creating Xero invoice: A validation exception occurred Detail: The TaxType code ‘xxx’ cannot be used with account code ‘yyy’.
↑ Back to topYou may see the following error in the order notes:
ERROR creating Xero invoice: ErrorNumber: 10 ErrorType: ValidationException Message: A validation exception occurred Detail: The TaxType code ‘xxx’ cannot be used with account code ‘yyy’.
If so, this is because either the Shipping Account or the Fees Account is set to the wrong type in the WooCommerce Xero settings. It must match the account setting in Xero.
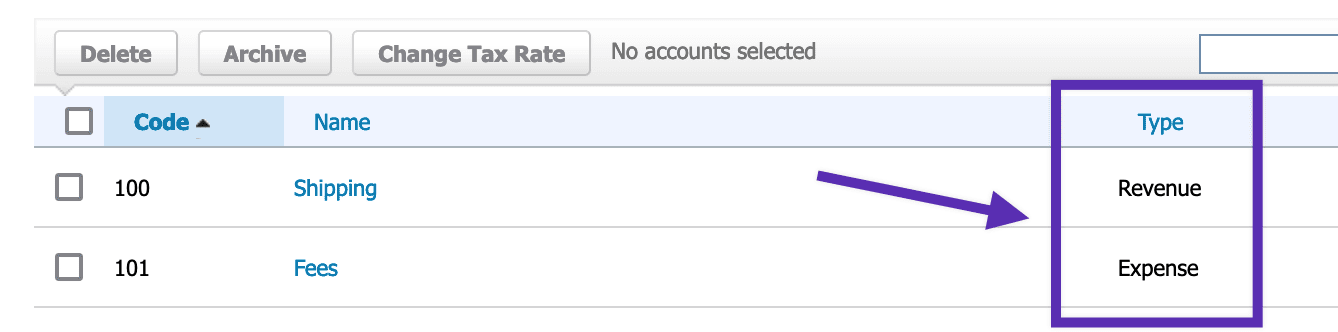
You can change that under WooCommerce > Xero settings by selecting alternatives for Treat Shipping As or Treat Fees As to match the Xero account. You must also be using at least version 1.7.7 of the Xero extension.
ERROR creating Xero payment. ErrorNumber:10| Error Message: Account type is invalid for making a payment to/from
↑ Back to topI am getting an error for payments.
Make sure that the account you specified for Payment Account in the Xero settings exists, is using the correct reference code, and has Enable Payments To This Account checked in Xero. This will need to be either a Bank account type or a Revenue/Sales account type.

Error: XERO: Invoice not created. OAuth Error: token_rejected | The organization for this access token is not active
This error happens when the API application was created with the wrong organization. Go to https://developer.xero.com/myapps?privateAppCreation=true and click on the application you created to connect to your WooCommerce site. If the Selected Organization is “Demo Company” you’ll need to delete this application and recreate another one.
When you recreate the application, on the option “Please select which organization your application can access:” be sure to select the correct organization.
ERROR creating Xero invoice: Invoice not of valid status for modification
↑ Back to topThis is typically because there is already an invoice on Xero end which is marked as Paid (might be due to test orders sent from your staging environment to Xero during site development, or invoices created within Xero itself). You can add invoice prefix to Xero settings and test again to confirm that.
ERROR creating Xero invoice: The document cannot be edited as it is currently dated before the end of year lock date, currently set at ‘xx-xxx-xxxx’
↑ Back to topWhen debug logging is enabled, the error above may also be accompanied by the following additional errors:
Invoice not of valid status for modification
This document cannot be edited as it has a payment or credit note allocated to it.
The above indicates that the WooCommerce order number attempting to be sent to Xero already exists in the Xero account. In this particular case, specifically prior to a Lock Date enabled in the Xero account. To ensure order numbers are unique, adjust the Invoice Prefix setting, or use an extension to customize the default order numbering system.
Questions and Support
↑ Back to topSomething missing from this documentation? Do you still have questions and need assistance?
- Have a question before you buy this extension? Please fill out this pre-sales form – please include the name of this extension in your query.
- Already purchased and need some assistance? Get in touch with a Happiness Engineer via the WooCommerce.com Support page and choose this extension name from the “I need help with” dropdown