The Worldpay payment gateway allows you accept credit card payments via a secure, hosted payment page without needing an SSL certificate on your WooCommerce store.
The payment process takes place in a single tab, for a seamless user journey.
Worldpay handles all major payment methods, debit cards and credit cards, including Diners, MasterCard, Visa, Amex, Maestro and JCB. After completing payment, the order is confirmed and the customer is taken to a Thank You page on your site.
Installation and Updating
↑ Back to topIf you need to update the extension you can do this from your WordPress admin if you have connected the site to WooCommerce.com, you can read more about that here
You can also update manually by downloading the latest version from your WooCommerce account
Once you have the zip file downloaded you should deactivate and delete the existing version from your WordPress plugins page and then install the new version using the upload option. You will not lose any settings or data by updating this way.
Setup and Configuration
↑ Back to top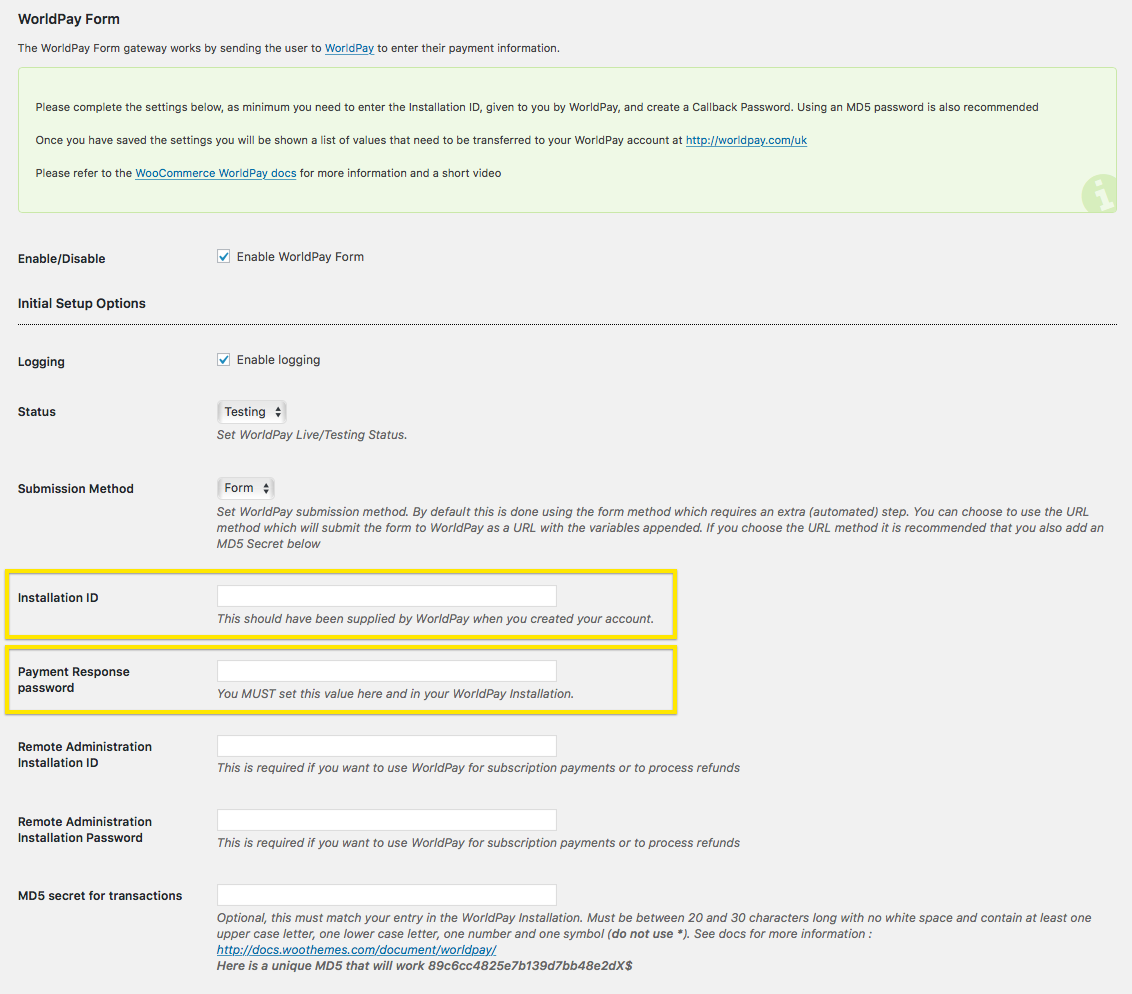
Go to: WooCommerce > Settings > Checkout > Worldpay.
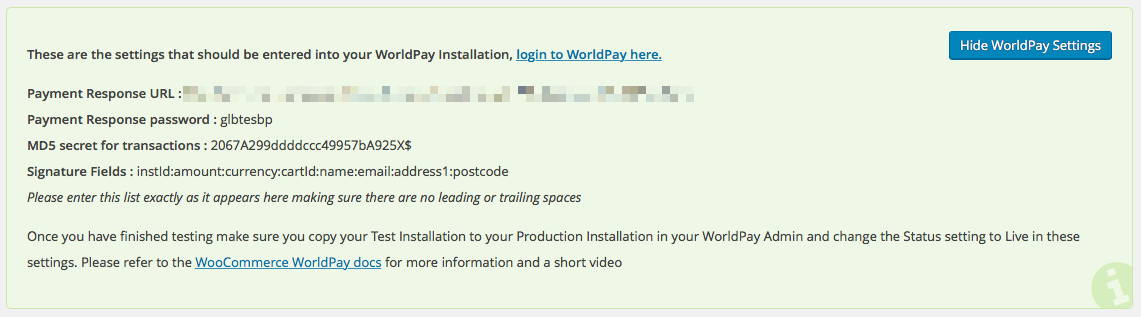
Add the Installation ID, supplied by Worldpay, to your settings in WooCommerce. You should create a Payment Response password. Using the MD5 secret is recommended. Once entered you should save the settings.
If you are using Worldpay with WooCommerce Subscriptions (Worldpay call this FuturePay) or if you want to be able to process refunds from your WooCommerce admin then you will need to enter a Remote Administration Installation ID and Remote Administration Installation Password. These are provided by Worldpay, you will need to request them, they are not issued by default when you apply for an account.

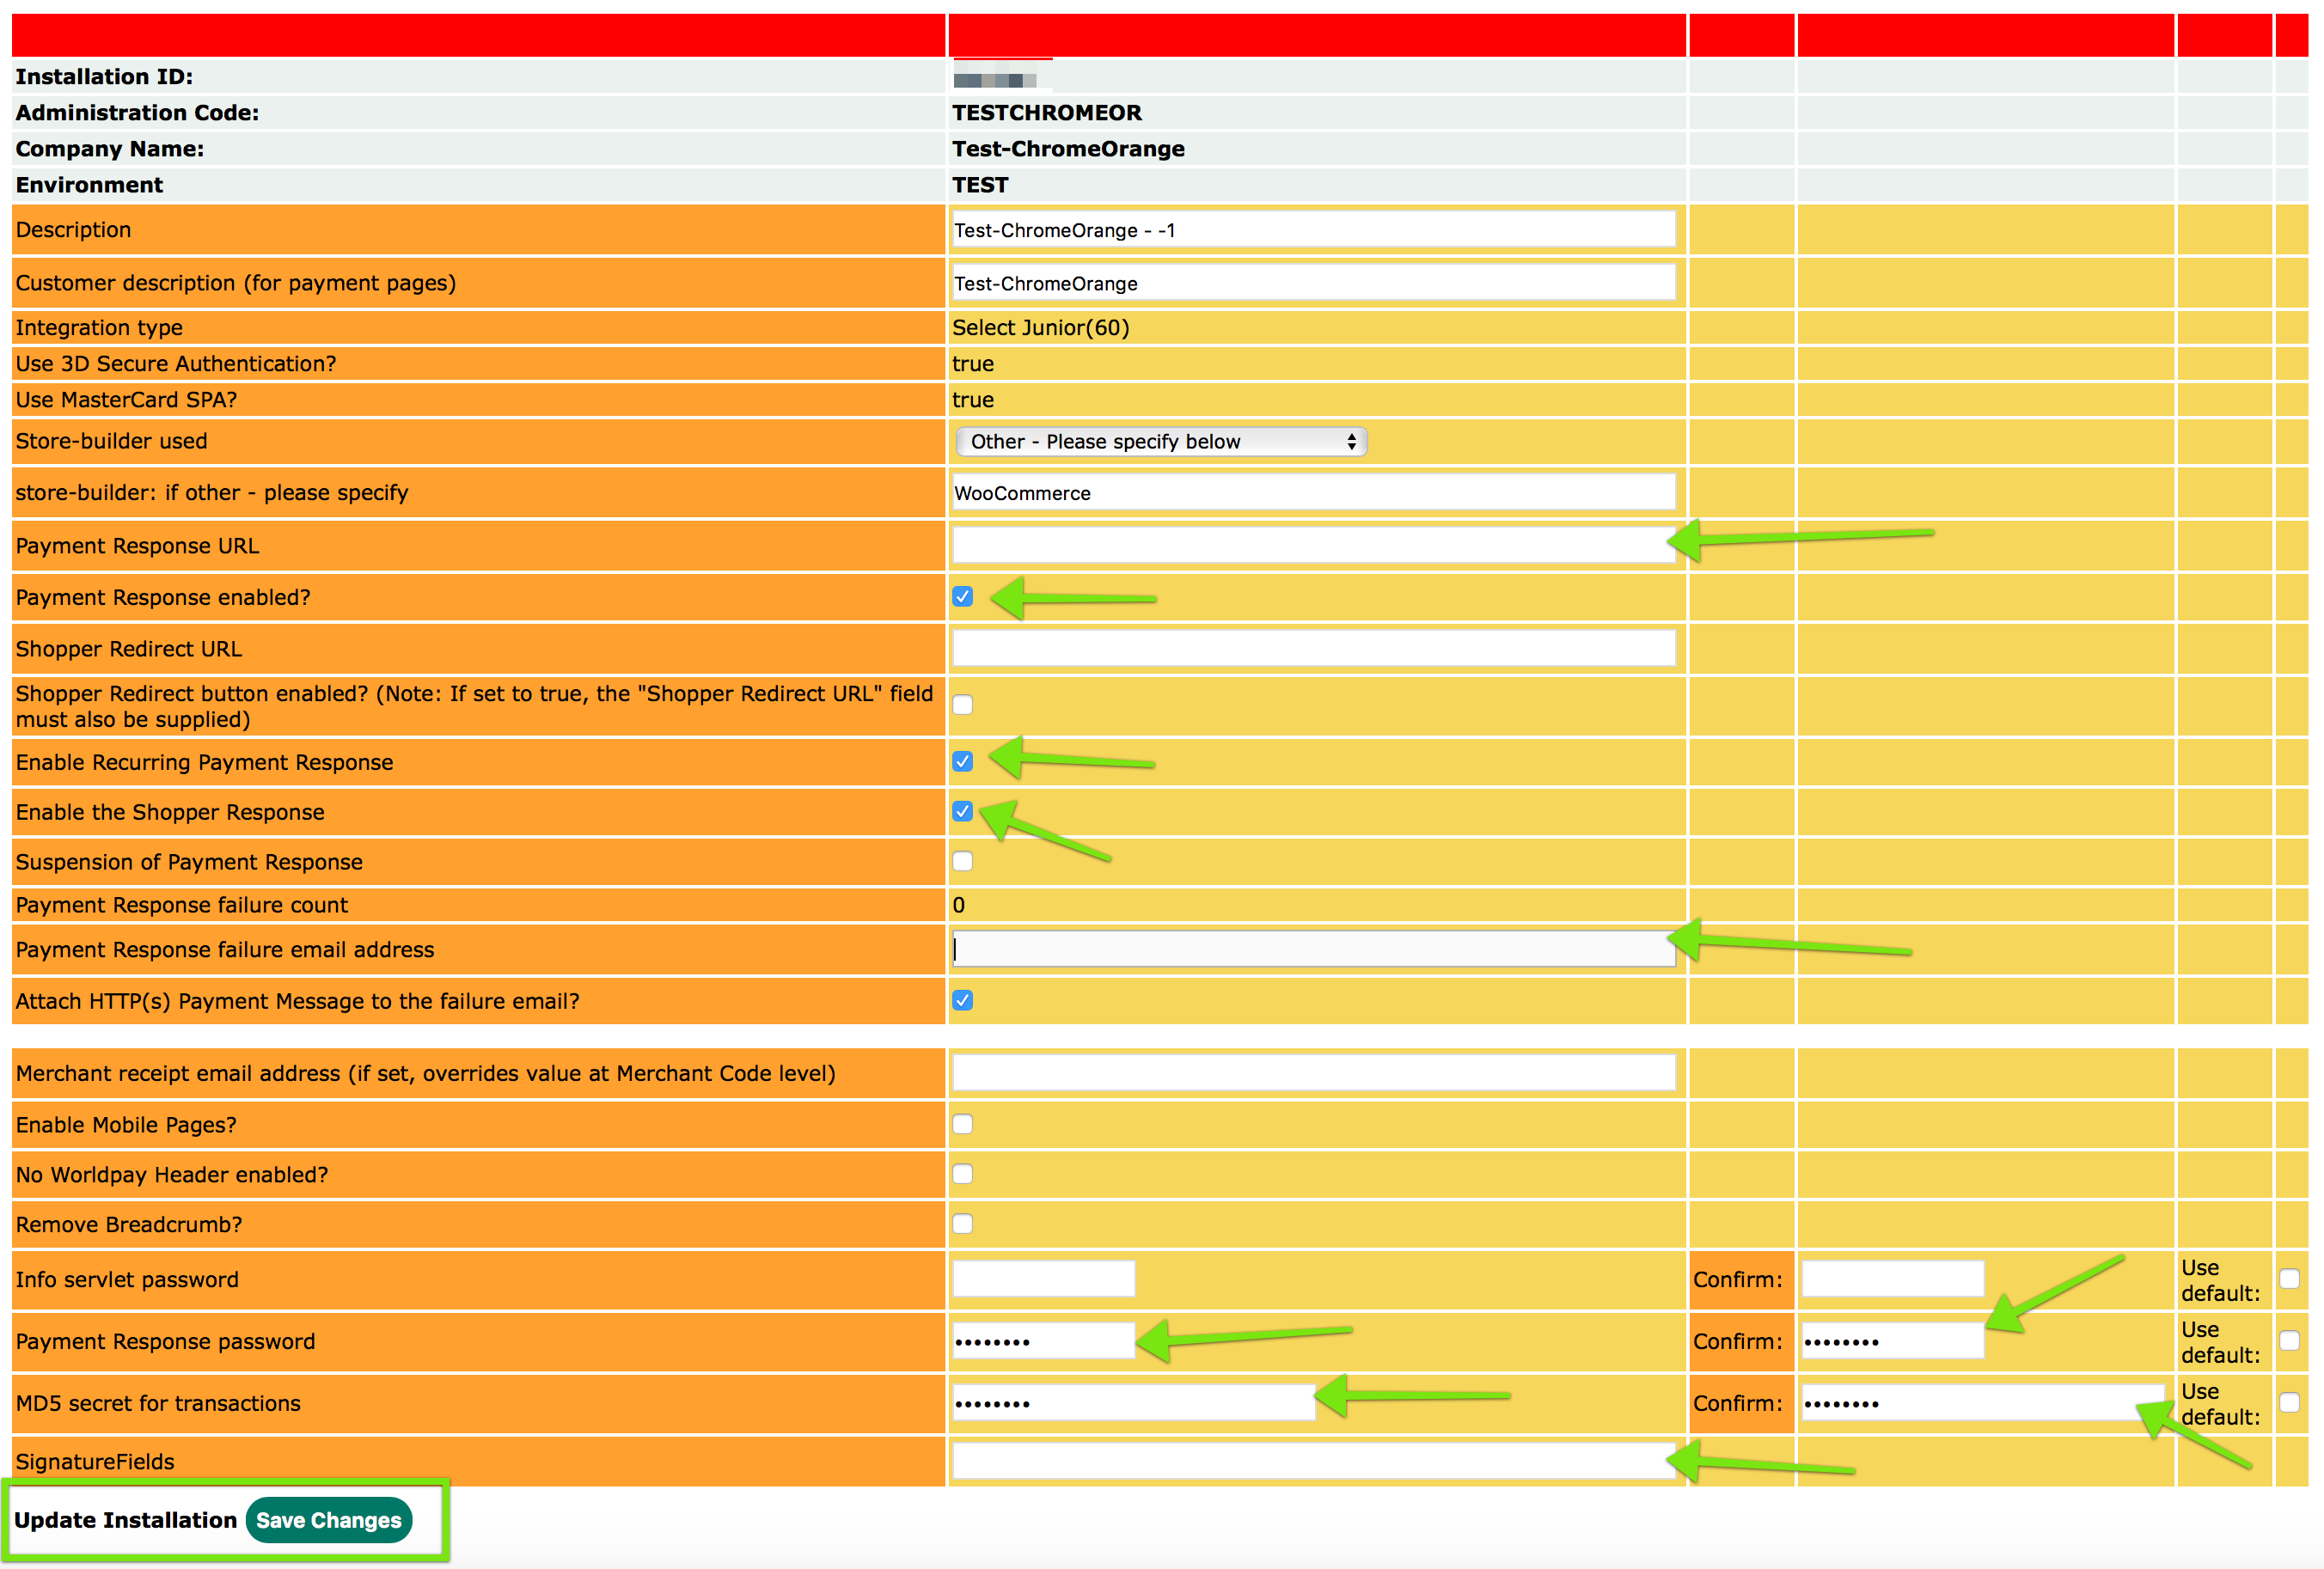
Enter the settings from your WooCommerce settings page and select the boxes indicated.
- Change ‘Store-builder used’ to ‘Other’
- Set ‘store-builder: if other – please specify’ as ‘WooCommerce’
- ‘Payment Response URL’ will be found in your WooCommerce settings for the gateway plugin. Make sure you copy this exactly as it is shown.
- Tick ‘Payment Response enabled?’
- Tick ‘Enable Recurring Payment Response’
- Tick ‘Enable the Shopper Response’
- ‘Payment Response password’ needs to be set using the same value from your WooCommerce settings
- ‘MD5 secret for transactions’ needs to be set using the same value from your WooCommerce settings – if you have left it blank in your WooCommerce settings then you can leave it blank here.
- ‘SignatureFields’ needs to be set using the same value from your WooCommerce settings – if you have left the MD5 secret blank in your WooCommerce settings then you can leave this blank.
Signature Fields
↑ Back to topYou can modify the default signature fields if required. By default the plugin will use instId:amount:currency:cartId.
The list may contain any of the following fields : instId, amount, currency, cartId, name, email, address1, postcode
These field names are case sensitive and should be separated with a colon (:)
The Signature Fields are used by Worldpay, in conjunction with the MD5 Password, to verify that the transaction has not been tampered with between your site and Worldpay.
We do not recommend changing the default fields. You should place test orders to confirm any changes you make.
Adding fields like name can cause problems if the customer name includes unacceptable characters, for example an apostrophe
Using Pre-Auth
↑ Back to topIf you want to Pre-Authorize payments and capture the funds later you can use the “Authorisation Mode” setting in the WooCommerce Worldpay settings.
You will need to check your settings at Worldpay to make sure that the “Capture Delay” is set to off, shown here

WorldPay FuturePay – WorldPay & Subscriptions
↑ Back to topThe WorldPay gateway for WooCommerce supports subscription payments with WooCommerce Subscriptions (separate purchase). Worldpay calls this Futurepay.
On Subscriptions:- Subscriptions can only be modified if there is more than 2 weeks for the next payment.
- Subscriptions with a regular payment schedule of less than 2 weeks between payments CANNOT be modified. They can only be cancelled.
- Cart cannot contain more than one subscription but can contain a subscription product and an ordinary product.
- Subscriptions can be cancelled from your WooCommerce admin or from the customer’s My Account page. To do this you MUST APPLY TO WORLDPAY for a Remote Administration Installation ID and enter the ID and password in to your settings. If you don’t enter a valid Remote Administration Installation ID and password, you can cancel the subscription in your WooCommerce admin but also need to cancel in your Worldpay FuturePay admin area.

URL Submission Method
↑ Back to top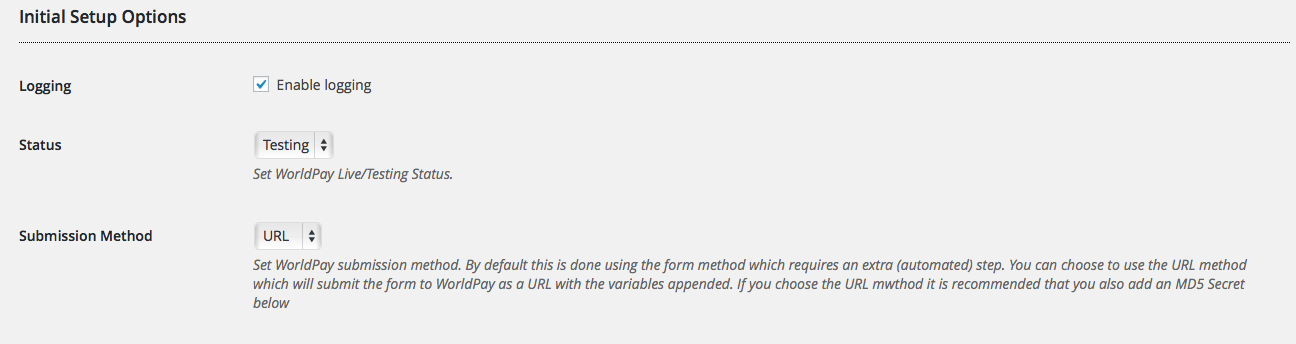
The advantage of the URL method is that there is one less page for your customer to visit, disadvantages are the recipient can see all the attributes and values in the URL string so you may not feel it is secure. This is an important difference when compared with the FORM method.
You should add an MD5 Secret to your Worldpay settings if you are using the URL method.
Security Column and Fraud Checking
↑ Back to topFrom version 4.3.0 the AVS result from Worldpay will be shown on the WooCommerce Order list

There are 4 values included in the AVS response :
- C : CVS check
- P : Postcode check
- A : Address check
- W : Country check
Each values has 4 possible results
- 0 : Not supported (yellow colour)
- 1 : Not checked (yellow colour)
- 2 : Matched (green colour)
- 4 : Not matched (red colour)
The transaction is also checked to confirm that the return is from a Worldpay URL and passwords match. Orders that fail these checks with be updated to Fraud Check to alert you. You can alter this in the WooCommerce Worldpay settings

Customization
↑ Back to topAdding Custom Arguments Sent To Worldpay
↑ Back to topFrom version 3.4.1 onwards you can modify the list of arguments that is sent to Worldpay, allowing you to add your own, which can then be included in emails.
For example:
add_filter( 'woocommerce_worldpay_args', 'custom_woocommerce_worldpay_args', 10, 2 );
function custom_woocommerce_worldpay_args( $worldpay_args, $order ) {
$worldpay_args['MC_test_field'] = 'This should show up somewhere';
return $worldpay_args;}
You will need to login to Worldpay and modify the email templates to use this additional information. your field name should be prefixed with “MC_” as in the example above.
You should not modify the standard fields, these are required by Worldpay and changing them could prevent your customer from checking out.
Troubleshooting
↑ Back to topCustomer is not redirected back to your website after payment
↑ Back to topYou can find the correct Payment Response URL in your Worldpay settings in your store. Make sure that you paste this into your Worldpay settings exactly as it is on your site. If your URL starts with HTTPS and your customers are not redirected back to the site then change the HTTPS to HTTP and test, Worldpay can have issues when returning to HTTPS URLs if the SSL certificate uses SNI, this is a known issue at Worldpay. If this does not resolve your issue then you may need to use a resultY.html file, see the section below for instructions on how to create that.
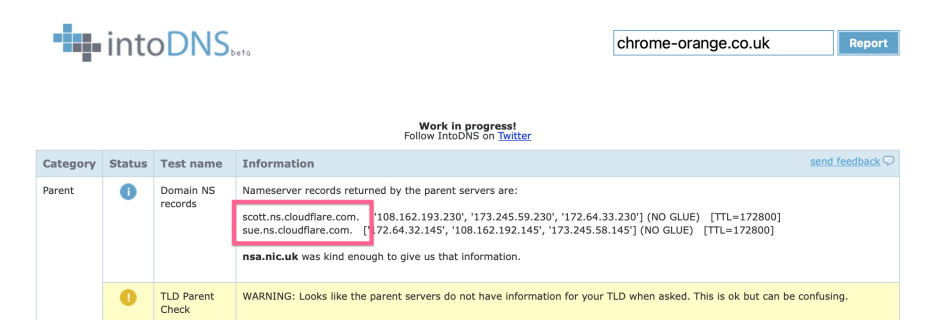
Are you using CloudFlare?
↑ Back to topSites that use CloudFlare may see occasional ‘invalid HTTP status line: >null<‘ messages from Worldpay. Currently there is no solution to this problem, however, creating the resultY file, as shown below, acts as a workaround. Your customers will be redirected back to your site and their orders will be updated correctly. A support ticket has been submitted to CloudFlare, as soon as a solution is available the plugin or docs will be updated as necessary. Worldpay are aware of this issue.
You can check your site if you are not sure if you use CloudFlare. Go to https://intodns.com/ and and enter your URL without the HTTP(S) or WWW. If you see cloudflare in the name server section then your site is using CloudFlare and you should create a resultY file.
How to create a resultY.html file in the Worldpay file manager
↑ Back to top| <html> | |
| <head> | |
| <meta http-equiv='Refresh' content='2; Url="<WPDISPLAY ITEM=MC_callback>&MC_order=<WPDISPLAY ITEM=MC_order>&transId=<WPDISPLAY ITEM=transId>&transStatus=<WPDISPLAY ITEM=transStatus>&transTime=<WPDISPLAY ITEM=transTime>&authAmount=<WPDISPLAY ITEM=authAmount>&authCurrency=<WPDISPLAY ITEM=authCurrency>&rawAuthMessage=<WPDISPLAY ITEM=rawAuthMessage>&rawAuthCode=<WPDISPLAY ITEM=rawAuthCode>&callbackPW=<WPDISPLAY ITEM=callbackPW>&cardType=<WPDISPLAY ITEM=cardType>&countryMatch=<WPDISPLAY ITEM=countryMatch>&AVS=<WPDISPLAY ITEM=AVS>&MC_transactionNumber=<WPDISPLAY ITEM=MC_transactionNumber>&futurePayId=<WPDISPLAY ITEM=futurePayId>&futurePayStatusChange<WPDISPLAY ITEM=futurePayStatusChange>"'> | |
| <title>Payment Successful</title> | |
| </head> | |
| <h1>Payment Successful</h1> | |
| <a href="<WPDISPLAY ITEM=MC_callback>&MC_order=<WPDISPLAY ITEM=MC_order>&transId=<WPDISPLAY ITEM=transId>&transStatus=<WPDISPLAY ITEM=transStatus>&transTime=<WPDISPLAY ITEM=transTime>&authAmount=<WPDISPLAY ITEM=authAmount>&authCurrency=<WPDISPLAY ITEM=authCurrency>&rawAuthMessage=<WPDISPLAY ITEM=rawAuthMessage>&rawAuthCode=<WPDISPLAY ITEM=rawAuthCode>&callbackPW=<WPDISPLAY ITEM=callbackPW>&cardType=<WPDISPLAY ITEM=cardType>&countryMatch=<WPDISPLAY ITEM=countryMatch>&AVS=<WPDISPLAY ITEM=AVS>&MC_transactionNumber=<WPDISPLAY ITEM=MC_transactionNumber>&futurePayId=<WPDISPLAY ITEM=futurePayId>&futurePayStatusChange<WPDISPLAY ITEM=futurePayStatusChange>">Go back to the site</a> | |
| <WPDISPLAY ITEM=banner> | |
| <WPDISPLAY ITEM=footer.html> | |
| </html> |
| <html> | |
| <head> | |
| <meta http-equiv='Refresh' content='2; Url="<WPDISPLAY ITEM=MC_callback>/?MC_order=<WPDISPLAY ITEM=MC_order>&transId=<WPDISPLAY ITEM=transId>&transStatus=<WPDISPLAY ITEM=transStatus>&transTime=<WPDISPLAY ITEM=transTime>&authAmount=<WPDISPLAY ITEM=authAmount>&authCurrency=<WPDISPLAY ITEM=authCurrency>&rawAuthMessage=<WPDISPLAY ITEM=rawAuthMessage>&rawAuthCode=<WPDISPLAY ITEM=rawAuthCode>&callbackPW=<WPDISPLAY ITEM=callbackPW>&cardType=<WPDISPLAY ITEM=cardType>&countryMatch=<WPDISPLAY ITEM=countryMatch>&AVS=<WPDISPLAY ITEM=AVS>&MC_transactionNumber=<WPDISPLAY ITEM=MC_transactionNumber>&futurePayId=<WPDISPLAY ITEM=futurePayId>&futurePayStatusChange<WPDISPLAY ITEM=futurePayStatusChange>"'> | |
| <title>Payment Successful</title> | |
| </head> | |
| <h1>Payment Successful</h1> | |
| <a href="<WPDISPLAY ITEM=MC_callback>/?MC_order=<WPDISPLAY ITEM=MC_order>&transId=<WPDISPLAY ITEM=transId>&transStatus=<WPDISPLAY ITEM=transStatus>&transTime=<WPDISPLAY ITEM=transTime>&authAmount=<WPDISPLAY ITEM=authAmount>&authCurrency=<WPDISPLAY ITEM=authCurrency>&rawAuthMessage=<WPDISPLAY ITEM=rawAuthMessage>&rawAuthCode=<WPDISPLAY ITEM=rawAuthCode>&callbackPW=<WPDISPLAY ITEM=callbackPW>&cardType=<WPDISPLAY ITEM=cardType>&countryMatch=<WPDISPLAY ITEM=countryMatch>&AVS=<WPDISPLAY ITEM=AVS>&MC_transactionNumber=<WPDISPLAY ITEM=MC_transactionNumber>&futurePayId=<WPDISPLAY ITEM=futurePayId>&futurePayStatusChange<WPDISPLAY ITEM=futurePayStatusChange>">Go back to the site</a> | |
| <WPDISPLAY ITEM=banner> | |
| <WPDISPLAY ITEM=footer.html> | |
| </html> |
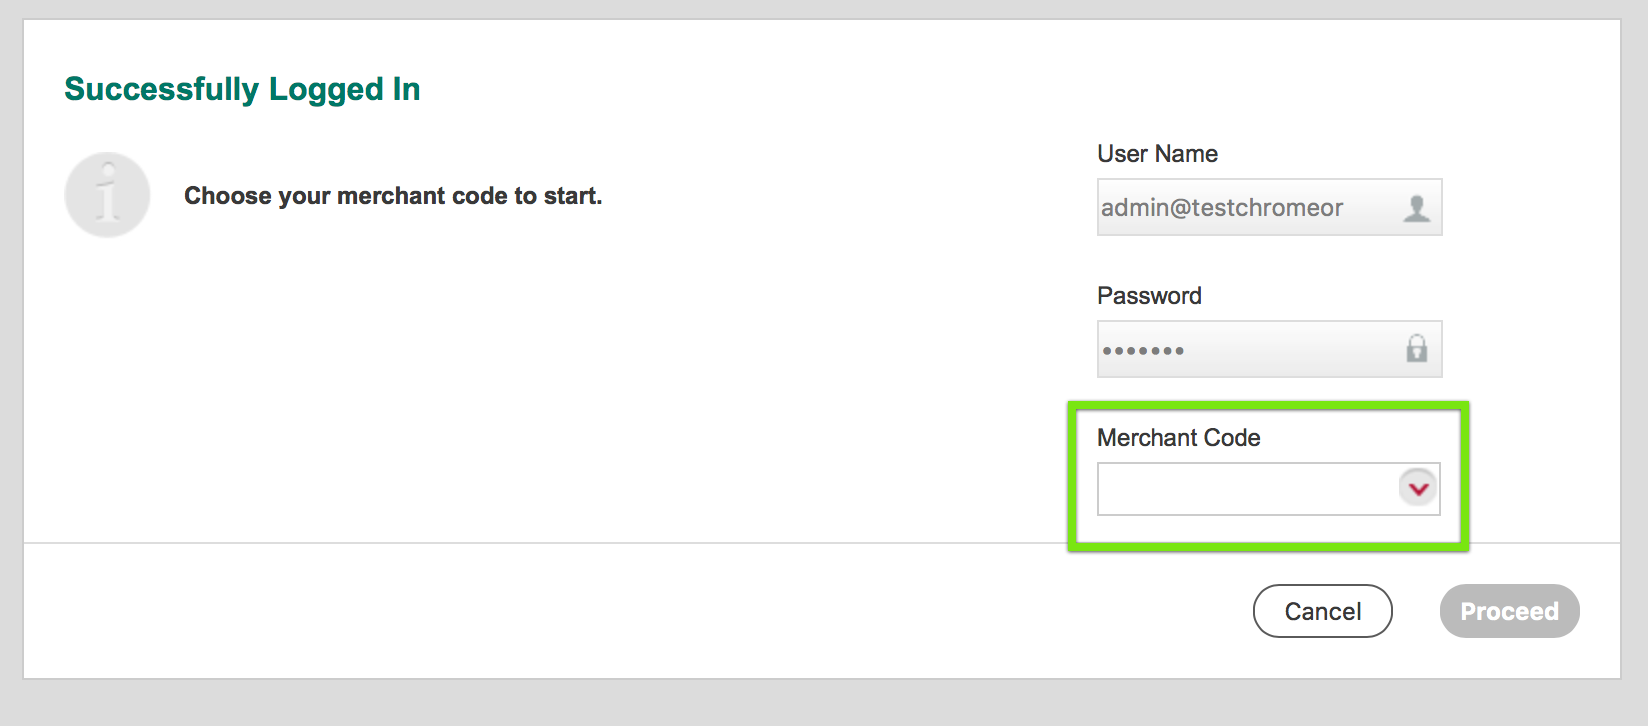
 Login to Worldpay
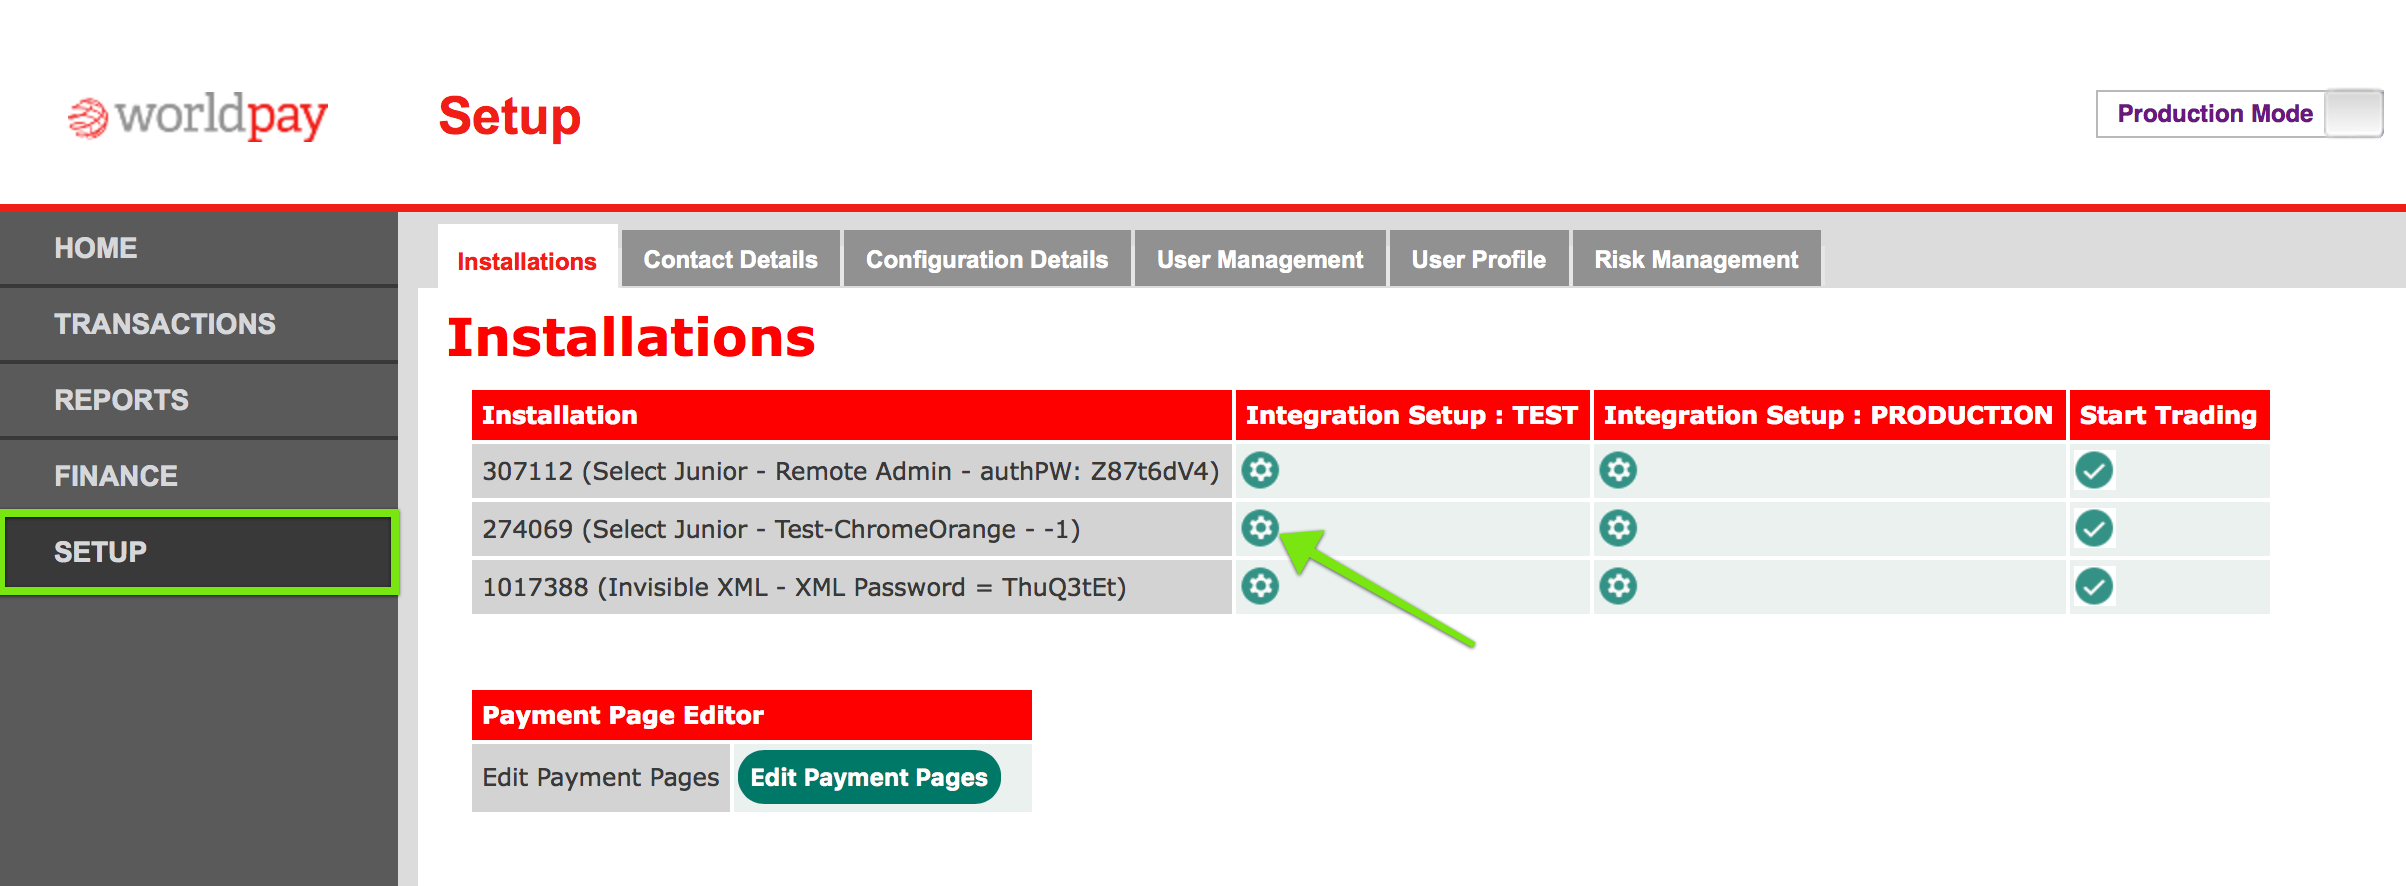
 Click “Setup” then “Edit Payment Pages”
 Choose your installation
 Then go to “file management”
 Now load your resultY.html file. Use resultY.html in the name field.
THE FILE NAME IS EXTREMELY IMPORTANT. If you see any warning messages you can ignore them.
Don’t forget to “Copy to Production”
Now load your resultY.html file. Use resultY.html in the name field.
THE FILE NAME IS EXTREMELY IMPORTANT. If you see any warning messages you can ignore them.
Don’t forget to “Copy to Production”
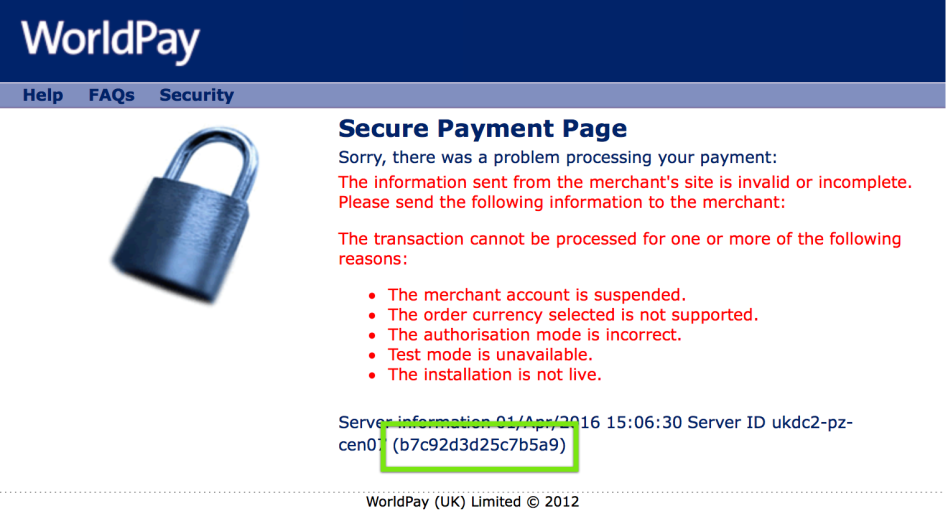
BulletProof Security
↑ Back to topSorry, there was a problem processing your payment
↑ Back to top