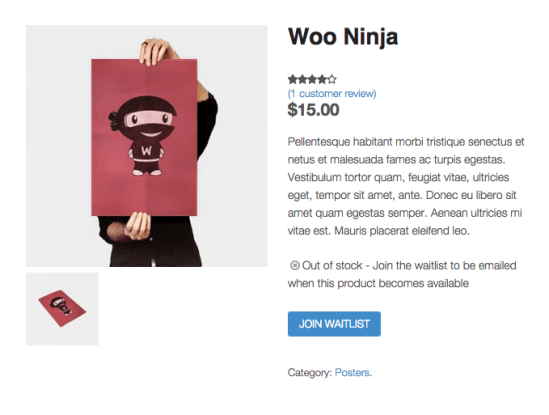
 Waitlist for WooCommerce allows customers to sign up to be notified by email when an out-of-stock product becomes available.
As a store owner you can also review who is on the waiting list for which products and sort products by the number of people registered on the waiting list.
Waitlist for WooCommerce allows customers to sign up to be notified by email when an out-of-stock product becomes available.
As a store owner you can also review who is on the waiting list for which products and sort products by the number of people registered on the waiting list.
Installation
↑ Back to top- Download the .zip file from your WooCommerce account.
- Go to: WordPress Admin > Plugins > Add New to upload the file you downloaded with Choose File.
- Activate the extension.
Upgrading to Version 2?
↑ Back to top- You can add waitlist elements anywhere on your site with the use of a shortcode [woocommerce_waitlist product_id=123] where “product_id” equals the ID of the product for which you want the user to join the waitlist. More information about shortcodes at: WordPress Codex – Shortcode
- No more page reloads when a user is added to a waitlist. Waitlist updates are handled in the background, and customers need not wait for a page reload when adding themselves. Customers click a button and are greeted with a notification that they have successfully signed up.
- Different WooCommerce pages can be targeted using the supplied body classes. For example: .single-product for single products and .post-type-archive-product for the shop page and other product archive pages (e.g., product category pages).
- Default WooCommerce wrapper classes can be used to specify styles for different product types. For example, .product-type-variable and .product-type-simple for variable and simple products, respectively.
- Waitlist elements are wrapped using the .wcwl_frontend_wrap class on product archive pages and .wcwl_elements on single product pages. This difference is due to the additional toggle button added on archive pages to avoid cluttering the page.
Setup and Configuration
↑ Back to topSettings Screen
↑ Back to top
- Waitlist require registration – logged out customers will be met with a notice informing them that they need to register where you would usually see the waitlist.
- Force account creation – when a customer adds themselves to the waitlist an account will be silently created in the background and a new account email will be sent to the customer.
- Opt-in options – show a consent message and checkbox which the customer will need agree to and check before being able to submit the waitlist form
- Show waitlist elements on shop page – whether or not you want to show the waitlist elements on the shop archive page. This will only work for simple products.

- Archive waitlist – Keep a list of email addresses after they have been removed from the waitlist (along with a date of when they were removed).
- Minimum Stock – The minimum stock amount required for waitlists to activate and send in stock notifications. This can also be set per product on the product edit screen.
- Remove data on uninstall – By default the waitlist data will not be removed when uninstalling the plugin. If you would like to delete all waitlist data (this includes removing all waitlists and archives) you can check this option.
- Export waitlist data – This button will collate all of your waitlist data into a downloadable CSV file.

- Update waitlist counts – If you notice your waitlist counts are wrong for any reason they can be recalculated here. This was implemented for older versions of the plugin when metadata structure was updated.
- Update waitlist metadata – Older versions of the plugin used a different metadata structure and this manually updates your current data to this structure. Should not be required unless you are updating from a very old version of the plugin.
Products Listing Screen
↑ Back to top
Edit Product Screen
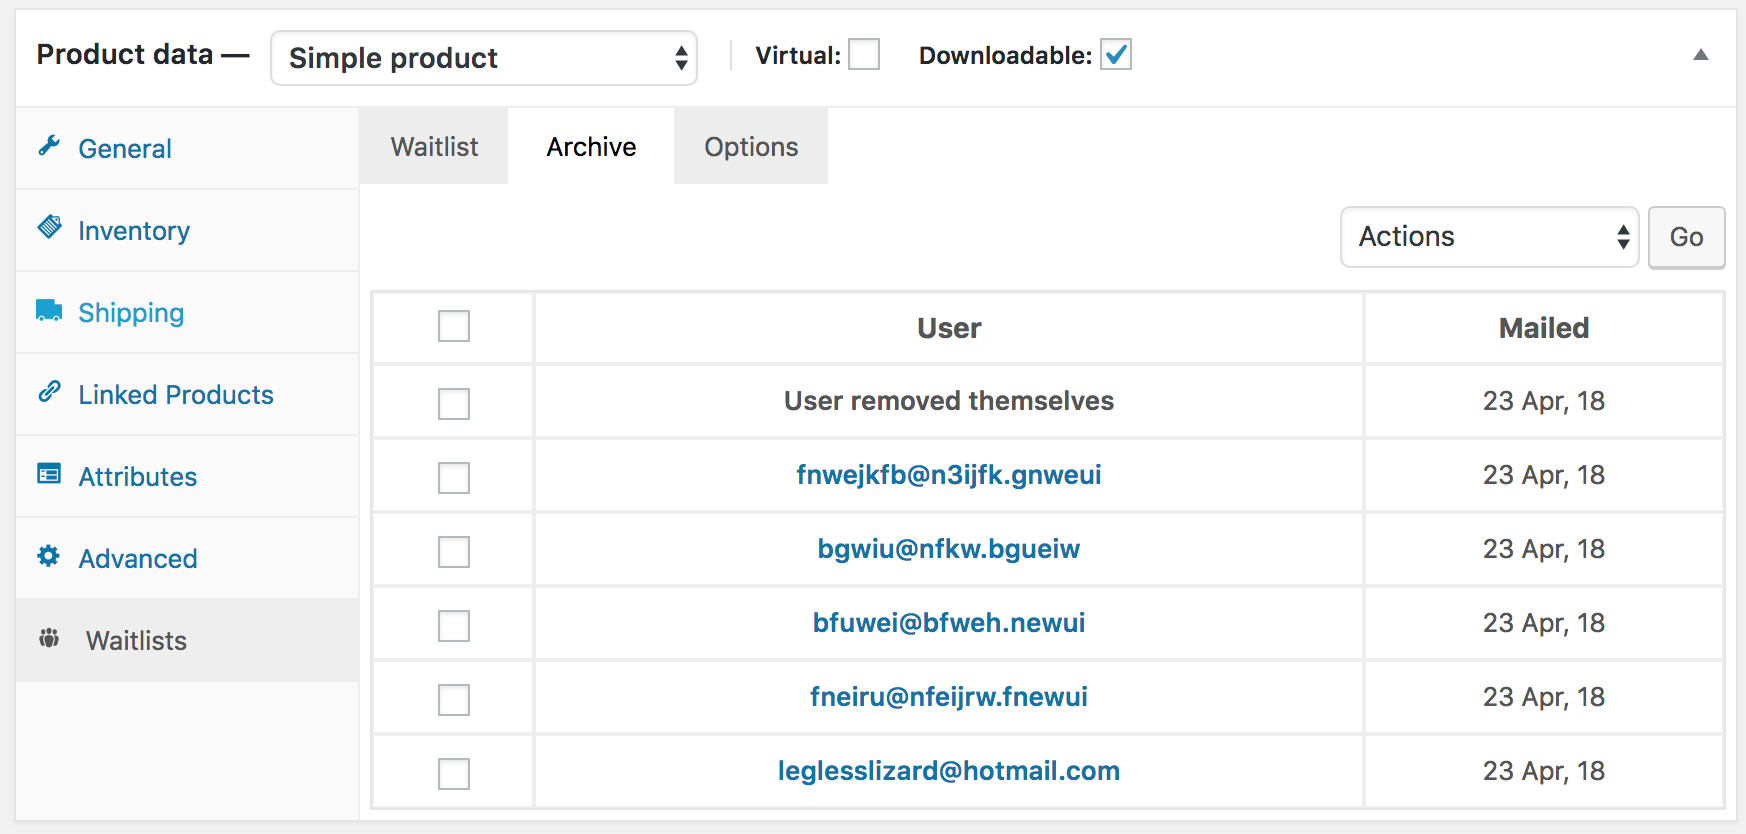
↑ Back to top On the archive tab the shop manager has options to add customers back to the waiting list (these customers will remain in the archive until deleted), permanently delete customers from the archive or send the customers a custom email (if, for example, it is suspected a notification email has not reached them). If a customer removes themselves from the archive (via the “My Waitlists” tab on the “My Account” page), this tab will also reflect this:
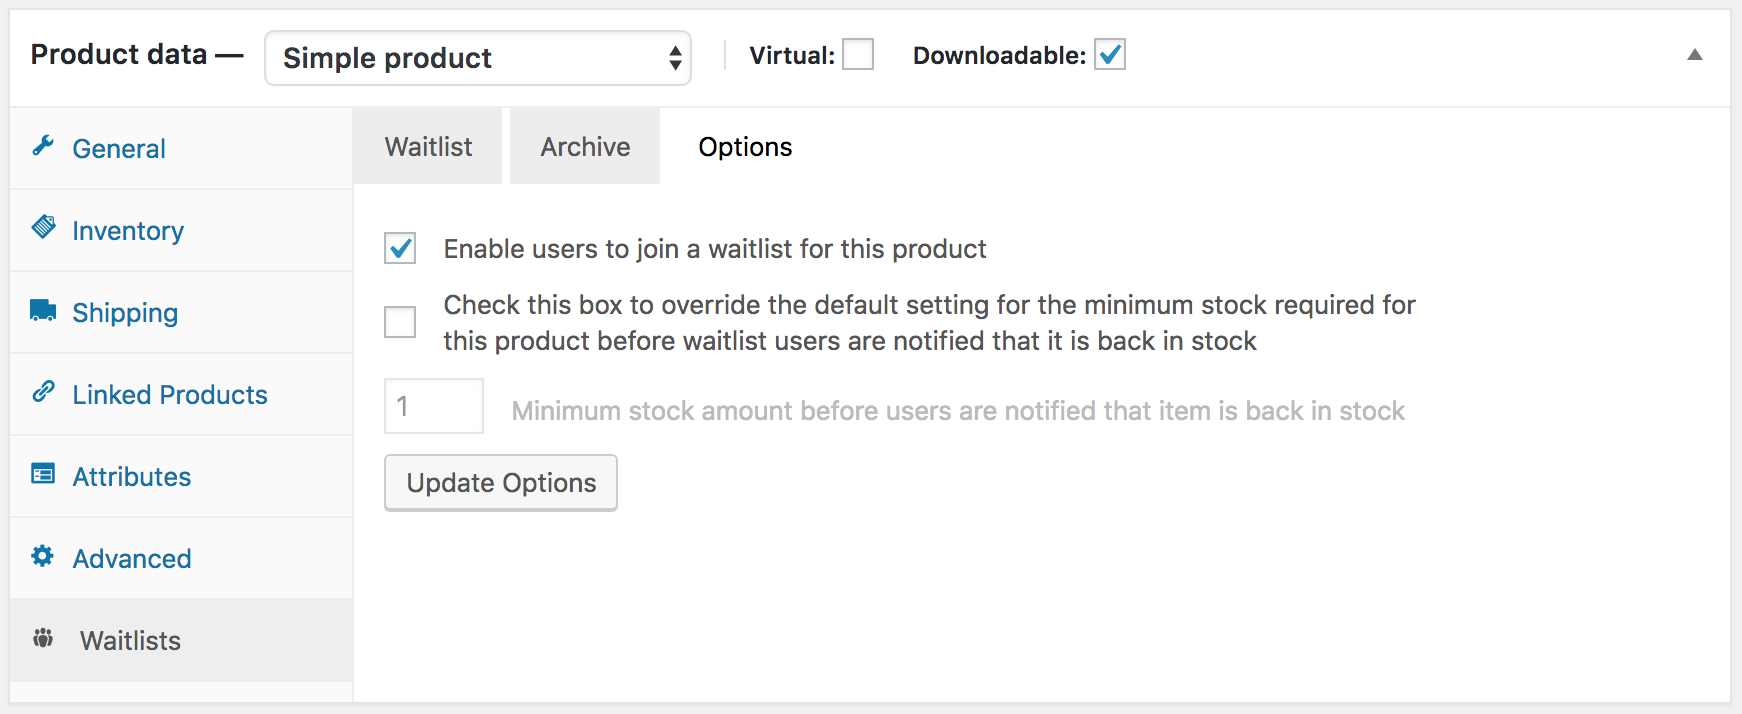
 The options tab provides the shop manager with the ability to enforce specific options for certain products. If set here, these options will override the global options (for this product only):
Automated Emails
↑ Back to top Here, it is also possible to add google analytics tracking codes to the product link sent out in the email.
Once this email is sent, Waitlist for WooCommerce removes all users from the waiting list for this product. If the product is subsequently switched back to ‘Out-of-stock’, the waiting list will be empty.
The settings for emails sent to an administrator when a user signs up to a waitlist can be found at WooCommerce > Settings > Emails > Waitlist Admin Sign-up Email:
Here, it is also possible to add google analytics tracking codes to the product link sent out in the email.
Once this email is sent, Waitlist for WooCommerce removes all users from the waiting list for this product. If the product is subsequently switched back to ‘Out-of-stock’, the waiting list will be empty.
The settings for emails sent to an administrator when a user signs up to a waitlist can be found at WooCommerce > Settings > Emails > Waitlist Admin Sign-up Email:
 There is also a “Waitlist joined notification”, “Waitlist left notification” and “Waitlist double opt-in” email that can be enabled, disabled and edited in a similar manner.
Waitlist Archiving
↑ Back to top
Opt-In Options
↑ Back to top There is now an option to use double opt-in for any non-registered visitors on your site that join the waitlist. This will not add the visitor to the waitlist until they have confirmed their email address (via a link sent to the email added to the waitlist form).
Displaying Waitlist Elements on Product Archive Pages
↑ Back to top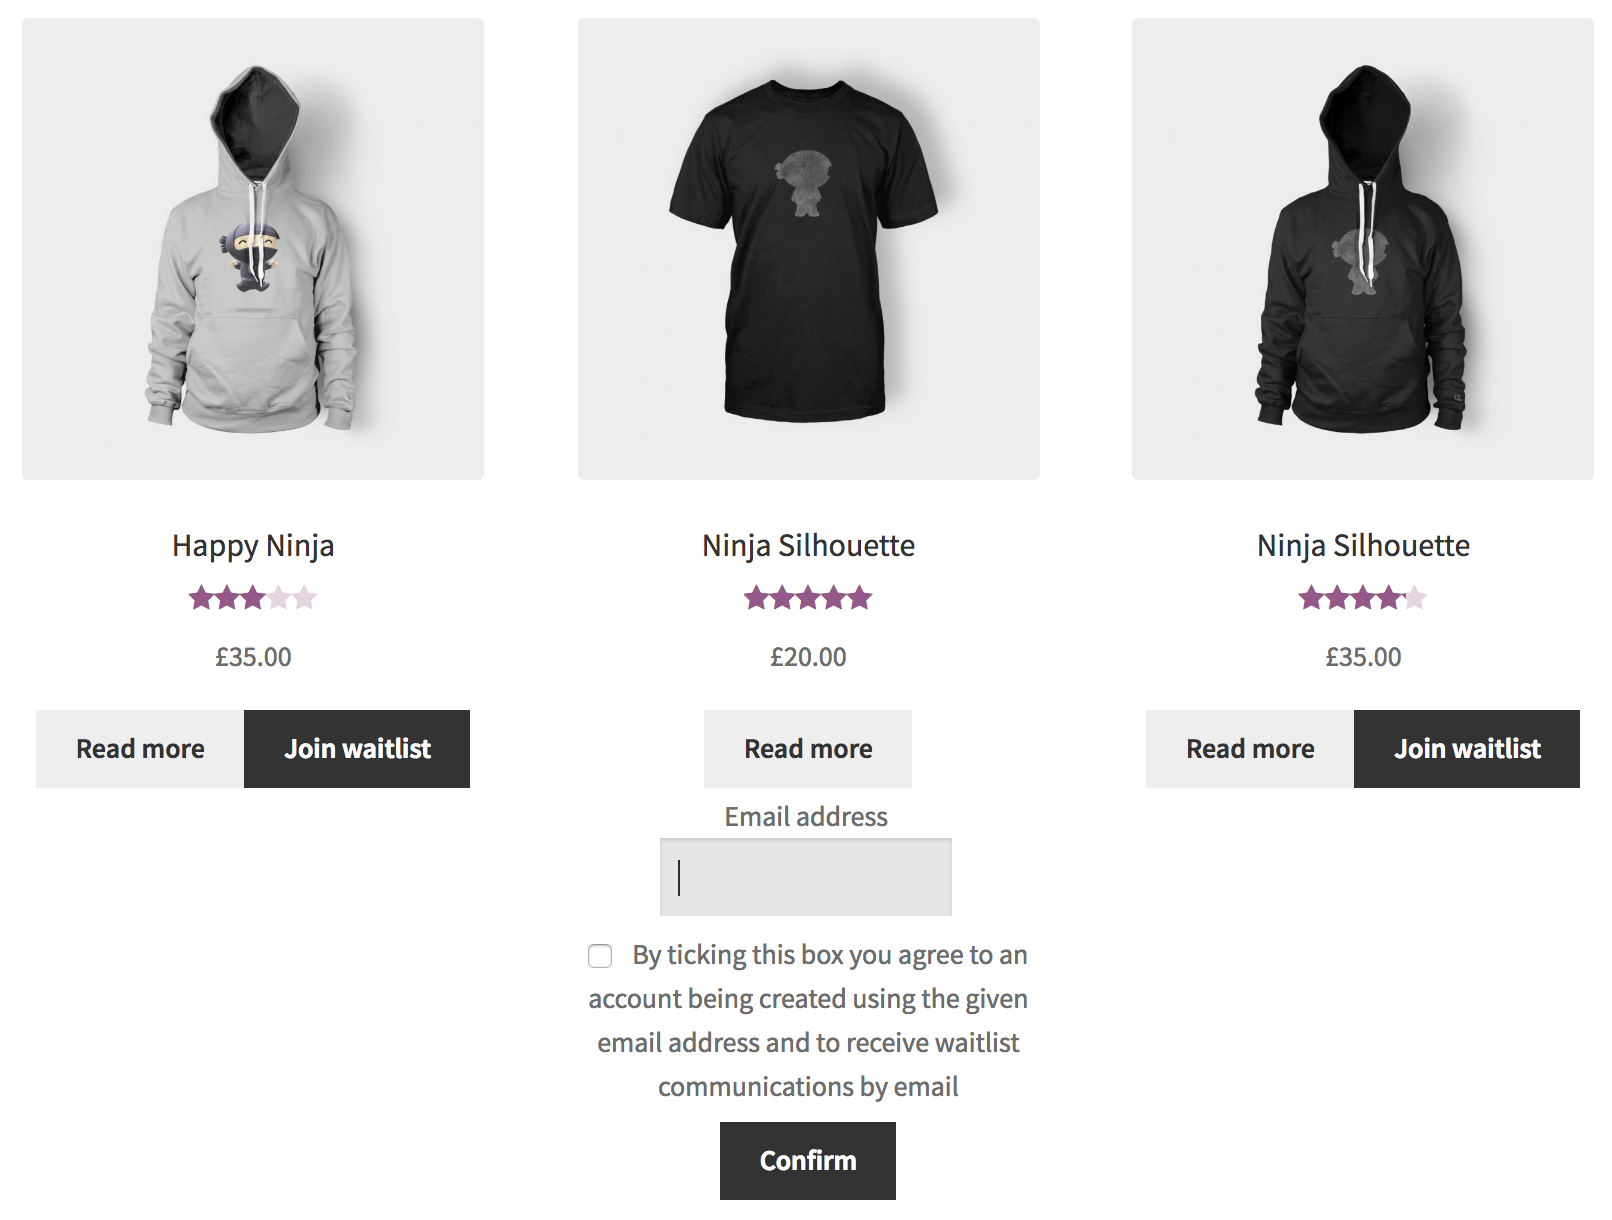
Personal Data
↑ Back to topCustomization
↑ Back to topNote: This is a Developer level section. If you are unfamiliar with hooks and filters and resolving potential conflicts, select a WooExpert or Developer for assistance. We are unable to provide support for customizations under our Support Policy.
Action Hooks
↑ Back to topwcwl_before_add_user_to_waitlistwcwl_after_add_user_to_waitlistwcwl_before_remove_user_from_waitlistwcwl_after_remove_user_from_waitlistwcwl_mailout_send_emailwcwl_new_signup_send_email
Filter Hooks
↑ Back to topOptions
wcwl_persistent_waitlists_are_disabledwcwl_automatic_mailouts_are_disabledwcwl_enable_waitlist_for_backorder_products
Admin
Text
wcwl_empty_waitlist_introductionwcwl_variation_tab_titlewcwl_updated_nag_textwcwl_dismiss_nag_text
Template paths
wcwl_include_path_admin_panel_tabswcwl_include_path_admin_panel_waitlist_tabwcwl_include_path_admin_panel_archive_tabwcwl_include_path_admin_panel_options_tabwcwl_include_path_admin_panel_side_tabwcwl_include_path_admin_panel_variablewcwl_include_path_admin_panel_simplewcwl_include_path_admin_panel_waitlist_add_newwcwl_include_path_admin_panel_waitlist_actionswcwl_include_path_admin_panel_archive_actionswcwl_include_path_admin_panel_table_row
User Waitlist Shortcode
wcwl_shortcode_titlewcwl_shortcode_intro_textwcwl_shortcode_product_titlewcwl_shortcode_thumbnailwcwl_shortcode_remove_textwcwl_shortcode_no_waitlists_textwcwl_shortcode_archive_intro_textwcwl_shortcode_archive_product_titlewcwl_shortcode_archive_remove_textwcwl_shortcode_visit_shop_text
Frontend
Join Waitlist Elements
wcwl_join_waitlist_message_textwcwl_join_waitlist_success_message_textwcwl_join_waitlist_already_joined_message_textwcwl_join_waitlist_button_textwcwl_new_user_opt-in_textwcwl_registered_user_opt-in_text
Leave Waitlist Elements
wcwl_leave_waitlist_message_textwcwl_leave_waitlist_success_message_textwcwl_leave_waitlist_button_text
Update Waitlist Elements (grouped products)
wcwl_waitlist_checkbox_textwcwl_grouped_waitlist_message_textwcwl_grouped_product_joined_message_textwcwl_event_waitlist_message_textwcwl_update_waitlist_button_text
Archive
wcwl_confirm_waitlist_button_text
Account
wcwl_account_tab_titlewcwl_account_removed_archives_messagewcwl_enable_waitlist_account_tab
Errors/Notices
wcwl_join_waitlist_user_requires_registration_message_textwcwl_join_waitlist_invalid_email_message_textwcwl_toggle_waitlist_no_product_message_textwcwl_error_message_invalid_noncewcwl_error_message_invalid_userwcwl_error_message_invalid_productwcwl_email_error_messagewcwl_optin_error_messagewcwl_generic_error_messagewcwl_loading_messagewcwl_dismiss_notification_textwcwl_notice_message_double_optin
Emails
woocommerce_email_subject_woocommerce_waitlist_mailoutwoocommerce_email_heading_woocommerce_waitlist_mailoutwoocommerce_email_subject_woocommerce_waitlist_signup_emailwoocommerce_email_subject_woocommerce_waitlist_signup_emailwcwl_tracking_urlwcwl_tracking_codes
Miscellaneous
wcwl_show_waitlist_elements_for_pagewcwl_show_waitlistwcwl_enable_waitlist_account_tabwcwl_new_user_opt-in_textwcwl_registered_user_opt-in_textwcwl_email_field_labelwcwl_email_field_placeholderwcwl_add_waitlist_for_elementor
Advanced
wcwl_supported_productswcwl_waitlist_endpointwcwl_locate_templatewcwl_notification_time_limit
FAQ
↑ Back to topCan I add the waitlist to a non-product/custom product page?
↑ Back to topCan a customer view all the products they are on a waiting list for?
↑ Back to topAre customers put on a waitlist in a particular order?
↑ Back to topDoes Waitlist for WooCommerce work with WPML?
↑ Back to topDoes this work for affiliate products?
↑ Back to topDoes this work for variable products?
↑ Back to top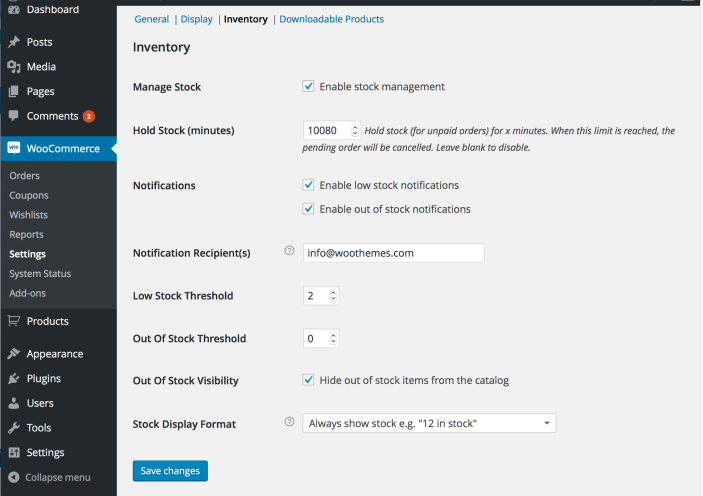
How do I change the subject/content of Waitlist Mailout emails?
↑ Back to topWhat if I don’t want users to be automatically emailed when a product is back in stock?
↑ Back to topadd_filter( 'wcwl_automatic_mailouts_are_disabled', '__return_true' );
What if I want to email users automatically, but don’t want them to be removed from the waitlist?
↑ Back to topadd_filter( 'wcwl_persistent_waitlists_are_disabled', '__return_false' );
Why does Waitlist only show up for some products?
↑ Back to top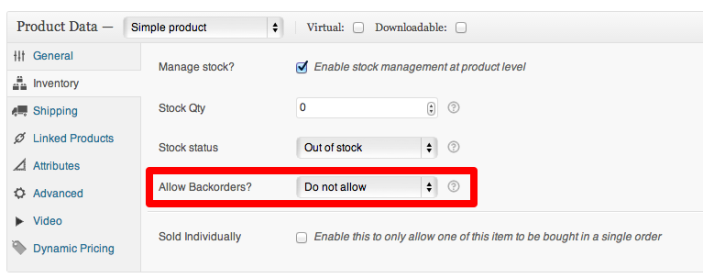
Do I have to show the “My Waitlists” tab on the my account page?
↑ Back to topadd_filter( 'wcwl_enable_waitlist_account_tab', '__return_false' );If you would like to display customer waitlists on another page simply use the shortcode [woocommerce_my_waitlist]
The “My Waitlists” tab doesn’t work, how can I get rid of the 404 “Page not found” error?
↑ Back to topCan I change the text on the Waitlist buttons?
↑ Back to topadd_filter( 'wcwl_join_waitlist_button_text', 'change_waitlist_join_button_text' );
function change_waitlist_join_button_text( $text ) {
return __( 'Custom Text' );
}
add_filter( 'wcwl_leave_waitlist_button_text', 'change_waitlist_leave_button_text' );
function change_waitlist_leave_button_text( $text ) {
return __( 'Custom Text' );
}
How can I hide the “add to cart” button for out of stock variations?
↑ Back to top.woocommerce-variation-add-to-cart-disabled {
display: none;
}How can I change the language of the plugin?
↑ Back to top- Download and install a free program called Poedit
- Within Poedit, Click File > New from POT/PO file… and choose the plugins .pot file
- Choose your translation language
- Translate each required string using either the bottom boxes to enter your own translations or the recommendations in the sidebar provided by Poedit
- Once you’ve finished click File > Save, change the filename to reflect the plugin and add the country code at the end of the filename, this is important! (e.g. woocommerce-waitlist-fr_FR.po for French)
- If a .mo file is not automatically generated when the .po file is saved you can generate one by clicking File > Compile to MO. This should be named the same as your .po file (woocommerce-waitlist-fr_FR.mo)
- Save both of these files into the site directory wp-content/languages/plugins/ (if this directory does not exist you can create it (You will need to do this in your servers file manager or over FTP)
- Change the site language in the WordPress admin by going to Settings and your translations should appear
- If they don’t appear immediately try clearing your cache and hard refreshing the page (ctrl+shift+r)
Can I show waitlists for products available on backorder?
↑ Back to topadd_filter( 'wcwl_enable_waitlist_for_backorder_products', 'wcwl_force_backorder_waitlist_true' );
function wcwl_force_backorder_waitlist_true( $product_id ) {
return true;
}Does this work for Product Bundles for WooCommerce?
↑ Back to topDoes this work for Composite Products for WooCommerce?
↑ Back to topDoes this work with Elementor?
↑ Back to topadd_filter( 'wcwl_add_waitlist_for_elementor', '__return_false' );Can I disable the waitlist feature for products by default?
↑ Back to topYes, by adding a code snippet to filter the default behaviour you can disable the waitlist for whatever products you like. This will apply to any products that have not had the waitlist options saved (new products and products that have not been edited since you activated the plugin). For any products that have waitlist options already, the saved option will always be respected, allowing you to override the filter by setting the option to enable the waitlist when you edit the product.
This snippet will disable waitlists for all products by default and can be edited in any way you require (the product ID is passed in to allow for advanced filtering) and added to your active theme’s (we strongly recommend a child theme to avoid your change being overwritten when you update your theme) functions.php file:/*** Filter the default option for enabling waitlist * * @param string $enabled whether the waitlist is enabled ('true' or 'false') * @param int $product_id product ID */function my_custom_disable_waitlist_by_default( $enabled, $product_id ) {return 'false';}; add_filter( 'wcwl_default_option_enable_waitlist', 'my_custom_disable_waitlist_by_default', 10, 2 );