Splash Popup for WooCommerce by Kestrel empowers store owners to effortlessly showcase targeted popups on their website, featuring content sourced from WordPress pages. With the ability to customize popup content based on user login status and customer status, you can effectively tailor your messaging to different audience segments.
The popup appears on the initial page visited by each customer, ensuring maximum visibility without interrupting the browsing experience. Once dismissed, the popup intelligently remains hidden via a cookie, providing a seamless and non-intrusive user journey.
Installation
↑ Back to top- Download the .zip file from your WooCommerce account.
- Go to: WordPress Admin > Plugins > Add New and Upload Plugin with the file you downloaded with Choose File.
- Install Now and Activate the extension.
More information at: Install and Activate Plugins/Extensions.
Setup and Configuration
↑ Back to top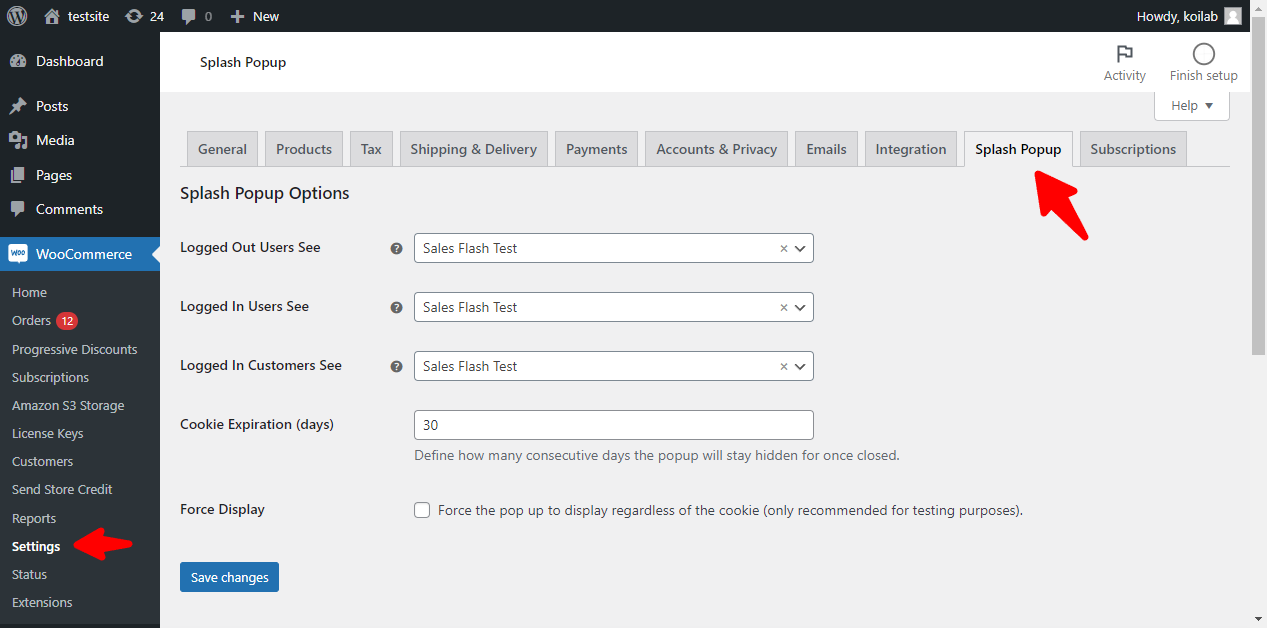
- Access Settings:
- Within your WordPress Admin Dashboard, go to WooCommerce > Settings.
- From the settings menu, select the Splash Popup tab.
- Select Popup Content:
- Choose the content that you want to display in the popup based on user status:
- Logged Out Users: Content displayed to visitors who are not logged in.
- Logged In Users: Content displayed to logged-in users who are not customers.
- Logged In Customers: Content displayed to users who are logged in as customers.
- Choose the content that you want to display in the popup based on user status:
- Set Cookie Duration:
- Determine the duration for which the cookie will remember store visits. Enter the desired number of days in the provided field.
- Force Popup Display:
- Optionally, enable the Force Display checkbox if you wish to ensure the popup is always shown, regardless of user status. This option is often used for testing purposes while designing the popup content.
- Save Changes:
- Once you’ve configured the settings to your liking, click on the Save Changes button to apply your changes.
How it works
↑ Back to topWith the Splash Popup extension, you can create custom popups by designing a regular WordPress page using the standard WordPress editor and Gutenberg. This approach allows you to craft visually appealing popup layouts and incorporate any desired information or elements directly into the page content.
- Create a Regular WordPress Page: Start by navigating to your WordPress dashboard and selecting ‘Pages’ > ‘Add New’. This initiates the creation of a new page where you’ll craft your popup content.
- Design Your Popup Content: Utilize the intuitive WordPress editor or Gutenberg blocks to intricately design your popup content. Incorporate text, images, videos, buttons, or any other supported elements to convey your message effectively.
- Assign the Page as the Splash Popup Content: After preparing your popup content, navigate to WooCommerce > Settings > Splash Popup. Within the settings page, select the appropriate WordPress page (by title) to display for Logged Out Users, Logged In Users, and Logged In Customers. By specifying the page in the Splash Popup settings, you establish a direct connection between your crafted layout and the dynamic popup display functionality.
- Cookie Expiration (days): By defining the number of consecutive days in this field, you determine the duration for which the popup will remain hidden after it has been closed by the user. For example, if you set the cookie expiration to 30 days, the popup will not reappear for the same user for the next 30 days after they have closed it. This feature helps in controlling the frequency of popup appearances, ensuring a smooth and non-intrusive browsing experience for your website visitors
- Display the Popup as a Modal Window: With your designated page set as the backbone for your Splash Popup content, it seamlessly transforms into a modal window when triggered on your website. Visitors exploring your site will encounter the popup seamlessly integrated into their browsing experience, effectively showcasing your tailored content and design.
This allows you to create engaging popups that effectively communicate your message and engage your audience.
Frequently Asked Questions
↑ Back to topHow do I add a newsletter signup?
↑ Back to topWooCommerce Splash Popup creates a popup from a WordPress page you create on your website. By creating a separate newsletter signup page, you can link to it and have customers sign up via the popup. But this is not a typical feature of the extension itself.
Is it possible to display different popups on specific pages or product categories?
↑ Back to topNo, currently, the WooCommerce Splash Popup extension is not designed to display different popups on specific pages or product categories. It primarily focuses on displaying popups based on user status (logged in/out) and customer status.
Can I use multimedia content such as images or videos in my popups?
↑ Back to topYes, you can include multimedia content such as images or videos in your popup by embedding them within the content of the associated WordPress page. Simply insert the desired multimedia elements using the WordPress editor, and they will be displayed within the popup accordingly.
Can I schedule popups to display only during certain times or dates?
↑ Back to topAt present, the WooCommerce Splash Popup extension does not include scheduling functionality. Popups are triggered based on user behavior and status.
How can I customize the appearance of the popup?
↑ Back to topThe WooCommerce Splash Popup extension primarily utilizes the content of WordPress pages for popups. To customize the appearance, you can modify the content of these pages using the WordPress editor. Additionally, you may apply CSS styling to the popup content using custom CSS or by modifying your theme’s CSS file.
Questions and Feedback
↑ Back to topHave a question before you buy? Please fill out this pre-sales form.
Already purchased and need some assistance? Get in touch with a Happiness Engineer via the Help Desk.