The WooCommerce Sales Report Emails extension redefines the way you stay informed about your store’s performance by delivering automated sales reports directly to your email inbox. This user-friendly extension generates and sends scheduled reports, allowing you to choose between daily, weekly, or monthly updates. These reports provide insights into your store’s sales performance, offering details on revenue figures, and order trends. The beauty of this extension lies in its simplicity – the reports are conveniently sent to your email, eliminating the need to access the WooCommerce dashboard regularly.
Requirements
↑ Back to top- WooCommerce 3.7+
- PHP 5.6+
Installation
↑ Back to top- Download the .zip file from your WooCommerce.com account.
- Go to: WordPress Admin > Plugins > Add New to upload the file you downloaded with Choose File.
- Activate the extension.
More information at Install and Activate Plugins/Extensions.
Setup and Configuration
↑ Back to top1. Goto to the Sales Report Set up page
↑ Back to topThis is the starting point for configuring the Sales Report Emails extension. In your WordPress admin area, find the WooCommerce menu, go to the Settings section, and then proceed to the Emails tab, where you’ll find the Sales Reports option.WooCommerce > Settings > Emails > Sales Reports.
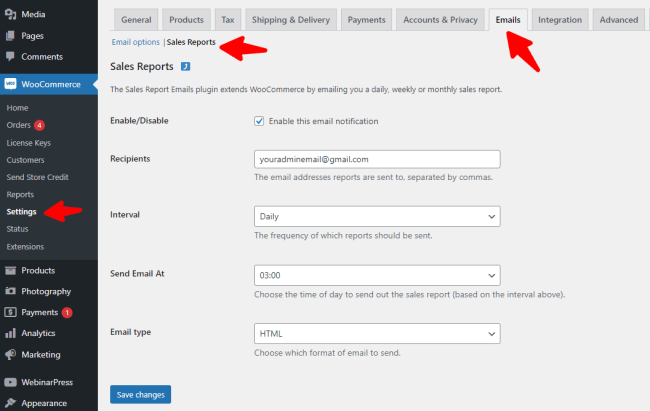
2. Enable or Disable:
↑ Back to top- This step is about turning on or off the automated sales reports. Enabling it allows the extension to send you reports while disabling it temporarily stops the reporting.
- To activate the Sales Report Emails feature, toggle the switch to Enable. This ensures that you start receiving automated sales reports.
- If, for any reason, you want to temporarily pause the reports, simply switch it to Disable.

3. Recipients:
↑ Back to top- In the ‘Recipients’ field, enter the email address(es) where you’d like to receive the reports.
- If you have multiple recipients, ensure to separate email addresses with commas.

4. Interval (Report Frequency):
↑ Back to top- Choose the frequency for when the reports should be sent.
- The Interval dropdown field will give you the following options:
- Daily: Receive insights every night to end your day informed.
- Weekly: Get a comprehensive weekly summary every Monday.
- Monthly: Enjoy a detailed monthly report on the 1st of each month.

5. Send Email At:
↑ Back to top- Choose the specific time you’d like to receive the reports. Tailor it to your schedule and preferences.
- This customization allows you to align the email delivery with your routine.

6. Email Type:
↑ Back to top- Select the email format that suits your preference:
- HTML: Rich and visually appealing reports.
- Plain Text: Simple and straightforward text-based reports.
- Multipart: A combination of HTML and Plain Text, providing flexibility.

Save Changes:
↑ Back to top- Ensure you save your changes by clicking the ‘Save Changes’ button. This step is crucial to apply your selected settings.
Enable or disable
This setting is used to turn on or off the automated sales reports. Enabling it allows the extension to send you reports while disabling it temporarily stops the reporting.
To activate the Sales Report Emails feature, toggle the switch to Enable. This ensures that you start receiving automated sales reports.
If, for any reason, you want to temporarily pause the reports, simply switch it to Disable.

Recipients
In the “Recipients” field, enter the email address(es) where you’d like to receive the reports. If you have multiple recipients, ensure to separate email addresses with commas.

Interval (Report frequency)
Choose the frequency for when the reports should be sent.
The Interval dropdown field will give you the following options:
- Daily: Receive insights every day.
- Weekly: Get a comprehensive weekly summary every Monday.
- Monthly: Enjoy a detailed monthly report on the 1st of each month.

Send email at
Choose the specific time you’d like to receive the reports. Tailor it to your schedule and preferences. This customization allows you to align the email delivery with your routine.

Email type
Select the email format that suits your preference:
- HTML: Rich and visually appealing reports.
- Plain Text: Simple and straightforward text-based reports.
- Multipart: A combination of HTML and Plain Text, providing flexibility.

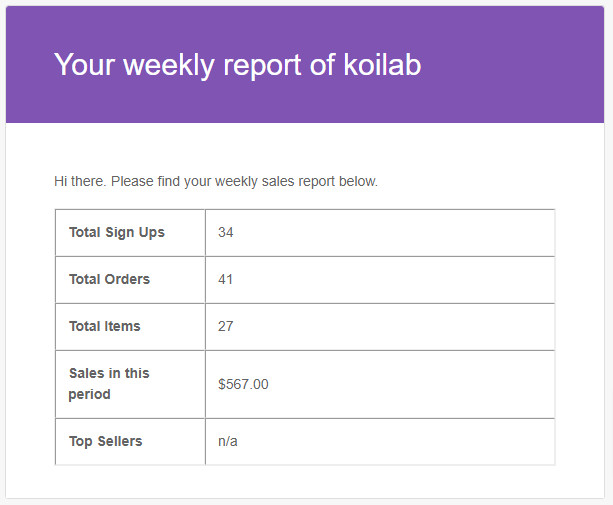
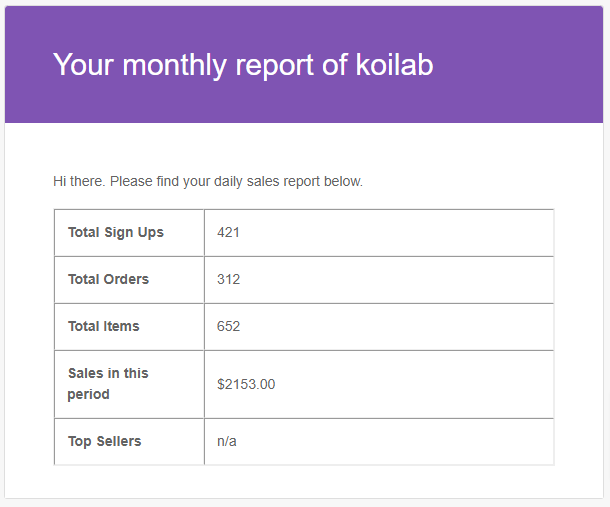
Sales Reports Email Preview
↑ Back to topTo enhance your understanding of the WooCommerce Sales Report Emails extension, we’ve provided a series of screenshots that offer a glimpse into the reports you’ll receive in your inbox.
- Daily Sales Report

2. Weekly Summary
- Monthly Report
Troubleshooting
↑ Back to topNot receiving the sales report email can have multiple causes.
- Check that the email notification is enabled and at least one email address is set in the recipients’ field.
- Check your Spam folder to ensure the message was not filtered. It’s not possible to trigger the email by setting the time for later the same day. Wait at least 24 hours before expecting the email.
- A cron plugin can help locate when the wc_sre_send event is set to run next. If none of the above solves the problem, contact your host to check if your website is allowed to send emails.
Not receiving the email at the scheduled time
↑ Back to topWordPress Cron, or scheduled tasks, plays a crucial role in triggering automated emails from the Sales report plugin. Some users may experience intermittent issues where scheduled events are not consistently triggered. Common Issues:
Server Configuration:
Inconsistent cron triggers may stem from server configuration issues. Ensure that your hosting environment supports WordPress Cron and is configured to allow cron tasks to run. Also, check the global WordPress setting “Timezone” is set properly.
High Traffic Loads:
During periods of high traffic or server loads, cron events might be delayed or missed. This is especially true in shared hosting environments. Consider optimizing your server resources or exploring managed hosting solutions.
Frequently Asked Questions
↑ Back to topWhat data is included in the sales reports sent?
Reports will include sales data of the selected period up until 23:59 (site time) the day before the report is generated. Examples:
- Daily is 12:00:00am to 11:59:59pm daily
- Weekly is Monday 12:00:00am to Sunday 11:59:59pm
- Monthly is 12:00:00am on the first to 11:59:59pm on the last
Questions and Feedback
↑ Back to topHave a question before you buy? Please fill out this pre-sales form.
Already purchased and need some assistance? Get in touch with a Happiness Engineer via the Help Desk.