The Quick View for WooCommerce extension by Kestrel adds a ‘quick view’ button to product loops that show product details in a lightbox when clicked.
Installation
↑ Back to top- Download the .zip file from your WooCommerce account.
- Go to: WordPress Admin > Plugins > Add New and select Upload Plugin, then Choose File and select the file you downloaded.
- Install Now and Activate the extension.
More information at: Install and Activate Plugins/Extensions.
Setup and Configuration
↑ Back to top- Go to: WooCommerce > Settings > General.
- Scroll down to the Quick View section, where you can enable one of two methods for displaying the Quick View pop-up:
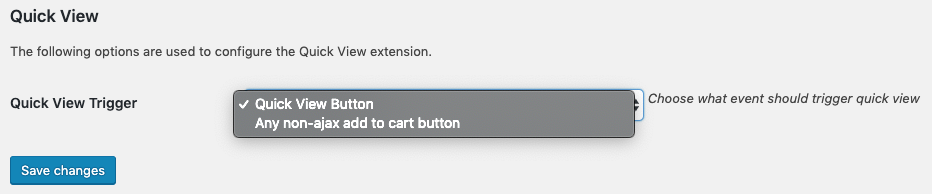
“Under the ‘Quick View Trigger‘ dropdown menu, you have two distinct options to choose from:
Quick View Button:
- By selecting this option, you can incorporate a dedicated ‘Quick View’ button directly into the product loop. This button becomes seamlessly appended to each product listing, offering customers a convenient means to access a rapid preview of product details. Clicking on the Quick View button triggers a pop-up window, providing an efficient way for users to explore essential product information without navigating away from the primary product listing page.
Any non-AJAX Add-to-Cart Button:
- Alternatively, you can opt for the ‘Any non-AJAX add-to-cart button’ option. This choice empowers you to configure various non-AJAX add-to-cart buttons across your store, including those associated with variation cart buttons. When users click on these designated buttons, the Quick View lightbox is activated, presenting a seamless and dynamic experience. This feature ensures that users can access detailed product information swiftly and intuitively, all without the need for page reloads.
How do you know if a button is a “non-ajax add-to-cart button”?
↑ Back to topTo determine whether a button qualifies as a ‘non-AJAX add-to-cart button,’ you can observe its behavior when selected. If clicking on a button, such as a shop button, results in a page reload, then it is categorized as a non-AJAX button. Notably, this criterion excludes the standard add-to-cart button.In practical terms, when interacting with a non-AJAX add-to-cart button, the entire page refreshes upon selection. This traditional behavior contrasts with AJAX-based actions, where only specific portions of the page are dynamically updated without requiring a full reload.By discerning the reloading behavior of buttons, you can identify and distinguish non-AJAX add-to-cart buttons. This distinction is particularly relevant when configuring the ‘Quick View Trigger’ settings, allowing you to integrate the Quick View functionality with the desired buttons, ultimately enhancing the efficiency and user experience on your WooCommerce store.
3. Save changes.
Usage
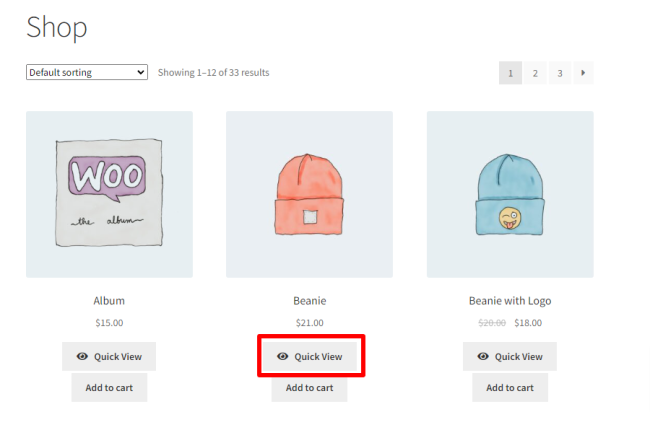
↑ Back to topQuick View buttons
↑ Back to topThe Quick View button will look something like this in the loop:
Quick View modal
↑ Back to topWhen you click on Quick View, a neat pop-up shows up with important product details. It’s a quick and straightforward way to see the key information. You can even add the product to your cart right from there.
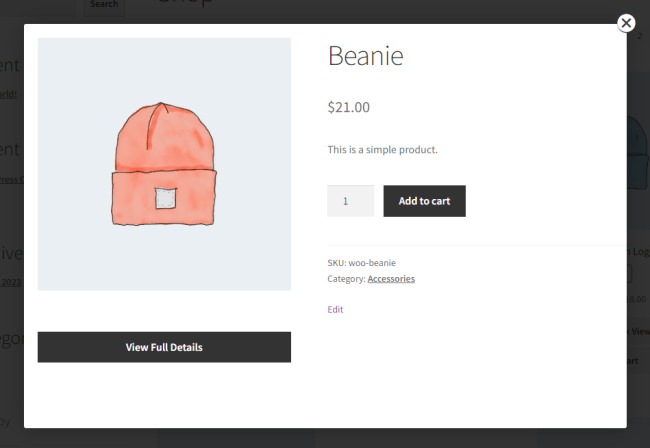
The typical content within the Quick View modal includes:
- Product Title: Clearly displayed at the top, providing immediate identification.
- Product Image and Variation Image (if applicable): High-quality visuals of the product, allowing customers to visualize the item.
- Product Gallery Images (if set): Additional images that offer a comprehensive view of the product from various angles or perspectives.
- Price: Clearly stated, making it easy for customers to ascertain the cost of the product.
- Short Description: A concise summary providing key details about the product.
- Add to Cart Button: An intuitive button enabling customers to add the product to their cart directly from the Quick View modal.
- SKU (Stock Keeping Unit): A unique identifier for the product, aiding in inventory management.
- Category: Information about the product category, helping customers understand where the product belongs within the store’s catalog.
- View Full Details Button: A link that redirects customers to the complete product page for more in-depth information.This Quick View modal layout ensures that customers have access to crucial details without the need to navigate away from the current page. The modal serves as a convenient and user-friendly way for shoppers to quickly assess product information, contributing to a seamless and efficient shopping experience on your WooCommerce store.
Customization
↑ Back to topChanging the Quick View button template
↑ Back to topMethod 1: Overwriting Template File
- Locate Original Template: Find
quick-view-button.phpinwoocommerce-quick-view/templates/loop/. - Copy to Theme: Copy the file to
your-theme/woocommerce-quick-view/loop/. - Edit Template: Open
quick-view-button.phpand customize as needed.
Method 2: Using woocommerce_loop_quick_view_button Filter
- Access Functions.php: Open
functions.phpin your theme. - Add Filter: Insert and modify this code to change the button:
function custom_quick_view_button_html($button_html) {
    // Your custom code here
    return $button_html;
}
add_filter('woocommerce_loop_quick_view_button', 'custom_quick_view_button_html');
Customize code inside the function.
These methods provide flexibility in changing the Quick View button template. Use the one that best suits your customization preferences. Always back up files before making changes.
Changing the Quick View template
↑ Back to topIn WordPress, template files control the appearance and functionality of your site. Overwriting a template file involves creating a custom version of that file within your theme’s directory, which takes precedence over the original file from the plugin or parent theme. This allows you to make specific customizations without modifying the original plugin or theme files directly.Here’s a more detailed explanation:
- Locating the Original Template: Original templates are often part of plugins or themes and are located in their respective folders. In this case, the original
quick-view.phptemplate is found inwoocommerce-quick-view/templates/. - Creating a Custom Folder in Your Theme: Inside your active theme’s directory, create a new folder with a name matching the plugin or theme (in this case,
woocommerce-quick-view). - Copying the Template: Copy the original
quick-view.phptemplate from the plugin’s folder (woocommerce-quick-view/templates/) to your custom folder in the theme (your-theme/woocommerce-quick-view/). - Editing the Custom Template: Open the copied
quick-view.phpfile from your theme’s folder in a text editor. Make the desired changes to the template. This could include adjusting HTML structure, adding CSS styles, or modifying PHP code. - Theme Priority: WordPress prioritizes files in your theme over the original files in plugins or parent themes. When a template file exists in both the plugin and your theme, WordPress uses the version from your theme.
- Backup: Always create backups before making changes to theme files to avoid accidental data loss or errors.
By overwriting the template file in your theme, you retain the ability to update the plugin or theme without losing your customizations. This practice is part of best coding practices and ensures that your modifications remain intact even after updates.
FAQ
↑ Back to topHow can I troubleshoot issues if the Quick View button is not appearing in my WooCommerce product loops?
↑ Back to topEnsure that the Quick View option is enabled in the WooCommerce settings under WooCommerce > Settings > General. If the issue persists, check for theme or plugin conflicts that might be affecting the display.
Is it possible to customize the appearance of the Quick View button differently for specific product categories?
↑ Back to topYes, you can achieve this by utilizing custom CSS or by applying conditional statements in your theme’s quick-view-button.php template.
What considerations should I keep in mind when modifying the Quick View template to maintain compatibility with future updates?
↑ Back to topAlways make changes in a child theme to avoid losing modifications during theme updates. Additionally, regularly check for updates to the Quick View extension for any new features or improvements.
Can I use a custom icon for the Quick View button, and if so, how do I implement it?
↑ Back to topYes, you can use a custom icon by modifying the Quick View button template (quick-view-button.php) and adding your icon’s HTML or CSS. Make sure the icon is properly integrated to maintain a cohesive design.
Are there any specific guidelines for optimizing the performance of the Quick View feature, especially on mobile devices?
↑ Back to topA: Consider optimizing images and minimizing unnecessary scripts in the Quick View modal. Test the feature on various devices to ensure a smooth and responsive experience.
Can the Quick View feature be extended to include additional product information beyond the default display?
↑ Back to topYes, you can further customize the quick-view.php template to include additional product details based on your specific requirements. This allows for a more tailored presentation of information in the Quick View modal.