Overview
↑ Back to topRequirements
↑ Back to top- WooCommerce 3.0
- PHP 5.6+ (You can see this under WooCommerce > Status)
Installation
↑ Back to top- Download the extension from your WooCommerce dashboard
- Go to Plugins > Add New > Upload and select the ZIP file you just downloaded
- Click Install Now, and then Activate
- Go to WooCommerce > Settings > Order Statuses and read the next section to learn how to setup and configure the plugin.
Setup and Configuration
↑ Back to top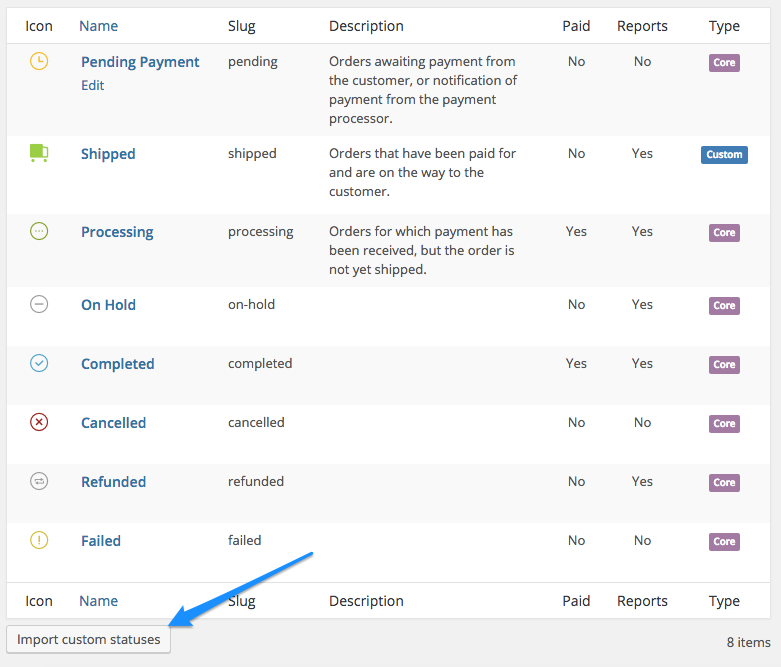

Set up Statuses
↑ Back to top
- Name – The name to display in your Orders Table and on all order information.
- Slug – Add a slug to identify this status, which can be used in custom code. For simplicity, we typically recommend adding a slug that’s a hyphenated version of your name, and not changing this in the future.
- Description – (Optional) Add a description to display to customers when they view the order. If customers hover over the order status in the “View Order” screen, this description will be shown to provide more information.
- Color – select a color for the order status icon
- Icon – select an icon for this status. If chosen, this will be displayed on the “Orders” page if the order has this status, replacing the text badge for status. If no icon is selected, a text badge is used.
- Action Icon – select an icon to use for the “Order Actions” button if this status is available as a next status (such as the “completed” action button)
- Next Statuses – Select any statuses that would be used later than this status in your fulfillment flow; these can be custom or core statuses. This will display the appropriate order action buttons on the “Orders” page.
- Bulk Action – Enable this to add a bulk action for this status on the “Orders” page. This will allow you to select orders, then assign this status in bulk.
- Include in Reports – Enable this to include orders with this status in your sales reporting. This is helpful for order statuses that designate an order that has been paid for, but is not yet “complete”, such as one that’s been shipped.
- Paid – Select the payment status of this order status. For example, if an order has been paid (think of this as a status “between” Processing and Completed), you can mark it as such.

- Orders with this status have been paid – This status will be treated like “processing” or “completed”. Orders will include download link access (if you allow it for paid orders), show purchase notes (if set), and in general ensure the status behaves like the processing status in terms of what customers see on your site.
- Orders with this status require payment – This status will be similar to “pending payment” or “failed”. Orders will show the “Pay” and “Cancel” links to customers in the account section, and will not allow access to downloads or other aspects of your store that require payment.
- Orders are neither paid nor require payment (Default) – This status is similar to “on-hold” or “refunded”. A customer will not have access associated with a paid order (such as download access), but will not be shown payment or cancel links in the account.


Set up Emails
↑ Back to top
- Name – The name to display in your Emails list for reference.
- Type – Determine whether this should be sent to the admin email addresses or the customer.
- Description – (Optional) add a description that’s solely for your reference in the emails list.
- When to dispatch – add all order status changes that should trigger this email to be sent. You can dispatch when moving from any status to a particular status, when moving from a particular status to any status, or from one status to another.
- Dispatch when a new order is created – (Optional) allows emails to be sent when a new order is created.

Please note that in order for emails to send, the two statuses cannot be the same status. For example, if you have a custom status called Shipping and you want an email to get sent out when an order moves to that status, you’ll likely want to have the From Status be set to Any. If you have both statuses set to Shipping, then no emails will be sent, as the status will not have changed from Shipping to Shipping.
Now you’ll need to edit this email and enable it when ready. Go to WooCommerce > Settings > Emails or click either the Status icon or the email name links to find your new email.


Usage: Order Statuses
↑ Back to top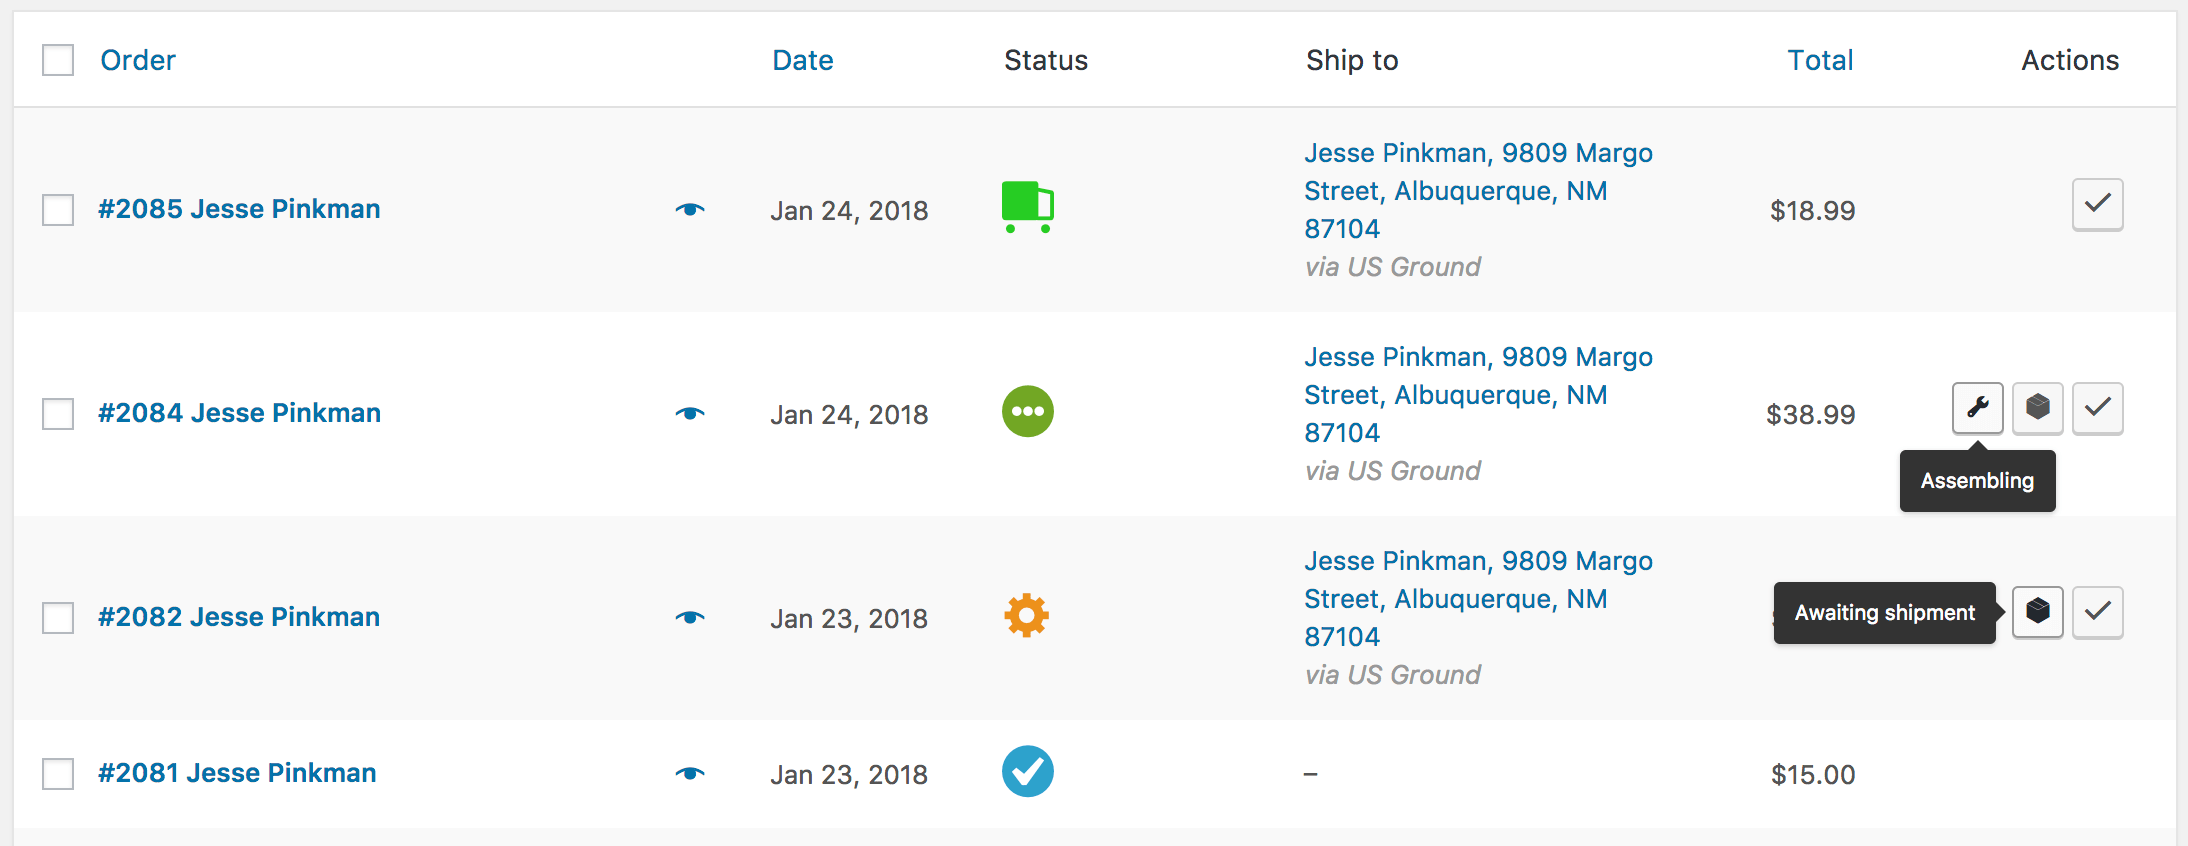

Deleting Statuses
↑ Back to top
 In either situation, order notes will be added to all affected orders to indicate the change.
Customer Experience
↑ Back to top When a customer views the “Recent Orders” list in the account section, or views a particular order, the status will still be displayed, even if it’s a custom status.
For statuses that are marked “requires payment”, the “Pay” and “Cancel” actions will be shown.
When a customer views the “Recent Orders” list in the account section, or views a particular order, the status will still be displayed, even if it’s a custom status.
For statuses that are marked “requires payment”, the “Pay” and “Cancel” actions will be shown.
 If you’ve entered a description for any core or custom status, this will also be displayed to a customer while hovering over the status name so customers understand what the status means:


Incompatible plugins
↑ Back to top- Booster for WooCommerce and Booster Plus for WooCommerce – These plugins may prevent the core WooCommerce “On hold” emails from sending.
- Disable Admin Notices Individually by Webcraftic – This plugin may remove the Email settings link.
Troubleshooting
↑ Back to topFrequently Asked Questions
↑ Back to topQ: Why can’t I delete core order statuses like I can with custom statuses? A: All core order statuses, even those that you may not typically use in your workflow, are used by plugins. As these plugins expect core order statuses to be present, we cannot remove them so that we don’t break the plugins, like payment gateways, that depend on them. You can edit the names for these statuses if desired, but cannot delete these statuses or change the slugs.
Q: Why can’t I edit orders with custom statuses? A: WooCommerce disables editing for orders once they have a “paid” status. However, this is filterable, and Order Status Manager will try to follow this format depending on whether you’ve designated a status as “Paid” or not. If this does not suit your workflow, you can use this code snippet to pass your custom status slugs to WooCommerce to tell it which statuses should be editable (please read this post if you’re not sure how to add custom snippets to your site): https://gist-it.appspot.com/github/skyverge/wc-plugins-snippets/blob/master/woocommerce-order-status-manager/allow-order-editing-with-custom-status.php?footer=minimal
Q: Can I translate custom order statuses? A: If WPML is being used to manage translations, you can create new statuses to translate, but make sure the new status has the same slug as the existing one for the translation, as statuses are treated like posts. You can also use the filters
wc_order_status_manager_order_status_name and wc_order_status_manager_order_status_description to translate the names without WPML (or ask WPML to add support for these filters and exclude the status post type OSM adds).
Q: What happens if I delete an order status? A: If you delete an order status that’s in use by orders, then any orders that have that status can be re-assigned to a new status. See our section on deleting statuses for more information.
Q: Do custom statuses show up in the REST API? A: Yes, if you use the WooCommerce REST API to pull the details of an order that has a custom status, you’ll see the slug associated with that custom status.
Q: Can I use my custom order status with WooCommerce API? A: Yes! When you create a custom order status, a new status registers in WooCommerce. Therefore, any update_status call made by WooCommerce to the custom status will work. So, updating the order through an API, PHP snippet, or otherwise will behave in the same way.
Q: Do custom statuses show up in the WooCommerce mobile app? A: Custom statuses will show up in the WooCommerce app, and you can filter by them. However, the app generally only displays core statuses, so you may not be able to assign custom statuses to orders through the app.
For Developers
↑ Back to top- The
/yourtheme/woocommerce/emails/{type}-order-status-email-{$slug}.phptemplate is loaded first, where “type” is “customer” or “admin”, and the “slug” is the name of your custom Order Status Email. - Next, the
/yourtheme/woocommerce/emails/{type}-order-status-email-{$post_id}.phptemplate is loaded, where the type is the same as above, and the post_id is the ID of the custom order status. - Finally, the plugin will attempt to load
/yourtheme/woocommerce/emails/{type}-order-status-email.phpwhich can be used as a general override for all custom order status emails.
woocommerce-order-status-manager/templates/emails/customer-order-status-email.php template file.
It’s also possible to include new merge tags for the existing email fields by using the filter:
apply_filters( 'wc_order_status_manager_order_status_email_find_variables', $this->find, $this->id, $this->type, $this->object );This would allow you to add a custom merge tag, that can then be replaced with data based on the following filter:
apply_filters( 'wc_order_status_manager_order_status_email_replace_variables', $this->replace, $this->id, $this->type, $this->object );where “ID” is the custom email ID, which can be found in the URL bar from the “section” query argument, when customizing the email template in admin. “type” is either “customer” or “admin”, and the “object” is the custom email instance. The email body can also be overriden using a filter, rather than a template override:
apply_filters( "wc_order_status_manager_order_status_email_body_text_{$this->id}", $this->format_string( $this->body_text ), $this->object );