One Page Checkout displays product selection and checkout forms on a single product, Post or Page. Customers can add products to an order, or remove them, and complete payment without leaving the page.
Usage
↑ Back to topThere are 3 ways of using One Page Checkout in a store:
- Enable One Page Checkout on a per-product basis.
- Manually insert the shortcode and attributes into the post.
- Use the One Page Checkout graphical interface (Classic editor only).
Per-product Setting
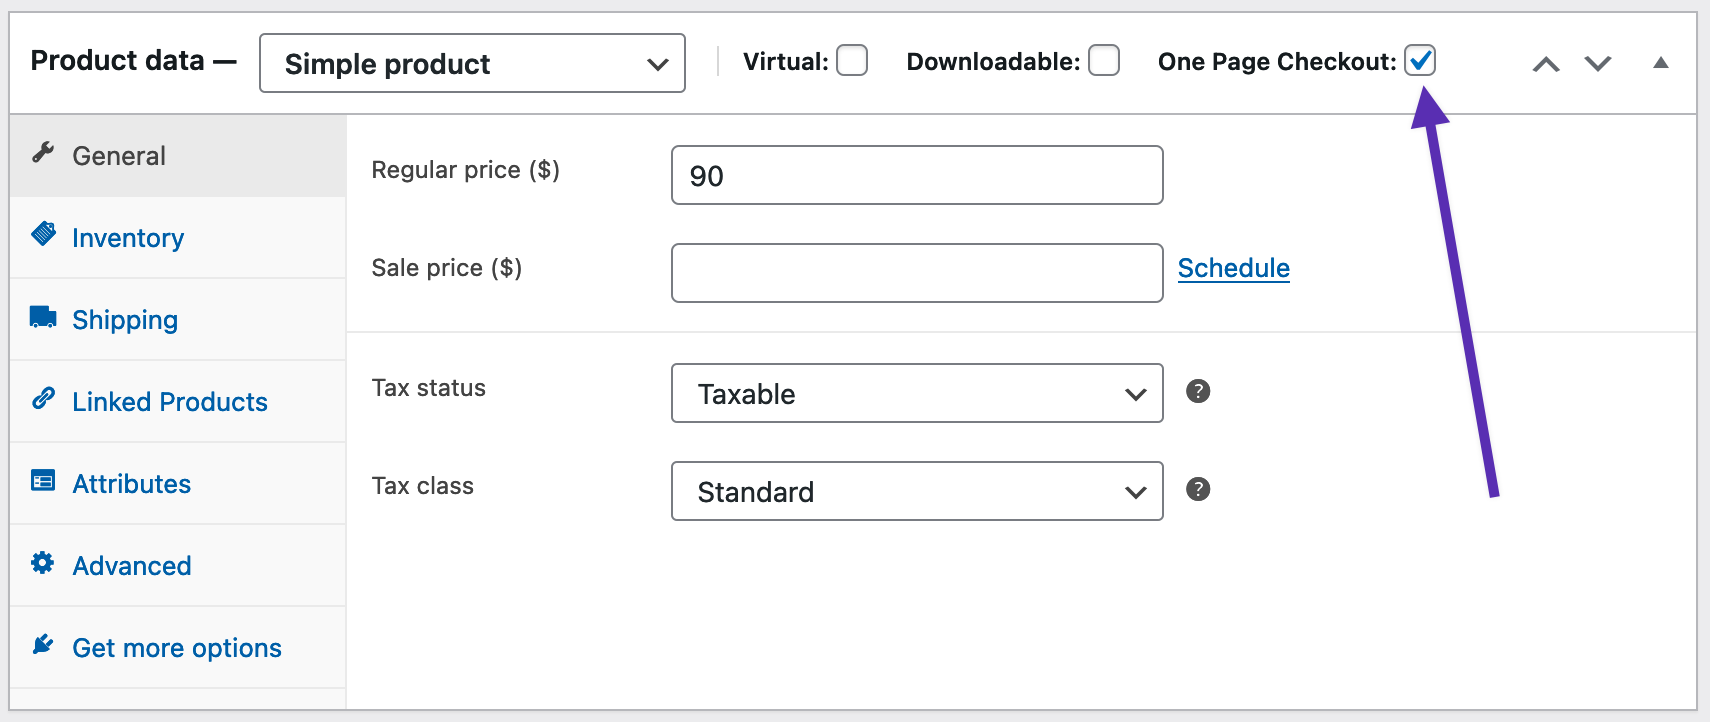
↑ Back to topOnce One Page Checkout is activated a new option is added to the Product Data panel. By checking this option, One Page Checkout is activated for that particular product.
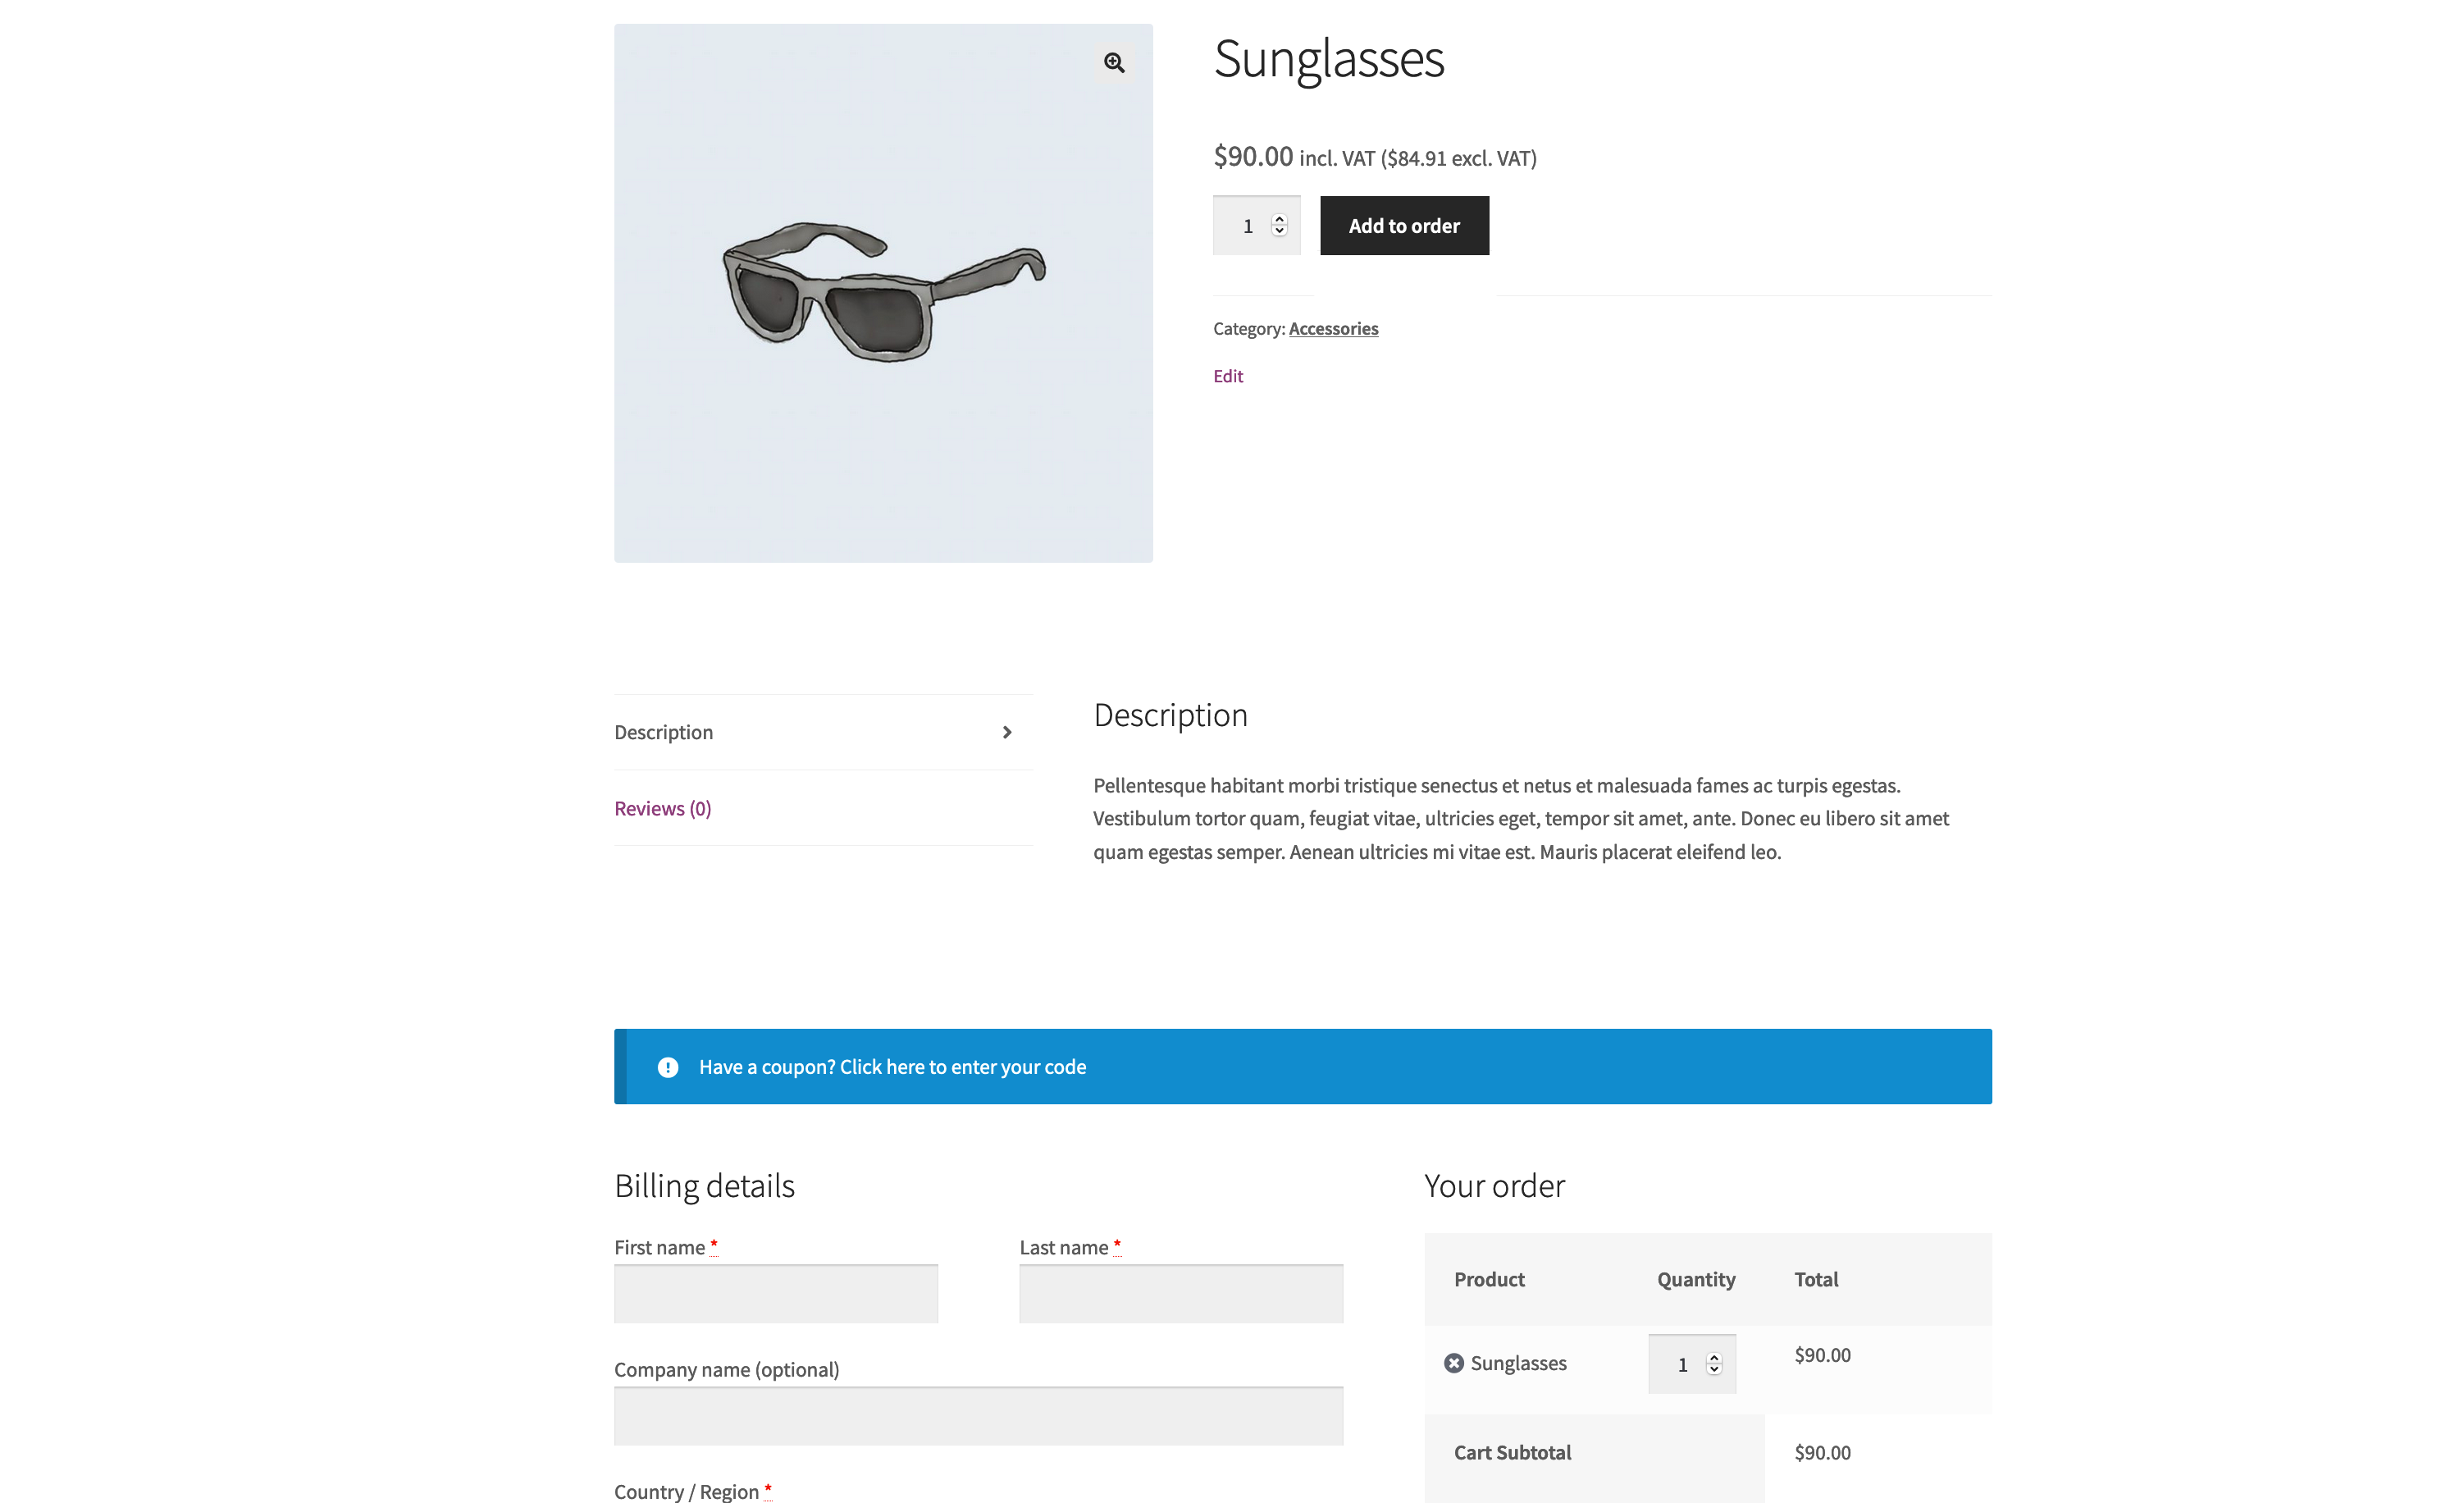
Once enabled, the Checkout form appears on the product page. The Add to Order button no longer redirects to the Checkout page, but will instead increase the product quantity by the specified number on the included Checkout form. Other products that were added elsewhere, are also visible, similar to how the normal Checkout page works.
Manual Shortcode Usage
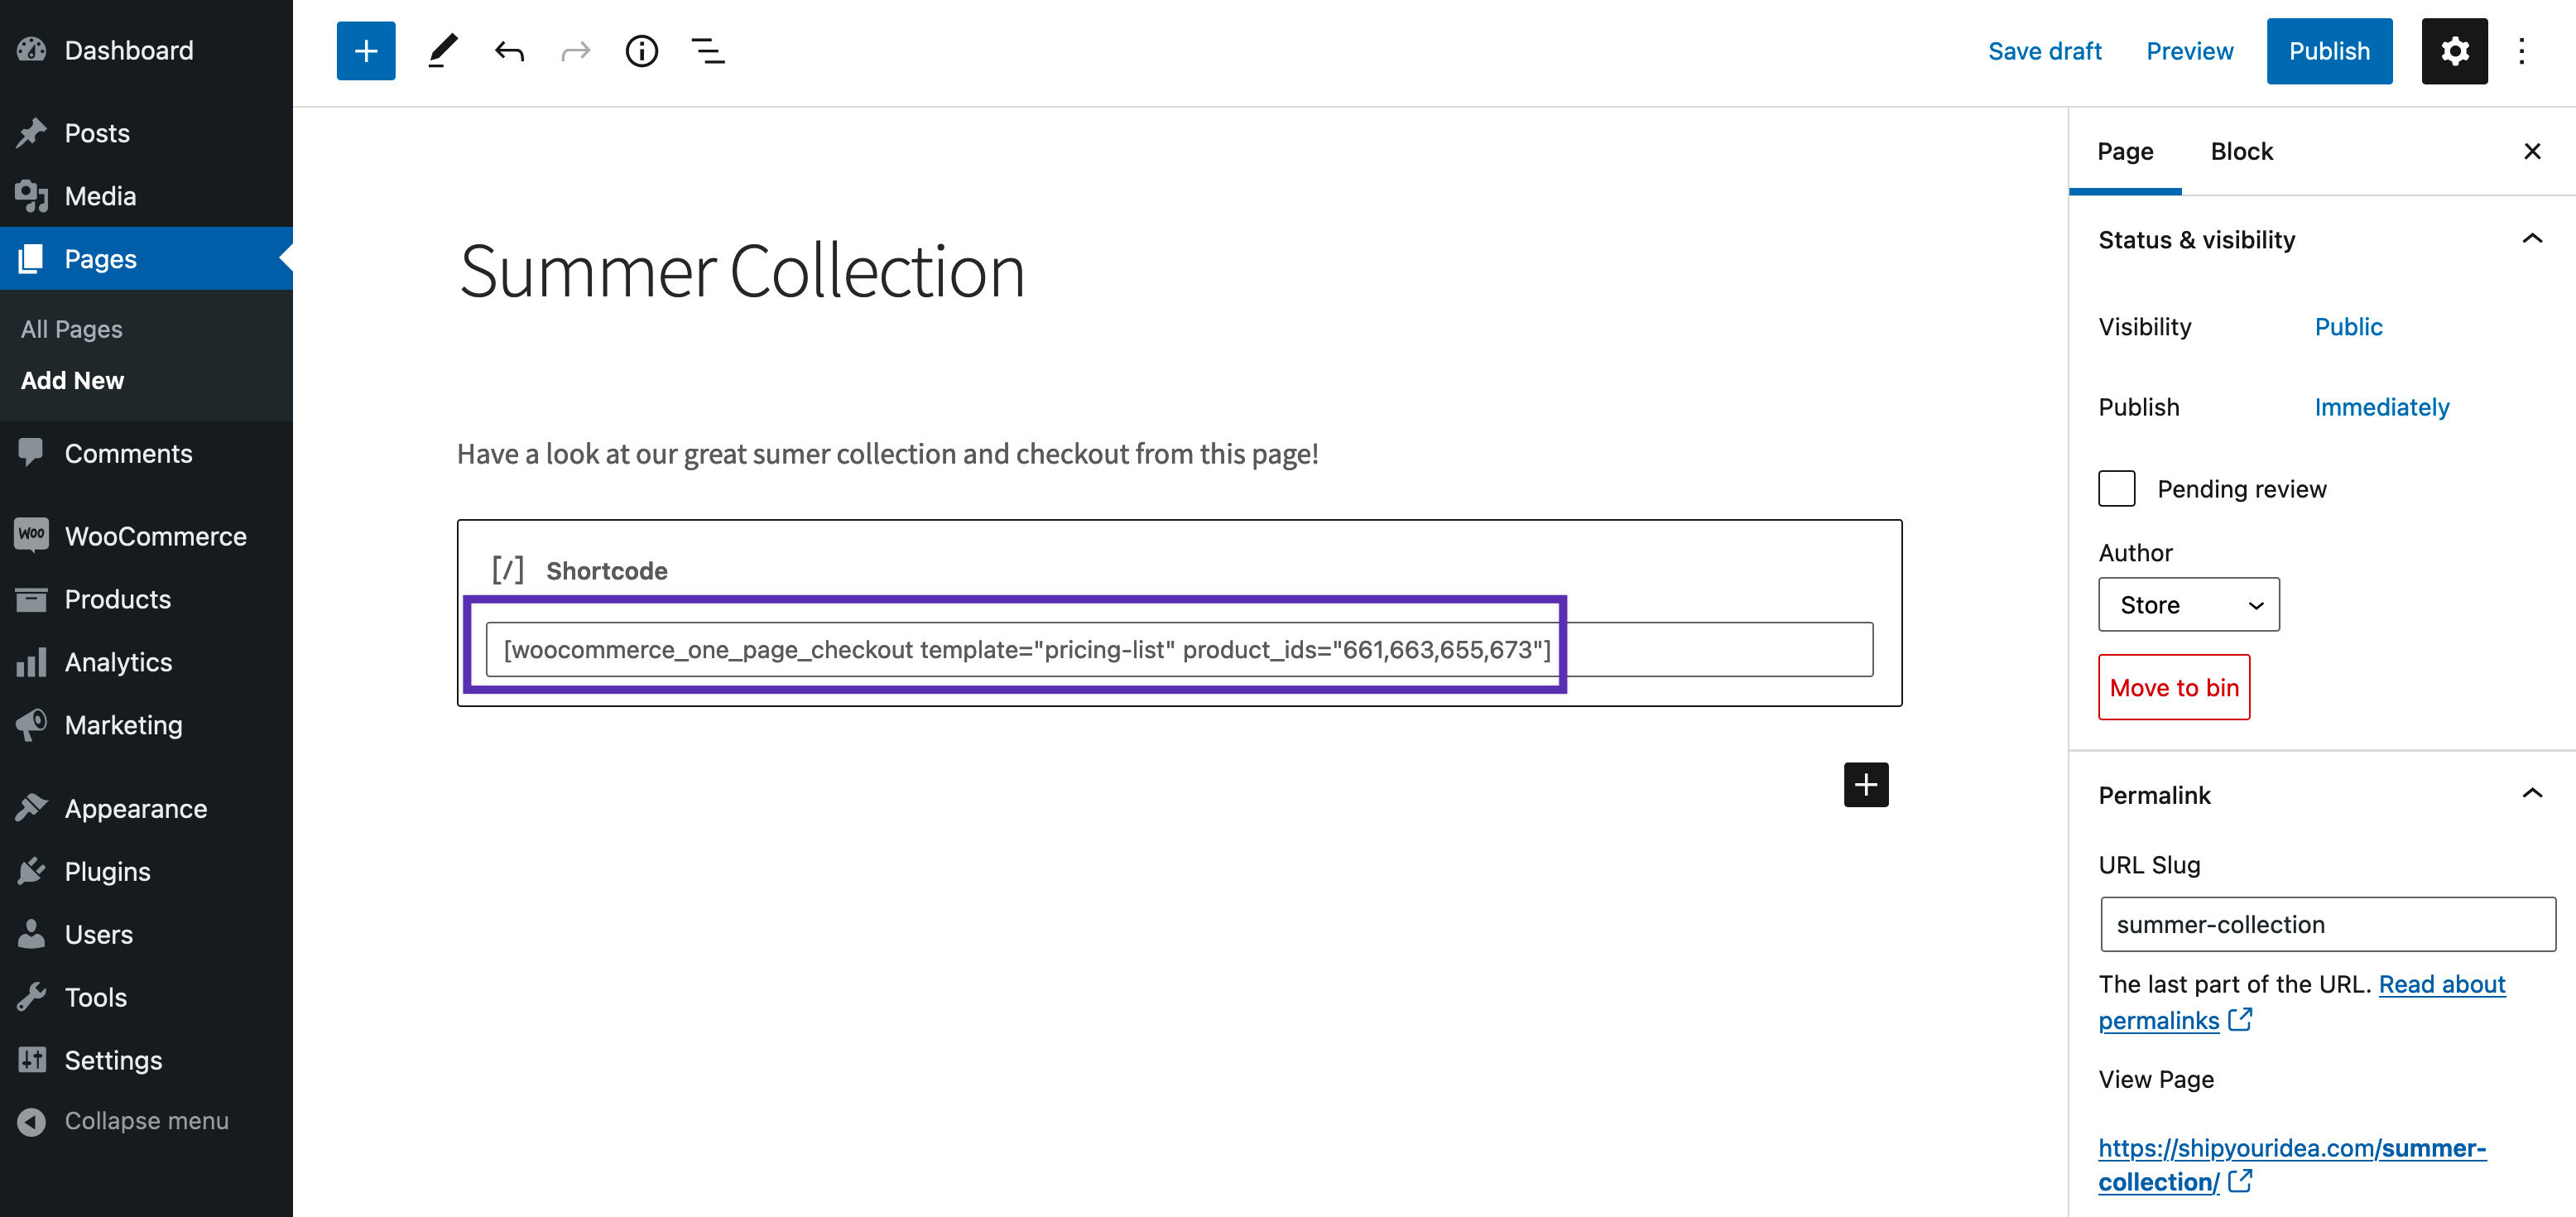
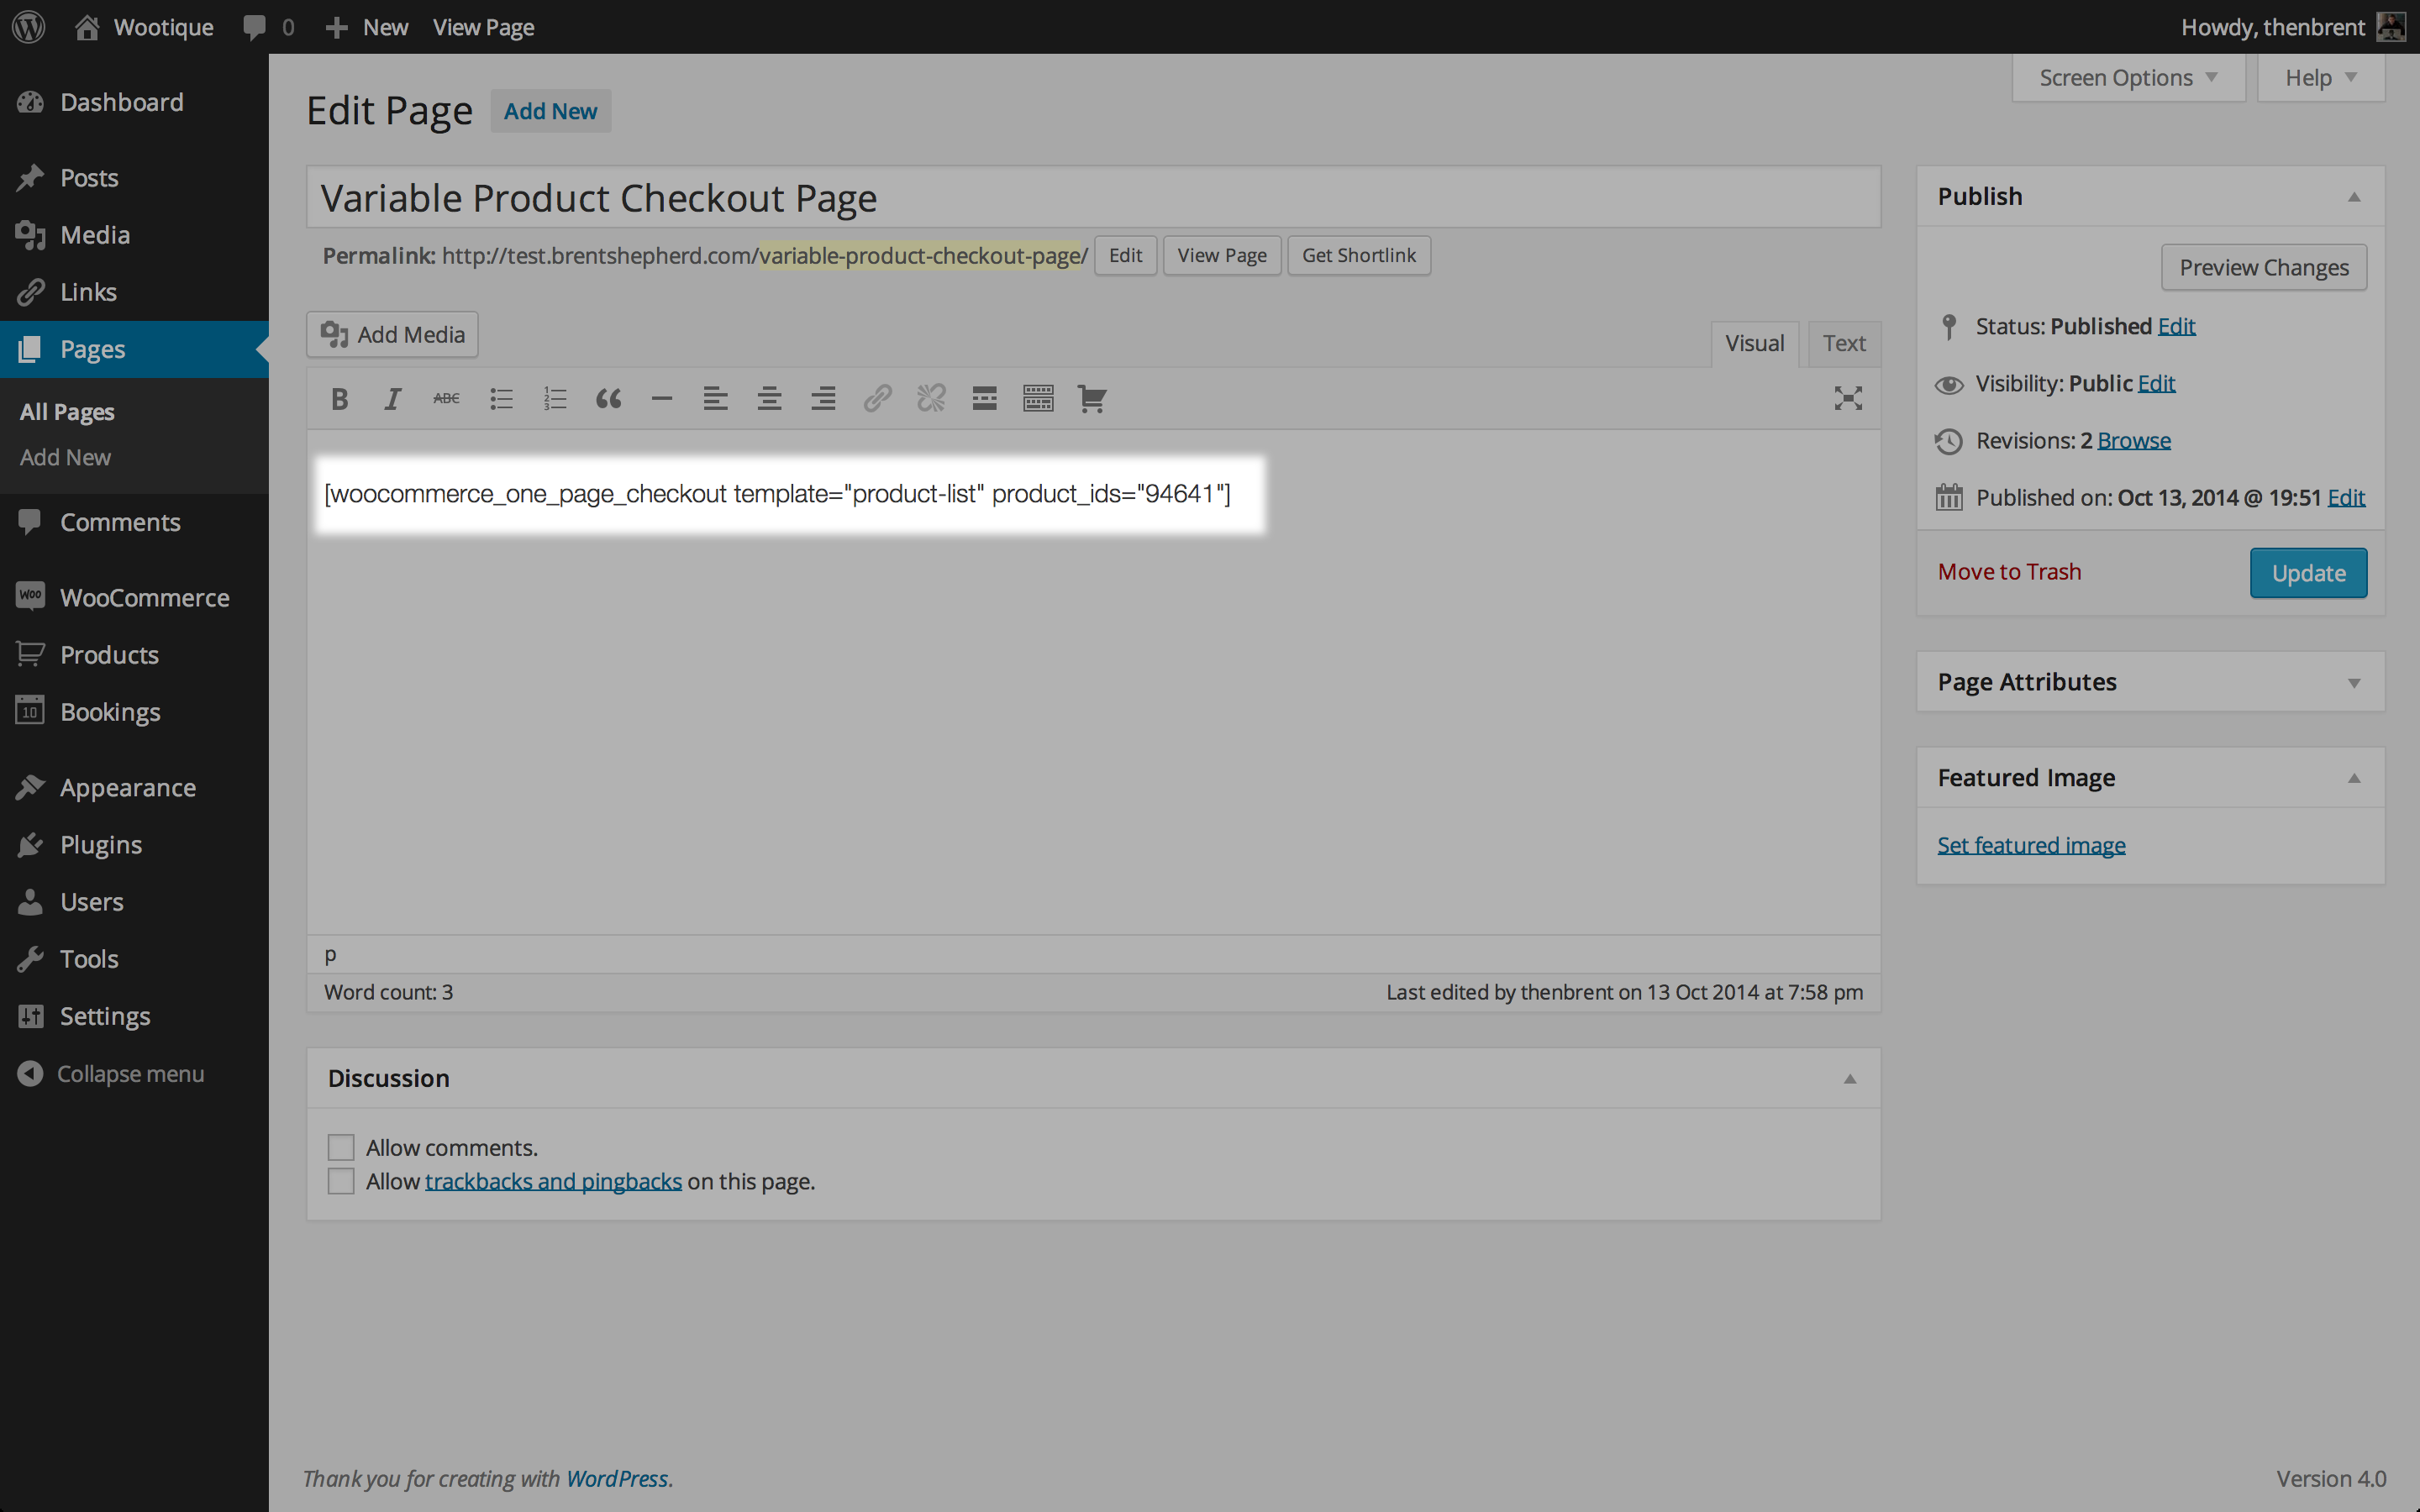
↑ Back to topYou can also manually add the shortcode [woocommerce_one_page_checkout] to any page, post or custom post type and customize the page using the shortcode’s attributes.
To manually add the shortcode:
- Insert
[woocommerce_one_page_checkout]into the page or post’s content - Add the
product_ids=""attribute with a list of product IDs to display at the top of the checkout process - Add the
template=""attribute with the slug of the template you want to use to display checkout process - Save the post or page
One Page Checkout Graphical Interface
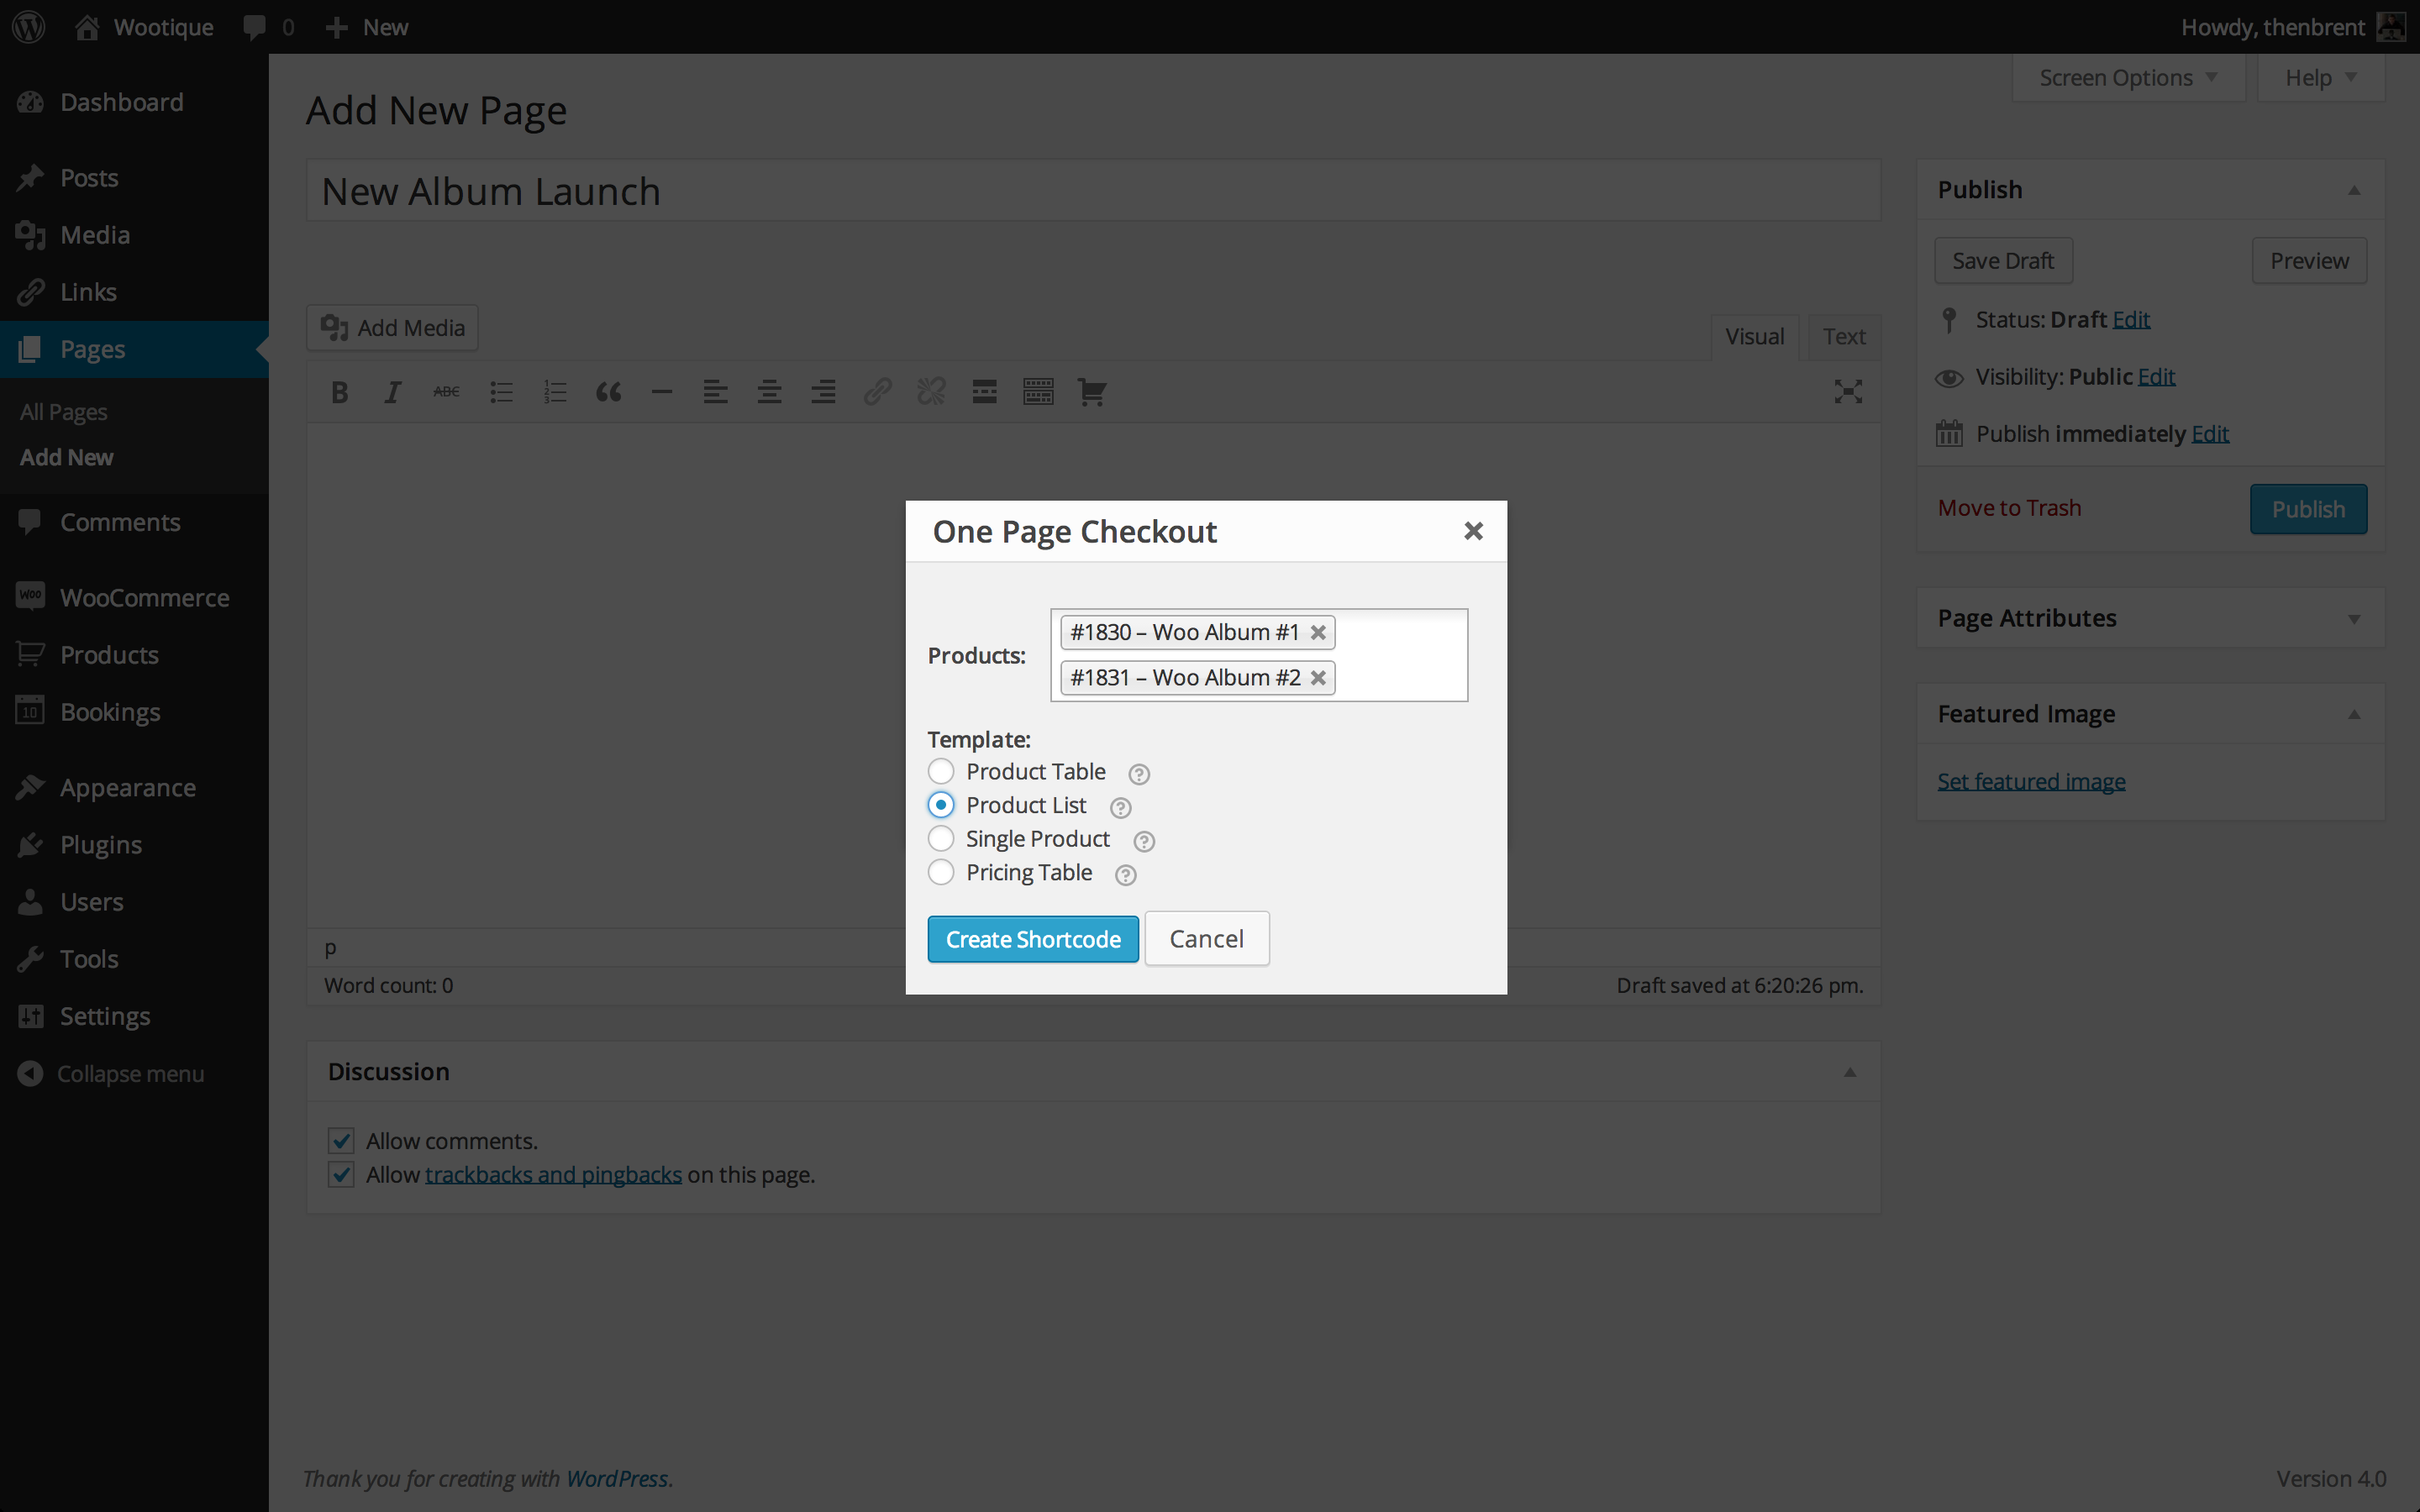
↑ Back to topTo insert the One Page Checkout shortcode using the graphic interface:
- Go to: Pages > Add New or Posts > Add New.
- Make sure the editor is in Visual mode.
- Click the One Page Checkout icon.
- Click inside the Products field and type the product name/s to display.
- Select the products to display.
- Select the template to use for product selection fields.
- Click Create Shortcode.
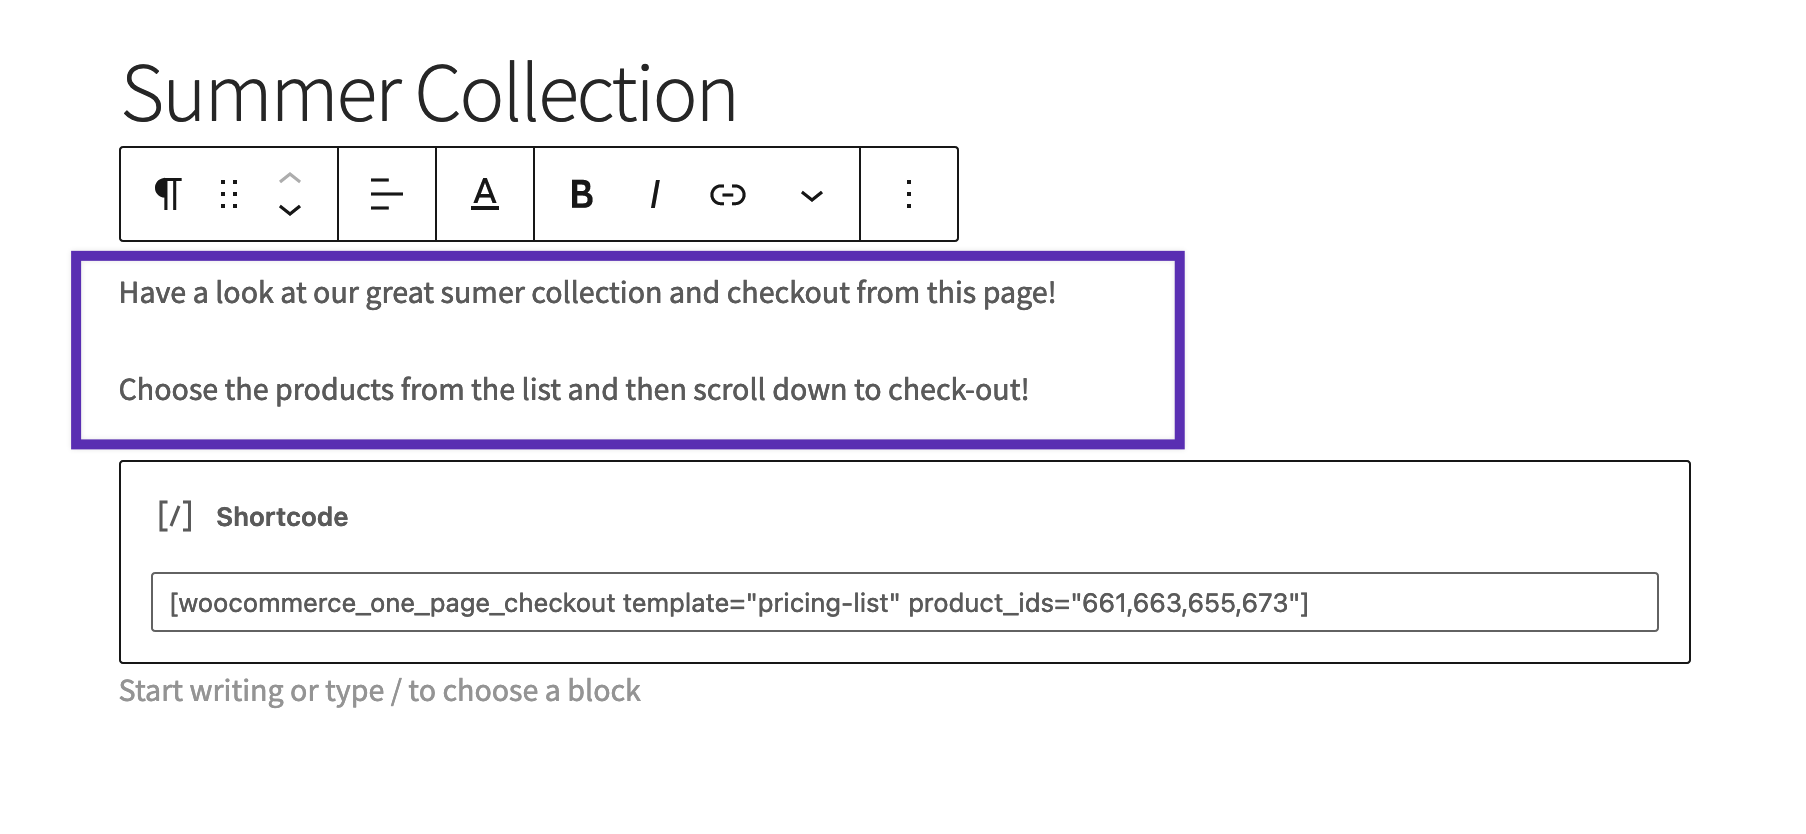
Additional Content
↑ Back to topAdd content above or below the One Page Checkout shortcode in the WordPress editor to display sales copy, terms and conditions or other content above or below the One Page Checkout product selection and checkout form.
Shortcode Attributes
↑ Back to topThe One Page Checkout shortcode uses attributes to customize the checkout process. Each of the attributes may only exist once per shortcode. If more than one set of attributes exist, the value of the second attribute will be used.
Product IDs Attribute
↑ Back to topTo show a limited set of products, use the product_ids attribute. This attribute expects a list of product IDs separated by commas as seen below.
The order of the product IDs here will also determine the order in which the product’s are displayed on the checkout page.
In some situations such as using add-to-cart buttons outside of One Page Checkout you may not want to show any products, to do this simply do not include this attribute or leave it blank.
If one or more of the product IDs defined in the attribute is invalid, the other products will still be displayed.
Example usage: [woocommerce_one_page_checkout product_ids="30,45,12"]
Category IDs Attribute
↑ Back to topTo display products that are classified in certain categories, use the category_ids attribute. This attribute can either be used with a single category ID or multiple. Multiple category IDs should be separated by a single comma, as shown below.
In some situations, such as using add-to-cart buttons outside of One Page Checkout, you may not want to show any products. To do this, simply do not include this attribute or leave it blank.
If any of the category IDs are invalid, the other products from the valid categories will display as expected in the chosen template.
For help on setting up product categories, refer to the WooCommerce doc on product categories.
Example usage: [woocommerce_one_page_checkout category_ids="27,11,45"]
Template Attribute
↑ Back to topTo give you control over how product selection fields are displayed, One Page Checkout uses templates. You can use the template shortcode attribute to select either a built-in or custom template.
Built-in Templates
To use a built-in template, include the slug of that template within the template attribute. The available templates (and their slugs) are:
- Product List:
product-list - Product Table:
product-table - Single Product:
product-single - Pricing Table:
pricing-table
Example usage: [woocommerce_one_page_checkout template="pricing-table"]
Custom Template
To use a custom template, you can either:
- use the slug of the template as the
templateattribute’s value if it is located in your theme’s /woocommerce/checkout/ template directory - use the full path of the template as the
templateattribute’s value if it is located somewhere else in your theme’s /woocommerce/ template directory
More information on creating custom templates can be found in the Creating Custom Templates section below.
Example Usage
To use a template located in the default /woocommerce/checkout/my-pricing-table.php:
[woocommerce_one_page_checkout template="my-pricing-table"]
To use a template of the same name located in a custom /woocommerce/my-templates/ folder:
[woocommerce_one_page_checkout template="my-templates/my-pricing-table.php"]
Product Selection Templates
↑ Back to topOne Page Checkout includes a number of templates for displaying the product selection fields at the top of the checkout form.
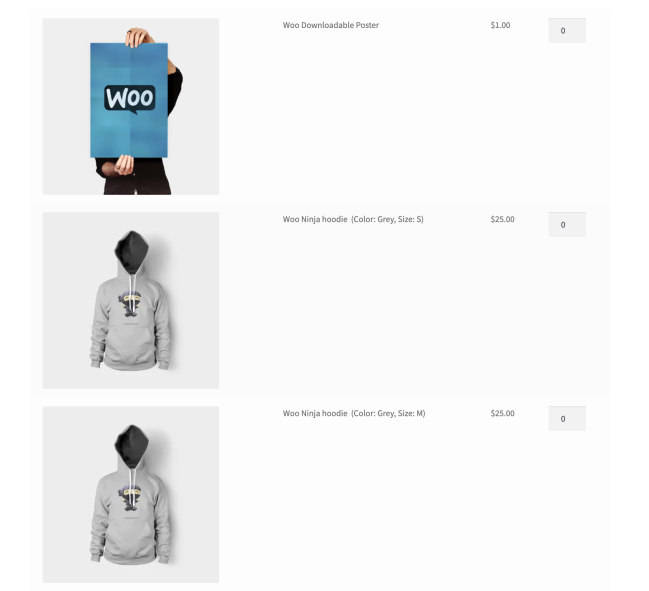
Product Table template
↑ Back to topThe Product Table template displays a row for each product containing its thumbnail, title and price. The style is based on the table displayed by default on the cart page.
This template is best for displaying a few products where the product images are helpful for making a choice, for example a set of halloween masks.
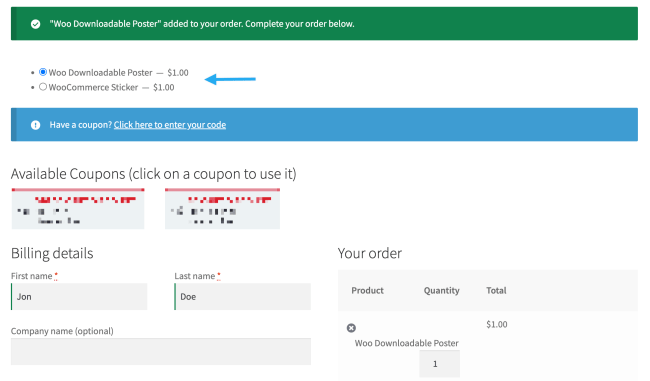
Product List template
↑ Back to topThe Product List template displays a list of products with a radio button for selecting an option.
This template is useful when the customer does not need a description or photograph to choose which product to purchase, for example, different versions of an eBook.
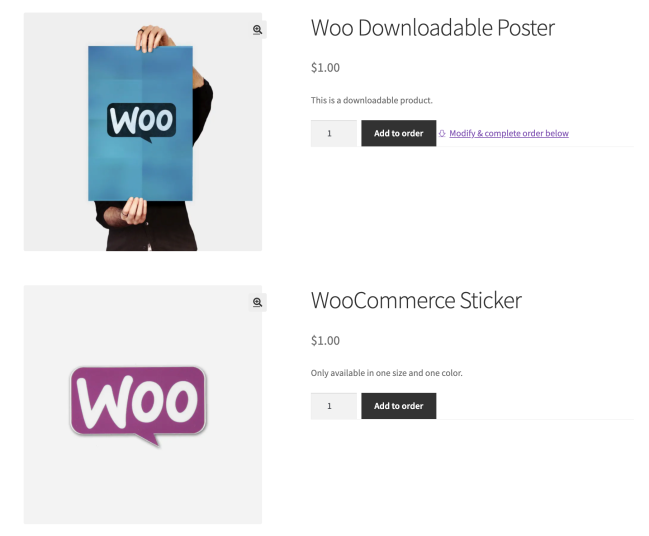
Single Product template
↑ Back to topThe Single Product template displays each product in a very similar way to the standard product page of your site. This means it includes the product’s short description, images, gallery and other meta data.
Despite its name, the Single Product template can be used to display two or more products. The name of the template is based on WooCommerce’s Single Product template, which this template builds on. It is not named this way because it is limited to displaying only one product.
This template is suitable for displaying one or two products on a page and providing product information in the product selection fields, rather than custom content before the shortcode.
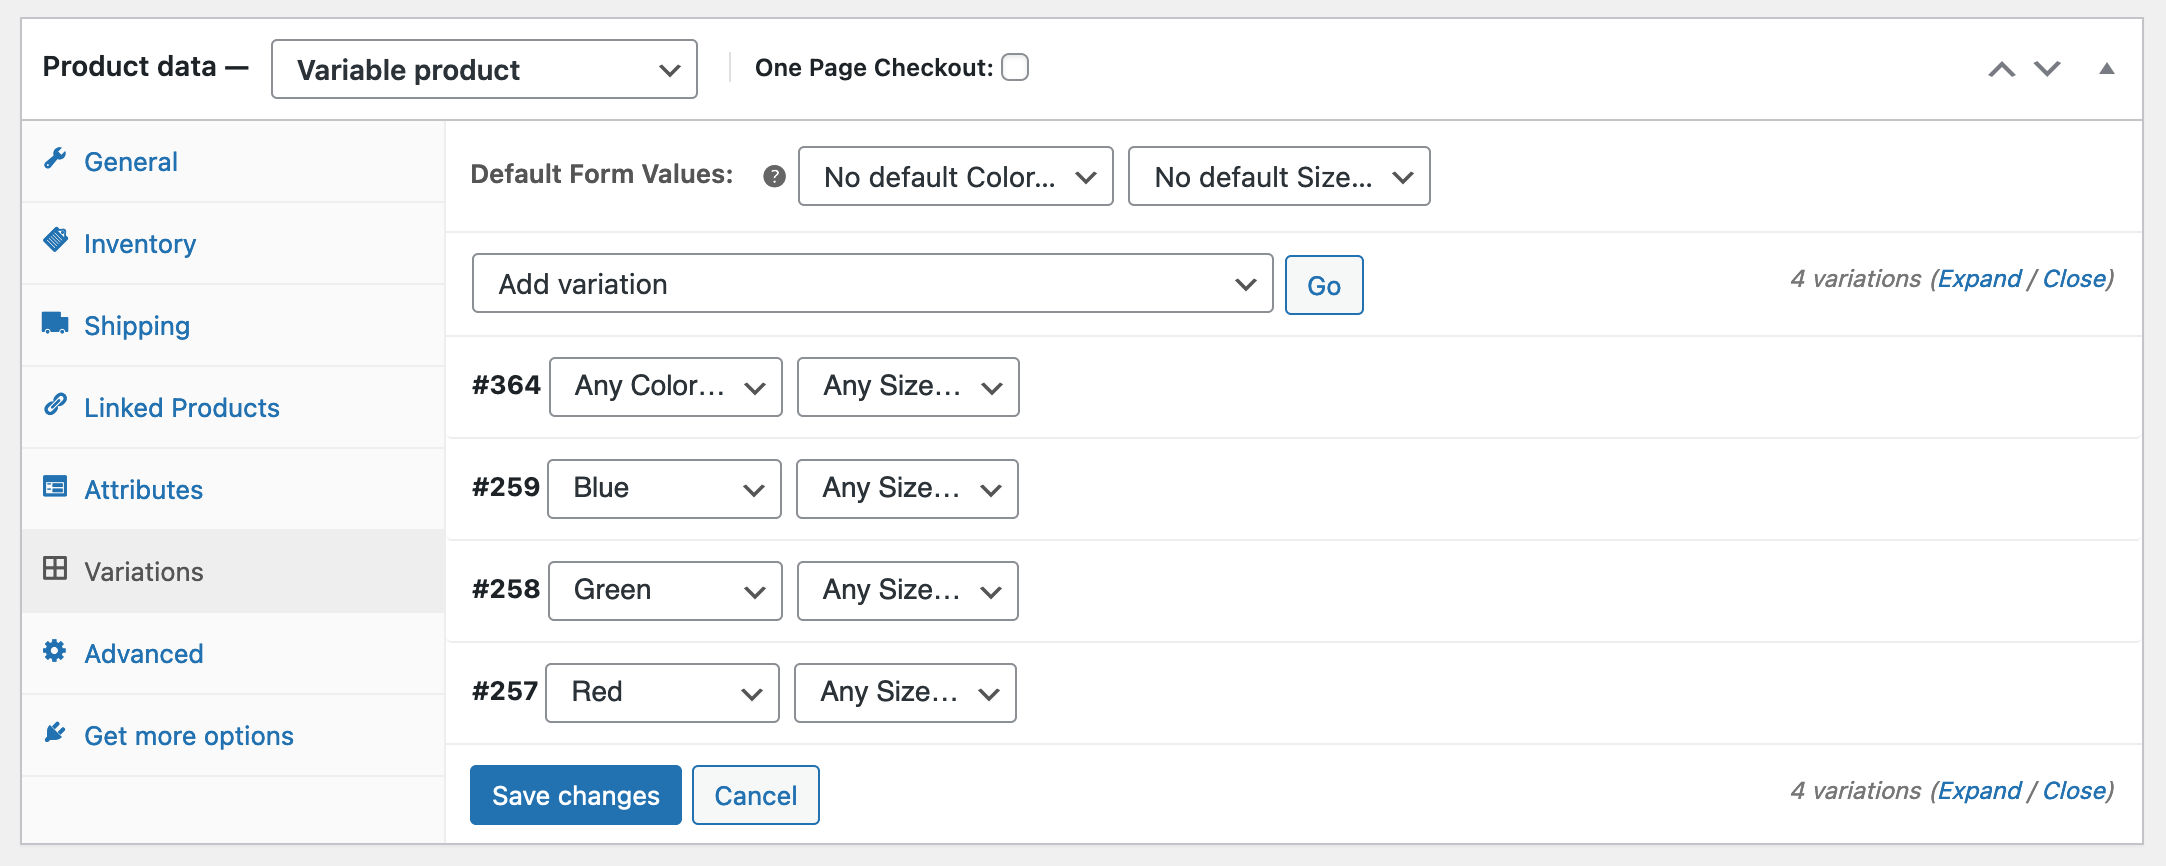
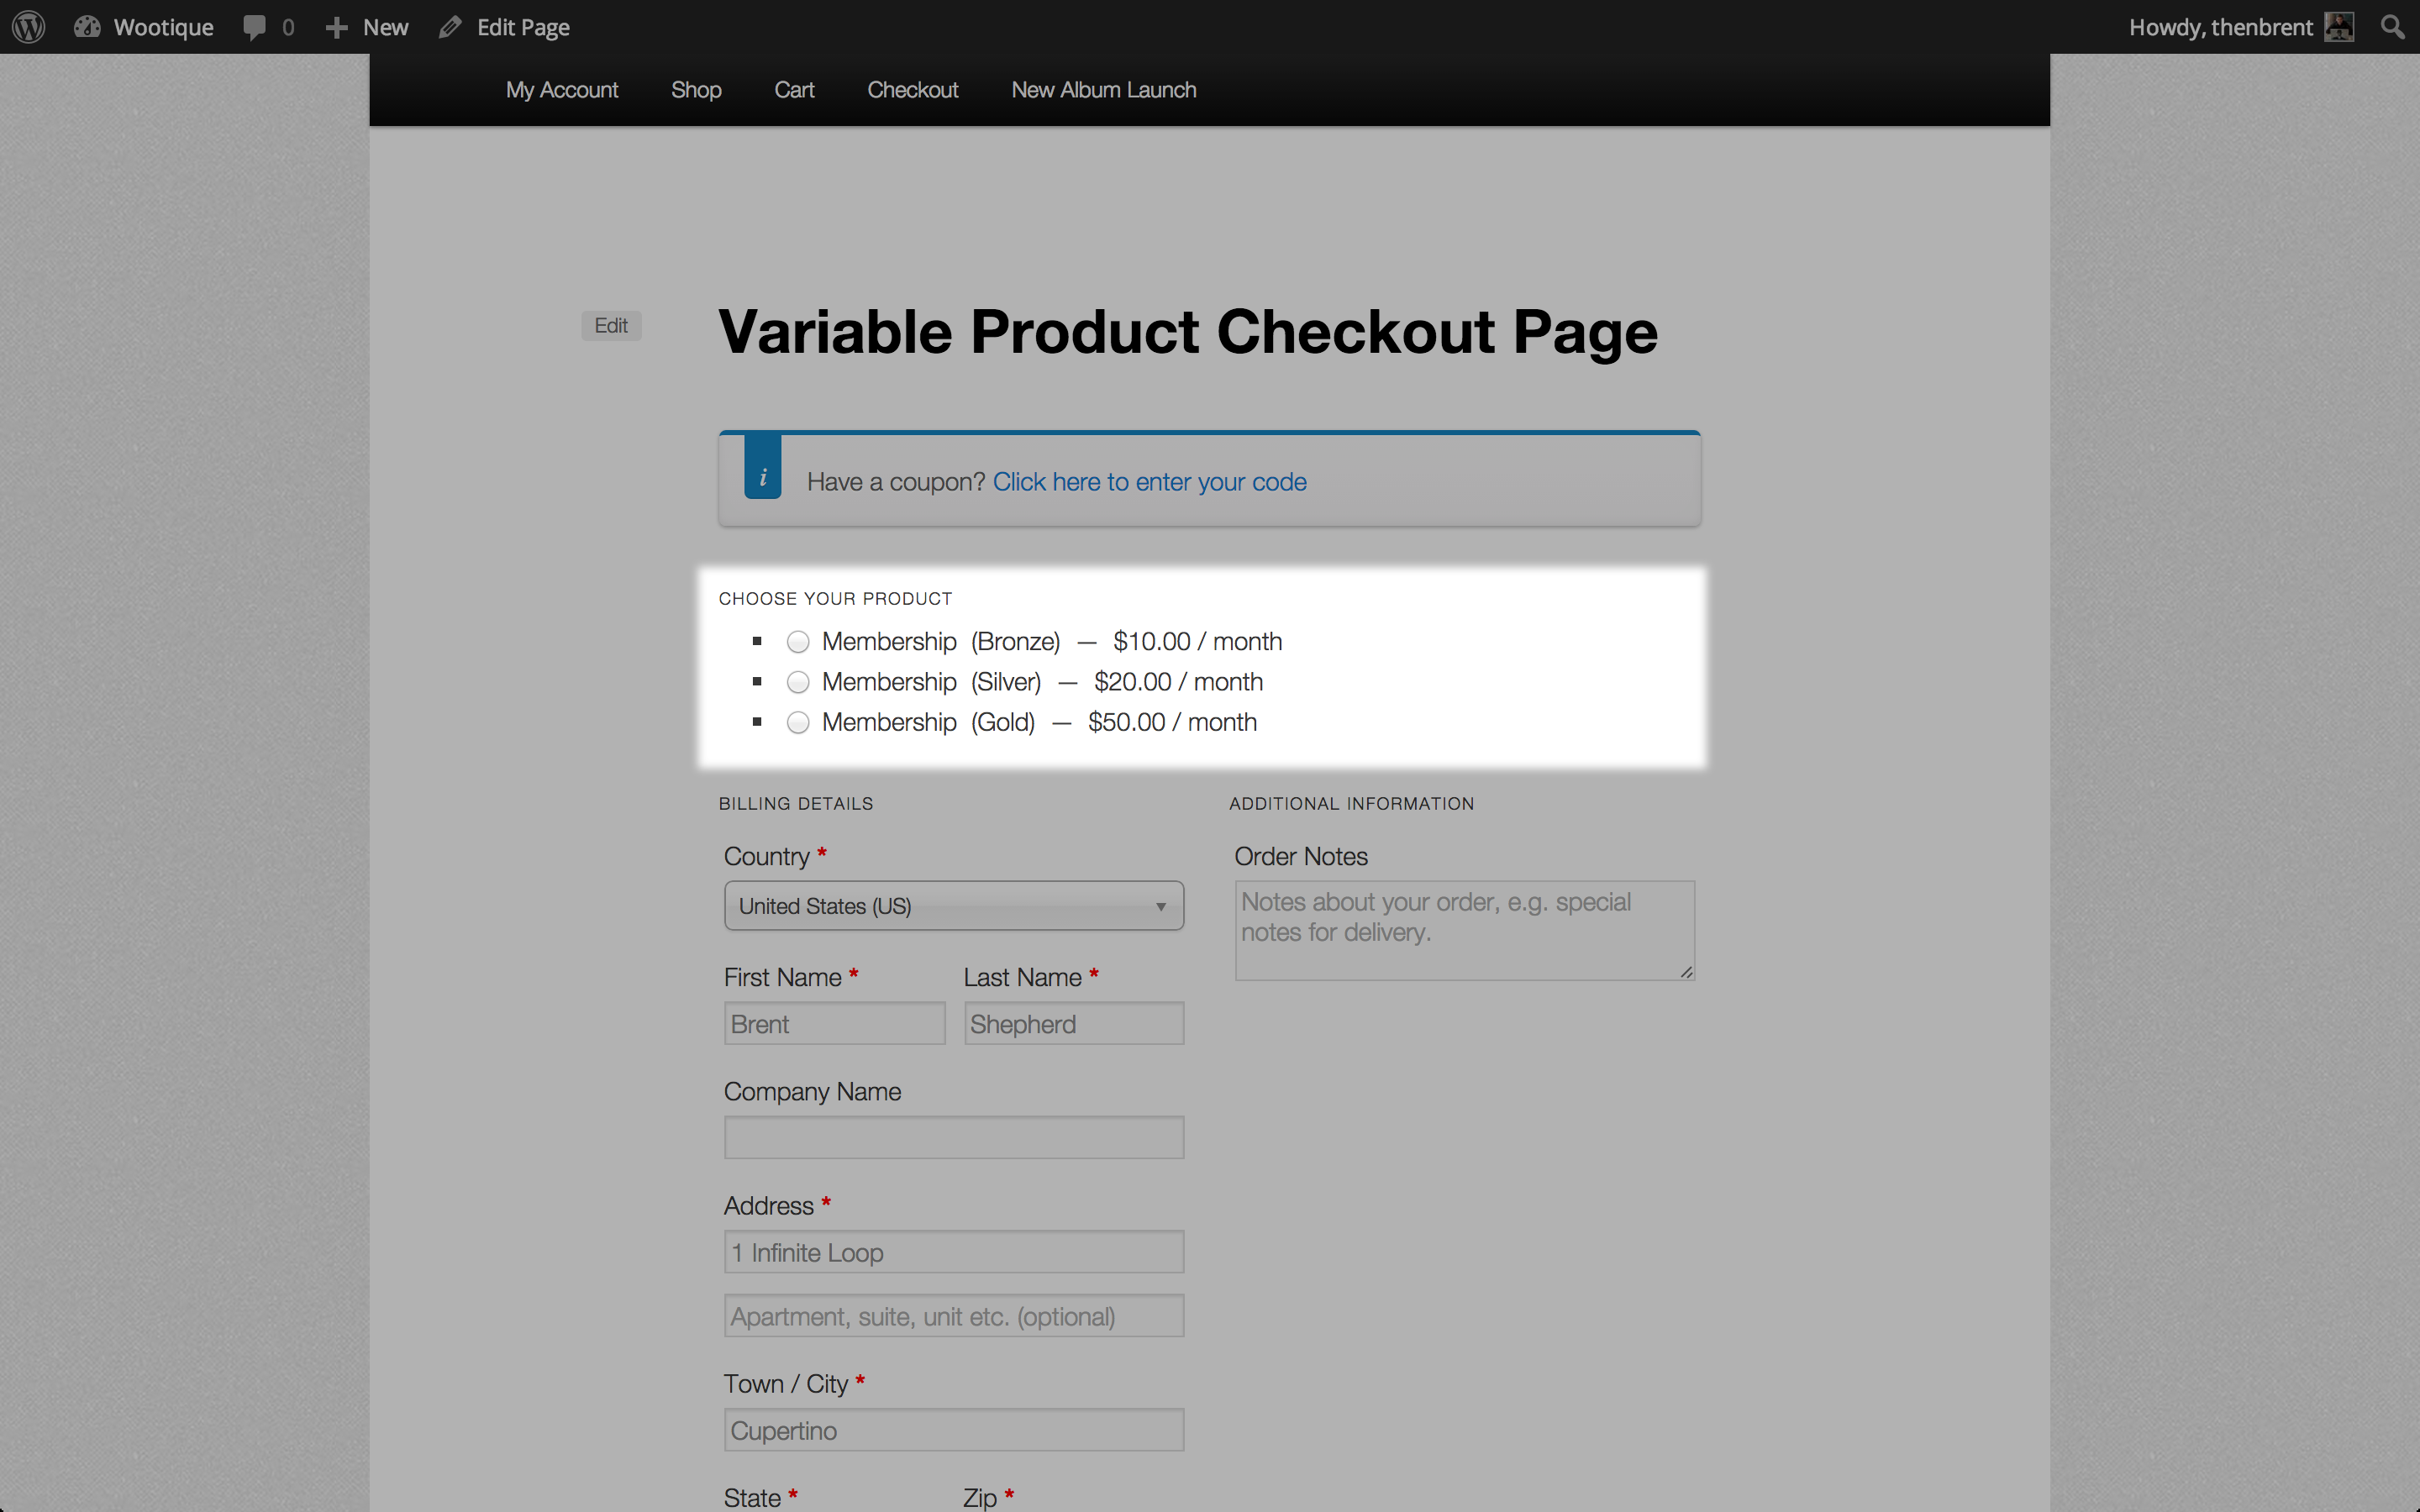
Single Product template for Variable Products
The Single Product template is also the only template to display the select boxes which allow a customer to choose different variations of a variable product. Other templates display each individual variation separately. The Single Product template will display the variable product, not the individual variations.
Because of this, if you have a variable product with a large number of variations, this is the best template to use.
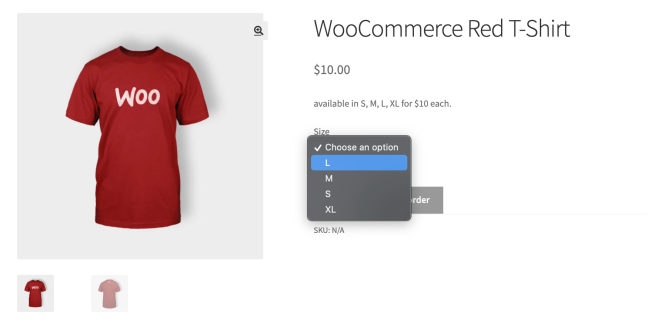
This is also the only template which allows a customer to select a variation which does not have all attributes set. For example, if a variable product has a Size attribute, you can set the variations to use Any Size to allow the customer to choose from a large number of sizes without you having to create a variation for each size.
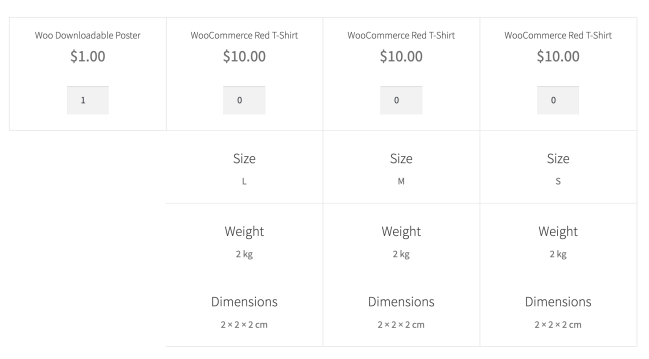
Pricing Table template
↑ Back to topThe built-in pricing table display products in a 2 to 5 column table with the product’s title, price and add to order input at the top, followed by the product’s attributes. If the products have a shipping weight and dimensions, these will also be displayed at the base of the table.
Configuring Attributes for the Pricing Table
The built-in pricing table template displays a list of each product’s attributes to make it possible to display each product’s features.
Both taxonomy attributes and custom product attributes will be displayed in the pricing table. Custom product attributes are easier to setup and configure for the pricing table. Taxonomy attributes are easier to maintain, especially if a lot of products will use the same attributes.
The attribute’s name will be displayed as a heading, and each of the attributes values will be displayed as a list item.
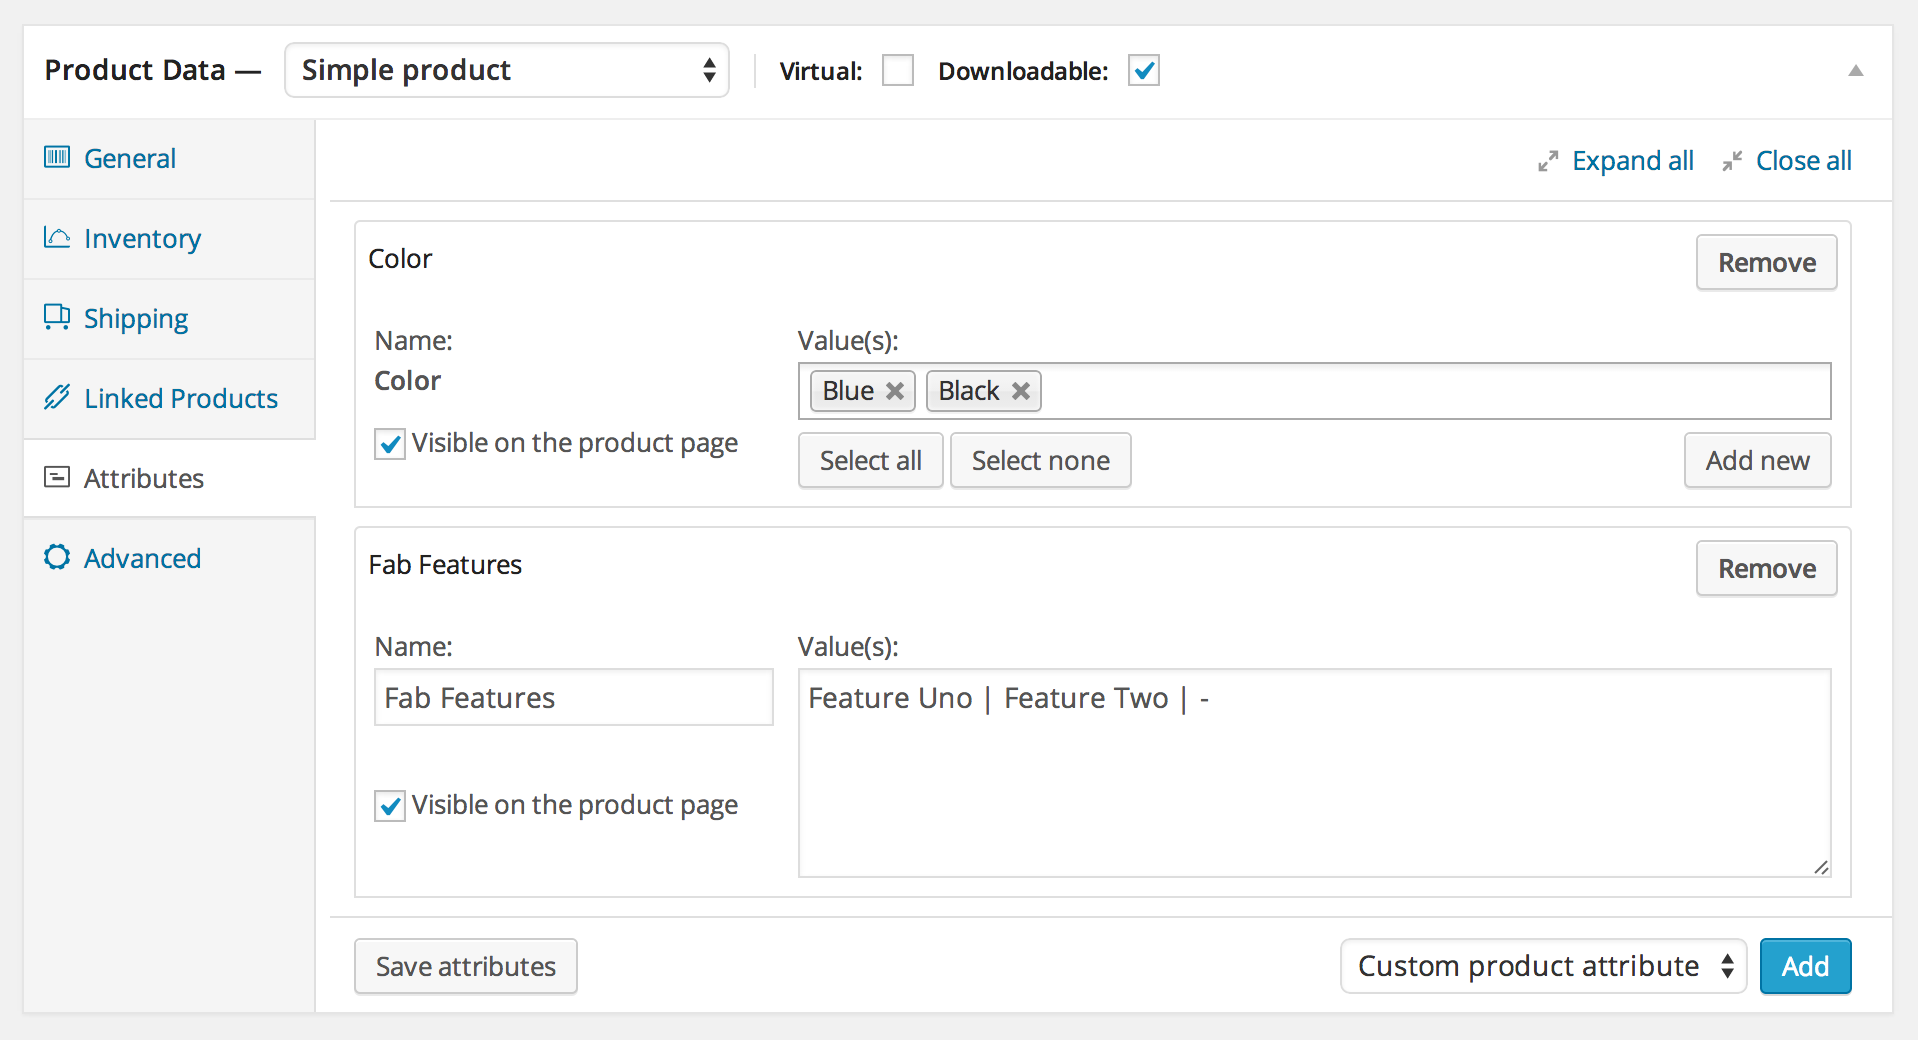
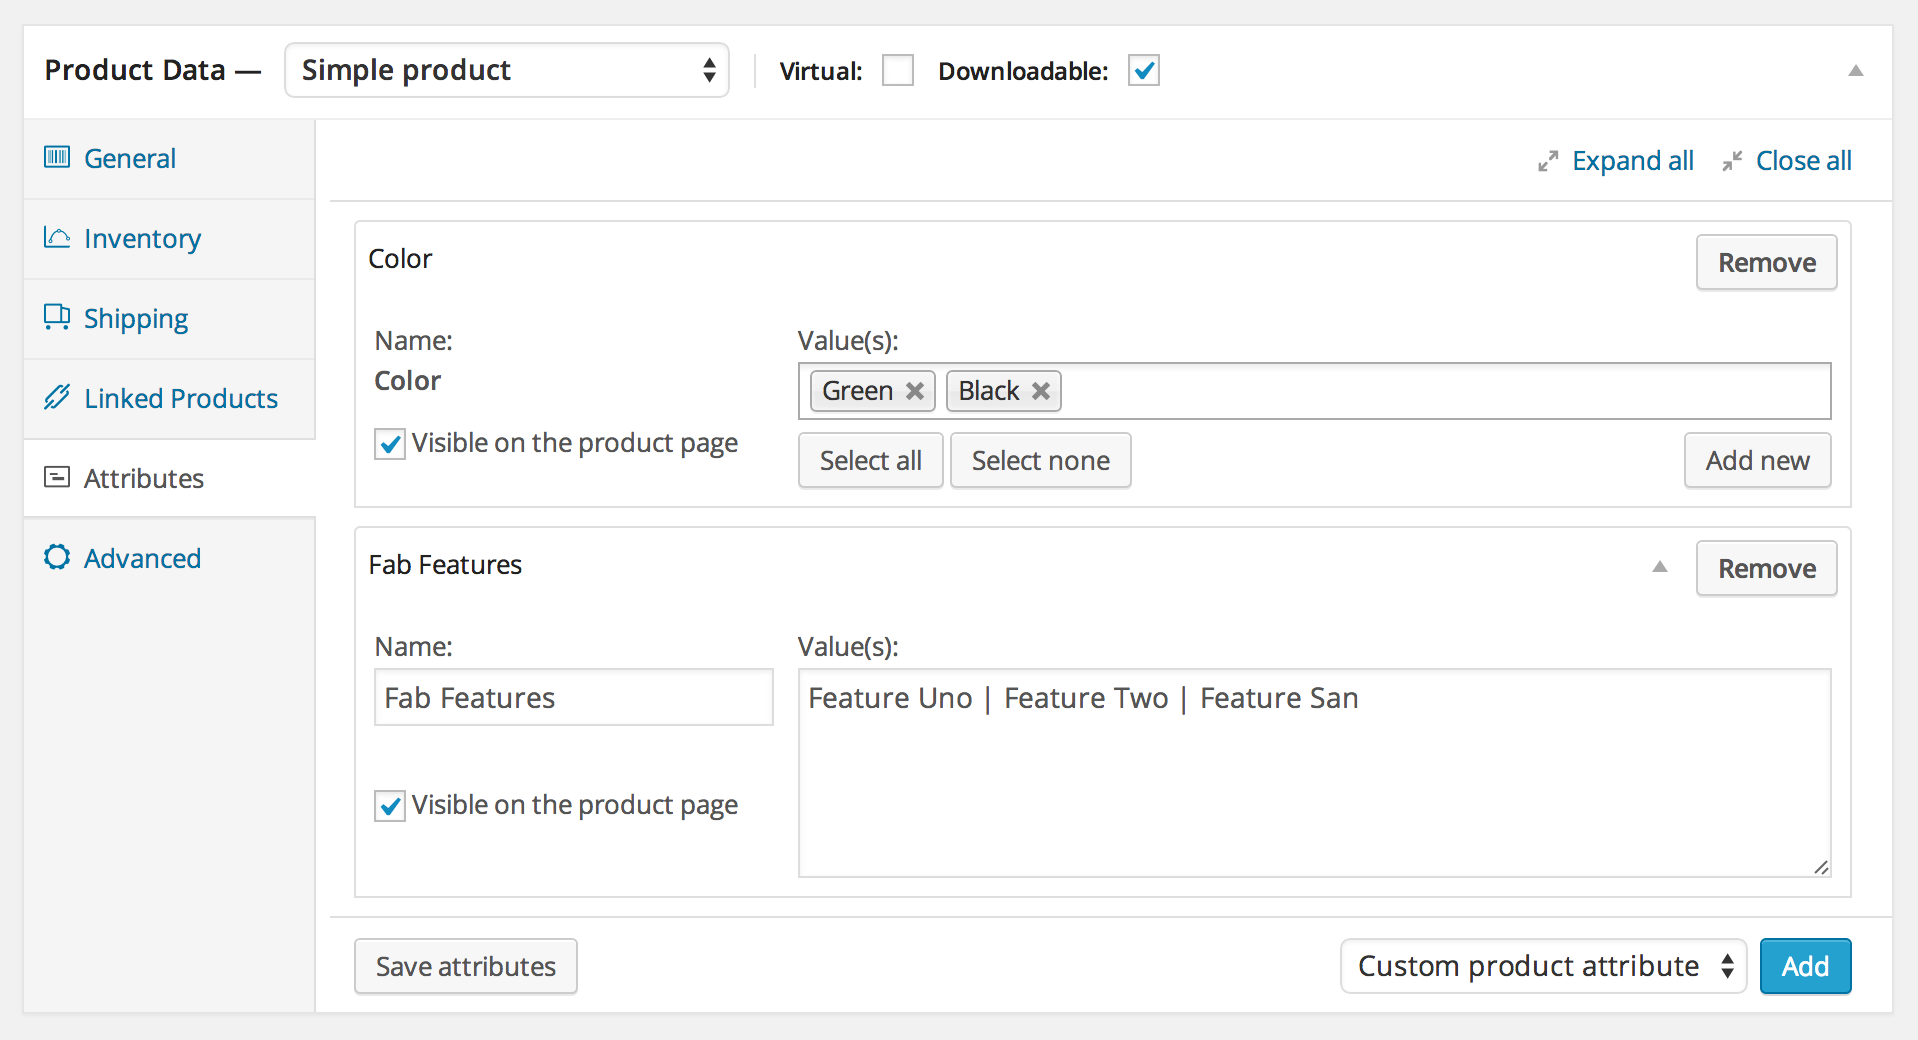
For example, the pricing table shown below displays two product attributes:
- Color: a taxonomy attribute
- Fab Features: a custom product attribute
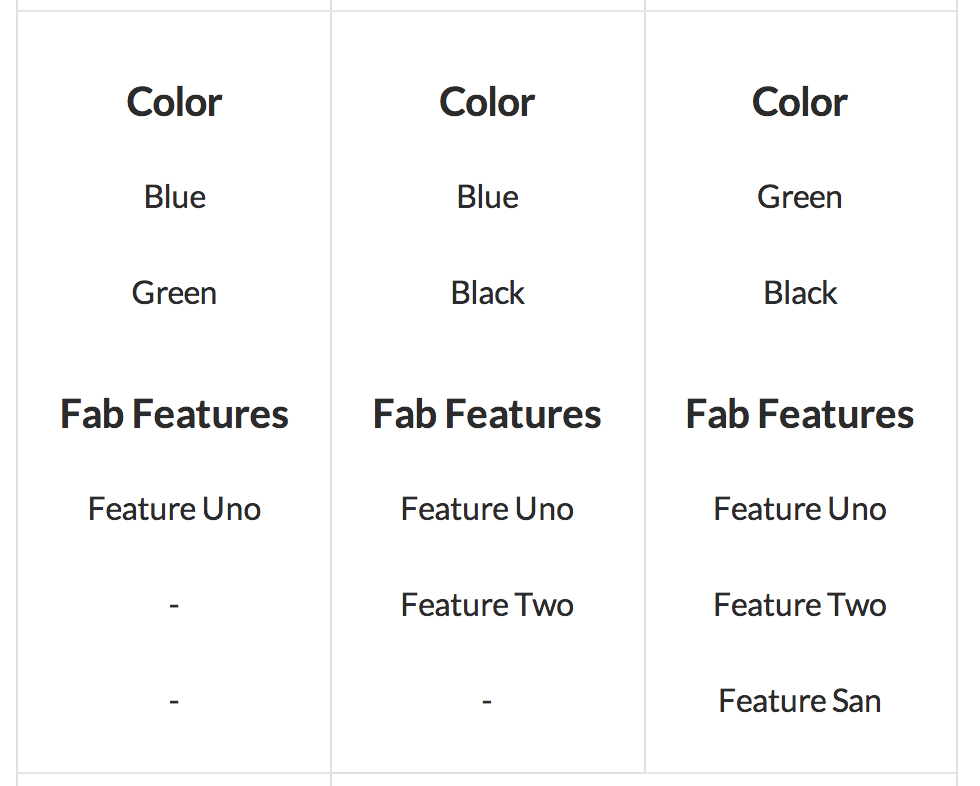
Each product has two colours, although not all three products have the same colour combinations. Each product also has a set of features, though only the product in the third row has all three features, while the product in the first row only has one.
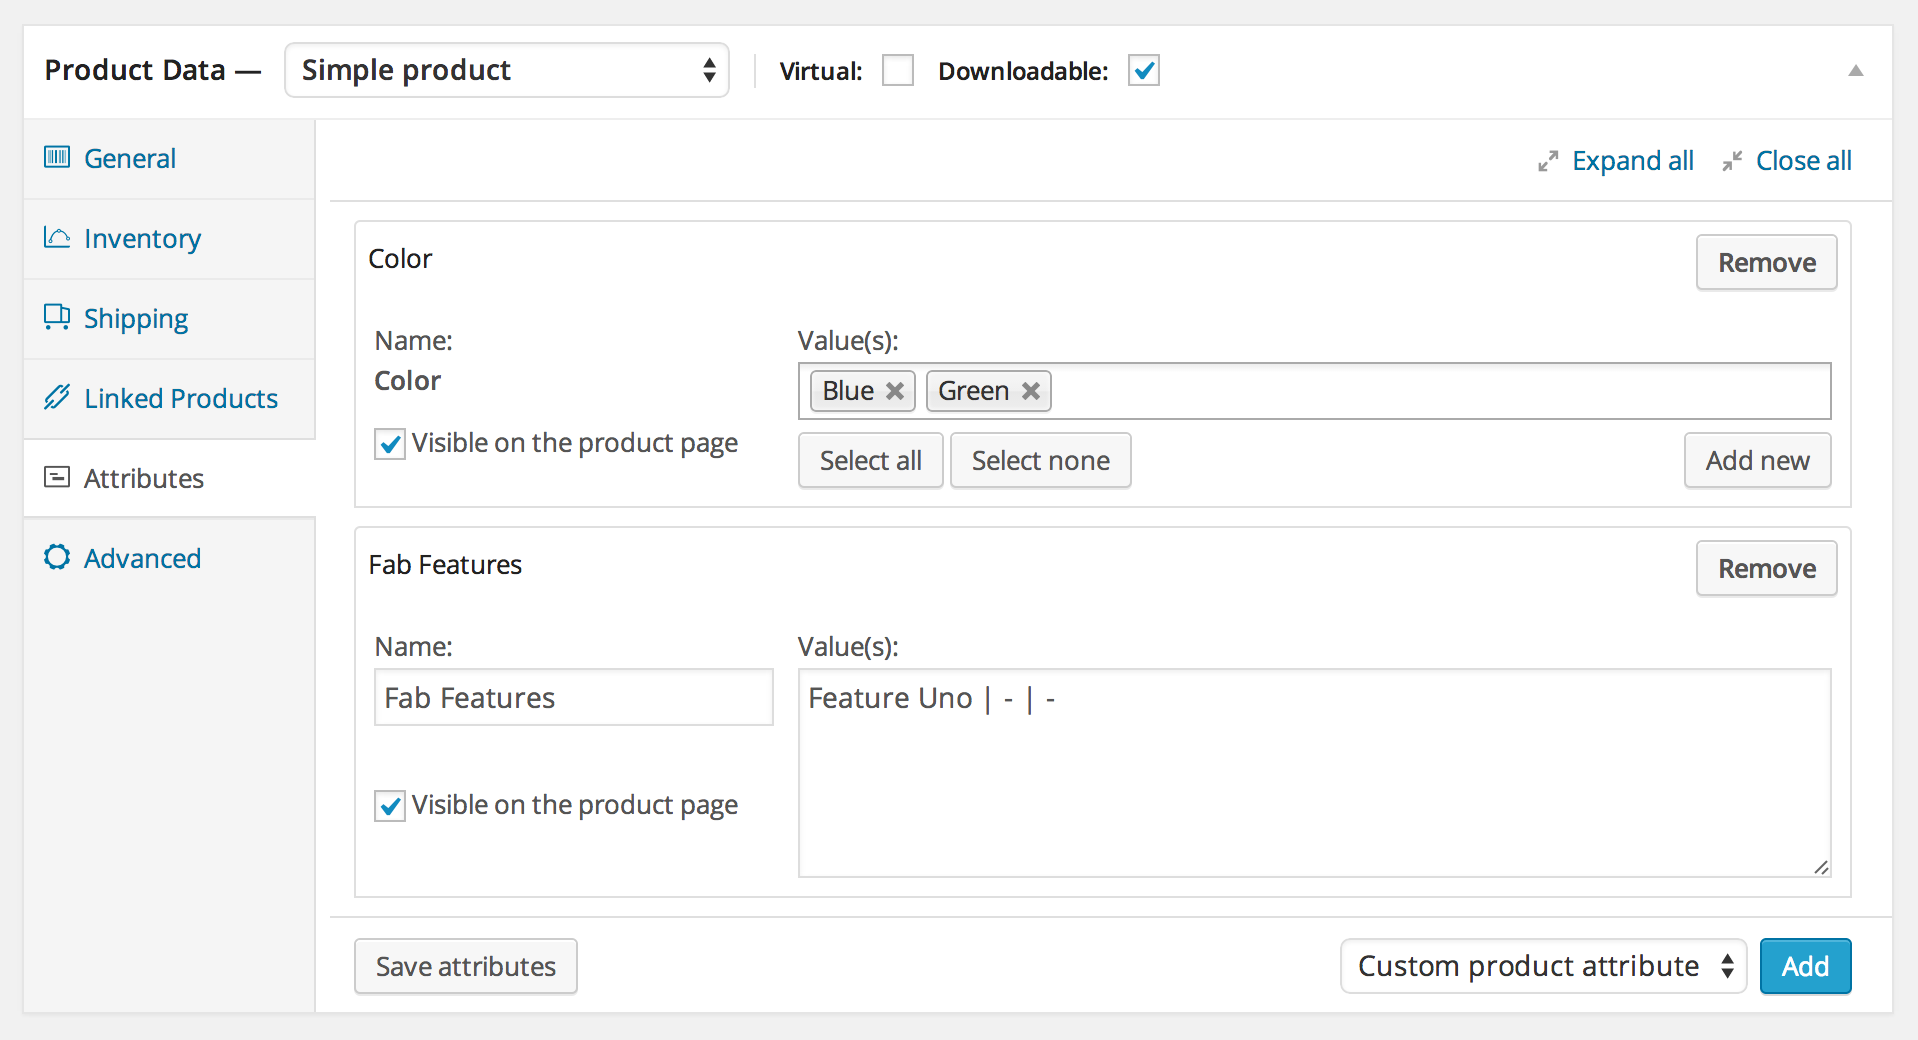
The attributes used to setup this pricing table are shown below. Notice how a dash (-) is used in the first and second product’s custom attributes to display a dash in the pricing table.
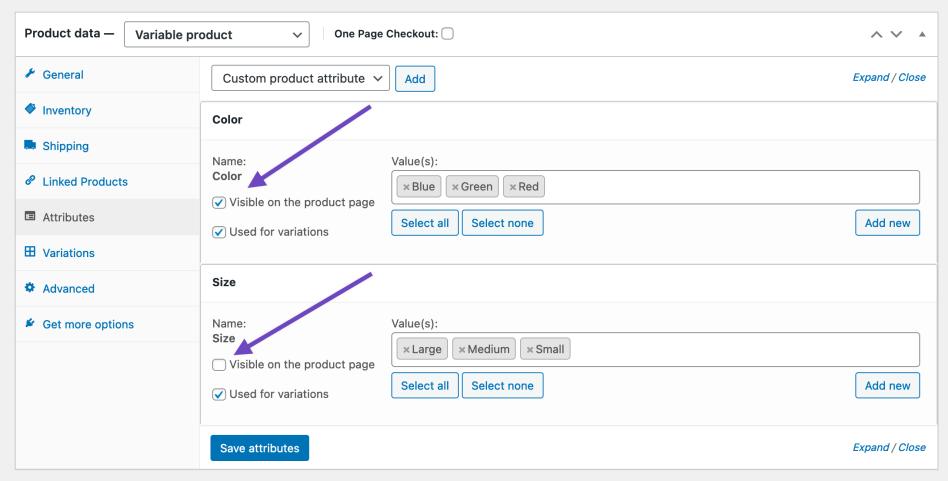
Visibility of Attributes on the Pricing Table
It is possible to choose which attributes to display on the pricing table using WooCommerce’s built-in Visibility setting for attributes.
To display attributes in the pricing table:
- Go to: Edit Product
- Click Attributes tab of the Product Data meta box
- Click Visible on the product page checkbox
- Save the product
To hide attributes from the pricing table, keep the Visible on the product page box unchecked.
Easy Pricing Table template
↑ Back to topThe extension also supports the free Easy Pricing Tables plugin and the premium Easy Pricing Tables plugin (both by FatCatApps).
There are two ways to use a pricing table with One Page Checkout:
- use the Easy Pricing Table template; or
- include an Easy Pricing Table shortcode in the page content.
Easy Pricing Table Template
To use the Easy Pricing Table product selection template, set the template shortcode parameter to be "easy_pricing_table" and include the pricing table’s ID using a easy_pricing_table_id shortcode attribute, for example:
Example Usage:
[woocommerce_one_page_checkout template="easy_pricing_table" easy_pricing_table_id="454"]
Easy Pricing Table Shortcode
If you wish to use a Pricing Table Toggle or some other complex pricing table that includes more than one pricing table on the page, you need to manually insert the pricing table or pricing toggle shortcode into the page’s content above the One Page Checkout shortcode.
You should also include no product_ids or template attribute on the One Page Checkout shortcode so that it displays only the checkout fields.
Example Usage:
[easy-pricing-toggle default_pricing_table_id="130" default_title="Annual" default_subtitle="Buy Yearly, Save 20%" alternate_title="Monthly" alternate_subtitle="Pay monthly" alternate_pricing_table_id="136" font_color="#3D9CD2" background_color="#3D9CD2" border_color="#efefef" ]
[woocommerce_one_page_checkout]
Creating Custom Product Selection Templates
↑ Back to topAs mentioned above, the One Page Checkout shortcode includes a
template attribute to determine which template to use for displaying product selection fields.
You can create custom product selection templates to customise the display of products on your single page checkout.
To create a custom template, you need to:
- Create a file in your theme’s /woocommerce/checkout/ templates directory
- Use HTML and PHP to display the products passed to the template
- Make sure there is an input field for each product with the product’s ID as a data attribute
- Register your template with One Page Checkout using the
'wcopc_templates'filter
Create a Template File
↑ Back to topOne Page Checkout conforms to the WooCommerce Template Structure.
To create a custom One Page Checkout product selection template, create a file within your theme’s directory of the form: /templates/checkout/{template-name}.php where {template-name} is replaced with the name of your template, for example my-pricing-table.
Display Products for Selection
↑ Back to topOne you have created a template file, you need to add the markup and PHP to the template to display each of the products for that page.
Before beginning to develop your template, review one or two of the built-in templates. These examples will give you a quick overview of the requirements for a custom template and help illustrate the information discussed in this section.
Product Loop
Your template will receive an array of products to display. Your template should loop over this array to display each of the products.
The products are passed in a variable named $products with each of the elements representing a product object, for example, WC_Product_Simple, WC_Product_Variation or WC_Product_Subscription.
As these objects are standard WooCommerce product classes, they include all the standard data and methods of a product object to use in the template, for example WC_Product::get_title().
Extra Data
The product objects passed to your template also include a few extra pieces of data useful for the template. These include:
$add_to_cart_id– the ID of the product for adding to the cart. This will be either$product->variation_idfor a product variation or$product->idfor a simple product.$in_cart– a boolean value indicating whether the product is already in the cart or not. This is useful for pre-checking input values on page load.$cart_item– if the item is in the cart, the cart item’s data is included here. This is useful for pre-filling quantity inputs on page load.
Selection Fields
↑ Back to topTo select a product, the customer needs a selection field. One Page Checkout supports button, radio, checkbox, a and number elements for input.
Built-in Template Parts
The easiest method for adding selection fields to your template is to use a built-in template parts.
For example, to display a button for adding/removing an item from the cart, include the following line of code:
<?php wc_get_template( 'checkout/add-to-cart/button.php', array( 'product' => $product ), '', PP_One_Page_Checkout::$template_path ); ?>
Similarly, to include a quantity input, use the following code:
<?php wc_get_template( 'checkout/add-to-cart/quantity-input.php', array( 'product' => $product ), '', PP_One_Page_Checkout::$template_path ); ?>
The same can be done for radio or checkbox inputs.
Custom Product Selection Fields
You may notice the built-in templates include a data-add_to_cart attribute on each product selection field.
This attribute is used by One Page Checkout to identify product selection fields and handle the addition or removal of the item to or from the order.
Therefore, to create a custom product selection field, you need to ensure that you include a data-add_to_cart attribute in your template, and that the value of that attribute is the $product->add_to_cart_id property of the product.
By using the built-in template parts for product selection input fields, this value will be automatically set.
Register your Template
↑ Back to topOnce you have created a template and it displays the product, you can use it on a page by including it within the shortcode’s template attribute by including the file name (either with or without the .php extension).
You can also register the template with One Page Checkout to have it display in the list of templates included with the graphic interface for creating the One Page Checkout shortcode.
To register your template, attach a callback to the 'wcopc_templates' filter and add a new array of your template’s details to the $templates array passed to your function.
For example, to register a custom pricing table template, the code would be similar to:
<?php
function eg_add_opc_template( $templates ) {

    $templates['my-custom-pricing-table'] = array(
        'label'       => __( 'My Pricing Table', 'eg' ),
        'description' => __( "Display a sophisticated and colourful pricing table with each product's attributes, but not weight or dimensions.", 'eg' ),
    );

    return $templates;
}
add_filter( 'wcopc_templates', 'eg_add_opc_template' ) );
?>
The key used in the $templates array should be the template’s file name (excluding the extension). The label element of the array is the name displayed on the One Page Checkout dialog. The description element is used for the tooltip next to the template’s name.
Extension Compatibility
↑ Back to topThese extensions have been tested and are compatible with WooCommerce One Page Checkout based on the different Product Selection Templates:
| Extension | Single Product | Product Table | Product List | Pricing Table | Easy Pricing Tables |
| Account Funds | ✔ | – | – | – | – |
| Bookings | ✔ | – | – | – | – |
| Chained Products | ✔ | ✔ | ✔ | ✔ | ✔ |
| Checkout Field Editor | ✔ | ✔ | ✔ | ✔ | ✔ |
| Composite Products | ✔ | – | – | – | – |
| Min/Max Quantities | ✔ | ✔ | ✔ | ✔ | ✔ |
| Name your price | ✔ | ✔ | – | ✔ | – |
| Postcode/Address Validation | ✔ | ✔ | ✔ | ✔ | ✔ |
| Product Add-ons | ✔** | – | – | – | – |
| Product Bundles | ✔ | – | – | – | – |
| Smart Coupons | ✔ | ✔ | ✔ | ✔ | ✔ |
| Subscriptions | ✔ | ✔ | ✔ | ✔ | ✔ |
| Table Rate Shipping | ✔ | ✔ | ✔ | ✔ | ✔ |
| WooCommerce Checkout Add-ons | ✔ | ✔ | ✔ | ✔ | ✔ |
| WooCommerce Deposits | ✔ | – | – | – | – |
Because WooCommerce One Page Checkout uses a custom template for product selection fields, it will reduce the out-of-the-box compatibility with many other extensions.
If you want One Page Checkout to work with another extension, please submit an idea to our Ideas Board to let us know. The popularity of requests will determine the priority for adding support.
Payment Gateway Extension Compatibility
↑ Back to topWooCommerce One Page Checkout should work with any WooCommerce payment gateway extension that uses the normal WooCommerce payment section.
One Page Checkout Settings screen
↑ Back to topAuto-Scroll
↑ Back to topAuto-scroll is enabled by default, but there is a setting to allow store managers to disable the automatic scroll (re-focusing) that occurs when adding a product to the cart on a One Page Checkout page.
This setting can be found in your WooCommerce settings at: WooCommerce > Settings > One Page Checkout.
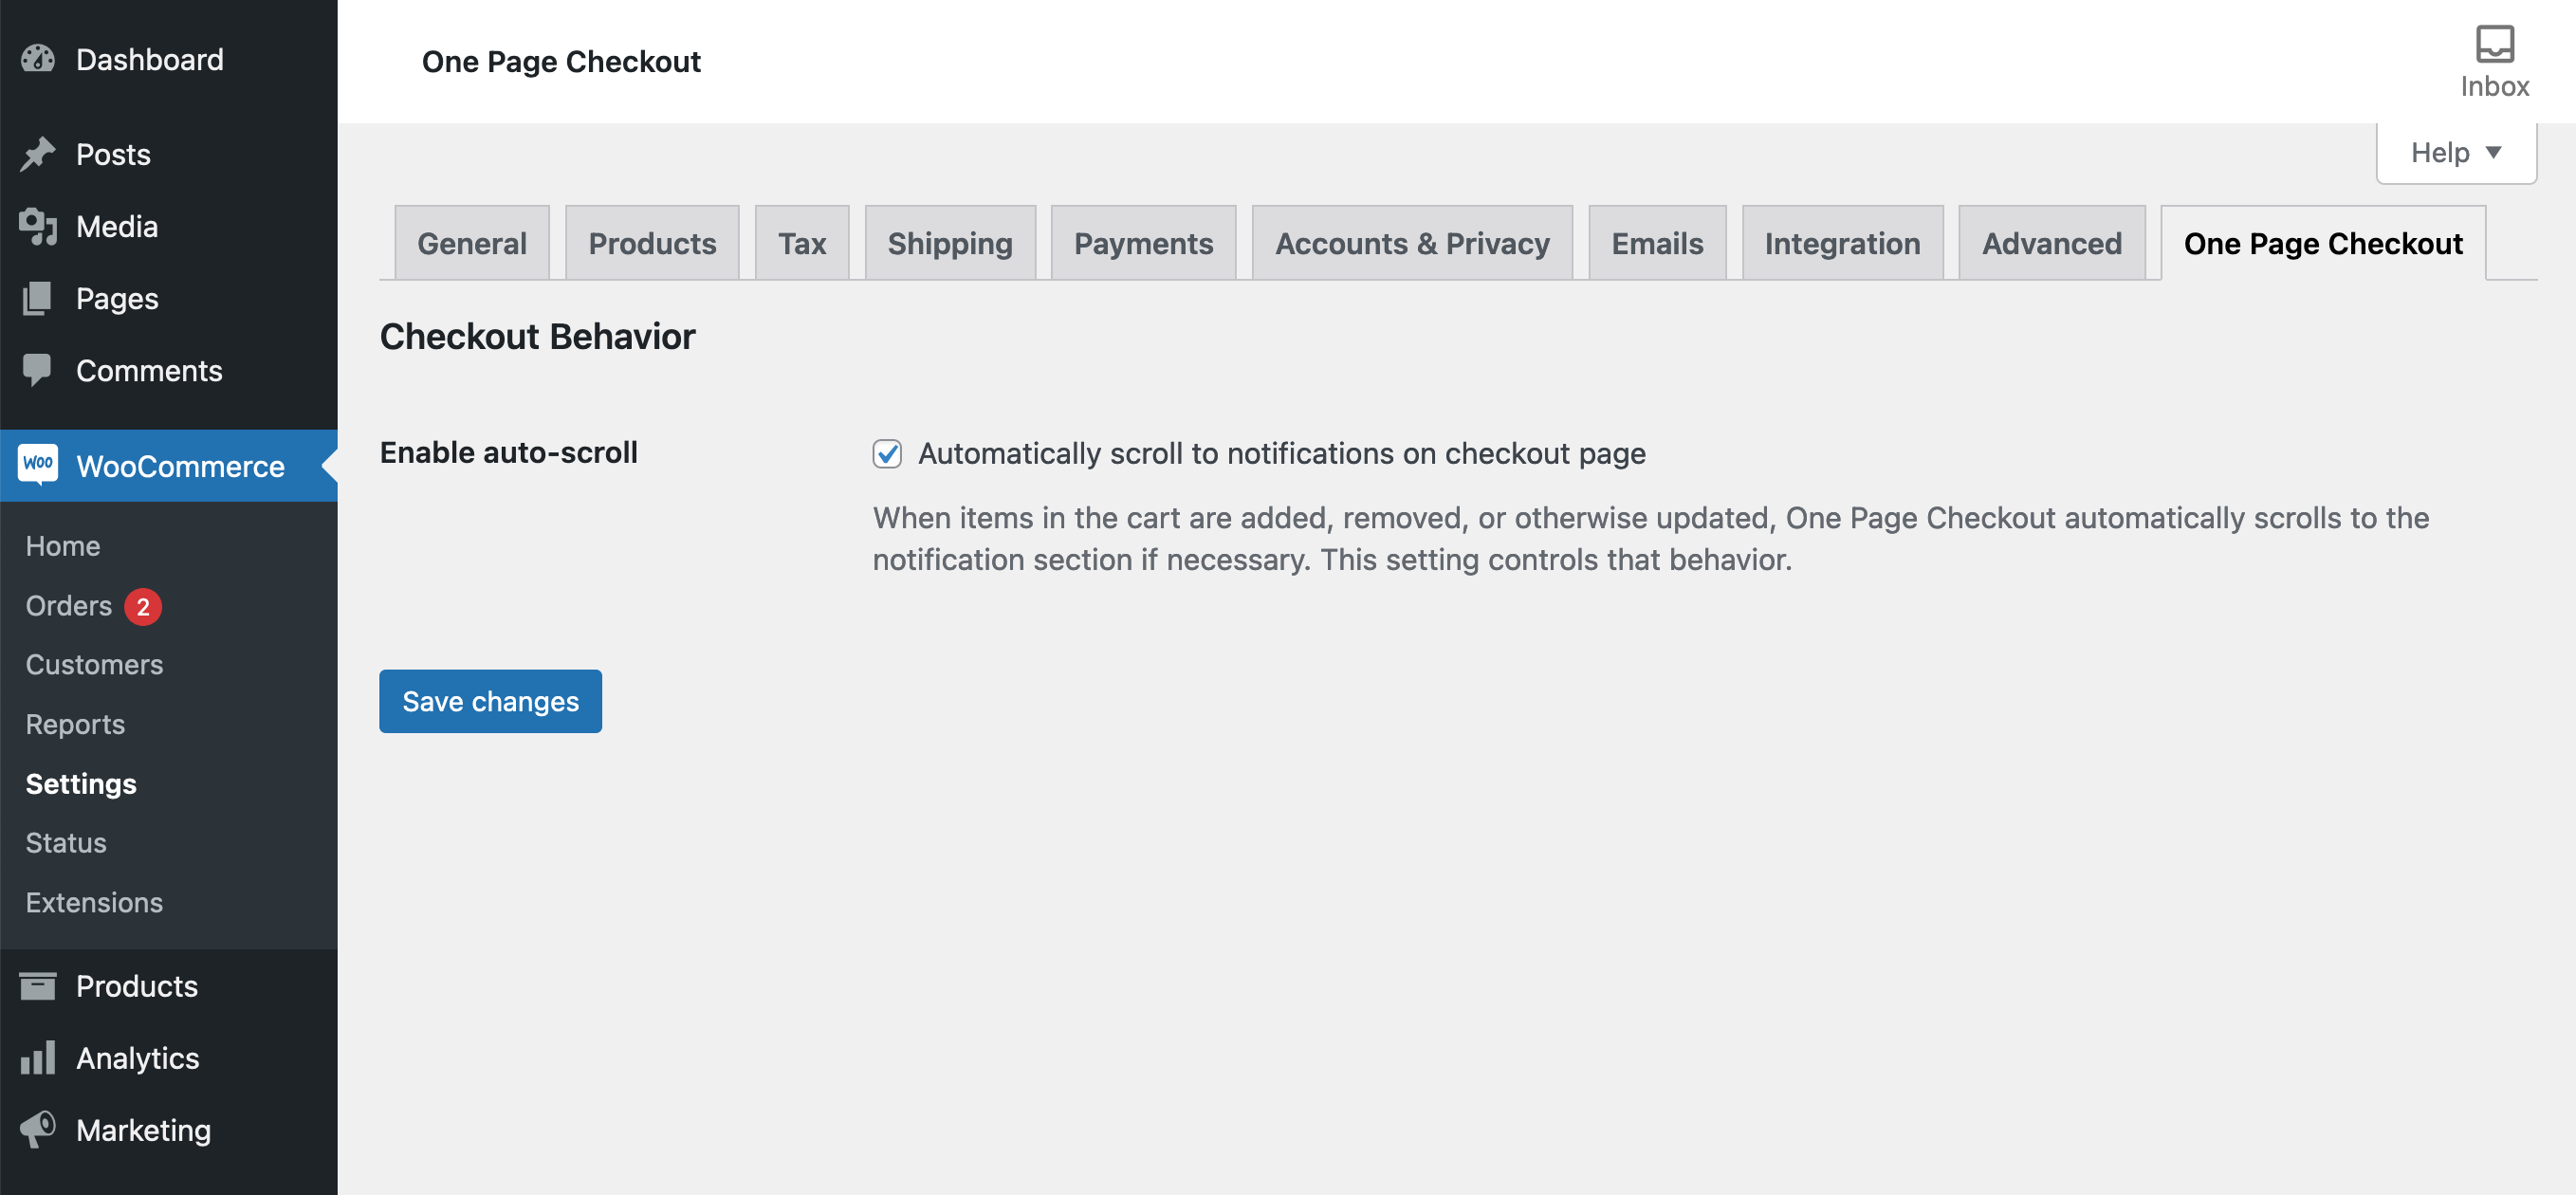
If the box is unchecked, One Page Checkout pages will no longer auto-scroll when adding a product to the cart. Once a product is added to the cart on the One Page Checkout page, the page will not automatically scroll to the notices that are populated at the top of the page. Instead, the notices will still appear on the page, but the user will not be automatically scrolled to view them.
By leaving this box checked, One Page Checkout pages will continue to auto-scroll when adding a product to the cart. Once a product is added to the cart on the One Page Checkout page, the page will automatically scroll to the notices that are populated at the top of the page. The notices will display whether the product has or has not been added to the cart for purchase.
FAQ
↑ Back to topCan I include other content on the page?
↑ Back to topYes! If you include content above or below the shortcode, that content will be displayed on the checkout page normally. Remember that any content below the shortcode will render after the checkout fields.
You can include video, images, text/HTML and any other content you would normally display on a post or page.
How can I customize the checkout form?
↑ Back to topYour theme’s default checkout template will be used to display the checkout fields on any page or post with One Page Checkout shortcode.
You can add or remove fields on the checkout form with a custom checkout template, or a WooCommerce extension, like Checkout Field Editor.
Why do some products have an Add to Order button while others have quantity input?
↑ Back to topThe built-in templates decide whether to display the add to order button or a quantity input based on whether the product is set to be Sold Individually on the Inventory Tab.
If the product is sold individually, then a button input is used (as only one of these products can be added to each order). If the product is not set to be sold individually, then the WooCommerce quantity input is displayed to allow the customer to add larger quantities of the product to their order.
Set a product to be sold individually (and therefore, display a button rather than quantity input) on the Inventory Tab of the Edit Product screen.
How are Variable and Grouped products displayed?
↑ Back to topWith the exception of the Single Product template, the built-in product selection templates currently only support displaying individual products. For product containers, which include multiple different products, like Variable Products or Grouped Products, each individual child product will be displayed separately.
Similarly, if you add a Grouped product, each of the Simple products grouped within that product will be displayed separately (e.g. as a separate row in the table).
From One Page Checkout version 1.1 onwards the Simple Product template displays variable products with select boxes for the customer to choose a variation, like the normal single product template bundled by default with WooCommerce. Because of this, it can not be used to display a single variation and instead, the containing Variable Product must be displayed.
The images below show a variable product added to the One Page Checkout shortcode and displayed as separate variations using the Product List template (which appends each variation’s attributes to the product title).

Why aren’t my variations displaying?
↑ Back to topIf you add a variable product to a shortcode using a template other than the Single Product template, each of its variations will be displayed individually. For example, as a separate column in the Pricing Table template or a separate row in the Product Table template.
Because of this, only variations which have a value set for all attributes can be displayed in these templates.
A variation with an attribute value left unset does not have a corresponding variation ID and therefore, needs to be chosen by the customer by selecting the specific attributes on the product page. The Single Product template is the only template that allows for this.
On the other hand, if you are trying to display only specific variations using the Single Product template by entering the variations’ IDs in the shortcode, these variations will not be displayed because the Single Product template only displays Variable Products, not individual variations. If you want to display individual variations, you need to either choose a different template or you can create a distinct product with the same attributes to use with the Single Product template.
Can I insert two checkout shortcodes on one page?
↑ Back to topNo, only one shortcode will work per page.
Why don’t the product selection fields display?
↑ Back to topIf the product IDs used in the shortcode are for products that do not exist or are out of stock, no products will be displayed for selection.
Alternatively, if you are using a custom product selection field template that does not correctly display the products, the fields may not display.
Why doesn’t my custom template work?
↑ Back to topMake sure your template is in the active theme’s /woocommerce/checkout/ directory and the template name in the shortcode’s template attribute matches the file name (with or without the .php extension).
Alternatively, your template may have a bug. Make sure you have debugging setup to help with diagnosing bugs in your custom template.
Does One Page Checkout replace WooCommerce’s checkout page?
↑ Back to topNo. The WooCommerce cart and checkout pages work independently of One Page Checkout. The existing WooCommerce cart and checkout shortcodes are not affected by One Page Checkout.
The checkout page is still required. It is used to display receipt and order confirmation to customers, so you should not change the [woocommerce_checkout] shortcode or remove the checkout page. However, as you can use the One Page Checkout shortcode on any page, you can replace any links in your menus or elsewhere on your site with links to your custom checkout page.
When will shipping fields be displayed?
↑ Back to topTo determine whether shipping address fields should be displayed on the checkout form, WooCommerce One Page Checkout will inspect the products that are to be displayed on the page to see if any require shipping.
If all products include in the product_ids attribute of the shortcode are marked as virtual, then no product requires shipping and the shipping address fields will not be displayed in the checkout form.
If one or more products are not marked as virtual, then the shipping address fields will not be displayed.
How can I include add-to-cart buttons outside of One Page Checkout?
↑ Back to topTo provide your customers with the best checkout experience, you should use the built-in product selection templates. These connect with One Page Checkout to add products to the cart without reloading the page.
However, there may be times where you need to include add-to-cart buttons outside of the One Page Checkout shortcode, for example, by including it in a hero banner in your theme, or even a slider.
To create a link anywhere on the page for adding a product to the cart, you need to:
- Add the shortcode to the page without the
product_idsattribute - Add an anchor element with a special add-to-cart URL
Step 1: Add the shortcode
To add the One Page Checkout shortcode in such a way that it does not display any products, include it without the product_ids attribute, like this:
[woocommerce_one_page_checkout]This template is best for displaying a few products where the product images are helpful for making a choice, for example a set of halloween masks.
Step 2: Add the Button with Special URL
To create a button, you will need to use an anchor element (i.e. <a>) with the href attribute set to the page’s URL and ?add-to-cart={product_id} appended.
For example, on a page located at https://example.com/holiday-sale/, to create a button which adds the product with ID 123 to the cart, the HTML would look like this:
<a href="https://example.com/holiday-sale/?add-to-cart=123" class="button">Add Product to Order</a>
If you add the button class to the <a> element, WooCommerce will style it as a button, rather than an ordinary link.
Although this method will add the product to the cart, the webpage needs to reload completely to add the product, unlike buttons within a One Page Checkout product selection template, which do not require a page refresh.
Note: When you click the button, there will be no auto-scroll to the checkout form and the webpage will be reloaded.
Do I still need WooCommerce’s cart and checkout pages?
↑ Back to topYes. Although One Page Checkout allows customers to checkout on other pages, WooCommerce’s checkout page is still required to display receipt and order confirmation to customers. Some plugins and payment gateways, like PayPal Standard, also require WooCommerce’s normal checkout and cart pages to work correctly.
Your store still requires all WooCommerce Pages setup including the Cart and Checkout pages, even when One Page Checkout is used to display checkout on another page.
Why aren’t my products displaying on the One Page Checkout page?
↑ Back to topMake sure that the catalog visibility of your products is not Hidden. Only visible products will be displayed on One Page Checkout pages.
Note: Hidden products will display on the One Page Checkout form if using a shortcode that specifies product IDs.
Can I display the One Page Checkout Shortcode using the do shortcode function?
↑ Back to topNo, or at least, not without additional custom code. If you wish to display the One Page Checkout Shortcode using WordPress’ do_shortcode() function instead of including the shortcode in a post or page’s content, you will also need to attach custom code to the 'is_wcopc_checkout' filter and make sure a boolean true value is returned.
To display a working checkout form, One Page Checkout needs to enqueue a variety of scripts and styles prior to outputting the content on the page. In order to do this, it will check if the current post content to determine if it contains the One Page Checkout shortcode, and only add the require styles and scripts when it does (to avoid loading them on all pages). In order for the checkout form to work on pages without the shortcode in the cotent, additional custom code is needed to help One Page Checkout identify the page as a checkout page and ensure these styles and scripts are enqueued.
Why is the cart emptied before adding new products from a radio input or Easy Pricing Table?
↑ Back to topRadio input elements are used to choose one of a set of options. Because of this, when a radio element is used in the product selection fields, One Page Checkout will empty the cart before adding new products to the cart.
The same logic is applied to product selection fields in Easy Pricing Tables. Usually, pricing tables are used to display different options for the one product, like differently priced levels for a SaaS subscription. Because of this, One Page Checkout removes the existing items before adding the newly selected item.
To change this behavior, you can use a free plugin WooCommerce One Page Checkout – Do Not Empty Cart available here.
One Page Checkout slow or not working?
↑ Back to topFollow the troubleshooting steps here.
Further Reading
↑ Back to topSkyVerge has also published a tutorial on using URL Coupons with One Page Checkout.
Learn more about how to show hidden products on the checkout page with One Page Checkout.
Questions and Support
↑ Back to topSomething missing from this documentation? Do you still have questions and need assistance?
- Have a question before you buy this extension? Please fill out this pre-sales form – please include the name of this extension in your query.
- Already purchased and need some assistance? Get in touch with a Happiness Engineer via the WooCommerce.com Support page and choose this extension name from the “I need help with” dropdown