MultilingualPress by Inpsyde GmbH enables the ability to connect an unlimited amount of varying language content within your WordPress Website such as products, posts, pages, tags, categories etc.
Number of Allowed Languages
Please note, this version allows you to manage up to three languages
Installation
↑ Back to topBefore you install MultilingualPress, please make sure you have a Multisite setup already. If not, here is a detailed tutorial how to setup a Multisite.
Also make sure WooCommerce is Network Installed, but not Network Activated, as this will pose a challenge for taxes and shipping. In combination with MultilingualPress, if WooCommerce is Network Activated, taxes and shipping can only be edited on the main store and do not transfer to the secondary store.
When you need to use it, just activate WooCommerce on every site separately. Here following the installation steps:
- Download the .zip file from your WooCommerce account
- Go to: WordPress Admin > My Sites > Network Admin > Plugins > Add New and Upload Plugin with the file you downloaded with Choose File.
- Install Now and then Network Activate the extension. This will make the plugin active for all sites on the Network.
Here you can find our first steps Video.
More information at: Install and Activate Plugins/Extensions.
Requirements
↑ Back to top- WordPress Multisite 4.8+
- PHP 7.2 or higher
Setup
↑ Back to topBasic Configuration
↑ Back to topGo to: WordPress Admin > My Sites > Network Admin > Dashboard. In the admin menu on the left select MultilingualPress . Here you access to the main plugin settings tabs:
- Modules
- Translatable Post Types
- Translatable Taxonomies
- Cache
In case the modules Redirect and/or Quicklink are activated, then two others tab will be available:
- Redirect
- Quicklinks
Let’s have a closer look at each tab.
Modules
In this section you find the modules that can be activated through by checkbox. Some of them might not be visible if the system is not set up properly: for example the WooCommerce Module is only available if WooCommerce is installed.
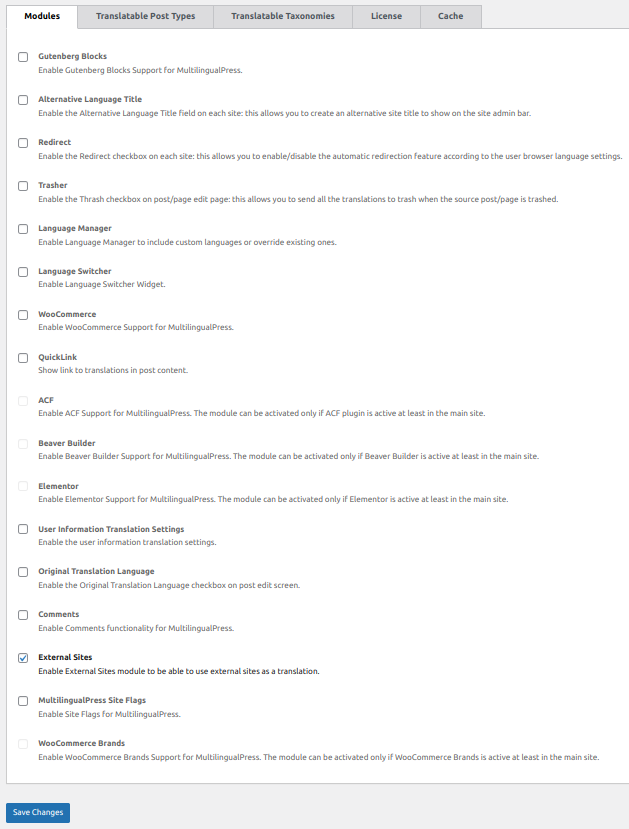
Here is the description of the modules:
- Gutenberb Blocks: enables the MultlingualPress blocks support.
- Alternative Language Site: enables the Alternative Language Title field on each site, this allows you to create an alternative site title to show on the site Admin Bar.
- Redirect: this allows you to enable/disable the automatic redirection feature according to the user’s browser language settings.
When enabled, the Redirect tab is available in the panel in order to configure the “Redirect Fallback”: the subsite where are redirected the users whose browser language is not available in the Multisite environment. - Trasher: enables the Thrash checkbox on post/page edit page: this allows you to send all the translations to trash when the source post/page is trashed.
- Language Manager: enables the Language Manager link on the WordPress Admin menu. Through this link you can access the Language Manager and change the settings of all the languages MultilingualPress provides, or just create a new language.
- Language Switcher: enables the Language Switcher Widget on the WordPress Admin Widget page. Through this widget you can quickly set a language switcher and rendering it in the location provided by your theme.
- WooCommerce: enables to extend the translation relationship features to WooCommerce products.
- QuickLink: shows direct links to the translations (if they exists) of the current post in the other language shops. It also render a new section where the position of the links can be set.
- ACF: MultilingualPress can manage the fields set via the Advanced Custom Fields (ACF) plugin, and this option is enabled when the plugin ACF is network installed and activated in your system. For further info are available here.
- Beaver Builder: enables the compatibility mode for the Beaver Builder plugin and MultilingualPress: the option is active only when Beaver Builder is installed and active; the new module lets MultilingualPress work properly with the Page Builder. More info is available here.
- Elementor: enables the compatibility mode for the Elementor plugin and MultilingualPress: the option is active only when Elementor is installed and active; the new module lets MultilingualPress work properly with the Page Builder. More info is available here.
- User Information Translation Settings: enables the translation for the “Biographical Info” text area available in the user profile page in the backend; through a dedicated translation metabox the user can set a translation for the “Biographical Info” for each language site in the network.
- Original Translation Language: enables a checkbox to specify that the content is the source one, and not just a translation of other content (post).
- Comments: enables comments support. Further info is available on MultilingualPress Comments support.
- External Sites: enables external sites support. Further info is available on MultilingualPress External sites support.
- MultilingualPress Site Flags: enables the automated rendering of the language flags in the language switcher menu.
- WooCommerce Brands: enables the compatibility mode for the WooCommerce Brands plugin and MultilingualPress: the option is active only when the Woocommerce Brand is installed and active; the new module let MultilingualPress to avoid a taxonomy slug conflict. More info are available here.
Translatable Post Types
To combine translations with WooCommerce products, you must first enable the option in the Translatable Post Types tab as this will be necessary to use the Plugin for WooCommerce Products.
Here you can check the post types you want to offer as a translation. Only select Use dynamic permalinks if you want to convert plain urls with query parameters e.g. http://site.com?var=value instead of http://site.com/value . This is normally not the case.
Translatable Taxonomies
To combine translations with WooCommerce products, you must also enable Translatable Taxonomies.
Here you can check the taxonomies you want to offer as a translation.
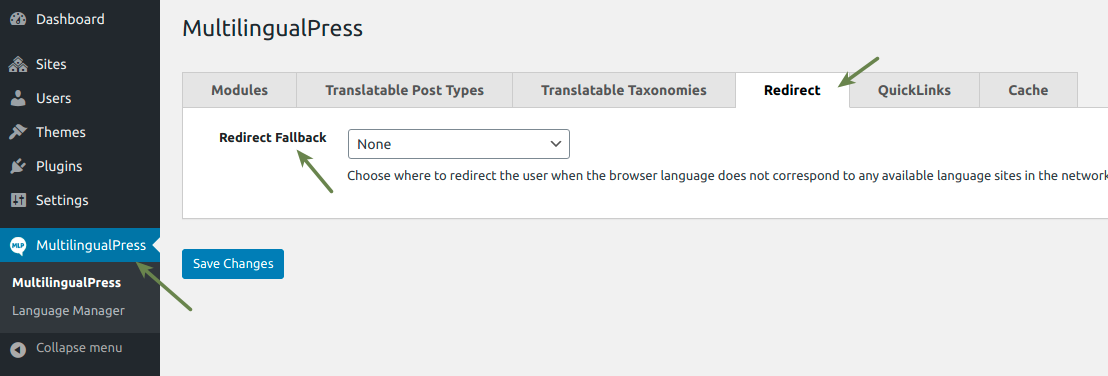
Redirect
When a user has a language that is not available in any of your sites defined within the Multisite network, here you can select a Redirect Fallback: this is the site where the user will be redirected to in this particular case.
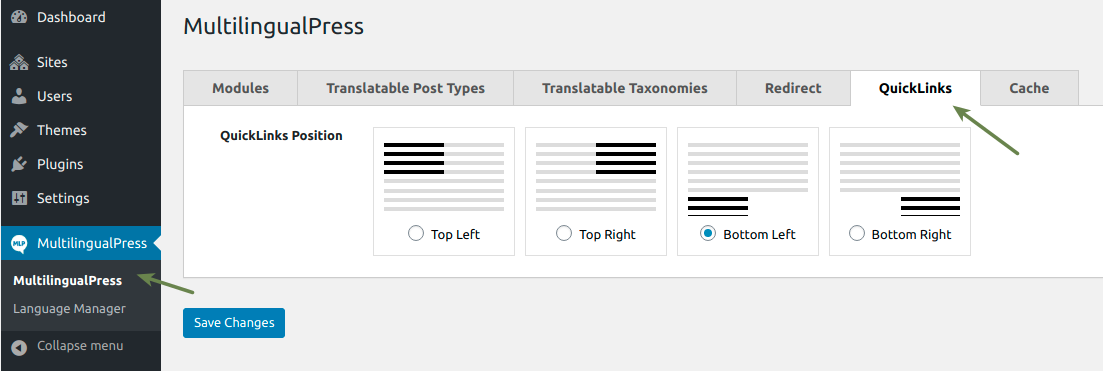
QuickLink
Here you can define in which position you want to show the post translation links. The available positions are related to the content of the post, and if no content is available on the related translation post, the link is not rendered even if the post exists.
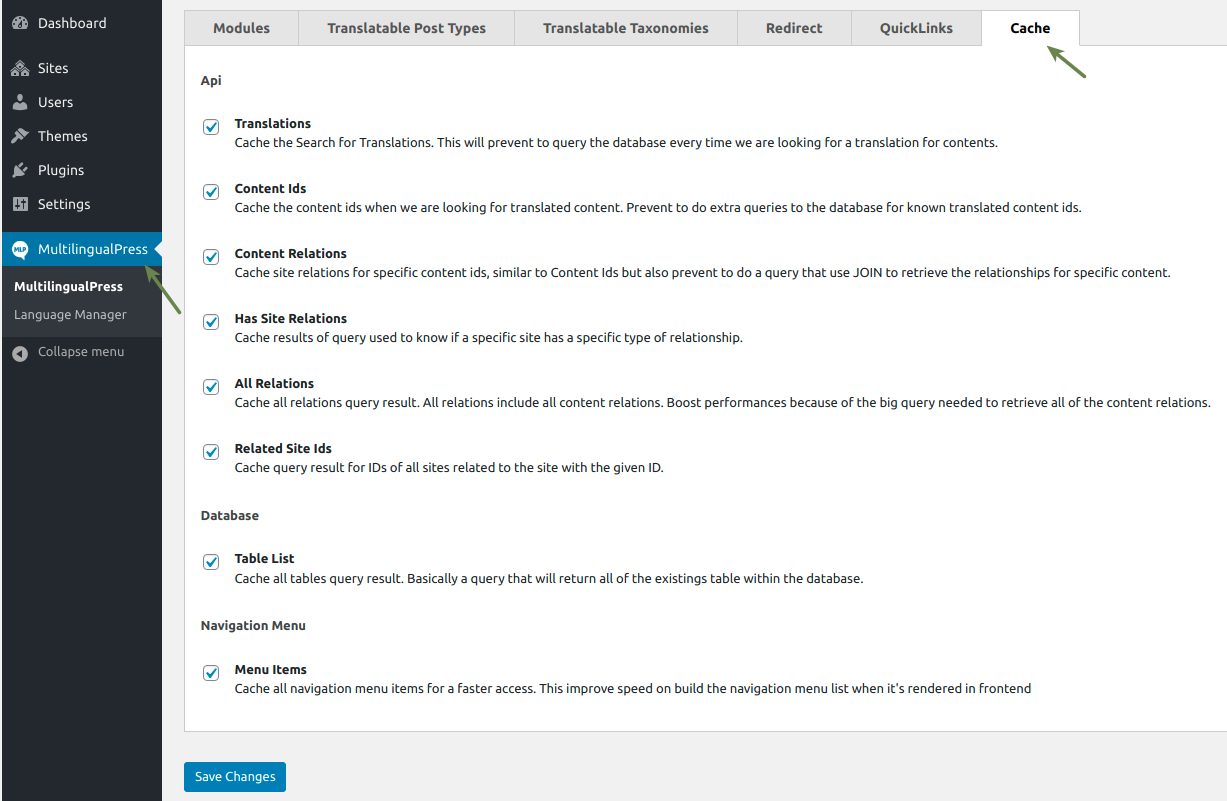
Cache
To enable cache features, in order to improve the plugin performance; or just to disable selectively some option to avoid conflicts with server cache or other plugins cache features.
Main Store Set Up
↑ Back to topAs a main store you can use the main site you have after creating a multisite WordPress install.
Otherwise, if you want to create a fresh new site and use it as main site you can go to: My Sites > Network site > Sites > Add New and complete all settings.
You can leave the MultilingualPress settings blank for now, apart from the Language, which needs to be selected by dropdown.
Consider that the language fields available are two: the first is used to define the locale, which is the language for the WordPress back end; the second, created via MultilingualPress, is used to define the language for the subsite as it is recognized by browsers and search engines.

Then from the Network Admin dashboard, in the Admin Menu go to: My Sites > Sites > All Sites.
Go to the Dashboard of your site, then in Admin Menu click on Plugin. From here:
- Activate WooCommerce
- Configure WooCommerce. Find out more on how to do that here.
- Add products. Find out more on how to do that here.
You can always change settings or add more products later, but with MultilingualPress it’s good to do this as detailed as possible as this plugin will allow you to base your secondary sites on this main one, including copy of settings and products, and linking the latter.
Secondary Stores Set Up
↑ Back to topYou can create as many secondary stores as you want, one for each language you need to use and then relate them to the main one through MultilingualPress.
So, here we provide an example of how to set up a secondary store site, but the procedure can be repeated and extended according to your needs.
From the Admin Menu go to: My Sites > Sites > All Sites. Click on Add New button and configure all settings.
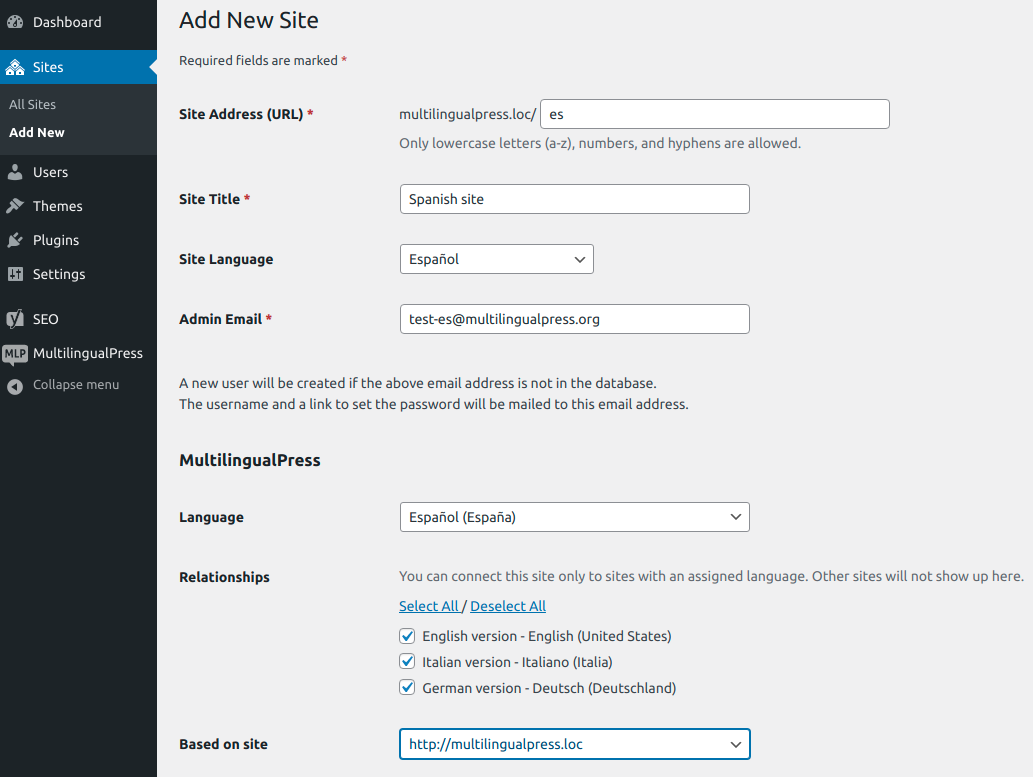
Make sure to enable the Relationship with all the sites you want to be connected, main and possible other secondary too, and select that this new site is a Based on site selecting the main site address. There select the main one.
After that, selecting the Copy Attachments checkbox will allow you to copy all the media in your new site, while Connect Content will create relationship connections through all the post of the source and destination site.
The Copy Attachments option has been introduced since some hosting service can prevent this automated copy and keep the process in pending state for long time. In that case the copy can be disabled and so the attachments can be manually copied right after the site duplication.
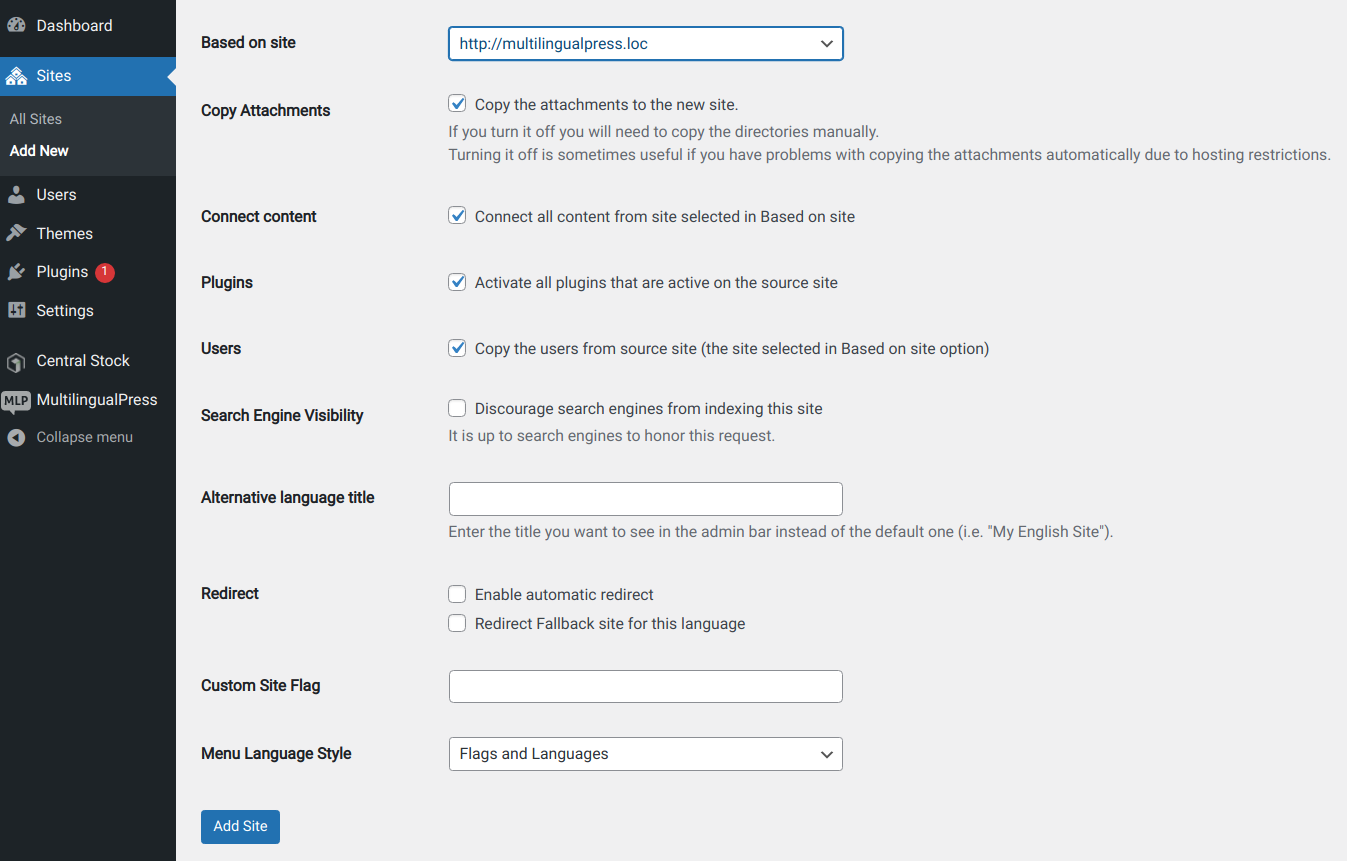
The Plugins checkbox will allow you to Activate all plugins that are active on the source site and this will activate WooCommerce and copy the settings.
The Users checkbox will allow you to copy all the users on the source website to the new one.
The Alternative Language Title, Redirect and Flag options are visible only if the related modules have been activated in the Modules settings. For further info check the related description in the Modules section.
About the redirection options, you can select them to activate the automatic language redirection of the particular subsite, and also to specify if the current subsite has to be used as a fallback for the related root language (selecting the option Redirect Fallback site for this language). That means, for example, if subsite A has English(UK) language, and subsite B has English(United States) language, and site A has the Redirect Fallback site for this language option checked, any customer who tries to access an English version which is not UK or United States kind, is automatically redirected to the subsite A.
When the new site is created, go to its dashboard and configure WooCommerce: you may want to set up different locales, taxes, shipping and payment methods.
If you go to Products, you will see that all products (Titles & Descriptions) are copied from the main site.
Configuration
↑ Back to topIn the previous section we learned how to set up a main store site, and how to create secondary store sites and relate them to main and other eventual secondary sites.
Now in this section we are going to configure them to work through MultilingualPress functionalities.
Connect Pages
↑ Back to topMultilingualPress lets you create relations between pages belonging to related sites. For example, in the previous section we created a secondary site using the Based on site and Connect Content option: in that case the pages of the new site will be already connected as translation of the corresponding source page in the main site.
In any case it is always possible to add new pages in MultilingualPress related sites and connect them as translation. To achieve that, just create a new page: under the editor you will see a language metabox that let you connect your page to a proper one in a different site. You will have one metabox for each related site.
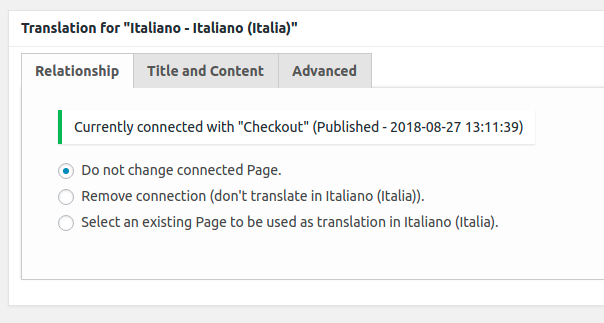
In the above picture you can see a translation metabox that connects the related page. Here following the available option tabs.
Relationship
This option lets you define the type of relation. It is possible to keep the current page connection, to remove it and keep the page not connected, or to select a specific page in the destination site to which connect the page to.
If the page was just created, an option to create a proper translation new page on the destination site is available.
Title and Content
This option lets you define the title of the destination page and use the source content page to overwrite the destination content page.
Advanced
This option lets you define the slug for the page, choose the status, and choose to copy the featured image. In case the latter option is selected, the featured image will be duplicated in the destination site Media Library and properly connected as featured image in the destination page.
Translate Categories
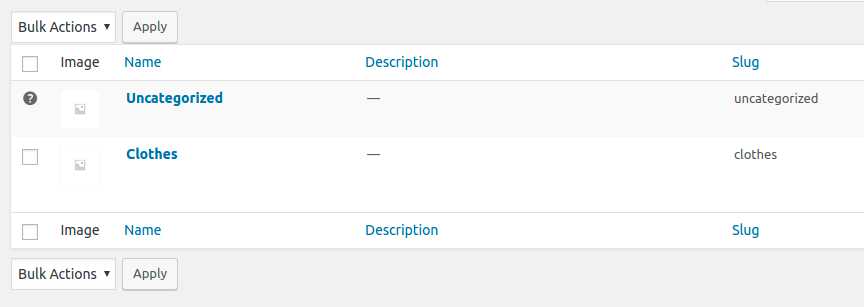
↑ Back to topProduct Categories, and in general Post Categories can be translated through MultilingualPress for each related site. For the product categories, first activate the WooCommerce module in the MultilingualPress Modules tab, and activate also the Product Categories option in the Translatable Taxonomies settings tab. Let’s consider for example the Product Category “Clothes” in the main site.
To create such a category, from the main site dashboard, go to: Products > Categories . Here create the category “Clothes”. Then in the category list, click on Edit for the category “Clothes”.
Now is possible to change the settings for the category, but also translation metabox are available: one for each related language site. Let’s describe the available translation options tabs.
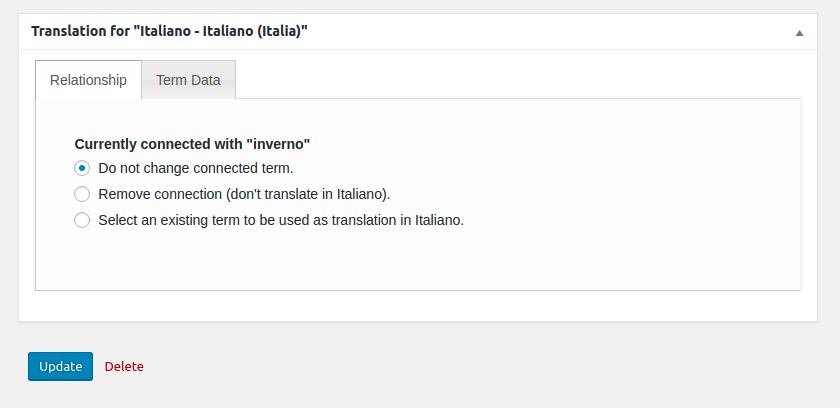
Relationship
This option lets you define the type of relation. It is possible to keep the current category connection, to remove it and keep the category not connected, or to select a specific category in the destination site to which you want to connect the source category to.
If the category was just created, an option to create a new category as a proper translation on the destination site is available.
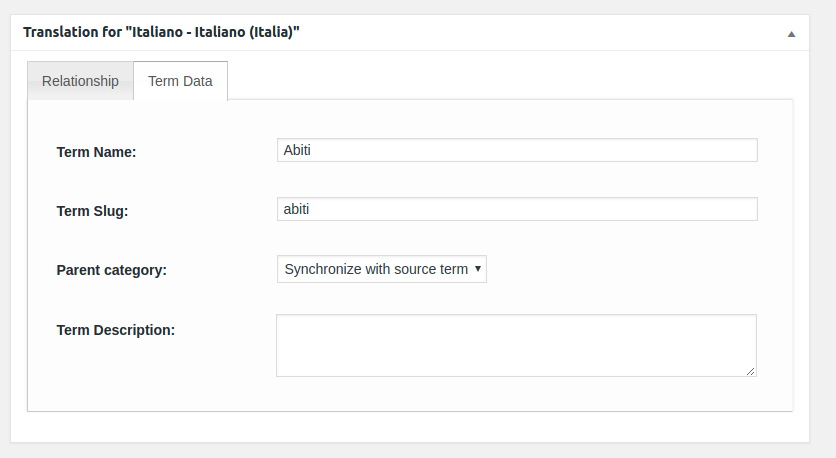
Term Data
The category is referred as a Term. In this section it is possible to define a destination term name, term slug, and synchronize the destination term with the source one.
Translate Tags
↑ Back to topProduct Tags, and in general Post Tags can be translated through MultilingualPress for each related site.
To create a new product tag, first activate the WooCommerce module in the MultilingualPress Modules tab, and activate also the Product tags option in the Translatable Taxonomies settings tab.
After that, from the main site dashboard, go to: Products > Tags . Here create a new tag. Then in the tag list, click on Edit for the new created tag.
Here it is possible to change the settings for the selected tag, but also translation metabox is available: one for each related language site. Let’s describe the available translation options tabs.
Relationship
This option lets you define the type of relation. It is possible to keep the current tag connection, to remove it and keep the tag not connected, or to select a specific tag in the destination site to which you want to connect the source tag to.
If the tag was just created, an option to create a new tag as a proper translation on the destination site is available.
Term Data
The tag is referred to as a Term. Here in this section it is possible to define a destination term name, term slug, and term description.
Translate Products
↑ Back to topMultilingualPress lets you create proper translations for WooCommerce products. To achieve this, activate the WooCommerce module in the MultilingualPress Modules tab, and activate also the Product post type in the Translatable Post Types settings tab; then proceed as follows:
- In your main site, or a secondary related site create a new product in Products > Add New
- Set the product: product name, description, category, type of product, etc.
- Finally, you will have as many translation metaboxes as WooCommerce destination sites are related to the one you are setting. In each metabox you can select the settings regarding the translations.
Let’s describe the available translation options tabs.
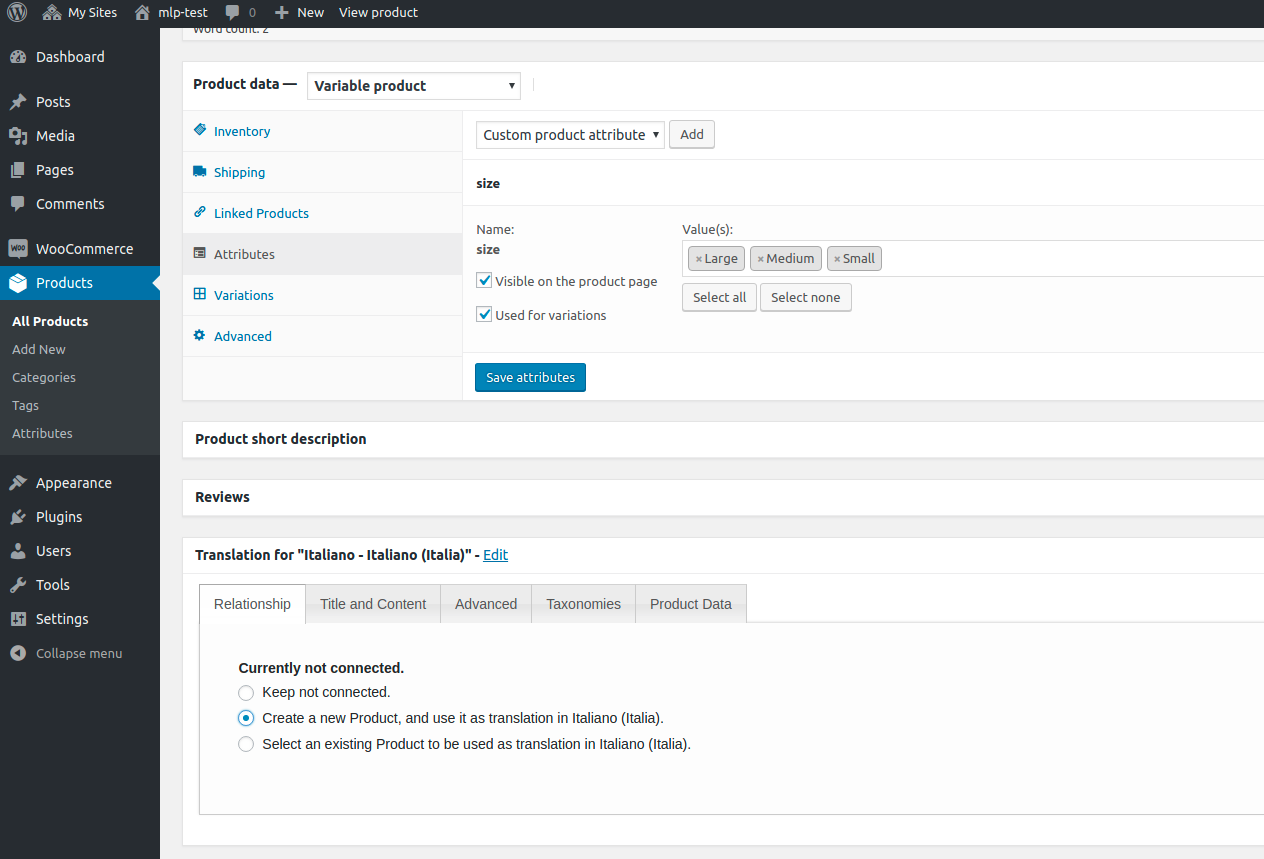
Relationship
This option lets you define the type of relation. It is possible to keep the current product connection, to remove it and keep the product not connected, or to select a specific product in the destination site to which you want to connect the product to.
If the product was just created, an option to create a proper translation for the new product on the destination site is available.
Title and Content
This option lets you define the name of the destination product, and use the source content product as a translation for the destination content product.
Excerpt
This option lets you set a translated excerpt for the destination product.
Advanced
This option lets you define the slug for the product, choose the status, and choose to copy featured image. In case the latter option is selected, the featured image will be duplicated in the destination site Media Library and properly connected as featured image for the destination product.
Taxonomies
In this section all the previously translated tags and categories, like shown in the above section, can be selected for the destination product. If the option Synchronize Taxonomies is selected, the source product category/tags selection will be automatically used for the destination product, through the proper category/tags translations.
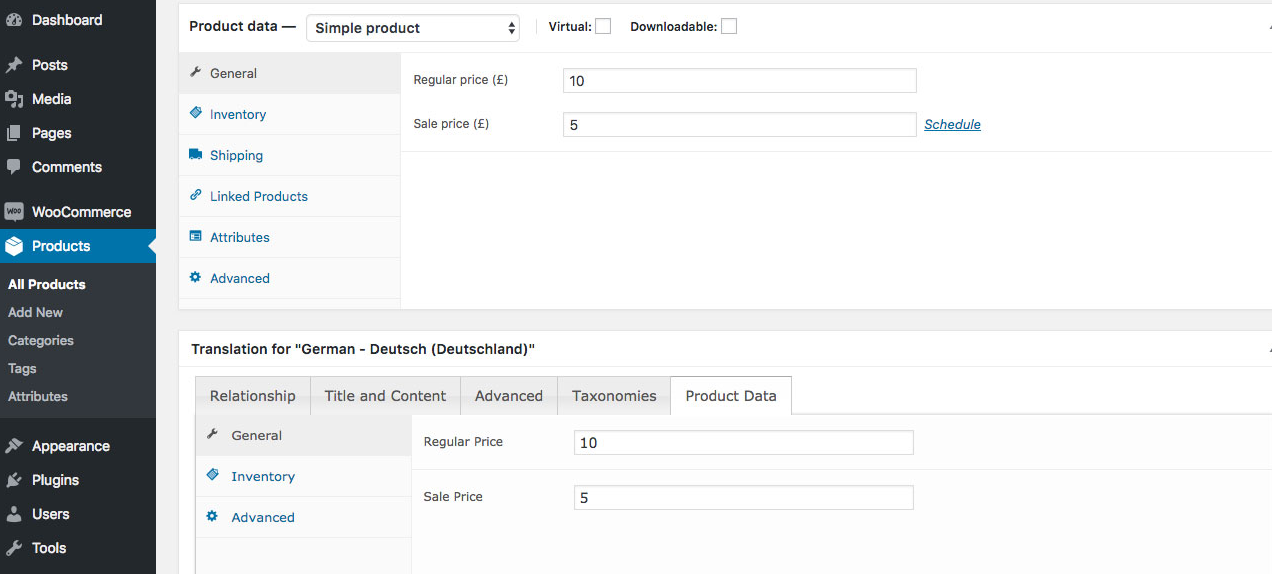
Product Data
In this section you can set several fields and/or options to properly create or update the related remote site product. Depending on the type of product selected, Product Data tab fields update accordingly with the data available for that type of product.
Simple Product Options
In case you select Simple Product, Regular Price and Sale Price fields allows you to copy prices to the remote site.
It is also possible to copy Downloadable file and Settings data to the remote site via the related options.
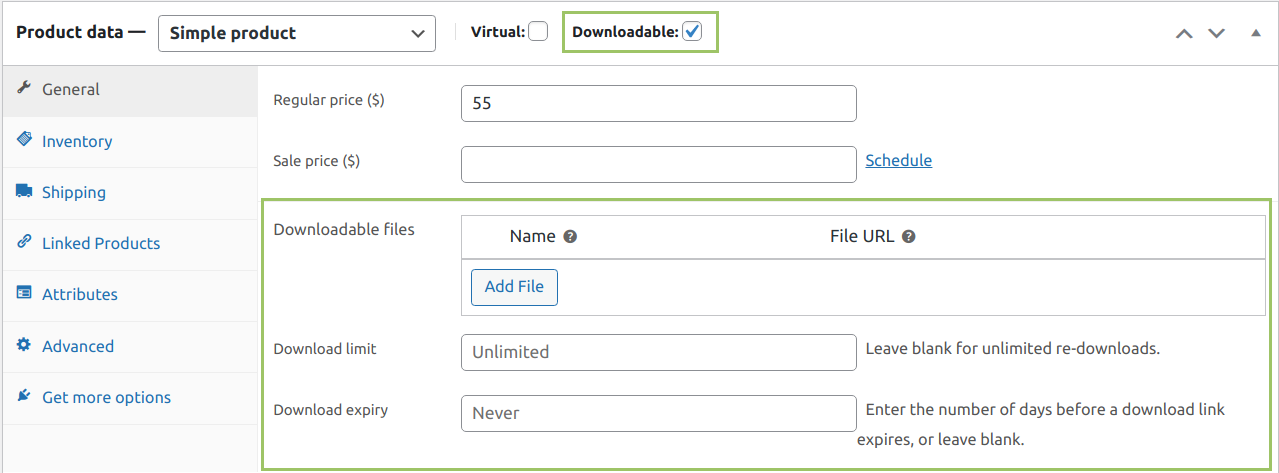
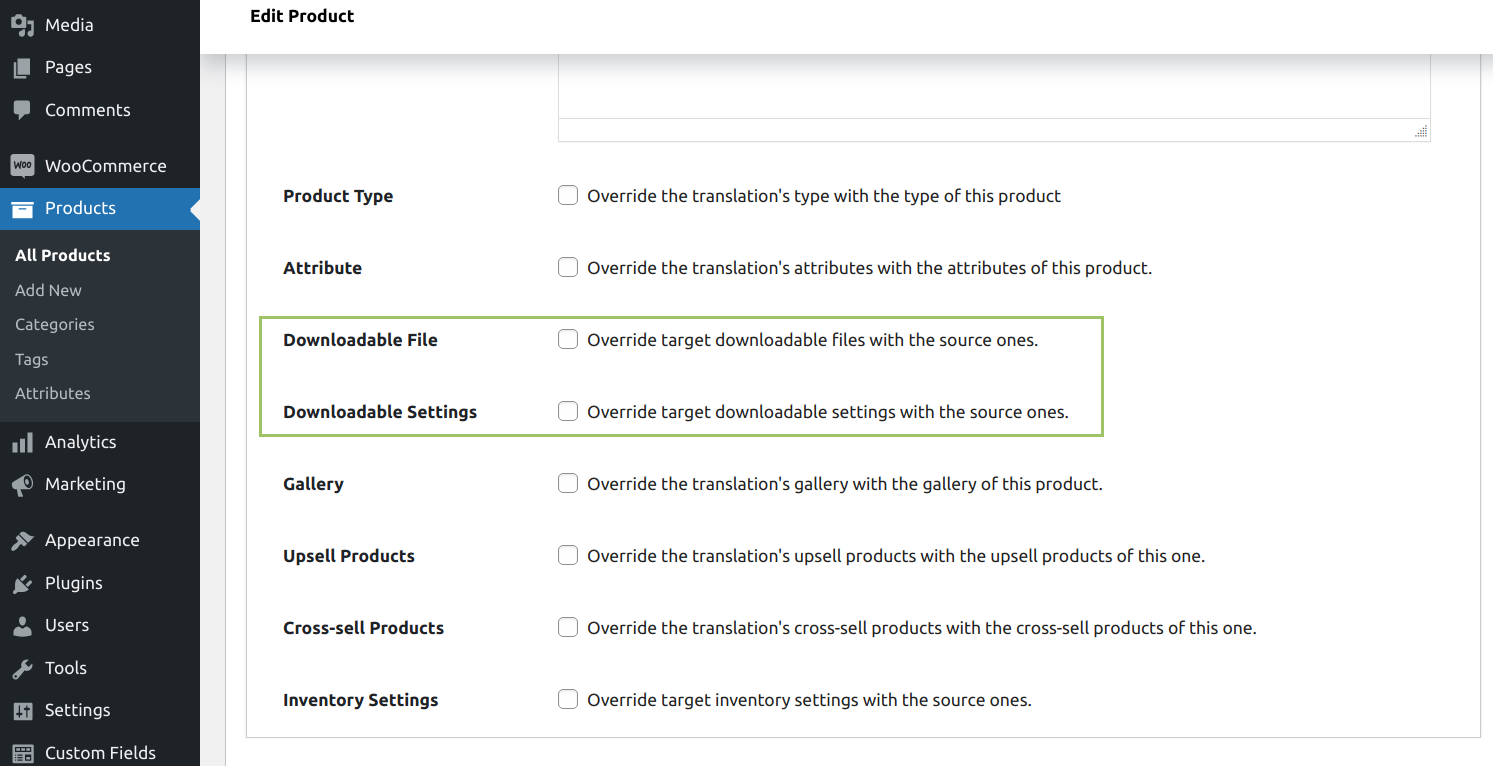
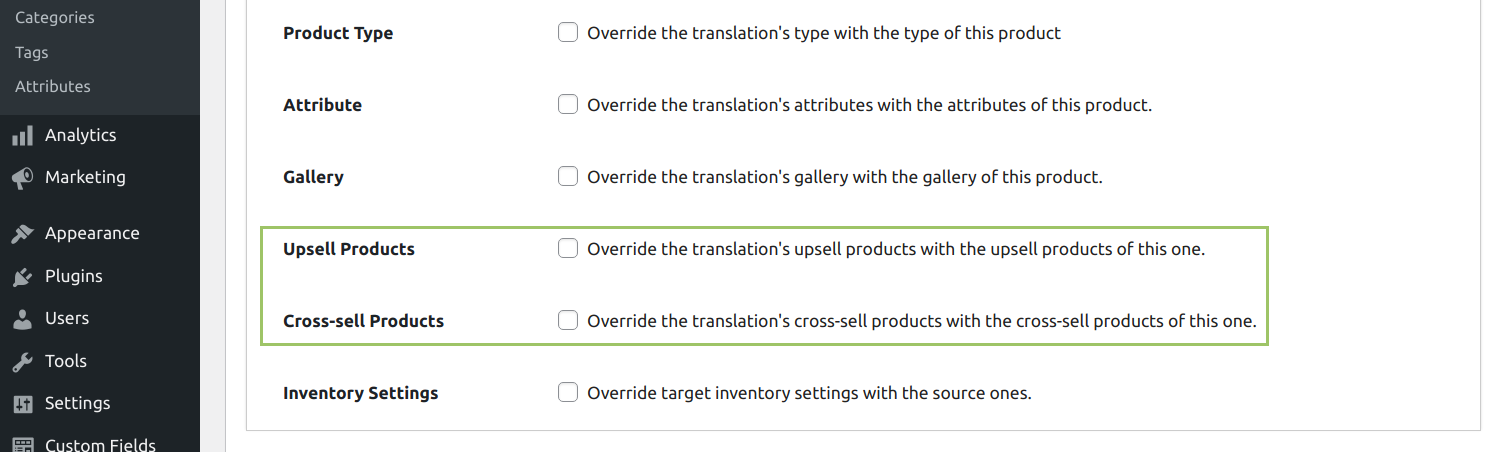
You can also copy Upsells and Cross sells products to remote site via checkboxes. Is important to keep in mind that selected Upsells and Cross sells products should exists and be connected in the remote site beforehand in order to copy the data correctly.
Grouped Product Options
When Grouped Product is selected, Grouped and Upsells products checkboxes appear to allow copy them to the remote site. Like Linked Products is important to keep in mind that the products should exists and be connected in the remote site beforehand.
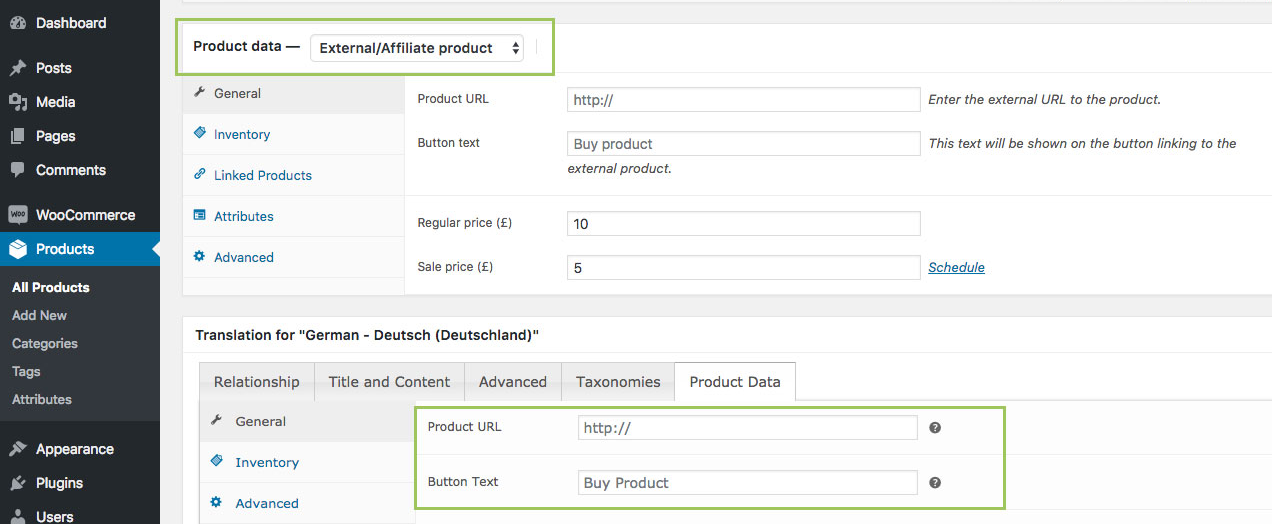
External/Affiliate Product Options
For External/Affiliate product type, Product URL and Button Text fields appear in General panel to allow you to copy the values to the remote site.
Variable Product Options
When Variable Product is selected, you can copy all variable product data using Attribute and Variations checkboxes.
Common Options
It is also possible to copy data that is shared across all product types. Here below the available options.
- Product Type: you can change the remote product type using the Product Type checkbox
- SKU: this field, under the Inventory section, allows you to copy SKU to the remote site
- Manage stock?: this field in the Inventory area let you enable stock management at product level
- Stock quantity: (field available when “Manage stock?” is active) this field in the Inventory area let you set the stock quantity for the product
- Allow backorders?: (field available when “Manage stock?” is active) this field in the Inventory area let you control whether or not backorders are allowed. If activated, stock quantity can go below 0.
- Low stock threshold: (field available when “Manage stock?” is active) this field in the Inventory area let you set a product stock level. When thil level is reached, it will be notified by email.
- Sold individually: this field in the Inventory area let you set only one product item to be bought in a single order
- Gallery: this checkbox allows you to copy product gallery images to the remote site
- Product Short Description: this advanced editor allows you to copy product description to the remote site
- Purchase Note: this field allow you to copy Purchase note to the remote site
- Inventory Settings: this field allow you to override the Inventory Settings in the related connected product with the values set in the source product
Translate Coupons
↑ Back to topWith MultilingualPress you also have the opportunity to translate coupons in WooCommerce, if the translatable post type option has been activated in the MultlingualPress Translatable Post Types settings tab. To achieve this proceed as follow:
- Go to WooCommerce > Coupon
- Create a new coupon or select an already existing coupon in Edit mode
- In Edit mode, enter all necessary data and scroll to the bottom of the page
- Here you will find the translation metabox, where you can define the settings for the translated version of you coupon

Let’s describe the available translation options tabs.
Relationship
This option lets you define the type of relation. It is possible to keep the current coupon connection, to remove it and keep the coupon not connected, or to select a specific coupon in the destination site to which you want to connect the product to.
If the coupon was just created, an option to create a proper translation new coupon on the destination site is available.
Title
This option lets you define the name of the destination coupon.
Advanced
This option lets you define the slug for the coupon and choose the proper status. A link to the destination coupon is also provided to directly access and edit it.
Add languages to the menu
↑ Back to topMultilingualPress offers the possibility to create a separate menu for each language. Users can switch to the desired language in the frontend using the language menu.
To create a language menu, proceed as follows:
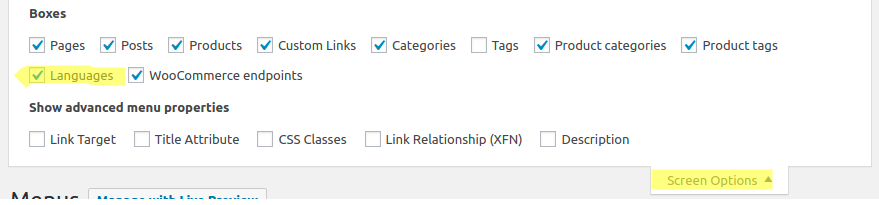
- Go to: Appearance > Menus
- Select Languages in the upper right corner of Screen Options tab to display the available languages

Besides, the menu can be quickly generated on every site via the copy navigation menu feature available in MultilingualPress. For more details check the tutorial here.
If the MultilingualPress Site Flags option is enabled in the Modules panel, a language flag is automatically rendered in the language menu.
Another way to quickly create a language switcher is through the Language Switcher Widget. Activate the widget through the MultilingualPress Modules settings tab, then from your sites Dashboard go to Appearance >Widgets .
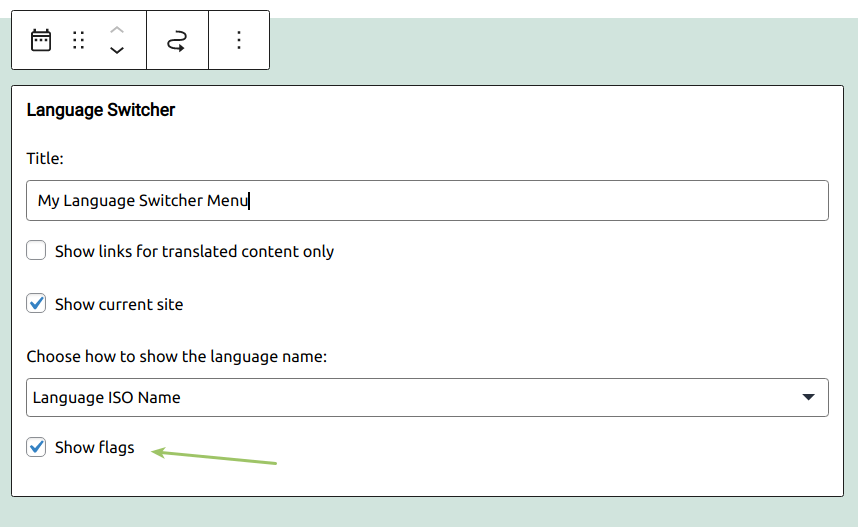
Select the widget and add it to the proper location: your menu will be automatically rendered in the related position defined within your theme.
Also in this case, if the MultilingualPress Site Flags option is enabled in the Modules panel, an additional option (Show flags) lets the user render automatically a flag for each language menu item.
Add languages menu block
↑ Back to topStarting from version 4.0, MultilingualPress comes with Gutenberg Blocks support that lets you add a Language Switcher to your posts/pages using the WordPress block editor. Further details are available following this link: The MultlingualPress Block Menu
Usage
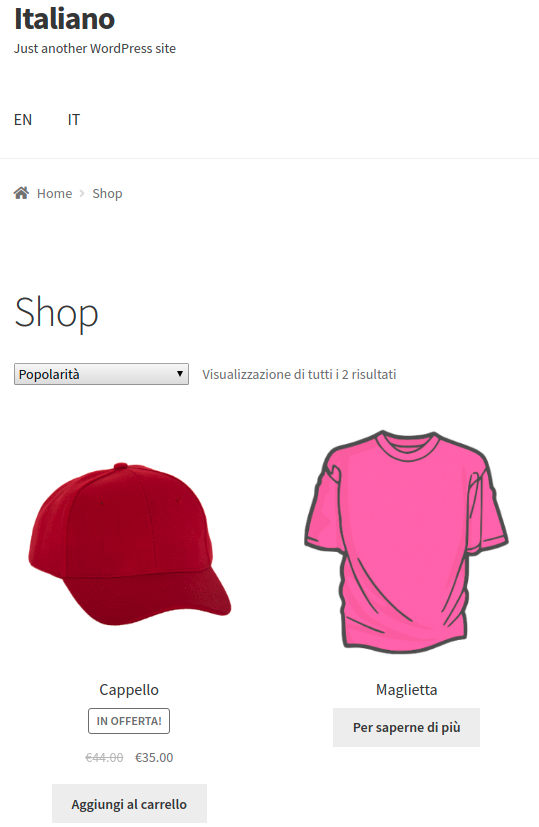
↑ Back to topOn the front end, customers can see, a Language Menu or just links within a menu, which links directly to the very same page/post/product, just in another language.
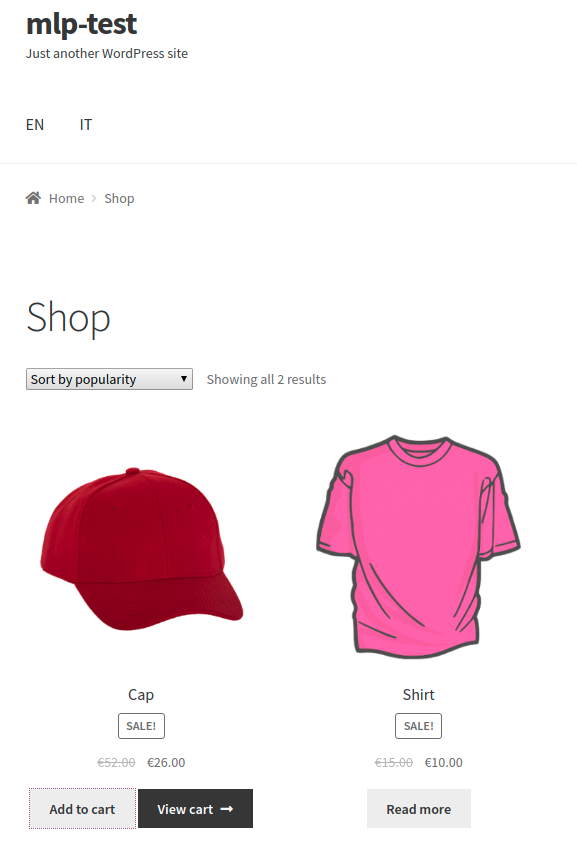
Customers now will be able to start in one store, go to a product and easily switch back and forth between the different language versions.
Troubleshooting
↑ Back to topMultilingualPress does not connect custom fields, a common approach is to create the same fields on each site manually with the same name, that way you can use the same slug in theme templates.
FAQs
↑ Back to topIs MultilingualPress also usable for non WooCommerce or an Online Shops?
↑ Back to topYes, MultilingualPress is a multilingual solution for any kind of WordPress website, especially if you need performance, flexibility, scalability, SEO-optimization, etc.
Can I use MultilingualPress on a single-site installation?
↑ Back to topNo. MultilingualPress is based on the core feature “MultiSite” within WordPress.
Will MultilingualPress translate my content?
↑ Back to topNo, it will not. It manages relationships between sites and translations, but it doesn’t change the content.
How to copy Media Library Content Between Connected Sites with Ease?
↑ Back to topMultilingualPress, starting from version 4.6.0 let you do easily copy the media library content. For further info check this document.
Does MultilingualPress automate currency conversion?
↑ Back to topMultilingualPress does not automate currency conversion. You can set up separate currencies, but the prices need to be changed manually on the products. You might consider to use the Currency Converter Widget.
Does MultilingualPress centralize stock?
↑ Back to topMultilingualPress does not centralize the stock inventory. Each version of the product will still be managed separately. The language may be connected, but the stock isn’t.
To centralize the stock inventory for your multisite shop network, we recommend our Central Stock for WooCommerce plugin. With Central Stock, you can sell in multiple shops and languages, all from the same warehouse.
I’m new to WordPress multisite. Are there any tutorials to get me started?
↑ Back to topYes, just have a look at our WordPress Multisite Installation Tutorial.
Is there a possibility to have my content professionally translated as a service?
↑ Back to topYes, you can use our translationMANAGER for professional translation service. With the translationMANAGER, exporting content from your WordPress Multisite is simple and straightforward. Select posts, pages and customized content (custom post types) with just a few clicks and send the texts to the Eurotext Translation Portal. Once translated, texts can be reimported just as quickly and then immediately published. All of this from the comfort of the WordPress admin area. Professional translations with WordPress have never been so simple!
Is it possible for language ‘fallback’ to be automated? For example if I’m on domain.com/de/about and I try to switch to the French version of the site, what happens if this doesn’t exist? Will it just return a 404?
↑ Back to topSure, you can setup in the plugin settings, that in your example visitors will be redirected to French home page instead of a 404 page.
Will any of the translations be located at the plain domain “www.mydomain.com” or will all translations/sites be located in subdomains, like: “www.en.mydomain.com”, “www.se.mydomain.com” & “www.es.mydomain.com”?
↑ Back to topMultilingualPress creates relationships between objects, like posts, products, pages and terms. You have normally different sites in the network – mydomain.com/, mydomain.com/se and mydomain.com/es
Always a separate domain, subdir or directory structure for each language or area.
Can I translate slugs and endpoints with MultilingualPress. like category slugs,and page url?
↑ Back to topYes, but you don’t need to do that. MultilingualPress will simply retrieve the correct value from the correct site. Everything is handled by WordPress.
For post types go to Network Admin > Sites, here click on the Edit link of the site you want to edit, then from the Post Type Slugs tab you can to translate them manually because MultilingualPress cannot know which are the translation for the post type slugs.
I have MultilingualPress version 2 installed and want to keep my settings, may I switch to version 3?
↑ Back to topCurrently it is not possible to switch from MultilingualPress version 2 to version 3. You should uninstall version 2 and then install and configure version 3 on your system. We are already working on a migration tool.