Instagram for WooCommerce, made by Kestrel, allows you to connect your store with Instagram, upload your products to your Business Manager, create shoppable posts and stories, and define product hashtags to showcase how your customers use your products in your store.
Requirements
↑ Back to top- WooCommerce 3.5+.
- An Instagram account.
- A Meta Business Suite account (formerly Meta Business Manager / Facebook Business Manager)
Installation
↑ Back to top- Download the .zip file from your WooCommerce account.
- Go to: WordPress Admin > Plugins > Add New and Upload Plugin with the file you downloaded with Choose File.
- Install Now and Activate the extension.
More information at Install and Activate Plugins/Extensions.
Business Manager setup
↑ Back to topBefore configuring and using this extension, you must set up a business portfolio in your Meta Business Suite / Manager account. If you don’t have one account yet, please, follow these instructions.
The Business Suite / Manager account is a Meta tool that helps you organize and manage your business resources like Instagram accounts, Facebook Pages, etc.
Connect an Instagram account
↑ Back to topIn your Business Manager account, connect your Instagram account by following these steps.

Connect a Facebook Page (Optional)
↑ Back to topYou can also connect a Facebook Page to your Business Manager. More info here.
If you don’t have a Facebook Page yet, you can create one from here.
Note: This step is optional but recommended if you want to enable a shop on your Facebook Page in the future or want to make use of the “Product images” feature included in our extension.
Create a Commerce account
↑ Back to topTo upload your products to the Business Manager and sell on Facebook and Instagram, you need to create a Commerce account. This allows you to use features like Instagram Shopping, Instagram Checkout, Facebook Shops, etc.
To create a Commerce account, follow this link.

After clicking on the button “Get Started”, two options will appear: Create a shop, or Create a catalog. Both options are supported by our extension, so choose what better fits your needs.

The “Create a catalog” option is the easiest to set up, so we recommend starting by creating a catalog. Moreover, if you plan to create a shop in the future, you will be able to connect it to already existing catalogs or create new ones.
To know more about the Commerce Manager and how to upload your products to a catalog, visit our “Product catalogs” section.
Convert your Instagram account to a business account
↑ Back to topOnce your Business Manager account is configured correctly, the next step is to convert your Instagram account into a business account. You can accomplish this in two ways: From the Instagram app or by connecting your Instagram account to a Facebook Page.
Note: If you want to use the feature of displaying Instagram images on your product pages tagged with a specific hashtag, use the “Facebook Page” method.
From the app
The Instagram app is the easiest way to convert your account into an Instagram business account. Just follow these instructions.


By connecting to a Facebook Page
Another way to get an Instagram Business account is by connecting your Instagram account to a Facebook Page.
Just go to your Facebook Page’s Settings and click on the Instagram menu item, then click on the “Connect account” button.
Your Instagram account is now ready, and you can proceed to connect it with your WooCommerce store.
Connect your store
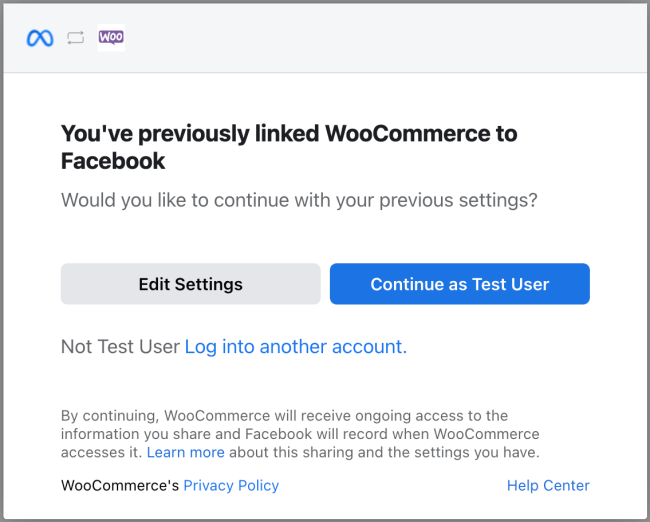
↑ Back to topIt’s time to continue the setup process in your WooCommerce store. Go to “WooCommerce > Settings > Integrations > Instagram” and look for a button with the name “Login with Facebook”.

Login with Facebook
↑ Back to topClick on this button and log in with the Facebook account associated with your Business Manager to start the connection process.
Note: You will be able to update your store’s connection anytime, so don’t worry if the first time, not all Facebook resources are available (Pages, Instagram accounts, etc.). Complete the connection process and review what integration is missing in your Business Manager. Fix the issues by following our “Business Manager setup” guide and launch the connection process again.
First, you will be asked for the Facebook account to use, you can continue with your current user if you are already logged in or change to another account.
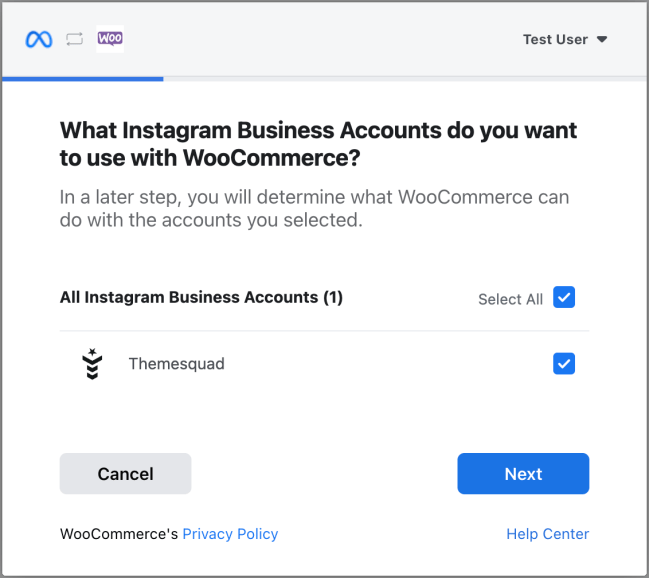
In the next step, you will see a list of Instagram Business Accounts. Select the account you previously connected to your Business Manager and click on “Next”.
After that, you will see a list of Facebook Pages. If you added a Facebook Page to your Business Manager, select it here. Otherwise, skip this step and go on to the next one.
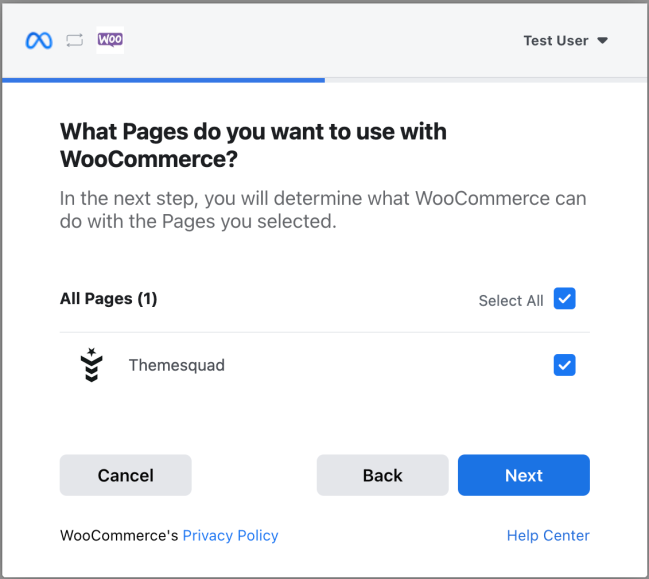
Before the connection is done, you will be asked to select what WooCommerce is allowed to do. Removing permissions may cause the application to stop working.

After accepting the permissions, the last step will be displayed. Click the “OK” button, and you will be automatically redirected to your store.
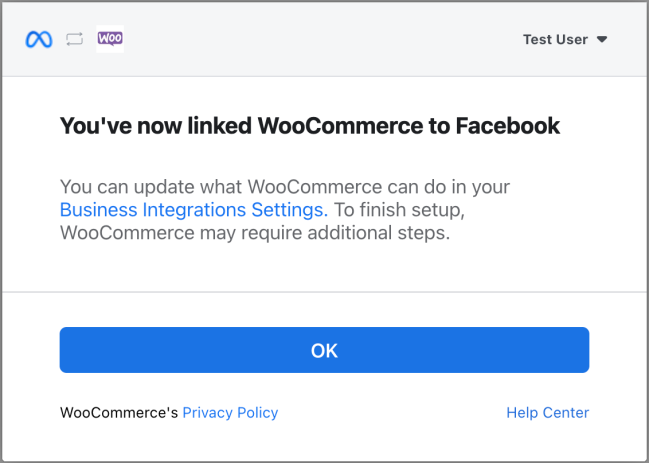
Congratulations!! You’ve connected your store with Instagram, and you can start using the extension.
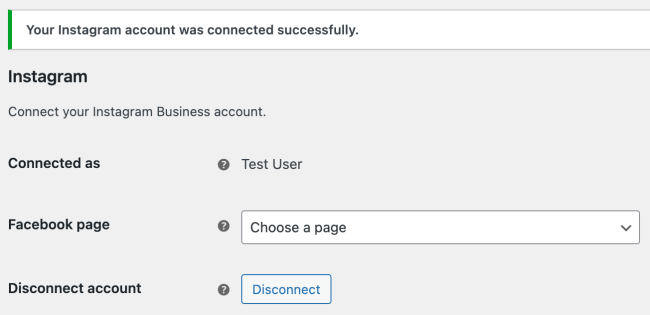
Note: If you selected a Facebook Page during the connection process, this one would appear in the “Facebook Page” setting. Select it and save the setting.
Manually entering your Facebook page ID
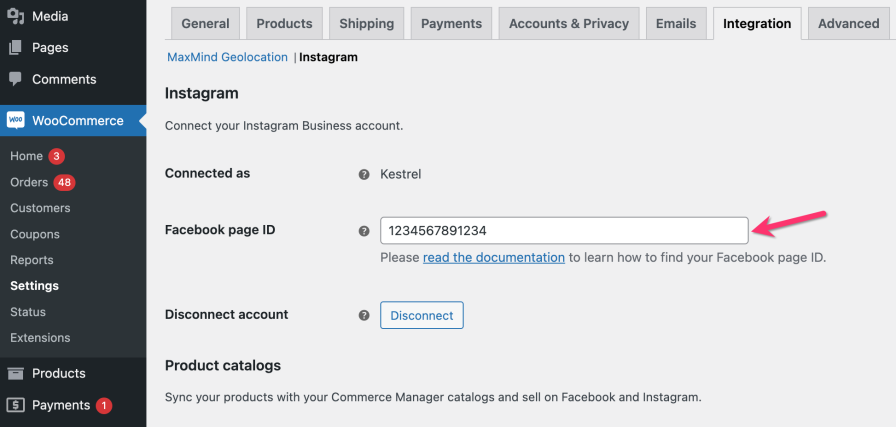
↑ Back to topIf the “Facebook page” setting only has “Choose a page” after you’ve connected your store, then you’ll need to get your Facebook page ID and manually enter it in settings. Facebook restricted app’s ability to retrieve your connected Pages, if you had previously created or linked your page through Meta Business Manager.
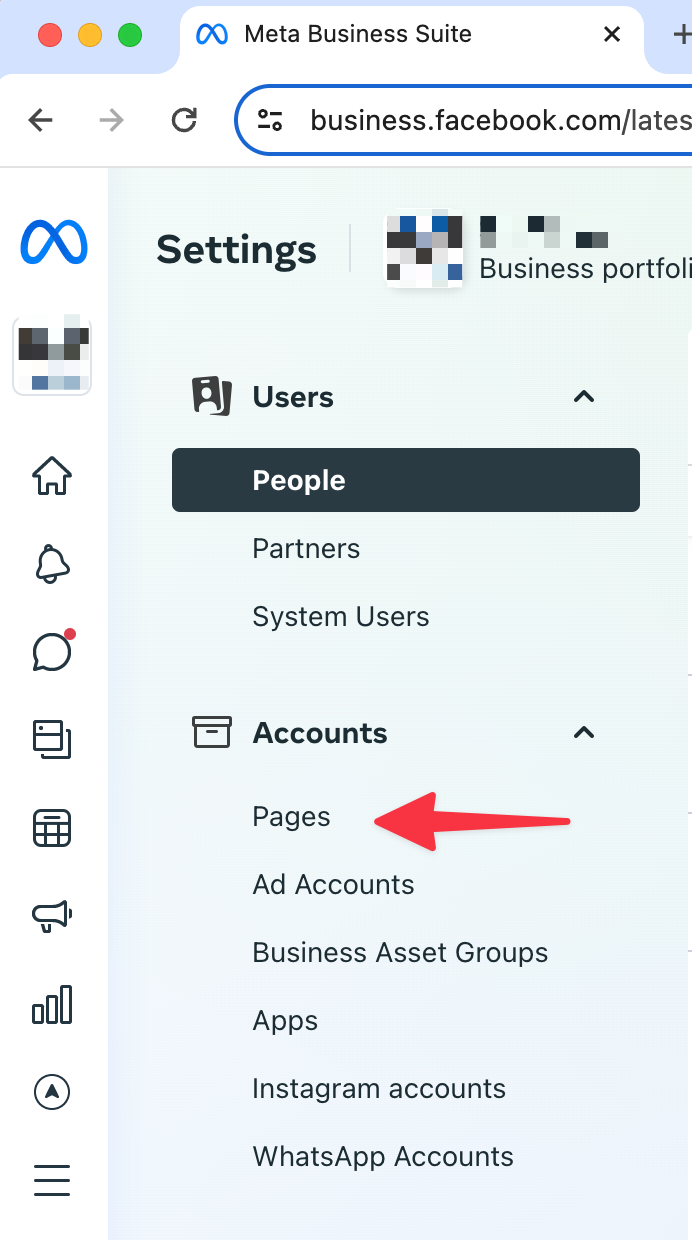
To find your page ID, log into your Meta Business Suite / Manager account and click on the gear icon next to the business that owns the page you would like to connect to:
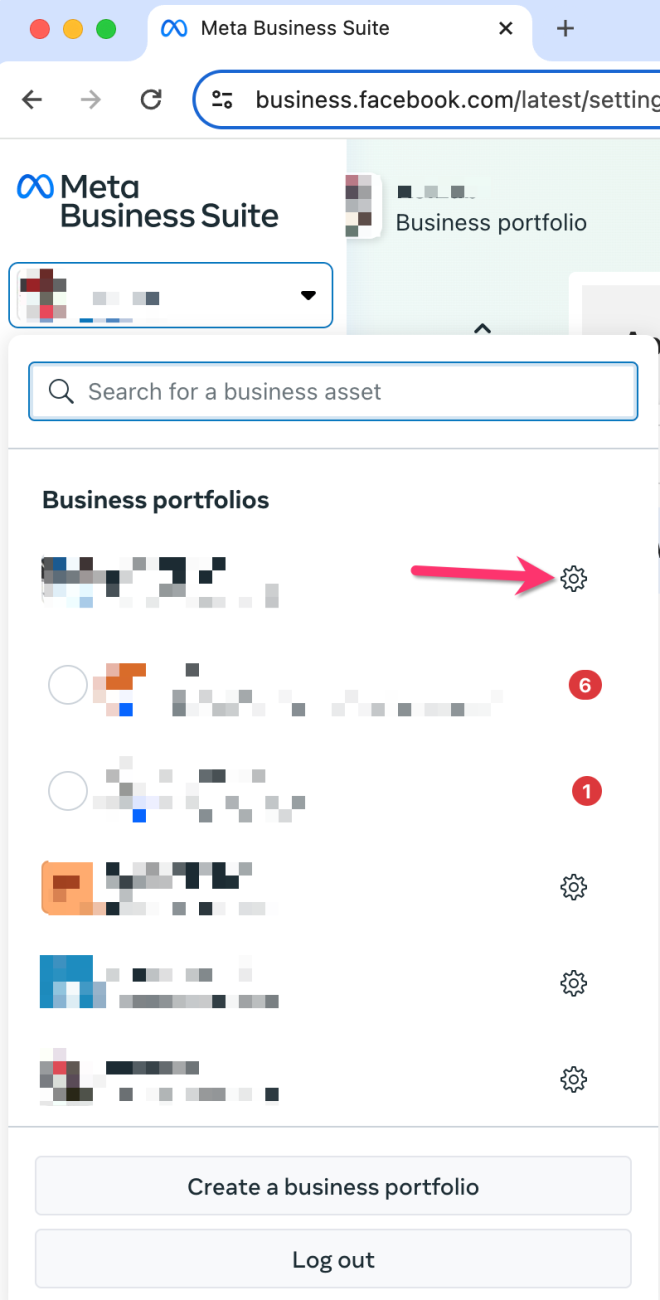
Then, click on “Pages”:
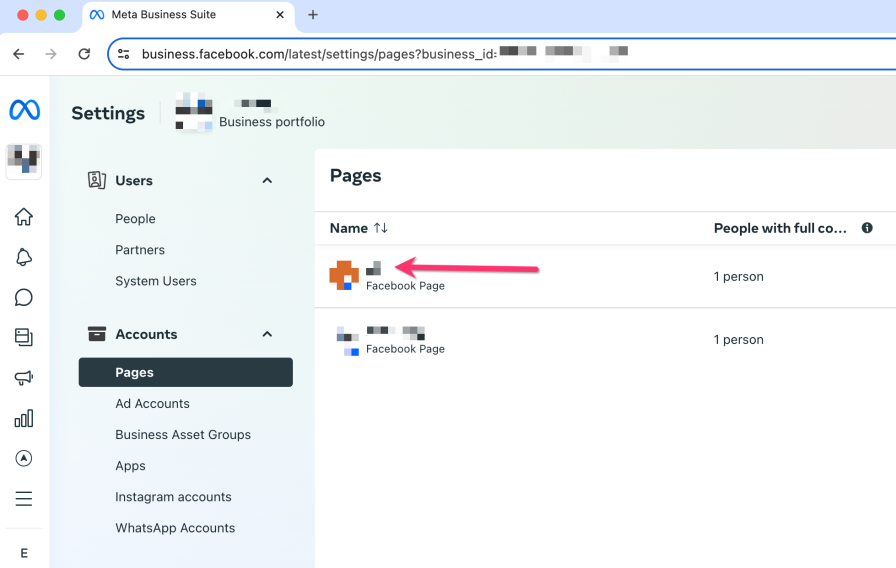
Then click on the Facebook page you want to connect:
And finally, copy the text shown next to Page ID:
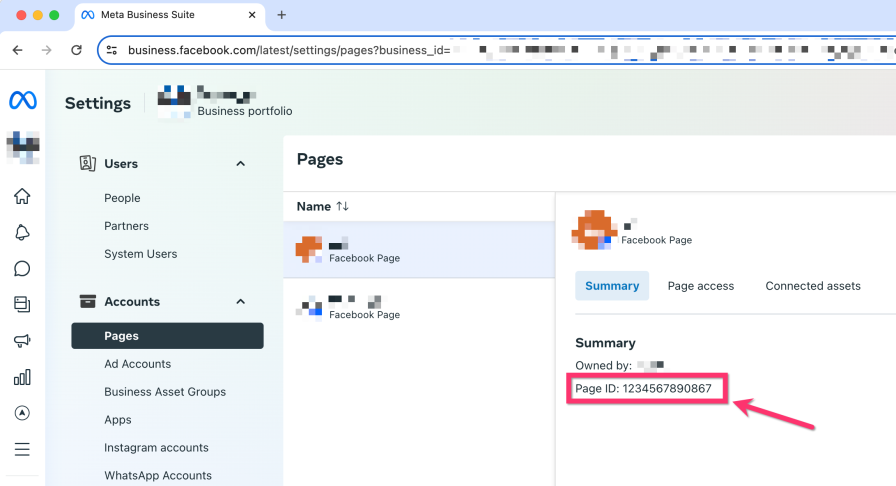
Paste this text in your WooCommerce > Settings > Integrations > Instagram page under “Facebook page ID”. Make sure there are no spaces or extra characters:
Click “save changes” and your page will be connected! ⭐
Updating the connection
↑ Back to topYou can re-launch the connection process as many times as you wish. This is especially useful for updating the app permissions and access to the different resources.
To do so, click on the button “Disconnect” and log in with Facebook to start the connection process again.
After that, click on the “Edit Settings” button and follow the steps described in the previous section.
Renewing access
↑ Back to topAfter connecting your Instagram account to your store, It will be necessary to renew the access credentials periodically to continue using the Instagram API. But don’t worry, we have automated the process to renew your access credentials, and it doesn’t require the intervention of the store owner.
In rare cases, Facebook could invalidate your current credentials (for security reasons, recent changes in its API, strange activity in your account, etc), and it will require you to re-connect your Instagram account with your store manually.
Additionally, your access credentials could expire due to large periods of inactivity or a problem with the renewal process. All these cases will be detected by our extension, which will display a notification to the store owner requesting him to re-connect the account manually.

If you see this notice on your admin screen, just click on the “Renew access” button and follow the steps.
Setup and Configuration
↑ Back to topOnce you’ve connected your Instagram account with your store, new settings will appear, and you can start the extension setup. The settings are divided into two sections:
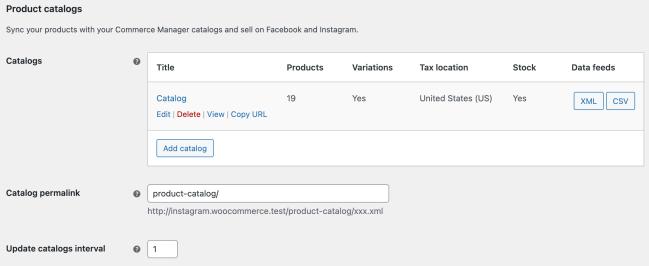
Product catalogs
↑ Back to topThis settings section allows you to define new product catalogs, set their update interval, and customize the permalink of their data feed URLs.
The whole process for creating a new catalog and uploading its products to your Business Manager is described in this guide.
Product images
↑ Back to topThis section allows you to set up different aspects of the images displayed on the product pages.
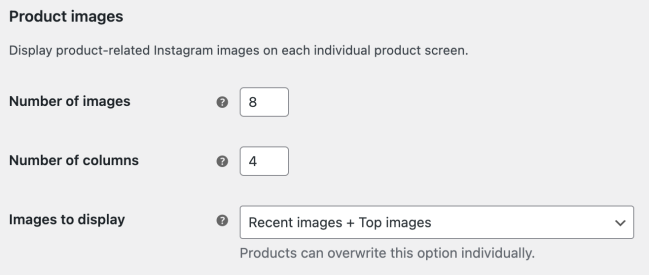
The settings are the following:
- Number of images: As its name says, it sets the maximum number of images to display.
- Number of columns: The number of columns to distribute the images.
- Images to display: This option sets the type of images to display. This is the global setting, but it can be configured individually for each product. Continue reading for more info about this option.
Images to display
Instagram allows you to fetch two types of images for a hashtag, the most recent images and the top images (The images with more likes, comments, etc).
When fetching the most recent images, Instagram only returns the images published in the last 24h when we make the request. This may cause no new images to be retrieved with the request. To avoid displaying an empty image list on product pages, we store the images from previous days and append them to the new ones. This way, we will have enough images to display with each new day.
Combining the recent images from previous days works fine, but if there are not enough recent images to retrieve on the first day we set up the product hashtag, we append the top images at the end to complete the image list.
This is how the extension works by default, but if you want to implement a different behavior, we have defined other options in the setting “Images to display“:
- Recent images + Top images: Default. Uses the behavior described above.
- Recent images: Only uses the most recent images. It will append the recent images from previous days if necessary, but it won’t complete the list with the top images.
- Top images: Always uses the top images sorted by popularity.
As we mentioned before, the type of images to display may be set up individually for each product. That means you can use the option “Recent images + Top images” by default and set a specific product with the option “Top images“.
Now that you configured these settings, you can proceed to add hashtags to your products.
Product catalogs
↑ Back to topYou can define as many catalogs as you want, each one with its own configuration. This adds a lot of flexibility and allows you to define catalogs with different products, taxes, etc.
The tax rates may vary depending on the country, and in EEUU, the prices are displayed without including tax. So, you can adapt your catalogs to the laws of each country.
Optionally, you can define a catalog with generic prices. See the setting “Currency code” in the product catalog form.
Create a product catalog
↑ Back to topIn the “Product catalogs” section of the settings page, you will find a “Catalog” setting for defining the product catalogs.
Click on the “Add catalog” button to add a new one. You will be redirected to a form where you will find all the necessary settings to create and customize your product catalog.
The most important setting is one called “Feed URL“. This setting represents the URL that Facebook will use to fetch your product data.

Note: The setting “Feed URL” will appear once you enter a title for the catalog.
The other settings are divided into two categories:
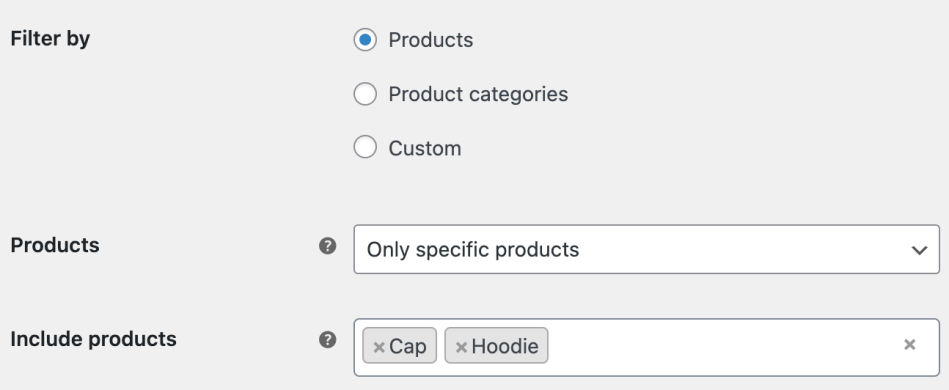
Product filters
By default, all published products will be included in the catalog, but you can filter which products to include.
Note: It’s important to consider that you can group and filter the uploaded products in your Commerce Manager by creating Sets of items. So, we recommend excluding only the products you don’t really want to upload to your catalog.
Now, let’s see some options for filtering the catalog products:
Products
This option is perfect when you only want to include a reduced set of products or all products except a few ones.
Product categories
If you only want to include a few product categories, then use the option “Product categories” in the “Filter by” field.

Note: The field “Product categories” also allows you to include specific categories in the catalog and exclude the rest. Just use the option “Only specific product categories“.
Custom
For more advanced criteria, use this option, which displays all the available filter fields like product categories, stock status, product types, etc.
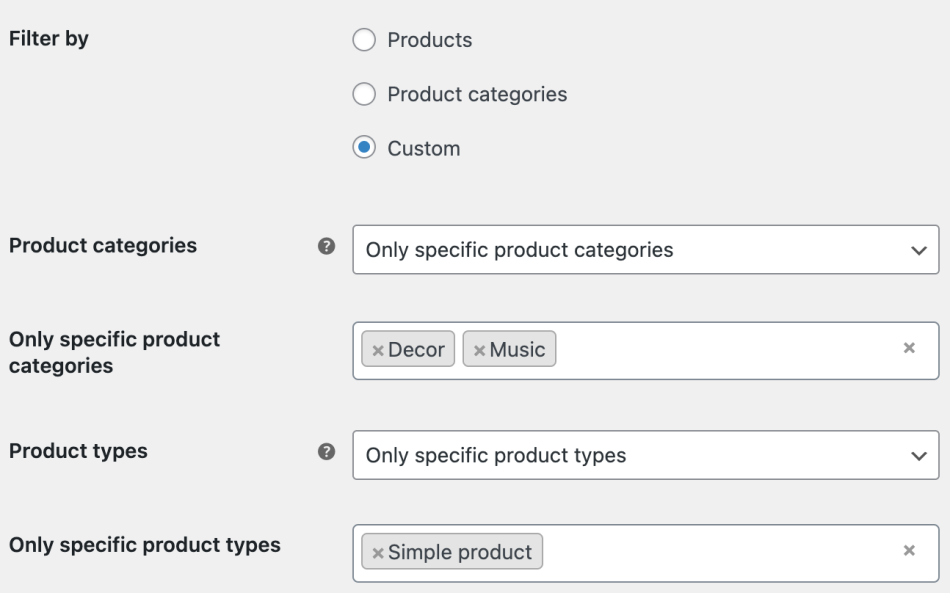
If you include “Simple” products in the catalog, you can also filter if they are “Virtual“, “Downloadable“, or both.
Note: If you set the filters “Virtual products” and/or “Downloadable products” to true, all non-simple products will be excluded from the catalog (Variable, grouped, etc.).
Finally, you can manually include or exclude products from the catalog. Just use the settings “Include products” and “Exclude products“. Look for the products and add them to the list.
These settings are especially useful when you want to include all products of a category/type except one or two products.

Or, in the opposite case, to exclude all products of a category/type except one or two specific products.

Stock status
This option allows you to filter the products by their status, for example, including only in-stock products.

Important: If you only include in-stock products in your catalog, when a product runs out of stock, it will stop its synchronization until it is back in stock again. Meanwhile, if the product was already uploaded to your Commerce Manager, it will keep the outdated product data and won’t be deleted from the catalog.
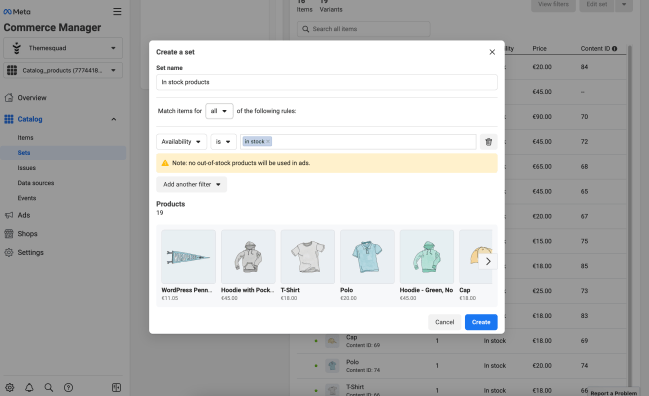
If you want to display only in-stock products on Instagram and Facebook, we recommend doing the following:
- Include all products in your catalog, not just the in-stock products, to keep all of them synchronized with your Commerce Manager.
- In your Commerce Manager Catalog, create a “Set of items” and filter the products by their “Availability“.
- Use this “Set” instead of the “All products” set in your Instagram and Facebook accounts.

Product data
These settings are for customizing the product data. Here you will find some interesting settings like:
Include variations
If you include “Variable” products in the catalog, you can opt to include the parent product or all its variations.
Note: Only enabled variations will be included in the catalog.
Currency code
Optionally remove the currency code from prices. This will allow you to create a catalog with generic prices. The catalog can be uploaded to multiple Facebook Catalogs and define the currency in the Facebook Business Manager platform. For example, $9.99, 9.99€, etc.
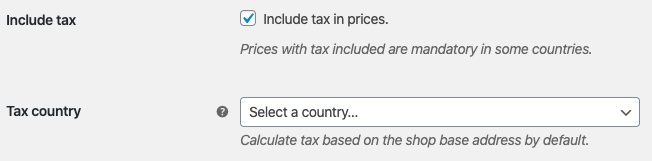
Include tax
You can opt to include the tax in prices. This is mandatory in some countries.
The tax will be calculated based on the shop base location by default. If you are calculating the tax based on the customer billing/shipping address, an additional field will appear to select the country used to calculate the taxes.
Product ID
Customize the product identifier in the Facebook Catalog. By default, the product ID will be used. To avoid collision with other importers, you can customize this identifier.

Note: The placeholder {product_id} will be replaced by the real product ID when outputting the product data.
Group ID
When including variations in a catalog, all product variations are grouped by a Group ID parameter with the same value. By default, the parent product ID is used as the group ID, but you can customize this identifier in the same way as the product ID.
Product MPN
The Manufacturer Part Number (MPN) is a unique number that identifies the products. By default, we use the product ID as an identifier, but you can also use the product SKU or a combination of these parameters in a custom format.
Brand
This field is optional, and it allows you to define the global value of the brand of the products. This option can be set per product.
Condition
It defines the condition of the products. The default value is new, and it can be set per product.
Images
Choose the product images that will be included in the catalog. It can be all the images or just the featured image. By default, all images will be included. This value can also be set per product.
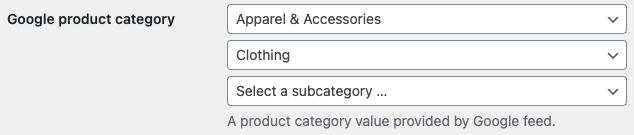
Google Product Category
Categorizes all your products with a default category. This option can be set per product and per product category.
Include stock
By default, only the stock status (in-stock or out-of-stock) is included in the product info. If you also want to include the stock quantity, just enable this option.
Note: The products’ stock quantity is required to use the catalog on Instagram checkout.
After enabling this option, products that manage the stock (Product data > Inventory > Manage stock?) will include the stock quantity in the catalog feeds.
On the other hand, if a product has the status “In stock“, then the value of the catalog option Stock quantity will be used. This is due to the stock quantity of a product is mandatory, and we need to provide one value.
Finally, the catalog option Backorder stock quantity defines the stock for products whose status is “On backorder“. Set the value to zero if you want to support backorders on your store but not on Instagram.
Important: Orders placed on Facebook or Instagram are not notified to the WooCommerce store to adjust the product stock. This is a design decision taken by the Facebook team.
Our extension uses the strategy of Slow-Selling Products for updating the stock quantities. If you want to know more about how Facebook handles the stock quantity of your products, please, check the doc here.
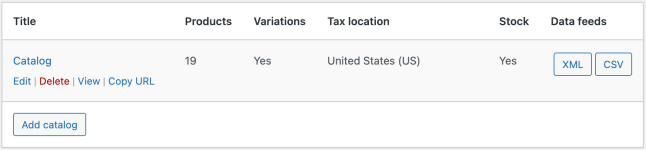
Data feeds
↑ Back to topEvery product catalog has two data feeds in XML and CSV formats. These data feeds contain the product data and are represented as files stored in your WordPress Uploads directory.
To view a data feed, just click on any of the buttons displayed in the “Data feeds” column of the “Product catalogs” table. After that, a popup will appear with the feed info and actions to perform over it.
Note: The content and actions of the feed popup will vary depending on the selected format.
XML feed
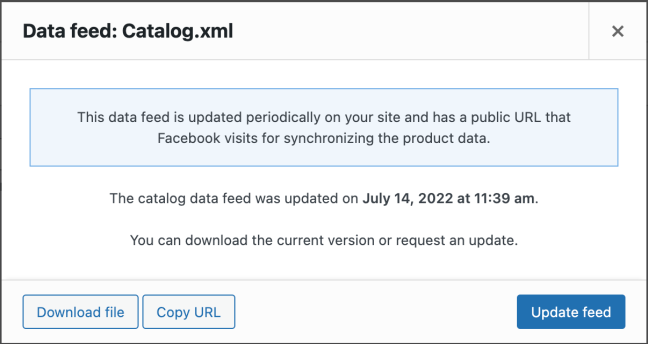
The XML data feed is updated periodically on your site and has a public URL that your Commerce Manager visits for synchronizing the product data on Facebook and Instagram.
How often the product data is refreshed depends on the setting “Update catalog interval”. Additionally, it’s immediately updated when the product catalog configuration changes.
In the popup content, you can see the last time the data feed was updated.
The actions you can perform on this data feed are the followings:
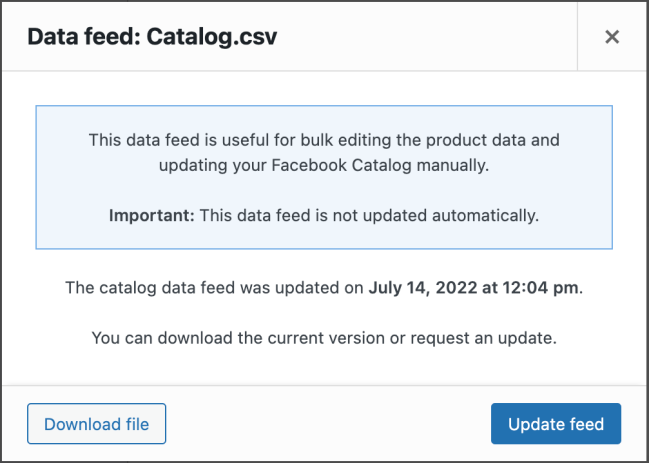
Update feed
You can manually request an update of the product data by clicking on this button. This action is useful when you modify your products and want to reflect these changes as soon as possible on your catalogs.
Important: Updating the data feed won’t synchronize the product data with Facebook and Instagram automatically. This is due to your Commerce Manager still needing to visit the feed URL to fetch the updated product data. To speed up the process, you can force an update from your Commerce Manager dashboard.
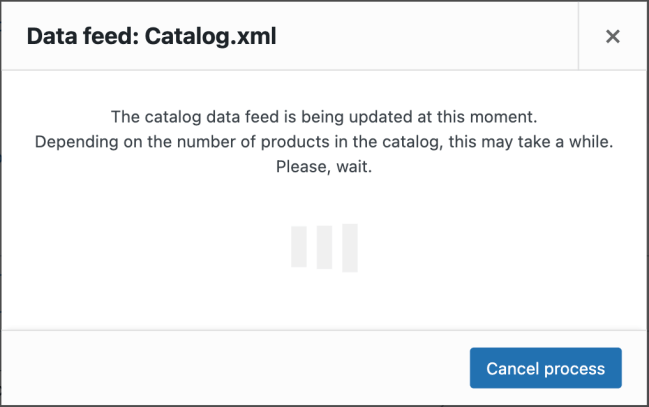
Depending on the number of products in the catalog, this process may take a while. While updating, a new button will appear to cancel the update process at anytime.
Copy URL
Copy the public URL of the data feed. Use this URL to schedule the synchronization of the product data with your Commerce Manager catalogs. Read more here.
Download file
Click on this button to download the data feed file on your computer. Use this file to manually update the product data in your Commerce Manager.
Tip: Using the CSV data feed is recommended for bulk editing the product data.
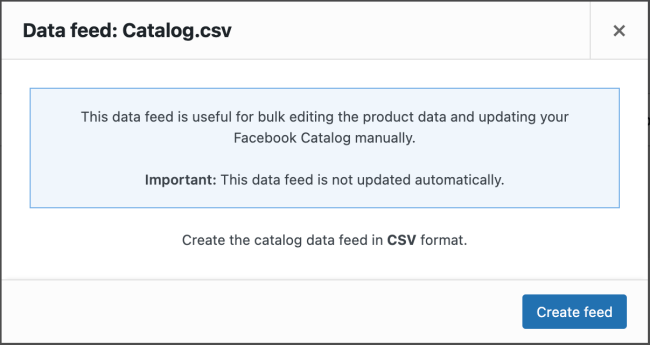
CSV feed
The CSV data feed works in the same way as the XML format, but with some differences:
It’s only created and updated on demand. So it isn’t used to synchronize the catalogs automatically. Besides, it doesn’t have a public URL to expose the product data.
This data feed is useful for exporting the catalogs in an easy-to-edit format and manually updating the product data in your Commerce Manager.
Product options
↑ Back to topWhen you create a catalog, you can define the default values for the product brand, condition, images to include in the catalog, and product category. This is the fastest way to get your catalog ready, but it might happen that a specific product has different values from the global one. In this case, you have to define custom values only for that product.
To accomplish this, go to the product edit screen and select the “Instagram” tab in the “Product Data” metabox. Here you will find the same options as in the product catalog form.
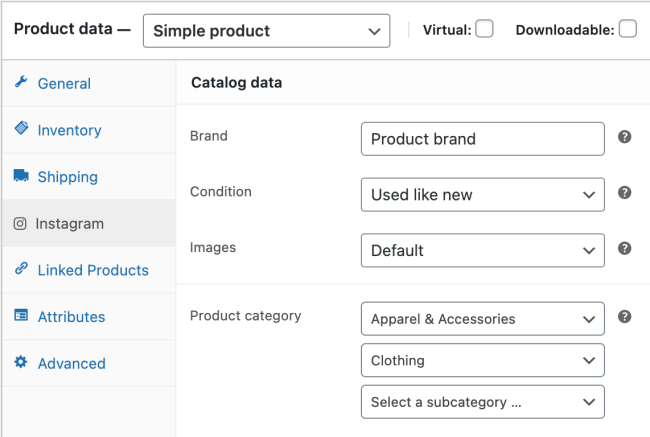
Select the option “Default” to keep using the global value defined in the catalog. Leave “Product category” empty to use the value default set in the catalog.
Additional information
↑ Back to topDepending on the selected Google Product Category, Facebook will ask you for additional information such as the size, color, gender, etc. Our extension uses the “Product attributes” functionality to provide this information when uploading the catalog. More info here.
Important: If you are defining attributes to a variable product, they must be used to create the variations. Otherwise, this info won’t be included in the feed.
Google attributes
When creating or editing a product attribute (Products > Attributes), a new field called “Google attribute” will appear in the forms. We only have to select an attribute from the list to associate it with the current product attribute.

Once a Google attribute is associated with a product attribute, the terms of this attribute will be used to include this information in the catalog. E.g.: You can create an attribute “Color” whose terms are “Blue”, “Green”, “Grey”, etc.
Some Google attributes like “Gender”, or “Age group” only support specific values. In these cases, you also have to associate the terms with the supported values by the Google attribute. This way, we guarantee the values included in the catalog are valid.

Now that we have mapped the product attributes with the Google attributes, we only have to assign them to each product in the “Attribute” tab of the “Product data” metabox.

As you can see in the image above, when a product attribute is associated with a Google attribute, this info will appear in the attribute metabox.
Note: Some attributes like color, material, etc. accept multiple values.
Custom product attributes
In addition to the global attributes, you can also define custom attributes for a product. These attributes allow you to add specific information that only this product has, and they can also be associated with a Google attribute in order to include this info in the catalog feed.
Adding a custom attribute to a product is easy:
- Go to the “Attributes” tab of the “Product data” metabox.
- Click on the “Add new” button, leaving empty the attribute selector field.
- Fill in the name and value of the attribute.
- Select the Google attribute to associate with this custom attribute.
- Click on the “Save attributes” button.
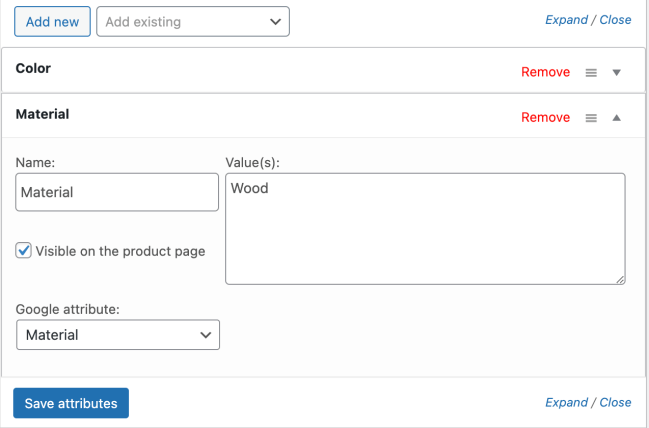
Note: Google attributes with a restricted set of values such as “Age group” or “Gender” cannot be associated with a custom product attribute. Use a global product attribute instead.
Upload a product catalog
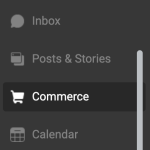
↑ Back to topOnce you have defined a product catalog, you can proceed to upload it to a Facebook Catalog. To do this, just copy the “Feed URL” of the catalog. Then, go to your Facebook Business Manager and click on the “Commerce” icon (A new browser tab will be opened).
In this new tab, click on the menu icon in the top bar and select the option “Commerce Manager“.
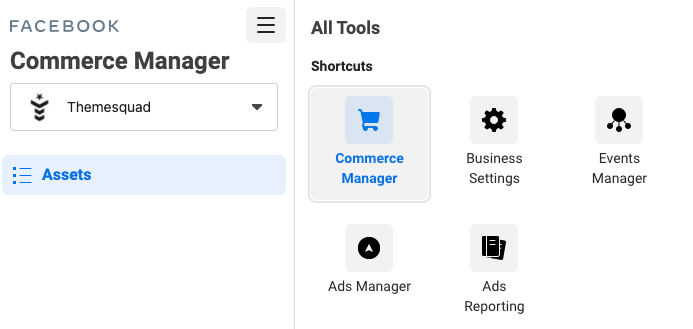
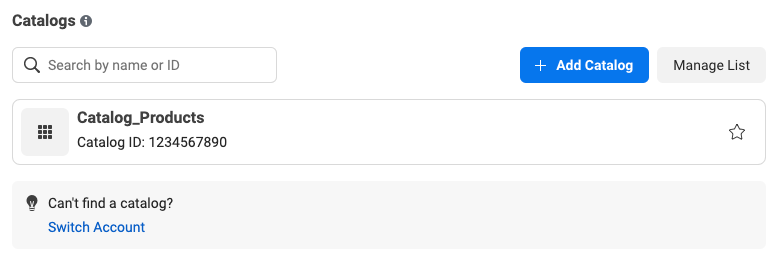
Finally, on this page, scroll down until the section “Catalogs” and click on the button “Add catalog“.
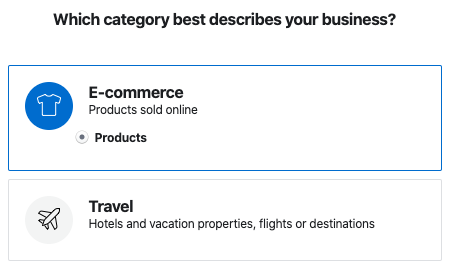
When you are creating a catalog, select the best category that describes your products, or just select the category “E-commerce”.
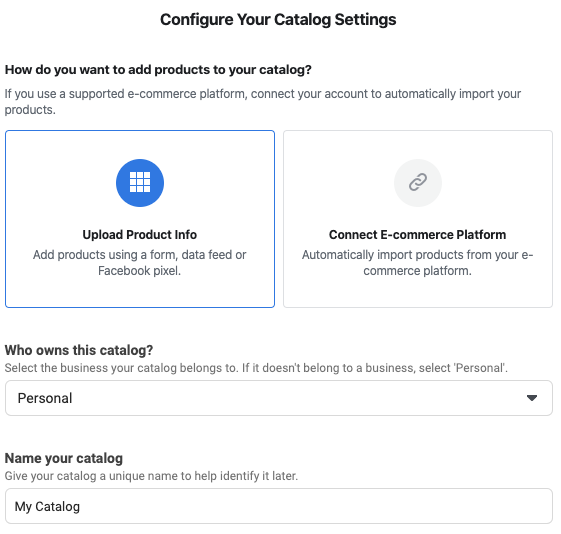
The next step is to select how the products will be added to the catalog. Select the option “Upload Product Info” and add a name to the catalog.
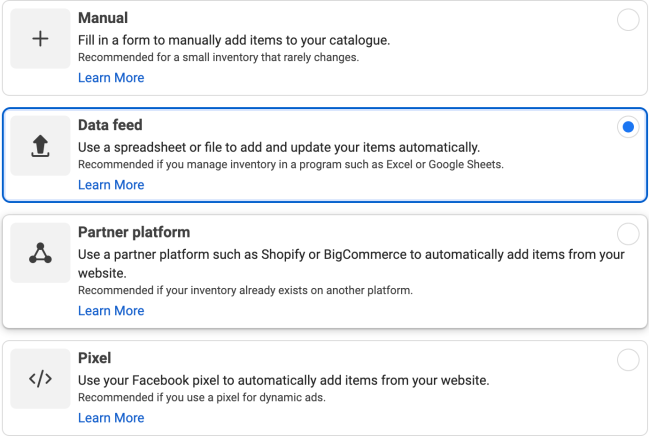
After saving the form, you will have a Facebook Catalog. Now, let’s add your store’s products to it. Click on the “Data Source” link that you will on the left menu. Then, click on the “Add Products” button and select the option “Data feed“.
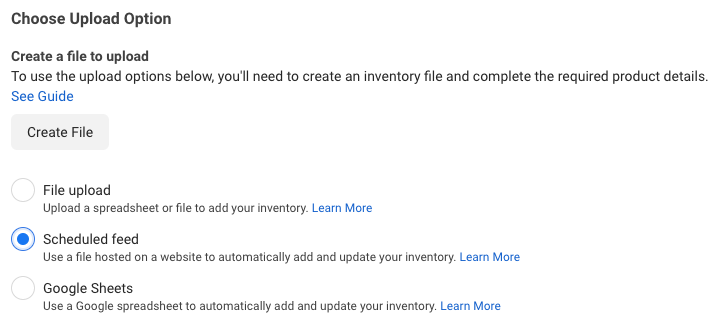
In the section “Choose Upload Option“, select the option “Scheduled feed“:
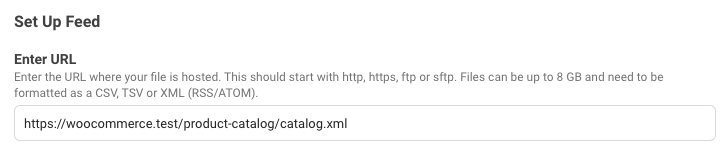
Next, paste the Feed URL of the product catalog copied from your WooCommerce store here:
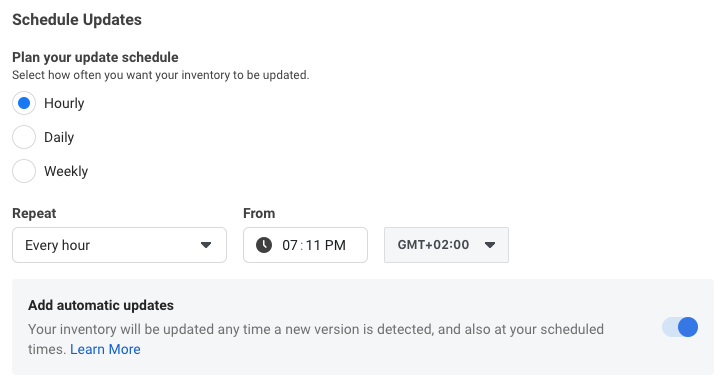
Optionally, you can edit the schedule settings. We recommend you synchronize the catalog hourly.
In the next step, add a name for the data source and select the default currency for the product prices.

Finally, click on the button “Start Upload“. Once the process finishes, your product catalog will be uploaded to your Business Manager Catalog. Congratulations!
Now, we will continue the process in your Instagram mobile app.
Update a product catalog
↑ Back to topThe catalog feeds are updated periodically according to the setting “Update catalogs interval“. Additionally, your Business Manager will fetch the product data from these feeds based on the “Schedule Updates” options defined when creating the catalog. E.g., Hourly.
This way, your catalogs will always be up to date in your Business Manager. If you need to update a catalog immediately, do the following:
1) In your WooCommerce store, select the catalog you want to update and click on the XML Data feed, a modal window will appear. Then click on the “Update feed” button and wait for the update process to finish.
2) In your Business Manager, go to the “Schedules” options of the Catalog “Data source” you used to upload the products. Here, request an update by clicking on “Request update now“.

Once the process finishes, your catalog will be up to date again.
Instagram app
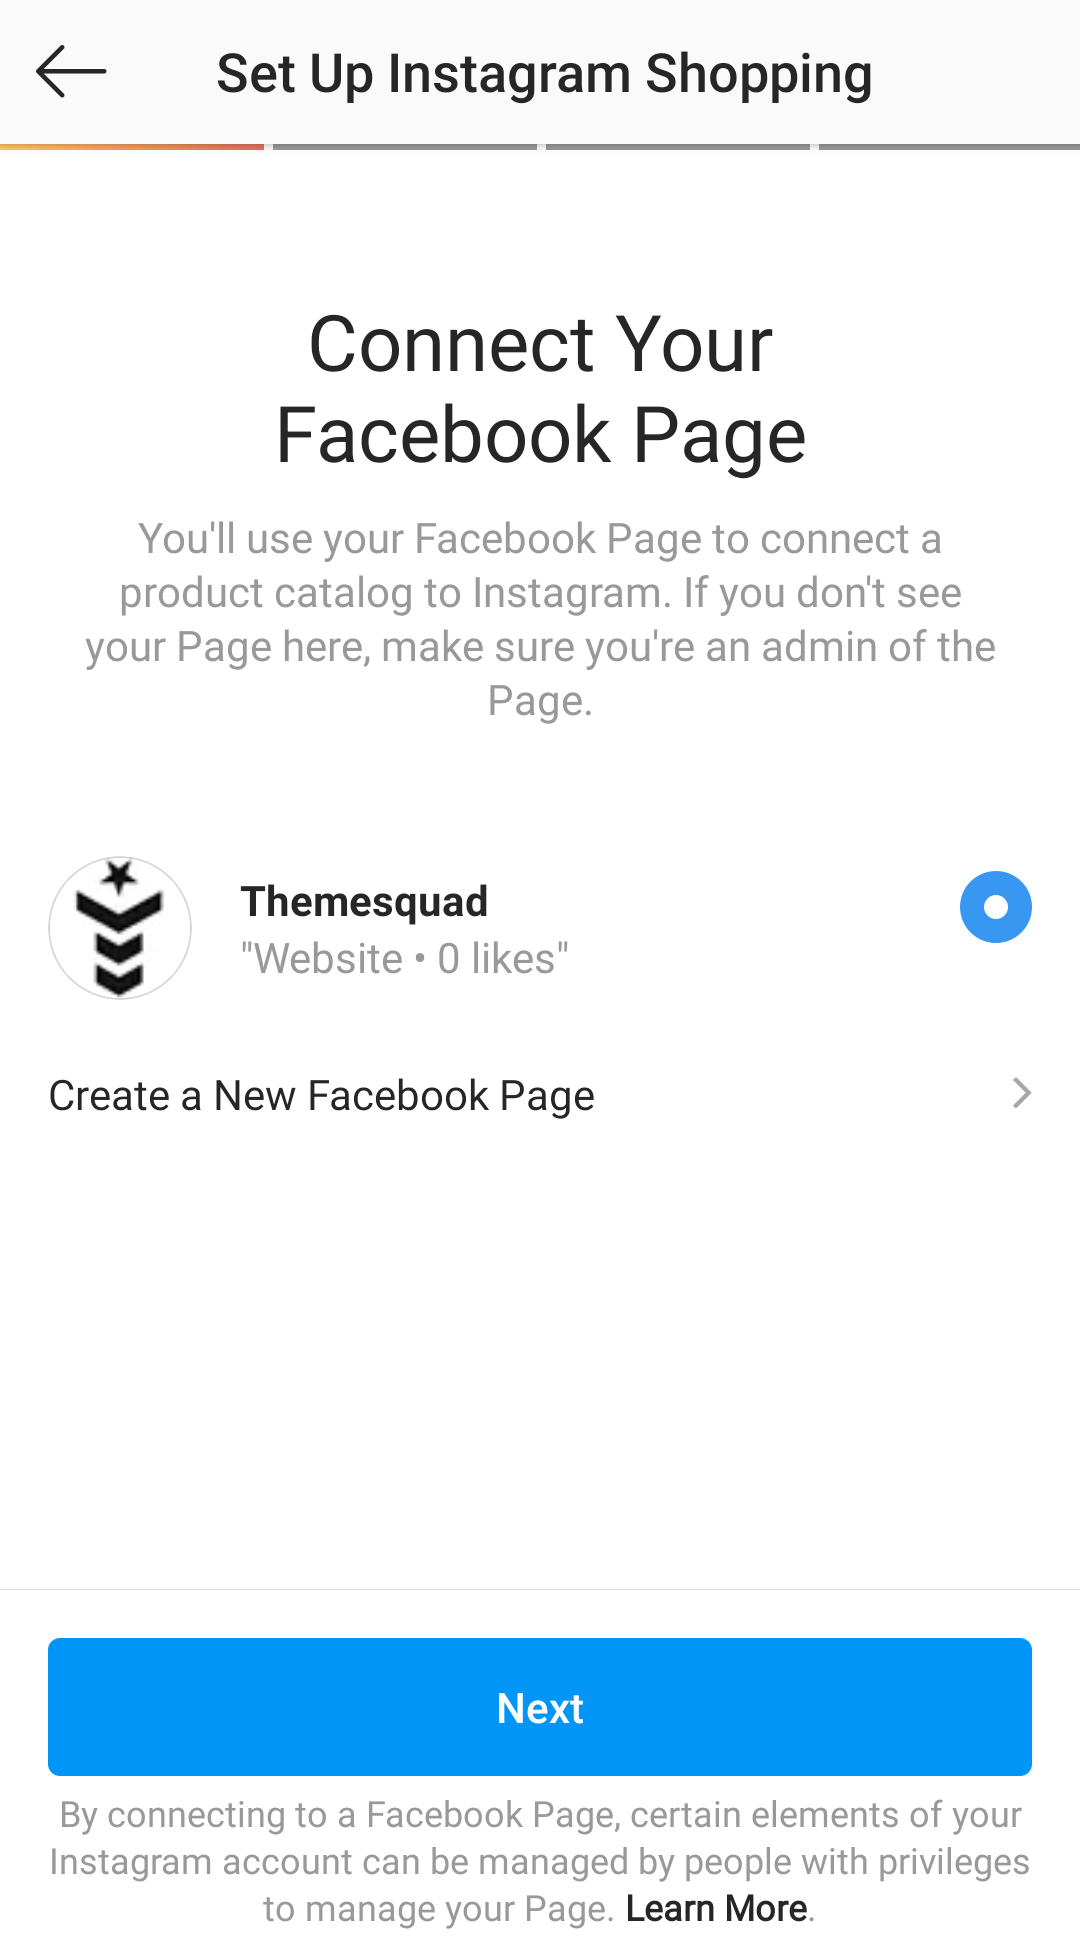
↑ Back to topIn your Instagram mobile app, log in with the same Instagram business account connected to your Facebook Page.
Go to your profile settings, tap on Business > Shopping > Set Up Instagram Shopping, and follow the steps to submit your catalog for review.

You will be asked to connect to a Facebook account during the process. Be sure you enter the same account you connected to the store and have access to the Business Manager.

Next, select the Facebook Page and Catalog.

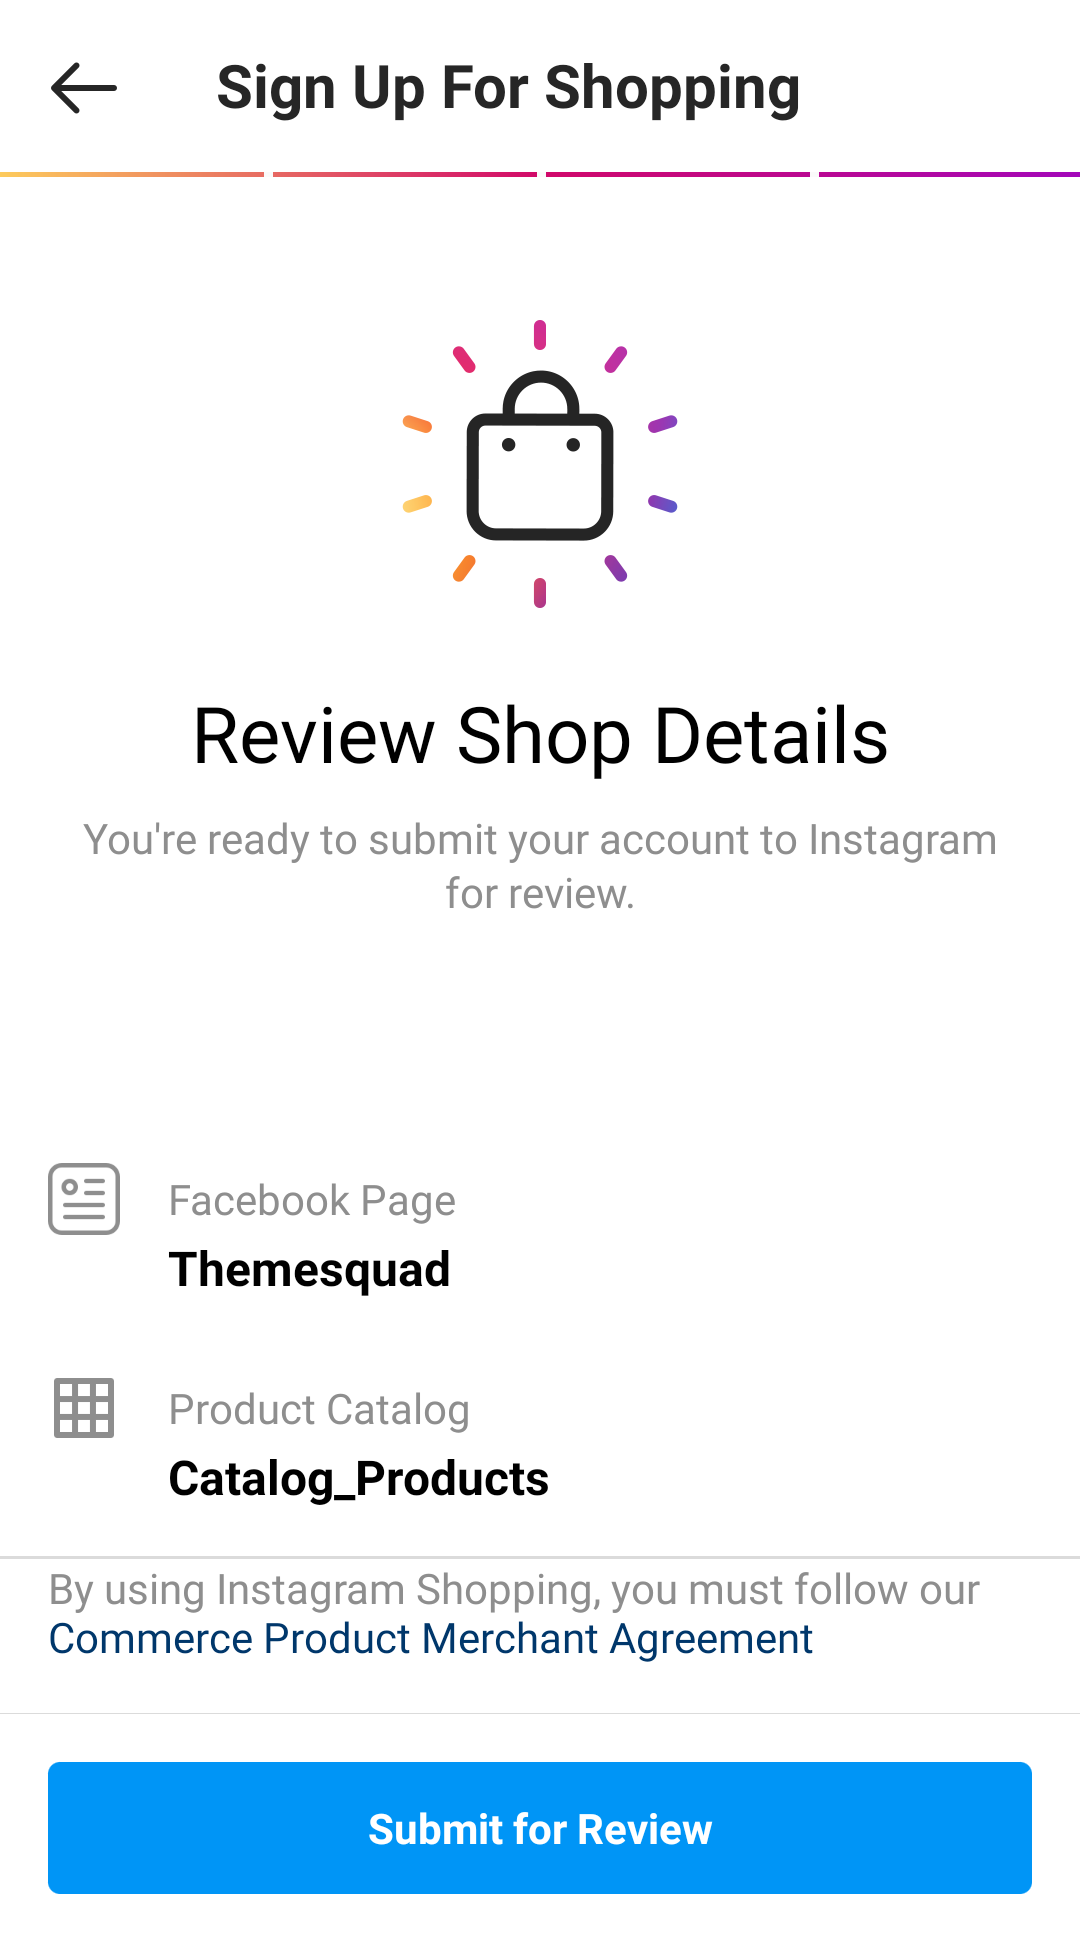
In the next step, you will have to select a Website Domain for the catalog. This is to validate you are the owner of the store you are loading the catalog. If you haven’t verified the domain of your store yet. In your Business Manager, go to “Business Settings > Brand Safety > Domains” and follow the steps.

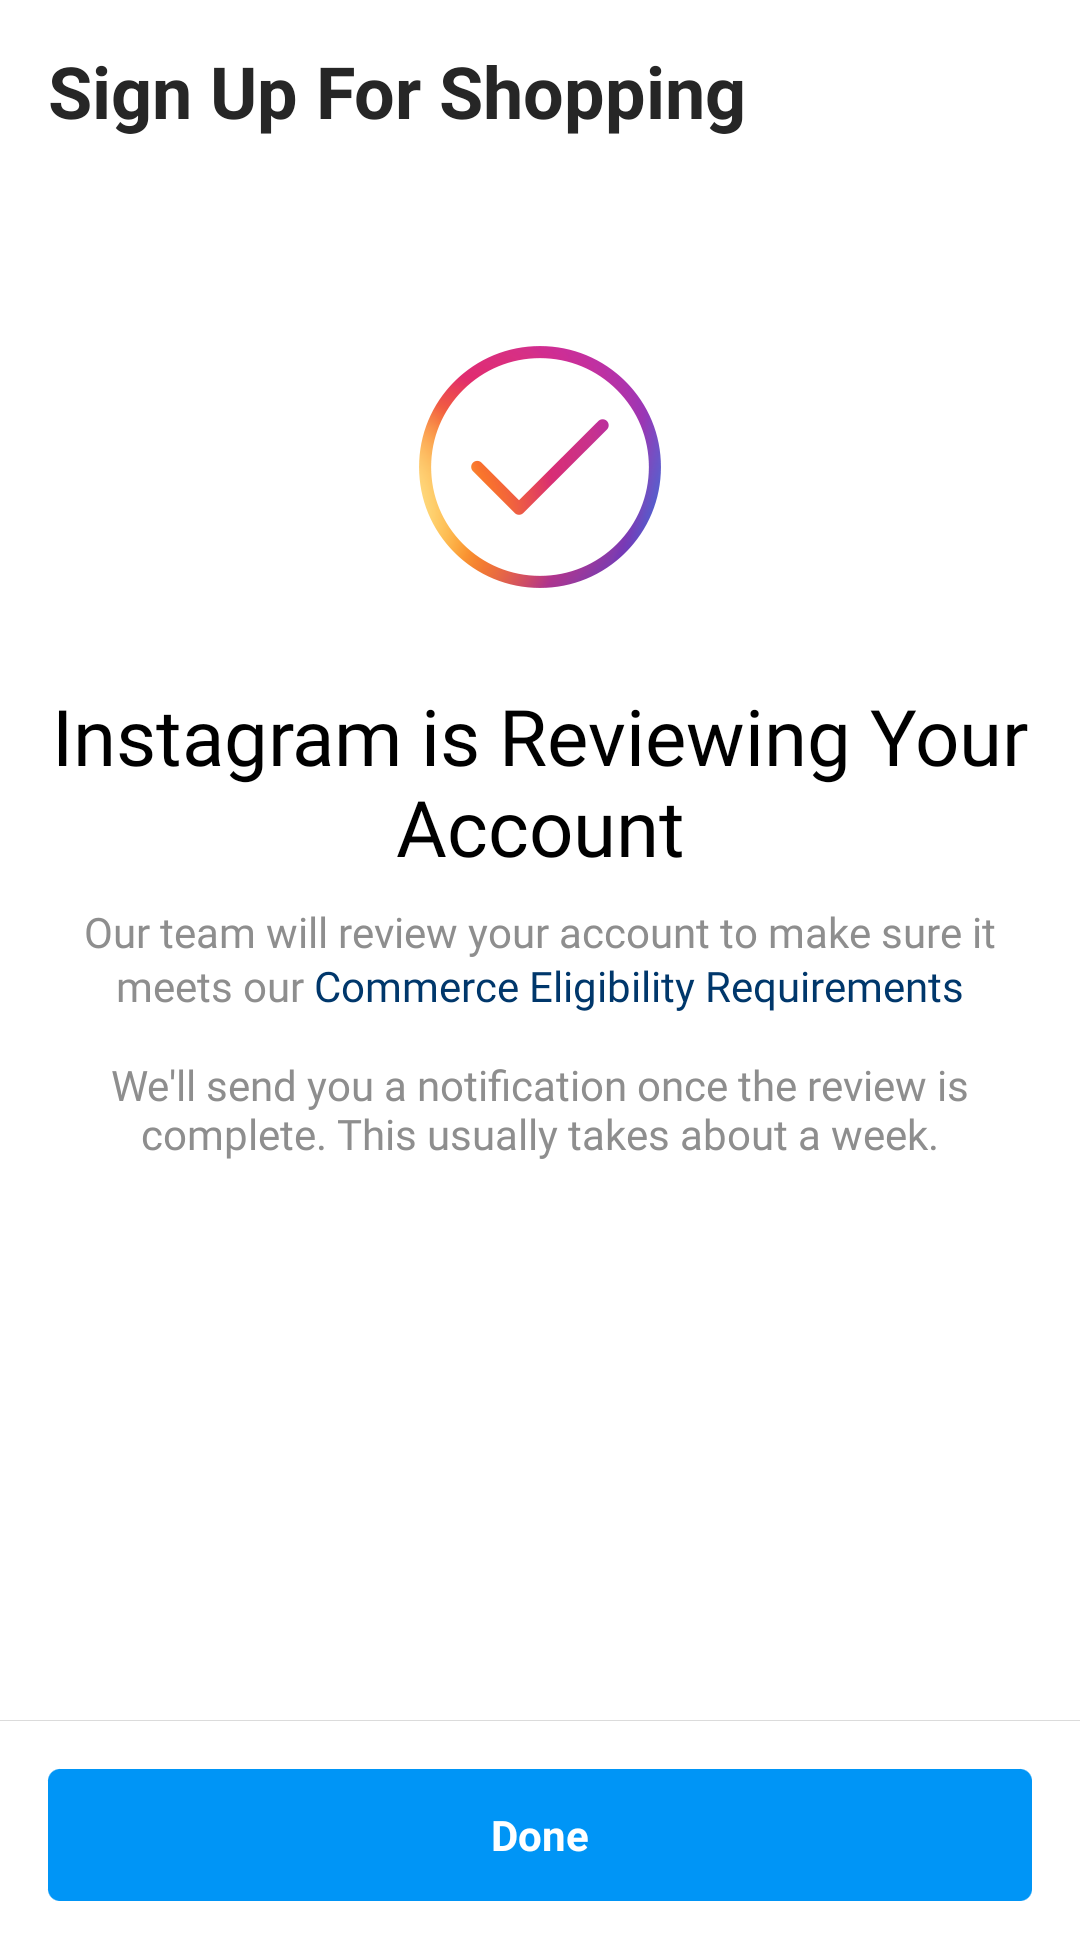
Finally, review the shop details and submit the catalog for review. Usually, the process takes a few days, but sometimes it can take longer. Once you’ve been approved, you’ll receive a notification from the Instagram team.
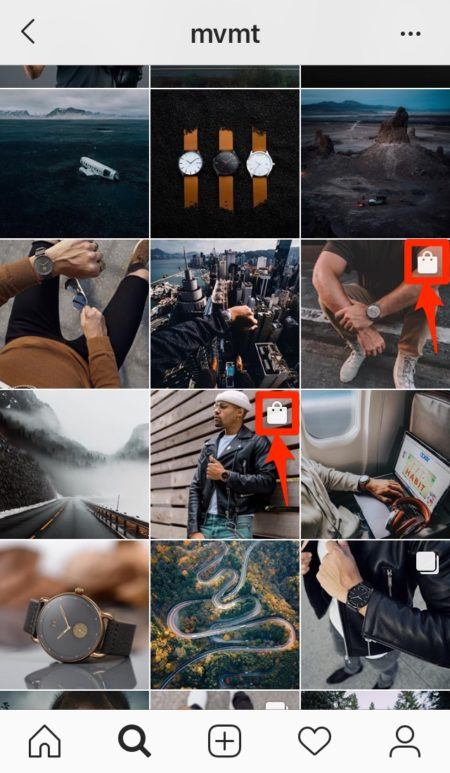
Now that your Instagram account has been approved for shopping, let’s turn on this feature. Go to “Settings > Business > Shopping“, select the “Product Catalog” you want to connect to your account, and tap on “Done“.
The final step is, Start tagging! You can tag your products in your Instagram posts and stories. Create a post as usual and tap on “Tag Products” to add a product from your catalog. Great, you’ve created your first shoppable post!
For more info about the usage of the app. Check the official documentation.
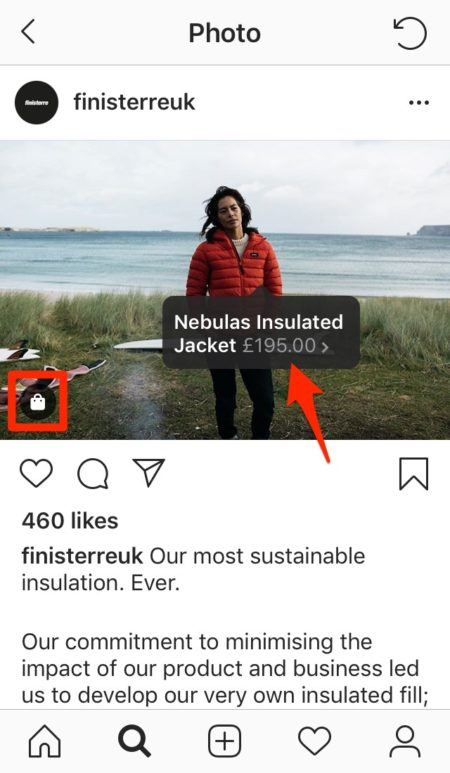
Add a Hashtag to a Product
To add an Instagram hashtag to a product:
- Go to WooCommerce > Products and select a product from the list.
- Select the Instagram tab in the Product Data meta box.
- Add a hashtag and update the product.
- Optional. Set the type of images to display or use the global behavior.
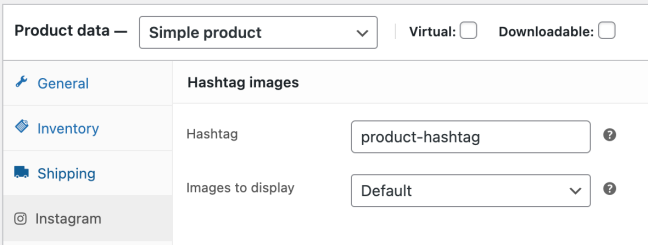
Images tagged with the supplied hashtag are then outputted on the product listing screens on the front end of your website.
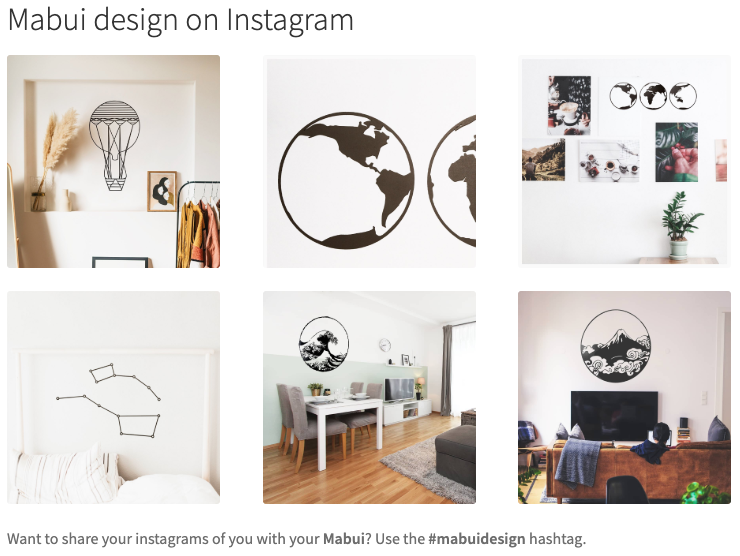
Note: The hashtag is not filtered by any account. It shows the images (even from other users) tagged with this hashtag. So, to only display images related to your products, it’s recommended to be as specific as you can when defining the hashtag. A combination of your store name + the product name could be fine.
Customization
↑ Back to topThis extension uses “WooCommerce Template Files”. So, you can easily customize the HTML markup of the Instagram section on the product pages.
Change images location
↑ Back to topIf you want to change the location where the Instagram images are displayed on your product page, use the following snippet:
// Remove current location.
remove_action( 'woocommerce_after_single_product', 'wc_instagram_product_hashtag' );

// Set the new location to any available hook of the 'content-single-product.php' template.
add_action( '{wc-single-product-hook}', 'wc_instagram_product_hashtag' );
You can paste the code in the functions.php file of your active theme or use an external plugin like Code Snippets for this.
FAQ
↑ Back to topWhy Facebook login?
↑ Back to topTo access the images published by other people and tagged with each product hashtag, it’s necessary to use the new Instagram Hashtag Search API (older has been deprecated).
This new Instagram API has been built over the Facebook Graph API, requiring to log in with a Facebook account instead of an Instagram account. There is no other way to access this information.
Additionally, Instagram cannot handle product catalogs by itself, you need to upload the products to your Meta Business Manager and connect your Instagram account to it.
Can I post content to my Instagram account?
↑ Back to topOur extension doesn’t post any content to your Instagram account or synchronize your current Instagram profile with your store.
How to deauthorize our application?
↑ Back to topIf you want to reset the connection between your store and Instagram, or you just want to disconnect it. Follow these steps:
- Disconnect the account on the “WooCommerce Instagram” settings page.
- In your Facebook account. Go to “Settings > Business Integrations” and select the WooCommerce app. After that, click on the “remove” button.
Something doesn’t work properly
↑ Back to topIf you are experiencing an error with our extension that isn’t listed in the Troubleshooting section, feel free to submit us a support ticket explaining your problem. To give you a solution as fast as possible, it would be very useful for us if you could attach a screenshot of the error log.
Where can I find the error log?
↑ Back to topThis extension creates a log to store all the errors related to the Instagram API. To find it, go to “WooCommerce > Status > Logs” and select the file “wc_instagram_api_errors“.
Can I use Instagram Shopping in my country?
↑ Back to topInstagram Shopping is enabled in most countries, but some of them are currently excluded. You can check the complete list of supported markets here.
What kind of products can I sell?
↑ Back to topPlease look at the Terms and Policies to know what kind of products you are allowed to sell on the different platforms.
How to update a catalog immediately?
↑ Back to topYou can force an update of the product data by following this guide.
Can I upload my products to Instagram directly?
↑ Back to topNo, Instagram only fetches the products uploaded to your Commerce Manager. It’s not possible to upload your catalog to Instagram directly.
How to group the products by the WC product categories?
↑ Back to topOnce you have uploaded your products to a Commerce Manager Catalog, you will have a list with all of them. To group the products by using the product categories defined in your WooCommerce store, you must create a “Set of items” for the different categories.
To select the products of specific categories, use the option “Product type” and enter the categories you want to include in this set.

Can I modify how my images are displayed on Instagram?
↑ Back to topYes. Go to your Business Manager. In Settings => Catalog => Image Cropping. You can choose different ways of how they are displayed.
Do I need to set up a Facebook shop?
↑ Back to topIf you completed this tutorial successfully, a Facebook Shop should have been created automatically during the process. You can find it in the section “Commerce Manager” of your Facebook Business Manager. Once the review of your Instagram account is finished, you can go on configuring the Facebook Shop for additional features and make it visible to your customers.
Instagram Shopping vs. Instagram Checkout
↑ Back to topWhat it’s the difference between both services? In a nutshell, Instagram Shopping redirects your audience to your store. Instagram Checkout allows your audience to purchase your products directly in the Instagram app. At this moment, Instagram Checkout is only available in the US.
How many hashtags can I use?
↑ Back to topThere are some limitations imposed by Facebook in the use of the Instagram Hashtag Search API. You can query a maximum of 30 unique hashtags every seven days.
Our extension caches all the query results to reduce your quota consumption. So, this limit might be exceeded (although it isn’t guaranteed) past the first seven days.
If you have more than 30 products and you are experiencing any trouble with the hashtag limit, we recommend you prioritize the products with this feature or share the same hashtag between very similar products.
Can I use a different hashtag per product variation?
↑ Back to topNo, and it isn’t recommended due to the limitations explained in the previous question/answer.
Can I change the image size?
↑ Back to topAt this moment, no. The Instagram API only returns the real size of the images. We’re working to create thumbnails with the same aspect ratio for the displayed images.
How do I refresh the product images?
↑ Back to topTo improve your store’s performance and not exceed the quota consumption of the Instagram API, our extension caches the images and the results of the API requests for 24 hours.
If you want to force a refresh of the images displayed on product pages, you can go to “WooCommerce > Status > Tools > Instagram images” and click on the “Clear” button.
What are the requirements to be eligible for Instagram Shopping?
↑ Back to topYou can find the requirements for enabling Instagram shopping here.
Can I create multiple catalogs and have them linked to different Instagram accounts?
↑ Back to topThe catalog feeds created by our extension can be connected to various Business Manager catalogs, and these Business Manager catalogs can be connected to as many Instagram accounts as you want. So, answering your question, yes, it’s indeed possible.
Your file is in the wrong XML format
↑ Back to topThis error indicates that the XML file is not being generated or created. It is possible the server disk is full or that the directory is write-protected.
I am using WPML and I need to export the products in different languages
↑ Back to topUnfortunately, our WooCommerce Instagram plugin is incompatible with the WPML plugin, so only products in the base language are exported.
Will my Instagram checkout orders be synced to WooCommerce orders?
↑ Back to topWooCommerce Instagram extension does not record or capture orders made directly on Instagram. Purchases made in Meta are independent of WooCommerce.
Can I change the Facebook account connected to my site?
↑ Back to topYes, if you want to change your Facebook account, just click on “Disconnect Account” on the extension’s settings page and then connect the new Facebook account you want to use.
Troubleshooting
↑ Back to topInstagram Business account not found
↑ Back to topIf you receive this error when saving your settings, it means that the selected page in the “Facebook Page” setting doesn’t have an Instagram Business account connected to it. Please, go to this section and review all the steps carefully.
My Instagram account is not eligible for shopping
↑ Back to topIf you read this message when trying to connect your Instagram account to your Business Manager Catalog or Shop, please, be sure your account satisfies all the requirements. Additionally, check you have turned your Instagram account into a business account.
Shops is no longer available in your region
↑ Back to topMeta recently changed the list of eligible countries for shops and updated their requirements. If you see this warning in the “Sales channels” section of your catalog setting, please, revise the new requirements for your region and update your Business Manager configuration to accomplish with them.
Most of the time, this error is thrown by the way Meta determines the location of your shop:
The location of a given shop will be determined based on the location of the commerce account that it is associated with. The location of the commerce account will be determined by the location of the user that created the account (if created after April 1, 2023), or the location of assets such as an Instagram account or Facebook Page associated with the commerce account (if created before April 1, 2023).
Meta Business Help Center
If you think there was a mistake determining your account is not eligible for shopping, we recommend you contact the Meta Business Manager support team to solve the incident. Unfortunately, this issue is out of our scope or the WooCommerce Instagram extension.
My Instagram account is pending review
↑ Back to topOnce you have converted your Instagram account into a business account and requested to enable Instagram Shopping, the Instagram team will review your account and check it accomplishes all the requirements. The process may take a few days. If you haven’t received a response after a week, contact the Instagram support team to get an update on the review status.
Some products don’t appear on Instagram
↑ Back to topIf you are missing some products in your Instagram shop, they probably weren’t synchronized correctly with your Commerce Manager or have issues with the product data. To fix this issue, follow these steps:
- Check the catalog feed is up to date and includes the affected products.
- Review the “Schedules” options of the “Data source” you created to upload the products to your Commerce Manager.
- Request an update by clicking on “Request update now“.
- Once the update finishes, check there are no issues in the product data that avoid loading using them. E.g., A missing description.
- If everything is ok, check the products are listed in the “Items” section.
- Go to your Instagram account and try to tag the products in a post or a story.
Note: Synchronizing your Commerce Manager and your Instagram Business Account might take a while.
Access credentials expired
↑ Back to topIf you see an admin notice with this message, it means the automated renewal process failed, or Facebook forced you to re-connect your Instagram account with your store. You only need to click on the “Renew access” button and follow the steps. More info is in the “Renewing access” section.
Hashtag images not loading properly on product pages
↑ Back to topInstagram rarely changes the URLs used to display the images (It uses a CDN), but when it happens, old image URLs are no longer valid, causing the images not loaded on your product pages.
To fix that, go to “WooCommerce > Status > Tools“, look for an option called “Clear Instagram images“, and click on the button “Clear“. This will clear all cached Instagram images in your store. Next time you or a customer visit a product page, the images will be refreshed automatically.
An unexpected error occurred
↑ Back to topIf you see this error during authentication. Probably there was an error related to the Instagram API connection. Please, take a screenshot of the “wc_instagram_api_errors” log and submit us a support ticket with it.
Privacy Policy
↑ Back to topCheck the Privacy Policy of this extension.
Questions and Feedback
↑ Back to topHave a question before you buy it? Please fill out this pre-sales form.
Already purchased and need some assistance? Get in touch with the Developer via the Help Desk.