Note: This product is no longer for sale at WooCommerce.com. Documentation is not being updated. We recommend the Amazon and eBay Integration as a replacement.
Requirements
↑ Back to top- WooCommerce 2.6+
- eBay Australia account. You can register here.
- PayPal account. You can register here.
Installation
↑ Back to top- Download the .zip file from your WooCommerce account.
- Go to: WordPress Admin > Plugins > Add New and Upload Plugin with the file you downloaded with Choose File.
- Install Now and Activate the extension.
Setup and Configuration
↑ Back to top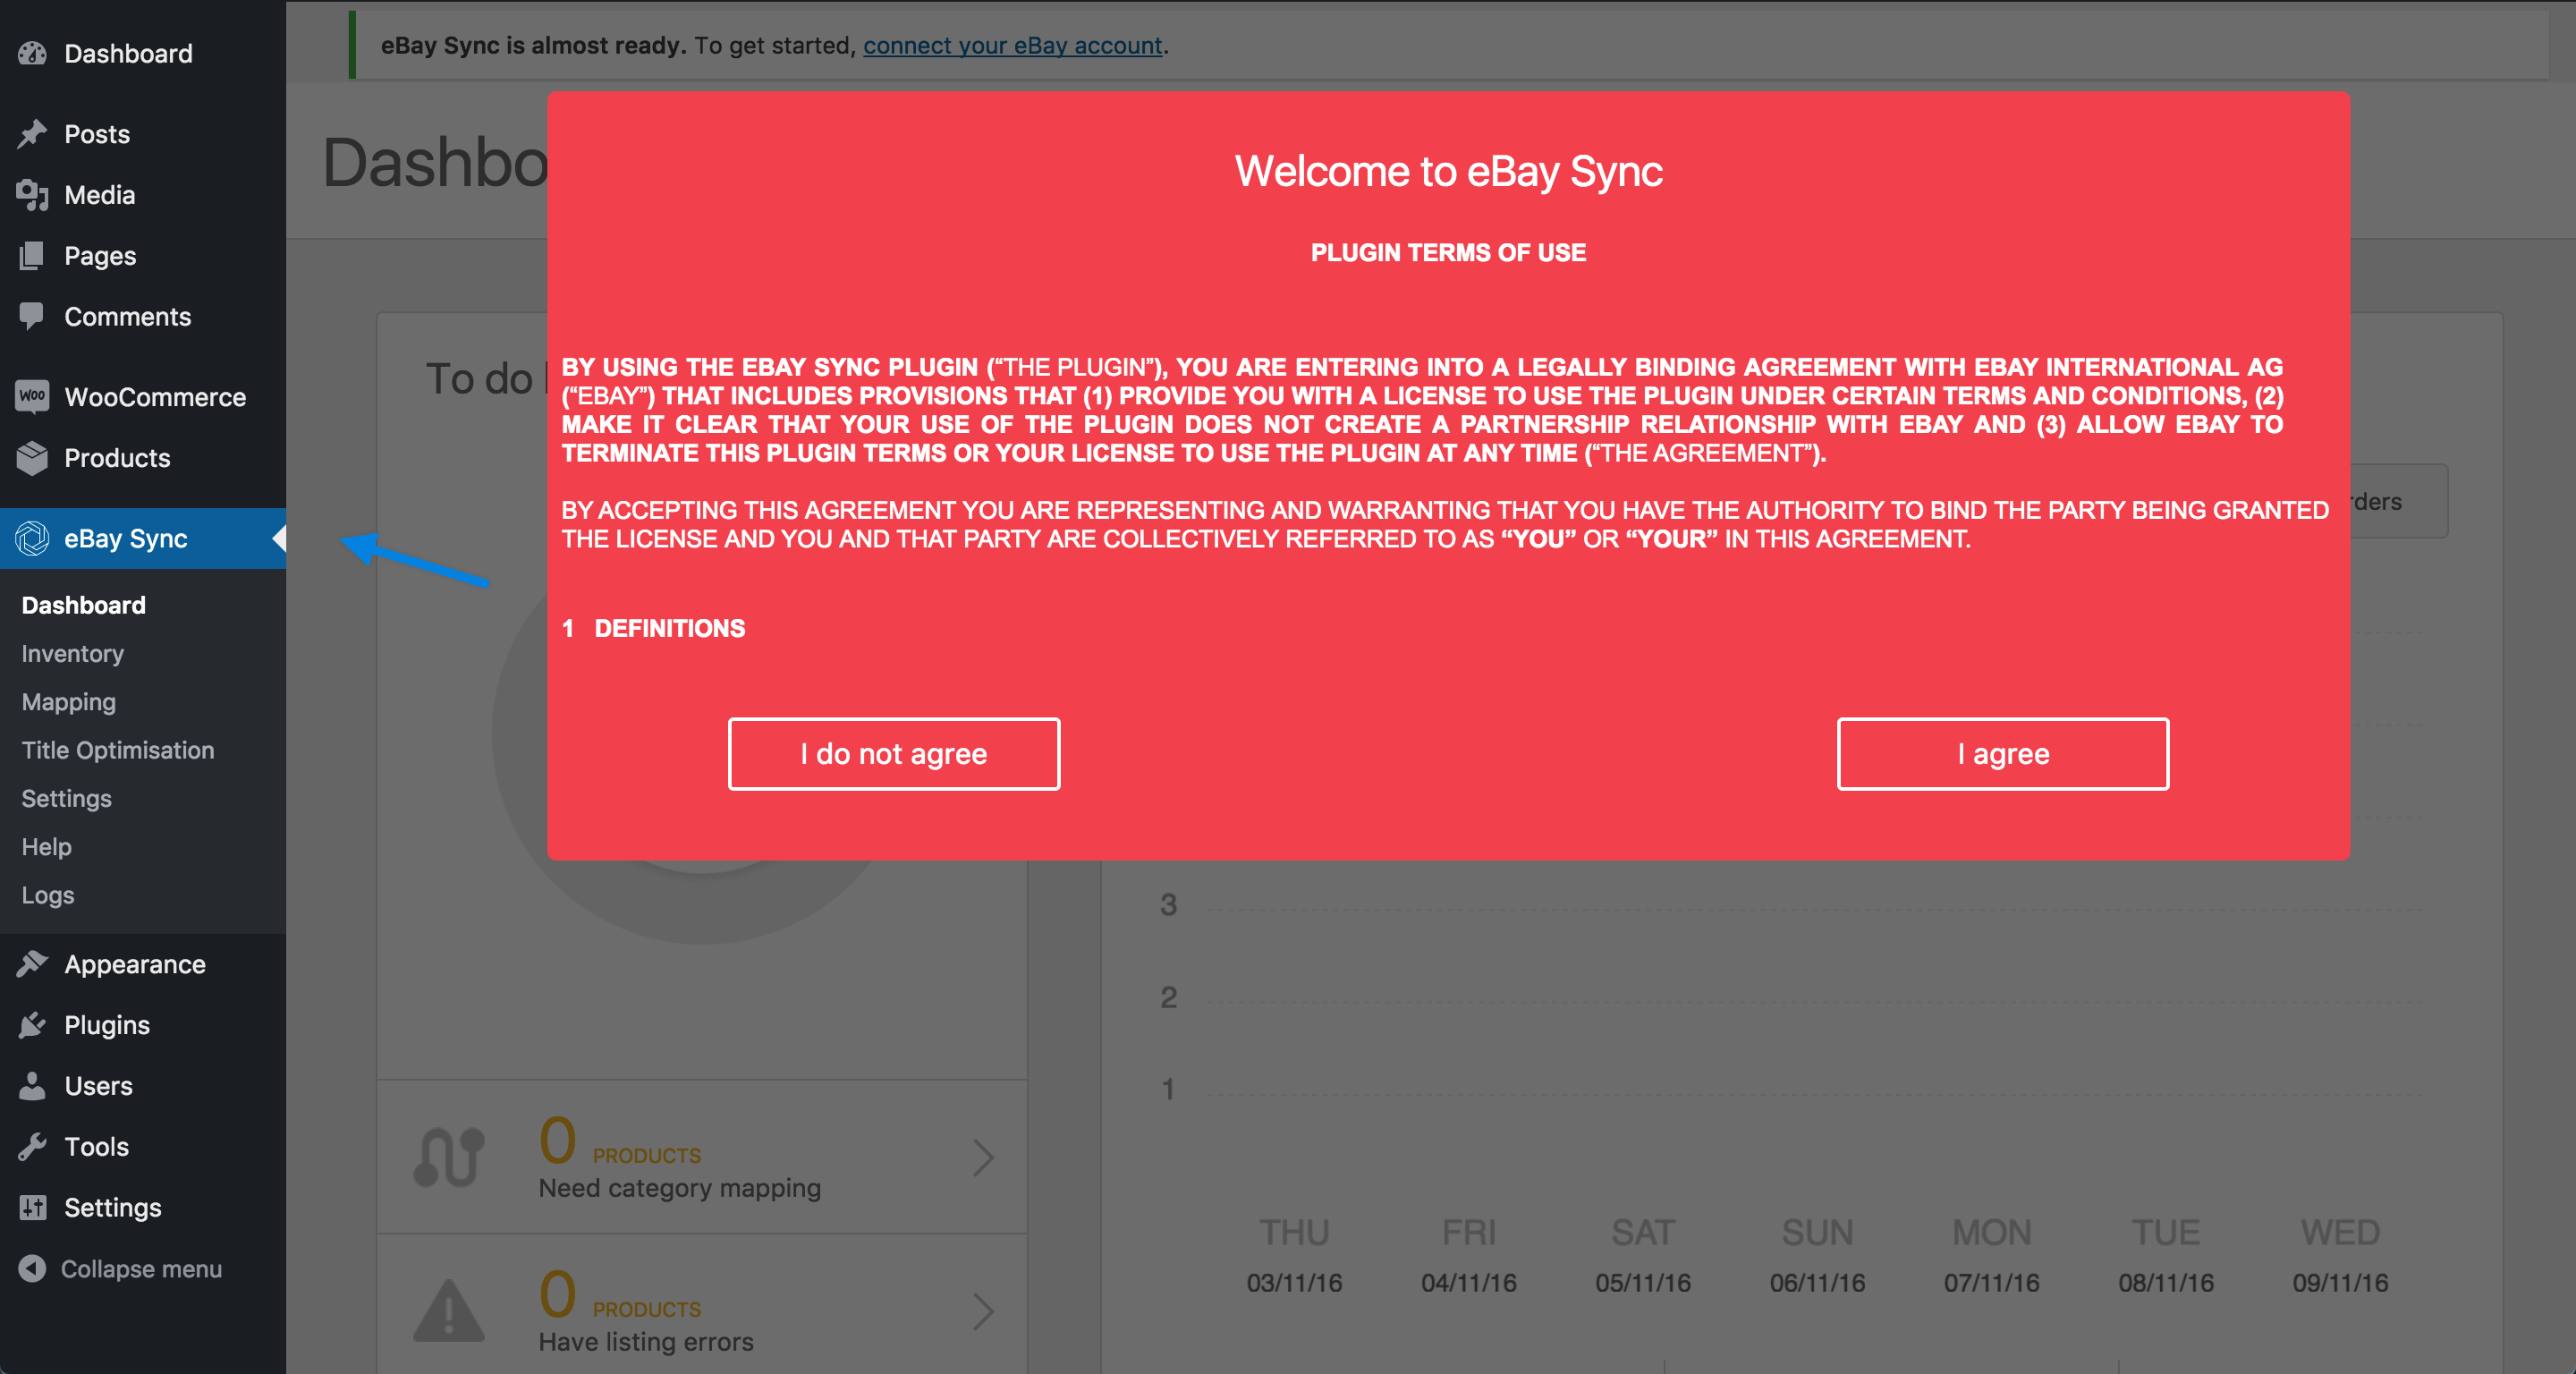 You should be taken to eBay Sync > Settings.
Connect your eBay account
↑ Back to top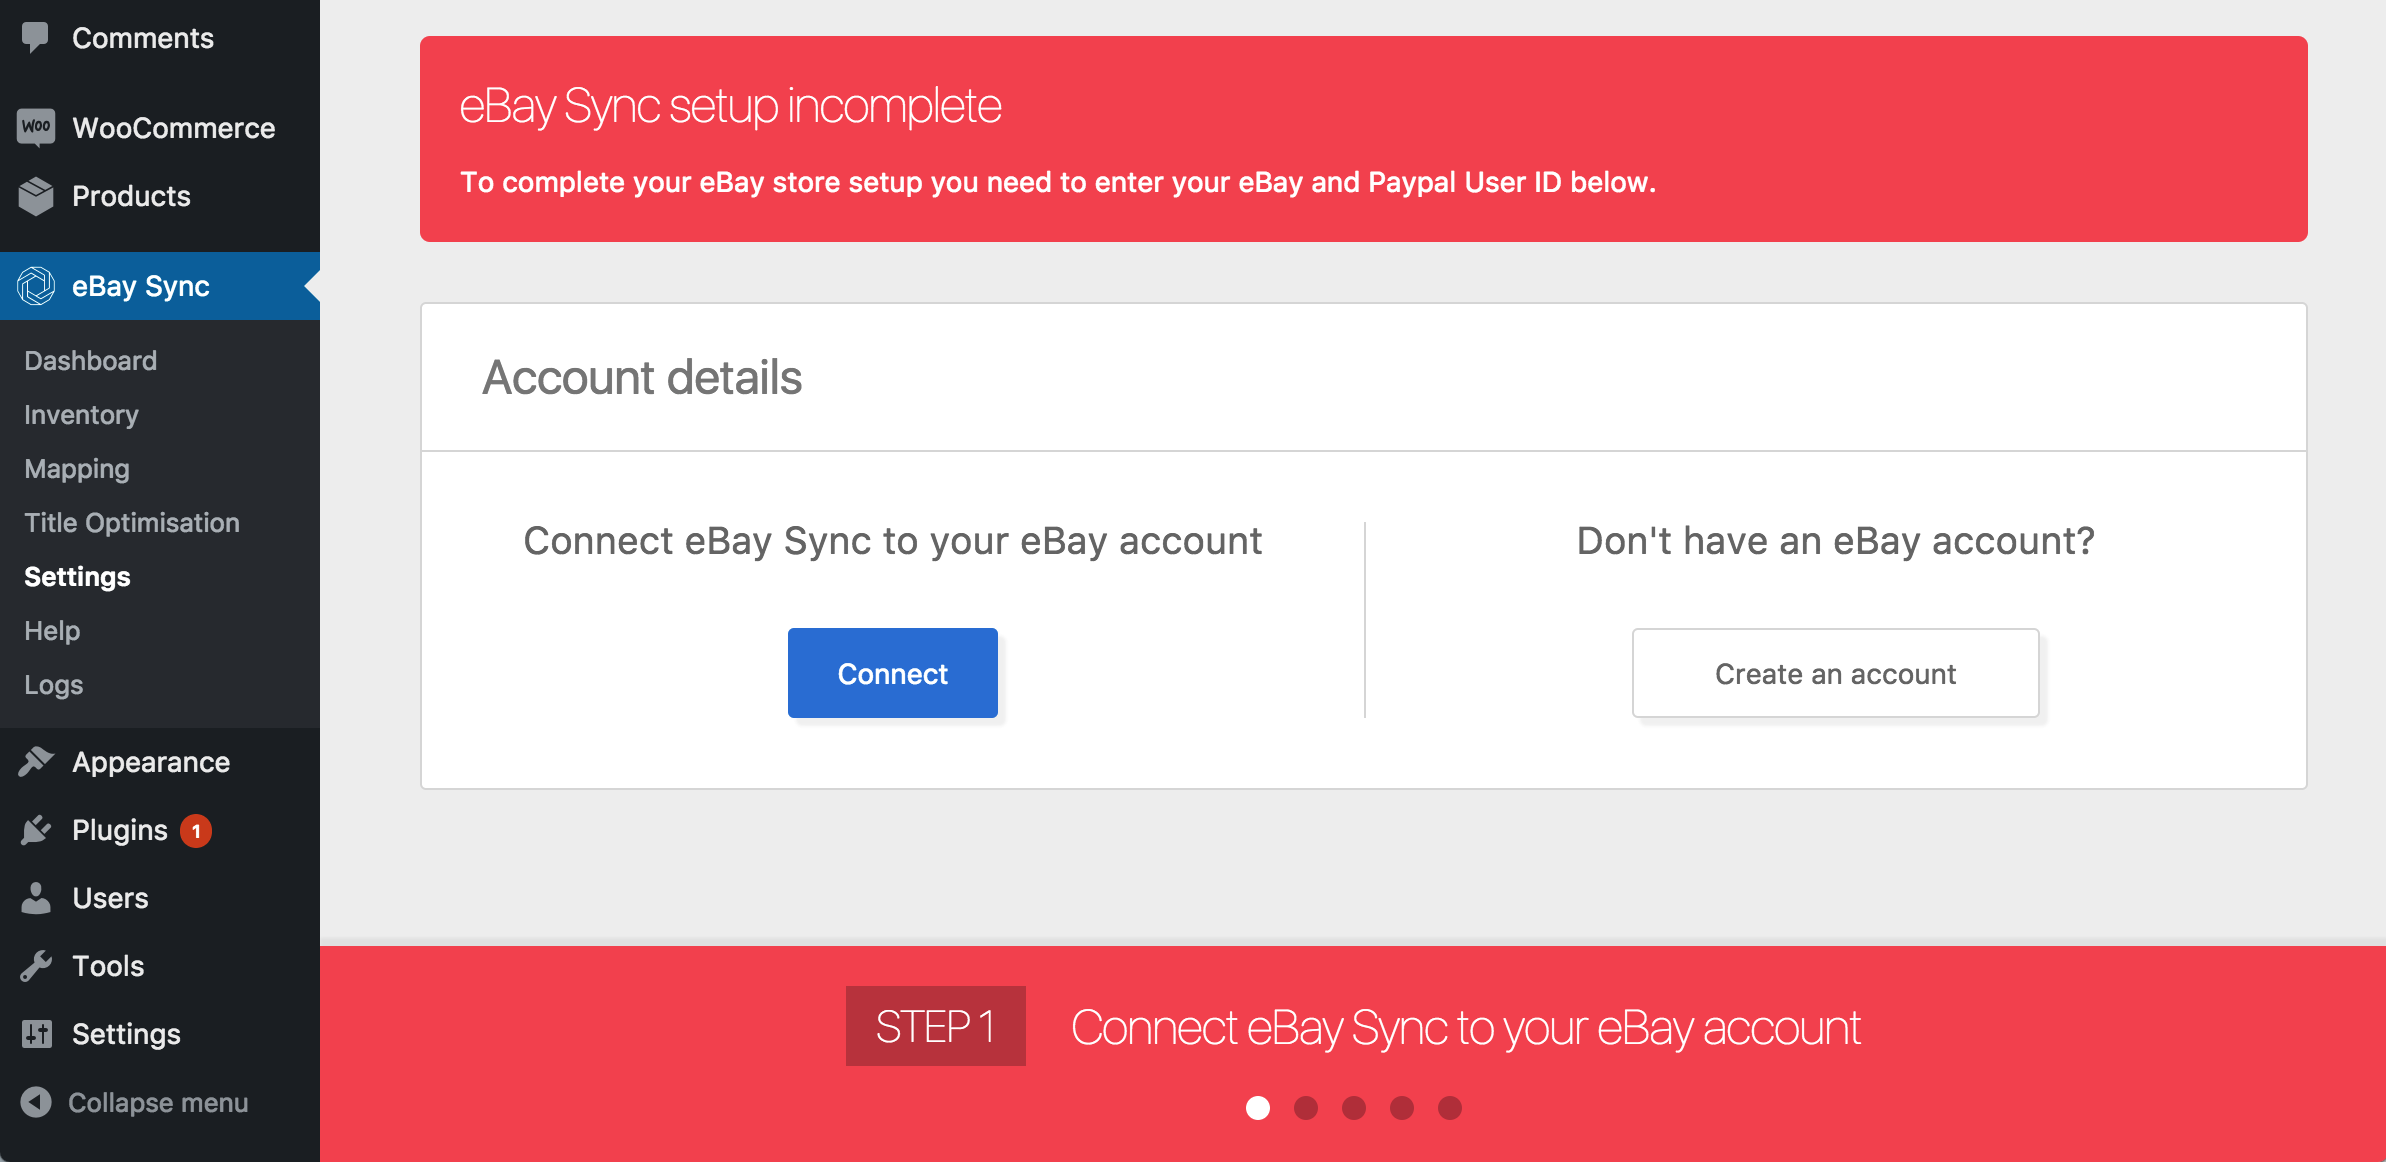 Or, if you have not yet registered for an eBay account yet, select Join Here to get to the eBay registration page.
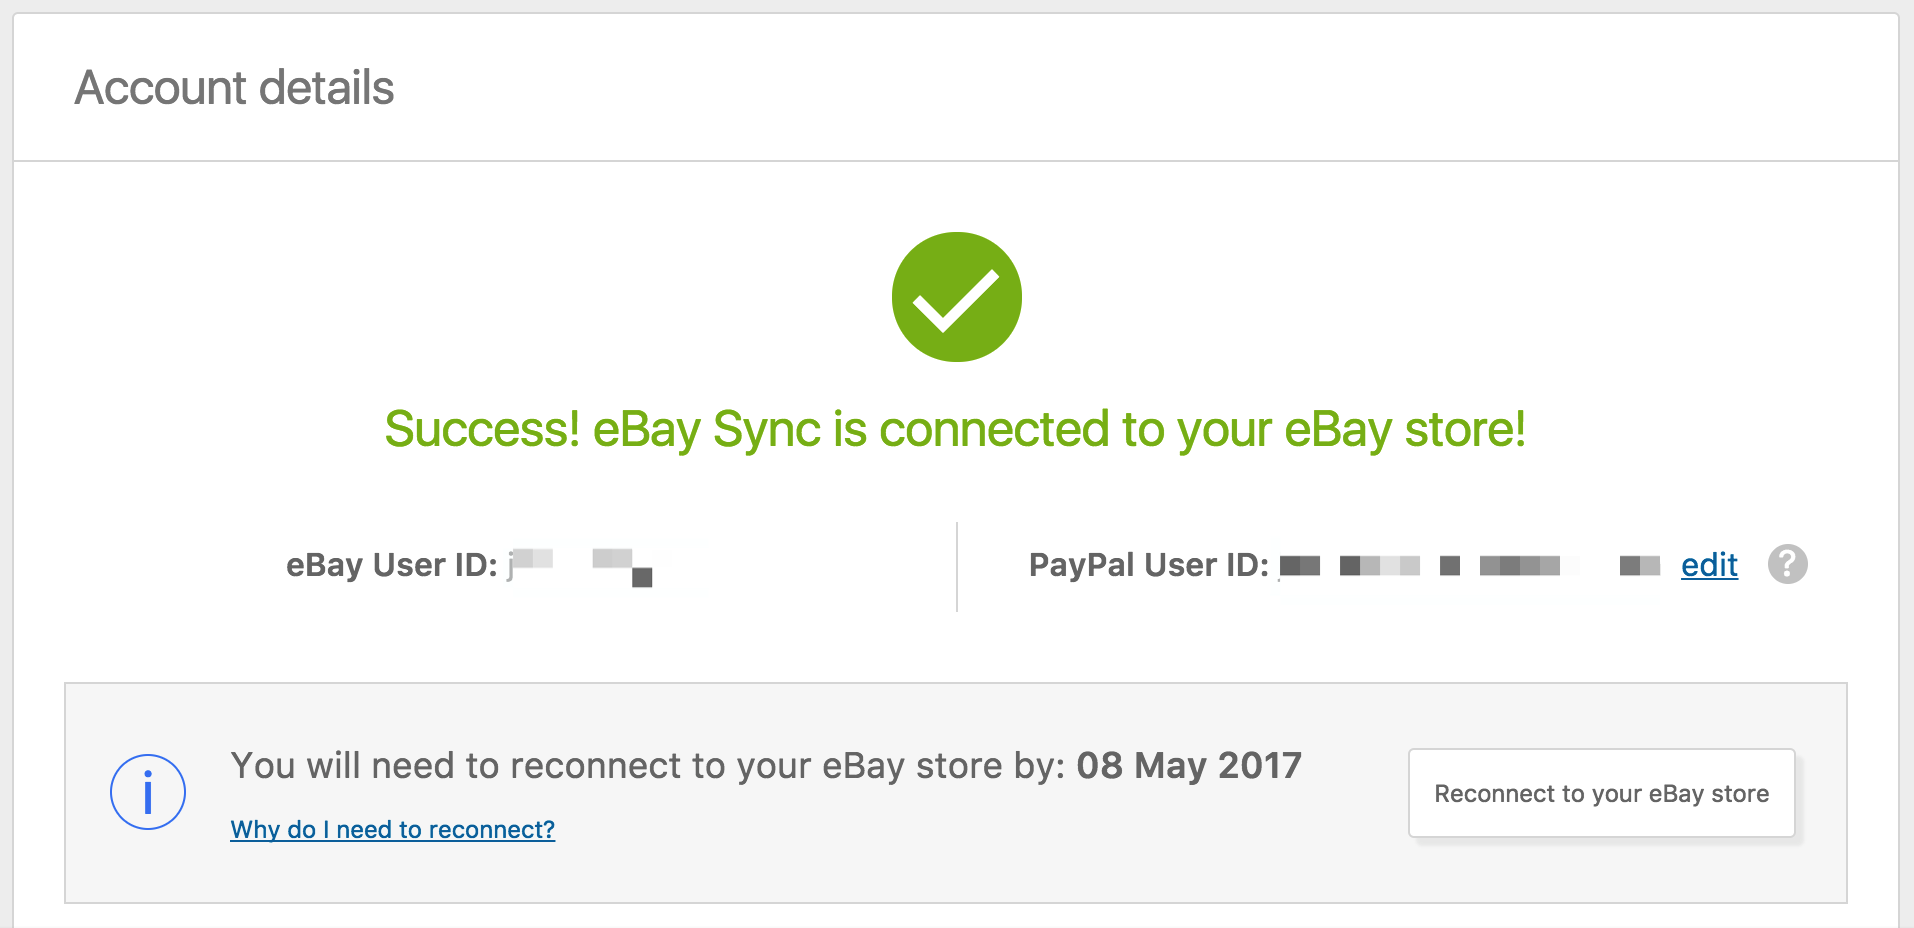
Your account is now successfully connected.
Or, if you have not yet registered for an eBay account yet, select Join Here to get to the eBay registration page.
Your account is now successfully connected.
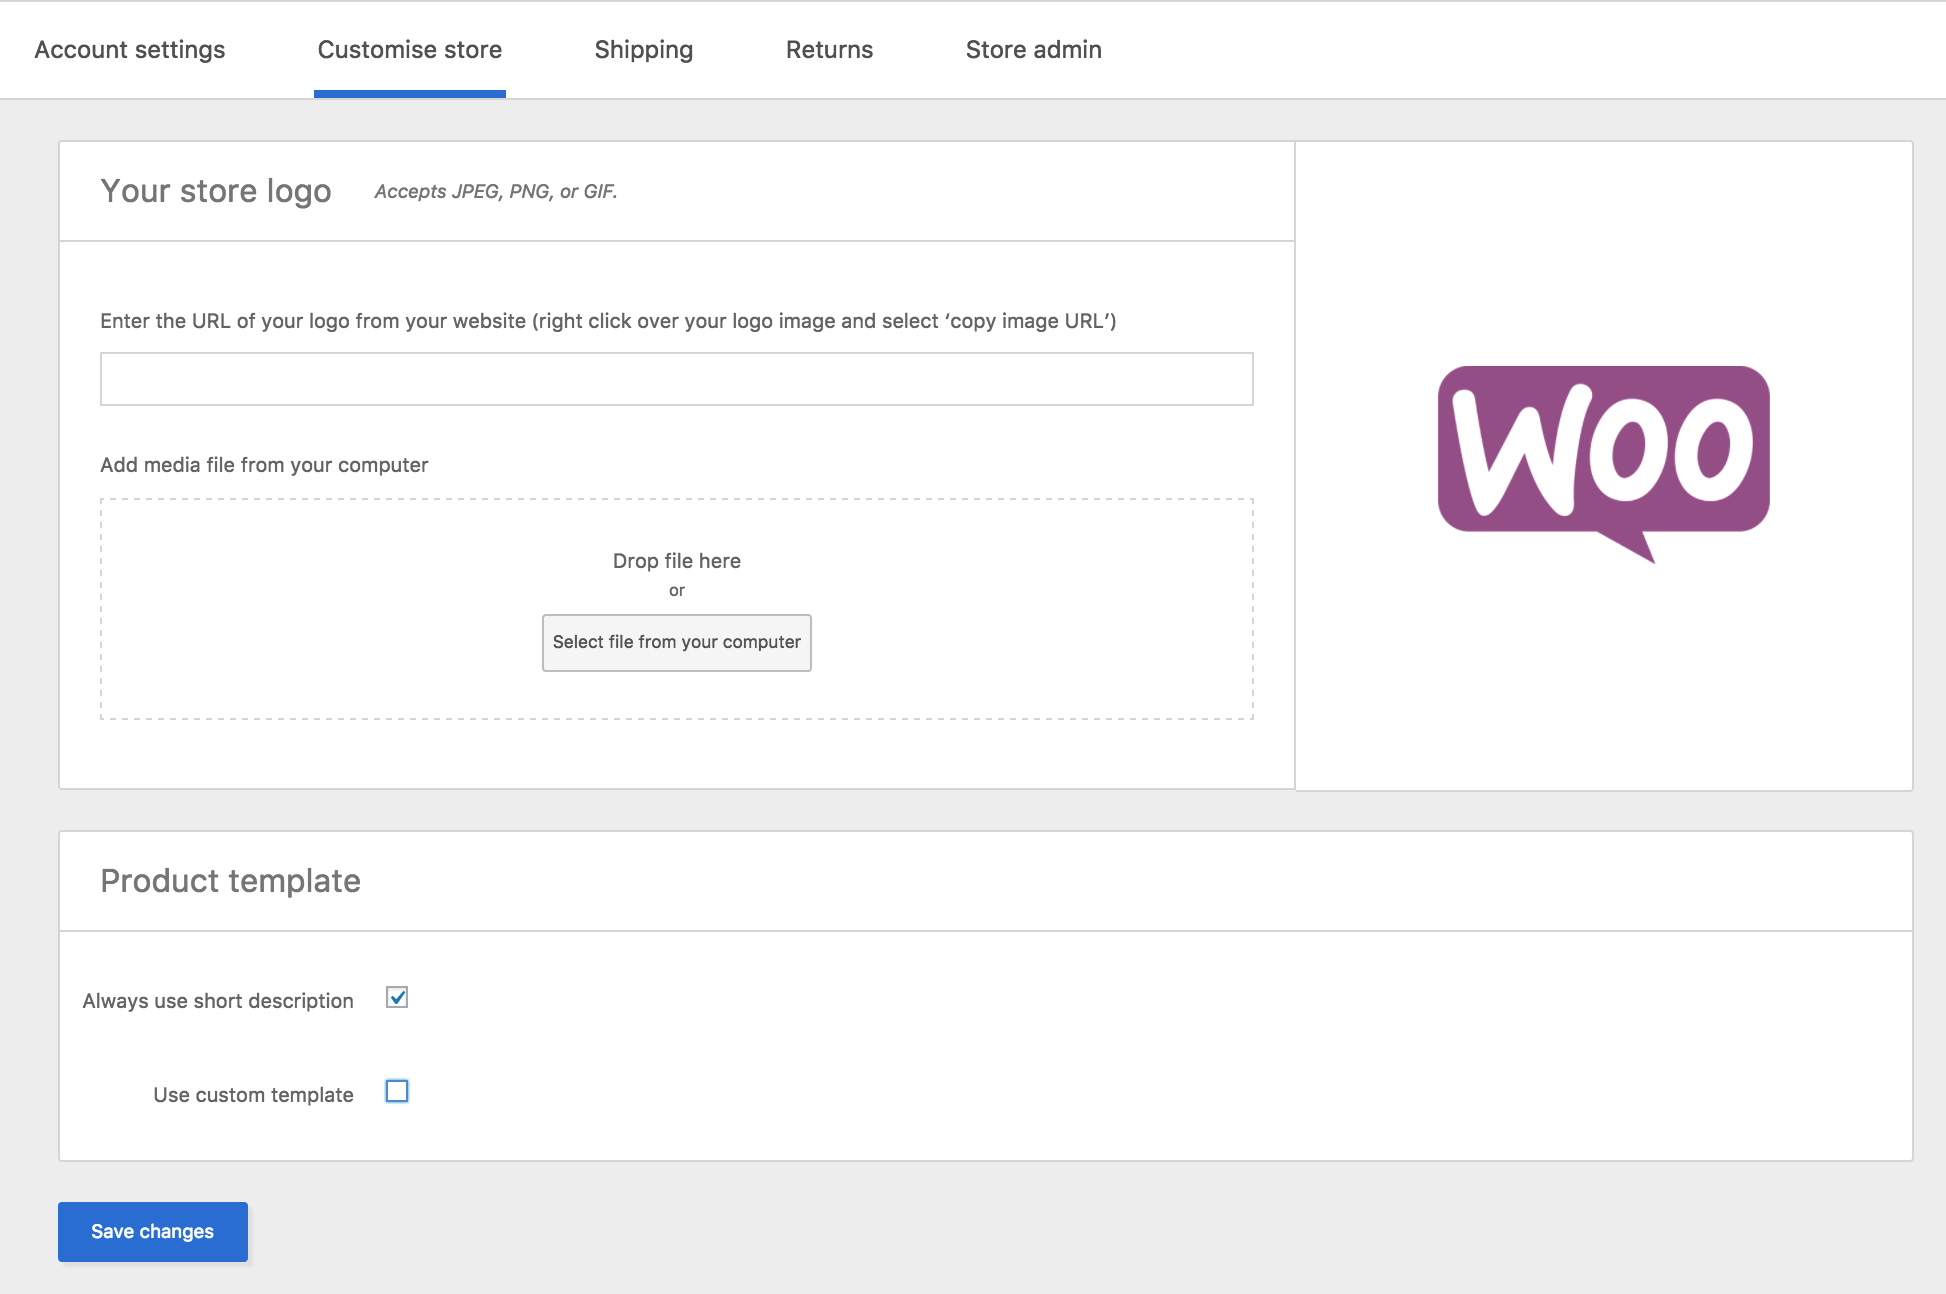
Customize your store
↑ Back to top- Change the logo by adding the URL of the logo or by uploading the file.
- Choose to enable the short description of products under Product template (optional).
- Select Use custom template if you wish to style your store. This opens a tab to add custom code and requires knowledge of CSS.
- Save changes
Shipping
↑ Back to top- Standard Shipping Fee: Amount you want to charge for standard shipping service. Or select Free Shipping. Leaving it blank is not an option.
- Express Shipping Fee: Amount you want to charge for express shipping service. Or select Free Shipping. Leaving it blank is not an option.
- Handling time: Number of days it takes for your store to process and ship the order to the customer.
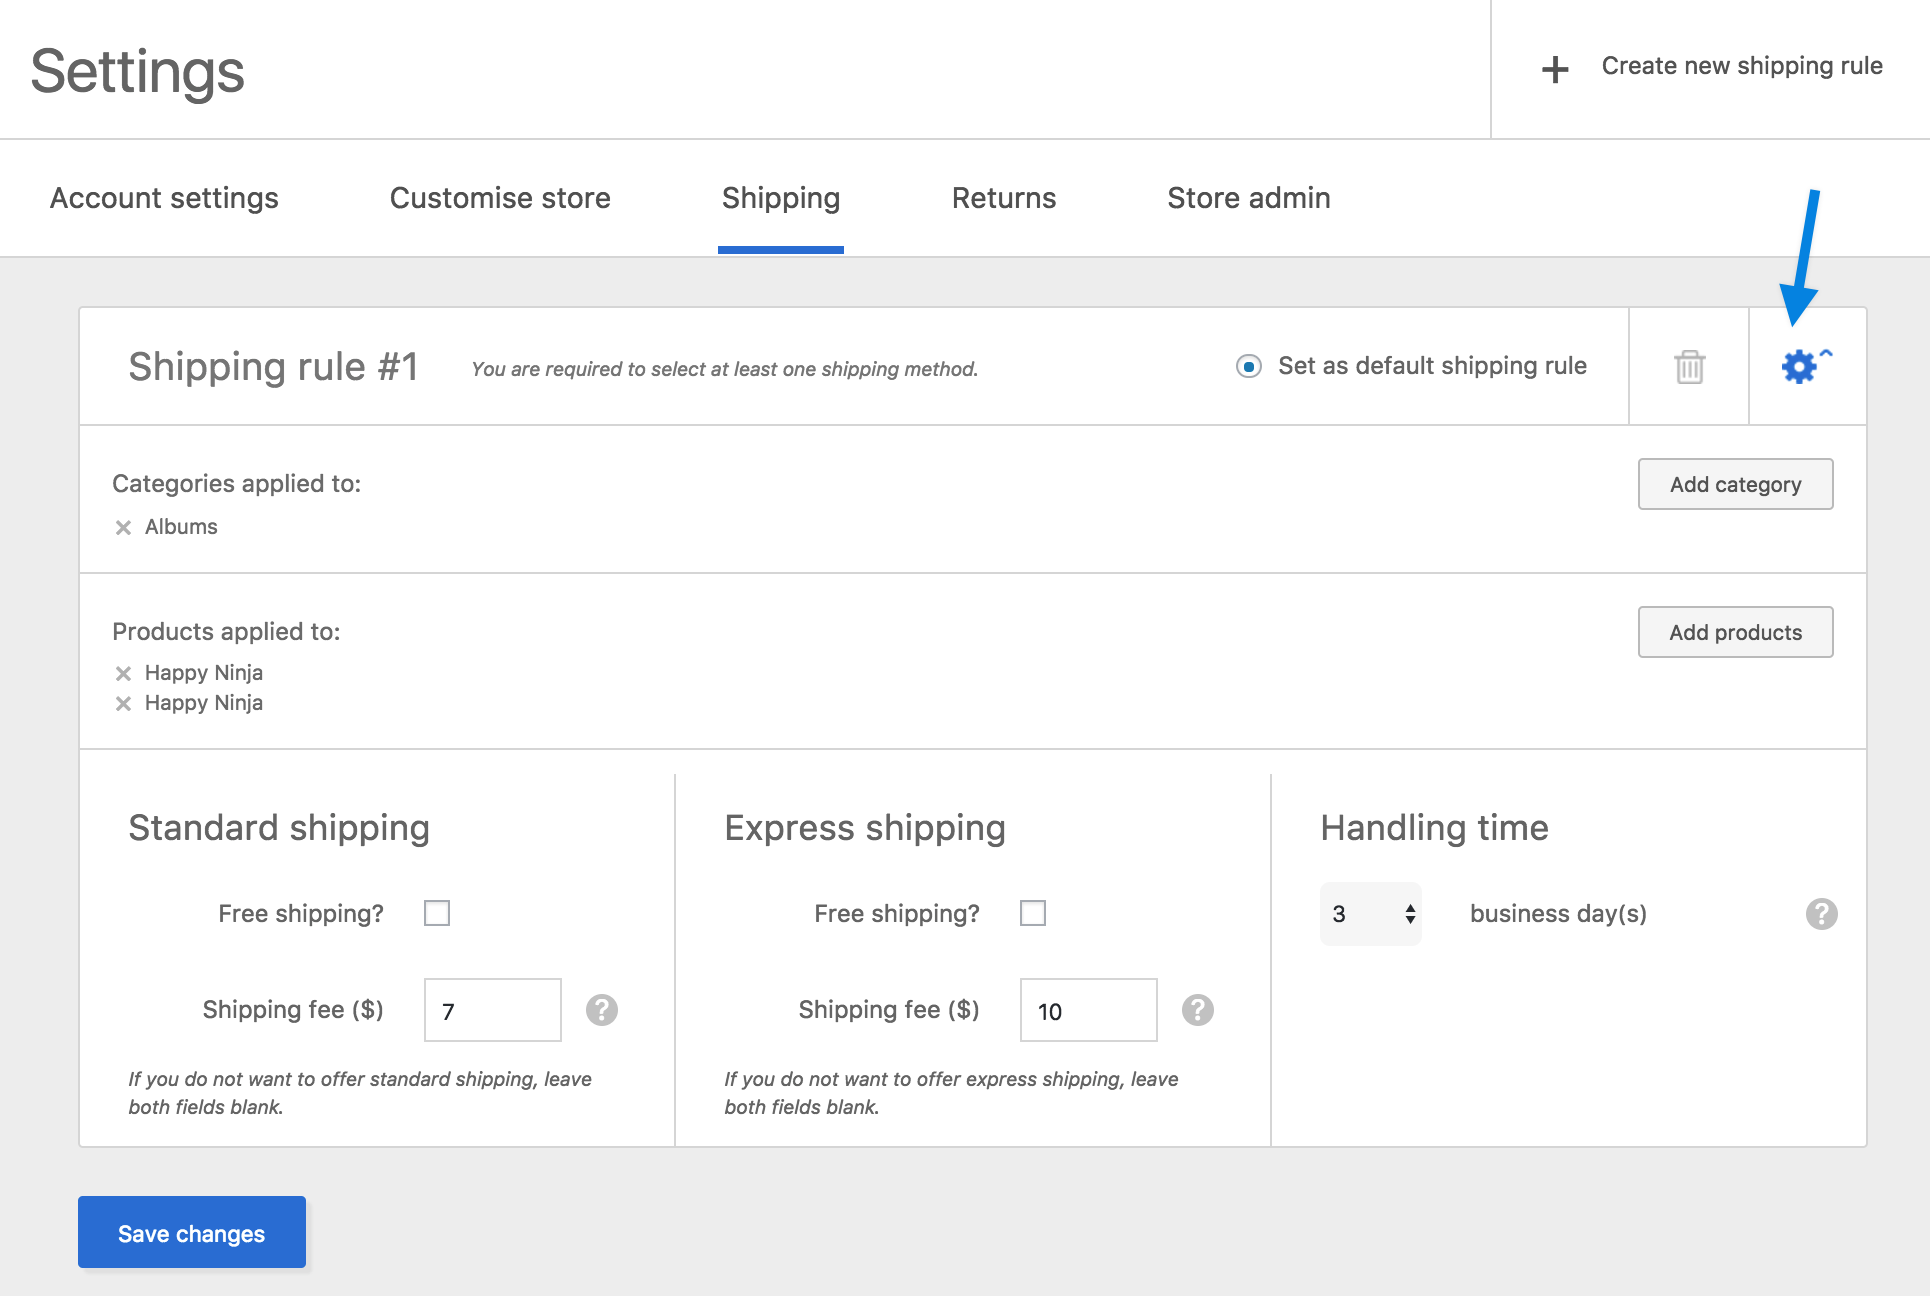 10/ Select Set as default shipping rule at the top right of the Shipping rule section, to make this the shipping default for all products that do not have a rule associated.
To create more shipping rules, select + Create new shipping rule at the top right corner and repeat the above steps.
10/ Select Set as default shipping rule at the top right of the Shipping rule section, to make this the shipping default for all products that do not have a rule associated.
To create more shipping rules, select + Create new shipping rule at the top right corner and repeat the above steps.
 11/ Save Changes after you finish creating/editing your shipping rules.
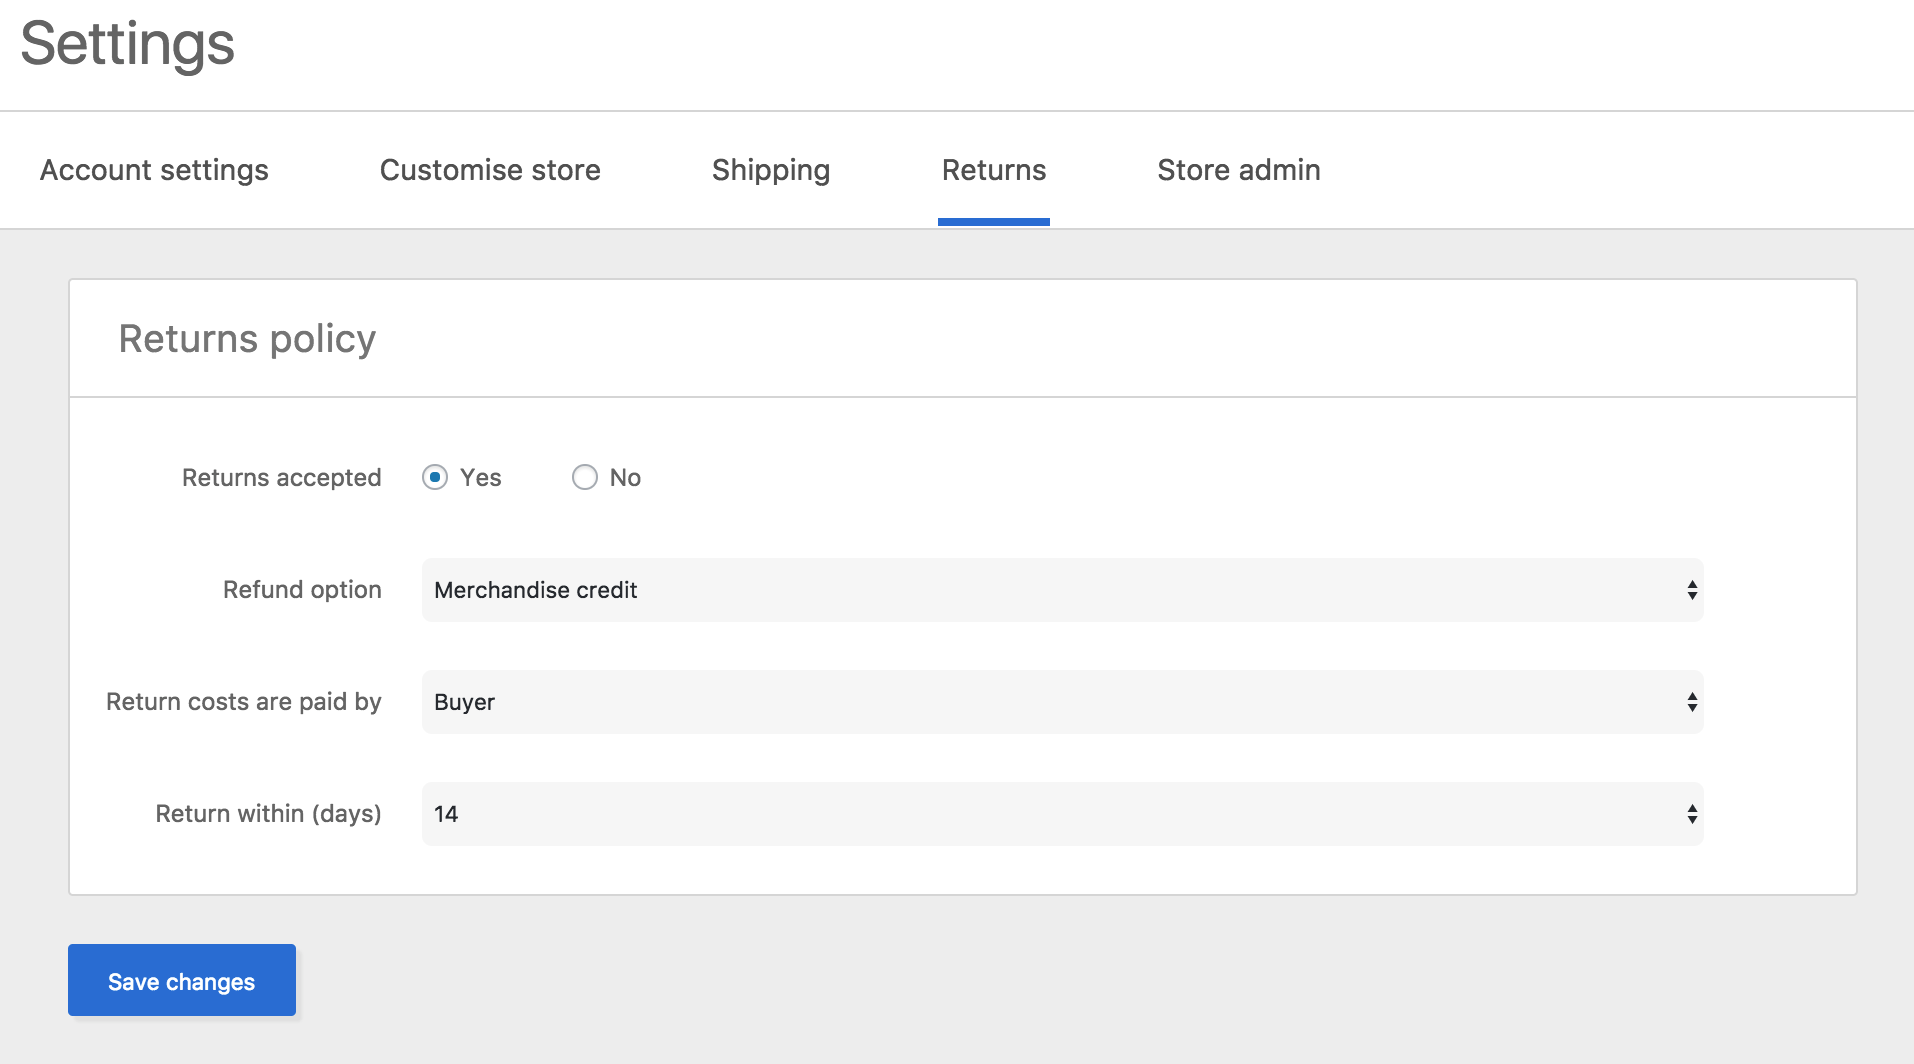
Returns
↑ Back to top- Money-back: Full refund.
- Exchange: Receive another product.
- Merchandise credit: Receive store credit.
Mapping
↑ Back to top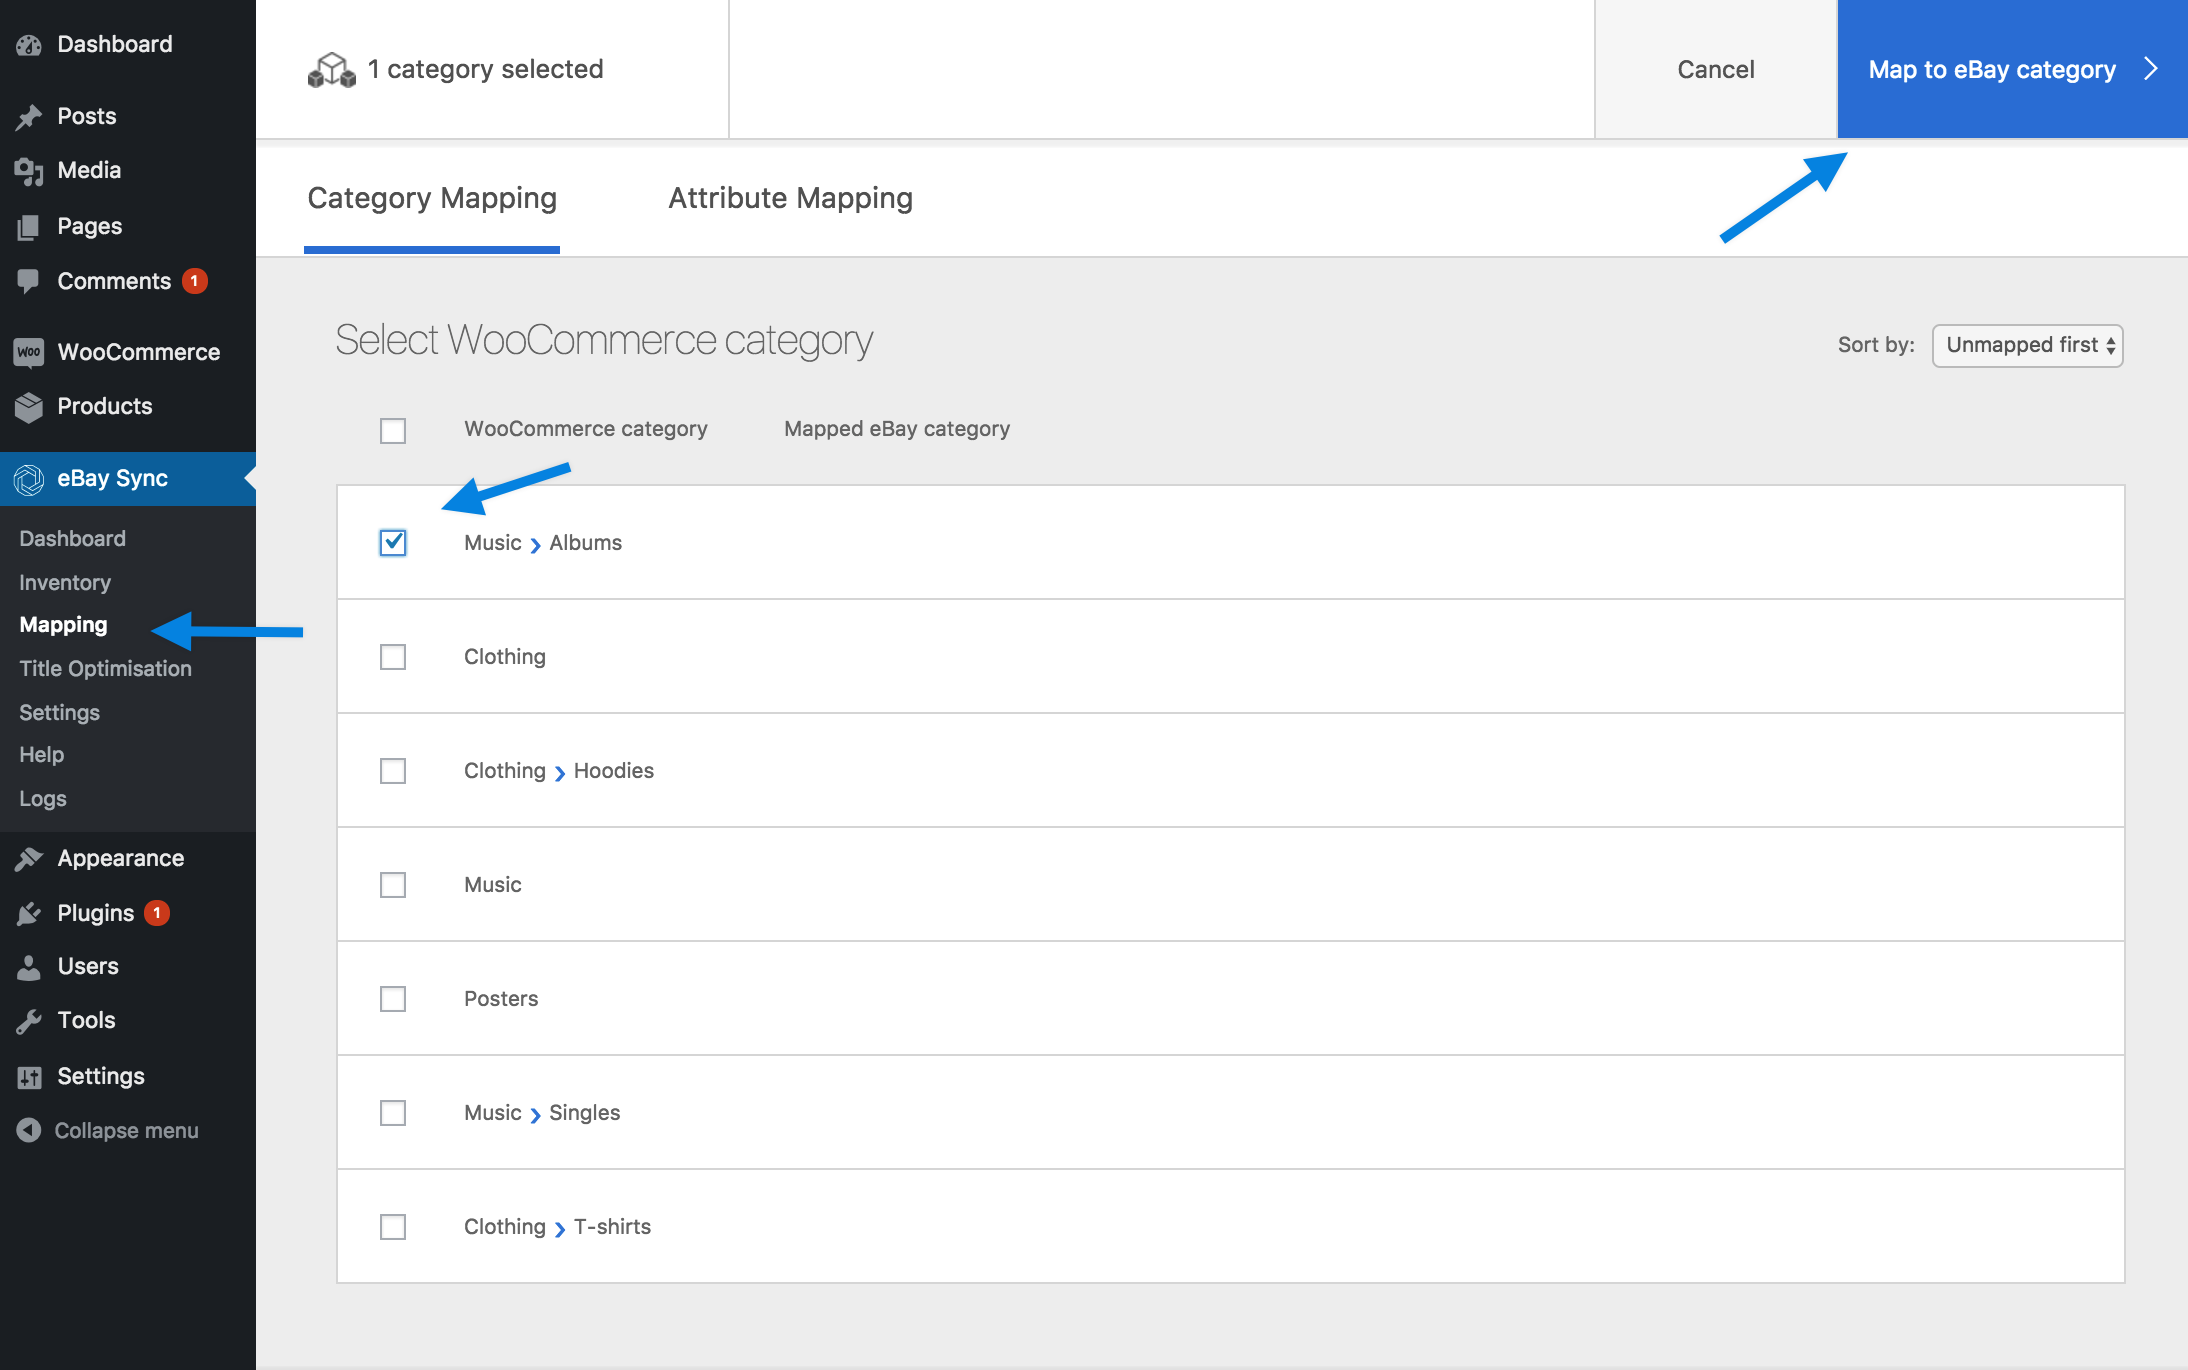 20/ Choose the eBay category that fits best.
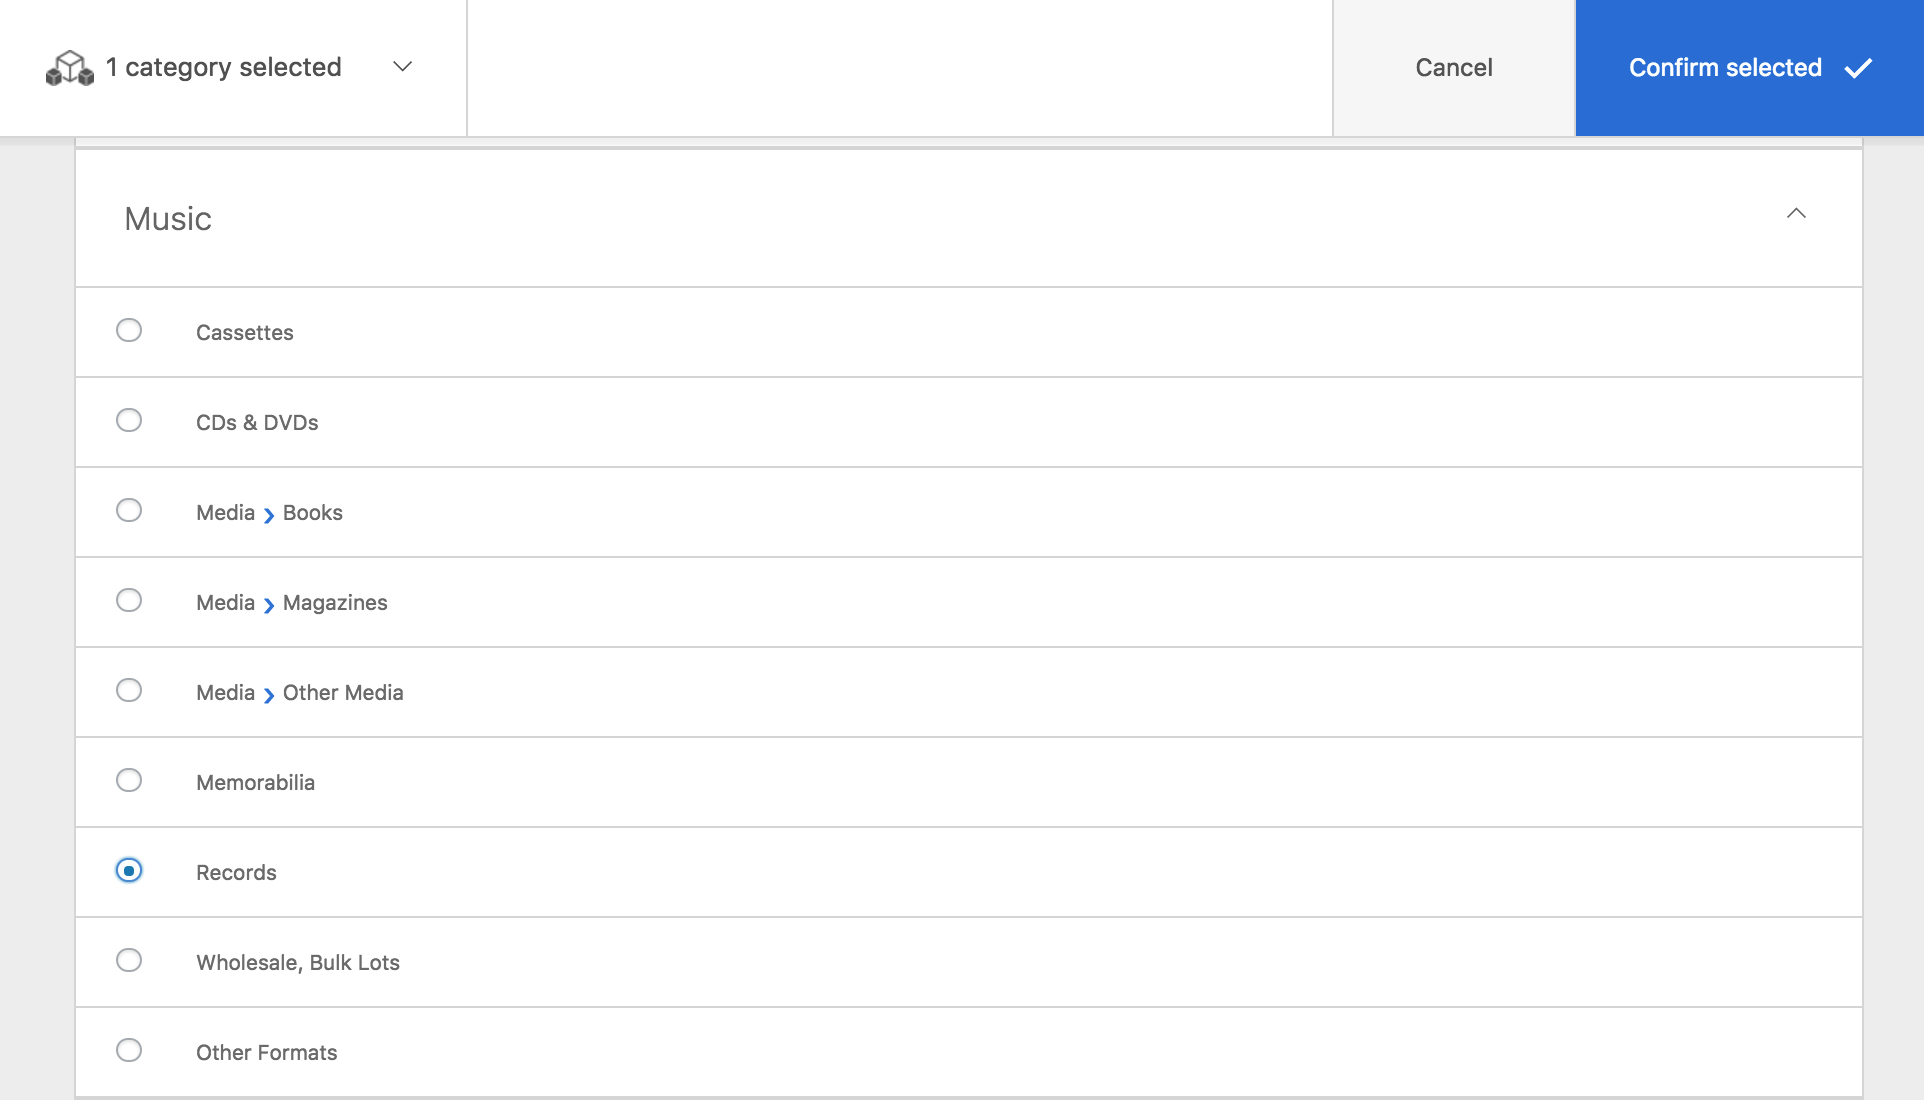 A red banner at the bottom prompts you with: Your store setup is almost complete!
21/ Select Sync to eBay to finalize setup.
A red banner at the bottom prompts you with: Your store setup is almost complete!
21/ Select Sync to eBay to finalize setup.

Inventory and Optimization
↑ Back to topPayPal
↑ Back to topInventory
↑ Back to topNote: For variable products, stock management needs to be enabled at the variation level AND the individual product level. This can be done under Product data > Variations
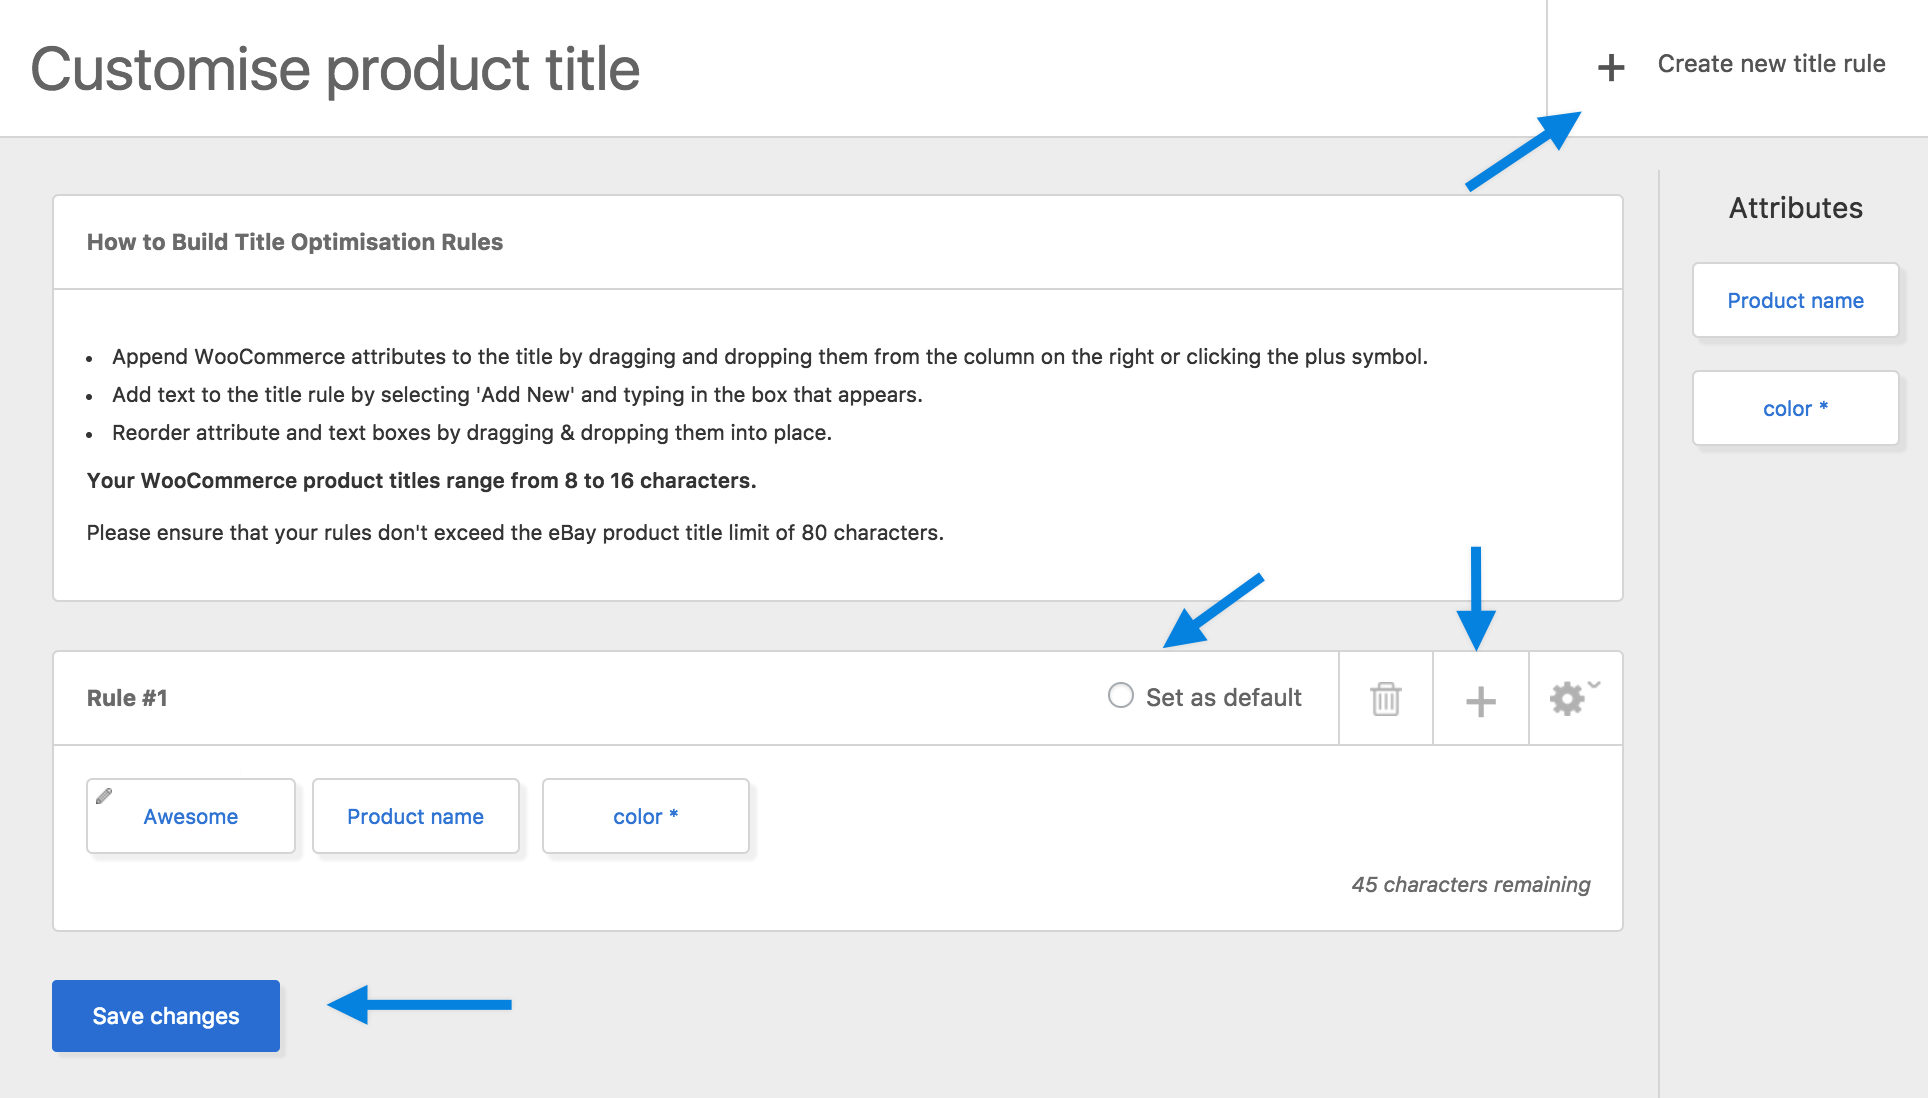
Title Optimization
↑ Back to top{AWESOME} {PRODUCT NAME} - {COLOUR}. Being:
{AWESOME}is a free-text entry (you can create any){PRODUCT NAME}will be replaced by your WooCommerce product title{COLOUR}will be replaced by the WooCommerce “COLOUR” (custom attribute) value
- Go to: eBay Sync > Title Optimization.
Select + Create new title rule. By default, it creates a new rule with Product Name.
Click “+” to add text to the title. A list of WooCommerce custom attributes and Add Text are displayed at the bottom of the menu.
- If you want to create an attribute replacement rule, click the attribute you want.
- If you want to create a free-text entry, click Add Text and then the white block and enter text.
Drag-and-drop blocks to re-order the rules.
Select the gear icon at the top right corner of the rule to associate the rule to WooCommerce categories and products.
Select Set as Default to apply the rule to all products that do not have a higher priority rule associated.
7. Save Changes.
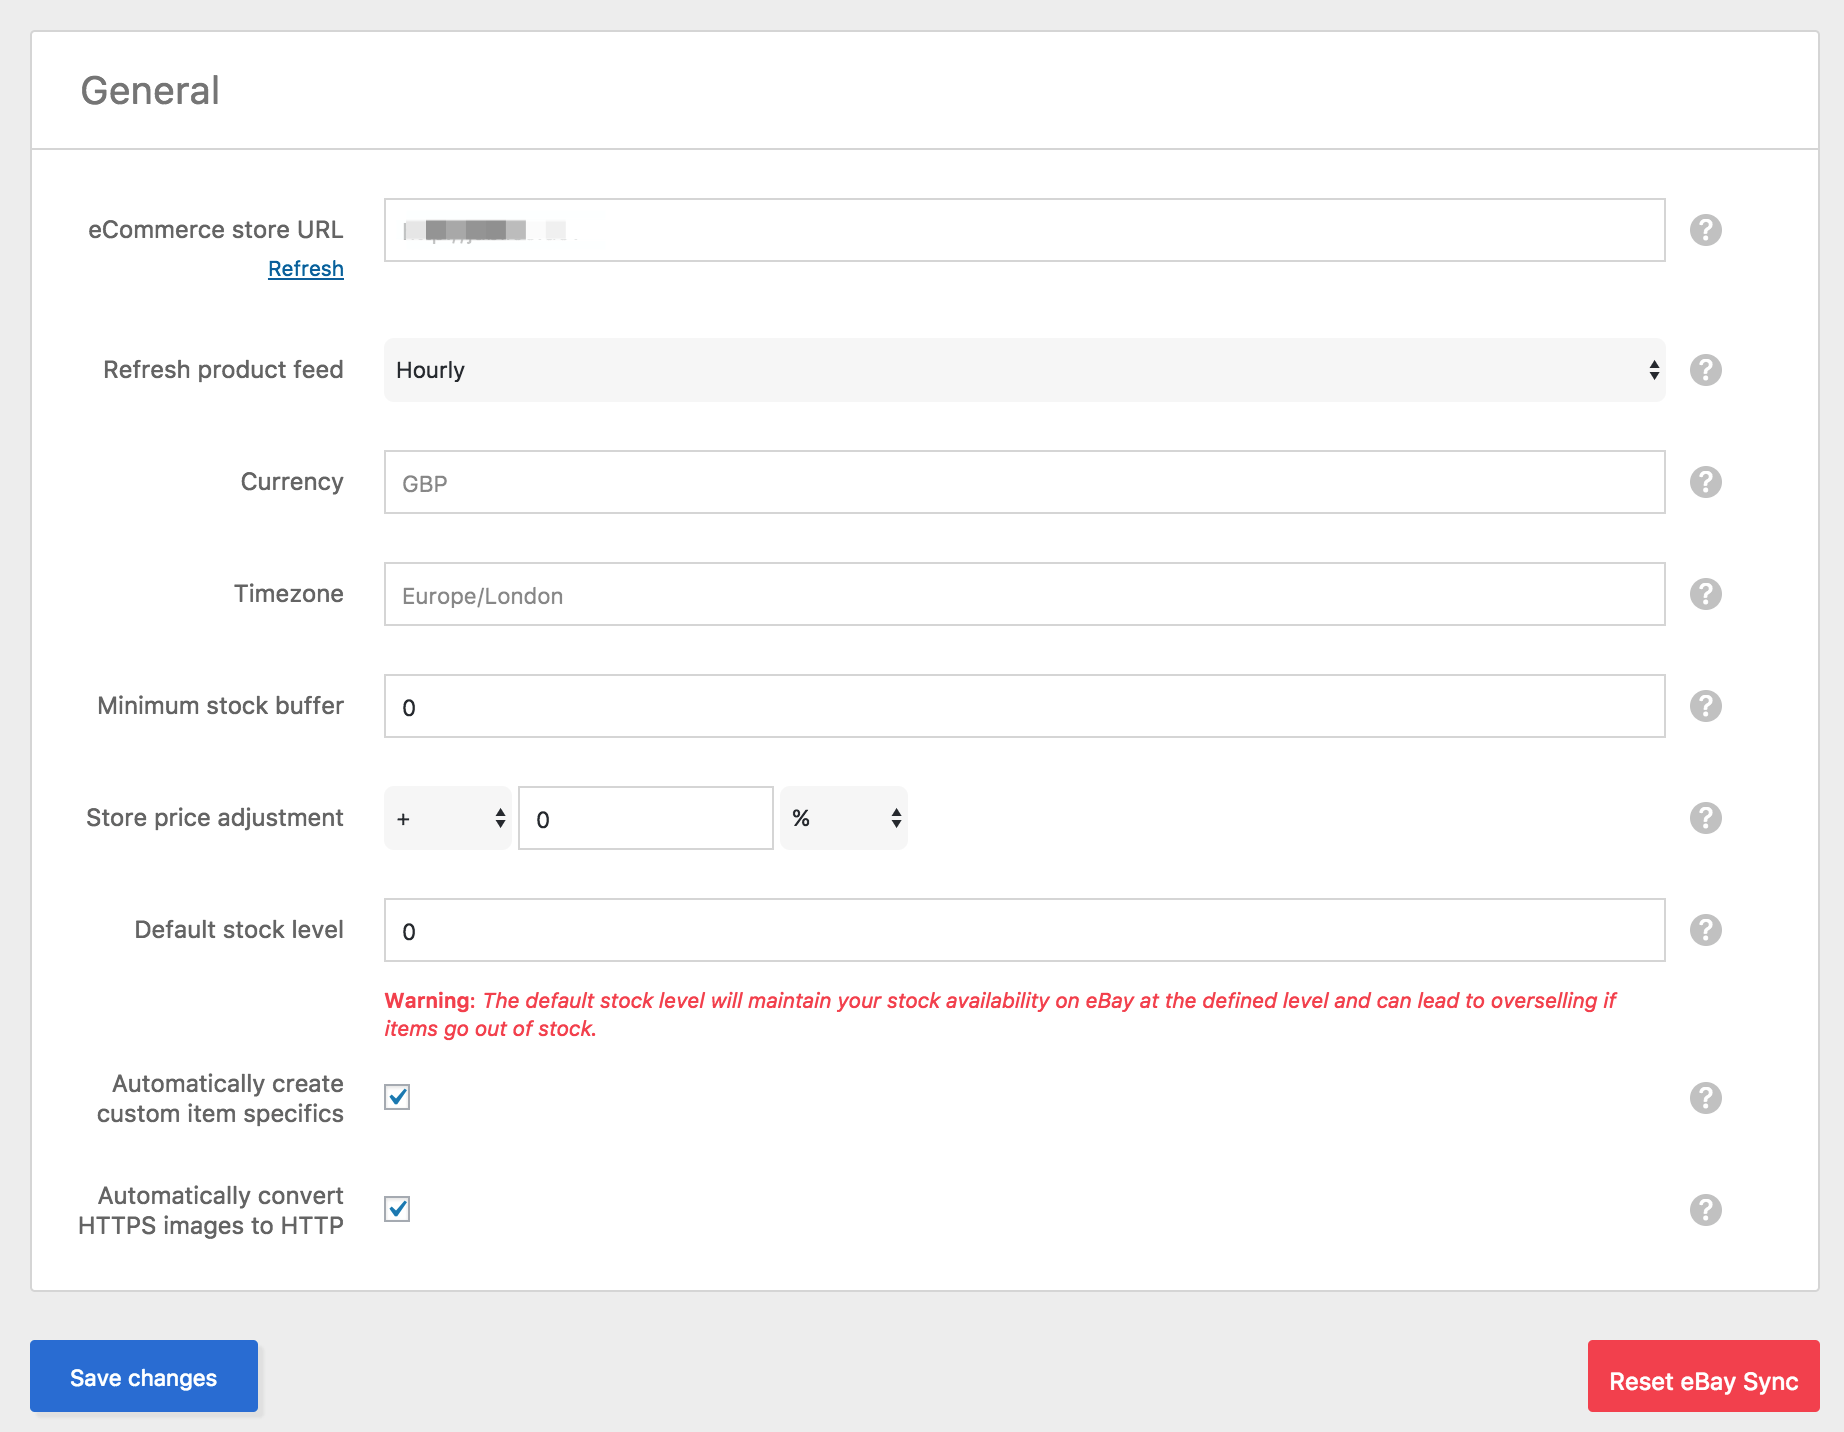
Store admin
↑ Back to top
- eCommerce store URL (cannot be edited): External URL of your WordPress site. This is used by eBay to inform your store of new orders. Use the Refresh button if you change the site address.
- Refresh product feed: How often you want the automatic background inventory synchronization to happen?
- Currency (cannot be edited): Your WooCommerce configured currency.
- Timezone (cannot be edited): Your WooCommerce configured time zone.
- Minimum stock buffer: Stock buffer for your eBay listings. All your eBay listings are created with a quantity of:
[woocommerce product stock quantity] - [minimum stock buffer]. - Store price adjustment: All your eBay listings are created with price:
[woocommerce product price] + or - [store price adjustment percentage]. - Default stock level: How much stock should be offered if there is no stock management on the product level.
- Automatically create custom item specifics: If enabled, attributes are synced even if they aren’t mapped.
- Automatically convert HTTPS images to HTTP: eBay uses HTTP for the URL of product images. Enable this to ensure product images are synced with eBay.
FAQ
↑ Back to topDoes eBay Sync support international shipping?
↑ Back to topHow do I change my eBay userID?
↑ Back to top- Go to eBay Sync > Settings > Store Admin.
- Select Reset eBay Sync at the bottom right.
- Change your eBay user ID as described here.
- Repeat the setup process again in eBay Sync.
You need to recreate any category mappings and title optimization rules after doing this.
How can I map WooCommerce custom attributes to eBay item specifics?
↑ Back to top- Go to: eBay Sync > Mapping > Attribute Mapping. It auto-detects all custom attributes on the first column, named WooCommerce attribute.
- On the second column, called eBay item specific, the most common eBay item specifics are provided. eBay Sync tries to automatically detect equivalent attributes and give suggestions.
- Create your own item-specific name in the third column, if you don’t want any of the values in the second column.
How can I map WooCommerce products and categories to eBay categories, with smart category suggestions?
↑ Back to top- To confirm: Automatically suggested categories for your products. Select items and confirm to associate with suggested categories.
- To do: Products that didn’t have an automated suggested category. You can still select multiple products and associate them to an eBay category.
How do I set up real-time and scheduled inventory synchronization?
↑ Back to top- Go to WooCommerce > Products.
- Edit the product.
- Select Sync to eBay, located underneath the Update button. Wait for the operation to finish, and the product page will refresh to indicate synchronization is complete.
- Update.
How do I use custom eBay descriptions?
↑ Back to top- Mark the field eBay Description to create a copy of your current WooCommerce description and use it on eBay instead.
- Mark the field eBay Template to use a pre-defined description template for your listing.
How can I view all my products listed on eBay?
↑ Back to top- At the top right, search for a product by its title or click on the icon to see the Filters panel.
- With the Filters panel, filter products by Price Range, Category, Product visibility and choose the sort order of the list.
- Product shows you the main image and the title of the product. Select the icon or title to see the Product Page.
- Regular Price shows you the configured WooCommerce regular price.
- Sale Price shows you the configured WooCommerce sales price.
- eBay Price shows you the WooCommerce effective price, plus taxes, plus/minus the price adjustment configured on the settings page.
- SKU shows you the WooCommerce product SKU.
- Visibility gives you the option of blocking or unblocking the product from being sent to eBay. Blocking a product that was already sent to eBay will end its current listing.
- Listing Error will show a yellow icon if the product has any warning or error. Errors will prevent the item from being listed on eBay. You can hover the icon to see the error message.
How can I view my eBay orders in WooCommerce?
↑ Back to top#{Order Number} to see the order details.
- At Order Details, find Shipping Details and options Mark as Sent, Tracking Number and Carrier Name.
- By selecting Mark as Sent and then clicking Save Order, you are marking the eBay order as shipped automatically. If you also insert Tracking Number and Carrier Name, eBay order tracking is automatically filled for you.