Our WooCommerce Deposits extension allows you to select products or services on which you would accept deposits or payments. Customers can then place deposits or choose a payment plan on these products, rather than pay in full.
Requirements
↑ Back to top- WooCommerce version 7.9 or higher
- WordPress version 6.1 or higher
- PHP version 7.2 or higher
Installation
↑ Back to top- Download the extension from your WooCommerce dashboard.
- Go to Plugins > Add New > Upload and select the ZIP file you just downloaded.
- Click Install Now and then Activate.
- Read the next section to learn how to set up the plugin.
Setup and Configuration
↑ Back to topStorewide Deposits Settings
↑ Back to topChoose whether to give customers the ability to place a deposit on all products or only on some products.
To apply the Deposit option on a global or storewide basis:
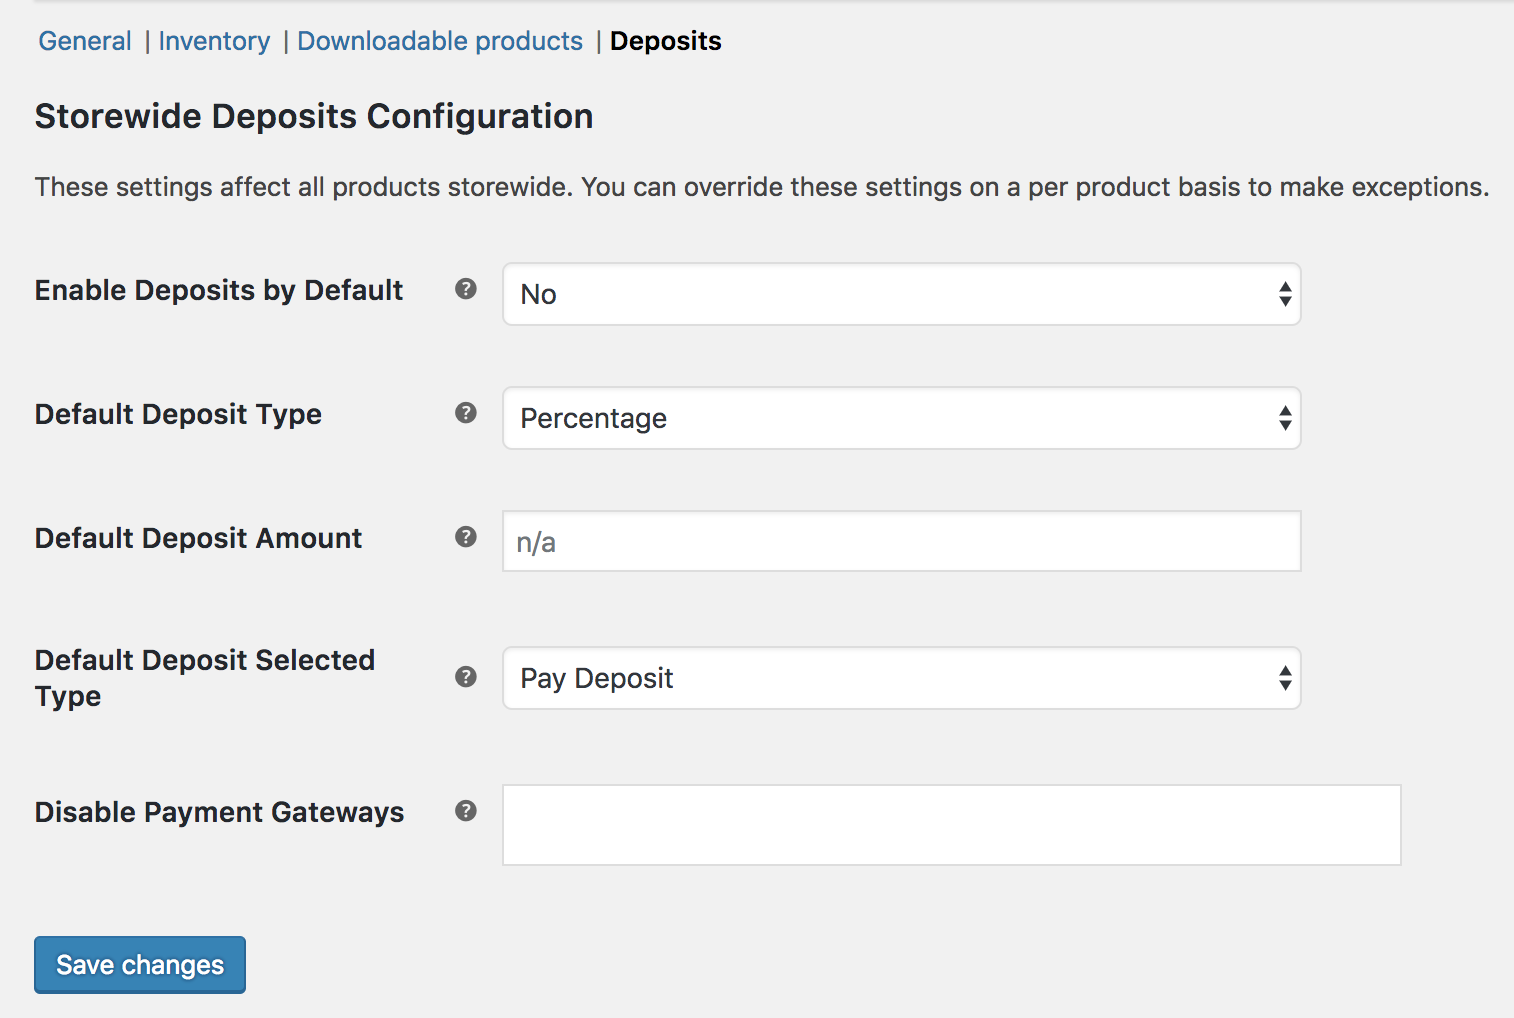
- Go to: WooCommerce > Settings > Products > Deposits.
- Enable Deposits by Default.
- No
- Yes – deposits are optional
- Yes – deposits are required
- Select Default Deposit Type
- None
- Percentage – use a percentage of the total amount
- Fixed amount – use a fixed amount for all products
- Payment plan – use a predefined payment plan (see below)
Options in next step will appear, depending on your selection.
- If you selected:
- None – go to next step
- Percentage – Enter a number (%) to set Default Deposit Amount
- Fixed Amount – Enter a number to set Default Deposit Amount
- Payment Plan – go to next step
- Select Pay Deposit or Pay in Full for Default Deposit Selected Type.
- If you selected Payment Plan (only):
- Search for available payment plans (payment plan needs to be created first, see Payment Plans below.)
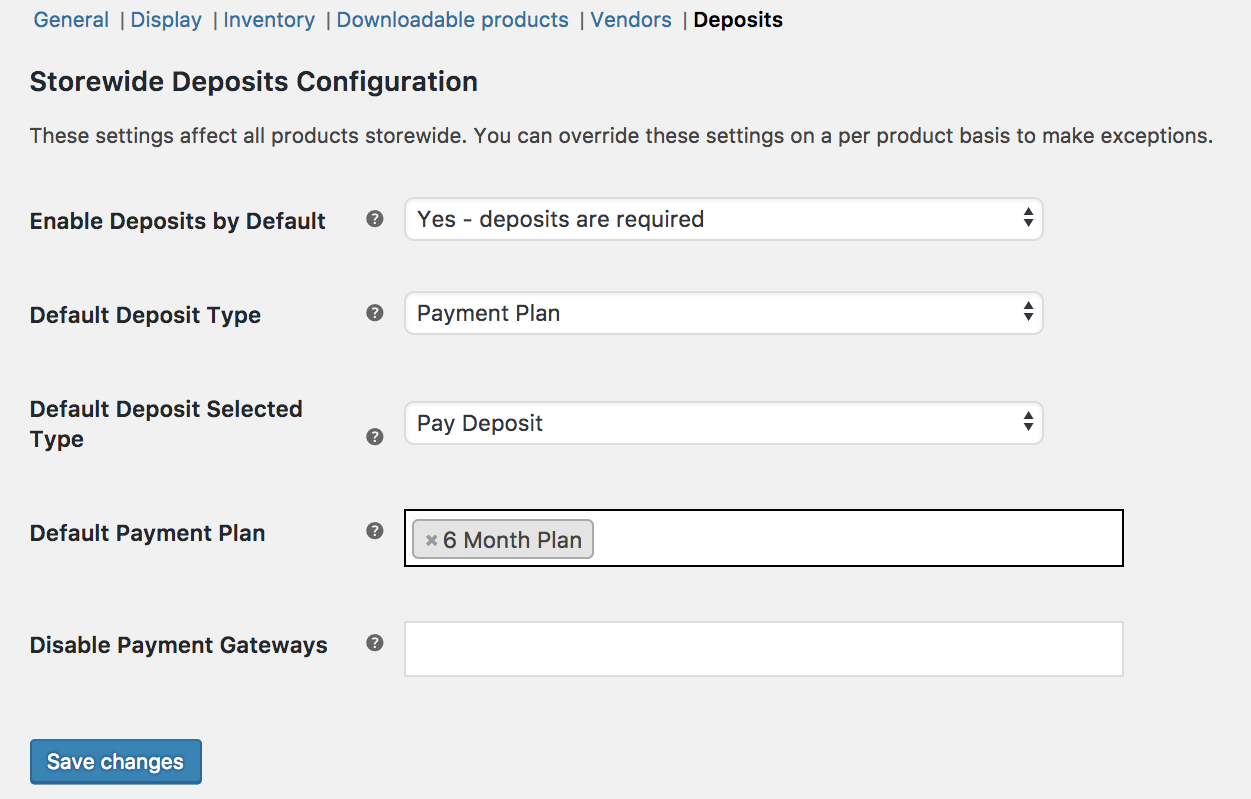
- Search for available payment plans (payment plan needs to be created first, see Payment Plans below.)
- Disable Payment Gateways – Allows you to select gateways to disable when a deposit is in the cart.
- Save changes.
Product Data Settings
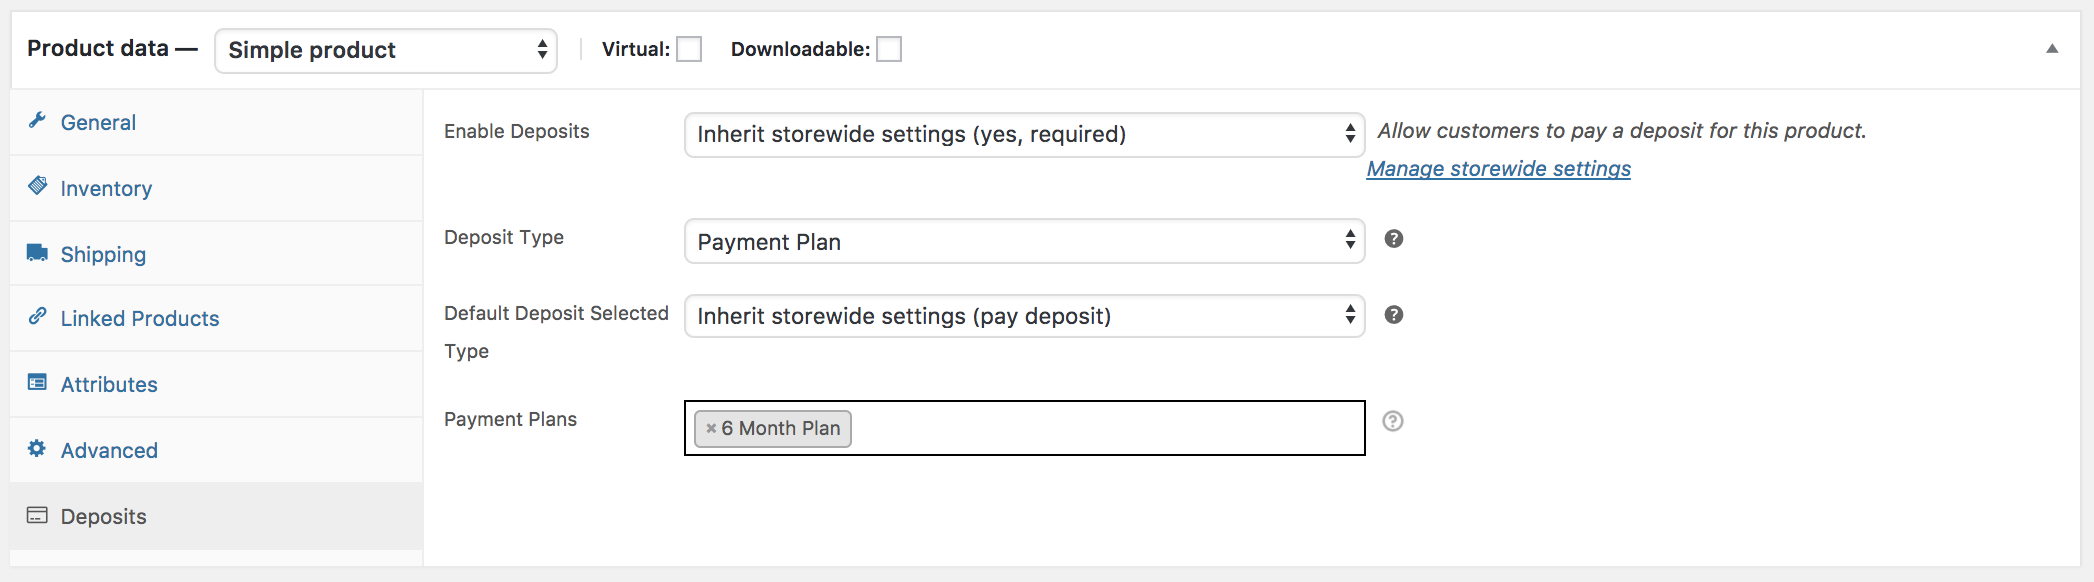
↑ Back to topTo apply the Deposit option to only selected products:
- Select or Edit the product to which you want to apply it. A Deposits tab is visible at the bottom, as pictured.
 Set the following options:
- Enable Deposits
- Inherit storewide settings. The default.
- Yes – deposits are optional. The customer can choose.
- Yes – deposits are required. The customer must give a deposit.
- No. Deposits are disabled for this product, regardless of storewide settings.
- Deposit Type
- Inherit storewide settings. The default.
- Percentage. User is charged a percentage, based on product price.
- Fixed Amount. User is charged a fixed amount, regardless of cost.
- Payment Plan. Allows you split the cost into payments – more information below in Payment Plans.
- Deposit amount The amount of deposit needed (without currency symbols).
- Default Deposit Selected Type
1. Inherit storewide settings.
2. Pay deposit. The default selected way for customers to pay for this product is deposit.
3. Pay in full. The default selected way for customers to pay for this product is pay in full - Click Update when done making changes.
- Enable Deposits
Payment Plans
↑ Back to topPayment Plans give customers the option to pay an upfront fee and the remainder at a later date, dividing payments into multiple parts over time. This would be similar to a loan, layaway or credit plan.
Each product can have a different payment plan and deposit if you’ve not applied Deposits “storewide.”
Adding a Payment Plan
↑ Back to topTo add a plan:
- Go to: Products > Payment Plans.
- Enter the following into the form on the left side:
- Plan Name – Name shown to the customer when viewing the plan.
- Plan Description – Description shown to the customer when choosing a plan.
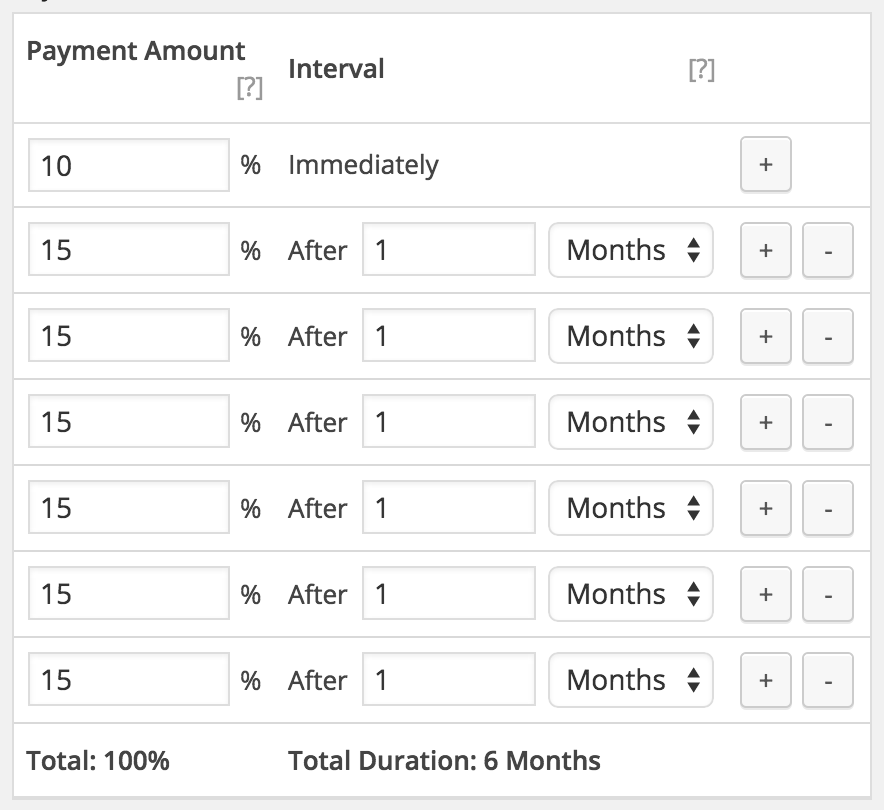
- Payment Schedule
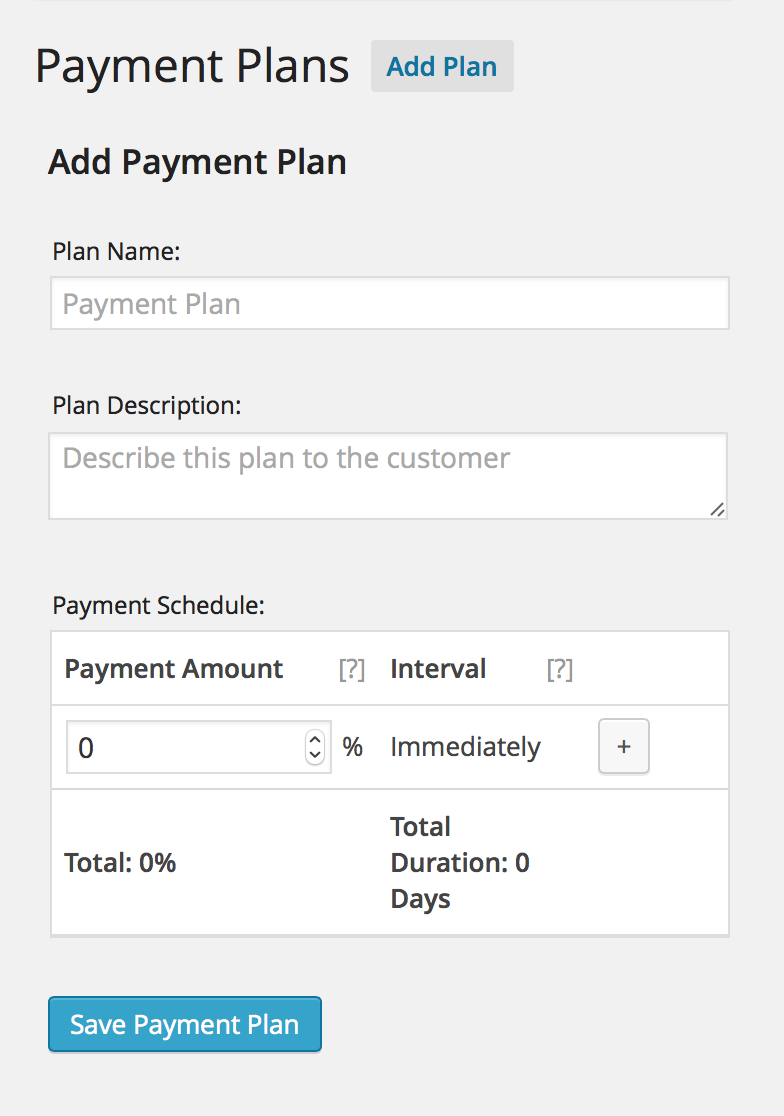
The schedule consists of multiple rows, each with a percentage of the entire cost, and the interval after which it should be paid. The first row is the initial payment or deposit:

Select the ‘+’ button on the right side to add another row that represents a future payment:

Adding multiple rows enables you to define the plan’s duration and overall cost. For example, if you want to charge a customer 10% up front and the remainder over six months, the plan would look like this:
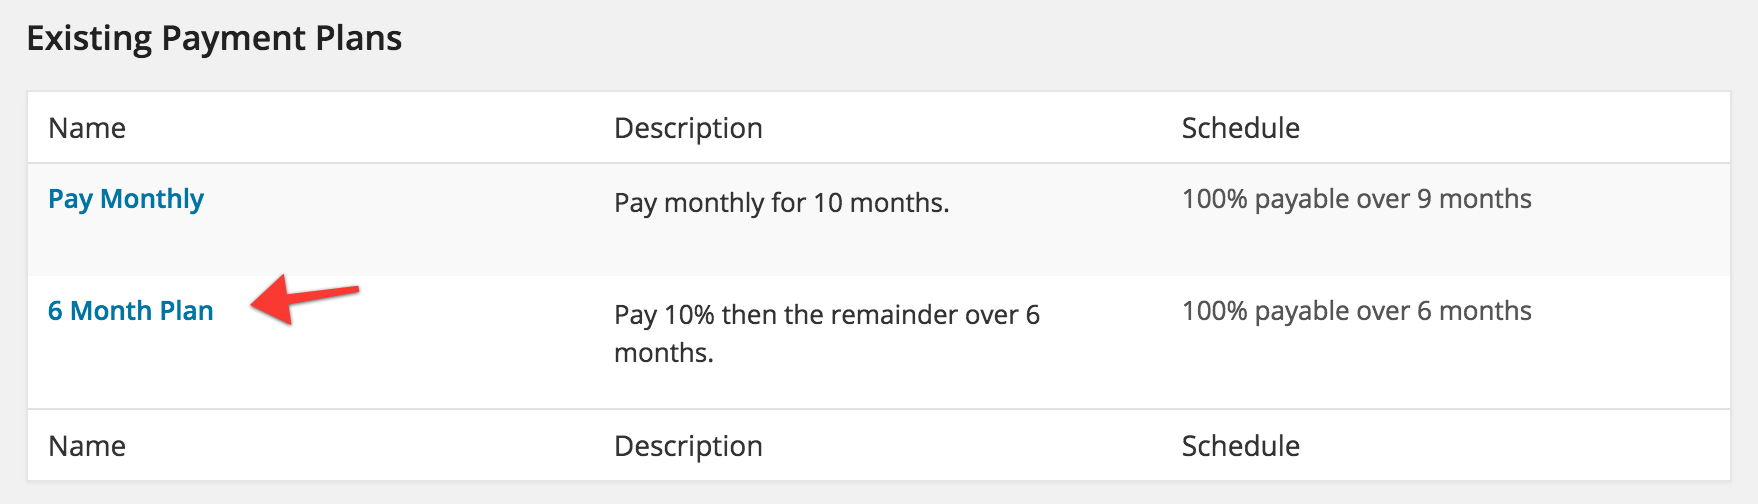
Save Payment Plan when finished, and it appears on the right side under Existing Payment Plans:
Editing and Deleting Payment Plans
↑ Back to topExisting plans are listed on the right side of the page. Hovering over a plan shows two links: Edit and Delete. The interface for Editing a plan is identical to Adding a plan (above).
Usage
↑ Back to topCart and Checkout Flow
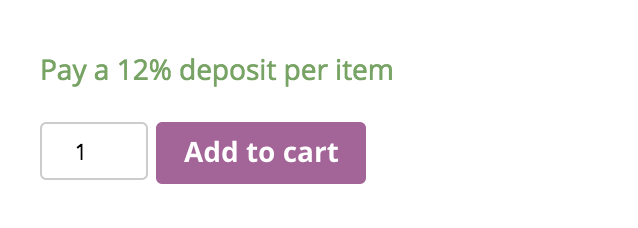
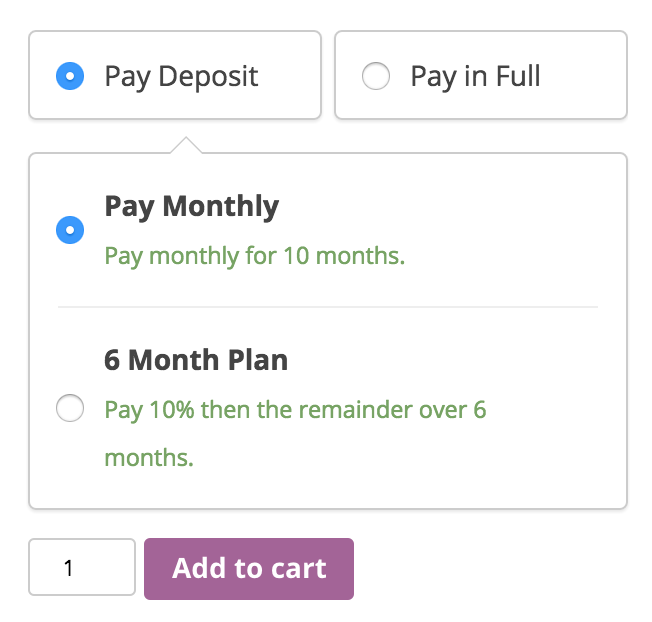
↑ Back to topIf a Deposit or Payment Plan option is available for a product, customers see the following on a single product page.
If the deposit is optional:
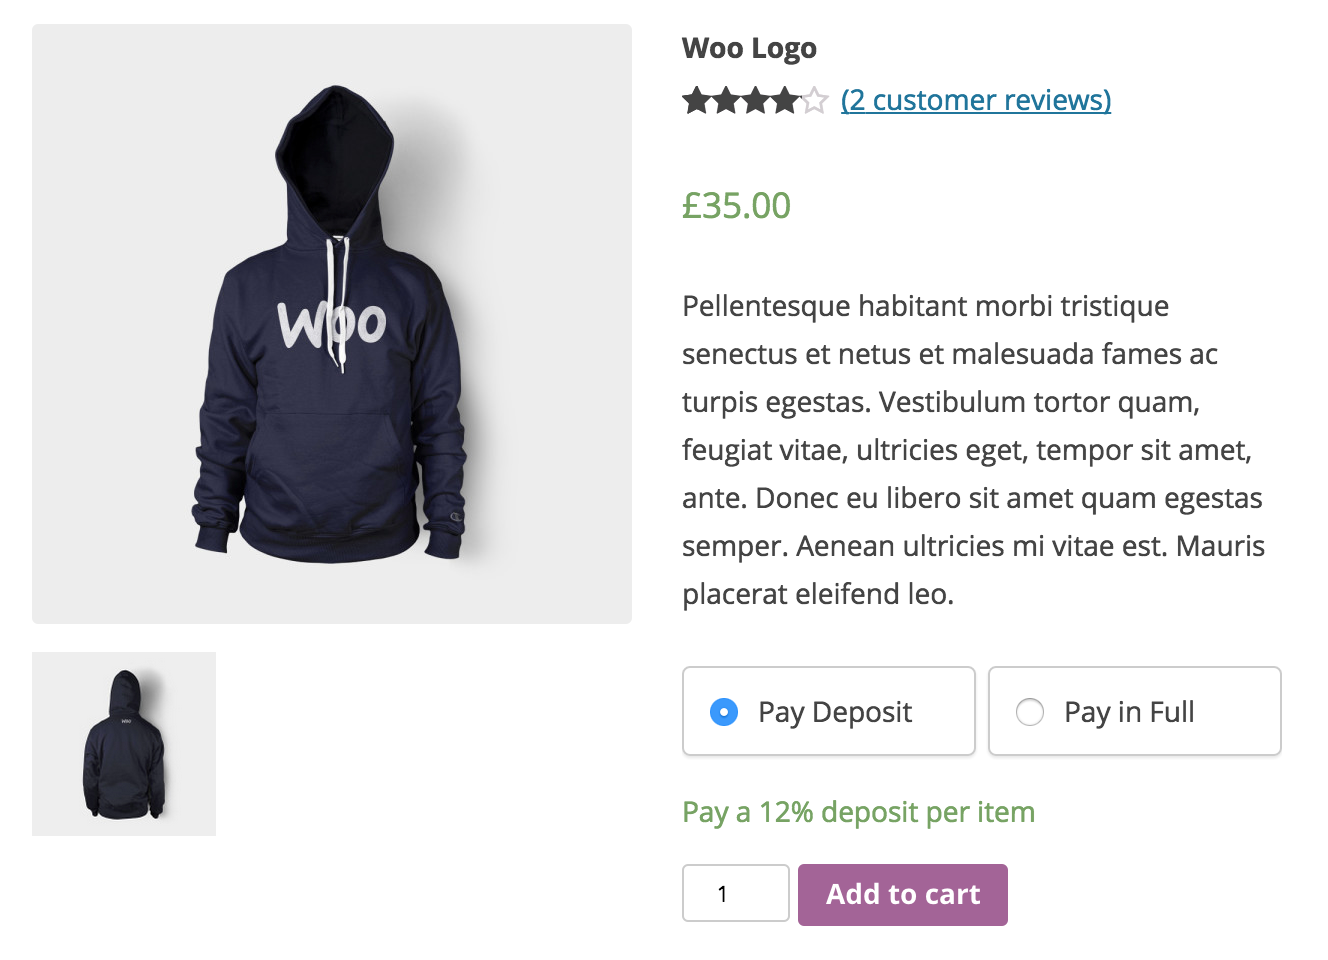
If the deposit is required:
If there are payment plans:
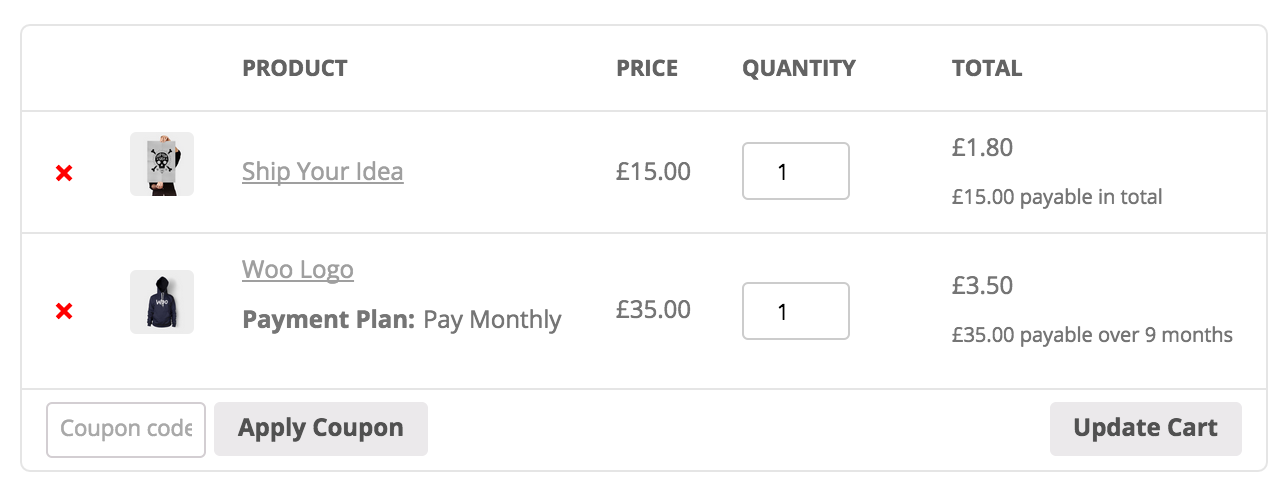
Once placed in the Cart, the deposit information is also shown to the customer:
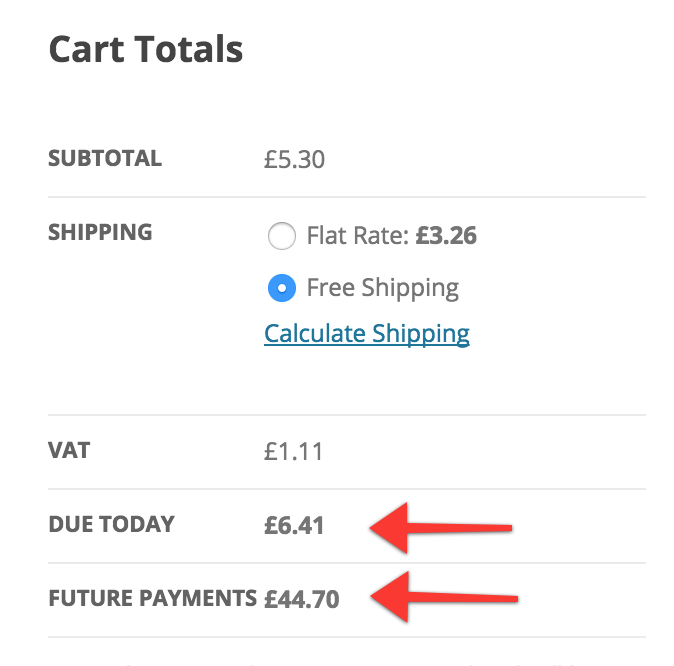
And again in Cart Totals:
Managing Order Deposits and Payment Plans
↑ Back to topAfter checkout:
- Pending Deposits payment status is same as Pending Payment – Order received (unpaid)
- Customers can view the order on their My Account page. This includes future Scheduled payments and the amount, which is updated over time. For convenience, customers can navigate between individual scheduled orders and a deposits original order from this screen.
- Admin users can see deposit information in Order emails and Edit Order screens.
- If an order contains a deposit, the original order shows a status of Processing (or Partially Paid). You can manually change this if you wish.
- If an order has a payment plan, all follow-up payments have an order created for them with a status of Scheduled.
Managing Deposit Orders
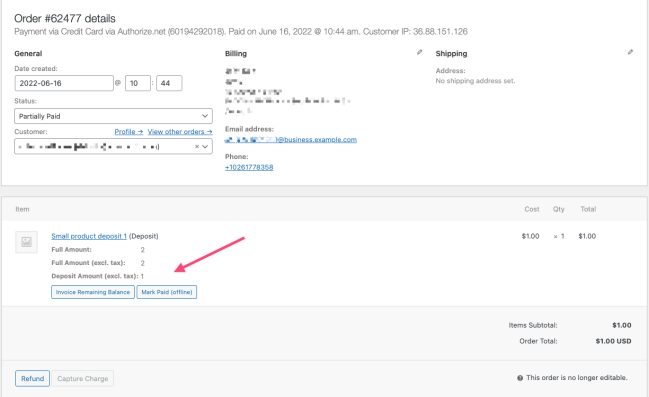
↑ Back to topIn the backend, when viewing an order, line items paid with deposits look like this:

There are buttons you can use to manage orders with deposits:
- Invoice remaining balance – Create a new order in WooCommerce for the customer with the remaining amount due. It can then be sent to the customer to pay online.
- Mark Paid (offline) – Use this button to declare that the amount has been collected in full offline and is paid.
- Remainder – Invoice #0000 – If you created an invoice for the remaining balance, a button appears to view this follow-up order.
Once invoiced and paid, or marked paid offline, the order status automatically updates to Completed.
Managing Orders on Payment Plans
↑ Back to topIn the backend, when viewing an order, line items with payment plans look like this:

The View Scheduled Payments button takes you to the order list, but only show orders created for that plan. These orders have a status of Scheduled and a future order date.
When a Scheduled payment is due, an invoice is automatically sent to the user to request payment on that date. Once all scheduled orders are paid, the plan ends and the original order is marked Completed.
Coupon Handling
↑ Back to topCoupons are applied according to standard WooCommerce functionality, explained in Coupon Management. You can apply it globally/storewide or on a per-product basis, excluding or including as you like.
For fixed coupons
↑ Back to topFor products with payment plans, a proportional amount of the fixed discount is applied now, and then the rest is applied proportionally to future payments. For example, on a payment plan with 4 payments of 25%, a $10 coupon would discount $2.50 from each payment.
For products with fixed and percentage-based deposits, the entire discount is deferred to the final invoice. If the value exceeds the amount of the final payment, the difference is applied to the first payment.
For percentage-based coupons
↑ Back to topFor products with payment plans, the discount is applied proportionally to present and future payments (similar to above).
For products with fixed deposits, the entire discount is deferred to the final invoice. If the value exceeds the amount of the final payment, the difference is applied to the first payment.
For products with percentage-based deposits, the discount is applied proportionally to the deposit and the final invoice.
Payment plans
↑ Back to topIf you have a payment plan and an option to pay in full on the same product, it’s not possible to only apply a coupon on the full payment option. This requires conditional logic according to what the customer selects, and this would require customization.
FAQ
↑ Back to topHow are taxes handled for deposits?
↑ Back to topTax is only calculated for the deposit on a product. Tax on the remainder is charged when the next payment is made.
How are taxes handled for payment plans?
↑ Back to topTax is charged on the initial fee/deposit of a payment plan. Future payments are also created in the system so they use the same tax point/rate (in case it changes during the plan’s term). For clarification on tax points: https://www.gov.uk/vat-instalments-deposits-credit-sales
Can I automatically charge customers when a scheduled payment is due?
↑ Back to topNo, manual and automatic recurring payments are not supported in the current version, so credit card data is not stored.
Can I send an invoice or reminder a few days or a week prior to a payment due date?
↑ Back to topOut of the box, Deposits currently has no settings that can do this. The invoice/email notification is triggered by the due date.
If you wish to send a reminder, you need a separate plugin such as Zapier or AutomateWoo.
Which payment gateways can I use with Deposits?
↑ Back to topDeposits is independent of payment gateways as it does not automatically collect any payments. You can set up any payment gateway you’d like and use Deposits with no issues.
Can I edit the emails Deposits sends customers?
↑ Back to topYes: Deposits uses the standard WooCommerce “Customer invoice / Order details” email template, which you can tweak at WooCommerce > Settings > Emails or supplant via a template override.
Which plugins/extensions is WooCommerce Deposits compatible with?
↑ Back to topAlong with Standard Simple and Variable products, Bookable Products from WooCommerce Bookings can have Deposits. With this integration, you are also able to multiply a deposit fixed amount by the number of persons.
Deposits is compatible with WooCommerce Blocks.
You should not need to use Deposits with Preorders or Subscriptions, so they are not compatible. WooCommerce Deposits is not compatible with Wishlists, Composite Products, Points and Rewards, Product Bundles, Grouped Products, Extra Fees for WooCommerce or Payment Gateway Based Fees.
Are deposits refundable?
↑ Back to topYes, but it will need to be refunded manually from the order.
Does the extension work with virtual products?
↑ Back to topYes! Virtual products will not become available until an order is marked as Completed.
Because I am extending credit to my customers, can this extension/plugin run a credit check?
↑ Back to topNo, because doing so would involve collecting sensitive financial information, such as social security/tax numbers. It’s up to you to weigh the pros and cons of accepting this as a risk of doing business.
Does this support security deposits?
↑ Back to topNo. WooCommerce Deposits is designed to collect partial payments by way of deposits, not to collect refundable security deposits.
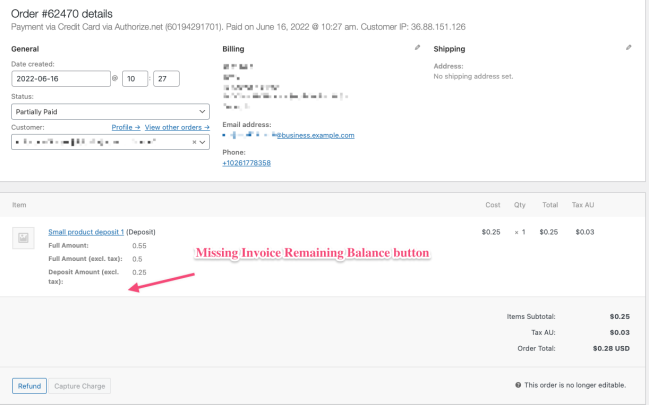
Why “Invoice Remaining Balance” is missing on the Edit order screen?
↑ Back to topThere is a certain minimum amount / minimum price before a product can even be purchased and checkout is possible for most payment gateway like Stripe or PayPal which is $0.50.
In the case of Authorize.Net, products with prices lower than $2 can still be purchased. But, the “Invoice Remaining Balance” and “Mark Paid (offline)” buttons will be unavailable, in the Edit order screen.
Please make sure that the minimum product price is $2, and the minimum deposit is $1 to ensure the “Invoice Remaining Balance” and “Mark Paid (offline)” buttons are visible.
How are fees handled for deposits?
↑ Back to topDeposits don’t modify the default fee handling behavior of WooCommerce. So, the fee doesn’t get divided between the initial deposit payment and future payments. If you want to apply a fee only on the deposit amount or on future payments as well, then it needs to be handled at the plugin or custom snippet side, which is used to add fees.
Questions and Support
↑ Back to topSomething missing from this documentation? Do you still have questions and need assistance?
- Have a question before you buy this extension? Please fill out this pre-sales form – please include the name of this extension in your query.
- Already purchased and need some assistance? Get in touch with a Happiness Engineer via the WooCommerce.com Support page and choose this extension name from the “I need help with” dropdown