Installation
↑ Back to top- Download the .zip file from your WooCommerce Account.
- On your WordPress Dashboard, go to Plugins > Add New and click Upload Plugin – choose the .zip file you have downloaded.
- Proceed to install and activate the extension.
For additional information see also Install and Activate Plugins/Extensions.
Configuring Thank You Pages
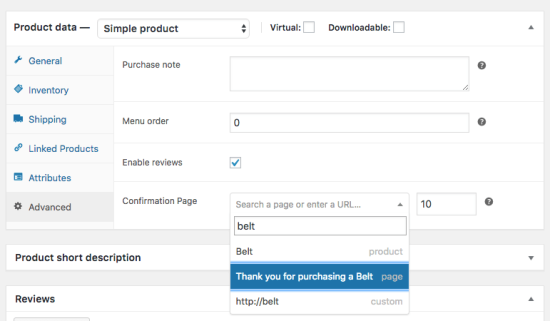
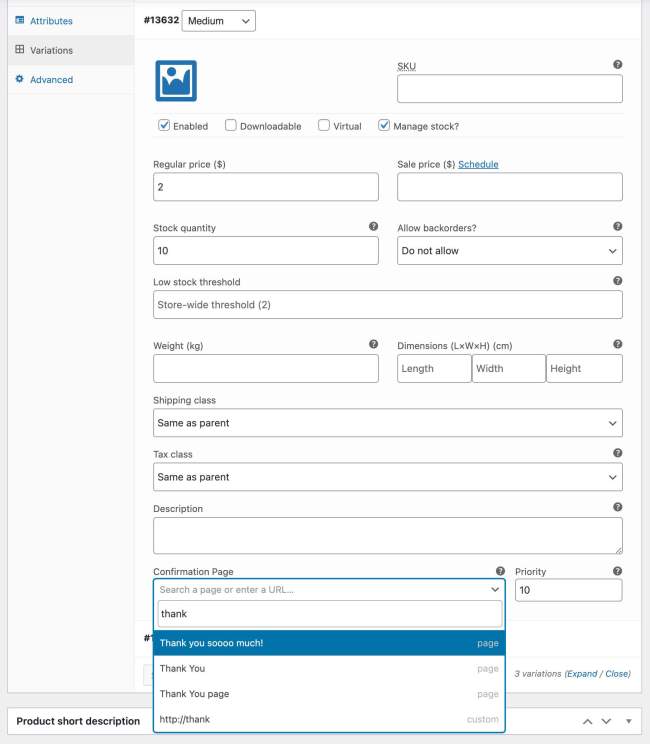
↑ Back to topThank you pages can be configured from the ‘Advanced’ section on every product, and the variation settings for each variation. There you’ll have a field where a custom URL can be entered, or searched for any page, post or custom post type.

Global Custom Thank You Page
↑ Back to topAbove you can configure the different custom confirmation page(s) per product and variation. A global custom thank you page that applies to all products can also be configured. The setting for this can be found at WooCommerce > Settings > Payments (previously Checkout) > Thank you pages.

Confirmation Page Priority
↑ Back to topAll fields have a ‘priority’ setting included. This setting determines the priority in which the thank you page will be picked / showing. The order is ascending, so starting with 0 it will display that confirmation page first, and the page with priority 10 after that.p
When a variable product has both a thank you page configured in the product and in the variation it will only take the thank you page from the variation, the product one will be ignored. When no specific thank you page is configured for the variation, but there is one for the variable product, it will use that one.
Quick Edit and Bulk Edit
↑ Back to topThe Custom Thank You Pages for products are also configurable using the well known WordPress quick and bulk edit features.
Purchasing Multiple Products With Custom Thank You Pages
↑ Back to topWhen a customer purchases multiple products that have custom thank you pages configured there are two ways to handle that.
(1) Showing One Thank You Page
↑ Back to topThe redirect pages are sorted by their priority from low to high. When only wanting to show one thank you page it will show the first in line, so the page with the lowest priority.
(2) Multiple Thank You Pages
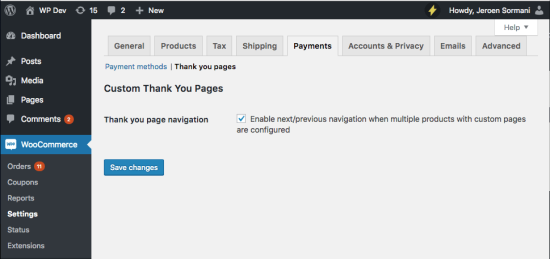
↑ Back to topThere’s also a possibility to show multiple thank you page. In the WooCommerce > Settings > Payments > Thank you pages section there is a setting to enable “Thank you page navigation”. When enabled and multiple products with custom thank you pages configured are purchased it will add a navigation to the top of the thank you page which will allow the customer to navigate between the different thank you pages. These are sorted according to the priority that can be configured individually.
Here’s an example where I’ve purchased two products with different thank you pages and the setting enabled.

Showing Order Details
↑ Back to topThe following shortcodes can be used to display details of the order;
[order_detail key='{KEY}’]
↑ Back to topThis shortcode can be used for many different details. The {KEY} needs to be replaced by one of the values below to determine what will be displayed by the shortcode. The following keys are available:
- ‘id’
- ‘order_number’
- ‘order_date’
- ‘total’
- ‘subtotal’
- ‘payment_method’
- ‘shipping_method’
- ‘status’
- ‘quantity’
- ‘shipping_address’
- ‘billing_address’
- ‘download_urls’
- ‘gateway_action’ – Performs actions related to the payment gateway, e.g. outputs bank details when BACS is used
- ‘thankyou_action’ – Performs the ‘woocommerce_thankyou’ action
- ‘thankyou_order_received_text’ – Output text that can be specific for payment gateways
For example, to display the order date, use the shortcode:
[order_detail key="order_date"]
Additional Order Details
↑ Back to topThis is for those who need additional order details and are comfortable getting in a bit more detail/depth. The [order_detail] shortcode offers dynamic retrieval of data based on the methods available in the WC_Order class. Any method that starts with get_* can be used in the ‘key’ attribute to output its return value.
E.g. the method get_billing_email exists in the WC_Order class. In order to use the value returned from this, you can simply use [order_detail key="billing_email"] (omitting the ‘get_’ part).
These are ALL the available methods
get_formatted_order_total
get_base_data
get_data
get_changes
get_order_number
get_order_key
get_customer_id
get_user_id
get_user
get_address_prop
get_billing_first_name
get_billing_last_name
get_billing_company
get_billing_address_1
get_billing_address_2
get_billing_city
get_billing_state
get_billing_postcode
get_billing_country
get_billing_email
get_billing_phone
get_shipping_first_name
get_shipping_last_name
get_shipping_company
get_shipping_address_1
get_shipping_address_2
get_shipping_city
get_shipping_state
get_shipping_postcode
get_shipping_country
get_shipping_phone
get_payment_method
get_payment_method_title
get_transaction_id
get_customer_ip_address
get_customer_user_agent
get_created_via
get_customer_note
get_date_completed
get_date_paid
get_cart_hash
get_address
get_shipping_address_map_url
get_formatted_billing_full_name
get_formatted_shipping_full_name
get_formatted_billing_address
get_formatted_shipping_address
get_downloadable_items
get_checkout_payment_url
get_checkout_order_received_url
get_cancel_order_url
get_cancel_order_url_raw
get_cancel_endpoint
get_view_order_url
get_edit_order_url
get_customer_order_notes
get_refunds
get_total_refunded
get_total_tax_refunded
get_total_shipping_refunded
get_item_count_refunded
get_total_qty_refunded
get_qty_refunded_for_item
get_total_refunded_for_item
get_tax_refunded_for_item
get_total_tax_refunded_by_rate_id
get_remaining_refund_amount
get_remaining_refund_items
get_order_item_totals
get_discount_total
get_total_shipping
get_order_currency
get_status
get_billing_and_current_user_aliases
get_prices_include_tax
get_cart_subtotal_for_order
get_items
get_extra_data_keys
get_item_subtotal
get_item_meta_array
get_used_coupons
get_meta
get_coupons
get_valid_statuses
get_tax_totals
get_payment_tokens
get_meta_cache_key
get_tax_location
get_total_discount
get_data_keys
get_total_tax
get_discount_tax
get_discount_to_display
get_tax_rates
get_item_tax
get_object_read
get_rounded_items_total
get_formatted_line_subtotal
get_download_url
get_item_meta
get_order
get_coupon_codes
get_shipping_method
get_meta_data
get_subtotal_to_display
get_cart_tax
get_id
get_taxes
get_shipping_total
get_parent_id
get_date_created
get_fees
get_data_store
get_shipping_tax
get_item_downloads
get_type
get_item_total
get_line_subtotal
get_subtotal
get_line_total
get_item_count
get_prop
get_shipping_methods
get_hook_prefix
get_total_fees
get_version
get_currency
get_date_modified
get_total
get_product_from_item
get_item
get_line_tax
get_items_key
get_items_tax_classes
get_values_for_total
get_cart_total_for_order
get_shipping_to_display
Note only the methods that output a string will work.
[confirmation_order_details]
↑ Back to topThis displays the standard order details table and details that is used on the default thank you page.
![Example of the standard output of the [confirmation_order_details] shortcode](https://woocommerce.com/wp-content/uploads/2018/11/custom-thank-you-page-standard-order-details-shortcode.png?w=550)
[wcctyp_page_switcher]
↑ Back to topThis displays a page switcher when there are multiple thank you pages available. The setting already does this automatically, but if you want to position it somewhere differently you can use this shortcode.
Questions & Support
↑ Back to topHave a question before you buy? Please fill out this pre-sales form.
Already purchased and need some assistance? Get in touch with the developer via the Help Desk.