WooCommerce Anti-Fraud detects fraud whenever an order is placed through your store. The outcome of the fraud check on each order is an Order Risk Score and suggests risk order advice. Furthermore, our plugin integrates with Artificial Intelligence-based MaxMind’s minFraud services to give you an extra layer of security.
Do you offer a Plugin Demo?
Demo
↑ Back to topOn the Demo site, you will be taken to the WooCommerce plugins page with Antifraud for WooCommerce plugin already installed.
Antifraud for WooCommerce Plugin Settings Page – To access the Antifraud for WooCommerce Plugin Settings Page navigate to:
WooCommerce > Settings > Antifraud.
Installation
↑ Back to top- Download the .zip file from your WooCommerce account.
- Go to: WordPress Admin > Plugins > Add New and Upload Plugin with the file you downloaded with Choose File.
- Install Now and Activate the extensions.
More information at Install and Activate Plugins/Extensions.
Getting Started With the Plugin
↑ Back to topIn Anti-Fraud Settings, you can enable rules, update rule weights and set automated actions based on the Order Risk Scores including:
- Cancel Fraud orders based on score.
- Put a Suspected order on hold based on the score.
- Notify the administrator with an email notification (but don’t change the order status)
- Verify PayPal before sending the order for fraud prevention.
- Assess fraudulent activity by integrating minFraud® AI-based service by MaxMind.
Blacklist Settings
↑ Back to topCan we block orders based on email addresses?
You can mark orders as high-risk by using the blacklist settings. Emails can be individually entered or using the wildcard character.
By adding an email to your blacklist, their purchases will automatically be detected as high-risk.
How does the blacklist feature work?
By enabling automatic blacklisting, email addresses with a high risk of fraud will be added to this list automatically. You can also block individual email addresses by adding them to the list manually. Use this feature for fraudulent customers whom you’ve had trouble with in the past.
Setup and Configuration
↑ Back to topAntifraud settings page can be found at WooCommerce > Settings > Antifraud:
Plugin Settings Page
↑ Back to top
The plugin settings page is where you configure the plugin, apply the weights to rules, select threshold values and interact with the other features of the Antifraud Plugin.
Where are the Antifraud Plugin settings located?
- The Antifraud Plugin Settings Page is located at WooCommerce > Settings > Antifraud
- Under the Plugin Settings Page, you will find a list of sub-menus
The Antifraud Dashboard:
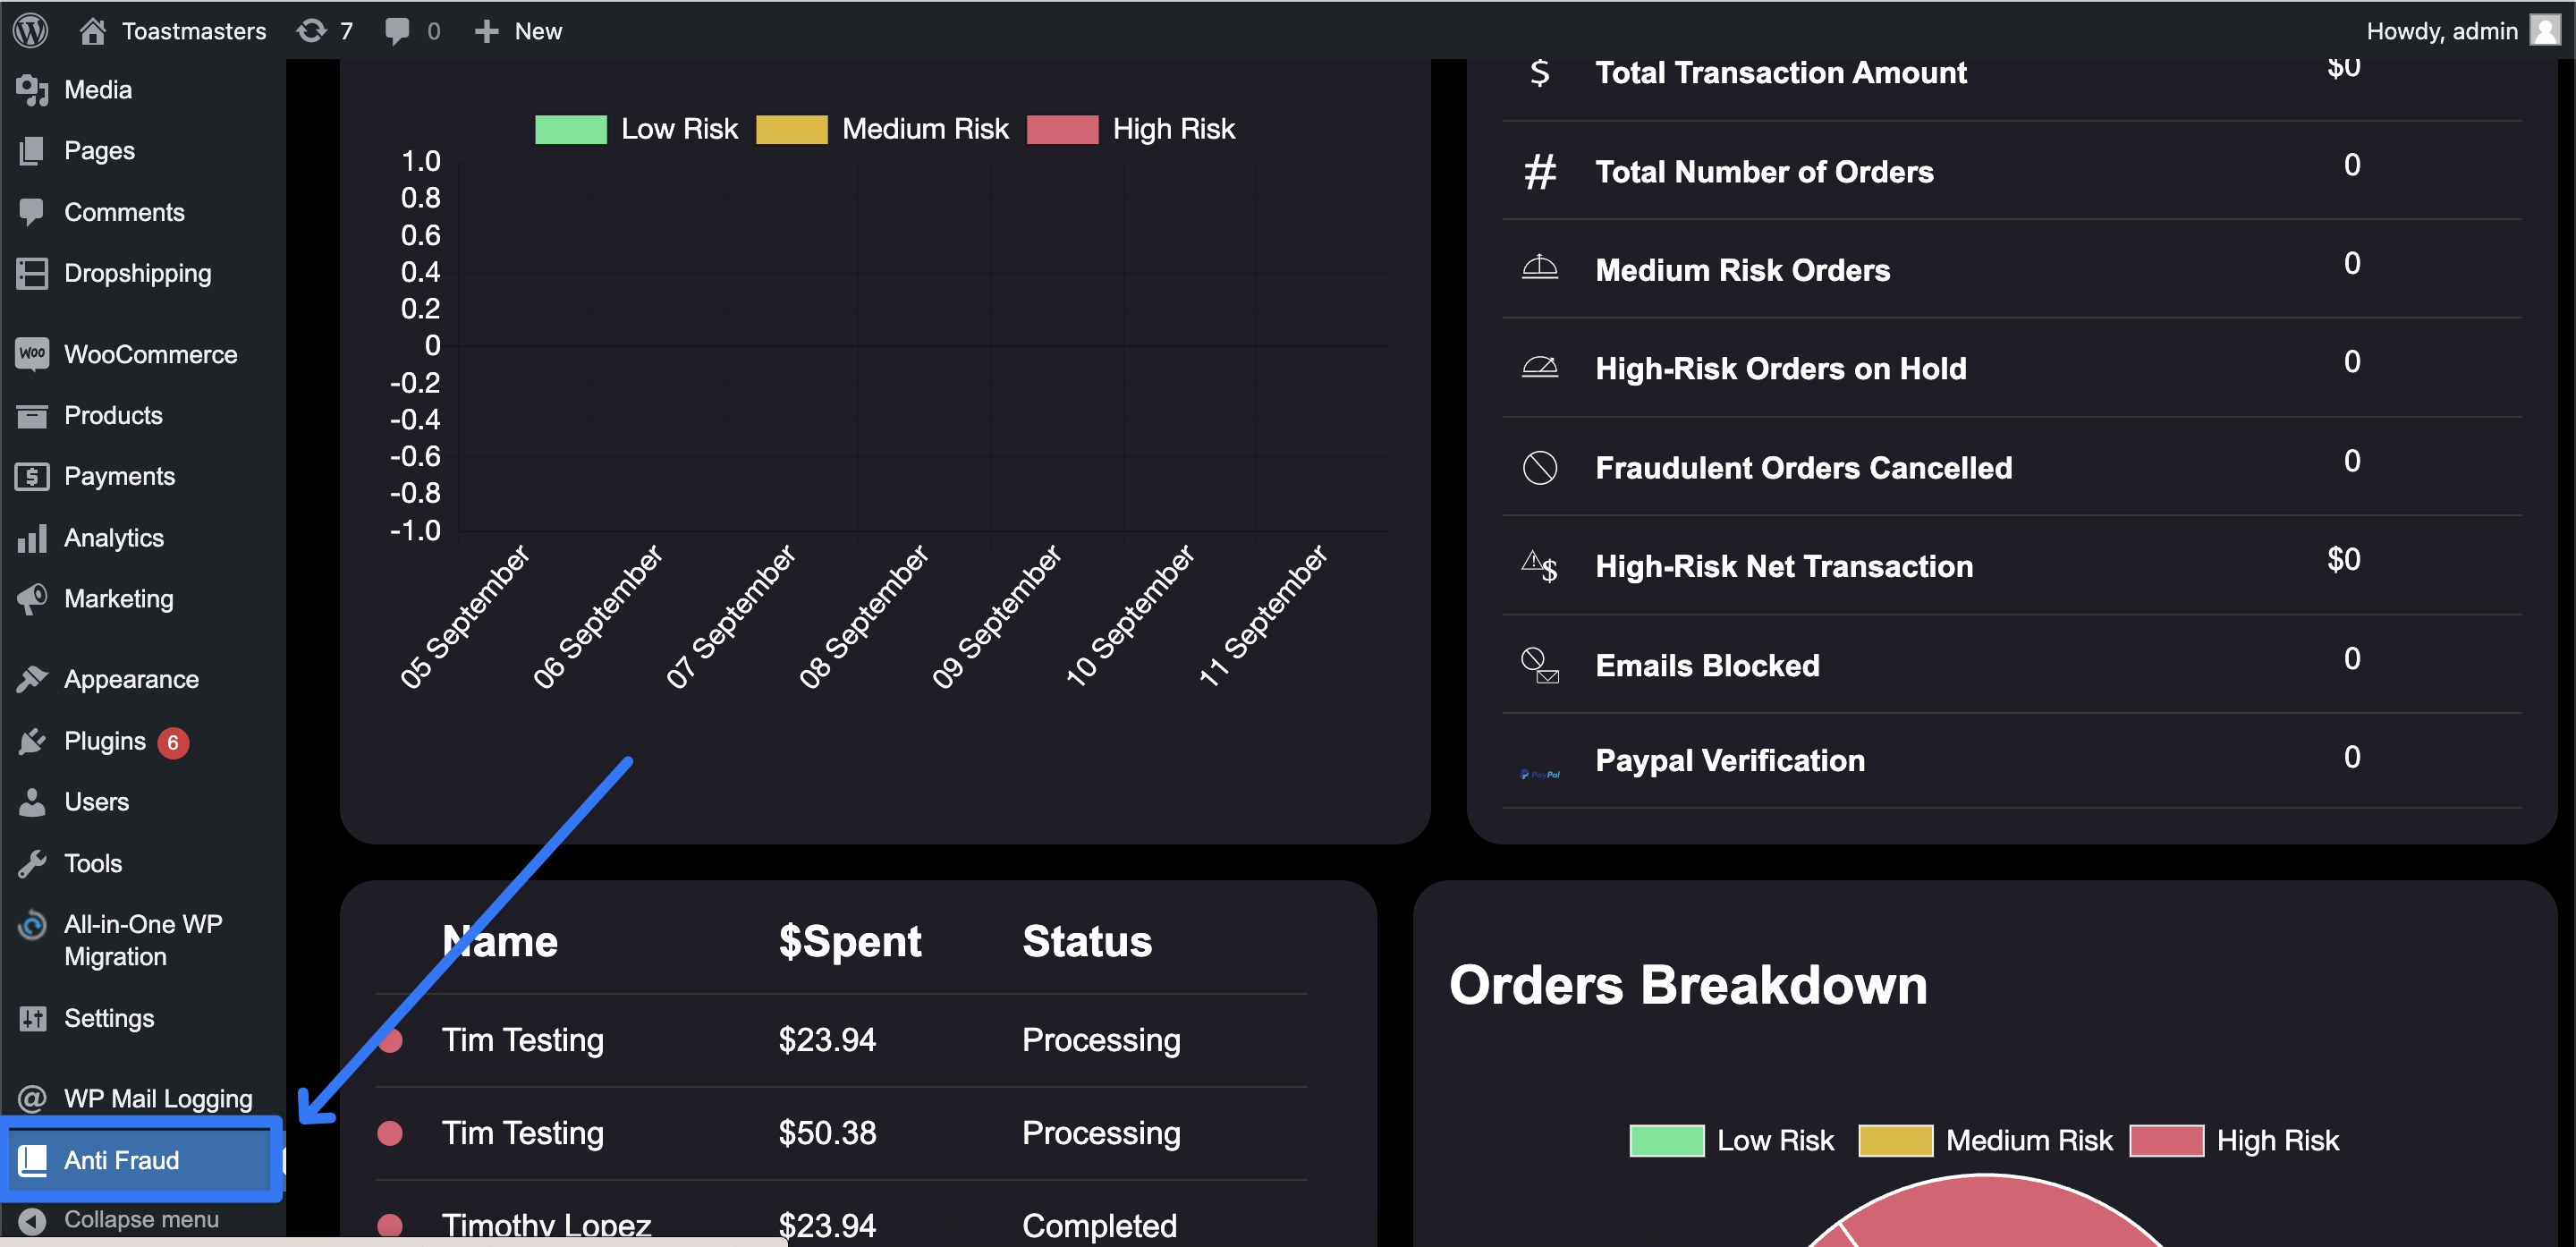
The Antifraud Dashboards page is an overview dashboard of all your fraud-related information and order information.
Where is the Antifraud Dashboard located?
The Antifraud Dashboard Page is located at: WooCommerce Admin Menu > Anti-fraud
View Order Risk Scores:
↑ Back to topWhat is the Order Risk Score?
The Antifraud Plugin checks order records a score and suggests recommendations based on the determined fraud risk.
What are the Suggestions?
The Antifraud Plugin checks order records a score and suggests recommendations based on the determined fraud risk.
The Antifraud Order Scores can be viewed on your store Orders Page and each specific order page.
Integrating with TrustSwiftly:
↑ Back to topThe Antifraud Plugin now comes with TrustSwiftly integration. You can enable and configure this from the TrustSwiftly sub-menu found under WooCommerce > Settings > Antifraud > TrustSwiftly
How to enable TrustSwiftly?
You can enable and configure this from the TrustSwiftly sub-menu found under WooCommerce > Settings > Antifraud > TrustSwiftly
How do I sign up for TrustSwiftly?
Sign up for TrustSwiftly here.

TrustSwiftly Settings Page
- Trust Swiftly Enable/Disable: Used to disable/enable the TrustSwiftly features.
- API Key: Your TrustSwiftly API Key.
- Base URL: Your TrustSwiftly URL.
- Validation Method: Default to Link. More methods will be supported in future releases.
- Verification Template: Choose the verification template, this field will be populated from your TrustSwiftly account templates after authenticating with your API and Base URL.
- When to Verify: Choose when to verify using TrustSwiftly. The options are Before Checkout and After Checkout. By default, this is set to Before Checkout.
- Select Threshold Weight: Threshold for detecting and requiring TrustSwiftly.
Why is TrustSwiftly not displaying at checkout?
Please note: Trust Swiftly will only be displayed for Logged-in users. This will not work for Guest Users. When using TrustSwiftly you may want to know how this works with other fraud detection rules such as the “On-hold” score and “Failed” Score. All orders verified through trust swiftly and successfully will be allowed to progress regardless of the other fraud scores. For more information reach out to us directly.
Velocity Attacks
↑ Back to topHandling 100’s of fraudulent orders
↑ Back to top
You may have installed our plugin as you’ve been hit with hundreds of fraudulent orders.
It can be a shock to start your day handling issues such as hundreds of fake, fraudulent orders from overnight, which can often result in flow-on effects. These may include your bank or 3rd party merchant banking provider suspending your account or sending you a large bill.
We refer to this sort of activity as a velocity attack. It is quite common but easily resolved in most cases.
Preventing Velocity Attacks with this plugin
↑ Back to topThe plugin is not stopping Velocity Attacks!
↑ Back to topThe plugin is effective at stopping velocity attacks. But this is not the case when there is another problem on your site that is rendering it ineffective. A good analogy here is, imagine you have decided to increase security on your house by installing a deadlock on the door. You then leave home, but leaving the back door wide open. While there is increased security on the front door, it is only as effective as the weakest point in your home security.
To sum this up, where reCaptcha has been set up within our plugin, and the issue persists, it indicates one or more of the following:
-Your site has a general security vulnerability – such as non-secure hosting.
-A plugin on your website has a security vulnerability.
-Your website has been hacked and is infected with malware.
Where this is the case, the plugin will not work effectively and you will continue to experience problems.
Help with Velocity Attacks – Next Steps:
OPMC works with both non-technical e-commerce store owners, as well as developers and agency partners who are not specialised in security, to solve these issues.
We are therefore experienced in handling these various scenarios quickly and cost-effectively. Please contact us through WooCommerce.com Support selecting this plugin and we can provide prompt expert advice to resolve this matter.
Using the Plugin
↑ Back to topWooCommerce Anti-Fraud checks for possible fraud whenever an order is placed. The outcome of this check is the output as an Order Risk Score and Order Risk Advice.
For Order Scoring and Advice:
- Low Risk – A Risk score lower than 25.
- Medium Risk – A Risk score between 25 and 75.
- High Risk – A Risk score higher than 75.
Risk Advice, Risk Score and a list of failed rules are added to the order edit display.
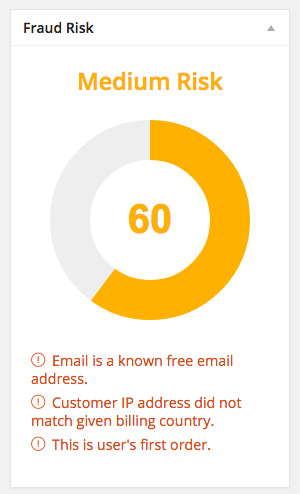
The Fraud Risk meta box
Risk Advice is also shown in the order overview screen as a colored shield, and the shield color is based on the level of Risk Advice.

Risk Advice color key:
- Green – Low Risk
- Orange – Medium Risk
- Red – High Risk
- Grey – No fraud check is done
How is Order Fraud Risk Score and Risk Advice calculated?
↑ Back to topWe created a set of rules that vary from simple checking if the shipping address matches the billing address to advanced rules such as proxy detection. We calculate a score based on the number of rules the order fails, then display Fraud Advise based on this score.
Configuring the plugin’s settings
↑ Back to topBy navigating to WooCommerce > Settings and clicking the Anti-Fraud tab. From here you can configure how the plugin reacts to different risk scores, what thresholds are set and who is notified. The Antifraud Settings are separated into the following sub-menus:
This section details the plugin settings.
- General Settings
- Rules Settings
- Blacklist Settings
- Email Alerts Setting
- Rules Settings
- reCAPTCHA Settings
- Paypal Settings
- MinFraud Settings
- MinFraud Settings
- MinFraud Insights Settings
- MinFraud Factors Settings
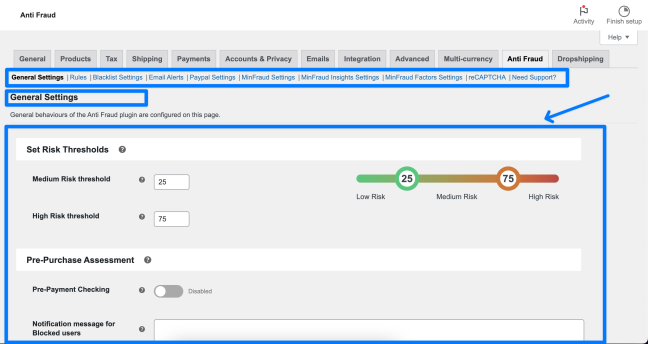
1. General Settings
↑ Back to topThresholds:
- Medium and high-risk thresholds – This field allows you to change what the plugin classifies as a medium-level risk or a high-level risk.
- Enable first-order check – When enabled, the plugin will include a warning if the order placed is a user’s first order. The risk score will also be affected according to the rule’s risk weight.
Pre-Purchase Assessment
- Pre-Payment Checking: By default, the order is checked after it is made on your store. This includes payment. Enable this if you want to check for fraud before allowing the user to pay.
- Add a notification message on the checkout page for customers who are blocked/cancelled/put on hold during pre-payment check due to being marked as high-risk orders.
Change Order Status based on Risk Score
- Update Order Status based on Fraud Score: Use this setting to enable the feature of auto-updating the order status based on the order score.
- Weighting to Cancel Order: Orders with a score equal to or greater than this value will be automatically cancelled.
- Weighting to On-hold Order: Orders with a score equal to or greater than this number will be automatically set on hold.
Whitelist Payment Methods
- Enable Whitelisting of Payment Methods: Setting to enable and select and whitelist payment methods.
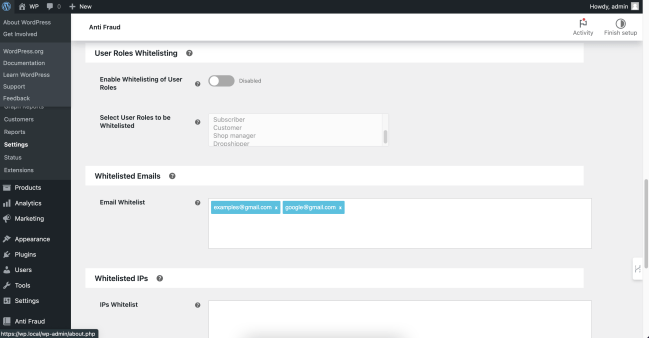
User Roles Whitelisting
- Enable Whitelisting of User Roles: Setting to enable and select and whitelist specific user roles.
Whitelisted Emails
- Enable Whitelisting of Emails: Setting to enable and select email to whitelist.
Auto Fraud Check For Existing Orders
- Enable Auto Fraud Check: Enable this setting to check orders that already exist in the store, that is, orders made when the anti-fraud plugin was not installed or deactivated. The period of orders can be configured.
Enable Debug Logging
- Enable Debug Log: This setting is used to enable the debug log for debugging and troubleshooting purposes.
2. Rule Settings
↑ Back to topFirst Time Purchase Rules
Update these rules to check for new customers based on first time placing an order on your site. This can check completed orders, but also orders that did not go through and are processing.
IP, Billing and Shipping Address-based Rules
Rules set for identifying fraudulent orders triggering risks based on IP, billing and shipping addresses.
- IP Address Match: Check if address provided by the customer and IP address from where the order is placed are same.
- Billing and Shipping Address Match: Enable to identify the difference between shipping and billing addresses.
- Geo Location Match: Activate this rule to check if billing/shipping state matches the geolocation provided by the browser.
- Phone Number and Billing Country Check: Enable this rule to verify if billing country and phone number provided are same.
- Customer Behind Proxy or VPN: Check if the customer is using a proxy or behind a VPN.
Multiple Orders Attempts using Different Addresses from Same IP
Rule to check if the buyer is ordering products using different addresses from the same IP over a certain period from your store.
Origin Countries
International orders tend to have a higher fraud risk than orders that originate in your home country. Merchants often find that certain origin countries have a higher potential for fraud. These rule sets help manage such risks.
High-Risk Email Domains
Merchants often find that certain email domains have a higher potential for fraud. These Rule sets will help you manage High- Risk Email Domains. Identify High-Risk Domains by manually adding such email domains to High-Risk Domain section and/or using QuickEmailVerification.com API key to make this operation automatic.
See how to set up QuickEmail Verification API key
Order Amounts and Attempts
The rules in this section are triggered based on defined order amounts and by counting attempted orders. You can also limit orders within a certain time frame. Orders with unusually high values, or customers who make an excessive number of transactions in a short period are more likely to be fraudulent.
- Order Amount is Above Average: Check if order significantly exceeds the average order amount for your site. Set multiplier value to trigger this rule. When an order placed is value times greater than an average order.
For example, the average order value in a store is $100 and you want to trigger this rule when an order made exceeds $500. In ‘Average Multiplier’ mention ‘5’ because 5 times $100 is $500. - Order Exceeds Maximum Amount Limit: Limit maximum order value by enabling this rule.
For example, if you don’t want an order to be greater than $5000. Set ‘Amount Limit($)’ to ‘5000’. - Too many order attempts: Enable this rule to limit number of orders per user for a certain timespan (hours).
- Limit Number of Orders between Time: To limit the number of orders for a certain time duration during the day enable this rule.
3. Blacklist Settings
↑ Back to topEnabling email and IP blacklisting will capture and block all emails and IP addresses that are marked as potential fraud by WooCommerce Anti-fraud plugin. To remove any email or IP address from the blocked list, click on ‘x’ next to IP or email address and save changes.
- Email Blacklisting
- IP Blacklisting
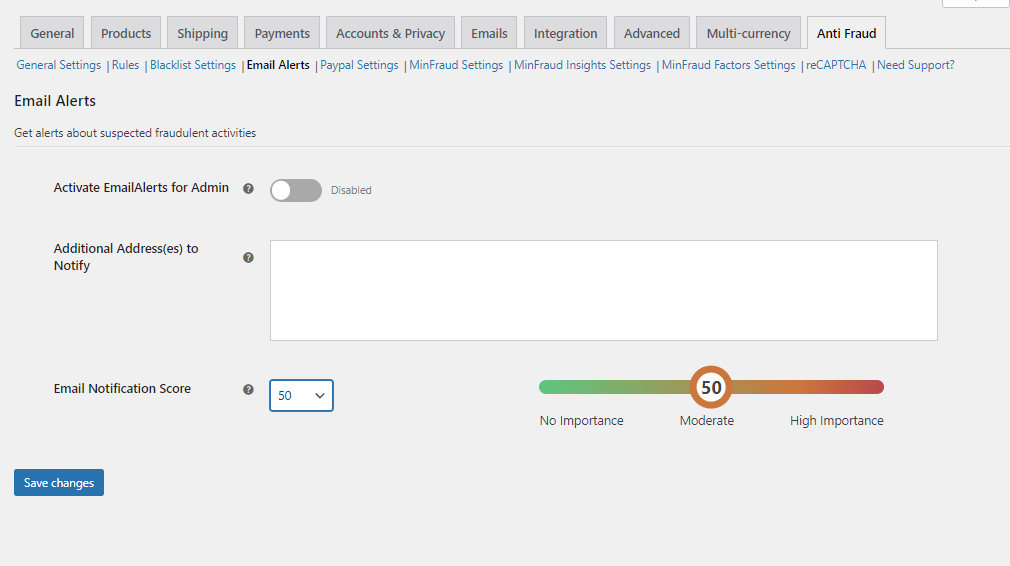
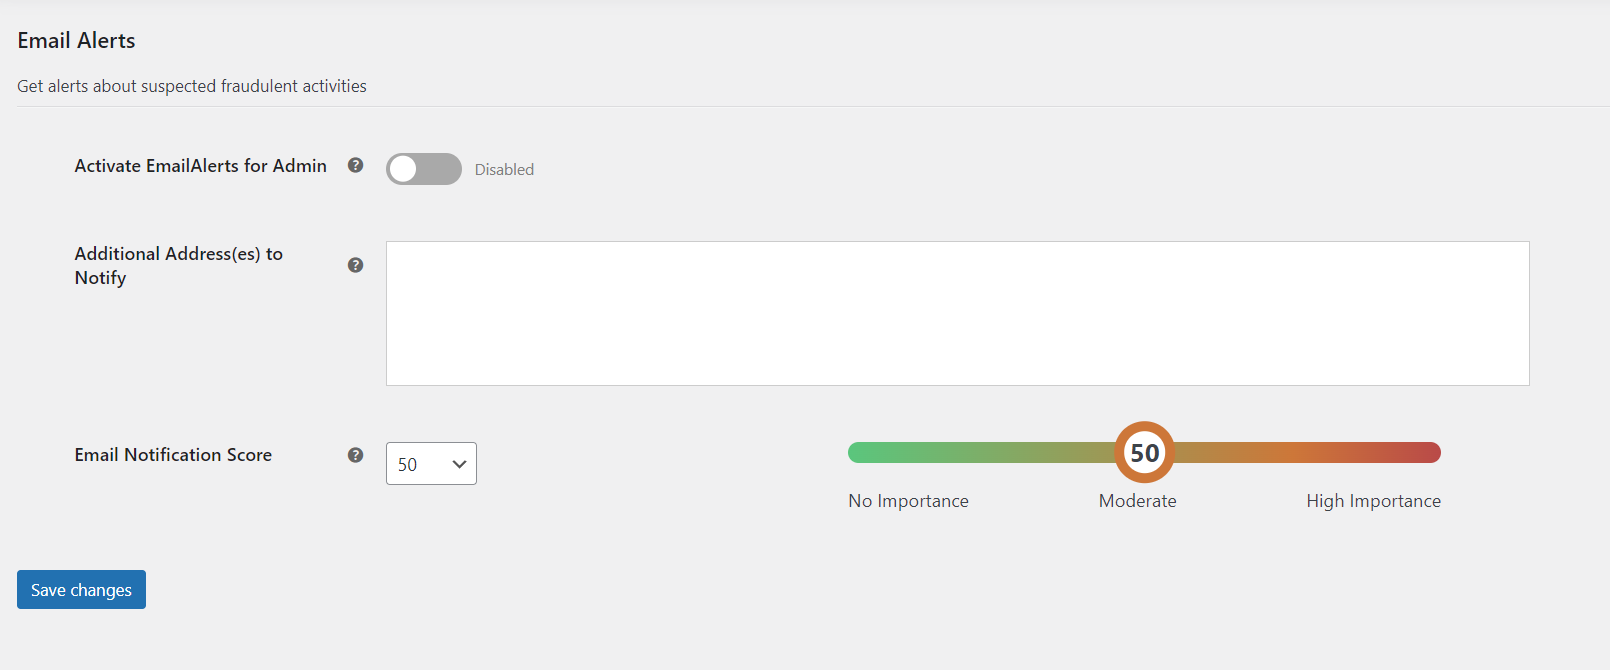
4. Email Notification Settings for Store Admin & Others:
↑ Back to topGet alerts about suspected fraudulent activities on your store directly to the admin email, or any other email by enabling email alerts. Configure multiple email addresses to get notified when any order passes a certain threshold.
Email Notification Score is basically a score when any order meets or exceeds this value triggers emails to specified emails.
Configure and enable Google reCAPTCHA from this section. Activating reCAPTCHA will enable the service on your Checkout page, which is an effective means of reducing spam orders, particularly from velocity attacks. WooCommerce Anti-fraud supports both v2 and v3 reCAPTCHA.
Please ensure you enter valid API keys for reCAPTCHA to work correctly. This is a two step process, please enable reCAPTCHA and then enter the API Key Value Pair, then confirm this works by checking for the reCAPTCHA on the checkout page.
6. Paypal Settings
↑ Back to top- Enable PayPal verification – When this setting is active, all PayPal payments will require verification. A verified PayPal email address is linked with more legitimate, low-risk orders. If verification fails, the order is put on hold.
- Prevent downloads if verification fails – For WooCommerce stores which have digital downloads, this setting can be used to restrict access to the downloadable file(s) until the PayPal email is verified.
- Time spend before further attempts – This setting adjusts how many days are allowed to pass before another email is sent.
- Email body – This field allows you to customize the message that is sent to customers who need to verify their PayPal accounts.
7. Rule settings of minFraud®
↑ Back to topBy default Minimum MinFraud Risk Score for minFraud® integration is set to 30. It is the threshold value after which the minFraud alert is triggered in the WooCommerce antifraud plugin. Similarly, the default value of MinFraud Rule Weight is also set to 30, which is the weighting in proportion to the total per cent of fraud set for the minFraud.
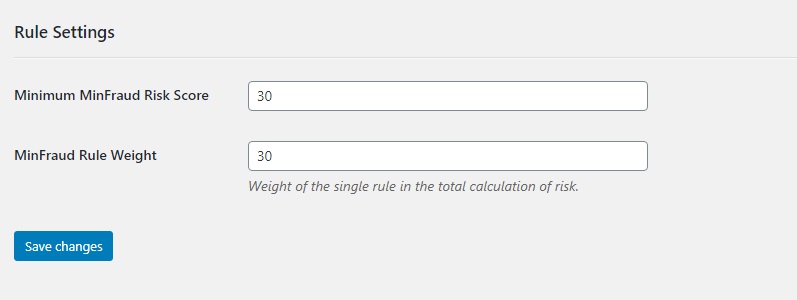
You can also customise your setting how it suits you. For example, you want minFraud to trigger when you get a score of 50, you have to set Minimum minFraud Risk Score to 50. Similarly, if you want to give minFraud more weighting, for example, 40 on Fraud risk graph that is displayed in your order then set MinFraud Rule Weight to 40.
minFraud integration is inactive by default. You have to set it after activating the plugin following the procedure mentioned above.
Troubleshooting
↑ Back to top1. How to debug the Antifraud Plugin?
↑ Back to topDebugging the antifraud plugin is straightforward.
To debug the Antifraud plugin enable the debugging setting on the General Settings Page. Once you enable and save this setting you will see the section now has files. Download the CSV which will contain the order information. Attach this and share this with support along with a summary of your issue.
2. How to disable a rule?
↑ Back to topMost rules have a toggle option to enable/disable the rule. You can set any risk weight to “0” to disable it.
3. Help – I’m not receiving the administrator notifications email.
↑ Back to topNot receiving the administrator’s email can have multiple causes.
- Verify in WordPress default settings that the admin email address is entered correctly
- Check your SPAM folder to ensure the message was not filtered
If neither, contact your host to check if your website is allowed to send the email.
4. Upgrading / Downgrading the Plugin – How can I update the plugin version without clearing the plugin settings?
We always recommend taking a backup of your site when updating or downgrading any plugin. There are many free plugins that allow this or your hosting provider can also help you. For more specific information please reach out to OPMC.
Additionally, as specified in WooCommerce best practices, we always recommend that plugin updates are completed on a staging/testing site. This prevents any loss of data or issues when working with your live site.
With that said, the settings should not be cleared when updating the plugin to a newer or older version.
Please test this on your staging/testing site first, OPMC understands this can be frustrating when plugin settings / configurations are clear, however, we take no responsibility and recommend testing this first on your staging/testing site.
5. When orders are declined by our payment gateway will the plugin notify the site Admin?
↑ Back to topWe don’t have a way to notify admin if there are declined payments through your payment gateway if this is not hosted on your site. The plugin only will only notify you if the order was declined by the Anti Fraud plugin.
To enable this use the following:
Under the Email Alerts setting of the Anti Fraud plugin, you have the option to have a notification when the fraud score is higher on a set score.
This setting will trigger an email to the Store Admin if the score is higher than the Email Notification Score. You can also add an additional email address to notify.
6. Manually checking Fraud Risk on old orders
↑ Back to topOrders that were placed prior to installing the Anti-Fraud extension can be manually checked by opening the order and clicking the Calculate Fraud Risk button in the Fraud Risk meta box.
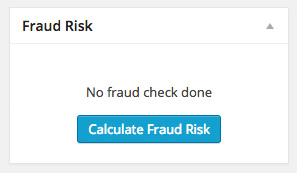
The ‘Calculate Fraud Risk’ button.
7. How do I enable 3D Secure? I want to use 3DS, can the Antifraud Plugin implement this?
↑ Back to topThis is not a feature of the plugin.
For extra fraud protection, 3D Secure (3DS) requires customers complete an additional verification step with the card issuer when paying.
3D Secure is a form of 2FA during Payment Processing, and would typically be set up at the payment gateway side.
Please contact your payment provider to enable this for you.
minFraud® Setup and Configuration
↑ Back to topminFraud® Integration is an AI-based scoring system to check risk affiliated with orders you receive.
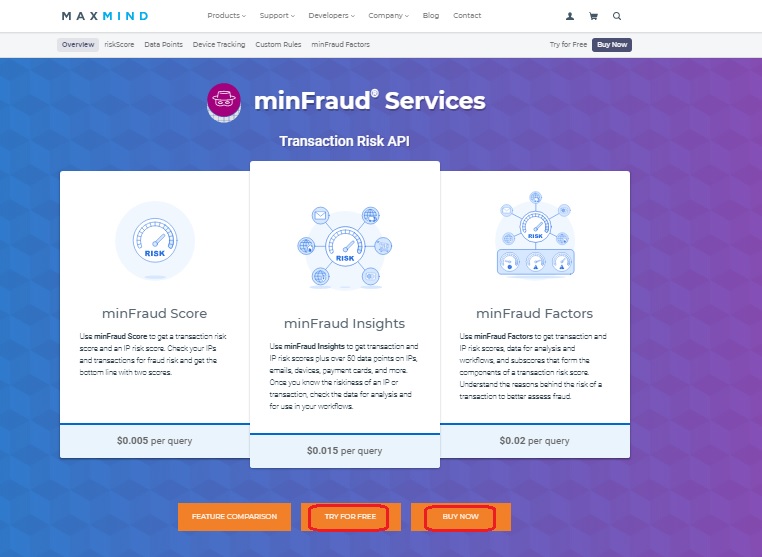
Signup for minFraud® fraud prevention service by visiting Maxmind minFraud Services here
After signing up, click My Account and select My License Key from tabs on and then click Generate new license key
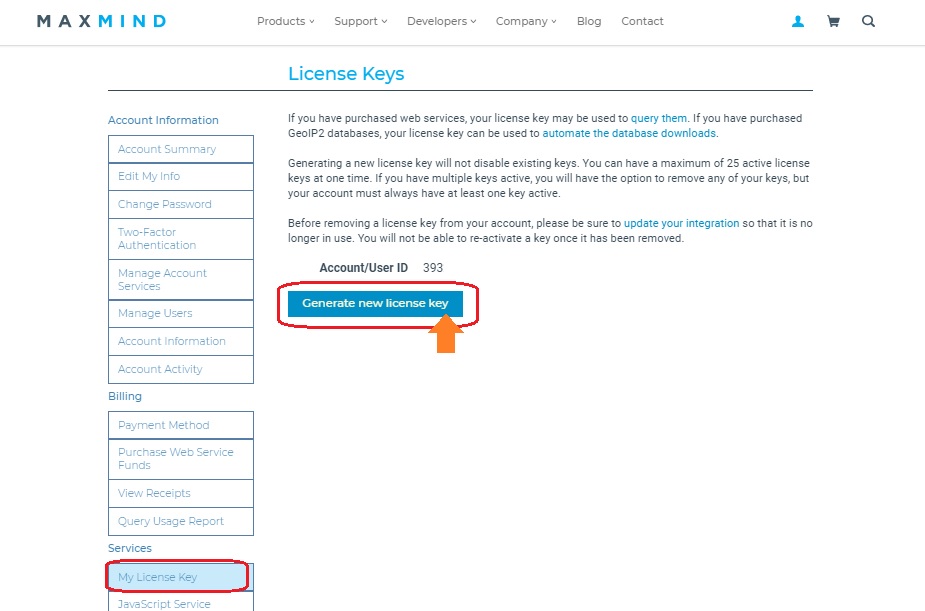
Note: Copy User ID, License key and save it in a safe place for future use, as License Key will be displayed in full only for the first time.
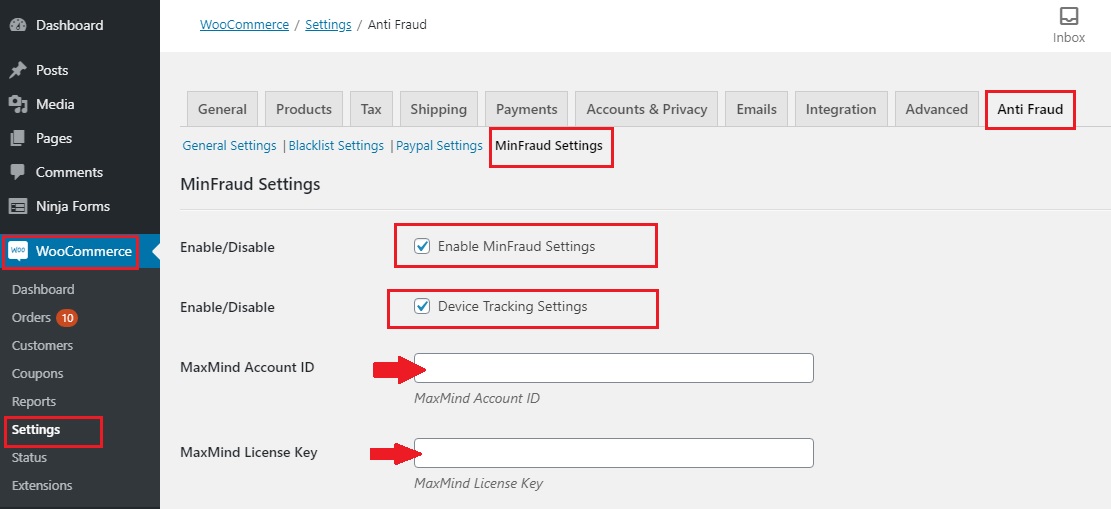
- Goto: WordPress Dashboard > WooCommerce > Settings > Anti Fraud > minFraud Settings
- Check Enable MinFraud Settings and Device Tracking Settings
- Paste User ID and License key and Click Save changes at the bottom.
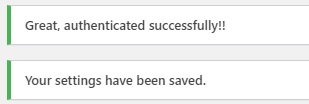
Authentication message will appear on the successful integration and you are all set up.
Checking minFraud® Transactions on MaxMind website
↑ Back to topSign in to your MaxMind account.
Goto MY ACCOUNT > minFraud Transactions
By clicking on the Transaction ID you can see for details of each order.
Checking minFraud® integration Response on the order page
↑ Back to topIf the transaction score exceeds the threshold set in minFraud’s Rule Settings tab you‘ll see a notification on your order page. These scores are integrated with our already set scoring system that can check other aspects of fraud as well and gives you extra protection over the fraudulent activities.
