Wholesale Product Page Customizer is a WooCommerce plugin that lets you level up your product pages with conversion-focused features that simply help you sell more.
Wholesale Product Page Customizer Documentation Menu
↑ Back to top- Requirements
- Compatibility
- Installation
- Configuration Options on Main Settings Page
- Attachment for Admins
- Minimum Order Quantity
- You Save Message
- Request for Sample
- Variation Tables
- Settings and Options on Individual Product Pages
- Attachment for Admins
- Minimum Order Quantity
- You Save Message
- Request for Sample
- Variation Tables
- Plugin Support
Requirements
↑ Back to topWholesale Product Page Customizer for WooCommerce requires:
- WooCommerce 3.3+.
Compatibility
↑ Back to topWholesale Product Page Customizer for WooCommerce is compatible with the following page builder plugins:
- Visual Composer
- Elementor
- SiteOrigin
Installation
↑ Back to topThe first step is to purchase the plugin. For that, visit the product page for WooCommerce Wholesale Product Page Customizer. On the right hand, you will see purchase options.
Once purchased, you will get a zip file.
To install the plugin, go to your WordPress dashboard and navigate to Plugins > Add New > Upload Plugin.
Upload the zip file that you have purchased. That will install the plugin.
From the sidebar, click on Plugins > Installed Plugins.
The Installed Plugins page displays a list of all the plugins that have been installed on your WP site. Navigate to, or search for: “Wholesale Product Page Customizer for WooCommerce”.
Note: Below the plugin name, if it shows an “Activate | Delete” option, click on “Activate”. If it’s showing a “Deactivate” option, it means that the plugin is already activated and you don’t have to do anything. However, in most cases after installation, you’ll be presented with the first option – i.e “Activate”.

Once the plugin is successfully activated, go back to your WordPress dashboard and navigate to WooCommerce > Settings.
Once the plugin is successfully activated, go back to your WordPress dashboard and navigate to WooCommerce > Settings.
On the settings page, you will notice multiple tabs like General, Products, Tax, and Shipping. As illustrated below, you can see a Wholesale Product Page Customizer tab. Click on it to open up the settings page.
Attachments
↑ Back to topSelect the Enable checkbox to enable the option to upload downloadable attachments on the Product Page.
Attachments can be uploaded from the Edit Product Page.
Minimum Order Quantity
↑ Back to topSettings under this option allow you to enable or disable Minimum/Maximum order quantity on product pages.
The options here include:
1. Enable Checkbox
Selecting this checkbox will enable this option. Deselecting will disable the option of specifying order quantity.
2. Minimum and Maximum Quantity Fields
You can use the min/max quantity fields here to set an amount globally, which will apply to all products. If you leave these fields blank, you can still specify a min/max order quantity on the Edit Product Page.
If min/max order quantity is set on both global and individual level, individual settings will override the global settings.
You Save Message
↑ Back to topSettings under this option allow you to enable or disable You Save Message on product pages. “You Save” Message calculates the difference between the actual price and discounted price and displays the savings with a custom set message that attracts your customers to buy the product.
The options here include:
1. Enable Checkbox
Selecting this checkbox will enable this option. Deselecting will disable the feature of displaying a discount message.
2. Set Individually or globally
Setting individually will allow you to customize the discount message on individual products. Setting globally allows you to set a discount message that will be applicable on all products.
3. Set Custom Message
Here, you can set your own custom message that will be displayed with the discount saving calculation. This option is valid if you have selected the global option. If you have set it on an individual level, you can customize the text message from the product page.
4. Select Area To Show This Text
Here, you can see different options to display the text. You can display it with the product title, after Add to Cart button or before Add to Cart.
Request for Sample
↑ Back to top
Settings under this option allow you to enable or disable the Request for Sample button on the product pages. Request for Sample button allows customers to add a sample product automatically in their cart and proceed to checkout directly with the sample product in the cart.
The options here include:
1. Enable Checkbox
Selecting this checkbox will enable this option. Deselecting will disable the feature of Request for Sample.
2. Set Button Label
This field allows you to customize the Button Label, which will override the default label – Request for Sample.
Use the options on the Edit Product Page to configure the sample product.
Variation Table
↑ Back to topSettings under this option allow you to enable or disable Variation tables on product pages. Variation tables allow you to display a table that lists all variations of the product along with a counter to select multiple quantities and the ability to buy multiple variations with a single Add to Cart click.
The options here include:
1. Enable Checkbox
Selecting this checkbox will enable this option. Deselecting will disable the feature of Variation Tables.
This option can only be configured on an individual product level. Hence, further options are given on the product pages.
How To Configure On Individual Product Level
↑ Back to topIf you have selected the “Set Individually” option on the settings screen, all these options will be enabled on individual product pages.
Attachments
↑ Back to topYou can upload the attachment for downloading, and set a custom title and download link. The custom title will appear above the attached file icon while the download link will appear below the attached file icon.
Minimum Order Quantity
↑ Back to top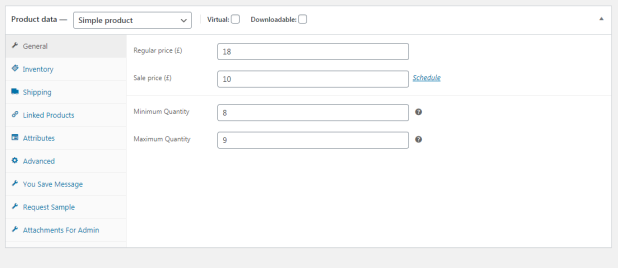
You can set the Minimum and Maximum order quantity here. Both fields are optional. So, you can have both of them or one of them – it’s up to you and what works for your business.
You Save Message
↑ Back to top
You can customize the message text here and also select the area where you want the message to appear.
Request for Sample
↑ Back to top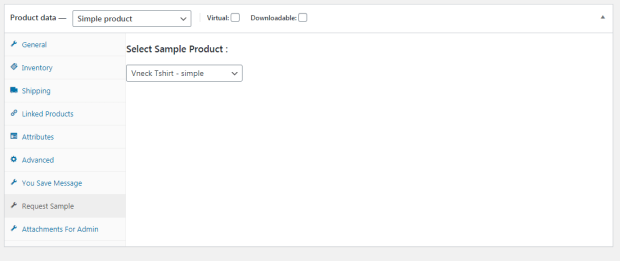
Here, you can select the sample product from the dropdown menu, which will be added to the cart when the user clicks on the Request Sample button.
If no sample product is selected, the Request for Sample button will not appear on the front-end.
Variation Table
↑ Back to top
The tab for Variation Table will only appear if you have selected Variable Product as the Product type and when you have created variations by adding attributes from the Attributes tab.
Here, you can select the Primary Attribute from the dropdown menu. This attribute will be displayed alongside the quantity counter.
Plugin Support
↑ Back to topShould you need any further assistance regarding this plugin, feel free to contact us at woosupport@codup.io and have our support team look into the issue for you. Thank you!