Integrate Viva.com Standard Checkout with your WooCommerce store to process and sync your payments and help you sell more.
Overview
↑ Back to topViva.com Standard Checkout lets you accept payments directly to your store without being redirected. It supports the following payment types:
- Visa
- Mastercard
- American Express
- Maestro
- Apple Pay
- Bancontact
- JCB
- iDEAL
- P24
- MULTIBANCO
- giropay
- EPS
- PayU
- BitPay
- WeChat Pay
- Sofort
- Discover
- Diners Club International
- Instalments (Greece only)
- Subscriptions (needs WooCommerce Subscriptions)
Translated into 17 languages
The Viva.com Standard Checkout now comes with the following languages out of the box, in addition to English: Bulgarian, Croatian, Czech, Danish, Dutch, Finnish, French, German, Greek, Hungarian, Italian, Polish, Portuguese, Romanian, Spanish, Swedish. One of these will be selected automatically according to the WordPress site language you choose during setup.
Accepts local payment methods
↑ Back to topYour customers can choose from various alternative payment methods depending on which ones you have enabled. To support any of these payment methods, contact your Viva.com sales representative who will start the on-boarding process for you. Alternatively, you can speak to us directly via our live chat facility. Log in to your Viva.com | Account and click on the Chat with us link in the left nav. Once you have the required payment methods enabled in your account, they will be available in the plugin settings (see Step 4 under Getting started, below, for setup instructions).
Supports WooCommerce Subscriptions!
↑ Back to top- Subscription suspension
- Subscription cancellation
- Subscription reactivation
- Multiple subscriptions
- Recurring total changes
- Payment date changes
- Customer payment method changes
Requirements
↑ Back to top- Viva.com | Account (sandbox account for demo)
- PHP 5.4+ (you can see this under WooCommerce > Status)
- WordPress 5.1+
- WooCommerce 3+
- An active domain name that points to your e-commerce site
- TLS 1.2 or higher protocol
- php cURL extension
Installation (if installing for the first time)
↑ Back to top- Click on the Free Download button on our product page.
A shopping cart is displayed - Complete the form with your details and click on the Purchase button. Note that as this is a free download you will not be asked for payment.
A confirmation page is displayed. - Click on the Download link to download to your local machine.
- Go to Plugins > Add New > Upload Plugin and select the ZIP file you just downloaded.
- Click Install Now then Activate Plugin.
- Find Viva.com Standard Checkout in the list and click Settings.
- Now proceed to the next section, below, to find out how to configure the plugin.
Installation (if upgrading from a previous version)
↑ Back to topSee upgrading the plugin further down this page. Once you have enabled the new plugin in the plugins list, proceed to Step 1 of ‘Getting started’, below.
Getting started
↑ Back to topBefore going any further, you need to ensure your WooCommerce currency is set to the same as your Viva.com | Account currency: WooCommerce > Settings > General > Currency options. There are 10 currencies available. Which one you should choose is dependent on the country in which you registered your Viva.com | Account:
- BGN – Bulgarian lev (Bulgaria)
- CZK – Czech koruna (Czechia)
- DKK – Danish krone (Denmark)
- EUR – Euro (Austria, Belgium, Cyprus, Finland, France, Germany, Greece, Ireland, Italy, Malta, Netherlands, Portugal, Spain)
- GBP – Pound sterling (UK)
- HRK – Croatian Kuna (Croatia)
- HUF – Hungarian Forint (Hungary)
- PLN – Polish złoty (Poland)
- RON – Romanian leu (Romania)
- SEK – Swedish Krona (Sweden)
Choose your WordPress site language
↑ Back to topTo configure your WordPress site language, go to Settings > General and look for the Site Language drop-down. If your required language is not listed under Installed, you will find it under Available.
All you need to do is choose your desired language and save your changes:
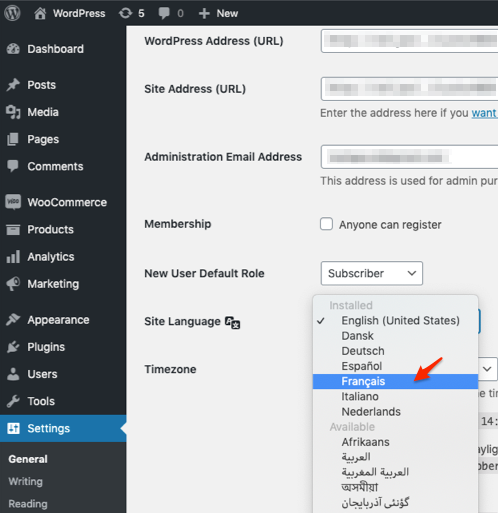
If one of the supported languages is selected, the Viva.com Standard Checkout settings page and customer payment form will also be displayed in that language.
Step 1: Grab Viva.com WooCommerce Credentials
↑ Back to topFirst, you need to grab your WooCommerce credentials from your Viva.com | Account:
- Log in to Viva.com, demo or live, and select the required account
- Go to Settings > API access
- Scroll down to WooCommerce Credentials and click on Generate a pair of credentials
- Make a temporary copy of the values in notepad (or similar):

Step 2: Specify required settings
↑ Back to topFrom WooCommerce > Settings > Payments on your WordPress site, do the following:
- Select the Enable Viva.com Standard Checkout checkbox.
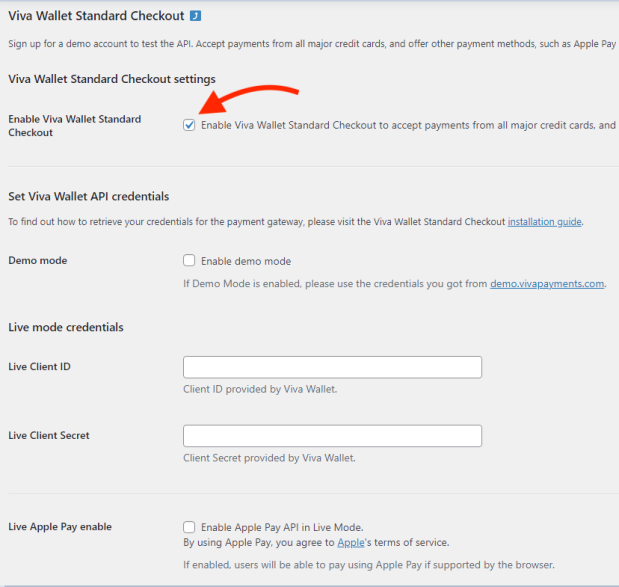
If you wish to offer your customers Apple Pay (Safari only), select the Enable Apple Pay checkbox. - Tick the Enable demo mode checkbox, if you wish to test before going live. Untick to begin accepting payments with Viva.com Standard Checkout.
- Enter your Live Client ID and Live Client Secret (obtained from your Viva.com | Account earlier). The Demo Client ID and Demo Client Secret are different and should only be used when ‘Enable demo mode’ is selected in step 2.
- Click on Save changes.
A confirmation message will be displayed with the payment source code that the plugin set up automatically within your Viva.com | Account. You’re ready to start receiving payments from your customers through Viva.com Standard Checkout.
Step 3: Specify advanced settings (optional)
↑ Back to topSelecting the Show advanced settings checkbox on the same page reveals further options: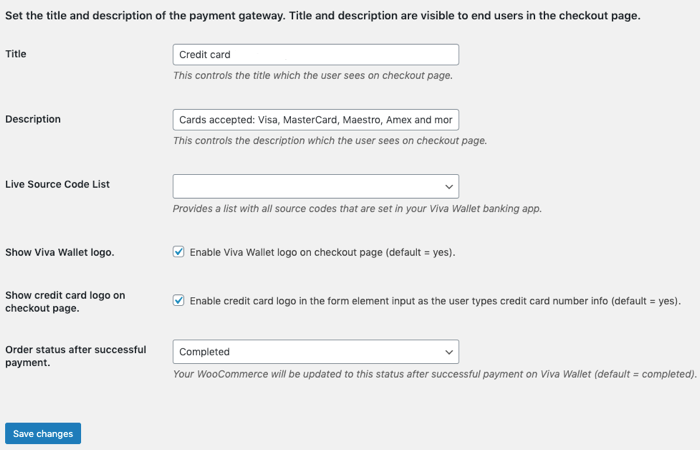
- If you wish, you can edit the Title and Description seen by the customer during checkout.
- Clicking the Source Code List dropdown displays the current payment source codes available in your Viva.com | Account.
- The Show Viva.com logo checkbox can be deselected if you wish to remove any Viva.com branding from your checkout.
- The Show credit card logo on checkout page can be deselected if you wish to disable the ability to show the issuer branding after card number validation.
- The Order status after successful payment dropdown enables you to choose Processing if more appropriate than the default Completed option. Which option you should select depends on the type of business you operate. E.g., for instantly available digital downloads, ‘Completed’ is appropriate, but for products where you need to check stock levels after taking payment, ‘Processing’ is more meaningful.
Step 4: Select local payment methods (optional)
↑ Back to topLocal payment methods require Pretty Permalinks to be enabled within WordPress. In your back office, go to Settings > Permalinks. Under Common Settings, select the Post name radio button then click on the Save Changes button.
To be able to accept local payment methods, you first need to have requested these to be added to your account. See Accept local payment methods for more information about how to do that. Once available, they will show in your WooCommerce settings. To switch on in the Viva.com Standard Checkout plugin for WooCommerce:
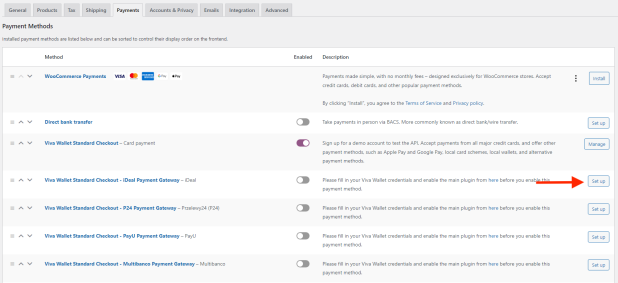
- Go to WooCommerce > Settings on your WordPress site and select the Payments tab.
- Click on the Set up button for the required local payment method as shown in the example below:
- Select the checkbox indicated below to enable the local payment method:
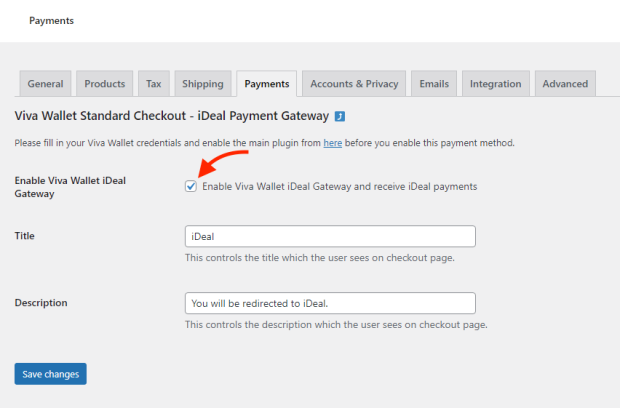
- Click on the Save changes button. If the payment method is available in your Viva.com | Account, you will see a confirmation message:

The payment method will now be shown to customers on the checkout page: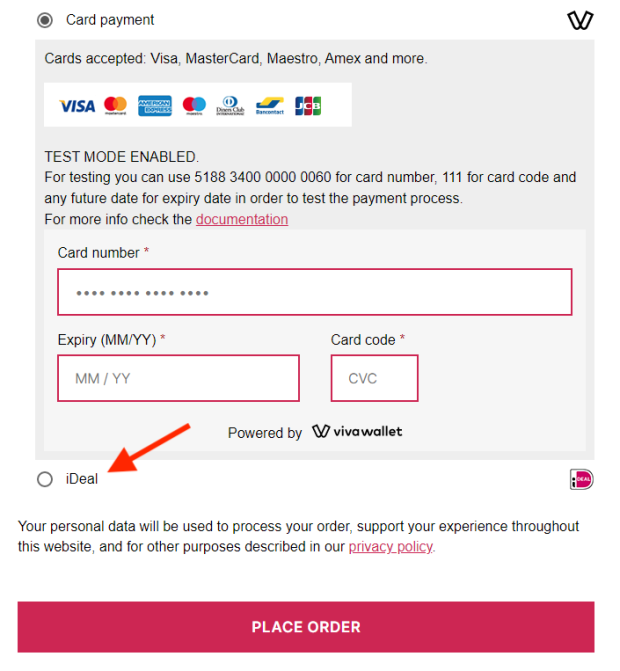
For test purposes we have set up a demo account with the iDeal local payment method enabled. Kindly note that payment attempts with local payment methods will fail on a demo account. This is just to see how local payment methods are displayed on the checkout page. In Step 2: Specify required settings, above, use the following credentials with demo mode selected:
Demo Client ID
3mzujpzf3xzr7uz82rnug4v9x24dbnv3mj9hf3pek4122.apps.vivapayments.com
Demo Client Secret
0GXfK8Rph0iGMVGqmW0RadqSOoJDVPPlease note that in WooCommerce > Settings on your WordPress site, under Currency Options, Euro (€) must be selected from the Currency dropdown to match the currency of the above Viva.com | Account.
Apple Pay
↑ Back to topFor Apple Pay to function correctly, all requirements for the native plugin must be met (i.e. you must have a verified Viva.com | Account and valid credentials set. Your account must be active and able to receive payments).
If your credentials are valid and Enable Apple Pay is checked, the installation process and registration of your domain with Apple Pay services are initialised.
Once the installation process is complete, you will see a new notice on the top of the page Your domain is verified with Apple Pay and you are ready to accept payments!
Requirements
↑ Back to topStores that wish to accept Apple Pay must meet the following requirements:
- Your entire website must be served over a secure network (HTTPS)
- Apple Pay works only in the Safari browser (iOS and macOS) on an Apple device with Bluetooth enabled. In all the other browsers and operating systems the Pay with Apple Pay button will not be visible to users.
- To use in demo mode, you need to have a Sandbox Tester Account, a paid developer subscription with Apple. To find out how to set one up, see Create a Sandbox Tester Account under Sandbox Testing on the Apple developer portal.
Payment request button
↑ Back to topCustomers need to have a payment method from a supported bank or payment card provider listed at the Apple Pay support page, and a compatible Apple device .
Enabling Apple Pay on your site via the Viva.com Standard Checkout is an automated process. When you select the Enable Apple Pay checkbox (see under Step 2: Specify required settings, above), the plugin configures Apple Pay and registers your domain automatically.
Pay by installments option
↑ Back to topThis is available to merchants with Viva.com | Accounts set up in Greece only.
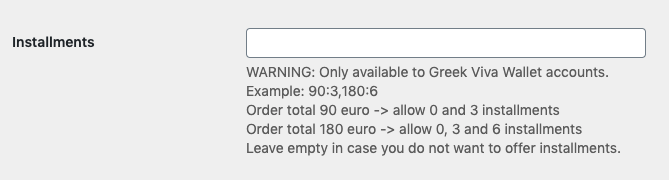
If you have a Viva.com | Account set up in Greece and want to allow customers to pay by instalments, you can define the instalment rules here.
Example: 90:3,180:6
This means:
Order total < 90 Euros –> offer 0 installments;
Order total >= 90 Euros and < 180 Euros –> offer 0 or 3 installments;
Order total >= 180 Euros –> offer 0 or 3 or 6 installments.
Leave empty if you do not want to offer installments.
Upgrading the plugin
↑ Back to topThere are two ways in which you can perform a plugin upgrade.
Automatic update
↑ Back to topIf you need to update the extension you can do this automatically from the WordPress plugins page. However, first you need to make sure you have connected your site to WooCommerce.com. To do that:
- Go to WooCommerce > Extensions on your WordPress site and select the WooCommerce.com Subscriptions tab.
- Click on the Connect button:

A confirmation message is displayed. - Click on the Approve button.
- Open the Plugins page and click on the Enable auto-updates link next to the Viva.com Standard Checkout.
Now, with each new release of our plugin, you’ll be prompted to update it. Clicking on the Update now link under the Viva.com Standard Checkout entry on the plugins page will do this immediately. Your previous settings will be retained.
Manual update
↑ Back to topYou can also update manually by downloading the latest version from your WooCommerce account. Once you have the zip file downloaded, you should deactivate and delete the existing version from the Plugins page on your WordPress site. Then you can install the new version using the Upload Plugin option. Now go to Step 1 of ‘Getting started’.
FAQs
↑ Back to topWhat card number can I use for testing?
↑ Back to top| Card number | Type | CVC | Expiry date |
|---|---|---|---|
| 5188340000000060 | Mastercard | Any 3 digits | Any future date |
When testing in demo mode enter the above in place of real card details. This will mimic a successful 3DS authentication and payment.
You can visit Viva.com developer portal for more test cards.
Can I test Apple Pay?
↑ Back to topYes, please follow the link here for instructions Apple Pay Sandbox Testing.
Is there any difference in the setup process between demo and live?
↑ Back to topIn both cases, the new payment source is activated immediately. However, on live, our team also checks the WooCommerce website assigned to the payment source in case of any potential issues.
Can I test the plugin using a development server?
↑ Back to topFor test purposes, the best option is to have a staging site, e.g. staging.yourdomain.com. You can replicate your live site and try out the Viva.com Standard Checkout without using a public domain name.
Another way is to set up a development environment on a local machine, but in this case you’ll need to use domain masking as localhost won’t work. You’ll need a directive in your hosts file so that you can navigate to www.yourdomain.com but the browser will serve the local site. This way you can test locally, make sure everything works, then apply the changes to your production website.
For both these options you should try the plugin in demo mode, configured with the WooCommerce credentials from your Viva.com sandbox account.
Another option for local testing is to use ngrok, an application for exposing a web server running on your local machine to the internet. View ngrok documentation.
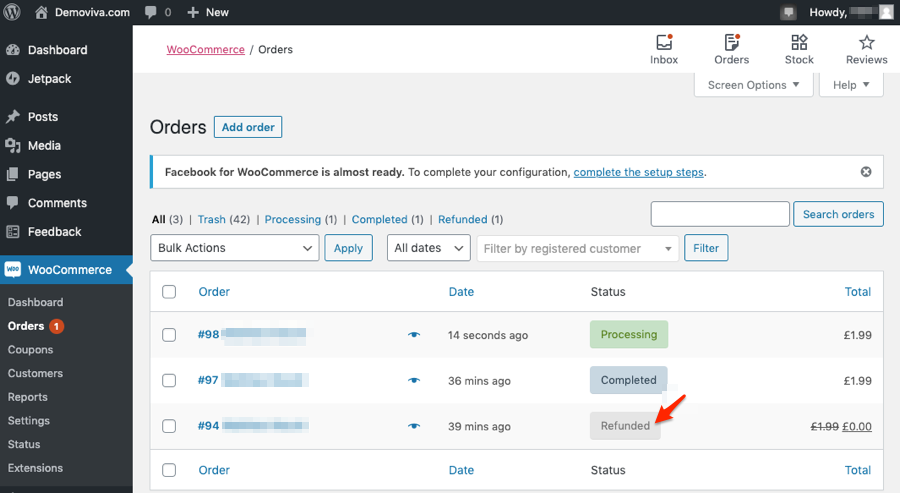
Can I refund a customer?
↑ Back to topYes, you can do this through the WooCommerce ‘Orders’ page as follows:
- Click on the required order to view the order details page.
- Enter refund amount, full or partial.
- Click Refund via Viva.com button:

- The order status is amended accordingly on the ‘Orders’ page:
Where can I get support?
↑ Back to topPlease email woosupport@vivawallet.com.
Troubleshooting
↑ Back to topSolutions to common problems.
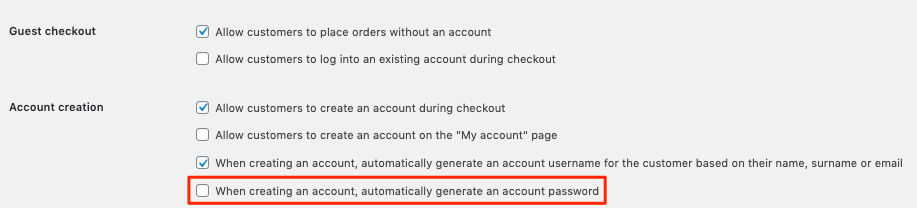
I’m getting a “Connection to WooCommerce checkout failed” error
↑ Back to topThis is caused by WooCommerce detecting a security issue. It usually means you have auto-generation of user password switched on in your WooCommerce settings. In your wp-admin, go to WooCommerce > Settings > Accounts & Privacy. Make sure that the When creating an account, automatically generate an account password checkbox indicated in the screenshot below is not selected:
I’m getting an API error
↑ Back to topEnsure that you have entered the correct credentials. If you are in live mode, you should have entered live credentials (not demo keys).
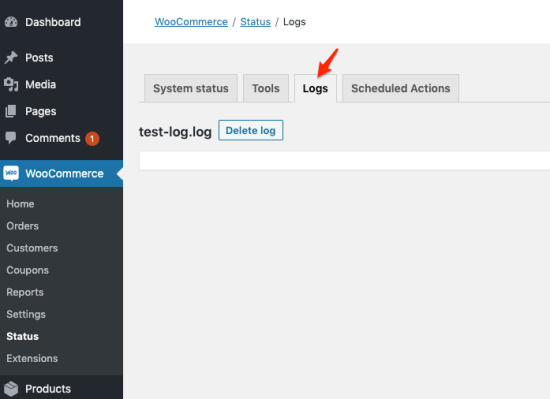
View and download logs
If this does not solve the error and you need to troubleshoot the issue, we have a log facility you can access. From within WP Admin, do the following:
- Go to WooCommerce > Status > Logs tab:
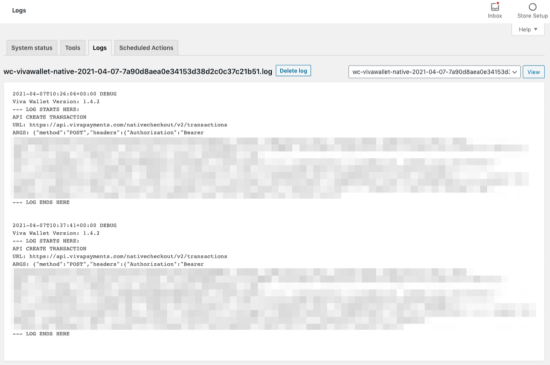
- Select required date with prefix “wc-vivawallet-native-” from the dropdown and click on the View button. A log file example is shown below with sensitive info blurred out:
- Copy the contents into a text file and save it with an appropriate name.
- Repeat steps 2 and 3 but this time choose the log file with the prefix “wc-vivawallet-native_update-“:
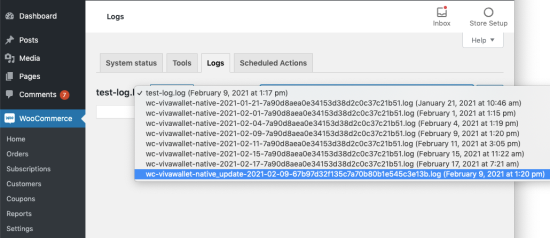
Note that this may not be from the date selected in step 2 in which case just choose the closest date.
I can’t receive any payments or intermittent payment problems
↑ Back to topOther issues could relate to your WordPress theme, other plugins you have installed or JavaScript problems.
WordPress theme
If using an extended or custom theme, try temporarily replacing with one of the default ones from WordPress.
Other third-party plugins
Try the following in case another plugin is interfering with the Viva.com Standard Checkout extension:
- Disable all plugins except WooCommerce and Viva.com Standard Checkout.
- Test the checkout with Developer Tools > Console open in your browser.
- If you see no errors you should try to enable one plugin at a time and check again. This way you should be able to find the plugin that is creating the issue.
JavaScript errors
The WordPress team have written a support guide on how to troubleshoot these types of error using your browser console.
Apple Pay – setup issues
↑ Back to topThe domain registration process with Apple Services is a two-step process. The plugin first attempts to create a new folder named .well-known located in your domain root folder (https://YOURDOMAIN.com/.well-known). It then tries to save a file named apple-developer-merchantid-domain-association in that folder.
If the first step is successful, a call to Viva.com API endpoints is fired. This registers the domain with Apple Pay services. When this call is made, the .well-known directory is scanned for the file that contains the relevant key. This is how the registration gets authenticated. In the case of errors produced while writing the file to your domain root, you will receive relevant error messages, for instance, unable to create folder / copy file. The most common cause of this is a permissions issue.
To resolve, do one or more of the following:
- You can try to create the folder
.well-knownmanually in your server root directory and set permissions to 755. - If the folder already exists, you can delete it and try the installation again.
- Attempt to visit Viva.com Standard Checkout plugin page and save your settings (complete the registration).
If the above fails:
- Download the Apple Pay verification file containing the domain association key.
- Upload the file to the
.well-knowndirectory. - Go to the Viva.com Standard Checkout plugin settings and reload/save your settings to complete the registration.
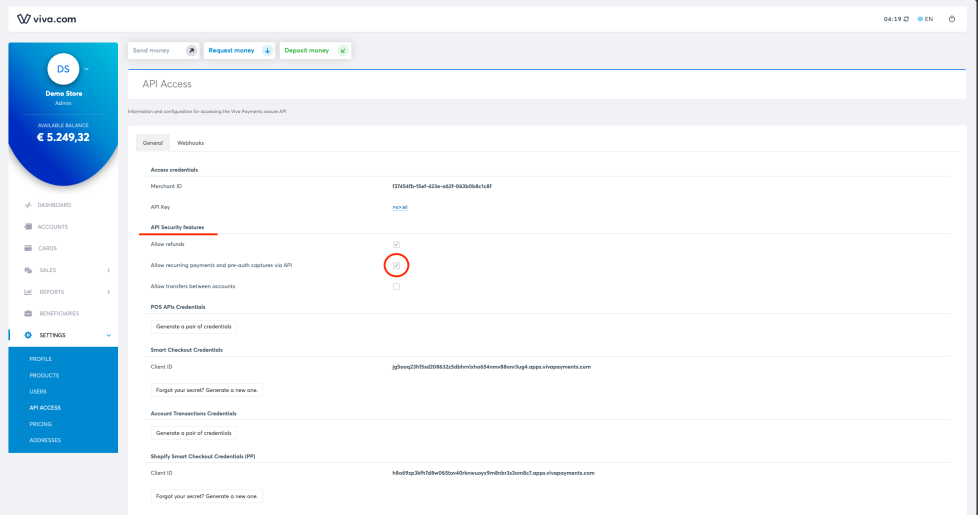
.well-known directory and related domain association file must be present.Subscription renewal failures
↑ Back to topFatal error: Uncaught InvalidArgumentException: Subscription doesn't exist in scheduled action: 0 in /home/customer/www/zenbears.co.uk/public_html/wp-content/plugins/woocommerce-subscriptions/vendor/woocommerce/subscriptions-core/includes/class-wc-subscriptions-manager.php:167
Stack trace: #0 /home/customer/www/zenbears.co.uk/public_html/wp-content/plugins/viva-wallet-for-woocommerce/includes/class-wc-vivawallet-subscriptions.php(58): WC_Subscriptions_Manager::expire_subscription(0)
#1 /home/customer/www/zenbears.co.uk/public_html/wp-includes/class-wp-hook.php(308): WC_Vivawallet_Payment_Gateway_Subscriptions->scheduled_subscription_payment('14.16', Object(Automattic\WooCommerce\Admin\Overrides\Order))
#2 /home/customer/www/zenbears.co.uk/public_html/wp-includes/class-wp-hook.php(332): WP_Hook->apply_filters('', Array)
#3 /home/customer/www/zenbears.co.uk/public_html/wp-includes/plugin.php(517): WP_Hook->do_action(Array)
#4 /home/customer/www/zenbears.co.uk/public_html/wp-content/plugins/woocommerce-subscriptions/includes in /home/customer/www/zenbears.co.uk/public_html/wp-content/plugins/woocommerce-subscriptions/vendor/woocommerce/subscriptions-core/includes/class-wc-subscriptions-manager.php on line 167This error can sometimes occur during subscription renewals when using the WooCommerce Subscriptions plugin. You can resolve this error by ensuring that recurring payments are enabled in your Viva.com | Account – API Security features: