Variable products in WooCommerce let you offer a set of variations on a product, with control over prices, stock, image, and more for each variation. You can use them for a product like a t-shirt, which you can offer in large, medium, and small sizes, all in different colors.
On this page you’ll learn:
- How to create a variable product in WooCommerce.
- How to add global or custom attributes to your variable product.
- How to use product attributes to create different product variations.
- How to define a default variation for a variable product.
- How to sort and organize product attributes and their options.
- What data you can add to a product variation and how to add it.
- Different inventory management options for variable products.
- How to bulk edit all variations of a product.
- What customers see on the front end of your site when you use variable products.
- Advanced topics for consideration when using variable products.
Adding a Variable Product
↑ Back to topAdding a variable product is similar to adding a simple product, but with a few more details to consider.
To add a new variable product:
- Navigate to “Products” in WP-Admin (the site’s admin area).
- Click Add New Product at the top of the page.
- Enter the product name.
- Choose “Variable Product” from the “Product data” dropdown menu.
- Click on the “Attributes” tab on the left hand side under the Product data dropdown.
- Add either a global/existing attribute or create a new one(specific to the product):
- Adding a Global Attribute:
- If you’ve already created global attributes, select the one you want to use from the “add existing” dropdown menu at the top of the settings.
- Select the variations/values you’d like to use from that attribute. You can add them all by clicking the “Select All” button below the values box or you can select specific ones you want to use by clicking on the “Select Values” box and selecting them one by one.
- Adding a new Attribute:
- Click the “Add New” button at the top of the settings.
- Add a name for your attribute (examples: size)
- Add the values (variations) you need. Separate each variation/value with | (i.e.: Medium | Large | XL | XXL )
- Adding a Global Attribute:
- Click “Save Attributes”.
- Click on the Variations tab on the left.
- Click either:
- Generate variations to add all possible variations from all attributes values/variations.
- Add manually to specify which variables will be available for the product.
- Click on each variation to expand to its product menu.
- Enter product information: Price, stock status, weight, dimensions, shipping class, and description. Add Linked Products if needed. Repeat for all variations.
- Optional: Use the “Bulk Actions” dropdown at the top of the “Variations” menu to set product information for all variations at once.
- Click Save changes at the bottom of the variations menu.
- Click “Publish” in the top right of the screen to publish the product.


Make sure to check the “Used for variations” box and save your added attributes.
Note: If you alter product attributes after creating variations, you may need to redefine the variations for the variation combinations to work correctly. Also, be aware that Dynamic product dropdowns on the product page have their behavior changed when working with products that have more than 30 variations.
Adding Variation Data
↑ Back to topEach variation can have the following properties:
- Image – Click the placeholder to add an image. See below
- SKU – Enter the SKU or leave blank. Note: If you set an SKU at the product level but leave it blank at the variation level, SKU will default to product level SKU.
- Enabled – Enable or disable the variation.
- Regular Price (required) – Set the price for this variation. Variations without prices don’t show in your store.
- Sale Price (optional) – Set a price for this variation when on sale.
- Downloadable – If this a downloadable variation. Adds the following download fields:
- Downloadable Files – Add file(s) for customers to download.
- Download Limit – Set how many times a customer can download the file(s). Leave blank for unlimited.
- Download Expiry – Set the number of days before a download expires after purchase.
- Virtual – If this product is not physical or shipped. Marking a product as virtual removes the following shipping settings:
- Weight – Weight for the variation, leave this blank to use the main product’s weight.
- Dimensions – Height, width and length for the variation, leave this blank to use the main product’s dimensions.
- Shipping class – Shipping classes can affect shipping. Set a variation specific shipping class here.
- Manage Stock? –
- Stock quantity – if selected. Allows to set the current stock level for the variation.
- “Allow backorders?” – Enables allowing backorders for the variation; if enabled, stock can go below zero.
- Low stock threshold – When the stock for the variation reaches this level, the system will send you a notification email. If you haven’t configured it, WooCommerce uses the product-wide threshold (see Inventory Management below).
- Tax class – Use tax classes to charge different tax rates for a specific variation. Read more about tax classes

Downloadable Variations
↑ Back to topIndividual variations of a product can be marked downloadable. To make a downloadable variation:
- Follow the steps at Adding a Variable Product to create a variable product and add variations.
- In the Product Data panel, select the Variations section.
- Click the variation of your choice to expand its details.
- Tick the Downloadable checkbox:
- After ticking this box, other options appear:
- Downloadable Files – Add file(s) for customers to download.
- Download Limit – Set how many times a customer can download the file(s). Leave blank for unlimited.
- Download Expiry – Set the number of days before a download expires after purchase.
- Select the Add file button, and then name the file. Enter the downloadable URL if it’s hosted elsewhere, or select the Choose file button to either insert an existing file from your Media Library or to Upload a new file. Upload the file and click Insert to set up each downloadable file URL.
- Enter “Download limit” (optional). Once a user hits this limit, they can no longer download the file.
- Enter “Download expiry” (optional). If you define a number of days, download links expire after that.
- Once you’ve completed this edit to the product, press Publish or Update as usual.

For more details about downloadable product settings, configurations, and troubleshooting, check the Digital/Downloadable Product Handling Documentation.
Combining Virtual and Downloadable products
For maximum flexibility, unless also marked as virtual, downloadable products have fields for shipping information, and incur shipping calculations at checkout. This allows you to offer physical products that include a digital download. For example, to digitally deliver the user manual for a smart device instead of including a printed one in the box.
Check the Virtual box as well as the Downloadable box, if the downloadable product doesn’t require shipping.
Note: Orders where all products are both virtual and downloadable will skip the Processing order status and move directly to the Completed order status. For more information about order statuses check the Managing Orders documentation
Sorting Attributes and Variations for Variable Products
↑ Back to topYou can sort attributes and attribute values of variable products to change their display in the shop’s front end. In the admin view, you can also sort product variations for ease of management. The following sections cover how to sort and organize the various details of your variable products
Reordering Attributes and values for the Customer View:
You can reorder both attributes and their values for the customer or storefront view from the “Attributes” tab. Here is how to do it:
Reorder Attributes
In the customer’s view, the selection fields of a variable product display in the same order as you sort them in the admin area. To sort your product’s attributes:
- Click on the “Attributes” tab.
- Drag and drop the attributes into a preferred order.
- Click “Save Attributes” at the bottom of the settings window.
- Click “Publish” or “Update” in the top right of the screen to finish.

Reorder values of Custom Attributes (Product Specific):
When using custom attributes on a variable product, the values will appear in the product dropdown on the storefront in the same order that you enter them in the “values” field.
To reorder values of custom attributes:
- Click on the “Attributes” tab.
- Click “Edit” to expand the attribute containing the values that you want to reorder.
- Remove/Delete the values in the attribute.
- Re-enter the values in the order they should appear on the front end.
- Click “Save Attributes” at the bottom of the settings window.
- Click “Publish” or “Update” in the top right of the screen to finish.

Reorder values of Global Attributes:
Similar to custom attributes, global attribute values appear in the same order on the product page as they do in the “Values” field of the product’s data. When created global attributes assign a defined sorting order, which determines how they populate in the “Values” field.
To change the default sort order of a global attribute:
- Navigate to Products > Attributes.
- Click the “Edit” link for the attribute you’d like to change.
- Select a new default sort order.
To reorder values of an attribute that has the “Custom Ordering” Default sort order:
- Navigate to Products > Attributes
- Click the “Configure Terms” link for the attribute you’d like to change
- Drag and drop the values/options in the order they should appear on the store’s front end.
- Changes save automatically.
Note: The product page utilizes the manually sorted order only if the attribute’s default sort order is set to “Custom Ordering.”
Reordering Variations in the Admin View:
If you’d like to re-order variations for admin purposes (i.e.: your customers will not see this change) you can do so by following these steps:
- Click on the “Variations” tab.
- Reorder variations by using one of the following methods:
- Drag and drop (using the three-lined “handle”) the variations to reorder.
- Click on the three-lined “handle” to change the position number of the variation directly. (If you have many variations this is how you can move variations from one page to another)
- Click “Save Changes” at the bottom of the settings.
- Click “Update” or “Publish” in the top right corner to finish.

Notes: If you’re using the “Any {attribute}..” to define one or more variations, their sorting order in the admin area is important. See the technical note below
Navigating Between Many Variations
If you have more than 15 variations, navigation arrows will appear at the top and bottom of the list of variations. Use the arrows to navigate through the entire list of variations. Changes save automatically when you switch to the next page. Click “Save Changes” at the bottom of the settings to finalize.
Setting a Default Variation for a Variable Product
↑ Back to topSet the default form value at the top of the variations settings if you want a certain variation already selected when a user visits the product page. With default values set, shoppers can add the variable product to the cart without having to make a selection first.

You can only set default form values after creating at least one variation.
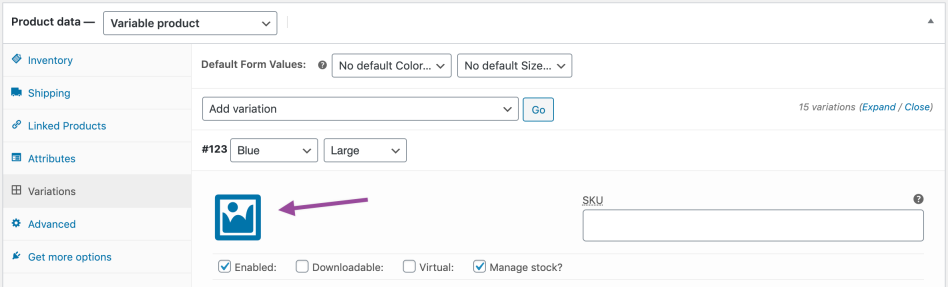
Add an Image to a Variation
If you’d like to add images for each variation of a variable product, follow these instructions:
- Click on the variation to expand the variation settings.
- Click the blue, image placeholder.
- Select the image for the variation.
- Click “Save” to finalize the changes.
Inventory Management for Variable Products
↑ Back to topYou can manage inventory for variable products at the product level, variation level, or a mixture of the two.. Below you’ll find information about and instructions for configuring each type of inventory management.
Product Level Inventory Management:
Product level inventory management sets a stock quantity that all variations can share.
One example of using product-level management is when you sell a physical product along with a digital download. It would look something like this:
- Variation 1: Physical Product only
- Variation 2: Physical Product + Digital Download
Setting the stock quantity at the product level allows you to track the number of physical products you have left regardless of whether the customer purchases variation 1 or variation 2.
Follow these steps to set stock levels at the product level:
- Tick the “Stock management” box in the “inventory” tab:
- Enter the product information in the applicable fields:
- SKU – Enter the SKU or leave blank.
- Stock Quantity – Enter the inventory/stock quantity here.
- Allow Backorders? – Select whether to allow back orders or not.
- Low stock threshold – set the low stock threshold to receive a low stock alert via email when stock quantity reaches that number.
- Sold Individually? – Check this box if you want to limit customers from buying more than one of these products per order.
- Click “Publish” or “Update” in the top right of your screen to save inventory settings.

Variation Level Inventory Management
Variation-level inventory management sets a stock quantity per variation in a variable product. One example of utilizing variation-level inventory management is when you have three distinct colors of a t-shirt and need to track the quantity of each color remaining.
- Blue t-shirt – quantity 5
- Green t-shirt – quantity 10
- Red t-shirt -quantity 15
When a customer purchases a red t-shirt, the stock decreases only for the red t-shirt and not for the blue or green t-shirts.
Follow these instructions to set stock at the variation level:
- Click on the “Variations” tab on the left side of the product menu.
- Click on a variation to open its product edit menu.
- Check the box next to “Manage Stock?” and then enter product information in the applicable fields:
- SKU – Enter the SKU or leave blank. Note: If you set an SKU at the product level but leave it blank in the variation level, SKU will default to product level SKU.
- Stock Quantity – Enter the inventory/stock quantity here
- Allow Backorders? – Select whether to allow back orders or not.
- Low stock threshold – set the low stock threshold to receive a low stock alert via email when stock quantity reaches that number.
- Click the “Save Changes” button at the bottom of the menu to save updates.
- Click “Publish or “Update in the upper right corner of the screen to publish or update the product for your customers.

Combining Inventory Management Systems: Variation Level + Product Level Management
Deciding whether to manage your variation’s inventory at the product level or the variation level is not an all-or-nothing choice. Any variations configured to manage their inventory at the variation level will pull stock from the variation level. Variations not configured to manage their stock at the variation level will pull from the product-level inventory if enabled.
Expanding on our first example, let’s illustrate how you can use mixed-level inventory management; say we also had a deluxe physical edition of our product:
- Variation 1: Physical Product only
- Variation 2: Physical Product + Digital Download
- Variation 3: Deluxe Physical Product + Digital Download
If we leave “Manage Stock” unchecked at the variation level for the first two variations, they will share stock and pull from the shared product level stock count, as before.
For the third variation we can enable stock management at the variation level, allowing this different physical product to have its own separate inventory tracked.
In this way, you can decide for each variation whether it should have its own inventory count, or pull from the shared inventory at the product level.
Bulk Editing
↑ Back to topWhen working with a large number of product variations, editing them all at once is possible using the “Bulk actions” dropdown menu at the top of the Variations tab:
- From the dropdown menu, select the action you would like to take.
- If the change requires an input – like setting a price or discount – a pop-up will appear asking for the value.
- Changes immediately save to all variations.
These bulk actions will apply to all variations of the current product.

These are the available bulk actions that you can apply to manage product variations more quickly:
- Delete all variations
- Status
- Toggle “Enabled”
- Toggle “Downloadable”
- Toggle “Virtual”
- Pricing
- Set regular prices
- Increase regular prices (fixed amount or percentage)
- Decrease regular prices (fixed amount or percentage)
- Set sale prices
- Increase sale prices (fixed amount or percentage)
- Decrease sale prices (fixed amount or percentage)
- Set scheduled sale dates
- Inventory
- Toggle “Manage stock”
- Stock (Count)
- Set status – In stock
- Set status – Out of stock
- Set status – On backorder
- Low stock threshold
- Shipping
- Length
- Width
- Height
- Weight
- Downloadable Products
- Download limit
- Download expiry
What Customers See
↑ Back to topOn the front end, when customers view a variable product, they encounter dropdown fields to select variation options. Once customers select all options, the available stock and price display. To add the variable product to the cart, customers need to select all options.

If the user tries to click the greyed out add to cart button before choosing an attribute, a message will appear asking them to select some attributes.

On the main shop view or product archive page, customers see a “Select options” button instead of “add to cart” because they must choose a variation before adding the product to the cart.
Variable products – Advanced Topics
↑ Back to topDefining Variations with “Any” attributes
↑ Back to topWhen defining the attribute options for each of your variations, you’ll notice that one choice is to select “Any {attribute}…” This option allows for some additional flexibility, such as fallbacks. It also allows scenarios where you can effectively consider several of your variations duplicates of each other. This can lead to confusing behaviors, especially on products with many attributes and variations.
In general, we highly recommend you define all attributes of all variations. This is by far the simplest method. However, if you’re not defining all attributes on each variation, and are using the “Any {attribute}…” for any of your variations, it’s much simpler if you:
- Use stock counts at the product level instead of the variation level.
- Price all of your variations the same.
- Sort your variations in the admin view from most to least specific.
- Thoroughly test to ensure you understand how variations match.
The following section explains how WooCommerce handles “duplicate” variations.
How WooCommerce handles duplicate variations
↑ Back to topIn the case where you have variations that are effective duplicates, WooCommerce uses product data from the first match it finds looking from top to bottom in the sorted list of variations. Because of this, the sorting order of the product’s variations in the admin area is very important when using “Any {attribute}…” to define variations.


Improperly sorting variations when duplicates exist, or having too many duplicates, can result in confusion with stock levels, pricing, shipping data, and any other variation-level product data. Be careful!
Dynamic Attribute Drop-Down Menus for Products with More than 30 Variations
↑ Back to topBy default, if a Variable product has 30 or fewer variations, the drop-down menus for selecting variations on the front end will be dynamic. For example, with a T-shirt that has “Size” and “Color” attributes, after the customer selects a Size, the Color dropdown updates to only display options available with the chosen Size.
However, if there are more than 30 variations, the drop-downs will be static and will display all attributes regardless of any prior selections. Following the example above, if the T-shirt has more than 30 variations, the Color dropdown will continue showing all of the color options even if they are not available for the selected Size. Instead, after the customer selects an unavailable combination, they will see the message “Sorry, no products matched your selection. Please choose a different combination.”
This action improves site performance. For products with large numbers of variations, calculating the available combinations after each selection can slow things down quite a bit.
Developers can modify the limit of 30 for dynamic dropdowns using a code filter provided by the developers. You can find more information about this in the following documentation article, which contains developer-focused details.
Questions and Support
↑ Back to topDo you still have questions and need assistance?
This documentation is about the free, core WooCommerce plugin for which support is provided in our community forums on WordPress.org. Searching there you’ll often find that your question has been asked and answered before.
If you haven’t created a WordPress.org account to use the forums, here’s how.
- If you’re looking to extend the core functionality shown here, we recommend reviewing available extensions in the Woo Marketplace.
- Need ongoing advanced support, or a customization built for WooCommerce? Hire a WooExpert agency.
- Are you a developer building your own WooCommerce integration or extension? Check our Developer Resources.
If you weren’t able to find the information you need, please use the feedback thumbs below to let us know! 🙏