Tiered Pricing For WooCommerce allows you to create different prices on different product quantities. Individual pricing can be set for different quantities of products. Tier Pricing can be applied to products, product categories, Users, and Roles. Prices can be created based on the following priorities:
- Product Based.
- Category Based.
- User Based.
- Role Based
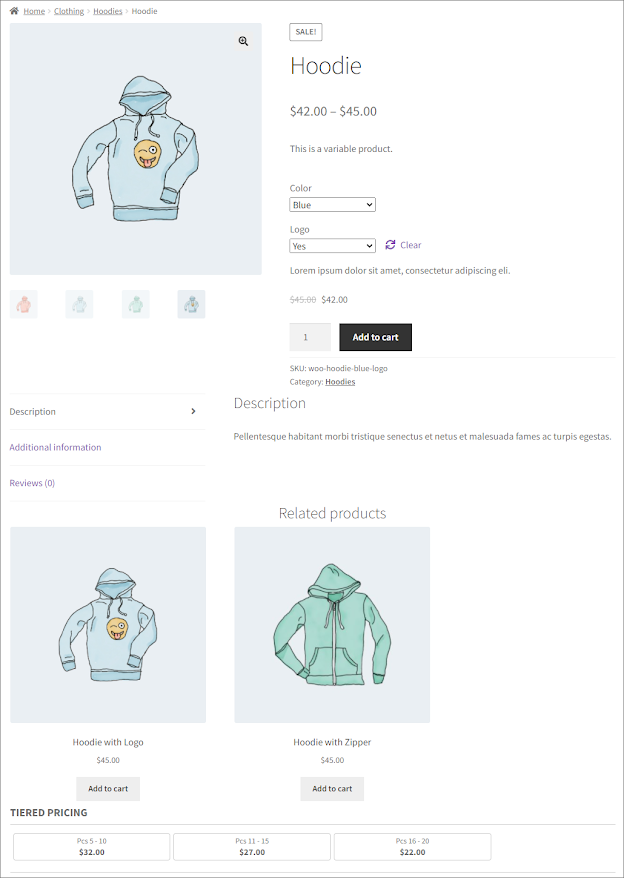
Tier Pricing can be applied on both simple as well as variable products.
Features
↑ Back to top- General Settings → Enable/Disable Tier Pricing option.
- General Settings → Add New Role.
- Product Based Discount → Simple Product Fixed/Percentage Discount.
- Product Based Discount → Enable/Disable Status option.
- Product Based Discount → Variable Product Fixed/Percentage Discount.
- Category Based Discount → Fixed Discount.
- Category Based Discount → Product with multiple categories.
- Category Based Discount → Disable, Delete, Edit Option.
- User-Based Discount → User-Based Discount.
- Role-Based Discount → Role-Based Discount.
- Customization → Display Type Settings (Tooltip)
- Customization → Tooltip Icon Color.
- Customization → Tooltip icon size (pixels).
- Customization → Tooltip Border.
- Customization → Active Price BG color.
- Customization → Price column text.
- Customization → Show discount column.
- Customization → Discount column text.
- Customization → Display type Settings (Block).
- Customization → Table Title.
- Customization → Table Position.
- Customization → Summary Block.
- Customization → Display Type.
- Customization → “Total” Label.
- Customization → “Each” Label.
- Customization → “Each” Label.
- Price Display Settings → Enable Hide Price & Add to Cart Button for Guest Users.
- Price Display Settings → Enable Tier Price Range.
- Price Display Settings → Display Tier Price Range.
- Import & Export → Import.
- Import & Export → Import Type (Product Based Discounts, Category Based Discounts, User Based Discounts, Role Based Discounts).
- Import & Export → Export.
- Import & Export → Export Type (Product Based Discounts, Category Based Discounts, User Based Discounts, Role Based Discounts).
Installation Guide
↑ Back to top- Log in to your WordPress Admin Panel.
- Navigate to the WordPress Admin Dashboard → Plugins → Add New.
- Click the Upload Plugin button on the top left corner of your screen.
- Next, click the Choose File button in the box that appears below.
- Select the zip file that you have downloaded and upload it.
Configuration
↑ Back to top- Go to Admin Dashboard → WooCommerce → Settings.

- Go to the Tier Pricing tab.

General Options
↑ Back to top- Go to the General Options sub-tab (selected by default once we open the Tier Pricing tab). The following options and their sub-options are available:
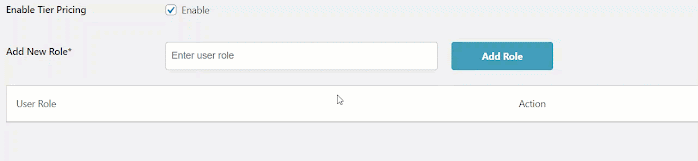
Enable Tier Pricing
↑ Back to top- Click on the checkbox to enable the Tier Pricing option.

Add New Role
↑ Back to top- Enter the user role in the given textbox and click on the Add Role button.
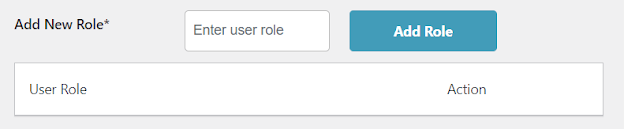
- All the roles will be added in the column mentioned below. These roles will appear in the User Role Based Discount.
- Admin can also remove the user roles by clicking on the Delete button in the Actions column.
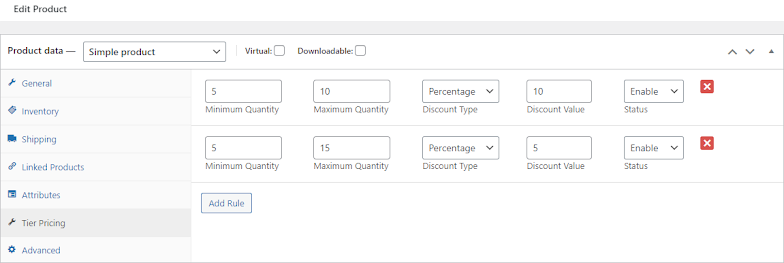
Product Based Discount
NOTE: This option is not mentioned in the Tier Pricing tab of WooCommerce Settings
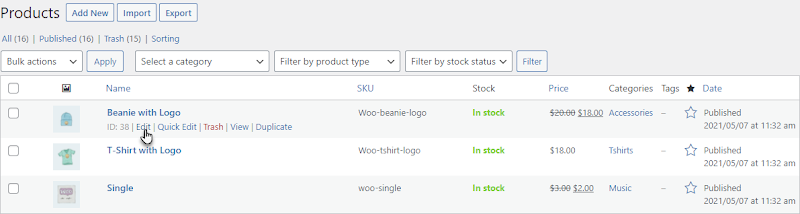
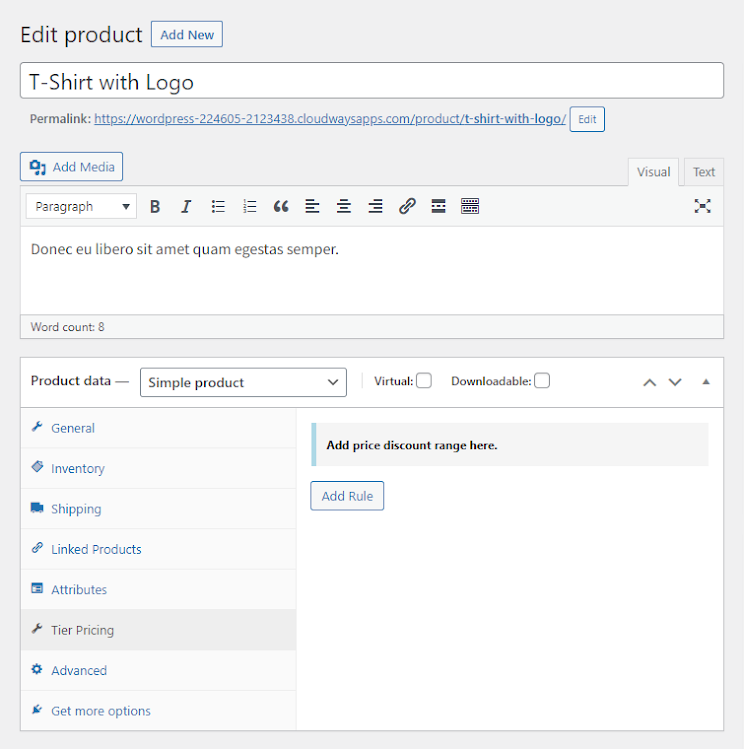
- Go to Admin Dashboard → Products → All Products.

- Hover on any respective product to view the sub-options.
- Click on the Edit sub-option.
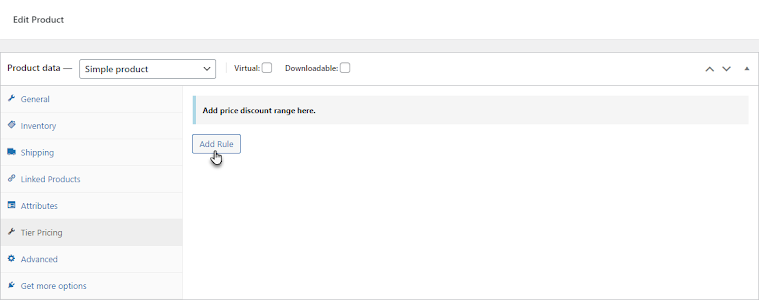
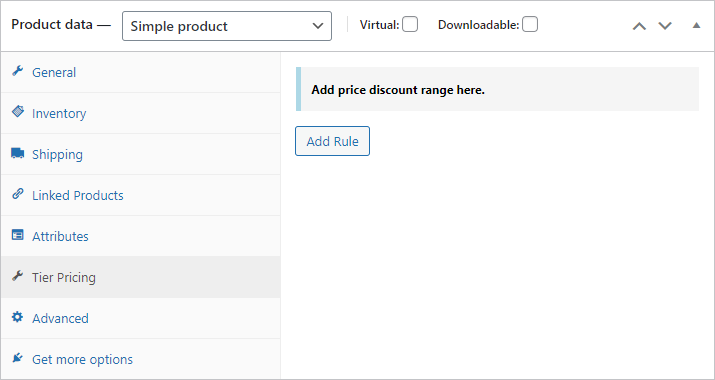
- Go to the Product Data section once you’re on the product configuration page.
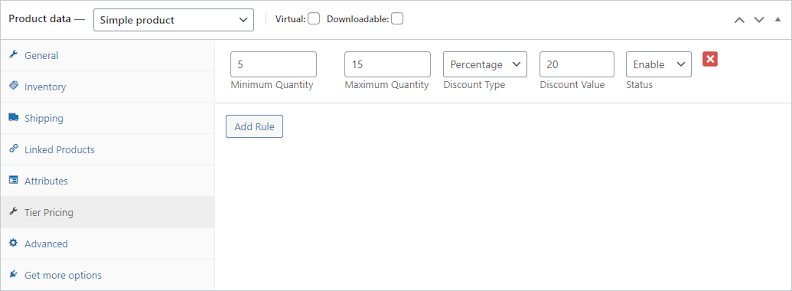
- Now go to the Tier Pricing tab and click on the Add Rule button.
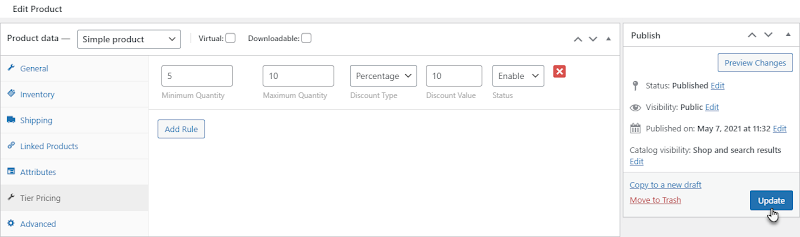
- Now set the Minimum and Maximum quantities.

- Admin can set the Discount Type as Percentage or Fixed.
- Admin can set the Discount Value.
- Admin can set the Status of the rule as Enable or Disable.

- Set the following fields and then click on the Update button.
- Set the following fields and then click on the Update button.
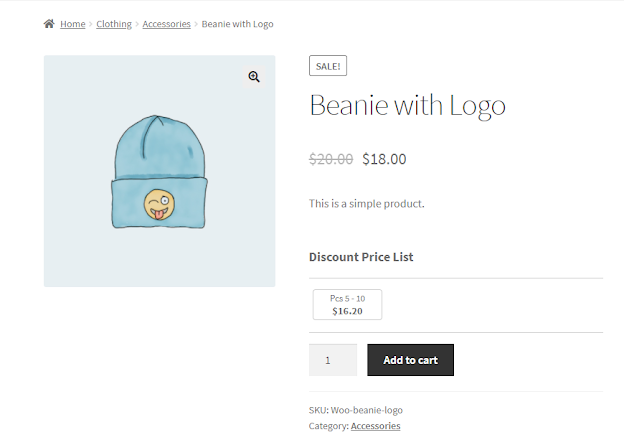
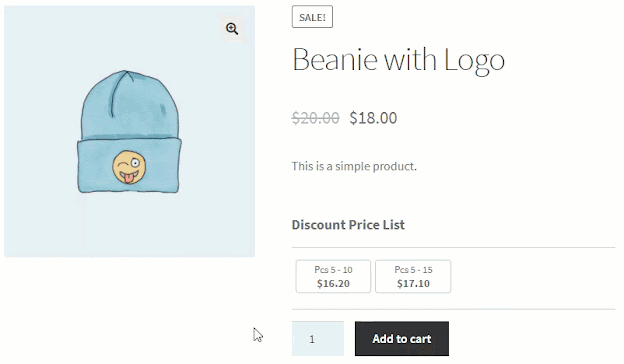
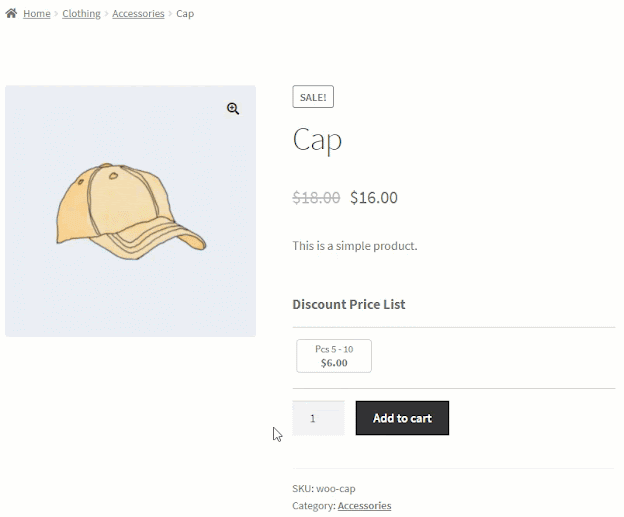
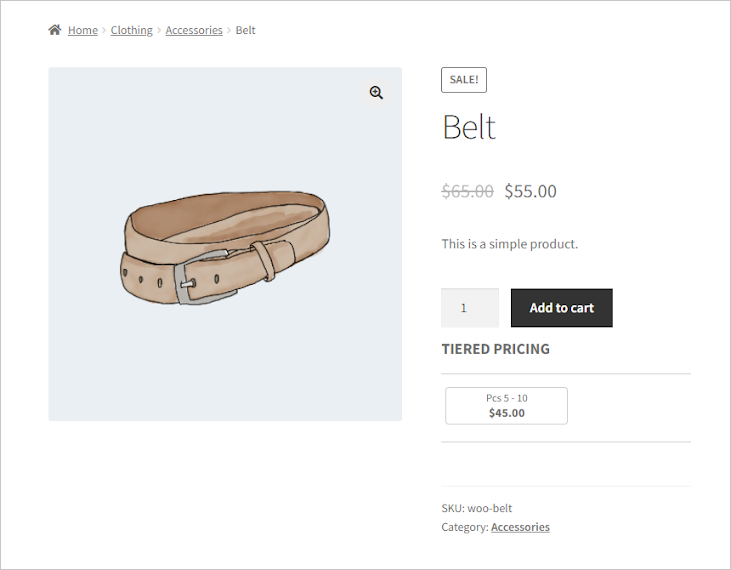
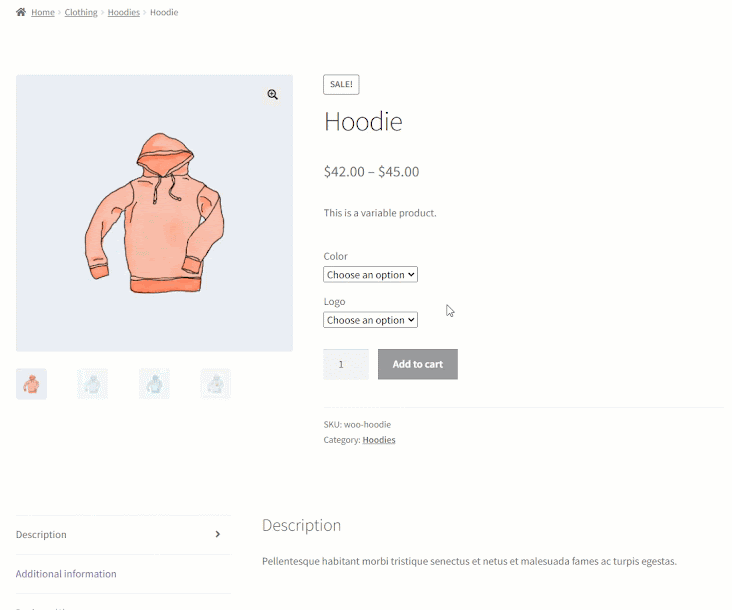
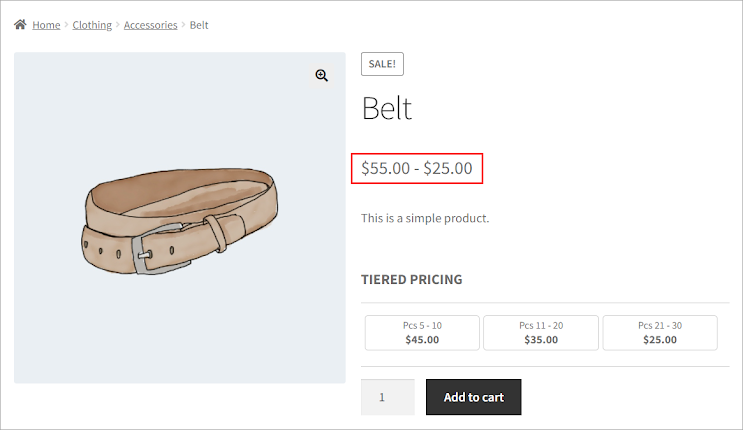
Front-End Impact
Before
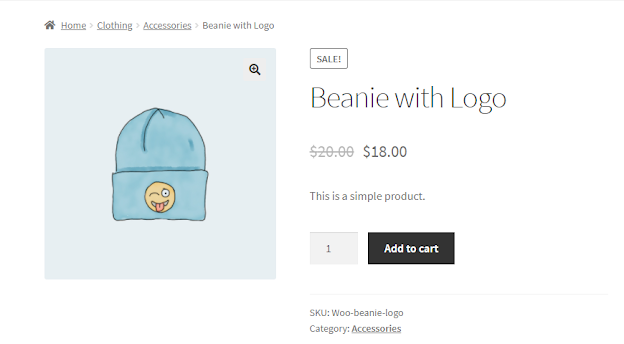
After
NOTE: If the Admin sets more than 1 Rule, the system will select the Rule according to the current condition provided by the user.
Back-End Configuration
Front-End Impact:
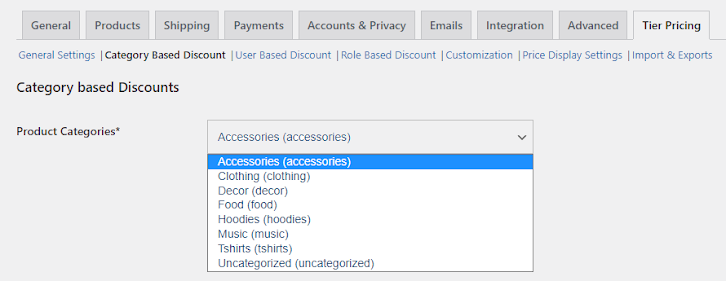
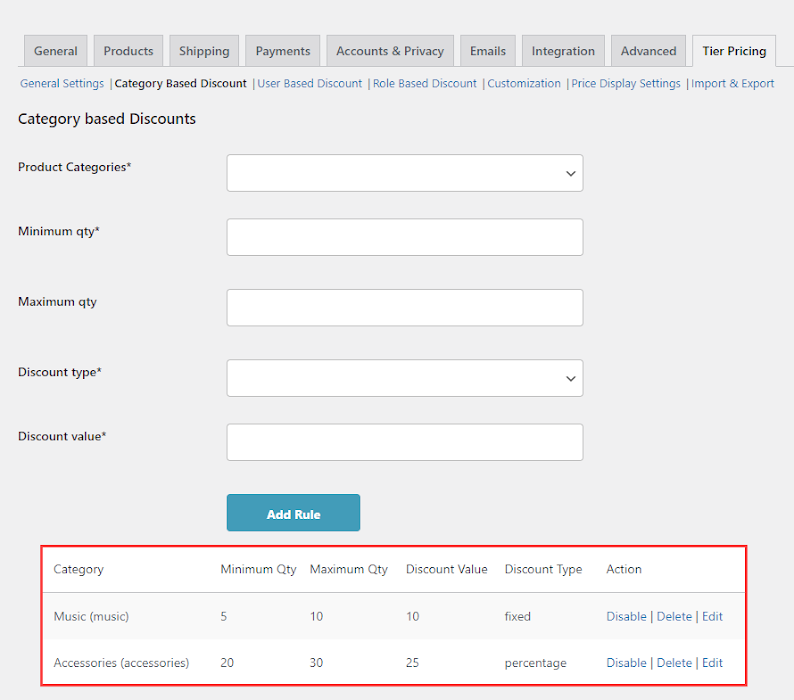
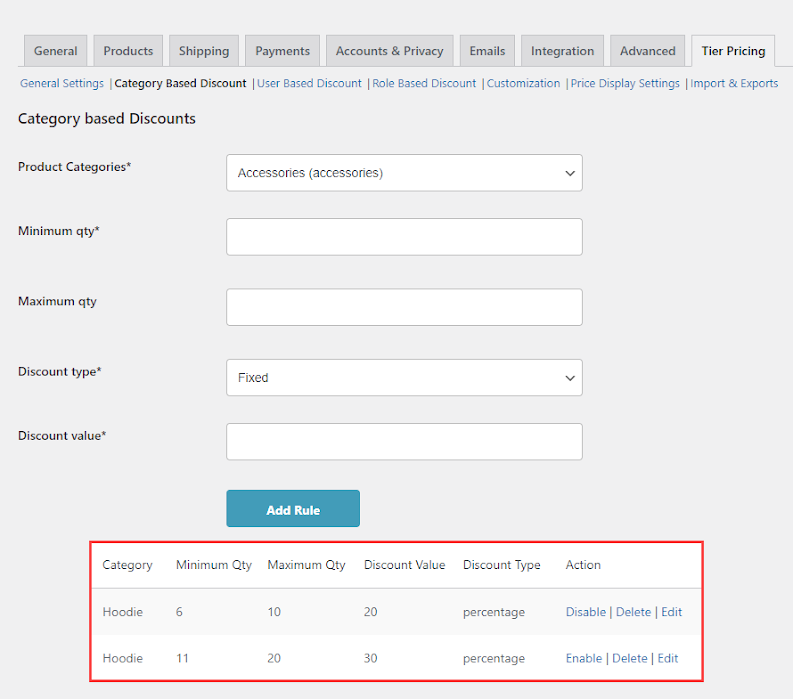
Category Based Discount
- Go to the Category Based Discount sub-tab. The following options and their sub-options are available:
Product Categories
↑ Back to top- Go to Product Categories, click on the dropdown list and select the Category.
Minimum and Maximum Quantity
↑ Back to top- Set the Minimum and Maximum quantities. The minimum quantity field is mandatory.

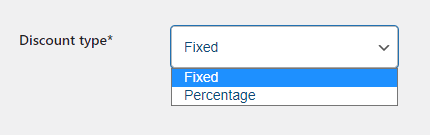
Discount Type
↑ Back to top- Select the discount type as Fixed or Percentage.

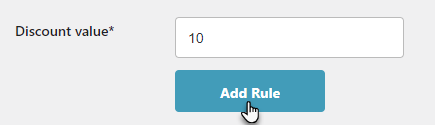
Discount Value
↑ Back to top- Set the Discount Value and then click on the Add Rule button.

Rules
↑ Back to top- Once the Admin clicks the Add Rule button, a rule is added below.

- You can also Disable or Enable the rule according to your requirements.
- You can also remove the rule by clicking on the Delete option.
- You can also edit the rule by clicking on the Edit option.

Front-End Impact:
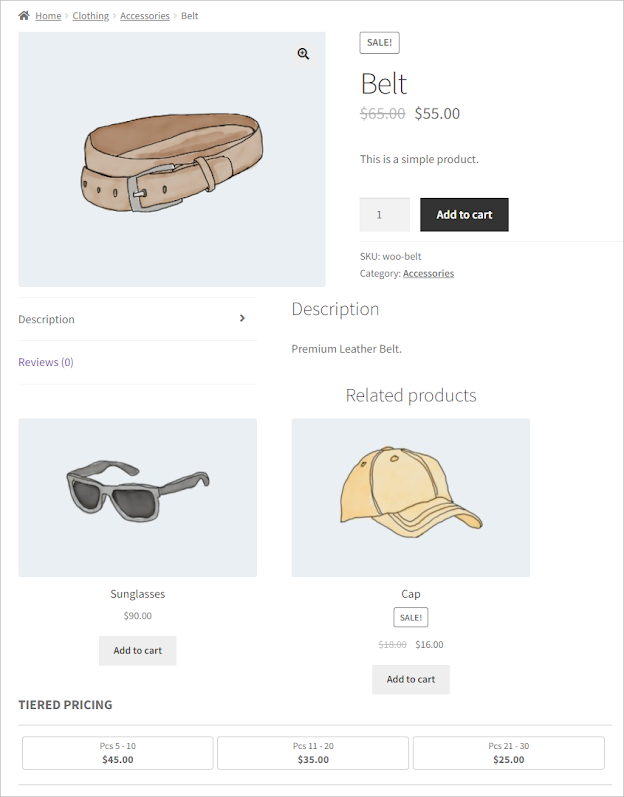
- Go to the Shop page and select any product under the Accessories category.
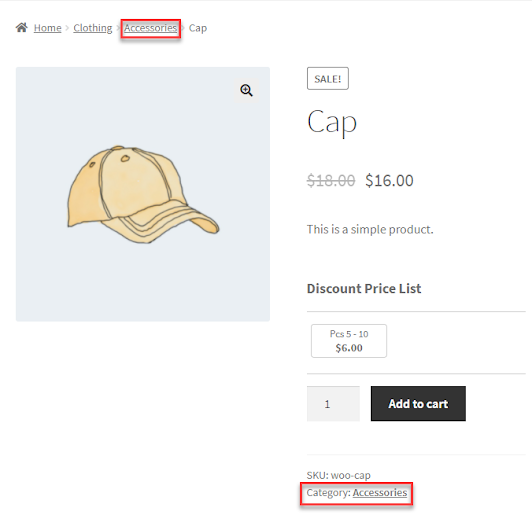
- According to the rule, the rule would be applied once the user reaches the minimum and maximum range.
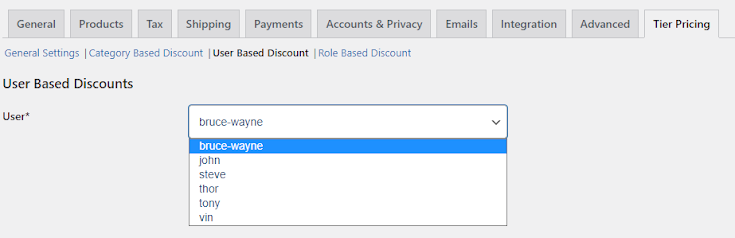
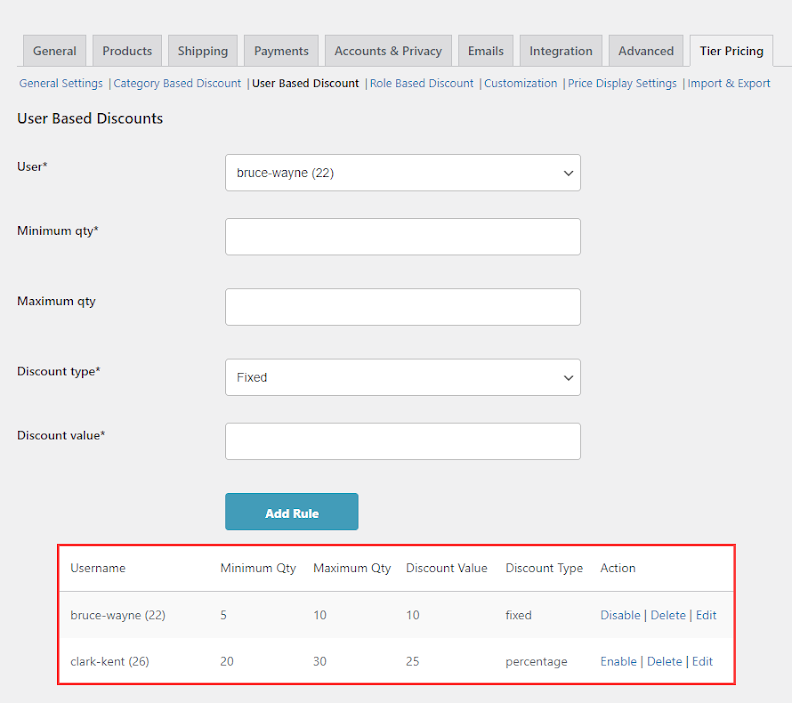
User Based Discount
- Go to the User Based Discount sub-tab. The following options and their sub-options are available:
Users
↑ Back to top- Go to Users, click on the dropdown list and select any present User on your WordPress.
Minimum and Maximum Quantity
↑ Back to top- Set the Minimum and Maximum quantities. The minimum quantity field is mandatory.

Discount Type
↑ Back to top- Select the discount type as Fixed or Percentage.

Discount Value
↑ Back to top- Set the Discount Value and then click on the Add Rule button.

Rules
↑ Back to top- Once the Admin clicks the Add Rule button, a rule is added below.
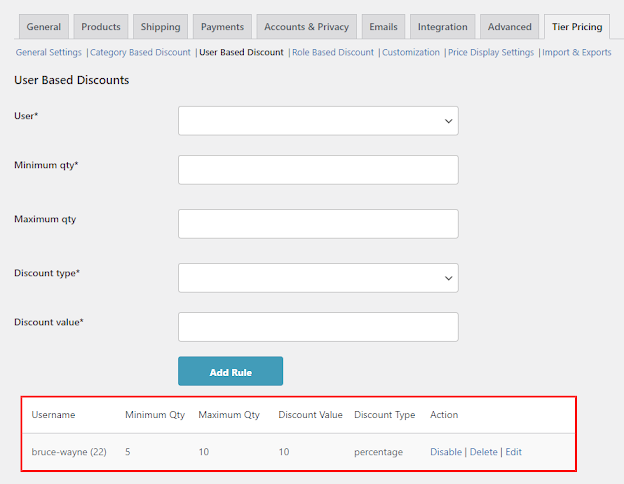
- You can also Disable or Enable the rule according to your requirements.
- You can also remove the rule by clicking on the Delete option.
- You can also edit the rule by clicking on the Edit option.

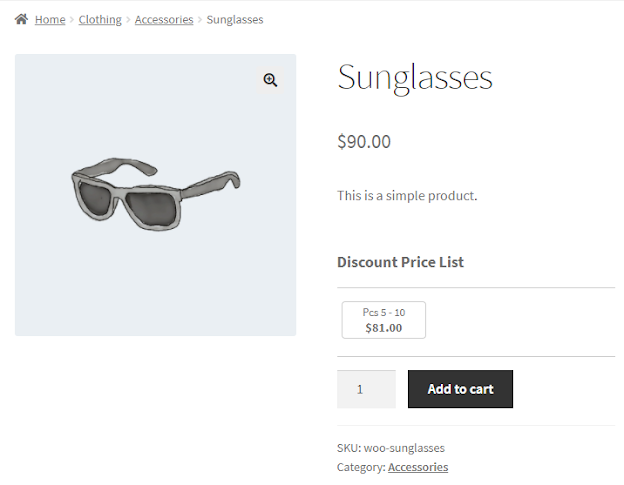
Front-End Impact:
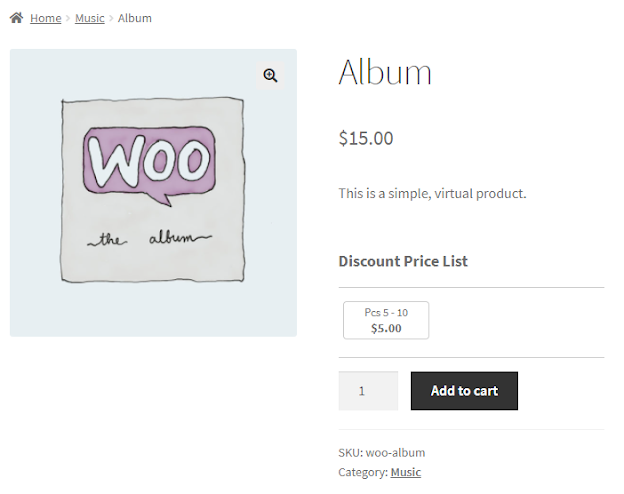
- According to the above image, we can see that the rule has been applied for the user Bruce-Wayne so the rule will be active when this user logins.
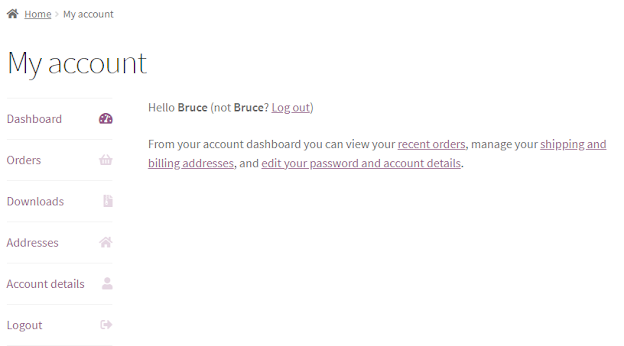
- Once logged in, the user will go to the Shop page and select any product.
- The user will view the configured rule on the Single Product page.
NOTE: The User Based discount will not be applicable on products for which the Category Based discount is enabled. Category Based discount will be applied to that product.
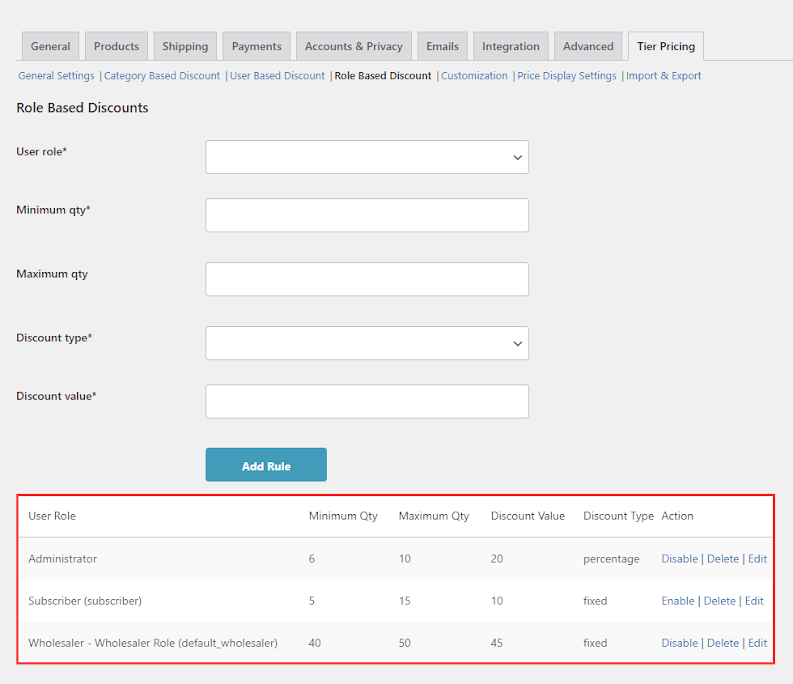
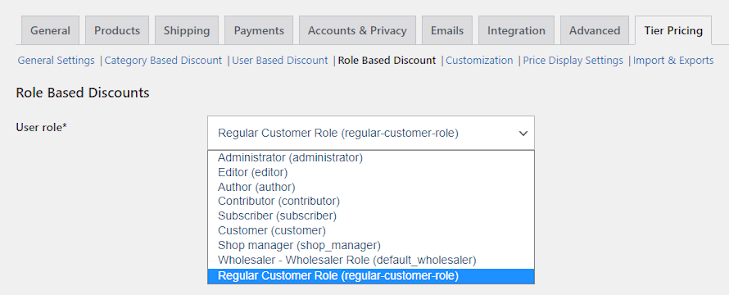
Role Based Discount
- Go to the Role Based Discount sub-tab. The following options and their sub-options are available:
User Role
↑ Back to top- Go to User Role, click on the dropdown list and select the current user roles on your WordPress.
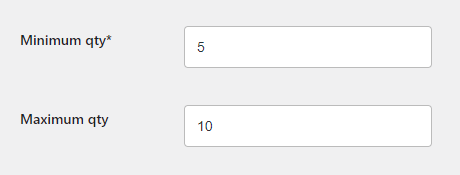
Minimum and Maximum Quantity
↑ Back to top- Set the Minimum and Maximum quantities. The minimum quantity field is mandatory.
Discount Type
↑ Back to top- Select the discount type as Fixed or Percentage.
Discount Value
↑ Back to top- Set the Discount Value and then click on the Add Rule button.
Rules
↑ Back to top- Once the Admin clicks the Add Rule button, a rule is added below.
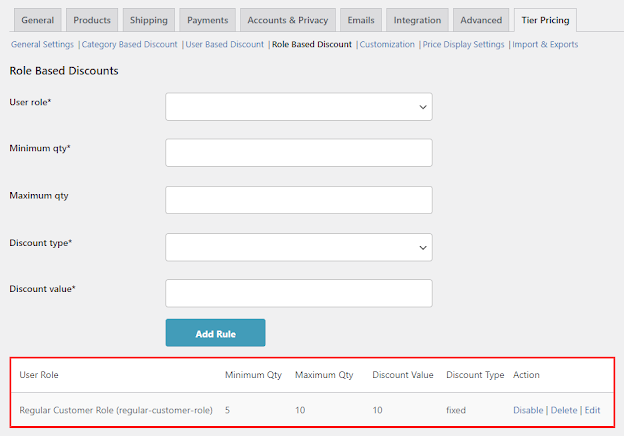
- You can also Disable or Enable the rule according to your requirements.
- You can also remove the rule by clicking on the Delete option.
- You can also edit the rule by clicking on the Edit option.

Front-End Impact:
- According to the above image, we can see that the rule has been set for the Regular Customer Role user role, so the rule will be active when the user whose user role is Regular Customer Role will log into.
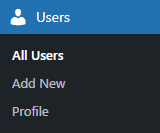
- We can see the User Roles of each user by navigating to Admin Dashboard → Users → All Users.
- All the users are present in this section.
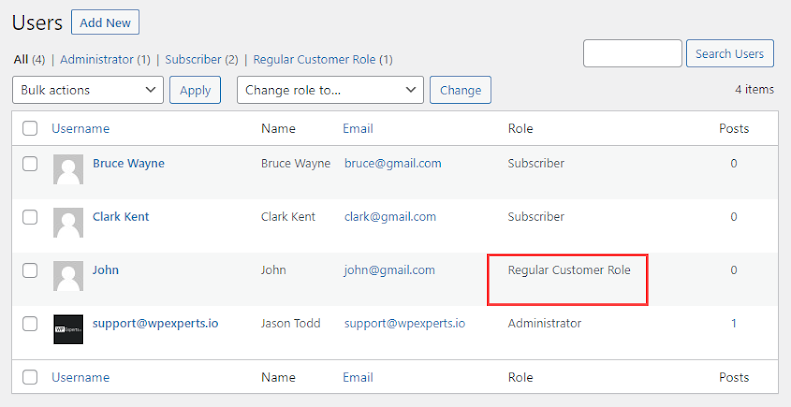
- Now the user having Regular Customer Role user role will log in.
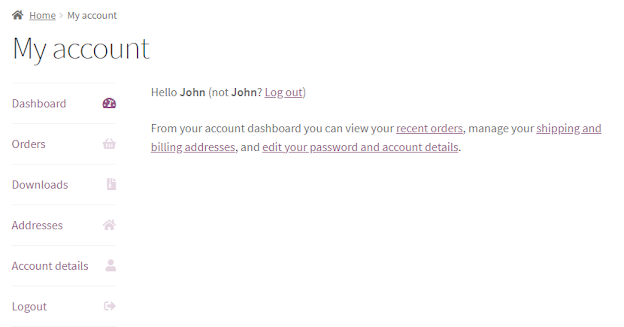
- Once logged in, the user will go to the Shop page and select any product.
- The user will view the configured rule on the Single Product page.
NOTE: The priority if all the tiers are activated at would be,
- Product Tier Price
- Category Based Discount
- User Based Discount
- Role Based Discount
Customization
↑ Back to top- Go to the Customization sub-tab. There are two sections in this sub-tab.
Display Type Settings – Block
↑ Back to top- Select the Block option.
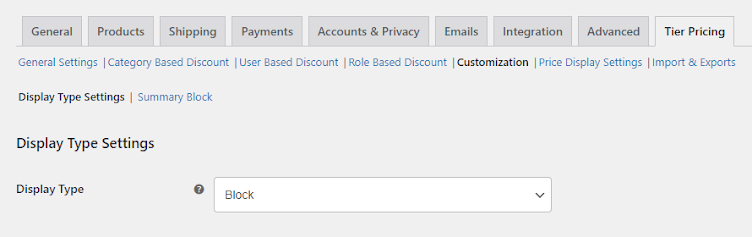
- Click on the Save Changes button to apply your settings.
Front-End Impact:
- The following options will appear when Block is selected as the display type.

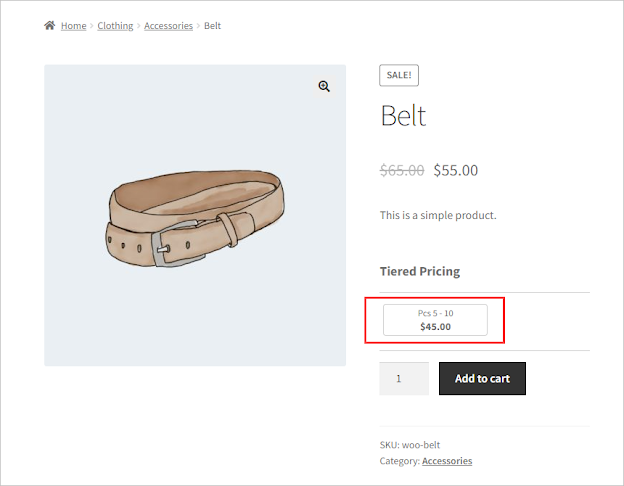
Table Title
- Set the text for the Table Title, which will appear on the single product page.
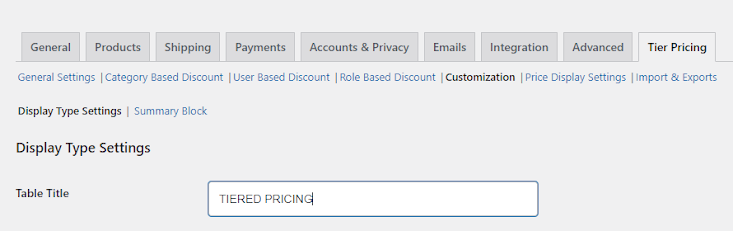
- Click on the Save Changes button to apply your settings.
Front-End Impact:
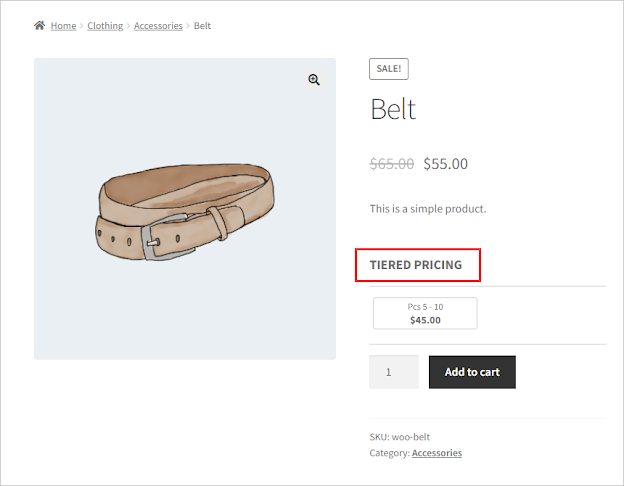
Table Position
- Select the Table Position, which will appear on the single product page.
- The following Table Position options are available.
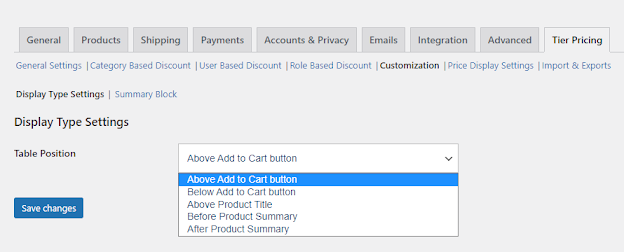
Above Add to Cart button
- Select the Above Add to Cart button option.
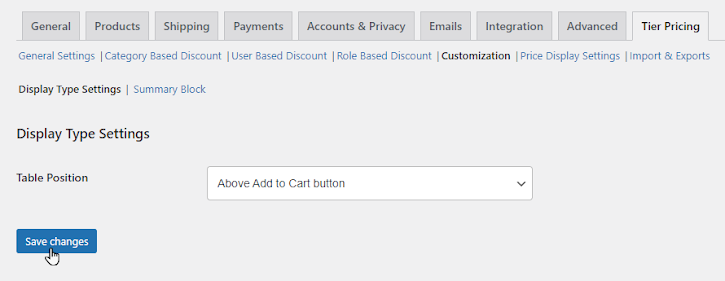
- Click on the Save Changes button to apply your settings.
Front-End Impact:
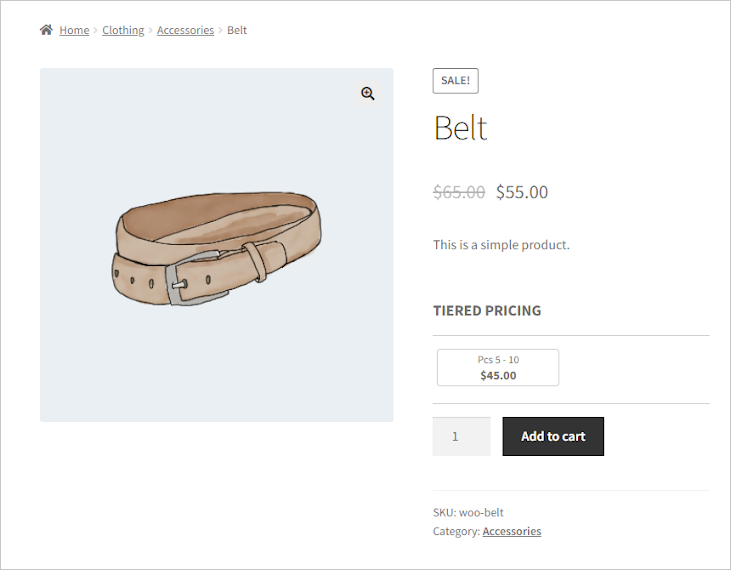
For Simple Product:
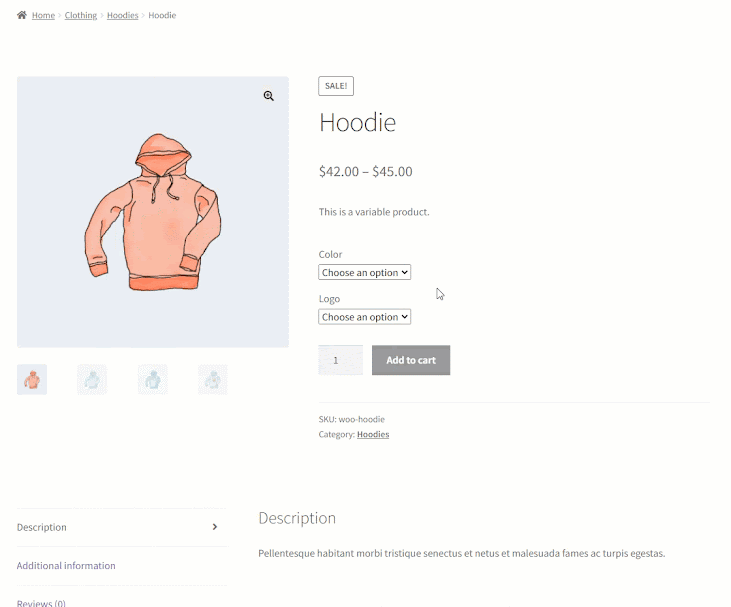
- For Variable Product:
Below Add to Cart button
- Select the Below Add to Cart button option.
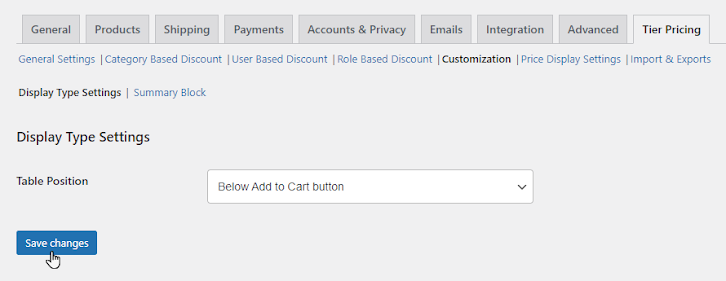
- Click on the Save Changes button to apply your settings.
Front-End Impact:
For Simple Product:
- For Variable Product:
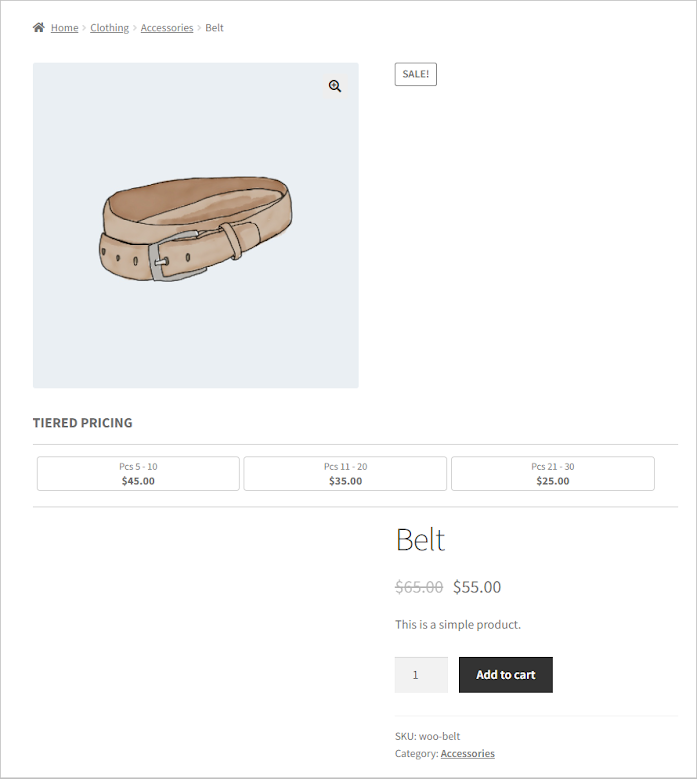
Above Product Title
- Select the Above Product Title option.
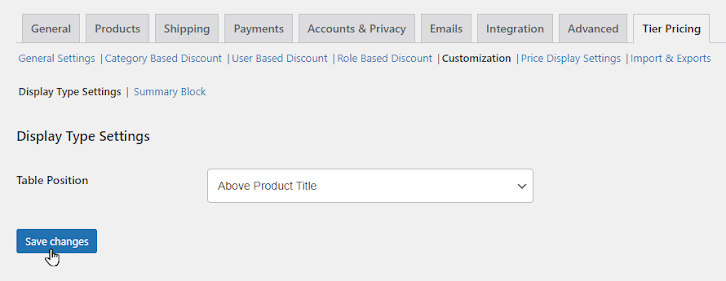
- Click on the Save Changes button to apply your settings.
Front-End Impact:
For Simple Product:
- For Variable Product:
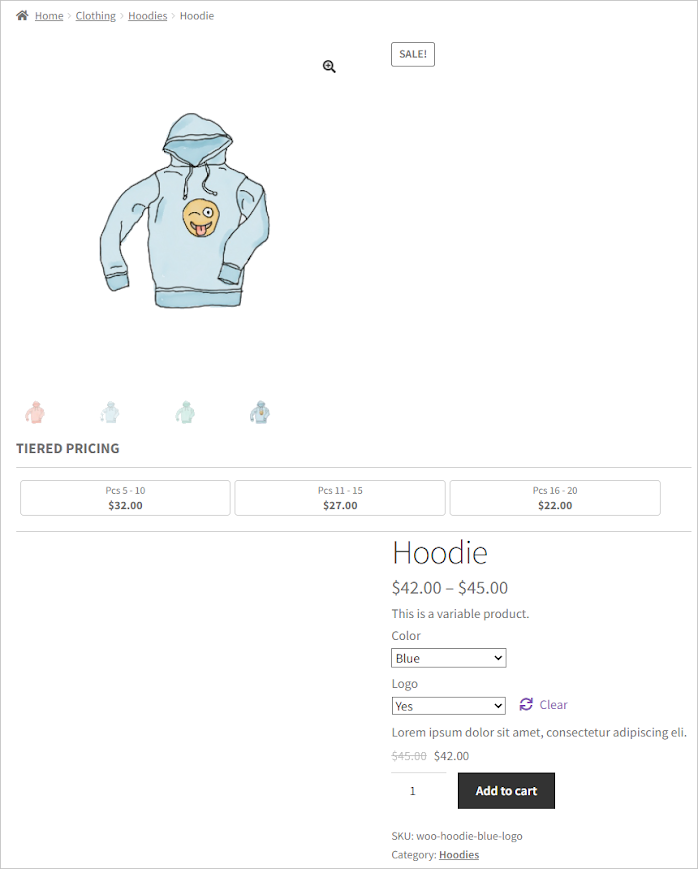
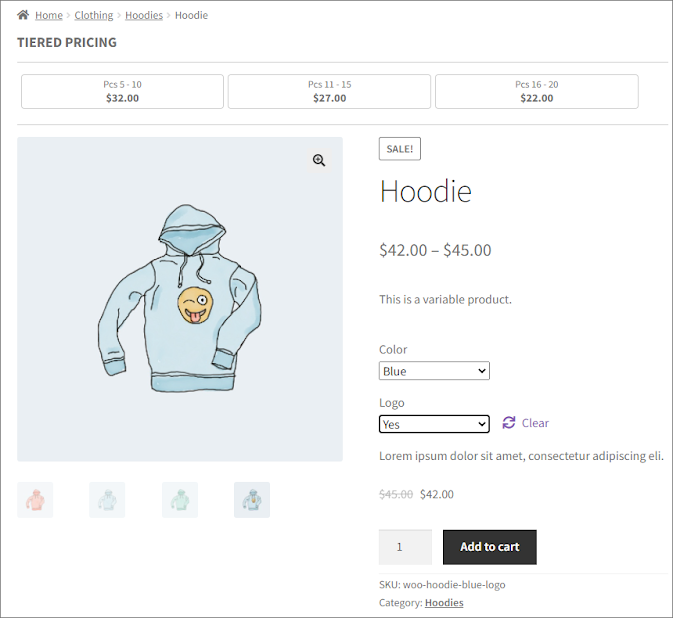
Before Product Summary
- Select the Before Product Summary option.
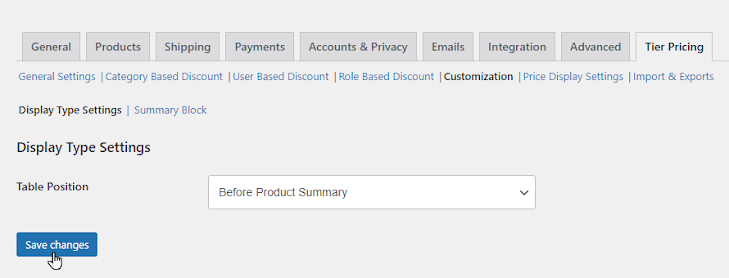
- Click on the Save Changes button to apply your settings.
Front-End Impact:
- For Simple Product:
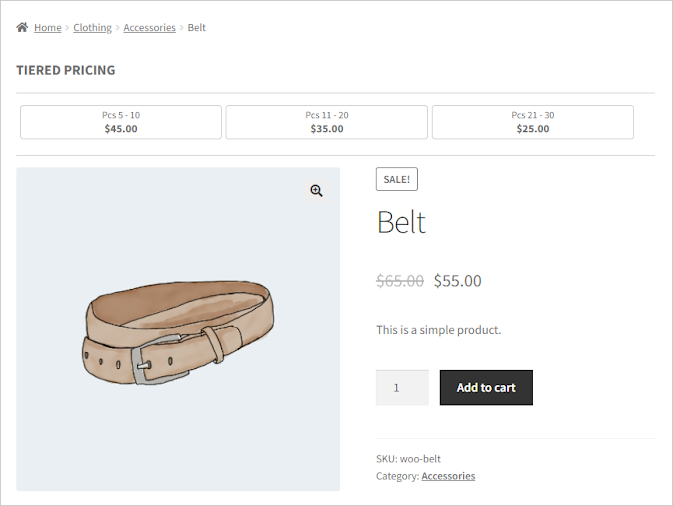
- For Variable Product:
After Product Summary
- Select the After Product Summary option.

- Click on the Save Changes button to apply your settings.
Front-End Impact:
- For Simple Product:
- For Variable Product:
Display Type Settings – Tooltip
↑ Back to top- Select the Tooltip option.
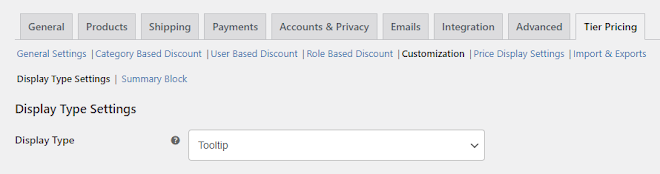
- Click on the Save Changes button to apply your settings.
Front-End Impact:
- The following options will appear when Tooltip is selected as the display type.
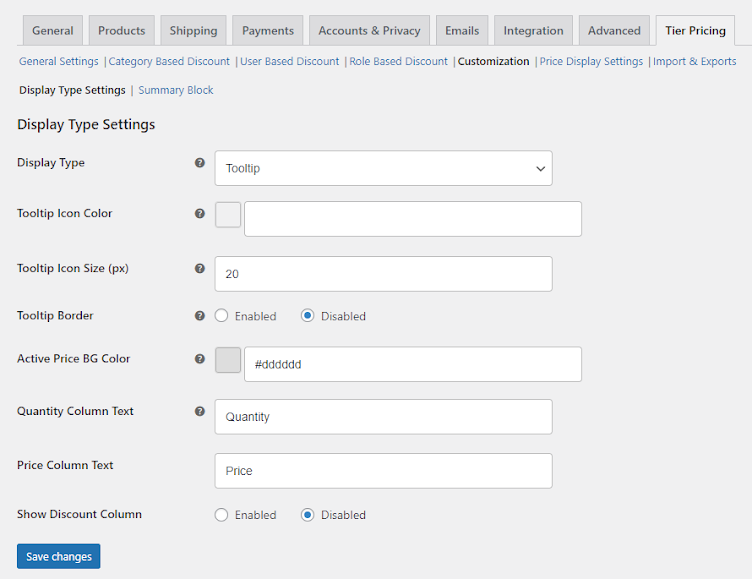
Tooltip Icon Color
- Select the color for the Tooltip icon.
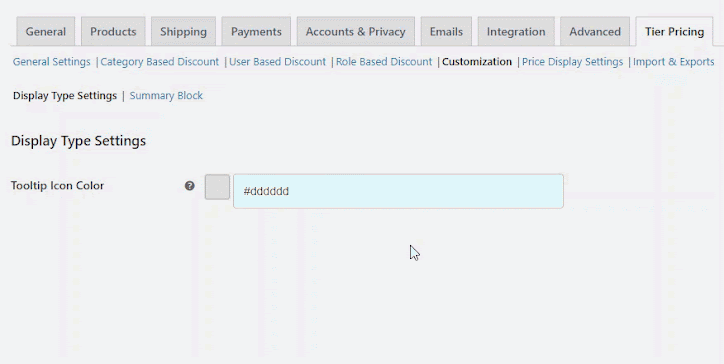
- Click on the Save Changes button to apply your settings.
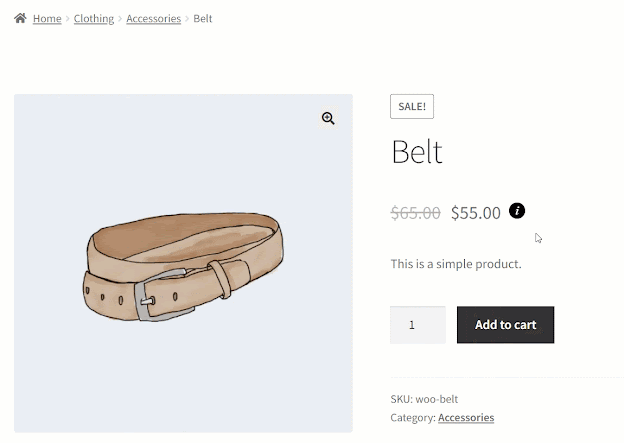
Front-End Impact:
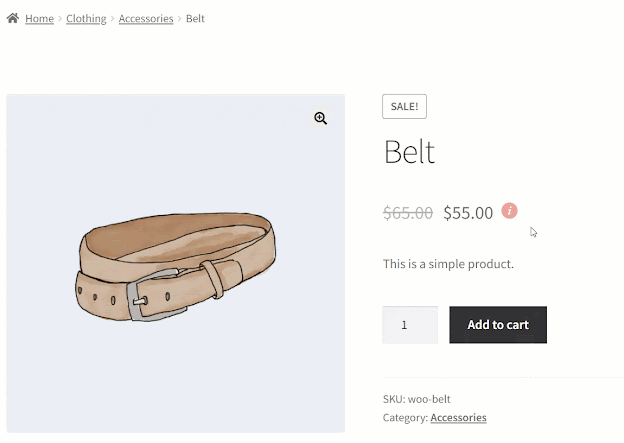
Tooltip Icon Size (px)
- Select the size for the Tooltip icon.
Click on the Save Changes button to apply your settings.
Front-End Impact:
Before:
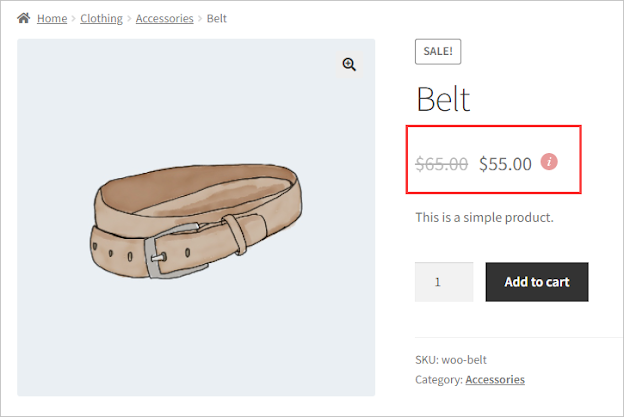
- After:
Tooltip Border
- Checkmark the Enabled radio button to enable the Tooltip border.
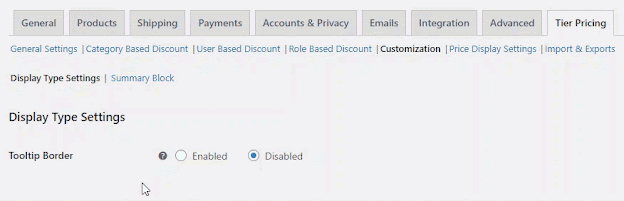
Click on the Save Changes button to apply your settings.
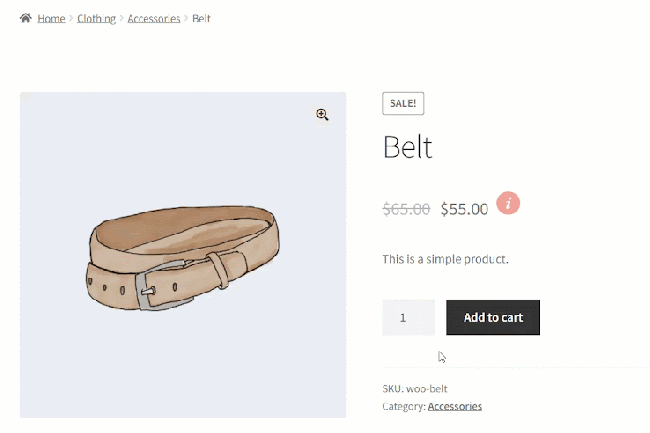
Front-End Impact:
Before:
- When the Tooltip border is disabled.

- After:
- When the Tooltip border is enabled.

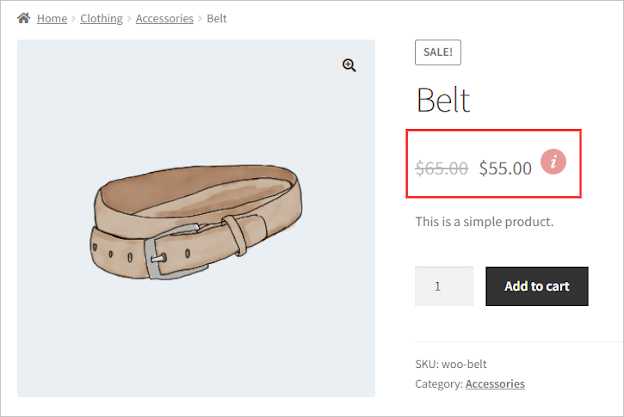
Active Price BG Color
- Select the color which will highlight the active price area in the tooltip.
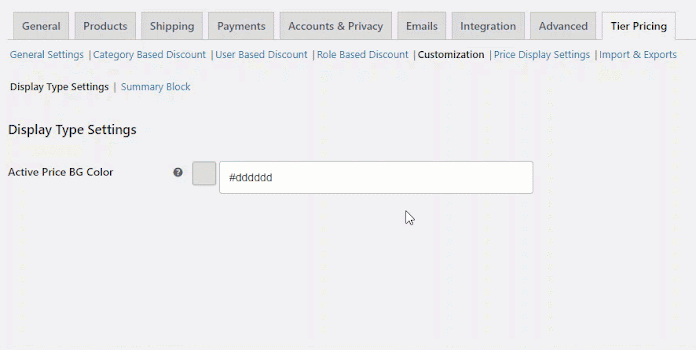
- Click on the Save Changes button to apply your settings.
Front-End Impact:
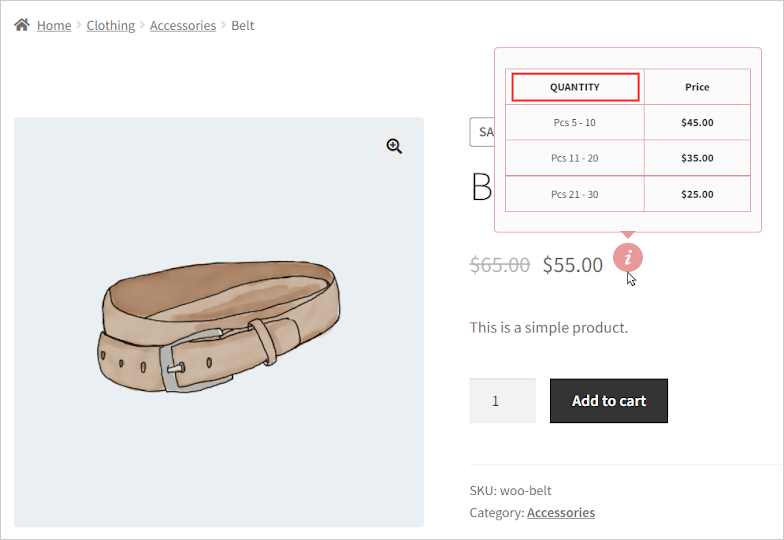
Quantity Column Text
- Set the text for the Quantity column in the Tooltip.
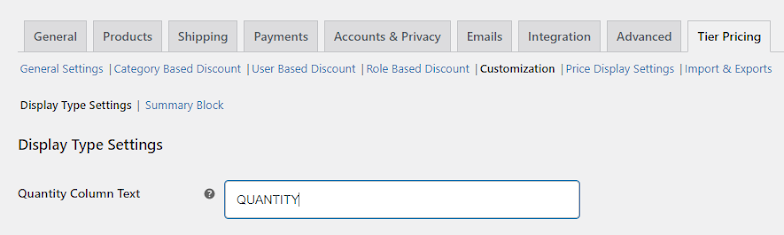
- Click on the Save Changes button to apply your settings.
Front-End Impact:
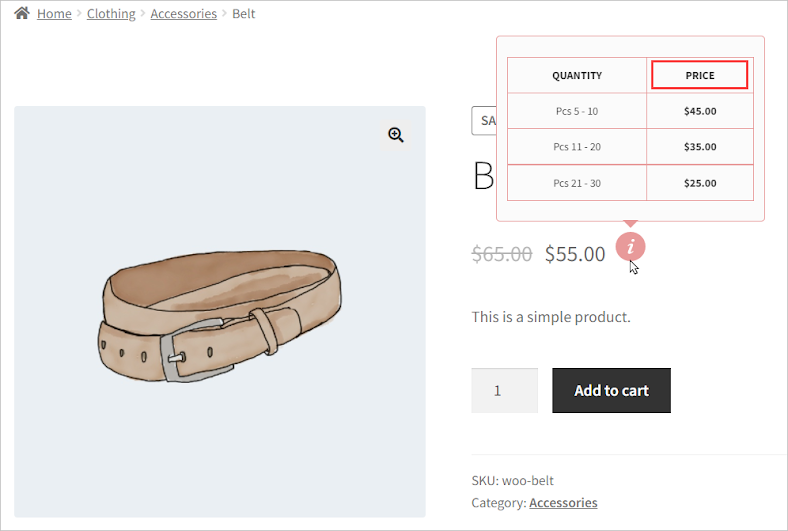
Price Column Text
- Set the text for the Price column in the Tooltip.
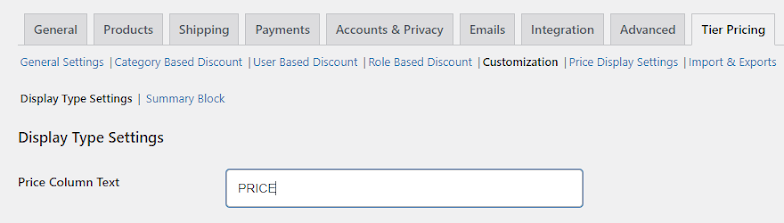
- Click on the Save Changes button to apply your settings.
Front-End Impact:
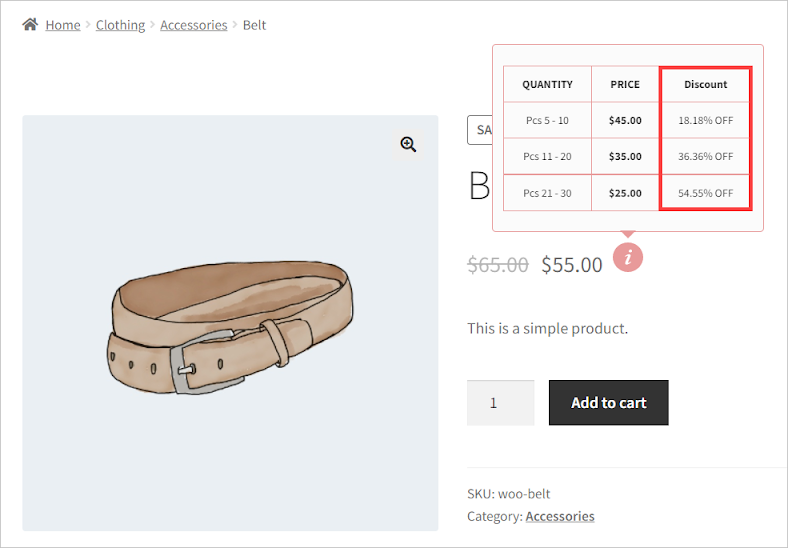
Show Discount Column
- Checkmark the Enabled radio button to enable the Discount column for the percentage table to display.
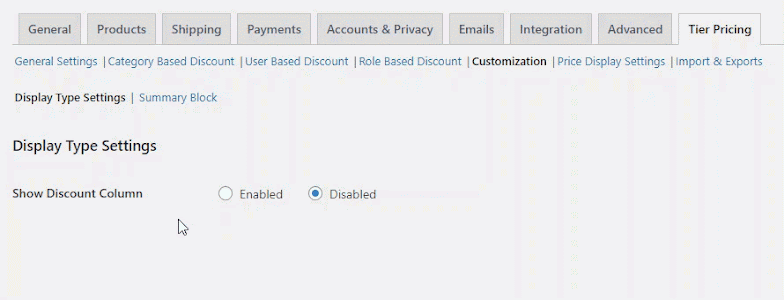
- Click on the Save Changes button to apply your settings.
Front-End Impact:
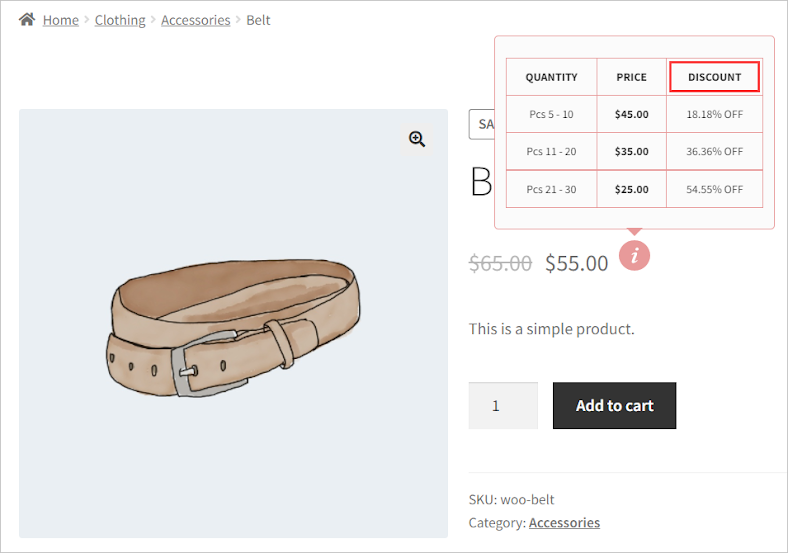
Discount Column Text
- Set the text for the Discount column in the Tooltip.
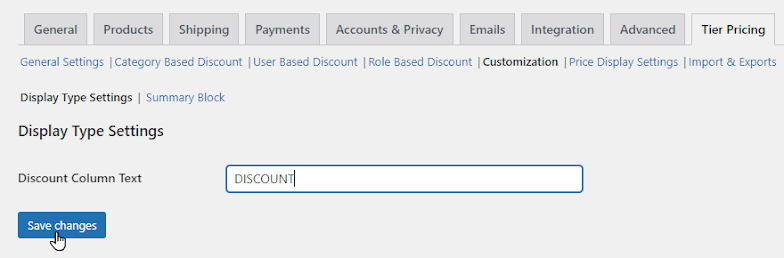
- Click on the Save Changes button to apply your settings.
Front-End Impact:
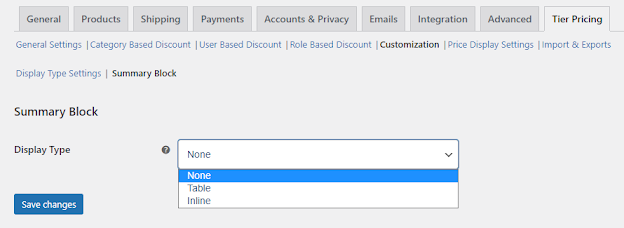
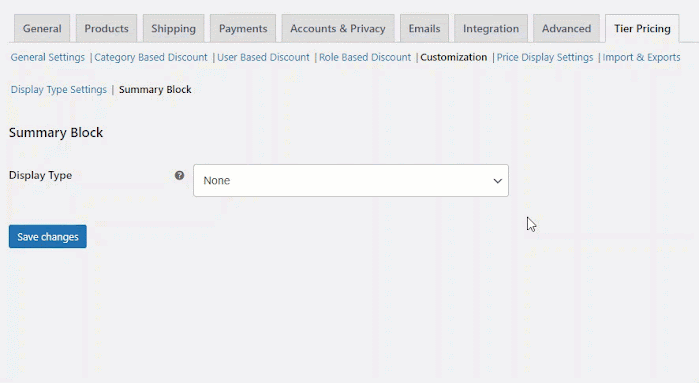
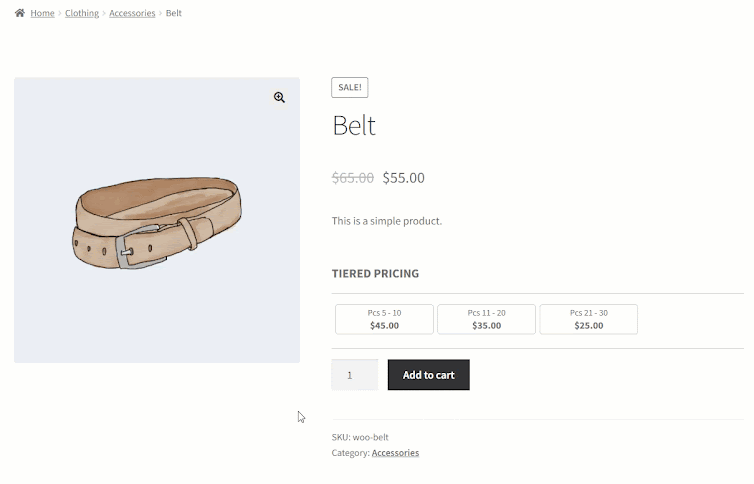
Summary Block
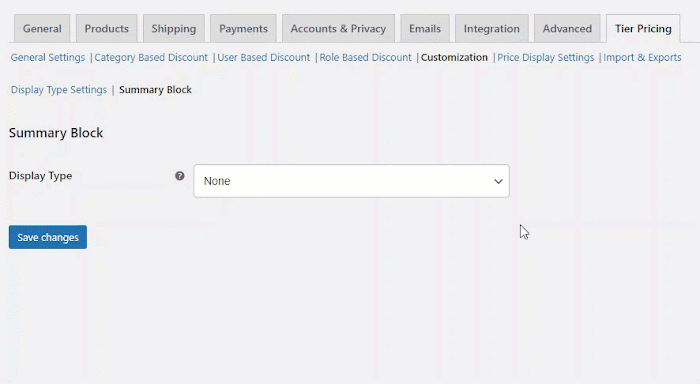
↑ Back to topDisplay Block
↑ Back to top- There are two types of display types available for Summary Block:
- Table
- Inline
Display Block – Table
↑ Back to top- Two more options will appear when the Table option is selected as Display Type.
Front-End Impact:
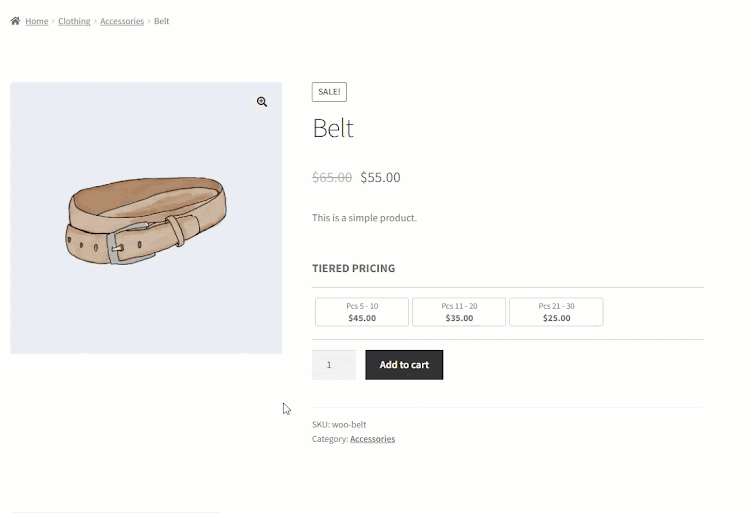
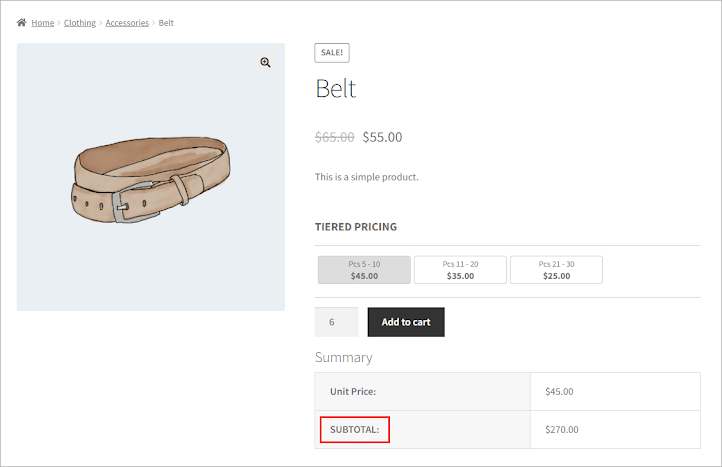
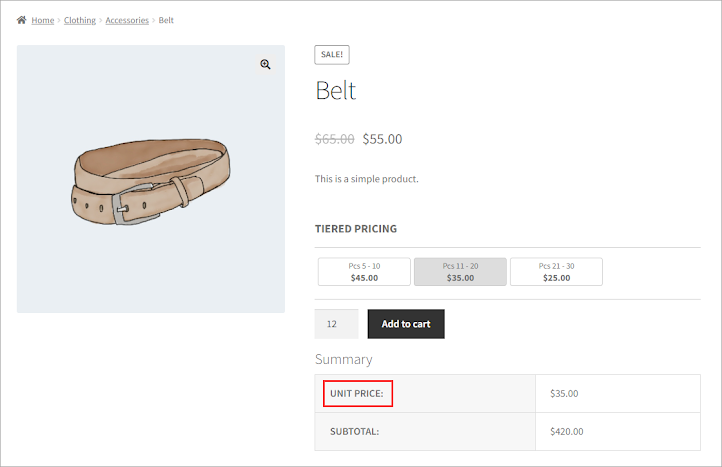
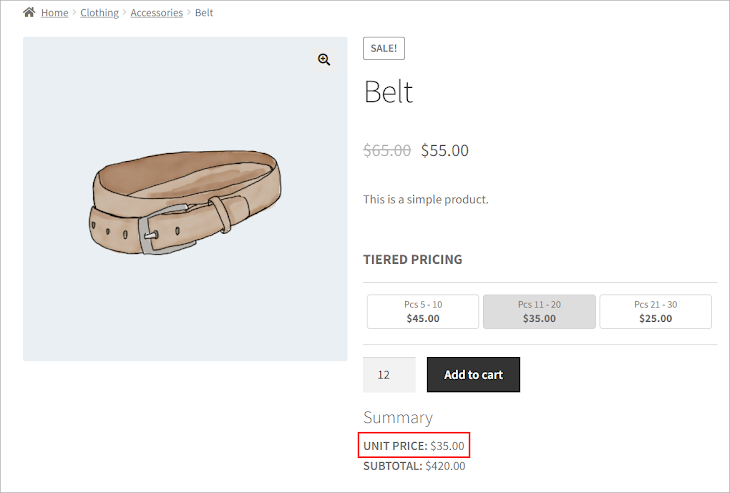
- A summary will appear on the Single Product page in which the following options will be displayed:
- Price of each unit according to the Tier Price rule, which is active.
- The total amount is according to the Tier Price.
“Total” Label – Table
- Set the text for the Total column in the Summary Block.
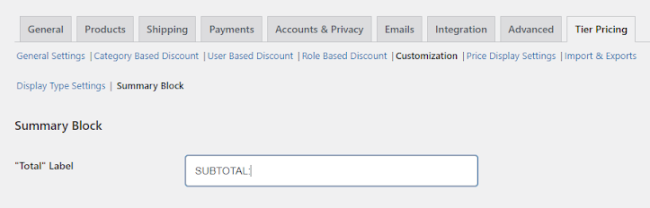
- Click on the Save Changes button to apply your settings.
Front-End Impact:
“Each” Label – Table
- Set the text for Each column in the Summary Block.
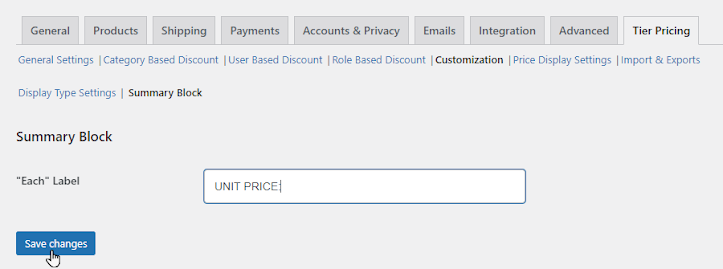
- Click on the Save Changes button to apply your settings.
Front-End Impact:
Display Block – Inline
↑ Back to top- Two more options will appear when the Inline option is selected as Display Type.
Front-End Impact:
- A summary will appear on the Single Product page in which the following options will be displayed:
- Price of each unit according to the Tier Price rule, which is active.
- The total amount is according to the Tier Price.
“Total” Label – Inline
- Set the text for the Total column in the Summary Block.
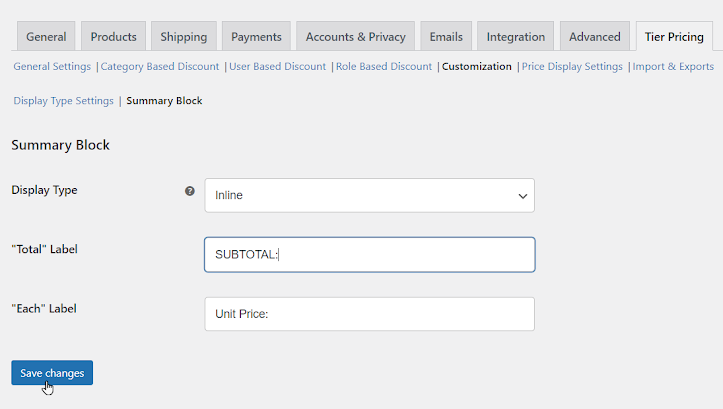
- Click on the Save Changes button to apply your settings.
Front-End Impact:
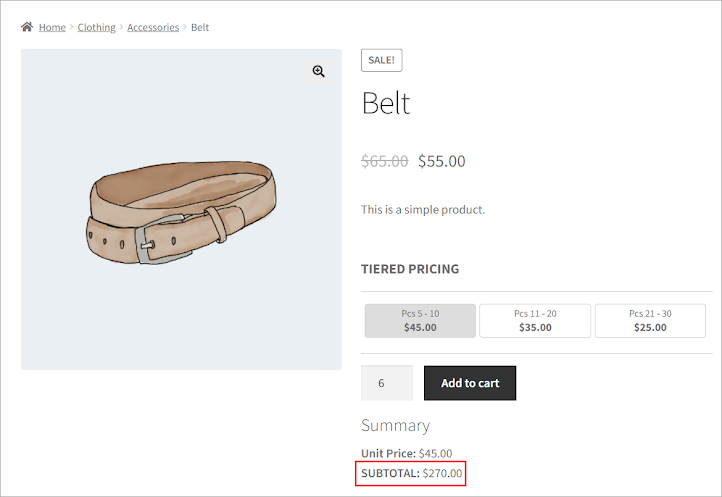
“Each” Label – Inline
- Set the text for Each column in the Summary Block.
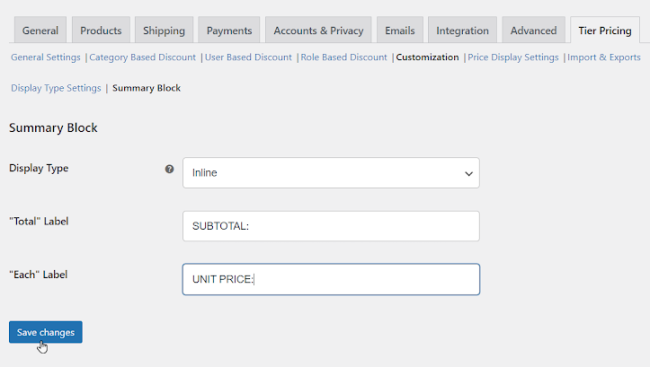
- Click on the Save Changes button to apply your settings.
Front-End Impact:
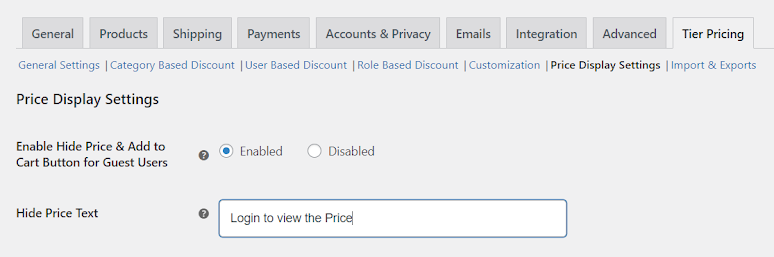
Price Display Settings
↑ Back to top- Go to the Price Display Settings sub-tab.
Enable Hide Price & Add to Cart Button for Guest Users
↑ Back to top- Click on the Enabled radio button to hide the Price and the Add to Cart button for the Guest Users.
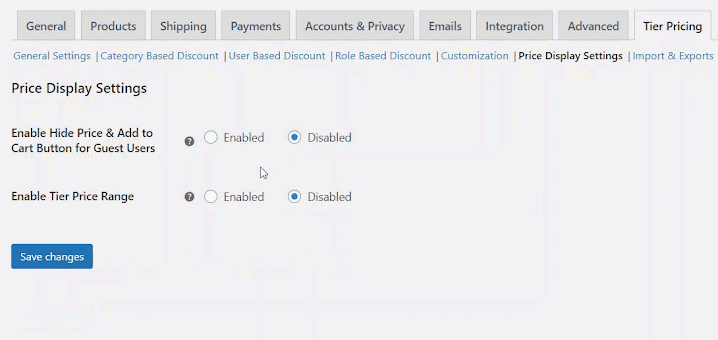
- Click on the Save Changes button to apply your settings.
- Once enabled, a Hide Price Text option will appear.
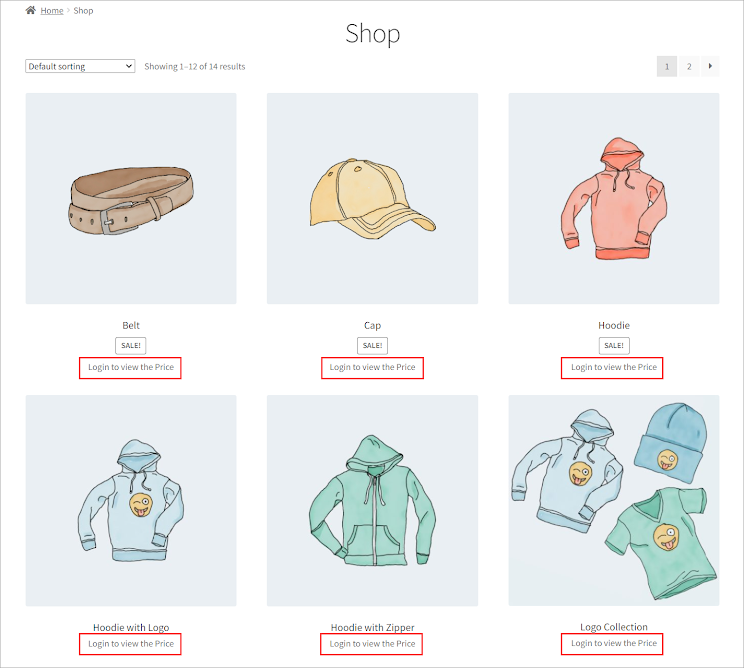
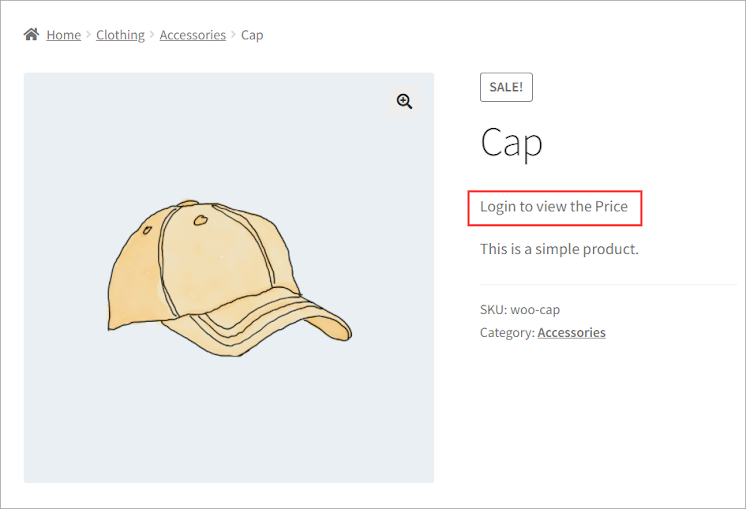
Front-End Impact:
- Shop Page:
- Single Product Page:
Hide Price Text
↑ Back to top- Set the text for the Table Title, which will appear on the single product page.
- Click on the Save Changes button to apply your settings.
Front-End Impact:
- Shop Page:
- Single Product Page:
Enable Tier Price Range
↑ Back to top- Click on the Enabled radio button to enable the price range of the products.
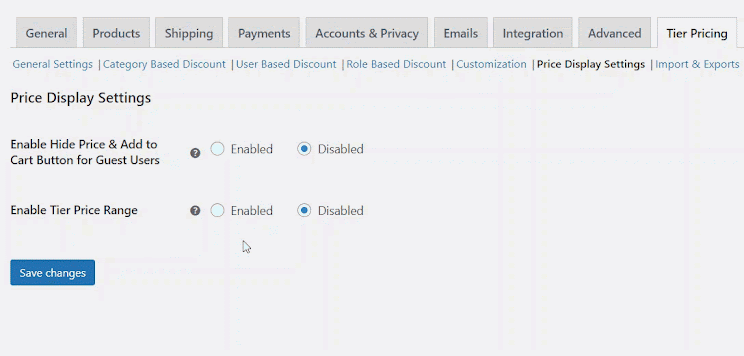
- Click on the Save Changes button to apply your settings.
- Once enabled, a Display Tier Price Range option will appear.
Display Tier Price Range
↑ Back to top- We have two range types available for the Display Tier Price Range option.
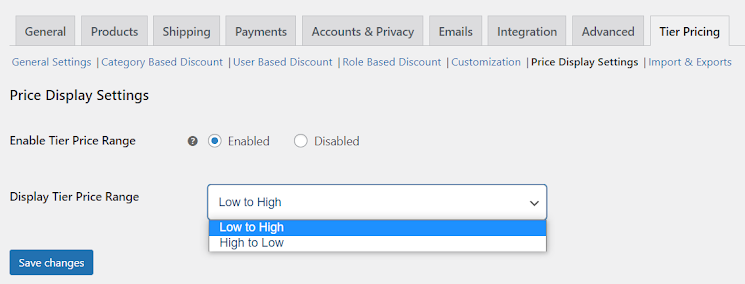
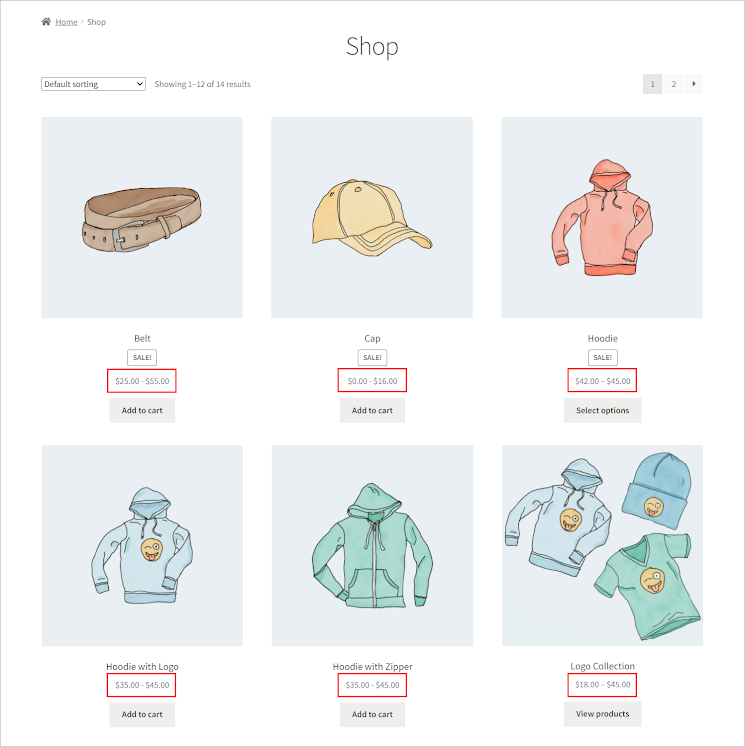
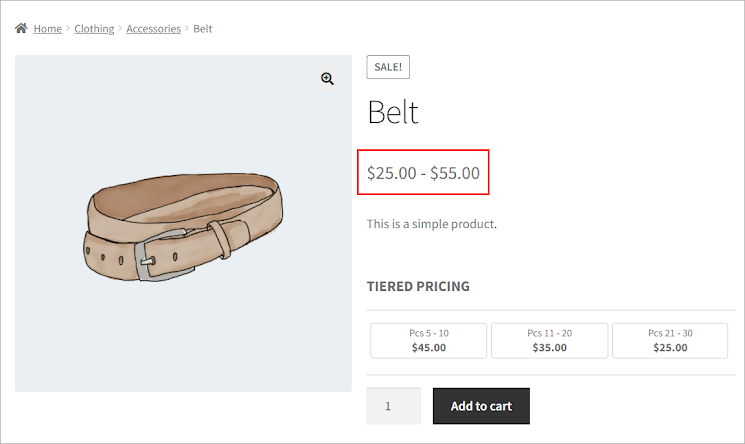
Low to High
- When Low to High is selected, the Price range from Lowest to Highest Tier pricing will be displayed.

Front-End Impact:
- Shop Page:
- Single Product Page:
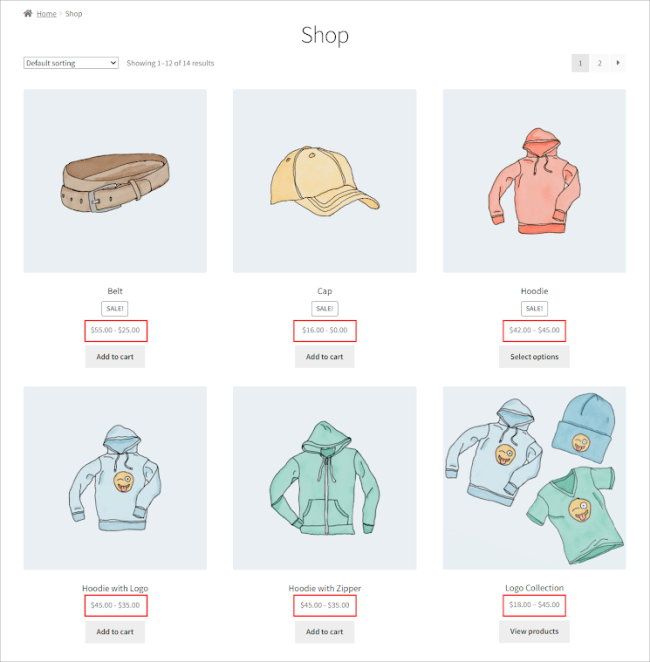
High to Low
- Similarly, when High to Low is selected, the Price range from Highest to Lowest Tier pricing will be displayed.

Front-End Impact:
- Shop Page:
- Single Product Page:
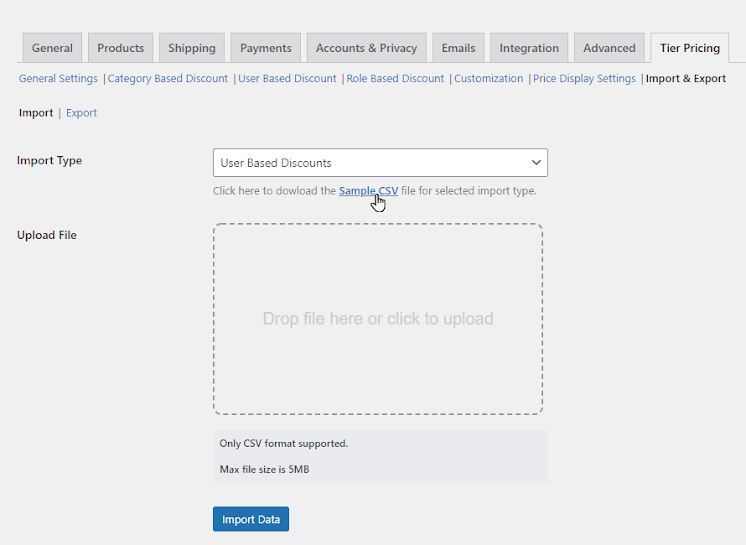
Import & Export
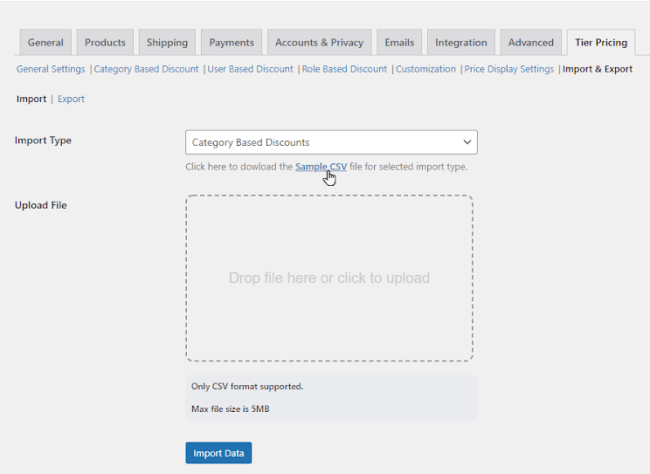
↑ Back to top- Go to the Import & Export sub-tab. There are two sections in this sub-tab.
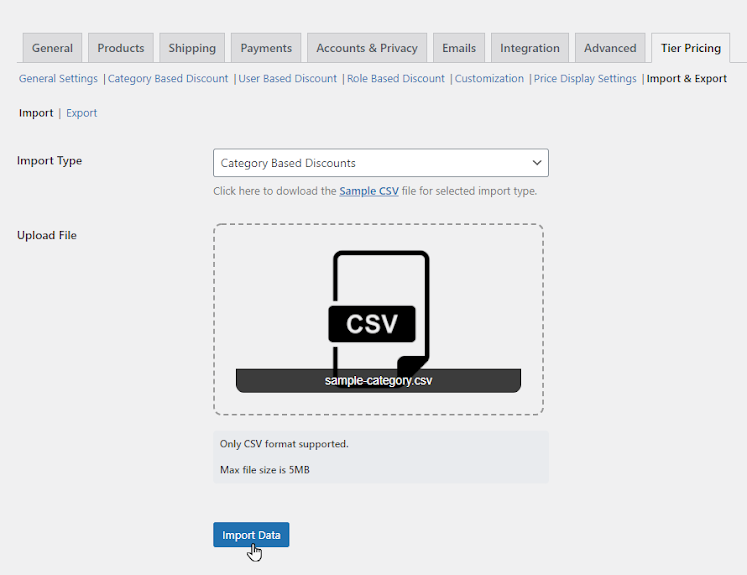
Import
↑ Back to top- In the Import section, we have an Import Type option available to select the Tier Type and then Upload the CSV File on the Upload File option and click on the Import Data button.
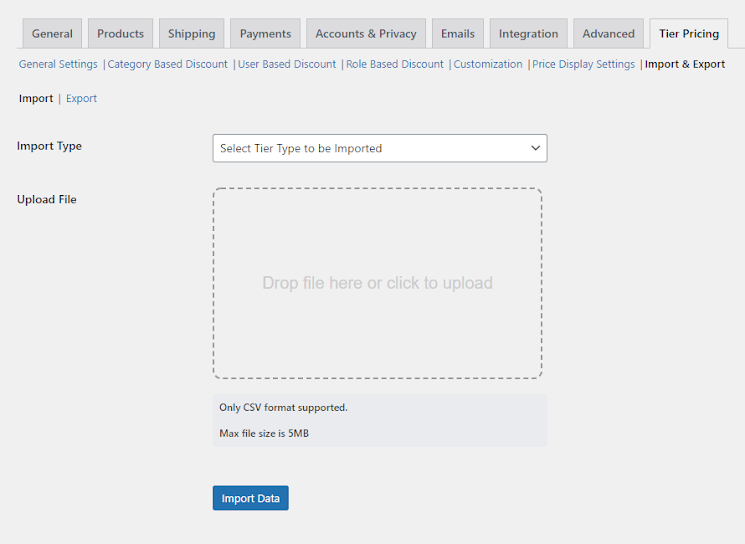
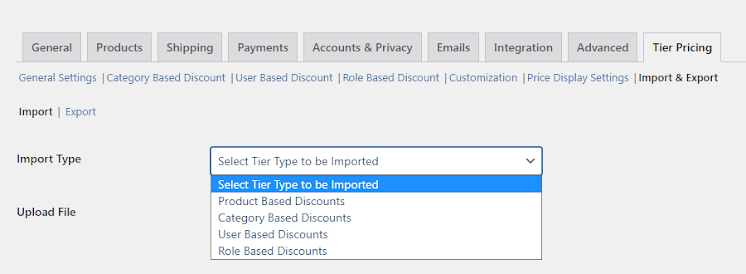
- In the Import Type option, we have the following Tier Types available.
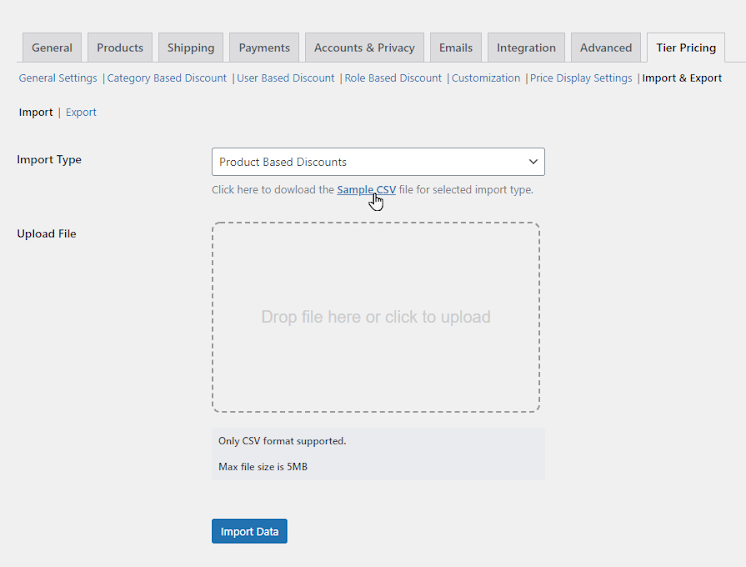
Product Based Discounts – Import
- Select the Product Based Discounts tier types option.
- Once done, we can see a Sample CSV hyperlink would appear just below the Import Type option.
- Click on the Sample CSV hyperlink.
- A Sample CSV File will be downloaded.
- Click on that Sample CSV File to open it.
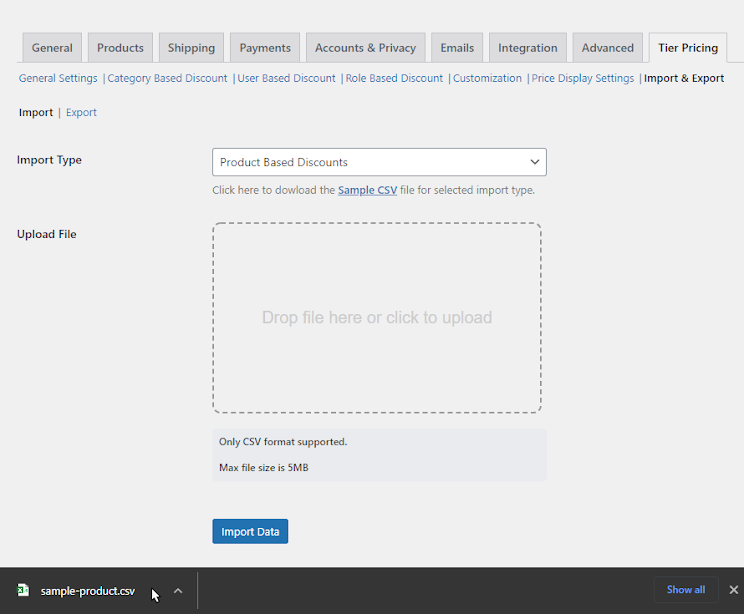
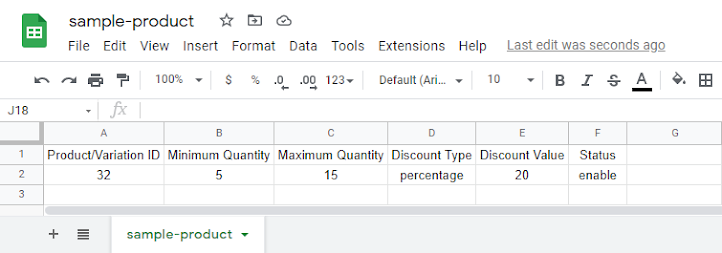
- We can see the format of the CSV File for Product Based Discounts.
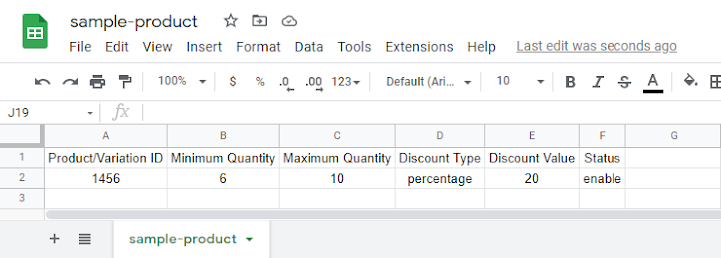
- Now edit the CSV File according to your requirement and save it.
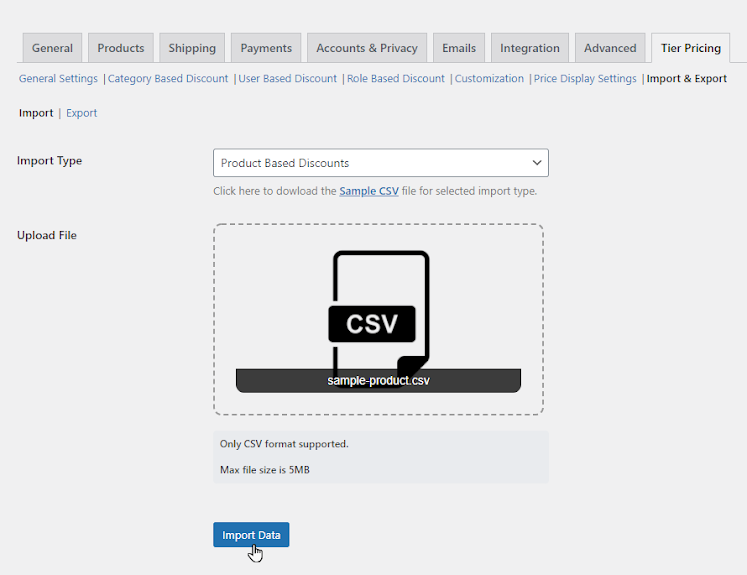
- Now click browse and select the CSV File in the Upload File option.
- Now click on the Import Data button.
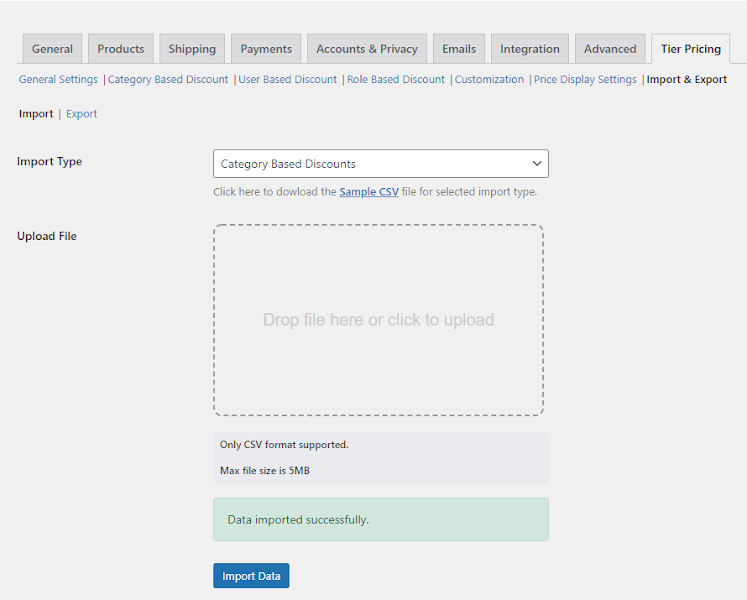
- A notification will appear once your file is imported successfully.

Back-End Impact:
- Navigate to Admin Dashboard → Products → All Products.

- Hover on the respective product to view the sub-options.
NOTE: We can view the Product ID when we hover over the product.
- Click on the Edit sub-option.

- Go to the Product Data section once you’re on the product configuration page.
- Now go to the Tier Pricing tab.
- Before the CSV File is Imported:
- After the CSV File is Imported:
IMPORTANT NOTE: The import data will overwrite the current data. In order to keep your previous data, export your data first then follow the import process.
Category Based Discounts – Import
↑ Back to top- Select the Category Based Discounts tier types option.
- Once done, we can see a Sample CSV hyperlink would appear just below the Import Type option.
- Click on the Sample CSV hyperlink.
- A Sample CSV File will be downloaded.
- Click on that Sample CSV File to open it.

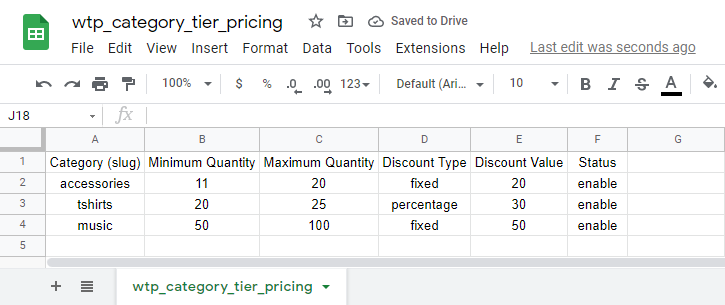
- We can see the format of the CSV File for Category Based Discounts.
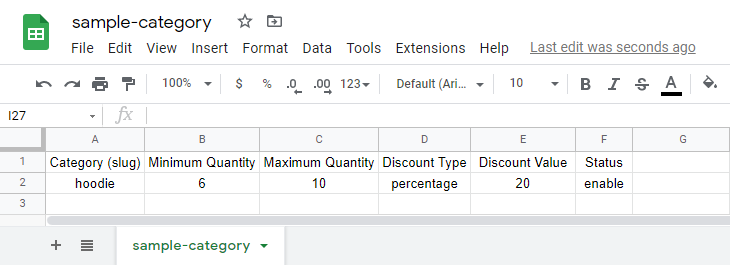
- Now edit the CSV File according to your requirement and save it.
- Now click browse and select the CSV File in the Upload File option.
- Now click on the Import Data button.
- A notification will appear once your file is imported successfully.
Back-End Impact:
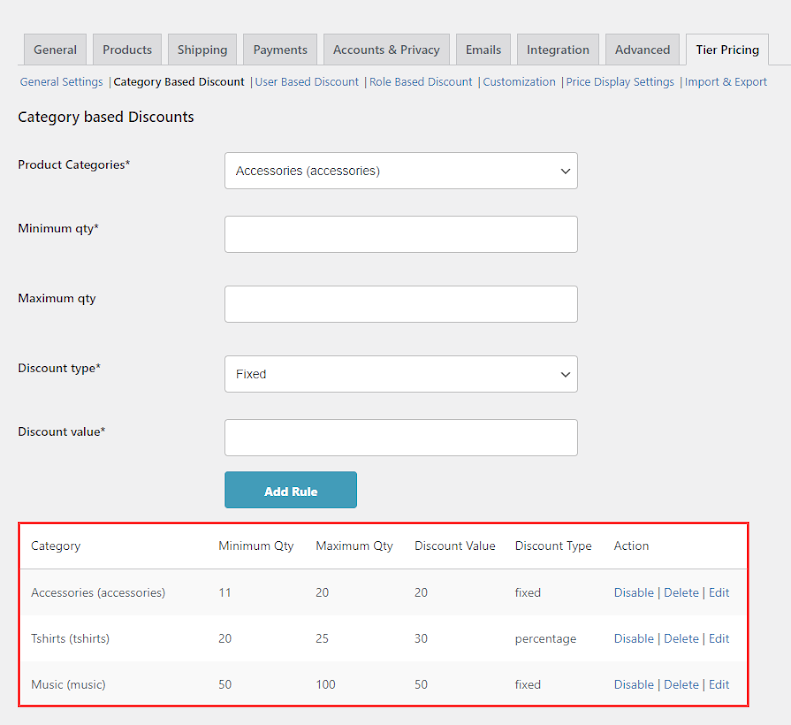
- Go to Admin Dashboard → WooCommerce → Settings.
- Go to the Tier Pricing tab.
- Now go to the Category Based Discount subtab.
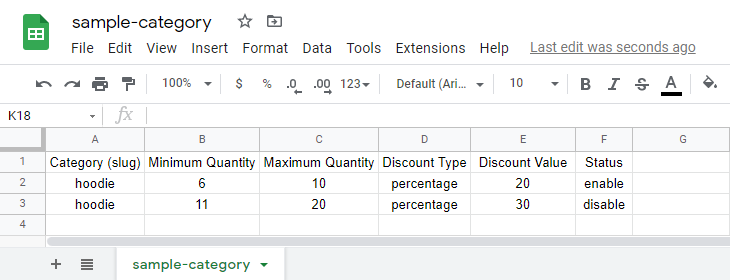
- We can see the rules which are imported from the CSV File.
- Before the CSV File is Imported:
- After the CSV File is Imported:
IMPORTANT NOTE: The import data will overwrite the current data. Inorder to keep your previous data, export your data first then follow the import process.
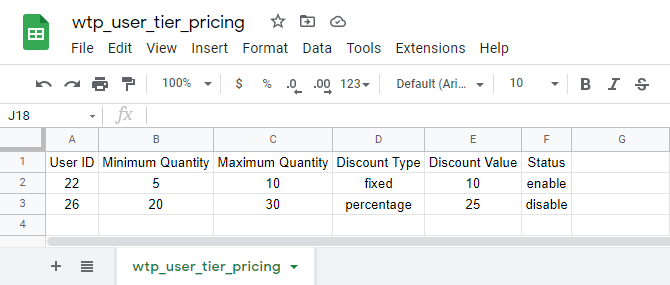
User Based Discounts – Import
↑ Back to top- Select the User Based Discounts tier types option.
- Once done, we can see a Sample CSV hyperlink would appear just below the Import Type option.
- Click on the Sample CSV hyperlink.
- Sample CSV File will be downloaded.
- Click on that Sample CSV File to open it.
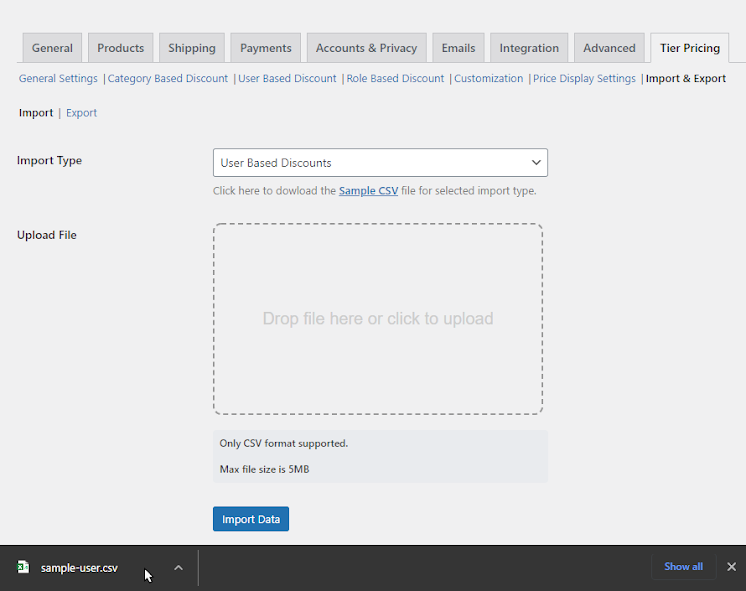
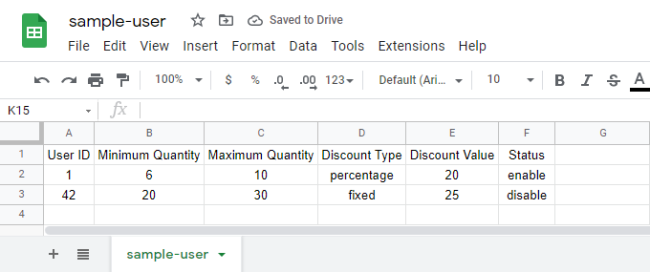
- We can see the format of the CSV File for Category Based Discounts.

- Now edit the CSV File according to your requirements and save it.
- Now click browse and select the CSV File in the Upload File option.
- Now click on the Import Data button.

Back-End Impact:
- Go to Admin Dashboard → WooCommerce → Settings.

- Go to the Tier Pricing tab.
- Now go to the User Based Discount subtab.
- We can see the rules which are imported from the CSV File.
- Before the CSV File is Imported:

- After the CSV File is Imported:

IMPORTANT NOTE: The import data will overwrite the current data. Inorder to keep your previous data, export your data first then follow the import process.
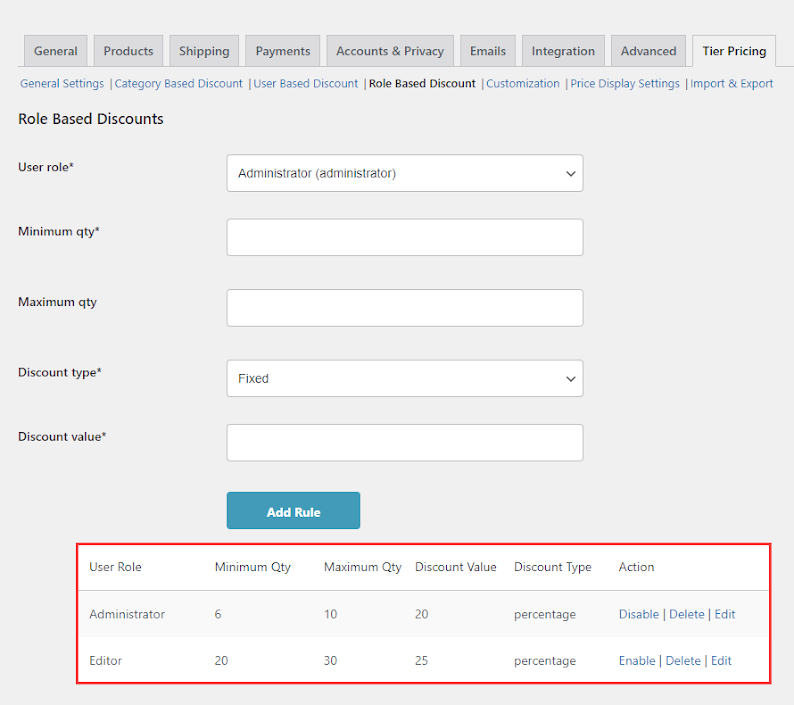
Role Based Discounts – Import
↑ Back to top- Select the Role Based Discounts tier types option.
- Once done, we can see a Sample CSV hyperlink would appear just below the Import Type option.
- Click on the Sample CSV hyperlink.
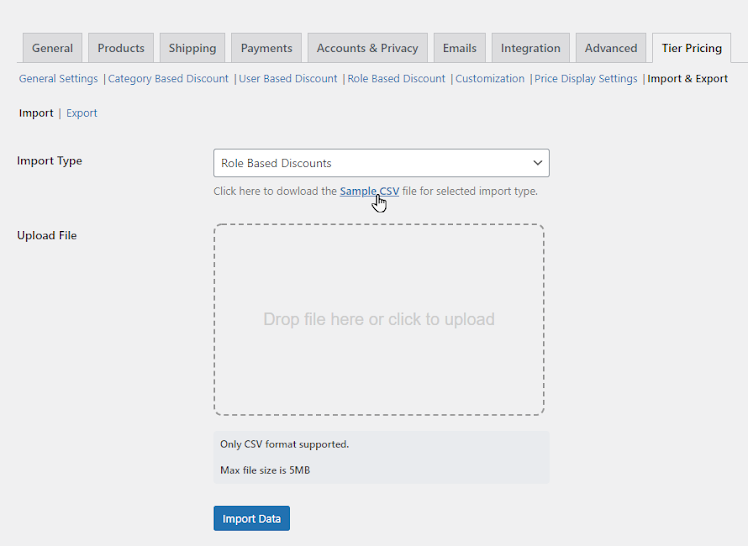
- A Sample CSV File will be downloaded.
- Click on that Sample CSV File to open it.

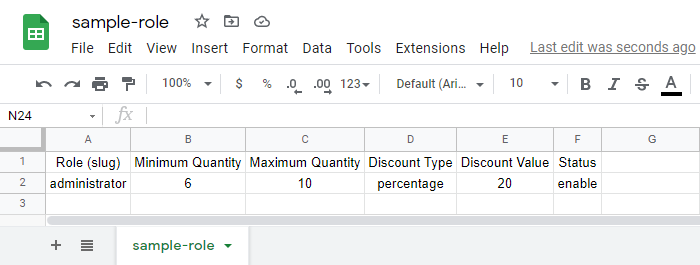
- We can see the format of the CSV File for Role Based Discounts.
- Now edit the CSV File according to your requirement and save it.
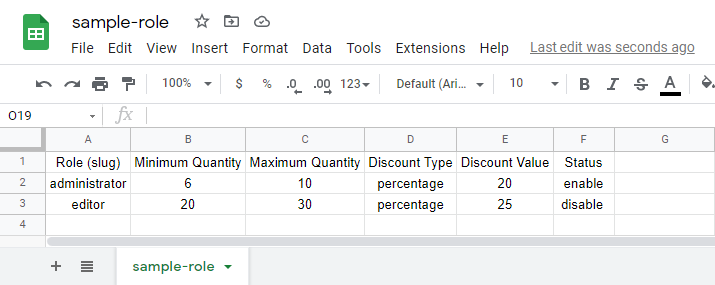
- Now click browse and select the CSV File in the Upload File option.
- Now click on the Import Data button.
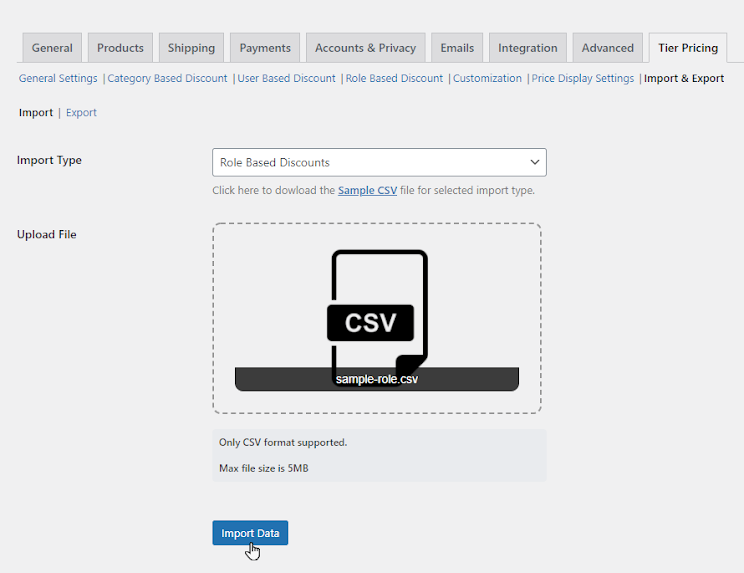
- A notification will appear once your file is imported successfully.

Back-End Impact:
- Go to Admin Dashboard → WooCommerce → Settings.

- Go to the Tier Pricing tab.
- Now go to the Role Based Discount subtab.
- We can view the rules which are exported in the CSV File
- Before the CSV File is Imported:

- After the CSV File is Imported:
IMPORTANT NOTE: The import data will overwrite the current data. Inorder to keep your previous data, export your data first then follow the import process.
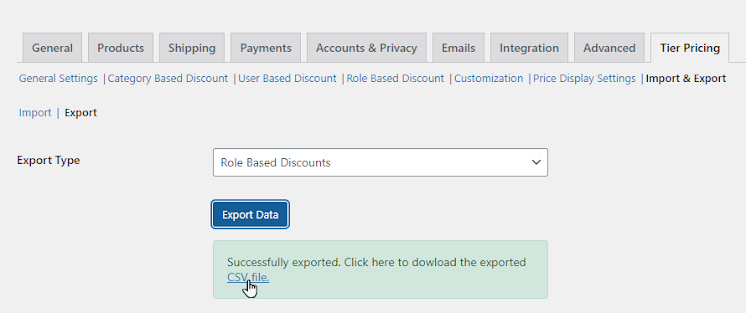
Export
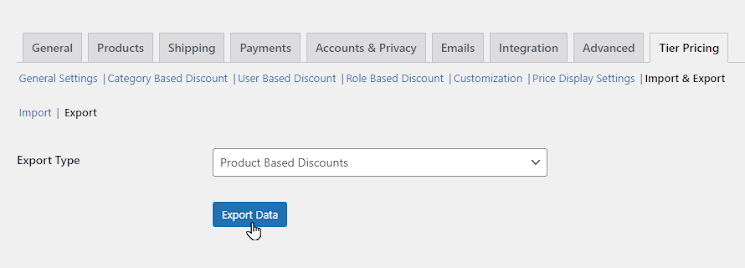
↑ Back to top- We have an Export Type option available in the Export section to select the Tier Type. Once done, then click on the Export Data button.
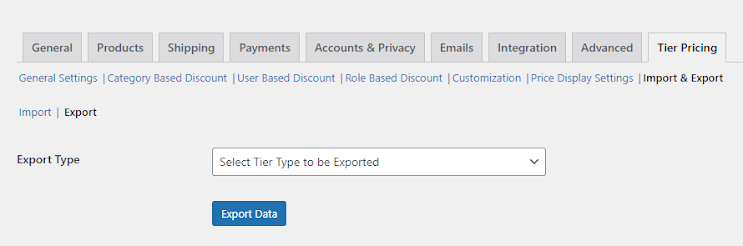
- In the Export Type option, we have the following Tier Types available.

Product Based Discounts – Export
↑ Back to top- Select the Product Based Discounts tier types option.
- Once done, click on the Export Data option.
- A CSV File will be exported, and a hyperlink will appear.
- Click on the CSV File hyperlink to download the exported file.
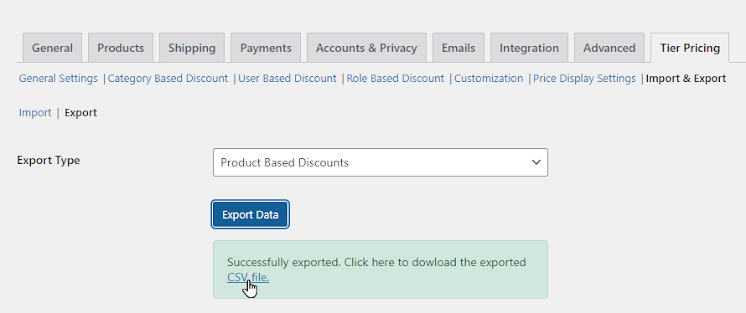
- Click on that CSV File to open it.

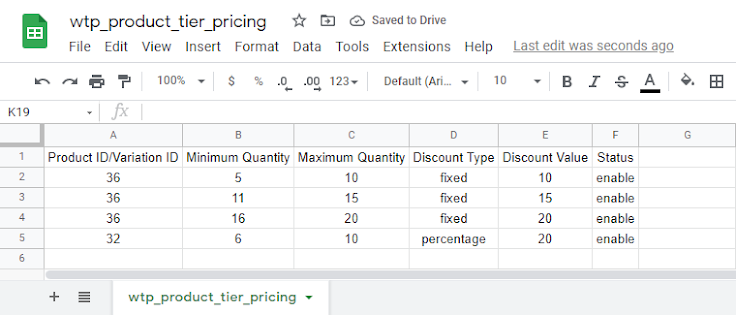
- We can view the rules exported in the CSV File.
- Back-End Rules for Product-Based Discount:
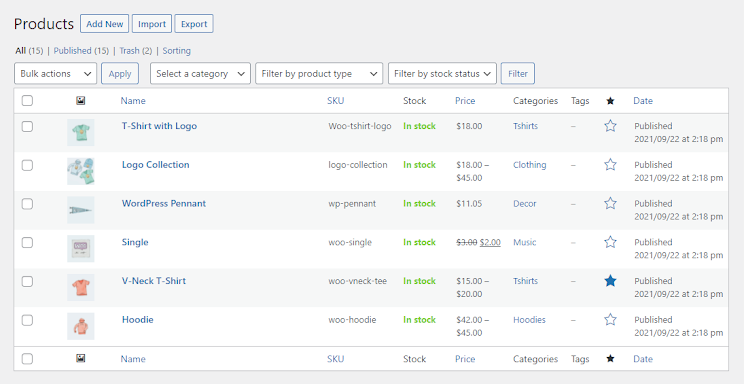
- Navigate to Admin Dashboard → Products → All Products.
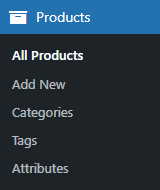
- Now you’re on the Products page.
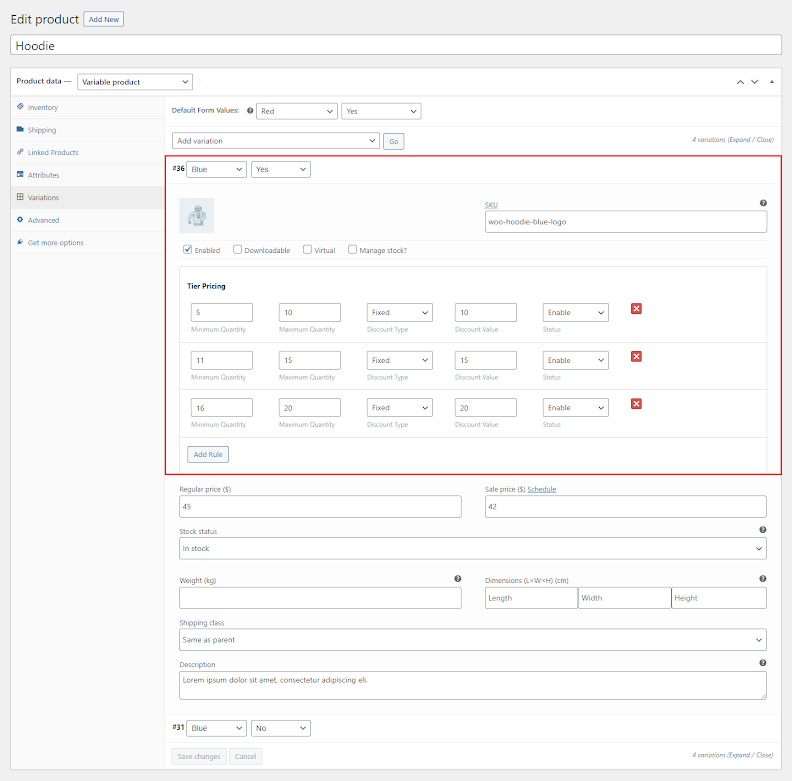
For Product ID/Variation ID 36:
- Hover over the Hoodie product to view the suboptions.
- Once done, click on the Edit button.

- Now you’re on the Edit product page.
- Since this is a Variable product, go to the Variations tab in the Product Data section.
- We can the rules which are exported in the CSV File.
For Product ID/Variation ID 32:
- Hover over the Hoodie product to view the suboptions.
- Once done, click on the Edit button.
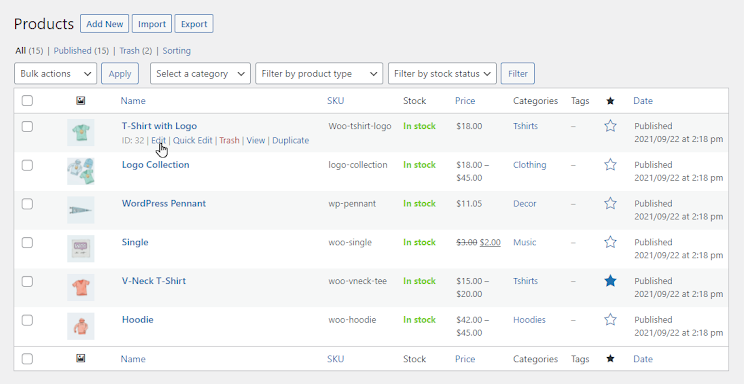
- Now you’re on the Edit product page.
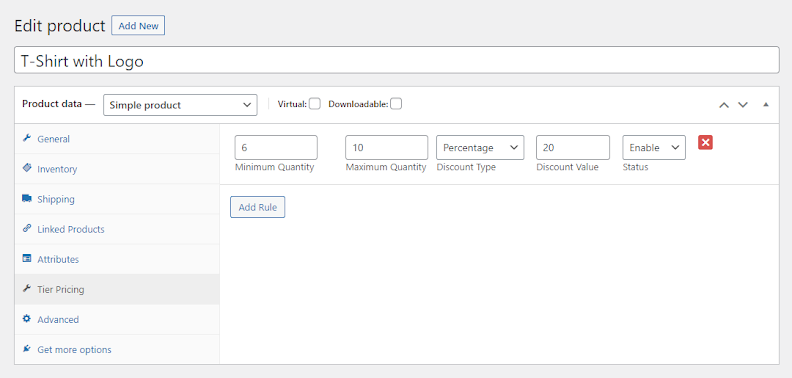
- Since this is a Simple product, go to the Tier Pricing tab in the Product Data section.
- We can the rules which are exported in the CSV File.
Category Based Discounts – Export
↑ Back to top- Select the Category Based Discounts tier types option.
- Once done, click on the Export Data option.

- A CSV File will be exported, and a hyperlink will appear.
- Click on the CSV File hyperlink to download the exported file.

- Click on that CSV File to open it.

- We can view the rules exported in the CSV File.
- Back-End Rules for Category Based Discount:
- Go to Admin Dashboard → WooCommerce → Settings.

- Go to the Tier Pricing tab.
- Now go to the Category Based Discount subtab.
- We can view the rules which are exported in the CSV File.
User Based Discounts – Export
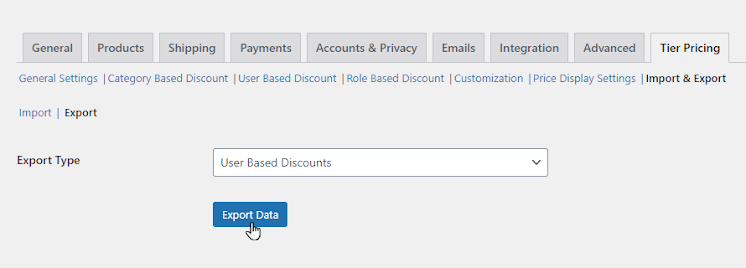
↑ Back to top- Select the User Based Discounts tier types option.
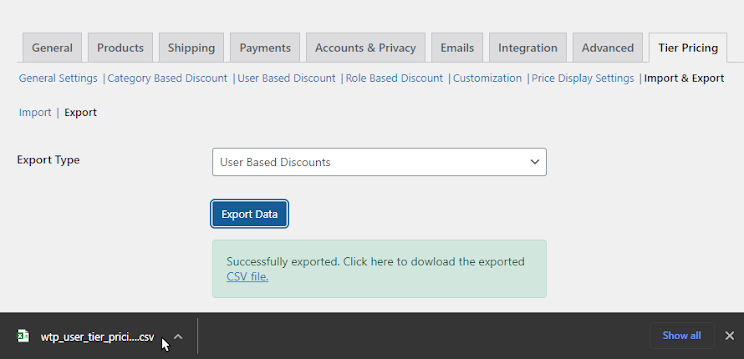
- Once done, click on the Export Data option.
- A CSV File will be exported, and a hyperlink will appear.
- Click on the CSV File hyperlink to download the exported file.

- Click on that CSV File to open it.
- We can view the rules exported in the CSV File.

- Back-End Rules for User Based Discount:
- Go to Admin Dashboard → WooCommerce → Settings.

- Go to the Tier Pricing tab.
- Now go to the User Based Discount subtab.
- We can view the rules which are exported in the CSV File.
Role Based Discounts – Export
↑ Back to top- Select the Role Based Discounts tier types option.
- Once done, click on the Export Data option.

- A CSV File will be exported, and a hyperlink will appear.
- Click on the CSV File hyperlink to download the exported file.
- Click on that CSV File to open it.

- We can view the rules exported in the CSV File.
- Back-End Rules for Role Based Discount:
- Go to Admin Dashboard → WooCommerce → Settings.

- Go to the Tier Pricing tab.
- Now go to the Role Based Discount subtab.
- We can view the rules which are exported in the CSV File.