General Setup
↑ Back to topInstallation
↑ Back to topTo install the Threads Theme you must first have a working WordPress(.org) installation. For information on installing WordPress, please see Installing WordPress, from the WordPress Codex. Once WordPress has been setup in your hosting environment, you can install your theme one of two ways:
FTP upload: download and un-zip your theme folder, and using the FTP program of your choice upload the theme folder to the ‘../wp-content/themes/’ folder on your server.
WordPress dashboard:
- Download the theme from your account.
- Sign into your WordPress dashboard (e.g., yourdomain.com/wp-admin).
- Navigate to Appearance > Themes > Add New > Upload, and select your zipped theme folder.
- Click “Install Now”.
- Once the theme is uploaded you will need to activate it, either with the provided link or under Appearance > Themes.
Note: If you use Safari as your primary browser you may find that your theme folder is not zipped after downloading it. You will need to re-compress your theme folder before initiating the second installation process.
Image Dimensions
↑ Back to topThe theme defines image dimensions as follows (these can be found in the ‘Theme Setup’ function at the top of your functions.php file):
- Logo: 240 x 240px
- Featured Large: 2400 x 1800px
- Featured Medium: 1200 x 800px
- Featured Small: 640 x 640px
- Featured Square: 1200 x 1200px
Custom Menus
↑ Back to topYou can setup and manage your menu under Appearance > Menus, in your WordPress dashboard. The theme utilizes 2 custom menus; a Main Menu, and Social Menu for displaying social media icons in the lower left corner.
See the Codex for an explanation of the custom menu system (Note: this tutorial is for WordPress.com, but the process is the same).
Demo Content
↑ Back to topDemo content can be installed using the One Click Demo Import plugin. Upon activating the theme, you will be recommended to install the plugin. Follow these steps to install the demo content:
- Installation and activate the One Click Demo Import plugin.
- Make sure all required plugins are active.
- Navigate to Appearance > Import Demo Data within the WordPress admin.
- Click the blue “Import” button for the Default Demo Import.
- Wait for the import to complete. It may take a few minutes.
- Begin editing.
Note: All content, widgets, and customizer options will be imported from the theme demo. Importing demo data will add to any existing content you have already created. Deleting the demo content must be done manually.
Home Page Setup
↑ Back to topThe home page in the Threads Theme demo is created using a combination of WordPress and WooCommerce blocks. The legend below outlines the blocks that were used on the home page demo. You can manually recreate the demo layout by adding the blocks illustrated in the legend, or you can import the demo content and edit the blocks as seen in the demo.

Theme Options
↑ Back to top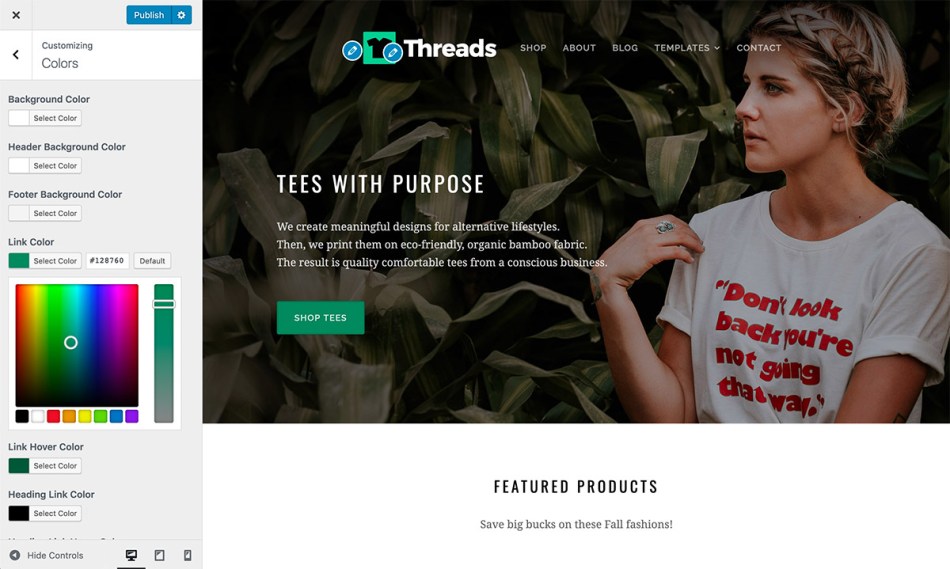
All options for the theme are located within the WordPress Customizer. Navigate to Appearance > Customize to setup the options for your theme.
Font Pairings: The theme provides options for selecting from hand-picked font pairings. To change the fonts, navigate to Appearance > Customize > Theme Options > Fonts within the WordPress admin.
Logo Resizer: Within the Appearance > Customize > Site Identity options, the theme features the option to upload and scale a logo image to the size of your liking.
Title Font: Within the Appearance > Customize > Site Identity options, the theme features the option to change the Site Title font from a list of hand-picked Google Fonts.
Site Identity: Additionally, within the Appearance > Customize > Site Identity options, you may choose to toggle the display of your Site Title and Site Tagline.
Colors: Within the Appearance > Customize > Colors options, you can optionally choose different colors for the menu background, header background, and various link colors.
Footer: Within the Appearance > Customize > Footer options, you can optionally change the footer credit for your website.
WooCommerce
↑ Back to topThe theme requires WooCommerce for selling products. After installing and activating WooCommerce, you may configure the display of products in your shop within the Appearance > Customize > WooCommerce settings.
Please see WooCommerce User Documentation for additional help with using WooCommerce: