Overview
↑ Back to topInstallation
↑ Back to top- Download the extension from your dashboard
- Go to Plugins > Add New > Upload and select the ZIP file you just downloaded
- Click Install Now, and then Activate
- Click the Configure link and read the next section to learn how to setup and configure the plugin.
Setup and Configuration
↑ Back to top
- Export Filename – Change the name of the filename that is exported. Remember that if this is changed after the initial setup, you will have to go through the setup process again for the Stamps.com desktop client.
- Attach order XML file to admin new order email – Enable this to attach an XML export file of the order to the admin new order notification email.
- Include Customs Information – Enable this to include Customs Information in the XML file for international orders. This will also include order line item information as well.
Setting up the desktop client
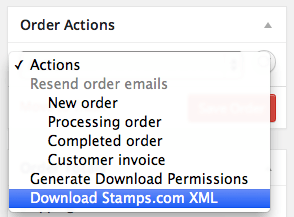
↑ Back to top- Go to WooCommerce > Orders and click the Stamps.com icon for a recent order.
- Now, copy the XML file exported from your WooCommerce site to the folder you will use for these files.
- Launch Stamps.com client and go to “Batch” option in left menu:
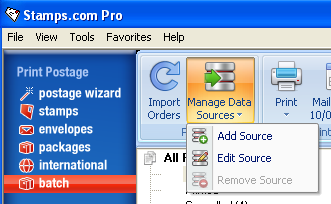
- Press Manage Data Sources > Add Source:
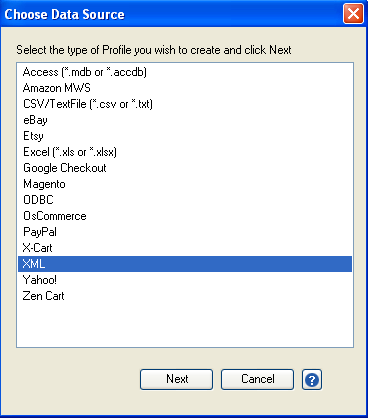
- On the Choose Data Source window, select “XML” and press Next:
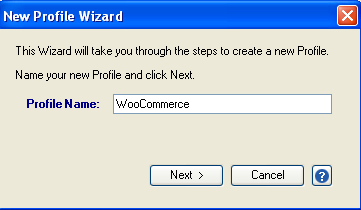
- Give the data source a Profile Name and press Next:

- Browse and find the location of the “woocommerce-orders.xml” file and press “Open”.
- On the “Profile Options” set the defaults for this data source:
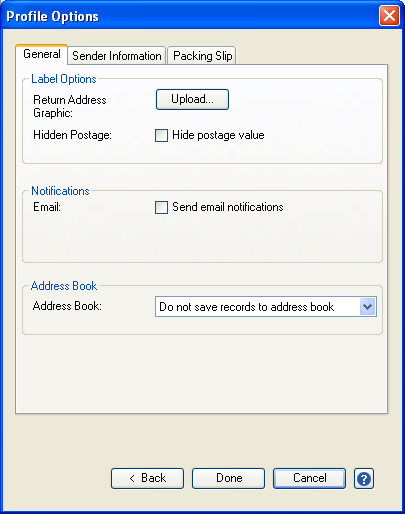
- Press Done to save this data source.
Note: The location and name of this file needs to remain the same, or you will need to repeat this setup each time you process a file.
Exporting Orders
↑ Back to topExporting Individual Orders
↑ Back to top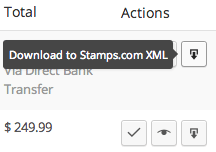
Exporting Orders in Bulk
↑ Back to top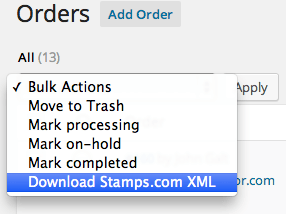
Exporting all orders
↑ Back to top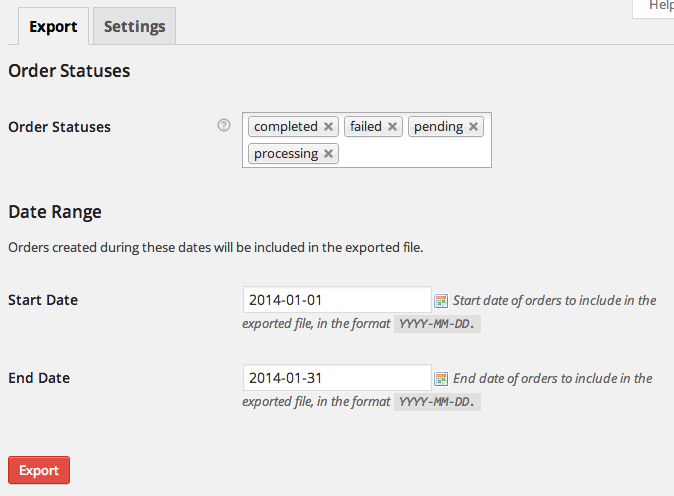
Importing into Stamps.com
↑ Back to top- Export an order via one of the WooCommerce export options.
- Copy the “woocommerce-orders.xml” file exported from your WooCommerce site to the folder you setup as your data source. You will overwrite any existing file.
- Launch Stamps.com client and go to “Batch” option in left menu.
- Press the “Import Orders” button.
- Orders will be imported and shown as “Not Printed”.
Possible outcomes during import
- You may receive a popup showing you an address correction to the address supplied by your customer
- You may receive a message saying no orders were imported. If this is the case, verify that the XML file that was exported from the WooCommerce site is the same name and in the same location as when you setup your data source. You can verify this by pressing the Manage Data Sources > Edit Source button.