Count down to an important event (i.e. end-of-season sale, product launch, or wedding timer),
Create a sense of urgency before your sale ends (i.e. free shipping for a limited time or sale ends soon timer), or
Count up from a number.
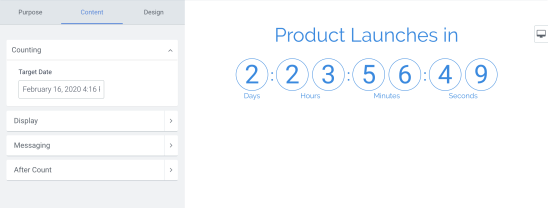
Count to Date: Promote an upcoming event
To advertise a future event with a custom countdown, follow these steps:
Open the POWR Editor for your Countdown Timer
Click the Content tab
Locate the Counting section
Enter the Target Date and time which you are counting down to.
If you’d like to repeat the timer after it has hit the target date, go to After Count and select Repeat. This will automatically restart the timer to count down with the same interval until its next calculated target date.Example: If a Countdown Timer created on May 31 with a Target Date of June 15 is set to Repeat, the new target dates will be June 30, July 15, July 30, etc.
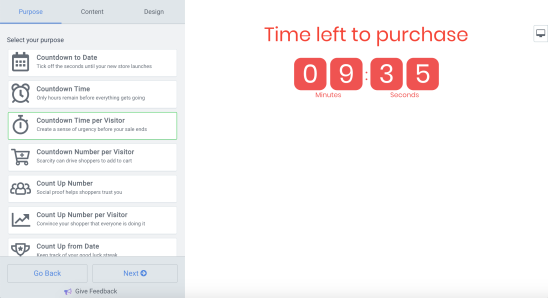
Countdown Time Per Visitor: Create urgency in checkout
Countdown Time Per Visitor is useful for creating urgency within the checkout process. Present the buyer with the information that their order needs to be placed within the next x minutes. Here is how you can set this up using POWR Countdown Timer:
Open the POWR Editor for your Countdown Timer and select the Countdown to Date template.
Access Counting > Count To
Select Time per Page Load from the dropdown
Enter the time to display to the visitor when they first hit your (checkout) page.
With this option, the timer starts at the same value for each new visitor to your page.
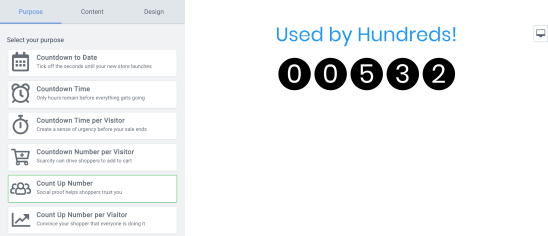
↑ Back to topAnother popular way to use Countdown Timer is to use the Count Up Number template to animate business numbers on your site. For example, if you make one sale per second on average, enter the starting number and have the number go up by one every second. That way, you have a dynamic display of your business metrics shown to your visitors in an eye-catching way. Here is how to do this:
Open the POWR Editor and select the Count Up Number template
In the Content tab go to Counting > Starting Number
Add your Starting Number and choose the update interval.
For more information on setting up Countdown Timer, visit the POWR Help Center.
How to Install POWR Countdown Timer on WooCommerce
Find POWR Countdown Timer in the WooCommerce Extensions Directory and click Install.
Download the files.
Go to Plugins > Add New > Upload > Select your POWR zip
Click on Activate Plugin
You will automatically be authenticated on POWR. Approve access to continue.
You will now see a POWR Plugins item in the left-hand navigation and you will be able to access all POWR Plugins for WooCommerce.
How to Add POWR Plugins to WooCommerce
In the POWR Plugins navigation menu, click on your chosen plugin:
Create your plugin in the POWR Editor.
When you’re ready, click the blue ‘Add to Site’ button on the top right of the POWR Editor.
Copy the HTML snippet and paste it wherever you would like to add your POWR plugin.
How to Add your POWR Plugin to WooCommerce Products
Option 1: Adding to Product Data
You will see a new section appear under Product data called POWR Plugins.
Click POWR Plugins and you will see a default form.
At the top of the form preview on the right-hand side you can select whether to display the form above or below your product, or not display it at all:
To edit the content of the form, click on Edit Form Builder.This will open the POWR Editor in a pop-out window where you can make any necessary changes:When you’re happy with your changes, close the POWR Editor.Click Update in the Publish panel on the top right :To check how it looks, click Preview Changes.Option 2: Adding to Text Sections
Go to Products.
Select your product and click Edit.
You will now see an option to add POWR plugins in all sections that contain a text editor. Select your preferred plugin and the code snippet will be added to the text sections automatically.
Click Update and then Preview Changes on the right-hand side.Customize your plugin live on your site!🎉Congratulations on installing your POWR plugin on WooCommerce! 🎉
 To advertise a future event with a custom countdown, follow these steps:
 Countdown Time Per Visitor is useful for creating urgency within the checkout process. Present the buyer with the information that their order needs to be placed within the next x minutes.
Here is how you can set this up using POWR Countdown Timer:
Countdown Time Per Visitor is useful for creating urgency within the checkout process. Present the buyer with the information that their order needs to be placed within the next x minutes.
Here is how you can set this up using POWR Countdown Timer:
 Another popular way to use Countdown Timer is to use the Count Up Number template to animate business numbers on your site. For example, if you make one sale per second on average, enter the starting number and have the number go up by one every second. That way, you have a dynamic display of your business metrics shown to your visitors in an eye-catching way. Here is how to do this:

 To edit the content of the form, click on Edit Form Builder.
This will open the POWR Editor in a pop-out window where you can make any necessary changes:
To edit the content of the form, click on Edit Form Builder.
This will open the POWR Editor in a pop-out window where you can make any necessary changes:
 When you’re happy with your changes, close the POWR Editor.
Click Update in the Publish panel on the top right :
When you’re happy with your changes, close the POWR Editor.
Click Update in the Publish panel on the top right :
 To check how it looks, click Preview Changes.
Option 2: Adding to Text Sections
To check how it looks, click Preview Changes.
Option 2: Adding to Text Sections
 Click Update and then Preview Changes on the right-hand side.
Customize your plugin live on your site!
🎉Congratulations on installing your POWR plugin on WooCommerce! 🎉
Click Update and then Preview Changes on the right-hand side.
Customize your plugin live on your site!
🎉Congratulations on installing your POWR plugin on WooCommerce! 🎉