- Download the .zip file from your WooCommerce Account.
- On your WordPress Dashboard, go to Plugins > Add New and click Upload Plugin – choose the .zip file you have downloaded.
- Proceed to install and activate the extension.
For additional information see also
Install and Activate Plugins/Extensions.
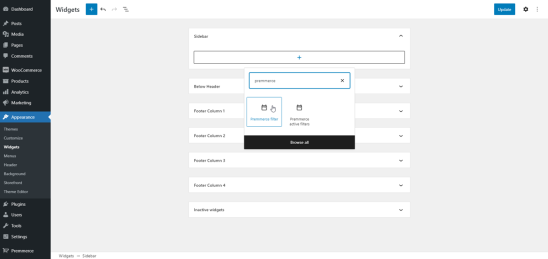
To add the product filter widget to the store page, go to
Appearance > Widgets > Add Block and select Premmerce filter:
You can customize the appearance of the filter by choosing a custom style:

You can also try a preset widget by selecting Premmerce in the dropdown.
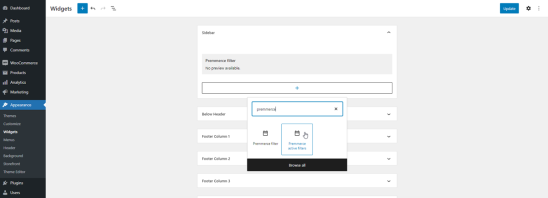
The Premmerce active filter widget contains all active filters (attributes, prices and brands). To add to the store page, go to
Appearance > Widgets > Add Block and select Premmerce active filters:
The following tabs are available within
Premmerce > SEO Product filter:
- Attributes – filter elements settings
- Settings – general filter settings
- Permalinks – filter permalink settings
- SEO Rules – adding SEO rules
- Cache – managing the filter cache
In this tab, you can setup the content and display of the Premmerce Filter widget.
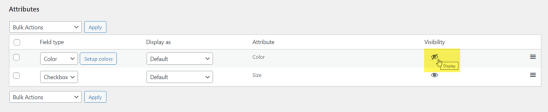
Setting up the attributes display in the filter:
To hide or display an attribute in the filter, select/deselect the icon in the ‘Visibility’ column.
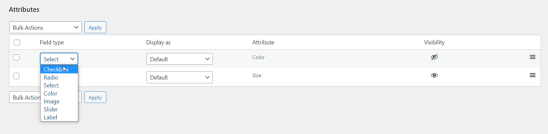
Setting up the attributes field type in the filter
To set the field type for each filter attribute:
- In the row of the attribute, click the dropdown list under the ‘Field type’ column.
- Choose the desired display type and your selection will be automatically saved.
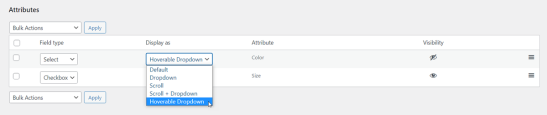
Choosing the attributes display type in the filter
Choose from 4 options, Default, Dropdown, Scroll, Scroll + DropDown, Hoverable Dropdown:
- In the row of the attribute, click the dropdown list under the ‘Display as’ column.
- Choose the desired display type and your selection will be automatically saved.
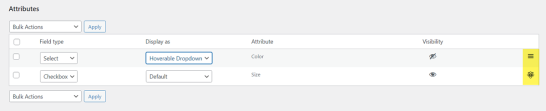
Changing the attributes display order in the filter
To adjust the order in which attributes are displayed, drag and drop the attribute to the position using the position change button (as highlighted below in the screenshot). The changes are automatically saved:
If you need to change the order of the attribute terms in the filter, you can do so by navigating to
Product > Attributes > and going to the ‘Configure terms’ page.
Additional field types:
Color
To assign a color to the attribute terms, click ‘Setup colors’:
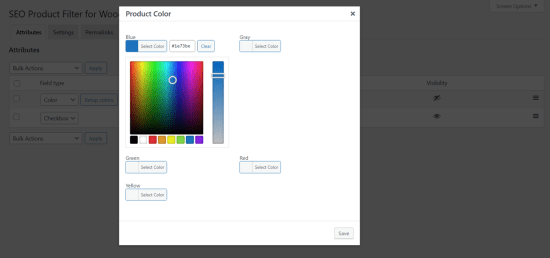
After the changes have been made, click ‘Save’.
Image
To assign images to the attribute terms, click ‘Setup images’ and select desired image from the Media Library or upload a new one:

After the changes have been made, click ‘Save’.
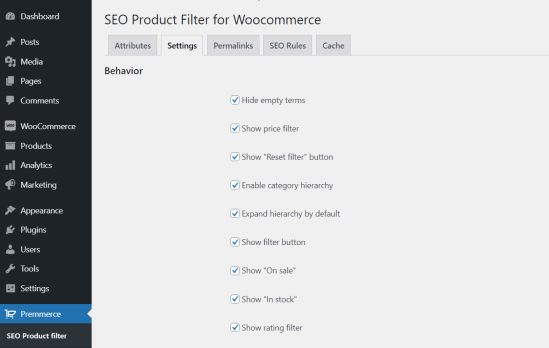
In this tab, you can customize the filter settings.
Within the
Behavior section, you can choose to display additional filters as displayed below:
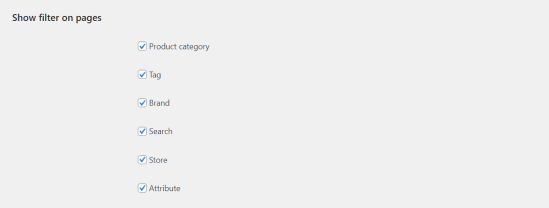
Within the
Show filter on pages section, you can select the filter widget to display on store pages:
Within the
Taxonomies section, you can add additional taxonomies to the filter:

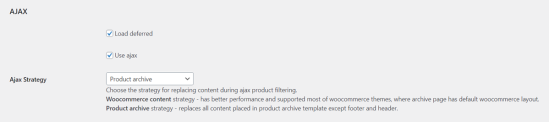
Within the
AJAX section, you can activate deferred widget loading, AJAX, and choose Ajax Strategy:
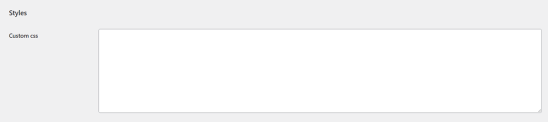
Within the
Styles section, you can add custom CSS code for filter widgets.
After making your selections, click
Save Changes.
How to use Shortcodes
[premmerce_filter] – for showing main Premmerce Filter (Product attributes filter)
[premmerce_active_filters] – for showing main Premmerce active filters (Product attributes active filters)
Please note: Shortcodes can be applied only on WooCommerce pages (shop, tags etc)
Filter shortcode example:
[premmerce_filter style=”custom” bg_color=”#fff” add_border=”on” border_color=”#000″ bold_title=”on”]
Filter shortcode example with all attributes:
[premmerce_filter style=”custom” bg_color=”#fff” add_border=”on” border_color=”#000″ bold_title=”on” title_appearance=”uppercase” price_input_bg=”#fff” price_input_text=”#000″ price_slider_range=”#000″ price_slider_handle=”#000″ checkbox_appearance=”0″ title_size=”14″ title_color=”#000″ terms_title_size=”14″ terms_title_color=”#000″ checkbox_color=”#000″ checkbox_border_color=”#000″]
Filter Shortcode Attributes:
| style=”custom” |
Filter style. Can be default, premmerce, custom.
All other attributes you can use after adding style="custom" attribute. |
| bg_color=”#fff” |
Filter Background color |
| add_border=”on” |
Filter Border |
| border_color=”#000″ |
Filter Border Color |
| bold_title=”on” |
Make filter title bold |
| title_appearance=”uppercase” |
Make title text uppercase or default |
| price_input_bg=”#fff” |
Filter Price Input Background |
| price_input_text=”#000″ |
Filter Price Input Color |
| price_slider_range=”#000″ |
Filter Price Slider Range Color |
| price_slider_handle=”#000″ |
Filter Price Slider Handle Color |
| checkbox_appearance=”0″ |
Choose Checkbox Appearance:
0 : BALLOT BOX, 2713 : BALLOT BOX WITH CHECK, 2715 : BALLOT BOX WITH X |
| title_size=”14″ |
Titles Font Size |
| title_color=”#000″ |
Titles Color |
| terms_title_size=”14″ |
Terms Titles Font Size |
| terms_title_color=”#000″ |
Terms Titles Color |
| checkbox_color=”#000″ |
Checkbox/Radio Color |
| checkbox_border_color=”#000″ |
Checkbox/Radio Border Color |
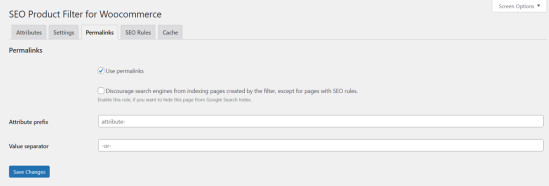
When the ‘Use permalinks’ option is enabled, instead of GET parameters, the Clean URL will be formed during the filtering process.
Before activation:
http://test.loc/shop/
?filter_secondary-connectivity-type=1fibre-channel-plus&query_type_secondary-connectivity-type=or
After activation:
http://test.loc/shop/
attribute-secondary-connectivity-type-1fibre-channel-plus/
Also, on this page, you can specify prefixes and a separator to form the Clean URL of filtering.
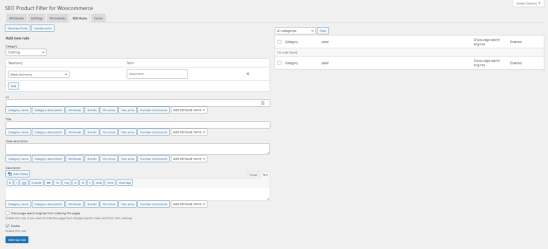
On this tab, you can setup rules to add metadata to separate landing pages with active filter values or generate rules for product categories.
Adding a New Rule
- Select the category.
- Select the taxonomy (attribute or brand).
- Select the taxonomy term.
- Fill in the necessary metadata (each field has buttons that add your store variable values: Category name, Category description, Attributes, Brands, Min price, Max price, Number of products).
- Click ‘Add new rule.’
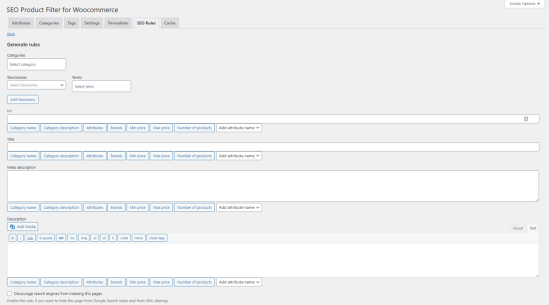
Rules Generation
“Click Generate Rules” within the ‘SEO Rules’ tab.
Follow the steps below:
- Select the categories for which you need to generate the rules.
- Select the taxonomies.
- Fill in the necessary metadata (each field has buttons that add your store variable values: Category name, Category description, Attributes, Brands, Min price, Max price, Number of products).
- Click ‘Generate.”
- The rules will then be generated.
Please note:
If you select taxonomies in the same field, the rules for the categories will be generated according to the principle: ‘category’ – ‘term of one attribute’.
If you need a combination of several attribute terms, add the additional taxonomy field and select the needed attribute. In this case, the rules will be generated by the rule: ‘category’ – ‘term of one attribute’ – ‘term of the second attribute.’ All possible combinations of taxonomy terms will be generated.
If you’ve installed and activated the Yoast SEO plugin, and the XML Sitemap has been activated, then all the added and generated rules (only those listed in the SEO Rules tab) will be automatically added to the XML Sitemap:
