Overview
↑ Back to topSelf-service Dashboard for WooCommerce Subscriptions is a simple self-service interface on top of WooCommerce Subscriptions that allows your customers to manage their subscriptions, so in return, you’ll get fewer Support Tickets.
With Self-service Dashboard for WooCommerce Subscriptions, customers can:
- Change the next payment date
- Change the subscription frequency
- Pause their subscriptions until a specific date
- Change shipping method
- Add new products to their existing subscriptions
- Add new products to their subscriptions for the next shipping only
- Remove products from the subscription
- Switch from one variation to another
- Change product quantities
- Update shipping method
Self-service Dashboard for WooCommerce Subscriptions requires:
- WooCommerce Subscriptions 4.0.0+.
- WooCommerce 5.9+.
Installation
↑ Back to topAs with any WordPress plugin, Self-service Dashboard for WooCommerce Subscriptions can be installed on the website in 2 ways:
- Installing Self-service Dashboard for WooCommerce Subscriptions directly from your website:
- Go to: WordPress Admin > Plugins > Add New and Upload Plugin with the file you downloaded with Choose File.
- Click Install Now and Activate the extension.
- Installing Self-service Dashboard for WooCommerce Subscriptions using FTP
- Extract the WordPress plugin ZIP file to a folder on your computer.
- Upload the plugin folder to your FTP server. The folder should be copied to the following WordPress folder wp-content –> plugins. If you are upgrading an existing plugin, please make sure to overwrite the existing plugin folder.
- Activate the plugin by logging into your WordPress backend. Go to Plugins –> Installed Plugins, find the plugin from the list and click ‘Activate’.
More information at Install and Activate Plugins/Extensions.
Setup and Configuration
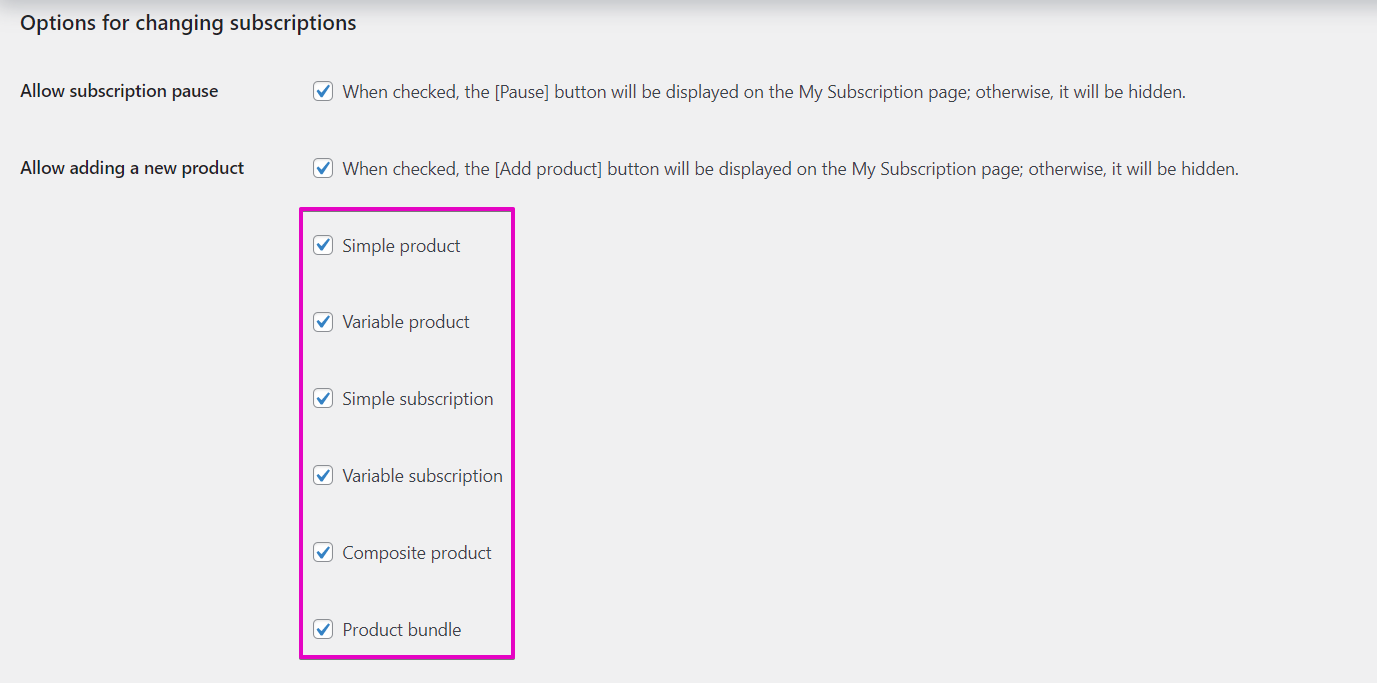
↑ Back to topPlugin functionalities can be enabled or disabled from the back-end by the administrator. To do this, go to WooCommerce – Settings – Self-Service Dash tab and here you can enable/disable the following options:
- Allow next payment date change
- Allow subscription pause
- Allow shipping method change
- Allow adding a new product
- Allow item removal
- Allow shipping method change
- Allow Quantity change
- Allow Item Switching
- Define subscription frequencies for the change subscription frequency option
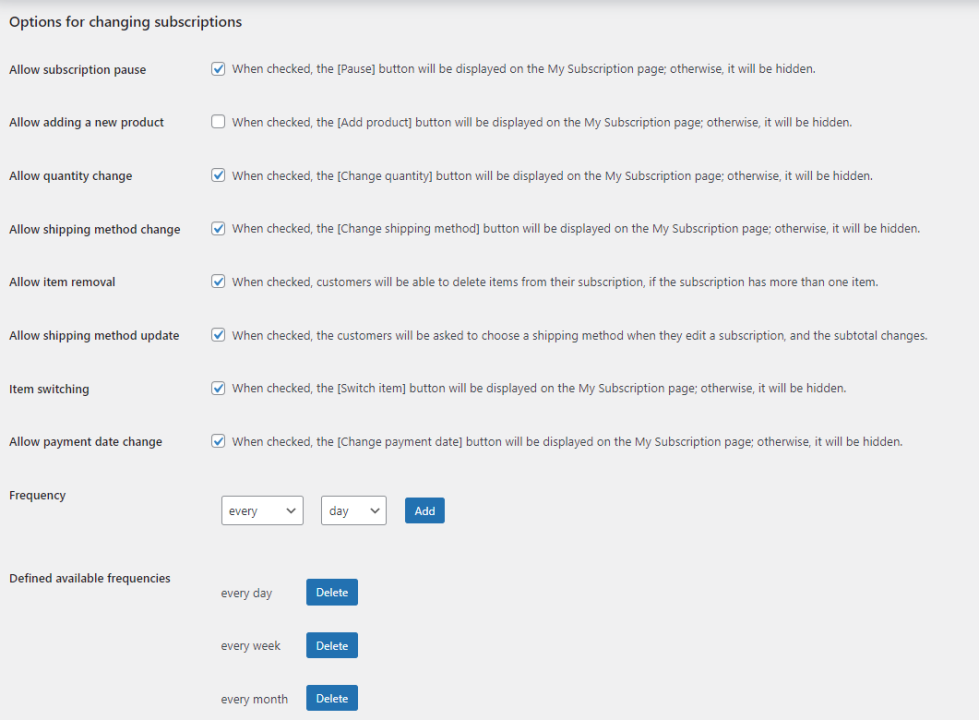
Once you’ve selected the options you want to use on your website click Save changes
Plugin features
↑ Back to topChange the next payment date
↑ Back to topIn order to change the next payment date for a subscription, the user will need to:
- Go to My account – Subscriptions – view subscription
- Click on the [Change payment date] button.
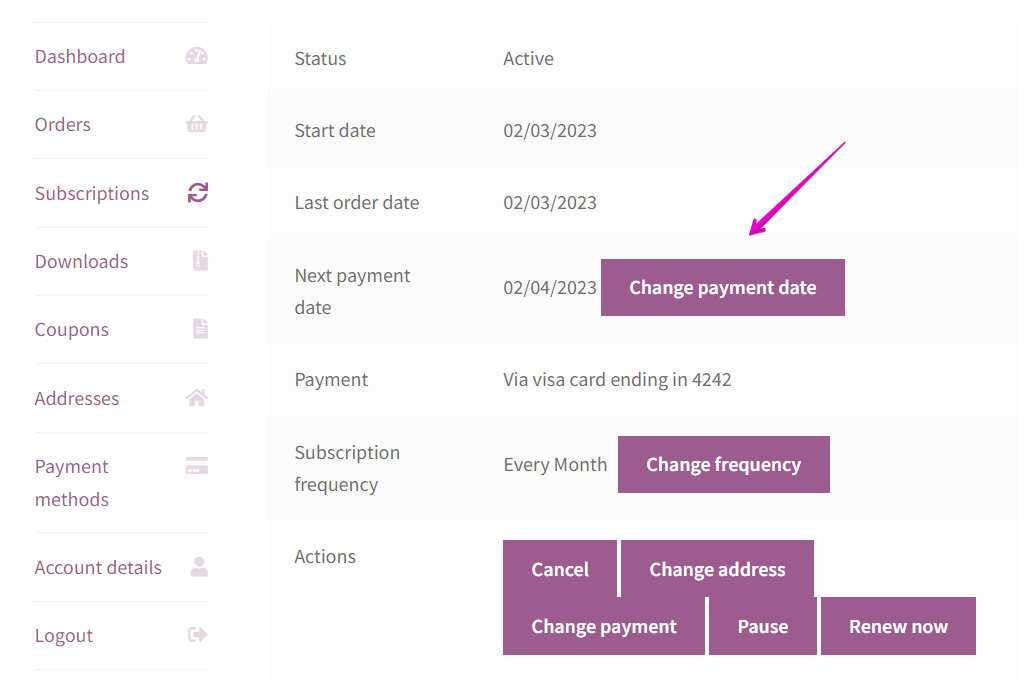
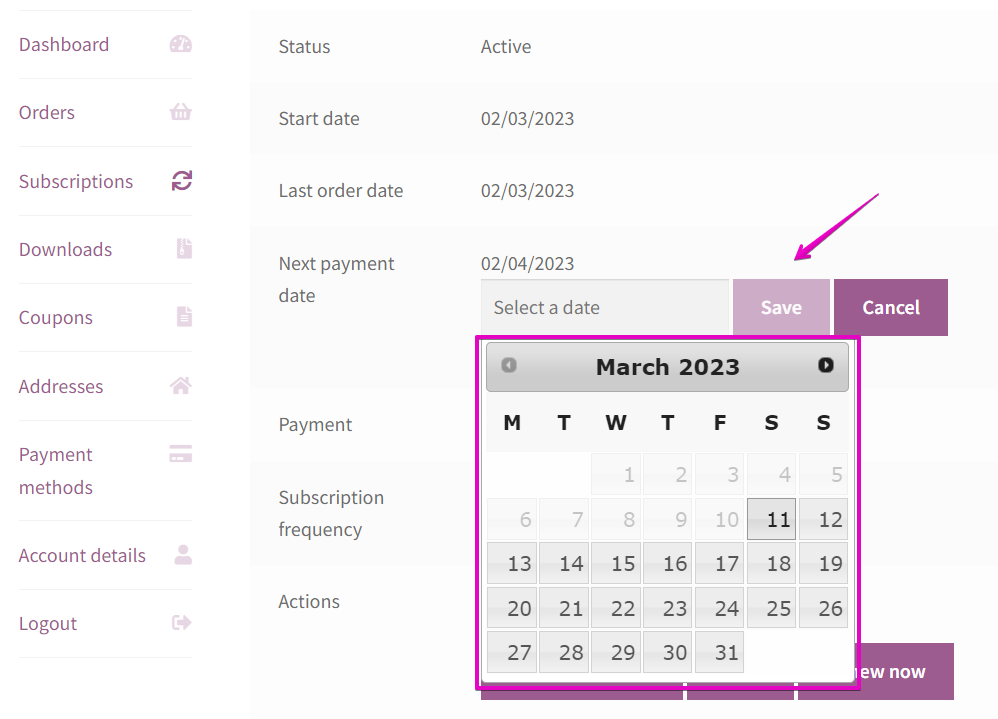
- Choose a date you want for the new payment date. The date picker will only allow the user to select a date within the next 30 days of the current date.
- Click [Save] to change the new payment date for the subscription.
- If you press [Cancel], the window will close without saving.
After the new payment date has been saved, the subscription will be renewed on the selected date.
After the subscription has been changed the customer will receive an email notification and a subscription note will be added to the back-end to record the change.
Change subscription frequency
↑ Back to topIn order for customers to change the frequency of their subscription, the permitted subscription frequencies must be defined in the back end. To define a subscription frequency the admin must go through the following steps:
- Go to WooCommerce – Settings – Subscription Force
- Under ‘Available frequencies for customers’ new frequencies can be defined by selecting the frequency and clicking on the [Add] button. The list of added frequencies will be displayed below.
- Click the [Save] button to save the new frequency list.

After a frequency list has been defined, the customer can change a subscription frequency to any defined frequency from the defined list by:
- Going to My account – Subscriptions – view subscription
- Click on the [Change frequency] button. A dropdown list with the defined frequencies will be displayed.
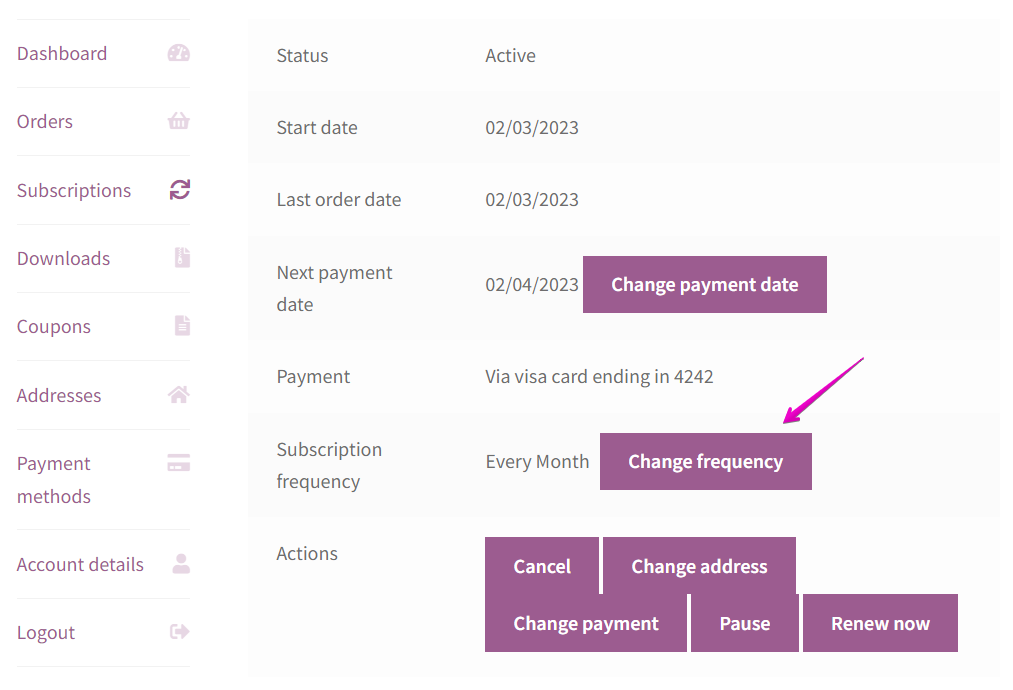
- Click [Save] to change the new subscription frequency.
- If you press [Cancel], the window will close without saving.

The new subscription frequency will take effect after the subscription’s next payment date.
After the subscription has been changed the customer will receive an email notification and a subscription note will be added to the back-end to record the change.
Limitations
The order in which the available frequencies are displayed in the front-end dropdown field is the same order they are saved in the back-end. If you wish to change the order of available frequencies, the saved frequencies must be deleted and added in the correct order.
Pause a subscription until a specific date
↑ Back to topIn order to pause a subscription, the user will need to:
- Go to My account – Subscriptions – view subscription.
- Press the [Pause] button.
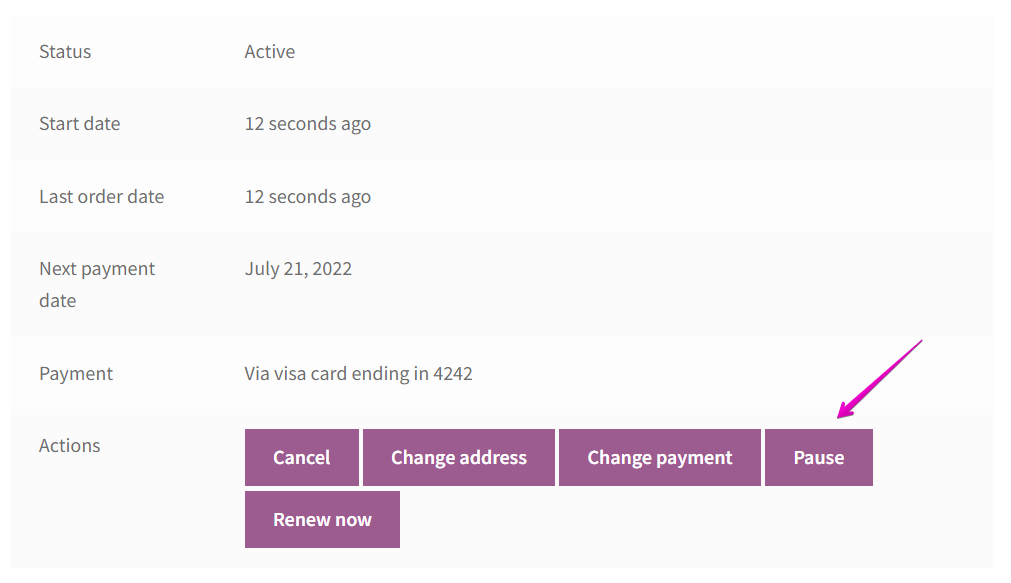
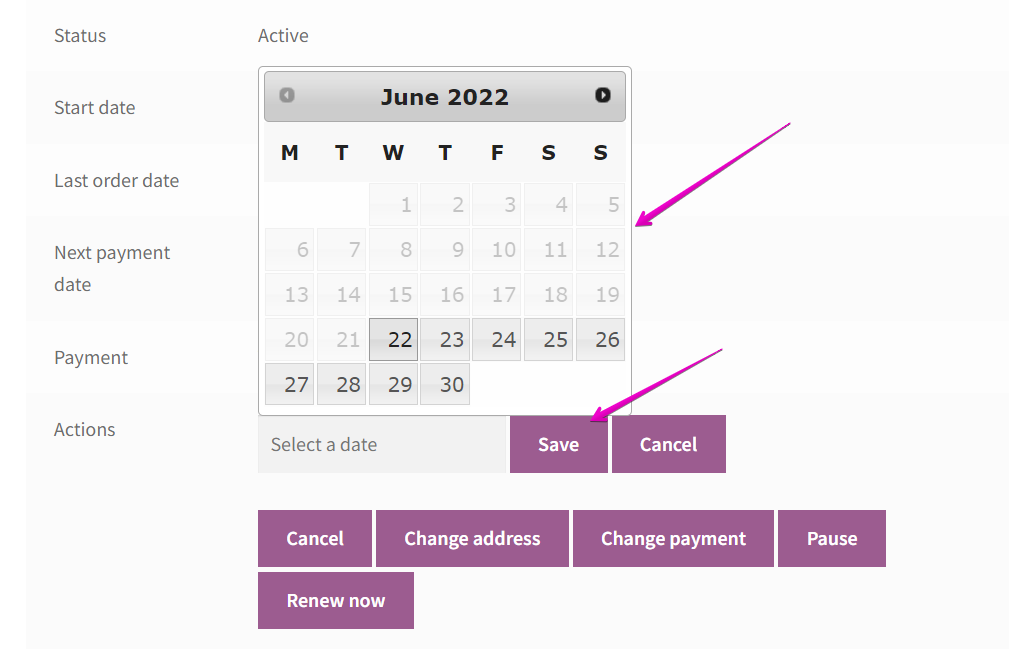
- Choose a date until you want the subscription to be paused from the date picker window.
- After the [Save] button is pressed, the subscription status will be changed to On-hold.
- If you press [Cancel], the window will close without pausing the subscription.
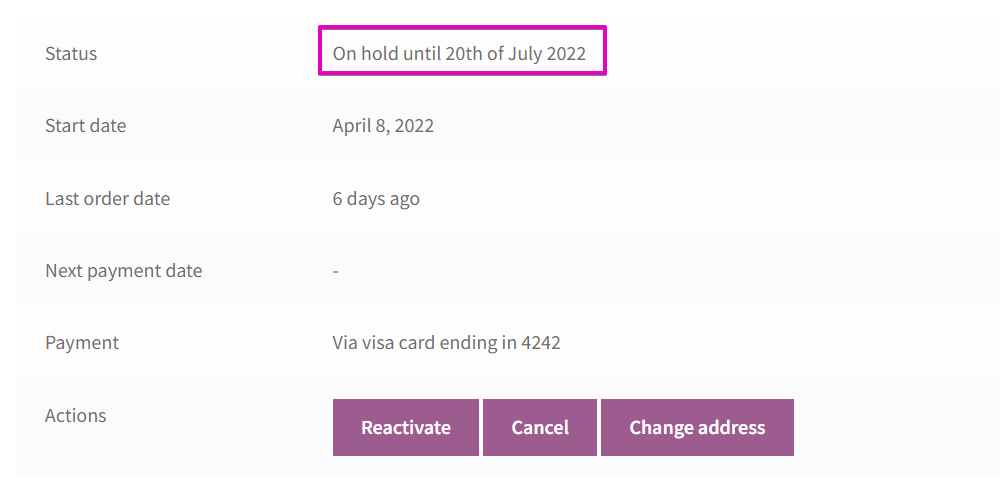
After the subscription has been changed a notice will be displayed. The customer will also receive an email notification and a subscription note will be added to the back-end to record the change.
While the subscription is on hold until a specific date, that date can be seen in the Status field. On the specific date set for renewal, the subscription will automatically change its status to Active. Customers may choose to reactivate the subscription before the selected date by clicking on the [Reactivate] button.
Important note: Pausing a subscription does not change the payment schedule. When a subscription is reactivated, the payment schedule will continue as it did before the subscription was paused. For example, if a subscription is renewed every month on the 15th, it will continue to renew every month on the 15th after it is paused and reactivated, regardless of the amount of time the subscription has been suspended.
Change the shipping method
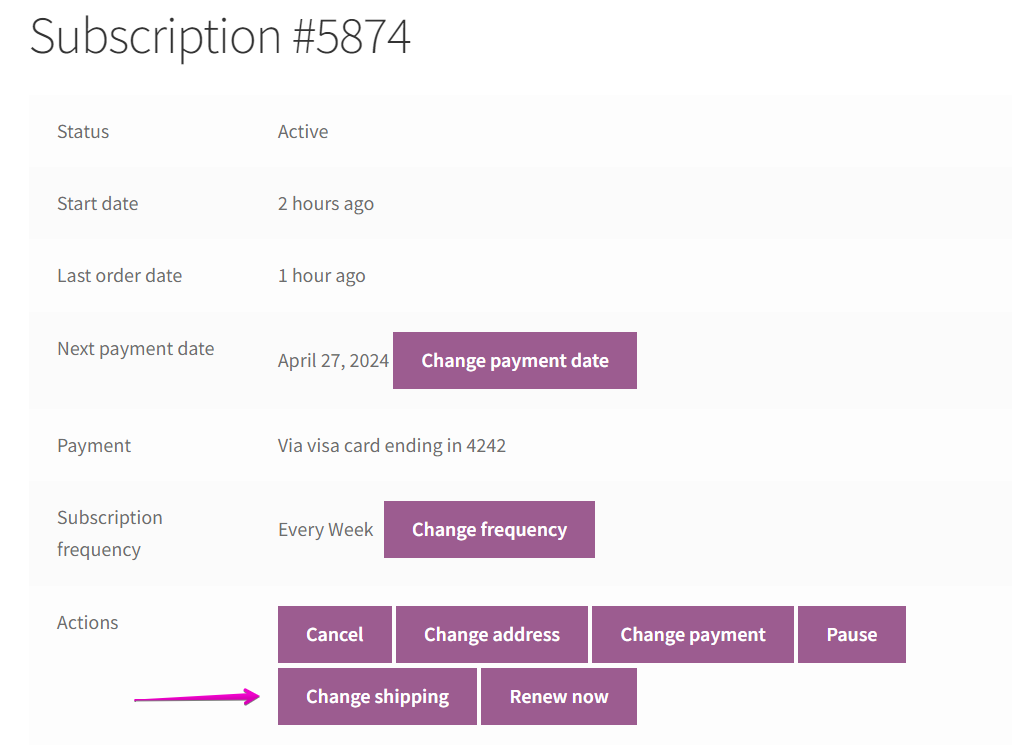
↑ Back to topIn order to change the shipping method for the subscription, users need to:
- Go to My account – Subscriptions – view subscription
- Press the [Change shipping] button, in the Actions row from the subscription details table.
- Select the desired shipping method and press [Save]. The shipping methods loaded in the modal depend on the content of the user’s subscription and the delivery address.
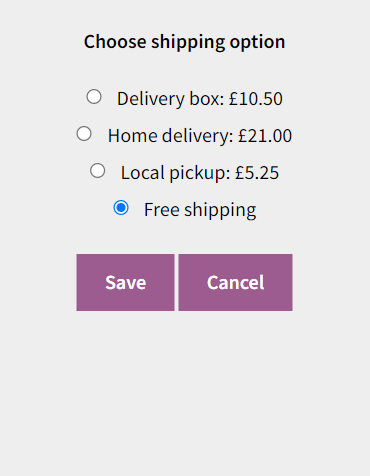
- If users press [Cancel], the Change shipping window will close without saving.
Note: Shipping methods are displayed in the order they are set in the WooCommerce shipping settings.
Change the product quantity
↑ Back to topIn order to change the quantity of a product, users need to:
- Go to My account – Subscriptions – view subscription
- Press the [Change quantity] button, under the product title.
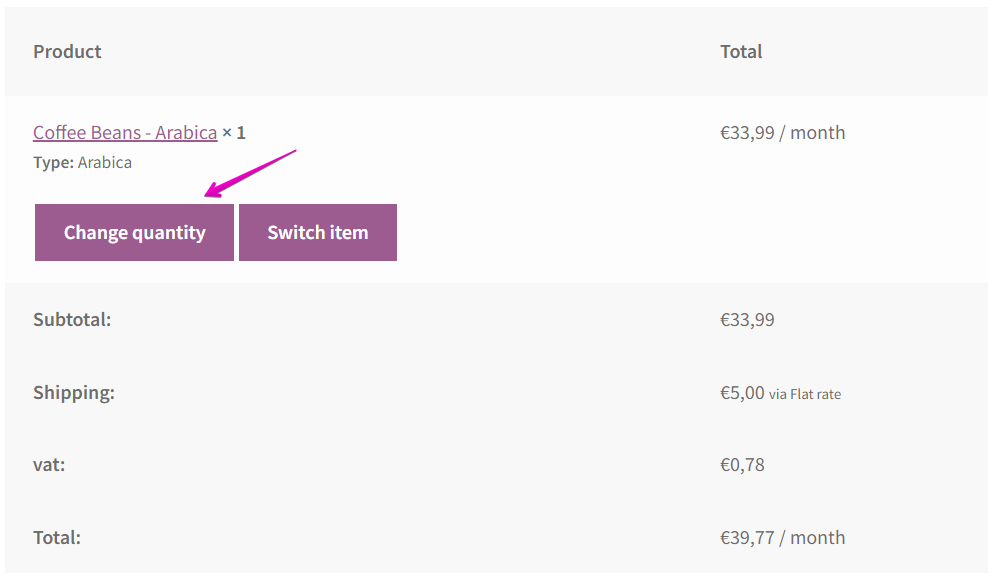
- Enter/select a new quantity and press [Save].
- The new value will be saved and the Subscription total adjusted.
- If users press [Cancel], the change quantity window will close without saving.

After the subscription has been changed a notice will be displayed. The customer will also receive an email notification and a subscription note will be added to the back-end to record the change.
Note: The quantity cannot be changed to 0. If you enter 0 in the numeric field and click Save the value will not be saved.
Limitations
New subscription plans generated with Self-service Dashboard for WooCommerce Subscriptions do not support Sign-Up Fees and the [Change quantity] button will not be displayed for products that have a sign-up fee.
If the “Sold individually” option in the Inventory tab is checked the Admin can limit the quantity for a certain product on a subscription to 1. With this setting, the [Change quantity] button will not be displayed for that product.
Item removal
↑ Back to topCustomers can also remove products from a subscription by clicking on the ‘x’ symbol placed on the right side of the product.
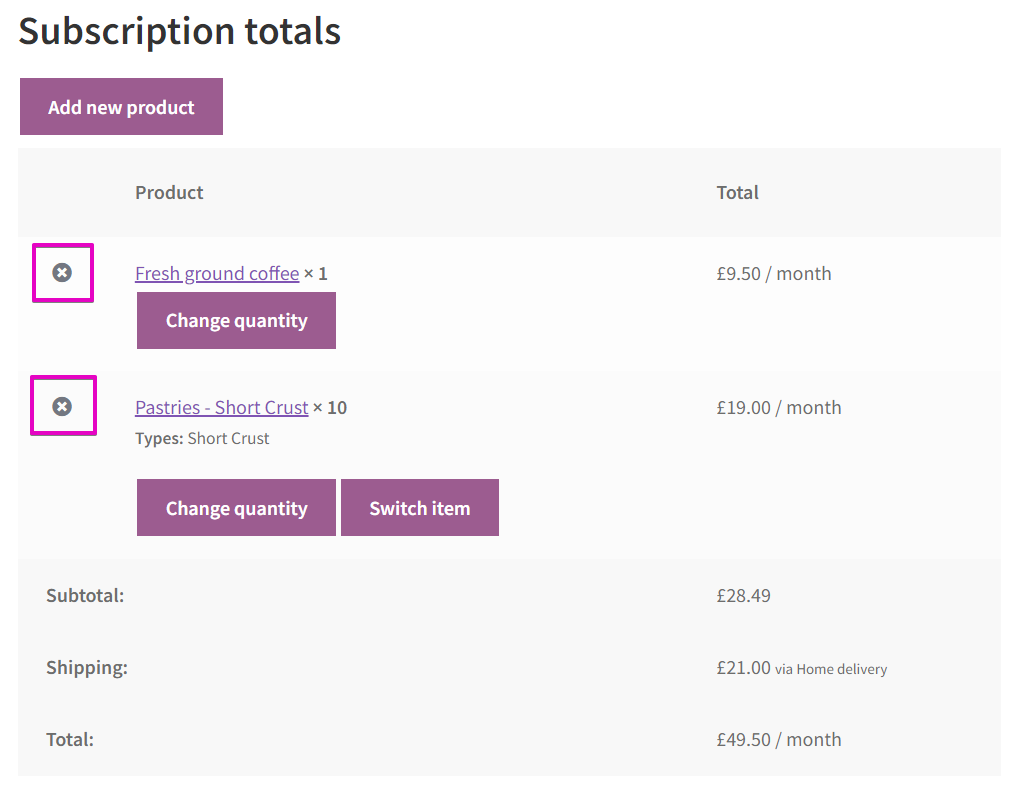
Note: Products can be removed from a subscription only if the subscription contains a minimum of 2 products.
Switch between product variations
↑ Back to topIf users have purchased a variable subscription product, they will be able to switch between the product variations. To do so, the user will have to:
- Go to My account – Subscriptions – view subscription
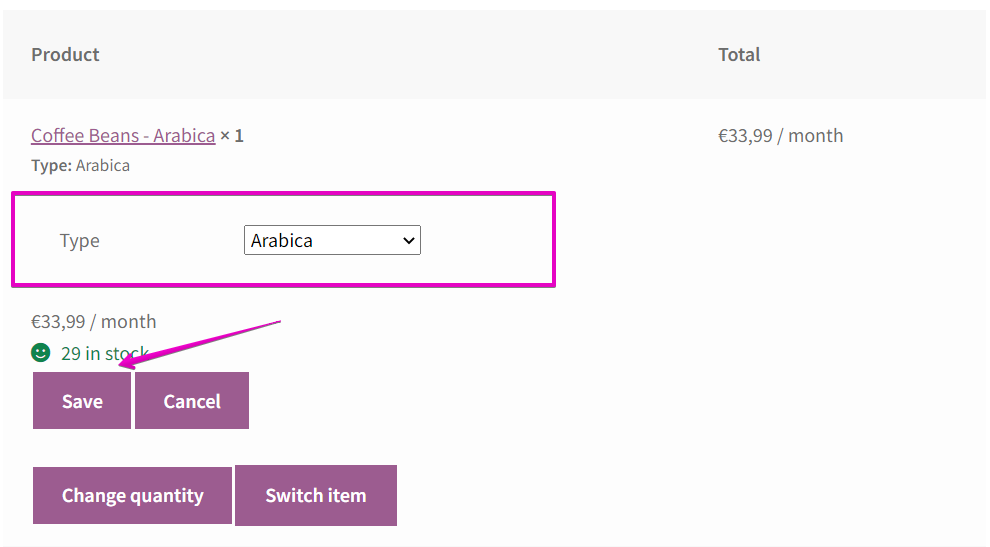
- Press the [Switch item] button, under the product title.

- A form will appear below the current table row, where the user can change variations using the drop-down menus.
- After the [Save] button is pressed, the current product variation is replaced with the one chosen by the user.
- If users press [Cancel], the switch item window will close without saving.
Note: If users choose a variation for a product with a different subscription frequency, the Subscription frequency will NOT be changed.
After the subscription has been changed a notice will be displayed. The customer will also receive an email notification and a subscription note will be added to the back-end to record the change.
Limitations
New subscription plans generated with Self-service Dashboard for WooCommerce Subscriptions do not support Sign-Up Fees and the [Switch item] button will not be displayed for products that have a sign-up fee.
The subscription frequency will not be changed if customers switch to another variation with a different frequency.
Add a new product to an active subscription
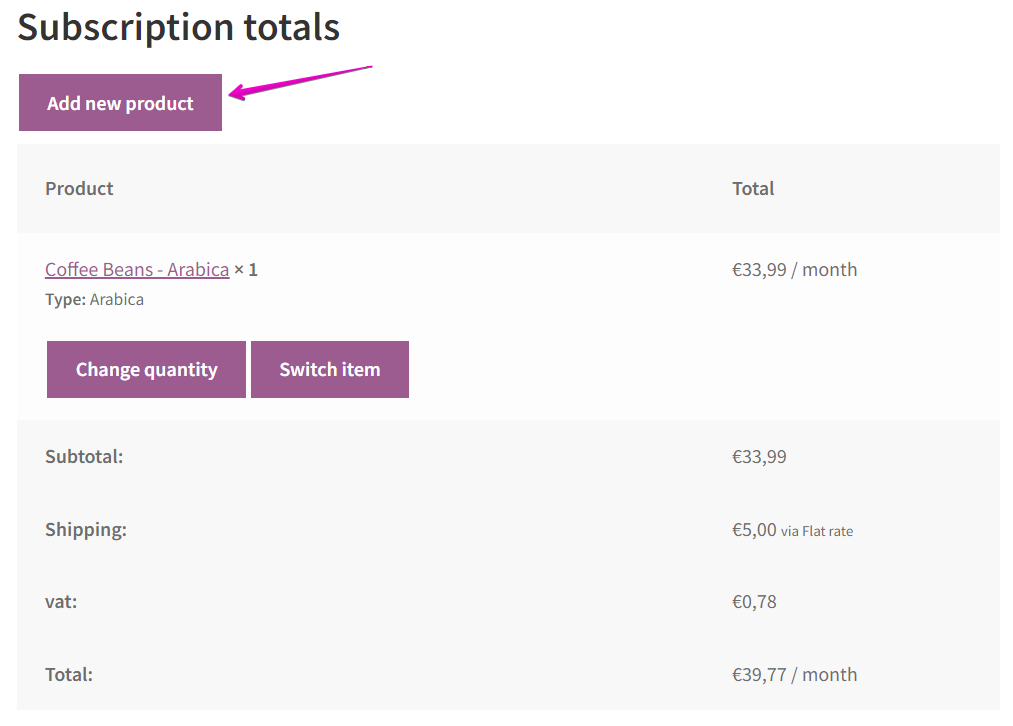
↑ Back to topIn order to add a new product to a subscription, the user will need to:
- Go to My account – Subscriptions – view subscription
- Press the [Add new product] button. A list of subscription products will appear in a modal from which the user can choose a product. The list will contain the product types that have been enabled in the back-end settings for this functionality. The products that are already on the subscription will be excluded. The list will be loaded with the first 30 (ordered alphabetically) but customers can use the search bar to find any simple/variable subscription product. Products and product variations that are already present on the subscription will not be displayed in this list.
- Press the [Add to subscription] button to add the product to the current Subscription. In the case of a Variable subscription product, a variation must first be selected before the product can be added to the subscription.
- Press the [Add to next shipment] button to add the product to the current Subscription for the next shipment only. In the case of a Variable subscription product, a variation must first be selected before the product can be added to the subscription. Products that are added for the next shipment only will be removed from the subscription after the renewal order is complete.
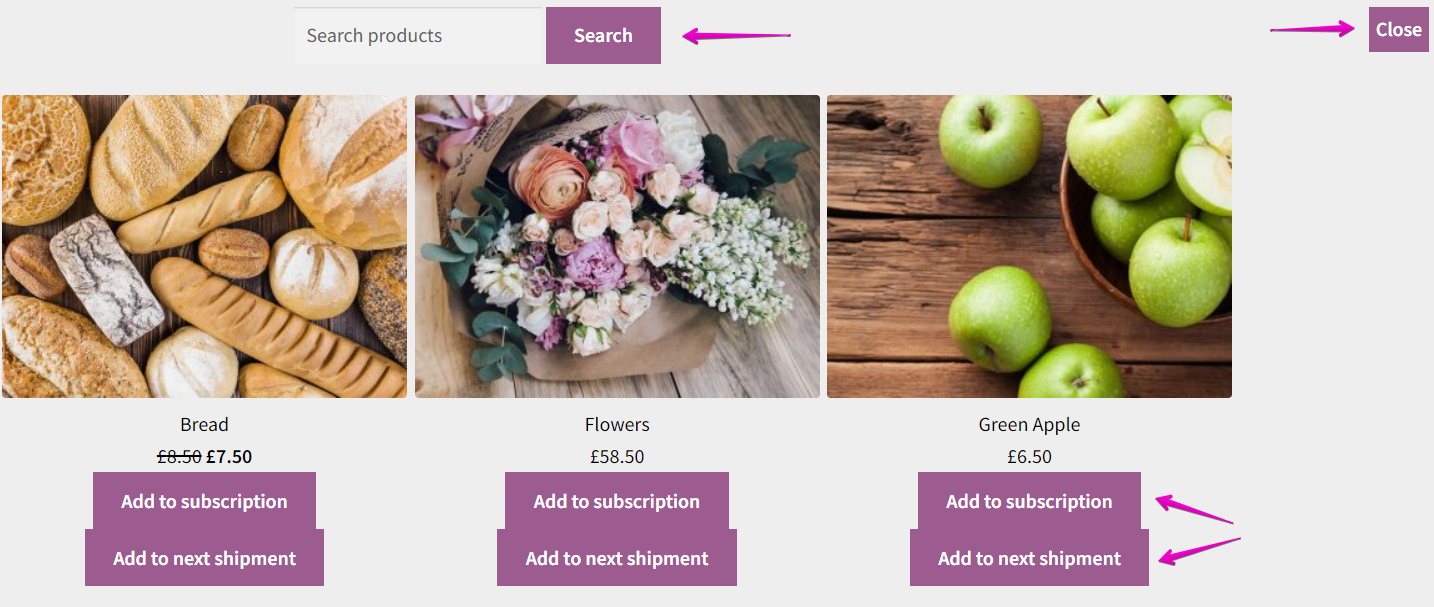
- If you press [Close], the Add new product modal will close.
After the subscription has been changed a notice will be displayed. The customer will also receive an email notification and a subscription note will be added to the back-end to record the change.
By default, only simple and variable subscriptions are displayed. If you wish to add more product types to this functionality, please read the Filter “Add new product” query arguments section in Hooks article.
Limitations
Although only simple/variable subscriptions will be loaded in the ‘Add new product’ window, other products might be excluded from this feature if:
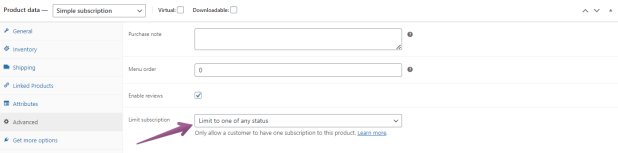
- The “Limit to one active subscription” option is selected in the back-end Advanced tab and the product is present on an active subscription.

- The “Limit to one of any status” option is selected in the back-end Advanced tab and the product is present on a subscription with any status. The customer cannot purchase that subscription product again unless the existing subscription is trashed or permanently deleted by a store manager.
- The “Sold individually” option is checked in the back-end Inventory tab and the product is already on the subscription that’s being viewed by the customer.

- The catalogue visibility option is set to “Hidden”.
- The product is out of stock
Update the shipping method
↑ Back to topIf this feature is enabled, the users will be prompted to confirm their shipping method when they make changes to their subscription which can affect the subscription value. The shipping methods loaded in the modal depend on the content of the user’s subscription and the delivery address. The actions that prompt the shipping method update window are:
- Change subscription frequency
- Change quantity
- Switch item
- Add new product
Note: If the user does not confirm the shipping method, the shipping method set before the change will be saved if it is present among the shipping methods loaded in the window. If the shipping method set before the change is not present among the shipping methods loaded in the window, the first shipping method in the list will be saved.
Note: Shipping methods are displayed in the order they are set in the WooCommerce shipping settings.
Compatibility
↑ Back to topSelf-service Dashboard for WooCommerce Subscriptions is compatible with WordPress Multisite and the following add-ons:
Developer Hooks & Shortcodes
↑ Back to topYou can find all Self-service Dashboard for WooCommerce Subscription hooks and shortcodes here:
Limitations
↑ Back to topSign-Up Fees
↑ Back to topNew subscription plans generated with Self-service Dashboard for WooCommerce Subscriptions do not support Sign-Up Fees and the [Change quantity] and [Switch item] buttons will not be displayed for products that have a sign-up fee. Please let us know if this is something you need and we’ll look into it.
Adding prorated products/carts to subscriptions
↑ Back to topIt will not be possible to add a prorated and synchronized product/cart to an existing subscription. Please let us know if this is something you need and we’ll look into it.
Changing the subscription for the current billing period
↑ Back to topAny changes to a subscription will not affect the current billing period. This means that changes are not prorated and do not go through the checkout process. All changes to a subscription will take effect with the next renewal order for that subscription (the next payment date set on the subscription).
Feedback and Suggestions
↑ Back to topIf you’d like to add a feature in Self-service Dashboard for WooCommerce Subscriptions that you think would be useful, we’d love to hear it!
Please send your suggestion to our support team and we’ll consider adding it in a future. Also you can add your idea to the Ideas board, or view and up-vote existing feature requests.
Questions & Support
Purchased Self-service Dashboard for WooCommerce Subscriptions and need assistance? If you’ve found an issue:
- Ensure you have the latest versions of WordPress, WooCommerce and WooCommerce Subscriptions.
- Go to WooCommerce > System Status to check for plugin updates and other important information that may require your attention.
- Rule out a plugin conflict: Turn off all plugins except WooCommerce, WooCommerce Subscriptions and Self-service Dashboard for WooCommerce Subscriptions. If the issue is resolved, find the plugin that triggers the issue by re-activating plugins one by one.
- Rule out a theme conflict. Activate Storefront, or a default WordPress theme such as Twenty Fourteen and check if the issue still occurs. If it doesn’t, please contact your theme author(s).
- Use the WooCommerce Self Service Guide.
If you followed these steps but the issue persists, get in touch with us via the Help Desk!