Our Opayo Payment Suite plugin is three payment gateways in one, allowing you to use one or more to take payments with WooCommerce via Opayo.
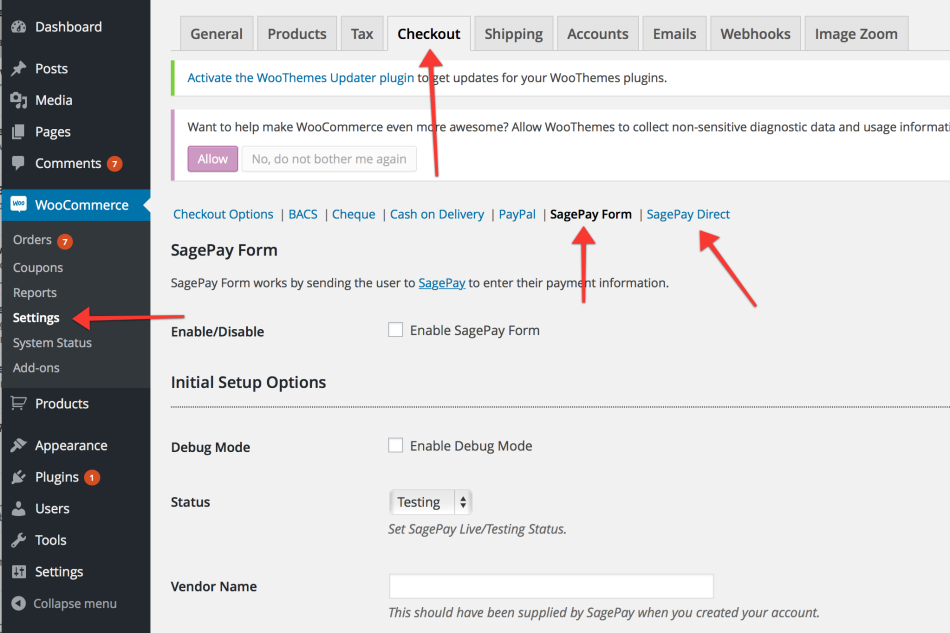
You need to sign up for a Opayo UK account to use this plugin: www.opayo.co.ukOption 1: Opayo Form
Customer is redirected to Opayo to complete payment – simplifies PCI Compliance
SSL Certificate recommended but not required
Supports refunds and voids in WooCommerce admin (requires Opayo Reporting to be setup)
Option 2: Opayo Direct
Customer stays onsite for entire transaction
SSL Certificate required
Supports WooCommerce Pre-Orders
Supports recurring payments for WooCommerce Subscriptions
Supports refunds in WooCommerce admin
Supports Tokens with WooCommerce 2.6 and higher
Capture Authorised transactions from within WooCommerce
Option 3: Opayo Pi
Customer stays onsite for entire transaction
SSL Certificate required
Supports refunds in WooCommerce admin
Opayo Fraud Scoring information available in WooCommerce (see here for more information on Opayo Reporting)
↑ Back to top
For a new installation please review our extension installation guide
If you need to update the extension you can do this from your WordPress admin if you have connected the site to WooCommerce.com, you can read more about that here
You can also update manually by downloading the latest version from your WooCommerce account
Once you have the zip file downloaded you should deactivate and delete the existing version from your WordPress plugins page and then install the new version using the upload option. You will not lose any settings or data by updating this way.
↑ Back to top
Place several test transactions to confirm that everything is working correctly. Once you have completed testing, contact Opayo about making your account live. Opayo will notify you when ready, and then you can set the status to Live.
Opayo has a list of test cards you can use to carry out test transactions at: Test Card Details for Test Transactions.
↑ Back to top
This is because you are using the wrong password in the Encryption Password field. Opayo sends you at least two passwords, one for your account and one encryption password. You need to use the second one.
↑ Back to top
Normally this is a password issue, make sure you have the encryption passwords set correctly – the live and testing passwords should be different. If it’s not a password issue then check the PHP error logs.
↑ Back to top
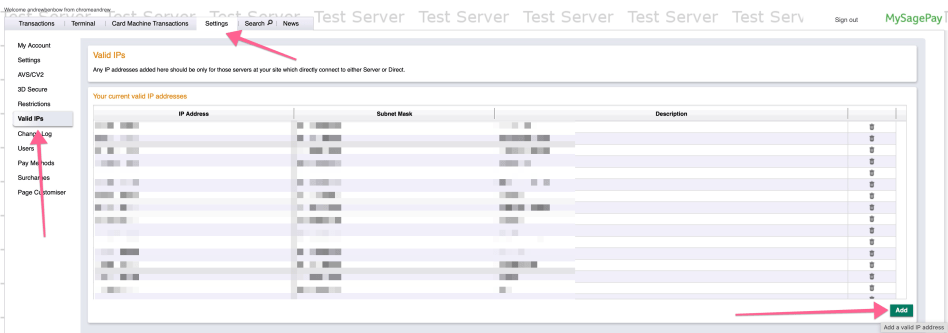
You must add the IP address of your hosting to MySagePay.
If you don’t know the IP address, you can obtain it from WooCommerce -> Status -> Tools -> “Get IP Address for MySagePay settings”
Get IP Address for MySagePay
↑ Back to top
The surcharge settings have been removed from the Opayo Form settings. To bring them back you will need add the following function in your custom functions :
This file contains bidirectional Unicode text that may be interpreted or compiled differently than what appears below. To review, open the file in an editor that reveals hidden Unicode characters.
Learn more about bidirectional Unicode characters
There are two filters available to allow for conditional application of the surcharges and conditional modification of the surcharges.
To set when the surcharges should be applied use :
↑ Back to top
With Version 3.2.1 the Opayo Direct checkout form was changed to include a drop down for card type. Opayo requires that the card type is included in the transaction information. Previously this was done by checking the first 6 digits of the card number using a 3rd party service BIN List (https://en.wikipedia.org/wiki/Bank_card_number) Unfortunately this service has proved to be occasionally unreliable and so has been replaced by the drop down.
↑ Back to top
As of version 3.3.0 tokens are supported with Opayo Direct. Your site will need to be running WooCommerce 2.6.0 or higher.
Tokens must be enabled on your Opayo account before your site will be able to use them.
The card details are not stored on your site, only the token from Opayo, the last four digits of the card number and the expiry date. You will not be able to store the CV2 number so this is not used during transactions that use a token, it will be checked when the token is created.
3D Secure will only be checked when the token is created, not for subsequent transactions using the token.
Tokens can also be used for Subscription payments making it easier for your customers to change their card details on your site.
↑ Back to top
Opayo provide some fraud screening during the payment process. If they flag a transaction then the order status will be changed during the checkout process to alert you. You will need to login to MySagePay to confirm that you are prepared to ship the order or that you need to cancel it. Once you have reviewed the reasons for the fraud notification you can go back to WooCommerce and update the order as necessary.
You can read about the way transactions are scored by Opayo here
↑ Back to top
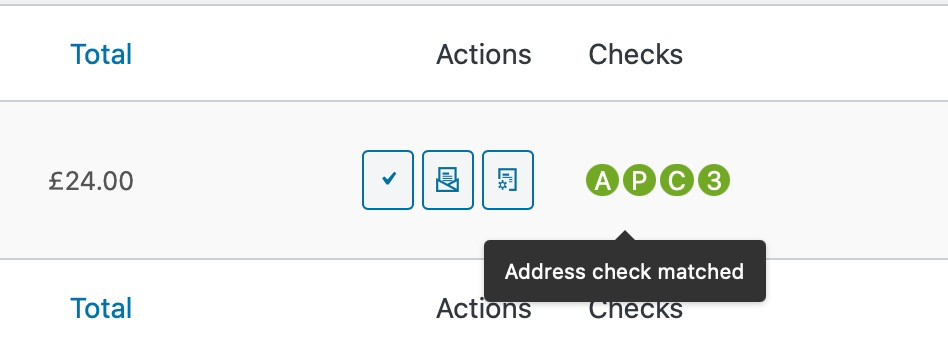
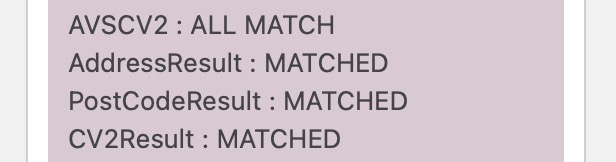
This section displays the status of checks done by Sage, previously this information was only included in the order notes. You will see
which will allow you to quickly check that the address, postcode, CV2 and 3D Secure information where all provided correctly. Green indicates correct, yellow indicates not checked and red indicates the information provided by the customer was incorrect. It is up to you to decide how to proceed if the icons are not green. Please note, renewal orders for subscription payments may not be all green as the checks are not re-done.
Note: This information may not be available or may be incomplete for orders placed before version 3.4.0 was installed. It has always been included in the transaction information in the order notes.
↑ Back to top
To place test orders using 3D Secure 2.0 you will need to be in “testing”
Then you can choose the “Magic Value” in the drop down
Each value in the drop down will give a different result for a test transaction.
Magic Value
3DSecureStatus
Description
SUCCESSFUL
OK
This is returned for a frictionless flow where authentication is successful
NOTAUTH
NOTAUTHED
This is returned for a frictionless flow where authentication is NOT successful
CHALLENGE
Status=3DAUTH
3DSecureStatus=OK
This is returned for a challenge flow, where the cardholder will be re-directed to the ACS to enter two-factor authentication. A CReq, VPSTxId, ACSURL and StatusDetail will also be returned.
Once you re-direct to the ACSURL, entering the correct password displayed on the site will simulate a successful authentication, entering any other password will simulate an un-successful authentication.
PROOFATTEMPT
ATTEMPTONLY
The cardholder attempted to authenticate themselves, but the process did not complete. A CAVV is returned and this is treated as being successfully authenticated.
NOTENROLLED
NOAUTH
This means the card is not enrolled in the 3D-Secure scheme.
TECHNICALDIFFICULTIES
INCOMPLETE
3D-Secure authentication was unable to complete. No authentication occurred.
STATUS201DS
Fallback to 3DSv1
Simulates fallback to 3DSv1. You will receive a PAReq, MD, ACSURL and StatusDetail
ERROR
ERROR
Simulates an error condition where 3D-Authentication cannot be performed due to data errors or service unavailability in one of the parties involved in the check
↑ Back to top
You will always receive an OK response and an Authorisation Code from the test server if you are using one of the test cards listed below. All other valid card numbers will be declined, allowing you to test your failure pages.
If you do not use the Address, Postcode and Security Code listed below, the transaction will still authorise, but you will receive NOTMATCHED messages in the AVS/CV2 checks, allowing you to test your rulebases and fraud specific code.
There are different cards for Visa and MasterCard to simulate the possible 3D-Secure responses.
Billing Address 1: 88 The Street
Billing Post Code: ST41 2PQ
Security Code: 123
Valid From: Any date in the past
Expiry Date: Any date in the future
 Now your customers will see the PayPal option in the card type dropdown
 IMPORTANT : PayPal will not show if there is a subscription product in the cart.
 If you don’t know the IP address, you can obtain it from WooCommerce -> Status -> Tools -> “Get IP Address for MySagePay settings”

 which will allow you to quickly check that the address, postcode, CV2 and 3D Secure information where all provided correctly. Green indicates correct, yellow indicates not checked and red indicates the information provided by the customer was incorrect. It is up to you to decide how to proceed if the icons are not green. Please note, renewal orders for subscription payments may not be all green as the checks are not re-done.
Note: This information may not be available or may be incomplete for orders placed before version 3.4.0 was installed. It has always been included in the transaction information in the order notes.
which will allow you to quickly check that the address, postcode, CV2 and 3D Secure information where all provided correctly. Green indicates correct, yellow indicates not checked and red indicates the information provided by the customer was incorrect. It is up to you to decide how to proceed if the icons are not green. Please note, renewal orders for subscription payments may not be all green as the checks are not re-done.
Note: This information may not be available or may be incomplete for orders placed before version 3.4.0 was installed. It has always been included in the transaction information in the order notes.

 Then you can choose the “Magic Value” in the drop down
 Each value in the drop down will give a different result for a test transaction.