Note: This product is no longer sold on WooCommerce.com. This document was left available to you for help with configuration and troubleshooting, but is no longer updated.
The Rich Snippets plugin for WooCommerce adds structured data to your store, which Google can use to display rich snippets in search results.
Installation
↑ Back to top- Download “Rich Snippets & Schema Markup plugin for WooCommerce” and have your .zip file.
- At the WordPress admin panel, go to the Plugins section, and click ‘Add New’ to upload and install the plugin you just downloaded from WooCommerce.
- Upload the .zip file to proceed with the installation.
- Wait until the plugin installs. After successful installation, activate the plugin, and move on to configuration settings.
Configurations
↑ Back to topTo configure the extension, go to WooCommerce > Settings within the WordPress admin panel. Here, you will find the Rich Snippets tab. There you will find 9 types of schemas that you can configure.
General Settings
↑ Back to topIn general settings, you will find all the settings for WooCommerce snippets. You can configure multiple schemas such as organizational schema, breadcrumb list, product schema, book schema, recipe schema, and many more.

Product Settings
↑ Back to topWhen you enable specific schemas such as product schema, book, or recipe schema you can configure them at the product level. The priority of the product-level settings is higher than general settings.
How to Add Organizational Schema?
↑ Back to topTo add organizational schema, go to WooCommerce settings. There you will find the rich snippets tabs. Click on the organizational schema and configure the following settings.
- Enable Schema: Checkbox to enable product schema.
- Business name: Add business or company name.
- Logo: Add the logo of your business to display in Google search results
- Description: Write a short description of your business
- Business URL: Include the URL of your business website
- Opening hours: Add opening and closing hours of your business
- Price Range: Include price range if you are a service provider.
- Google Map: Select the checkbox to enable Google Map and enter the URL of the business location.
- Include business members: Checkbox to include the members of your business. You can include the name, contact information, and address of the member. Furthermore, it allows you to add multiple business members.

How to enable the Breadcrumb list?
↑ Back to topIn the rich snippets WooCommerce general setting you will find the breadcrumb tab. Click on the tab and enable the checkbox. It will automatically create the breadcrumb list.

How to enable Product Schema?
↑ Back to topYou can enable the WooCommerce product schema from the general settings. It will also be enabled at the product level if it is enabled in general settings. Some of the settings you can configure at both general and product level settings are:
- Enable product schema: Checkbox to enable the product schema for all the products.
- Store name: Enable store name to display with product in Google search results.
- Product name: Checkbox to enable product name.
- Product description: Enable or disable displaying product descriptions in a rich snippet.
- Product price: Click on the check box to allow product price in the schema
- Product SKU: Checkbox to enable the product SKU
- Product availability: Enable the checkbox to display product availability in the WooCommerce schema.
- Product rating: Click on the check box to allow the rating of the product.
- Product reviews: Checkbox to enable product reviews.
Product schemas are configured the same way at the product level. However, the priority of the product-level schema settings is higher than general settings.

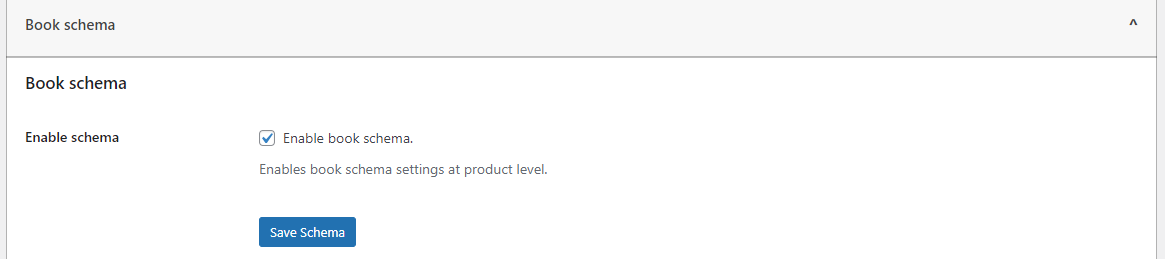
Book Schema: How to enable it?
↑ Back to topAt the general settings, click on the book schema tab and select the checkbox to enable book schema at the product level.
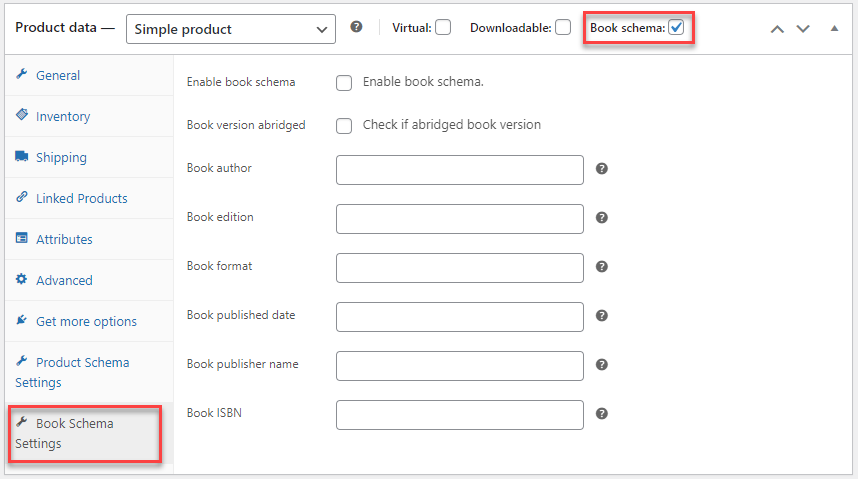
For configuration of the book schema, go to Products and choose any product where you want to enable the schema. Click on the book schema checkbox in the product data table. Then select the book schema settings tab. There you will find some settings to enable the book schema.
- Enable book schema: Checkbox to enable the book schema.
- Book version abridged: Click on the checkbox if the book version is abridged.
- Book author: Enter the name of the author to show in the schema.
- Book edition: Include the edition of the book.
- Book format: Add the format of the book.
- Book published date: Enter the book published date.
- Book publisher name: Include the name of the book publisher.
- Book ISBN: Add book ISBN number to display in a schema.
How do I enable Recipe Schema?
↑ Back to topClick on the recipe schema tab in the general settings and check the option to allow recipe schema at the product level.

To configure the recipe schema, navigate to Products and select any product where you want to enable the schema. In the product data table, check the recipe schema checkbox. Then click the recipe schema options tab. There are various settings there to activate the recipe schema.
- Enable schema: Checkbox to enable the recipe schema.
- Enable reviews: Click on the checkbox to show recipe reviews in the schema.
- Recipe name: Add the name of the recipe.
- Recipe author: Enter the name of the author’s recipe.
- Cook time: Include the cooking time of the recipe to display in WordPress snippets.
- Published date: Add recipe published date to show in schema.
- Description: Include a short description of the recipe.
- Image URL: Enter the image URL that depicts the recipe.
- Instructions: Provide preparation instructions.
- Recipe Yield: Add recipe yield.

How to enable Carousel Schema?
↑ Back to topTo enable the carousel schema, head towards the rich snippets general setting. Then go to the carousel schema tab and click on the checkbox to enable the schema.

How to add Article Schema?
↑ Back to topIn the general settings, go to the article schema tab and check the option to allow article schema at the product level.

To configure the article schema, go to Products and choose any product where you want to enable the schema. Select the article schema checkbox in the product data table. Then, on the article schema settings page, click OK. There are multiple settings to activate the article schema.
- Enable Schema: Checkbox to enable the article schema.
- Article Name: Add the name of the article.
- Article Author: Include the name of the author.
- Published Date: Provide the publication date of the article to show in rich snippet for WordPress.
- Article Headline: Write the headline of the article.

How to enable Course Schema?
↑ Back to topIn general settings, click the course schema tab and enable it. This will enable the course schema settings at the product level.

Head toward the product level setting to configure like other schemas. Some of the settings you will find for the course schema are:
- Enable Schema: Click on the checkbox to enable course schema.
- Course Name: Enter the name of the course.
- Course Description: Write a short course description to display in the schema.
- Published Date: Add the course published date.
- Provider Name: Enter the name of the course provider or tutor.

How to configure the FAQ’s schema?
↑ Back to topTo configure the FAQ schema, simply go to the general settings of the rich snippets for WooCommerce. Click on FAQ schema and enable it to display on the product level settings. Following the same process as other schemas to configure, by clicking on the checkbox at the product data table.

- Enable schema: Checkbox to enable the FAQ’s schema.
- Question: Enter the frequently asked question related to a specific product.
- Answer: Add the answer to the question.
You can add multiple FAQs by clicking on the Add another FAQ button. However, you can edit and delete them at any time.

Note: Rich Snippets takes minimum 3 to 12 weeks to appear in search results as it depends on Google. Source