The Rapyd Payments Plugin helps lower your transaction processing costs while converting more shoppers to buyers by accepting cards and local bank transfers.
Download it now at WordPress.org or via the Add New option under Plugins on your WordPress control panel. For detailed information, read the full instructions on this page.
Step 1: Get Started with Rapyd Payments
↑ Back to topSign up for a Rapyd Client Portal Account.
↑ Back to topWith a Rapyd Client Portal Account, you can:
- Activate and set up your plugin
- Access sandbox mode and test payments
- View supported payment methods
- View payment reports
- Invite team members
- Complete KYB steps to fully activate your account
Step 2: Activate Your WooCommerce Plugin in the Rapyd Client Portal
↑ Back to topA. Sign in to Client Portal and navigate to Settings.
B. Click on Plugins.

C. In the WooCommerce window, click Activate Plugin

Step 3: Install Plugin on WooCommerce
↑ Back to topA. Sign in to your WordPress site and navigate to Tools > Plugins.
B. Select Plugins > Add New from the main menu.
C. In the Search Plugins textbox enter Rapyd Payments Plugin. The Rapyd Payments Plugin appears.
D. Click Install Now. The Installing plugin page appears.
E. Click Activate Plugin. The Plugin page displays the Rapyd Payments WooCommerce Extension.
Step 4: Rapyd Payments Plugin Configuration
↑ Back to topFrom the WooCommerce Settings you can begin to manage specific payment methods as well manage your Secret Keys for testing and production.
A. To manage payment methods: Select WooCommerce > Settings from the menu.

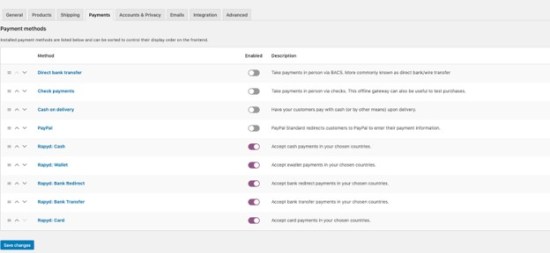
B. Click the Payments tab.

C. The Payment methods page appears. All Rapyd payment methods are automatically enabled.

D. Click the Manage button of any Rapyd Payments method.
E. The Settings page appears.

F. In the Rapyd plugin settings section, enter your Rapyd Secret Key and Access Key for the sandbox environment, then select the Enable test mode checkbox.
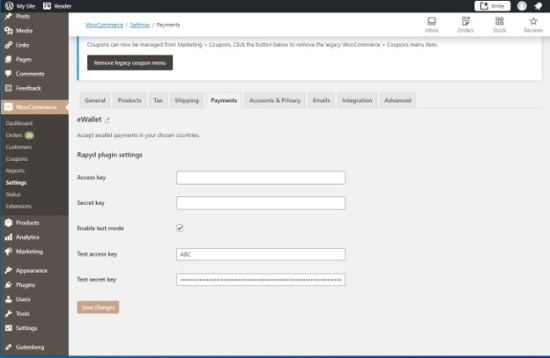
G. Click Save Changes.
Step 5: Testing the Rapyd Payments Plugin
↑ Back to topNote: The Rapyd Client Portal must be in sandbox mode during the testing phase.
How to Test a Payment
- Go to your WooCommerce test site and add an item to the cart.
- Add the customer details and then move to the payment screen. Select a payment method that is provided by Rapyd and click Place Order.

- A checkout page for completing the payment appears.

After you have finished testing the plugin, you can switch to production mode.
Note: In circumstances where the paid amount is less than the original amount, use the Client Portal to verify the actual amount that was paid, and not the store’s admin portal.
Step 6: Configuring WooCommerce Plugin for Production
↑ Back to topOnce you’ve completed testing you need to set the Plugin for Production Mode.
Note: to fully activate your account for production mode you’ll need to complete the KYB form for compliance review in the Rapyd Client Portal.
Steps to Move into Production:
A. Access the Rapyd Client Portal and set the Client Portal to production mode (toggle beneath left side menu).
B. On your WooCommerce site, go to the Settings page of any Rapyd Payment.
C. Enter your Rapyd Secret Key and Access Key for the production environment. Note that these keys are different from the sandbox keys.

D. Clear the Enable test mode checkbox.
E. Click Save Changes.
Step 7: Setup a Landing Page URL
↑ Back to topAfter the checkout process completes, the customer can be forwarded to a landing page. This may be the main URL of the ecommerce site or any other landing page that you may want to define. To set the landing page URL:
A. Sign in to the Client Portal and navigate to Settings > Branding.

B. Click on the link icon and enter the URL of the landing page in the Fallback URL field.

C. Click Save.