This feature is available to an invite-only beta group of WooCommerce Shipping customers. We’re not taking additional applications to join this beta program at this time. Previously invited users can connect their own UPS account with WooCommerce Shipping to view negotiated UPS rates and print UPS labels right from the WooCommerce dashboard.
Requirements for setting up the UPS beta feature:
- Be a member of the invite-only beta group for this feature.
- Have the WooCommerce Shipping & Tax extension installed, activated and connected to WordPress.com.
- Have a UPS account based in the US (shipments must originate from the US). You can create an account on UPS.com.
Installation
↑ Back to top- Get your UPS account number and other details such as Name, address, and business info. If you don’t have a UPS account yet, go to UPS.com to create a new account.
- To use WooCommerce Shipping, follow the steps on the WooCommerce Shipping document to install and activate the extension.
- Go to: WooCommerce Settings > Shipping > WooCommerce Shipping.
- There, scroll down to “Carrier account”. This will only be visible if you’re participating in the beta test.

- Next to UPS, select “Connect” to open the form where you’ll add your UPS account information.
- In order to make the connection, you’ll need to complete all required fields in the form. Check the box in the last section if you’ve received a UPS invoice within the last 90 days, and fill out the additional information that can be found on the invoice.
- Once you complete all required fields and click “Connect” at the bottom of the form, your UPS account number will appear in the Carrier account settings card.
Viewing UPS Rates Before Buying a Shipping Label
↑ Back to top- Go to: WooCommerce > Orders.
- Select an order that’s processing.
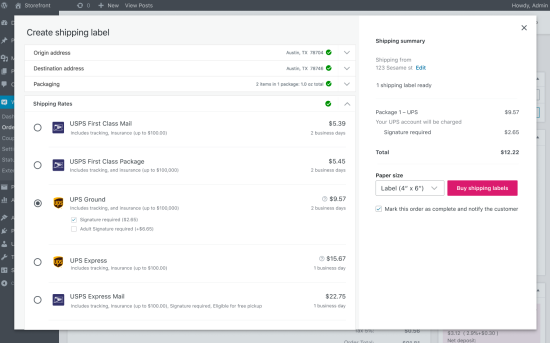
- Select “Create shipping label”. The shipping label modal will open from the order page. Once the origin and destination addresses are entered and verified, you’ll see a list of shipping rates including rates from your connected UPS account. Note the UPS rates presented are estimates only based on your UPS rates and information you submitted. It may not accurately reflect the rates that you will be billed by UPS.
- Select the shipping rate you want to use.
- Choose the paper size.
- Select “Buy shipping labels”
Setting UPS Paperless Invoice for International Shipments
↑ Back to topWooCommere Shipping requires your UPS account to be enrolled for UPS Paperless Invoice to ship internationally.
When shipping internationally, customs require a commercial invoice to help them vet and process incoming international imports.
WooCommerce Shipping automates this process for you using UPS Paperless Invoice. UPS Paperless Invoice is a free service that eliminates paper invoices by electronically transferring your shipping information to UPS. There is no need to manually fill out or print a commercial invoice. You will need to enroll for UPS Paperless Invoice.
To enroll in UPS Paperless Invoice:
- Log in to your UPS.com account.
- Click the account name in the upper right hand corner.
- Click Payment Options from the drop down menu.
- To the right of the account name, click the Edit link.
- Expand the Paperless Invoicing tab, click Enroll my Account and fill out the enrollment form.
Once complete, you’ll typically be eligible to use UPS Paperless Invoice within 24 hours.
For countries supported by UPS Paperless Invoice, WooCommerce Shipping automatically submits your customs information electronically. You only need to print the shipping label.
For countries’ non-supported countries by UPS Paperless Invoice, you need to print the customs documents. You’ll be prompted to print the custom document right after printing your label. You can always find and print the custom documents from your order page. Select the three ellipsis menu in the Shipping Label metabox.

UPS Paperless Invoice is available for most destination countries; you can verify the availability using UPS’s Import/Export tool and checking the Invoice Requirements box.
FAQs
↑ Back to topWill my customers see UPS rates at checkout?
↑ Back to topNo. UPS live rates will not be available for customers at checkout during this first phase, however we plan to introduce this at some point in the future.
How do I edit my UPS account?
↑ Back to topIf you need to edit any information on your UPS account such as address or business info, go to UPS.com and make those changes. The UPS account will remain connected to WooCommerce Shipping.
How do I disconnect my UPS account?
↑ Back to top- Go to WooCommerce Settings > Shipping > WooCommerce Shipping.
- Scroll down to the Carrier account card where you see the UPS account connected.
- Select “Disconnect”, then confirm when the modal pops up.
The account will be removed from WooCommerce Shipping and all information will be deleted.
Can I connect accounts with other carriers?
↑ Back to topAt the moment, there’s no way to connect other carrier accounts besides UPS, but it’s on the roadmap for some time in the future.
Is this a replacement for Worldship?
↑ Back to topYes. Worldship is software that provides label printing and shipment tracking, similar to WooCommerce Shipping. The advantage of shipping with UPS through WooCommerce Shipping is that you can compare rates with USPS, print labels directly in your WooCommerce dashboard, include tracking codes in customer emails, and avoid manual entry of information.
Can I connect multiple UPS accounts?
↑ Back to topNo. You can only add one UPS connection at a time.
Can I connect my UPS account to multiple WCS installations?
↑ Back to topNo. This feature is only available for one WCS installation per user.
How do I pay for my UPS labels?
↑ Back to topUnlike USPS labels which are bought and paid directly from WooCommerce, UPS labels are paid using your own account with UPS. Whatever billing arrangements you have made with UPS will apply for labels you print using WooCommerce Shipping. All fees, credits, refunds and charges are between yourself and UPS, and you are responsible to UPS for all purchases made via WooCommerce Shipping.
Can I refund UPS labels?
↑ Back to topUnlike USPS labels which are paid at the time of printing them, UPS only bills your account once you give them the package. Hence if you got a label that you no longer need but didn’t hand off the package to UPS, there is no need to request a refund.
Are there any limitations on UPS services?
↑ Back to topThis integration is limited to shipments originating from the US.
Also, please note that for international shipments you’ll have to create customs forms separately for the shipment – it won’t print with the shipping label in the same way as it does with USPS. Read more here.
Are there separate packages settings for UPS?
↑ Back to topNo. The packages you’ve saved for all carriers are saved together in Settings.
Are all UPS One Rate packages available as options during the label flow?
↑ Back to topYes. All UPS carrier packaging will be available in the dropdown when you create a new package from Settings or from the shipping label modal.
Troubleshooting
↑ Back to topAn error message appears when connecting my UPS account.
↑ Back to top- Double check all information entered on the form and make sure it matches with the UPS account. Pay special attention to the phone number, that it’s correctly entered with only numbers and no punctuation.
- If your UPS account is more than 30 days old, be sure to enter your most recent invoice information in the last section of the form.
- Be sure to enter the address associated with your UPS account payment method.