Overview
↑ Back to topPinterest for WooCommerce connects your WooCommerce store to Pinterest to help people discover your eCommerce shop. You can promote your products on Pinterest and measure the results of the actions customers take on your website.
With this plugin, you can:
- Sync your WooCommerce catalog to Pinterest to let customers browse products from your Pinterest shop.
- Add the Save to Pinterest button to let customers create full-featured Pins from your products.
- Install the Pinterest tag to track events and conversions.
Installation
↑ Back to topIf you don’t have Pinterest for WooCommerce installed, you can install and activate the plugin:
- Go to Plugins > Add New and search for Pinterest for WooCommerce.
- Click Install Now and then Activate.
- Go to Marketing > Pinterest and follow the instructions in this document to learn how to set up the plugin.
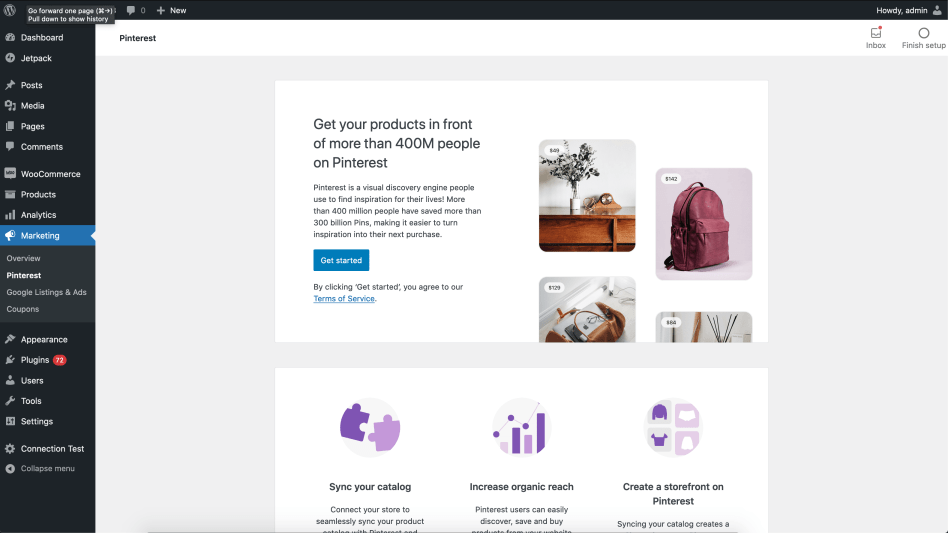
Getting started
↑ Back to topHead to Marketing > Pinterest, then click Get started and follow the steps below.
Connect your Pinterest business account
↑ Back to topIf you don’t have a Pinterest business account, click on Create a new Pinterest account. You’ll be taken to Pinterest in a new tab to create a business account that you can use to continue.

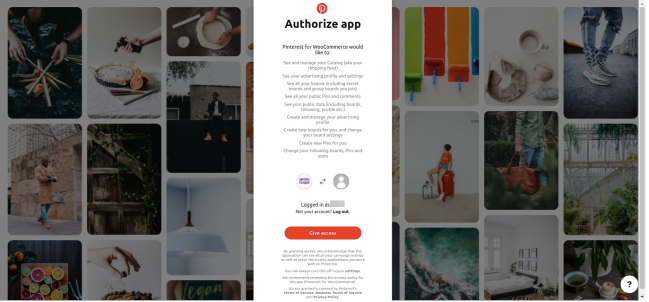
Once you have a Pinterest business account you intend to use, click Connect. You’ll be taken to Pinterest, and asked to log in if you haven’t already.
If you try to log in with a personal Pinterest account linked with a Business account, you will automatically connect to the linked Business account. Otherwise, you will be given the option to Create a new Business Account or Convert your Personal Account to a Business account.

You’ll be asked to grant the plugin permission to access your Pinterest business account. Click Give access.
After successful authentication, you’ll be redirected back to your website. Click That’s my site – Redirect me.

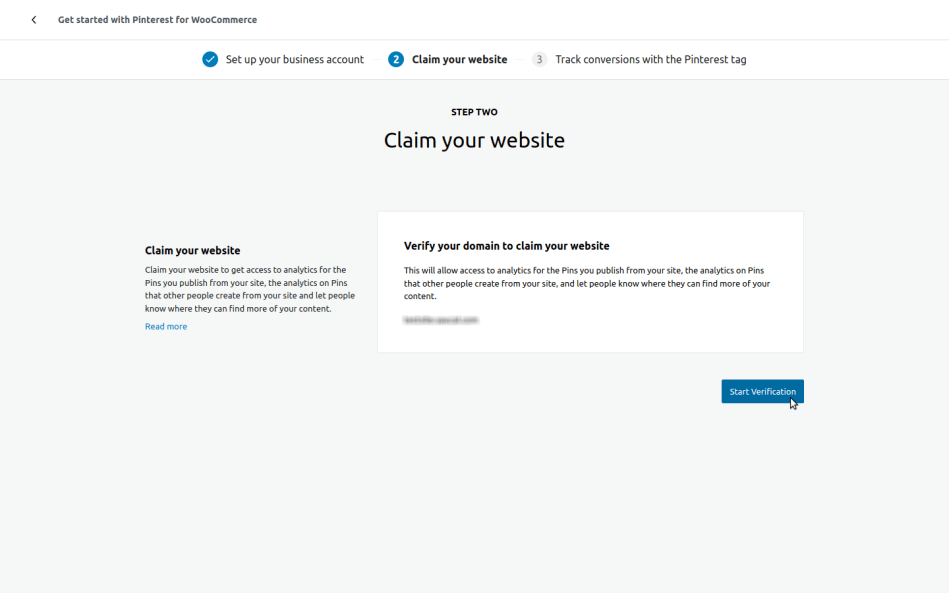
Claim your website
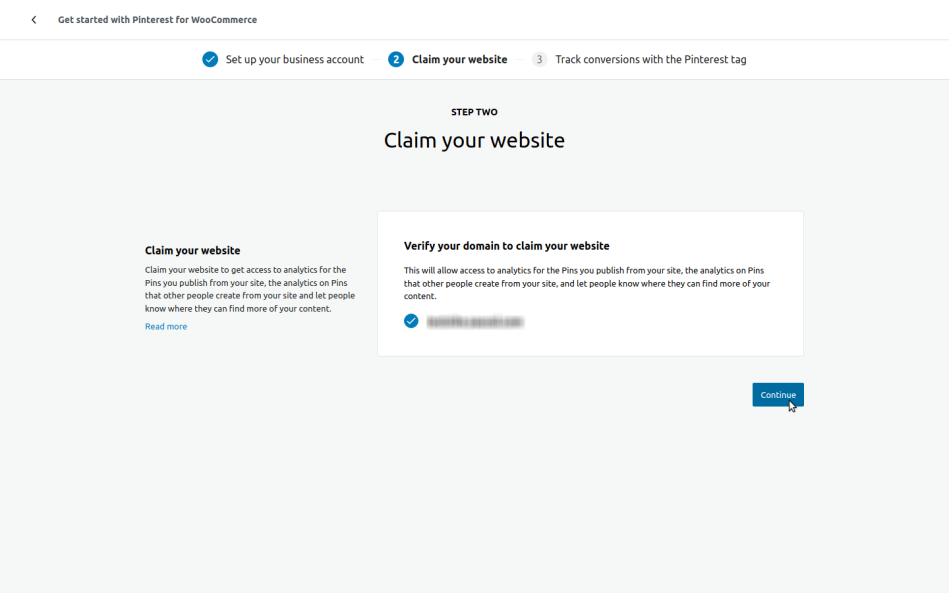
↑ Back to topClick on Start verification.
Wait a few seconds while your website domain is linked to your Pinterest business account. After successful verification, click on Continue. If another user has claimed the domain, you’ll get an error message and won’t be able to continue.
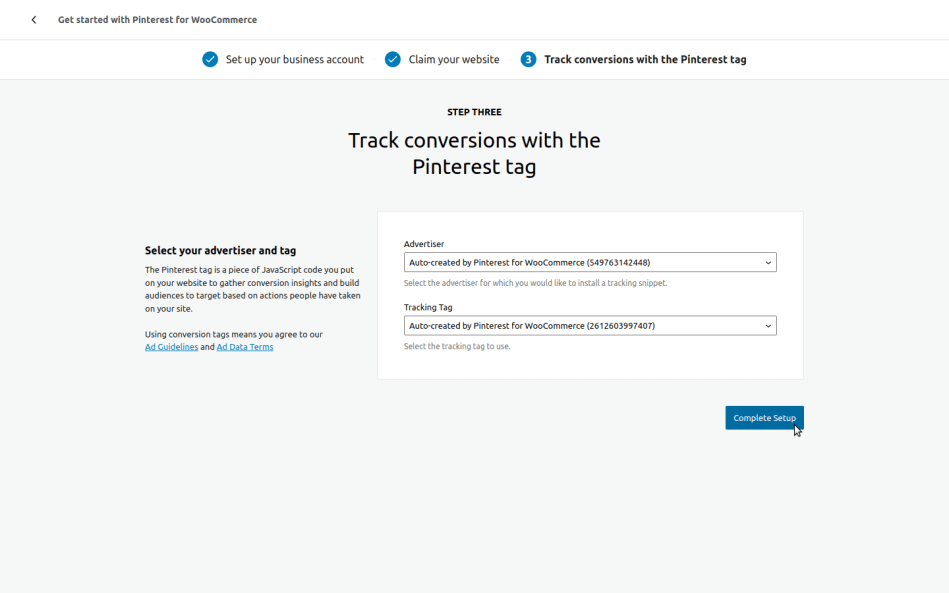
Set up the Pinterest tag
↑ Back to topIf you don’t have an Advertiser and a Tracking Tag on your Pinterest business account, they will be automatically created for you. Select the ones you want to use, and click Complete Setup.
Connection information
↑ Back to topAt any time after completing the initial setup, you can head up to Marketing > Pinterest, and then to the Connection tab, to find a summary and even change some options.
After changing any settings, scroll to the bottom and click Save changes.
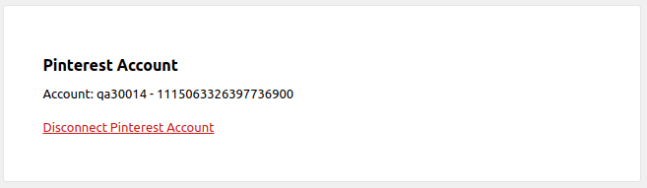
Linked account
In this section, you can identify the Pinterest business account that is connected to the store, disconnect it, and set up a different one. If you disconnect an account, this will delete all feeds on that Pinterest account.
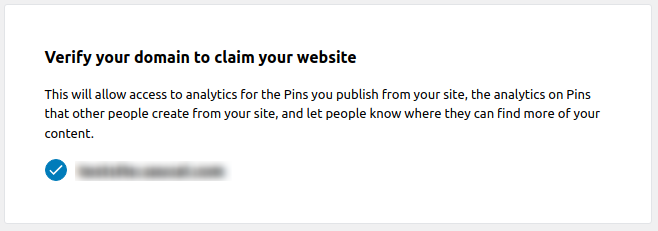
Verified domain
In this section, you can identify the domains that are linked to the connected Pinterest business account.
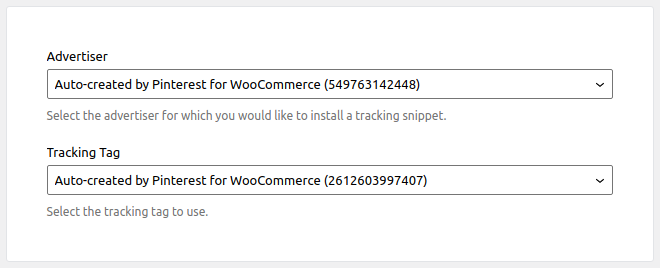
Track conversions with the Pinterest tag
In this section, you can identify and change the Advertiser and Tracking Tag that you are using.
Settings
↑ Back to topAfter completing the initial setup, you’ll be taken to the main settings page. You can get there at any time by going to Marketing > Pinterest, and then to the Settings tab.
Options:
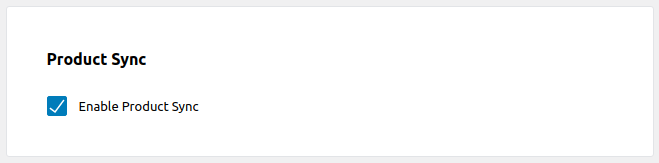
- Product Sync > Enable Product Sync – Enabled by default
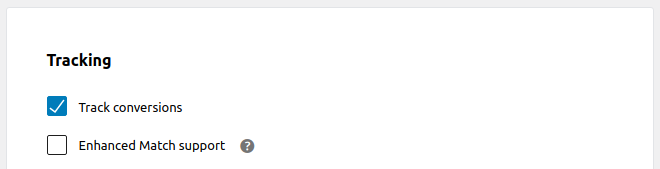
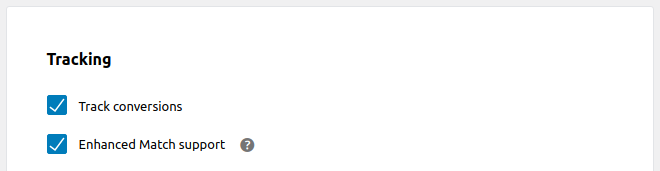
- Tracking > Track conversions – Enabled by default
- Tracking > Enhanced Match support – Enabled by default (Automatically disabled if “Track conversions” is disabled)
- Rich Pins > Add Rich Pins for Products – Enabled by default
- Rich Pins > Add Rich Pins for Posts – Enabled by default
- Save to Pinterest > Save to Pinterest – Enabled by default
- Debug Logging > Enable Debug Logging
- Plugin Data > Erase Plugin Data
Sync your WooCommerce catalog to Pinterest
When Enable Product Sync is enabled, the Pinterest for WooCommerce extension will automatically synchronize the products in your WooCommerce and Pinterest catalogs.
To enable this feature:
- Head to Marketing > Pinterest, then to the Settings tab.
- Find the Set up Product Sync group, then the Product Sync subgroup.
- Check the Enable Product Sync setting (enabled by default).
- Scroll down to the bottom and click Save changes.
Add the Save to Pinterest button
The Pinterest for WooCommerce extension can make it really easy for your customers to save your product pins to their own Pinterest boards from your product, post and archive pages.
To enable this feature:
- Head to Marketing > Pinterest, then to the Settings tab.
- Find the Publish Pins and Rich Pins group, then the Save to Pinterest subgroup.
- Check the Save to Pinterest setting (enabled by default).
- Scroll down to the bottom and click Save changes.

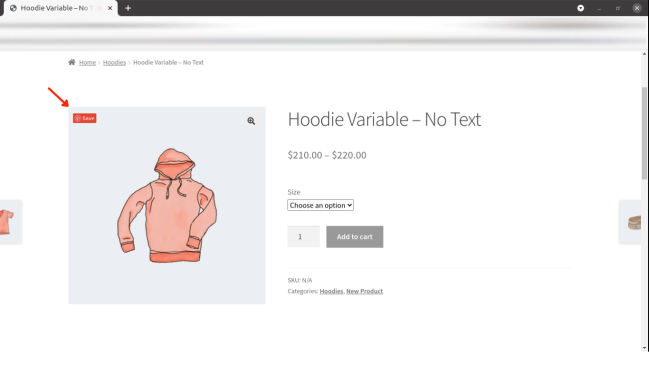
With this setting enabled, the Save to Pinterest button is added to your WooCommerce products. Customers who click on it are offered to pin the product or post to a Pinterest board of their choice.
Rich pins
Products and posts can be enriched with metadata, in order to offer more relevant actions when pinned to customers’ Pinterest boards:
- WooCommerce products can be rendered as product rich pins.
- WordPress posts can be rendered as article rich pins.
To enable this enhancement:
- Head to Marketing > Pinterest, then to the Settings tab.
- Find the Publish Pins and Rich Pins group, then the Rich Pins subgroup.
- Check all the specific Add Rich Pins settings that you need (enabled by default).
Scroll down to the bottom and click Save changes.

It is possible to expose OpenGraph metadata for products and posts to enable Rich Pins. Metadata passes validation in Pinterest Rich Pins Validator.
Example for a product:
<meta property="og:url" content="https://<<URLsite>>/product/beanie/">
<meta property="og:site_name" content="Mass Grasshopper">
<meta property="og:title" content="Beanie">
<meta property="og:type" content="og:product">
<meta property="og:image" content="https://<<URLsite>>/wp-content/uploads/2021/11/beanie.jpg">
<meta property="product:price:currency" content="USD">
<meta property="product:price:amount" content="18">
<meta property="og:price:standard_amount" content="20">
<meta property="og:description" content="Pellentesque habitant morbi tristique senectus et netus et malesuada fames ac turpis egestas. Vestibulum tortor quam, feugiat vitae, ultricies eget, tempor sit amet, ante. Donec eu libero sit amet quam egestas semper. Aenean ultricies mi vitae est. Mauris placerat eleifend leo.">
<meta property="og:availability" content="instock">
Example for a Post:
<meta property="og:url" content="https://<<URLsite>>/2021/11/08/hello-world/">
<meta property="og:site_name" content="Mass Grasshopper">
<meta property="og:type" content="article">
<meta property="og:title" content="Hello world!">
<meta property="og:description" content="Welcome to WordPress. This is your first post. Edit or delete it, then start writing!">
<meta property="article:published_time" content="2021-11-08T11:12:15+00:00">
<meta property="article:author" content="demo">
Install the Pinterest tag
The Pinterest for WooCommerce extension can easily allow you to track the events and conversions that help you understand how customers are interacting with your website.
To enable this feature:
- Head to Marketing > Pinterest, then to the Settings tab.
- Find the Publish Pins and Rich Pins group, then the Tracking subgroup.
- Check the Track conversions setting (enabled by default).
- Scroll down to the bottom and click Save changes.
The Pinterest tag code is added to relevant pages of your website. Then, you can set up and follow conversions from your Pinterest business account, on the specific advertiser that is configured in Ads > Conversions.
Examples:
- Page Visit: Should send the event every time the user visits a page
<script>pintrk( 'track', 'pagevisit', );</script>- View Category: This should send the event every time a user visits a category page.
<script>pintrk( 'track', 'ViewCategory' , {"product_category":16,"category_name":"Accessories"},); </script>- Search: This should send the event every time a user searches for something on the page.
<script>pintrk('track', 'search', {search_query: 'hoodie'},);</script>- Add to Cart: The event should be sent every time user adds product to the cart from Shop/Category/Product page
<script>pintrk('track', 'AddToCart', {product_id: 10,order_quantity: 1,});</script>- Checkout: The event should be sent every time User places an order.
<script>pintrk( 'track', 'checkout' , {"order_id":45,"value":"220.00","order_quantity":4,"currency":"USD","line_items":[{"product_id":3,"product_name":"Belt","product_price":"55","product_quantity":3,"product_category":["Accessories"]},{"product_id":4,"product_name":"Hoodie with Logo","product_price":"45","product_quantity":1,"product_category":["Hoodies"]}]});</script>Enhanced match support
You can increase the accuracy of your tracking by leveraging Pinterest’s Enhanced match feature.
To enable this enhancement:
- Head to Marketing > Pinterest, then to the Settings tab.
- Find the Publish Pins and Rich Pins group, then the Tracking subgroup.
- Check the Enhanced Match support setting (enabled by default). (This field will be disabled if “Tracking conversions” is disabled.)
Scroll down to the bottom and click Save changes.
Enhanced Match is used when:
- The user is logged in to the site
- Cookies saved on the browser After placing the order (Guests users)
It adds a hashed email to the Tracking Conversion event so it can be matched on Pinterest
pintrk('load', '2613101893693', { em: '8302f4115fded8c3885dbc5cc115fe90' });If you disable product sync, the feed will be deleted from the site but not from the Pinterest account.
Technical log
You can keep a detailed log of what the plugin does. This is especially useful when contacting Customer Support for assistance.
To enable this feature:
- Head to Marketing > Pinterest, then to the Settings tab.
- Find the Advanced Settings group, then the Debug Logging subgroup.
- Check the Enable Debug Logging setting.
Scroll down to the bottom and click Save changes.

Clean uninstall
You can ensure no related data will remain on your website when uninstalling the plugin.
To enable this feature:
- Head to Marketing > Pinterest, then to the Settings tab.
- Find the Advanced Settings group, then the Debug Logging subgroup.
- Check the Erase Plugin Data setting.
- Scroll down to the bottom and click Save changes.

Feed Content
↑ Back to topA data feed with information from your WooCommerce products is automatically generated and maintained. Pinterest fetches it regularly and updates the catalog in your business account.
You can see the status of the sync (along with any errors or required actions) at any time by heading to Marketing > Pinterest, and then to the Catalog tab.
Please note that the first synchronization can take up to 24 hours.
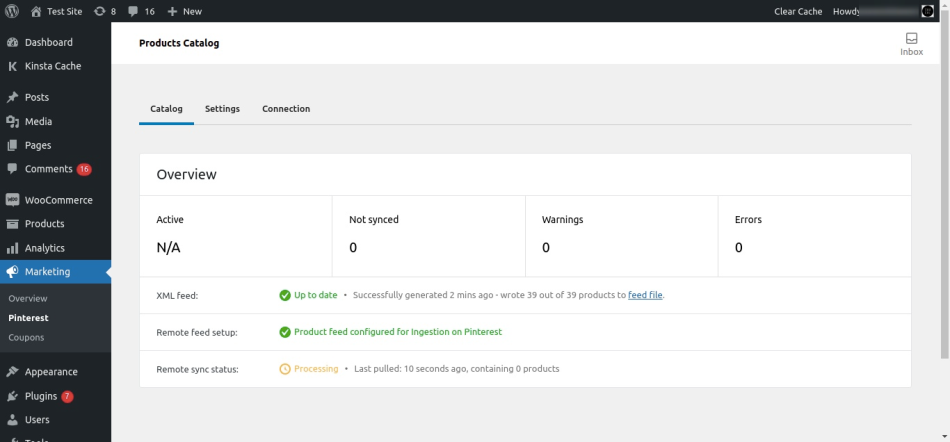
If everything is working well, you will find your WooCommerce products in the catalog of your Pinterest business account.
Starting version v1.2.9 the plugin product feed file includes the following product types by default:
- Simple product.
- Variation products (a corresponding parent Variable product is not included since version
v1.0.9).
The plugin product feed file excludes the following product types (since v1.2.9):
- Grouped products.
- Subscription products.
Please, note that included/excluded product types can be modified by using pinterest_for_woocommerce_included_product_types and pinterest_for_woocommerce_excluded_product_types filters. The filter to exclude product types takes precedence over the include filter (since v1.2.9)
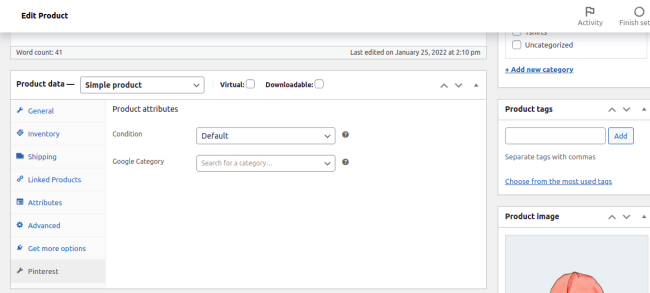
Product page (WooCommerce products)
↑ Back to topThe Pinterest plugin will add 2 fields to the products page for simple products: Condition and Google Category. These fields are not required by Pinterest but if they are not filled they will show a Warning message on Catalog Tab (Alert message).
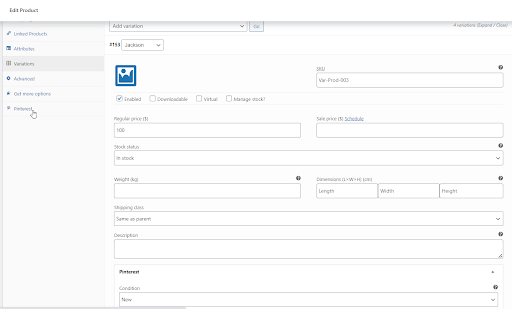
For variable products, the Pinterest tab will be added to the main product (parent) containing the Google category. Product condition will be added to each product variation.
Bulk Editing Pinterest Product Attributes
↑ Back to topThe Pinterest Condition and Google Category attribute available on the Pinterest tab of the product editing screen can be bulk edited via CSV. The steps involve exporting products using the built-in Product CSV Importer and Exporter, adding the Condition and the Google Category information in the CSV, and then using it to update existing products on the site. Here are the steps:
1. Assign the condition and Google product category to one product directly on your site in the Pinterest tab of the product editing screen. (The product column will serve as a guide in the CSV)
2. Navigate to WooCommerce > Products, and click ‘Export’ at the top
3. Select the column, product type, and category of products you wish to export (Leave the default settings to export all products and columns)
4. On the export screen, select `Yes, export all custom meta’:

5. Select ‘Generate CSV’ and wait for the export to finish
6. Open and edit the CSV using the recommended editors
7. Locate the column with the label Meta: _wc_pinterest_condition and Meta: _wc_pinterest_google_product_category and use the product you assigned the condition and Google product category on the site as a guide to assign the attributes to all products.
8. Save the CSV file and update the existing products using it.
Shipping settings
↑ Back to topPinterest For WooCommerce supports mapping of WooCommerce shipping settings to Pinterest products shipping costs. Because both systems operate on different rules the mapping is not perfect, still it allows a granular and fine-tuned setting. Free Shipping and Flat Rate Shipping methods are supported, with certain limitations.
When the products are synced to ( check Sync your WooCommerce catalog to Pinterest for more information ) the shipping information gets extracted from the WooCommerce shipping settings and added to the synchronized products.
Free Shipping
↑ Back to topThe following Free shipping requires... settings are supported:
N/AA minimum order amount– The minimum order amount is calculated against the value of a single product.
Flat Rate
↑ Back to topThe Flat Rate Shipping method is supported with shipping classes and no class costs settings.
Shipping zones
↑ Back to topZones with continents, countries, and regions are supported. Zones with zip postcodes are discarded. If the zone defines a country or a number of countries that are not supported the not supported countries will not be present in the shipping configuration. The remaining supported countries will be added to the configuration.
Supported Countries
↑ Back to topPlease check the Pinterest documentation for the list of supported countries https://help.pinterest.com/en/business/availability/shopping-availability
Disconnect or Switch Pinterest Accounts
↑ Back to topDisconnecting your website from or switching between Pinterest accounts currently needs to be done from the Pinterest side. If this feature affects you, we’d like to hear from you; please contact Support to let us know.
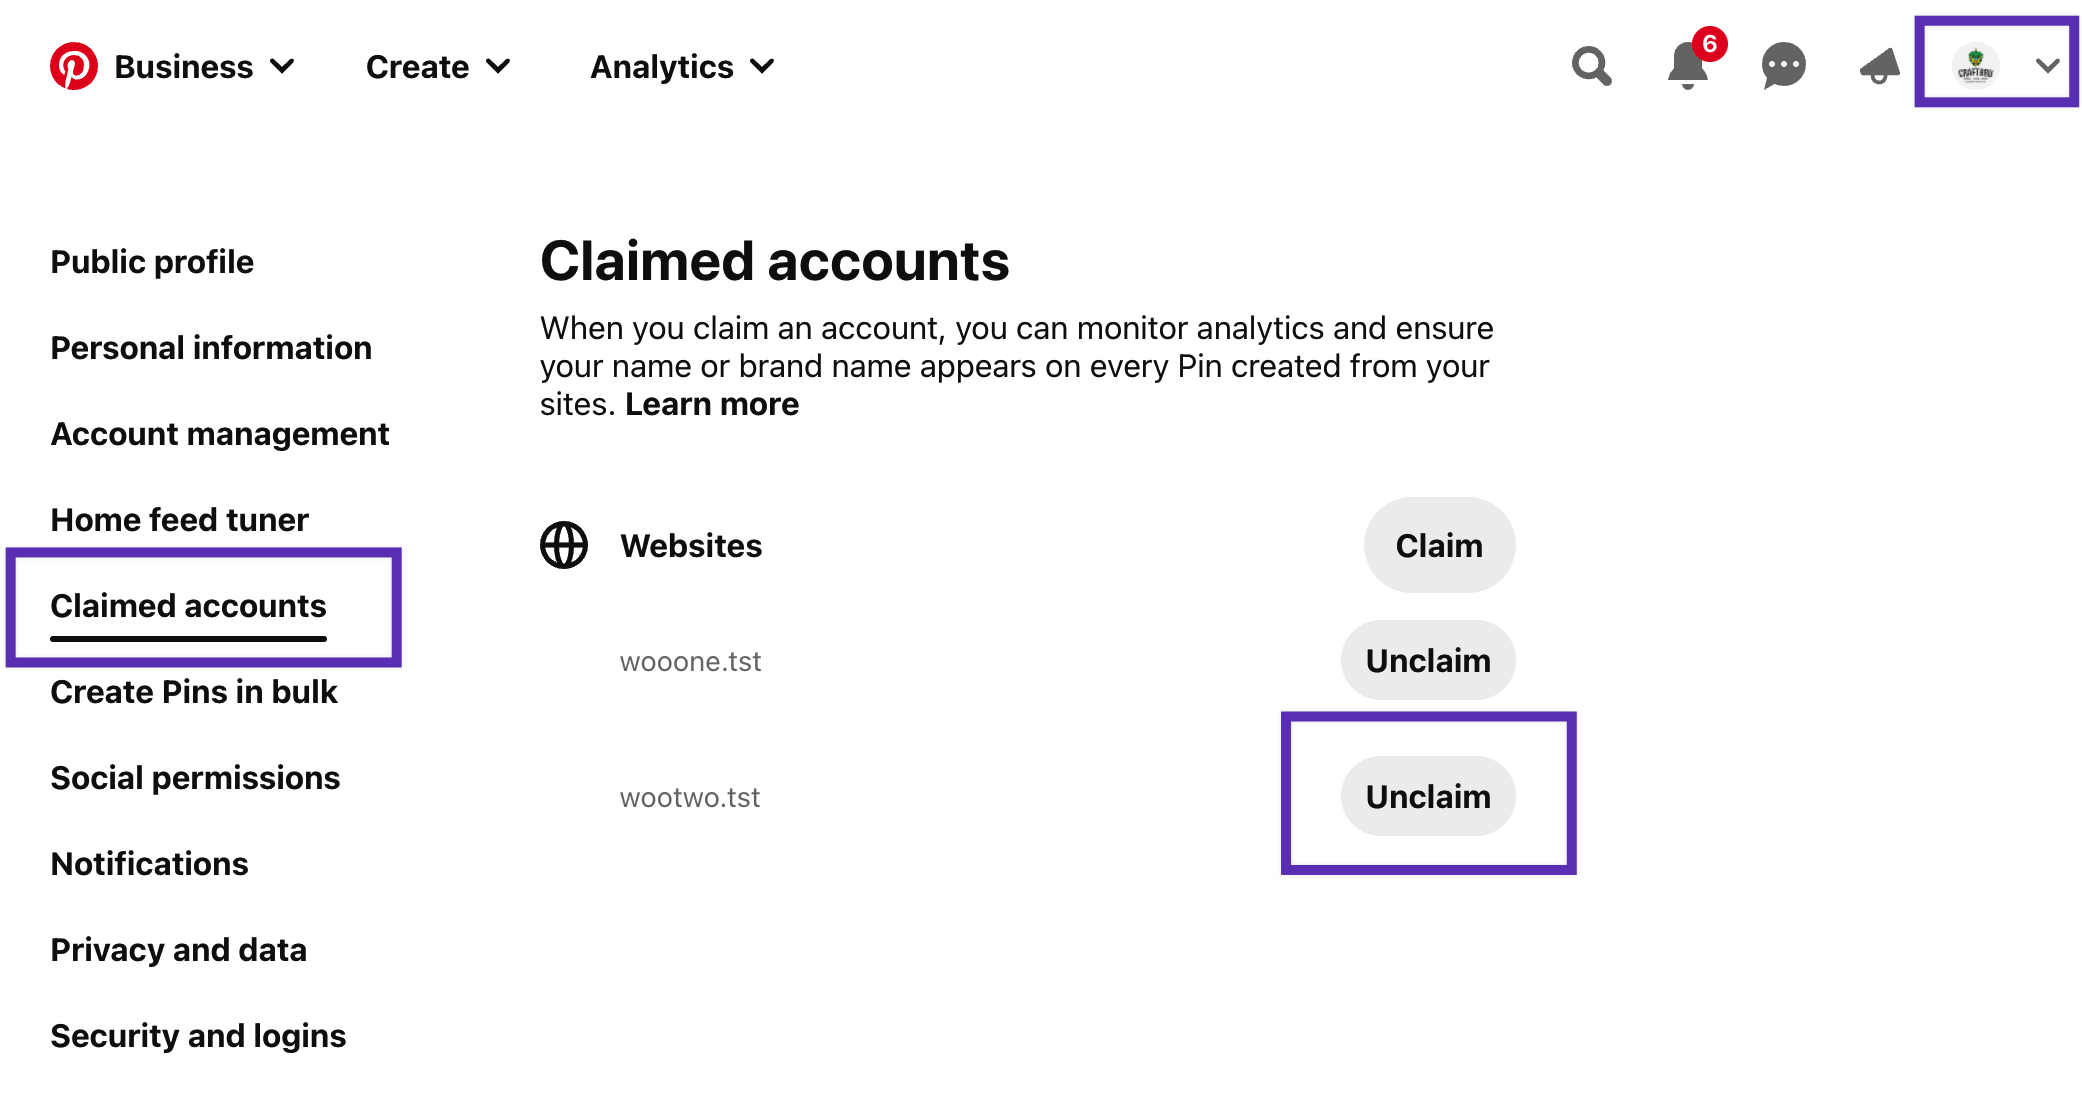
To disconnect or switch Pinterest accounts, follow the instructions below:
- Log on to Pinterest.com
- Click the down arrow next to your profile avatar visible top right
- Select Settings > Claimed Accounts
- Next to the website you want to disconnect, click Unclaim
Common issues and how to resolve them
↑ Back to topUnhealthy tag
↑ Back to topPinterest flags the tag health as unhealthy if a checkout event isn’t detected on the site in a couple of days:
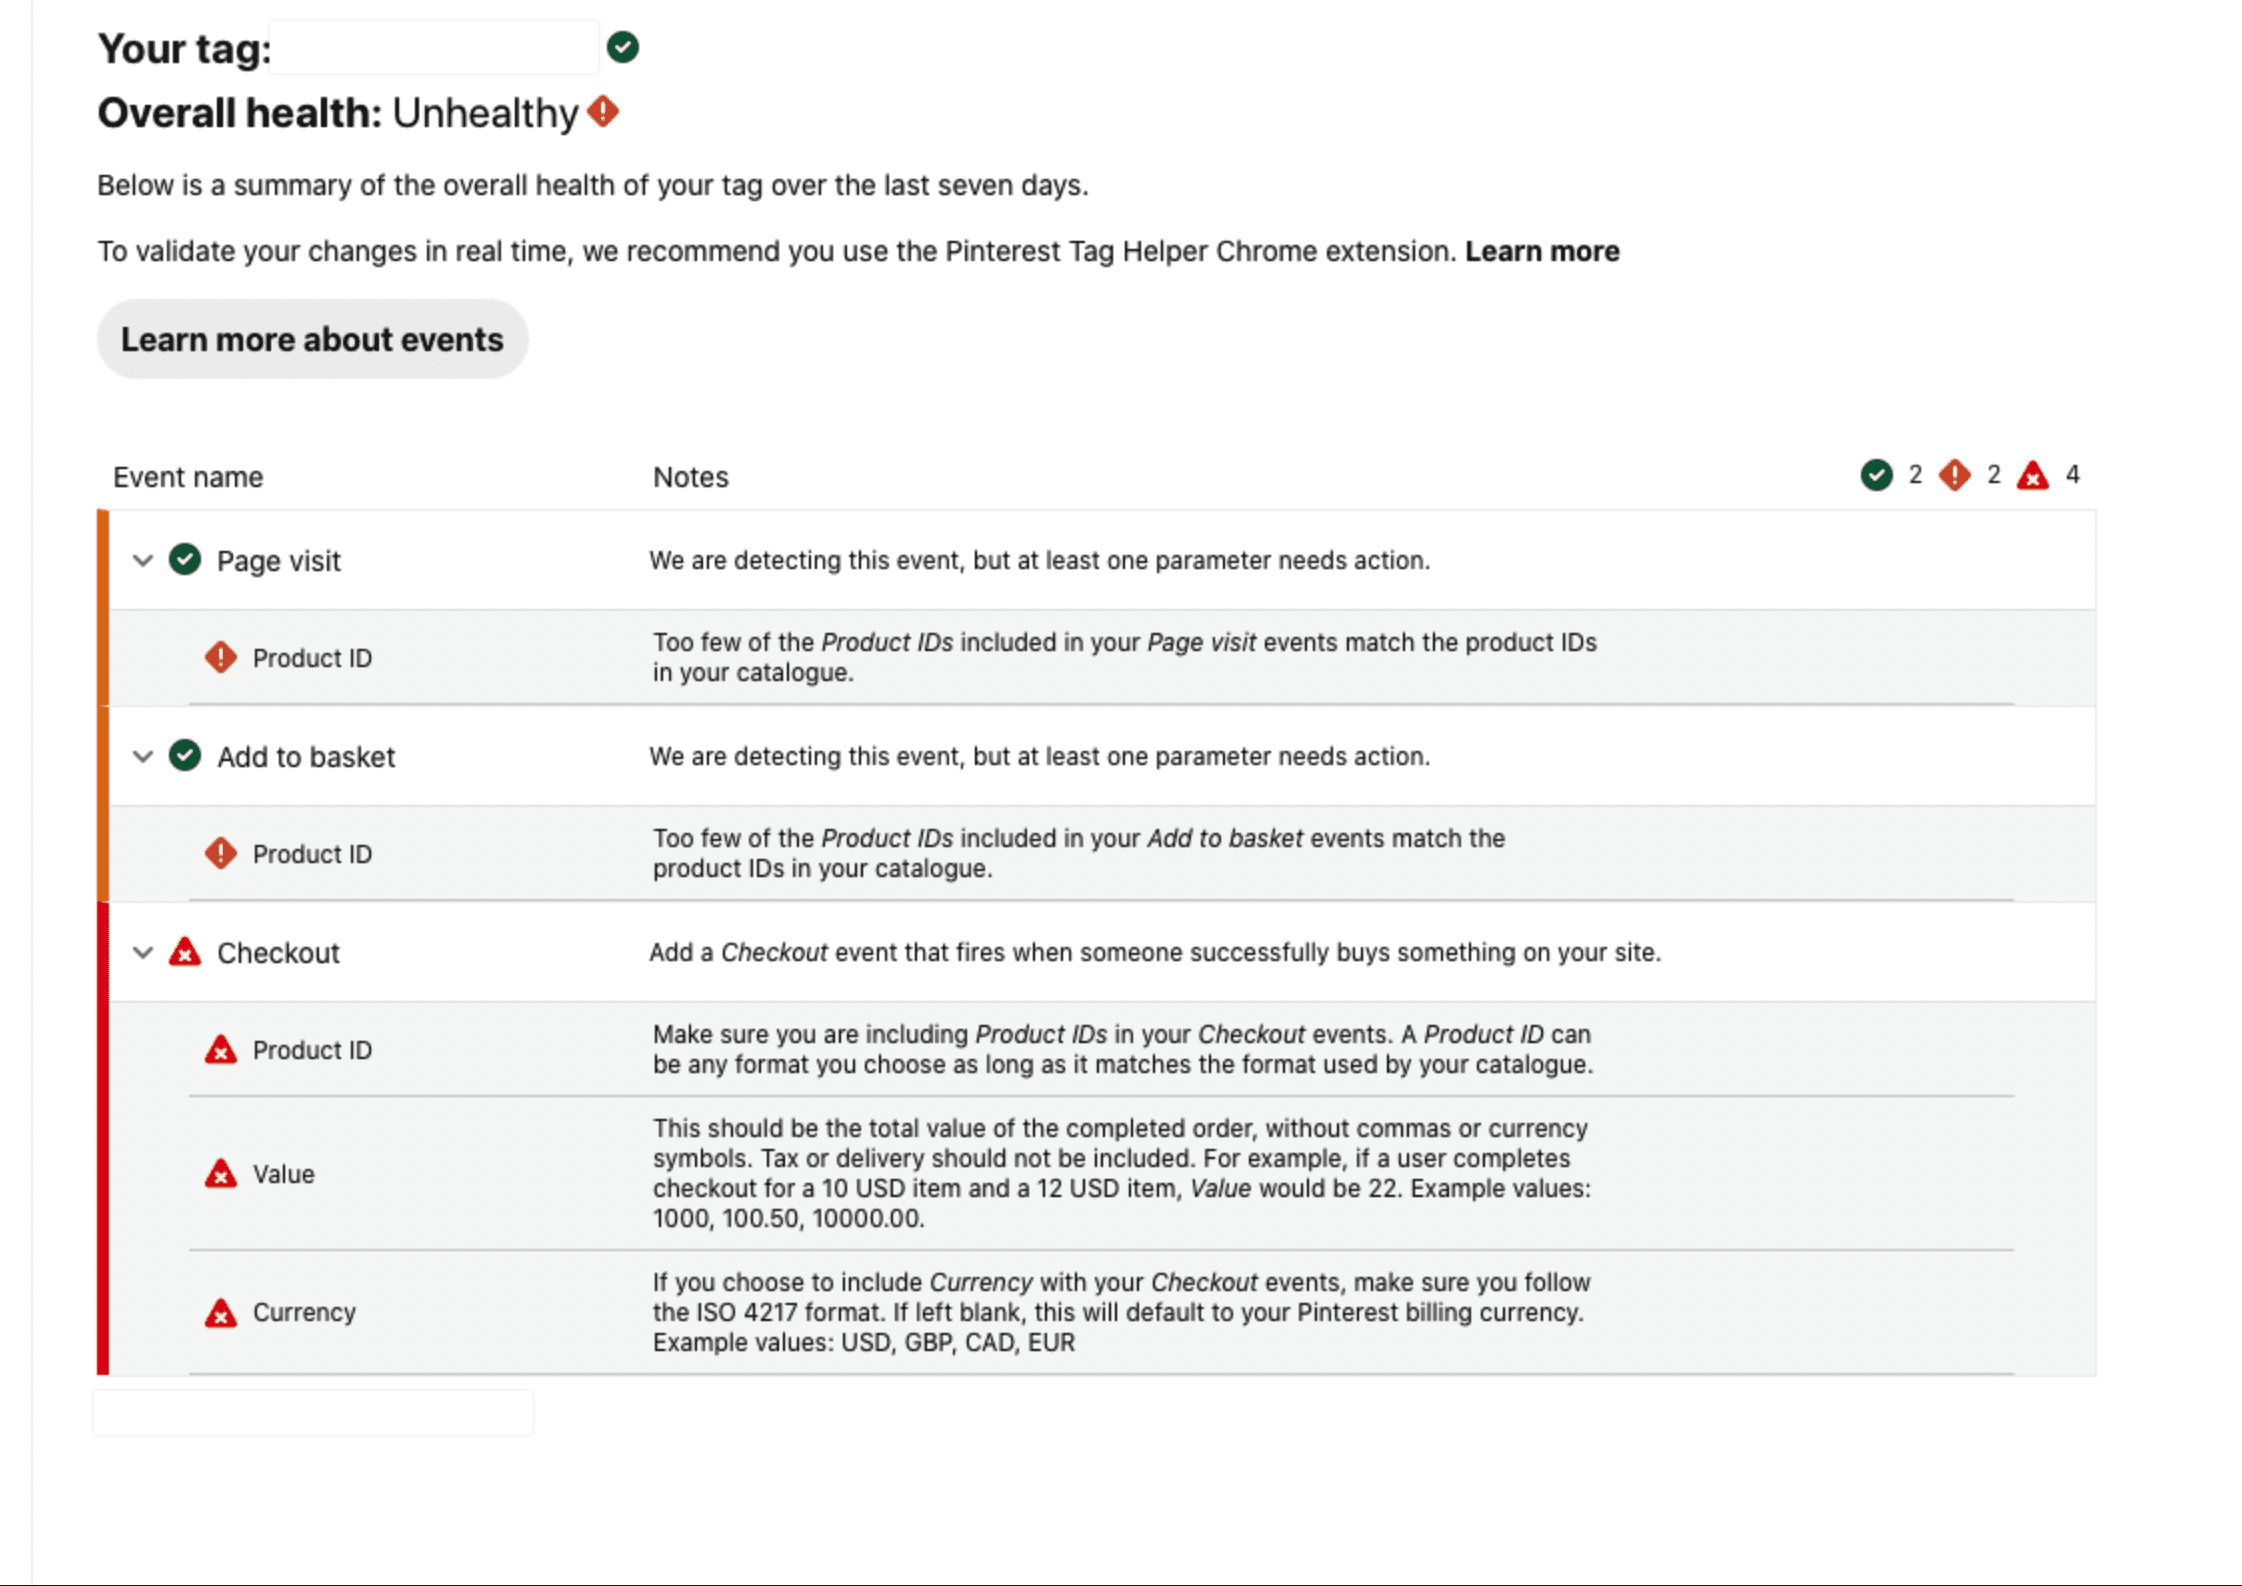
For the checkout event to be triggered, the order must require a payment – Pinterest doesn’t support “0” checkouts, so they don’t count for checkout events. This means you need to have customers checking out with paid products to avoid your tag health being flagged as unhealthy.
If your tag is health is being flagged as unhealthy, to confirm that your Pinterest tag is working as expected and to trigger checkout events to clear the unhealthy tag errors, follow these steps:
1. Add the Pinterest Tag Helper Chrome extension to your browser if you haven’t yet.
2. Visit your site in Chrome and view the red Pin icon in your browser and a gray number registering events to ensure the tag is installed.
3. Enable test mode in your payment gateway or enable a gateway like Bank Transfer or Check Payments
4. Add a product to your cart, and proceed to checkout. (Do not use a coupon to zero out the purchase total)
5. Click on the Pin icon extension to see more details about the events.
6. Confirm that the Checkout event registers with a green check and message that it was sent successfully:
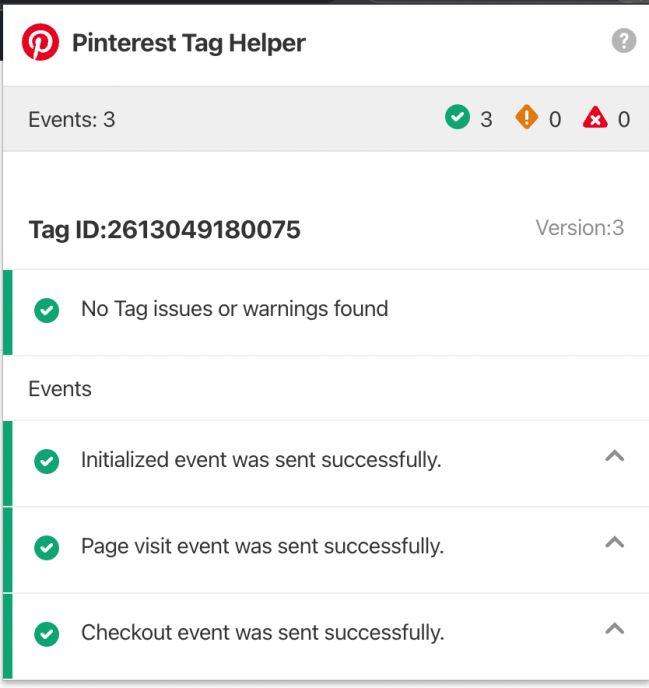
This will ensure Pinterest gets data from your site to mark your tag as healthy. After testing, be sure to disable test mode in your payment gateway and cancel the orders to prevent fulfilment. If you don’t have an order for some time, you’d have to repeat this to tell Pinterest that the tag is still active and working.
If you perform the steps and find your checkout events aren’t being triggered, please contact our Happiness Engineers for assistance.
Products not syncing
↑ Back to topTypically, the feed file is updated every 10 mins in WooCommerce and pulled by Pinterest every 24 hours to update the catalog on Pinterest. If you find your feed isn’t pulled every 24 hours, please restart the catalog following these steps:
- Go to Marketing > Pinterest > Settings
- Uncheck the box for “Enable product sync”
- Check the box “Erase Plugin Data” and Save
- Go to the Connection tab on Marketing > Pinterest and disconnect your account by clicking on “Disconnect”
- Deactivate and delete the “Pinterest for WooCommerce” extension.
— At this point, no feed should be present on /wp-content/uploads, no settings on the table wp-options, no Scheduled actions related to Pinterest, and no feed registered on Pinterest— - Reinstall “Pinterest for WooCommerce” in Plugins > Add new
- Restart the Pinterest onboarding
- Wait for 24 hours for Pinterest to approve the catalog
If that doesn’t help, please check with Pinterest that there’s no issue with your account and contact our Happiness Engineers for further assistance
Unable to Claim Website
↑ Back to topMake sure that the site is not hidden behind a coming soon or maintenance page. Pinterest will not be able to read the meta tag to confirm ownership unless the site is public.
If the website is claimed on another Pinterest account, it can’t be claimed again. Confirm that you’ve connected the correct Pinterest account, or unclaim the website on the previous account. If you do not have access to the previous account, contact Pinterest support.