Per Product Shipping is a premium extension that allows you to define different shipping costs for products, based on customer location. These shipping costs can be added to other shipping methods, or used as a standalone shipping method.
Installation
↑ Back to top- Download the extension from your WooCommerce dashboard.
- Go to Plugins > Add New > Upload and select the ZIP file you just downloaded.
- Click Install Now, and then Activate.
How Per-Product Shipping Can Be Used
↑ Back to topPer-Product Shipping can be used in two ways:
- Multiple Shipping Methods: If enabled, rates can be applied in addition to your other shipping methods. For example: If your store offered a bulky product that you wanted to set up with extra shipping fees, you could create a fee to be added to that specific product. If you had multiple items in your cart, two kinds of shipping would be represented in one cost — a) your default shipping costs for the other items in the cart, and b) the shipping cost of the bulky item.
- Standalone Method: In this scenario the ‘per-product shipping’ is the default shipping method. In this case, all product costs are added together to form a single rate.
- When the Standalone method is chosen, no other shipping methods are offered.
Setup and Configuration
↑ Back to topSetup follows this order:
- Go to WooCommerce > Settings > Shipping and select the shipping zone you want to add Per-Product Shipping to. Then, click “Add shipping method” and add Per-Product as a shipping method. This is required for the Standalone Method so that Per-Product Shipping will be displayed as a shipping method at checkout.
- Go to WooCommerce > Products and select a product on which to enable per-product shipping.
- Define shipping costs for products and variations as explained in the next sections.
- If you have not defined the Per-Product Shipping method for any of your shipping zones, you can use Multiple Shipping Methods (legacy system)
Defining Shipping Costs for products
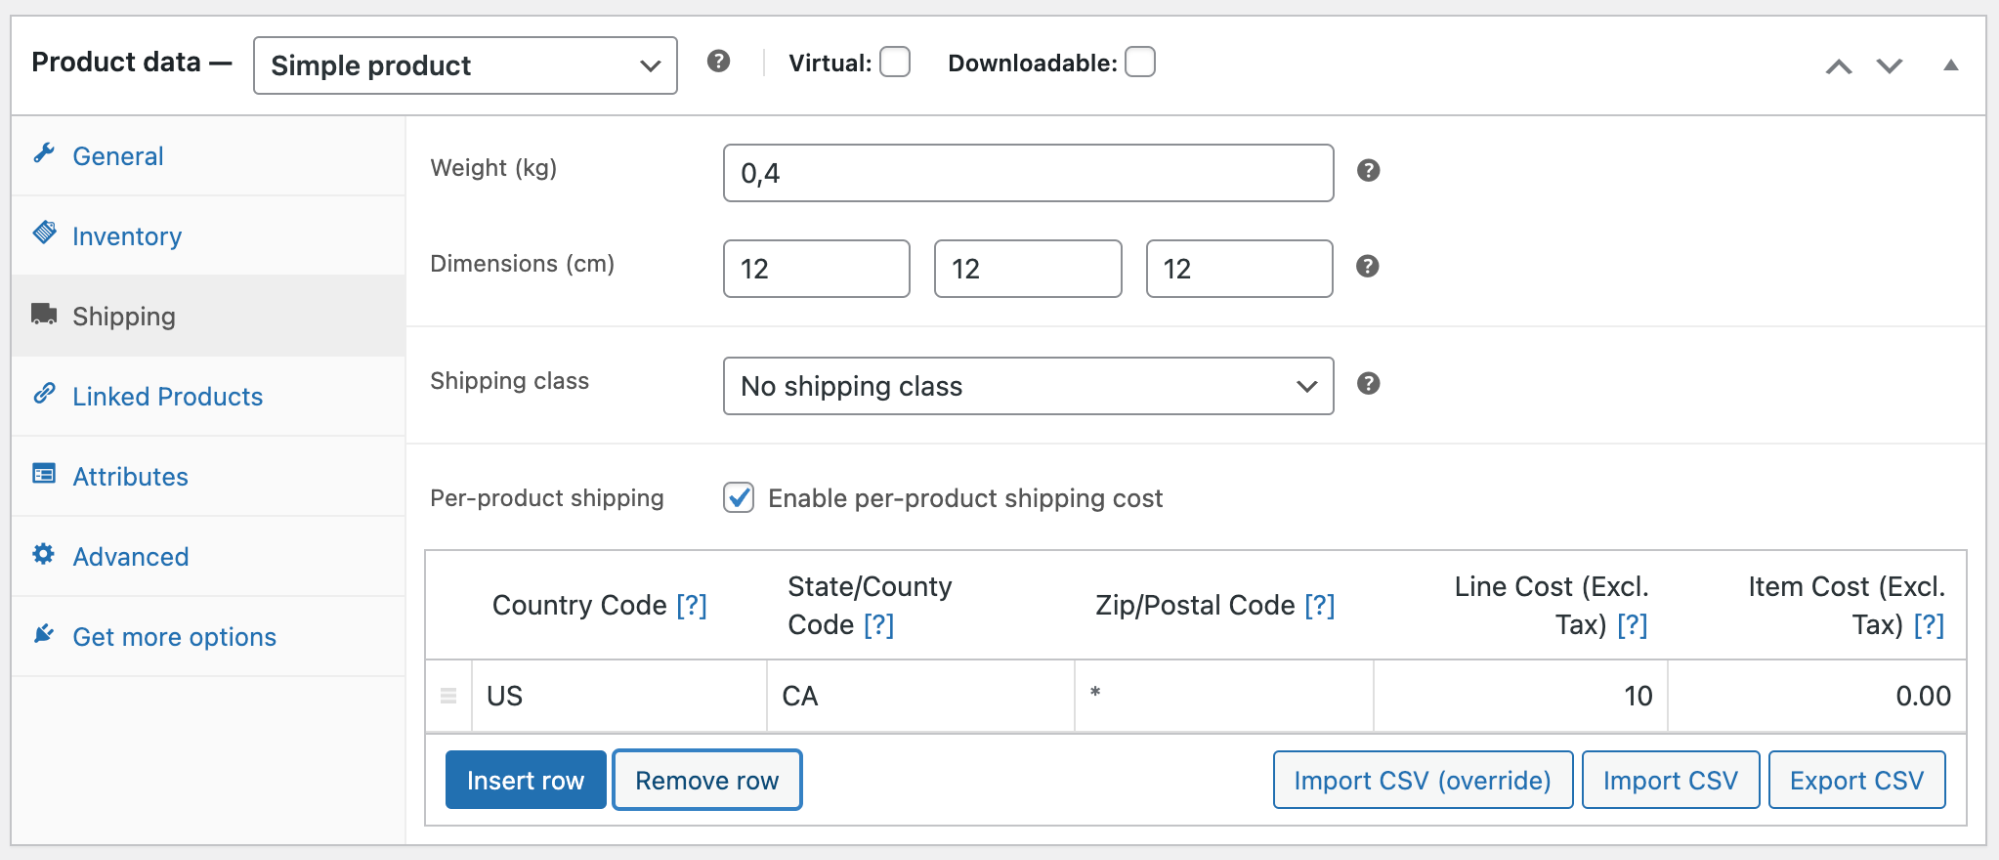
↑ Back to topFirst edit your product. On the Shipping tab you will see a per-product shipping checkbox. Tick the box to enable per-product shipping – from there you can add your costs:
Note: The following “Add per-product shipping cost to all shipping method rates?” option only appears if you’re using the legacy shipping per product. It is recommended to use the new way instead.
If you choose to select the “Add per-product shipping cost to all shipping method rates?” option, the per product shipping cost you set will be added on top of any additional shipping methods (excluding free shipping) you have activated.
The table is where you define your custom rates. Click ‘Insert row’ and fill in each column;
- Country Code – Use the 2 digit country code, e.g. US or GB
- State/country Code – Use a 2 digit state code, e.g. AL or NY
- Zip/postcode – Enter a single postcode to apply the rule to. Use a wildcard to match multiple similar postcodes, e.g. PE* or 90210
- Line Cost – Enter a cost which is applied to the line (ignores quantity). This cost should exclude tax.
- Item Cost – Enter a cost which is applied to the item (cost * quantity). This cost should exclude tax.
You may add as many rows as you need. Only one row will match the customer location, starting from top to bottom.
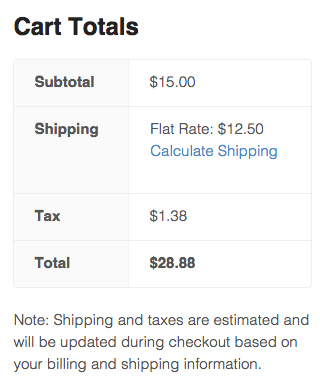
In the following example, Flat Rate Shipping was set at $7.50 and the Per Product Shipping was set to $5 (per the screenshot settings above).
Exporting a CSV
↑ Back to topBeneath the rate table you will see two import/export buttons. The export button will export the product rates into a CSV file containing the following columns:
- Product ID
- Country Code
- State Code
- Postcode
- Line cost
- Item cost
For more information on how to import CSVs, see Importing Rates via CSV. This is useful if importing similar rates for all products.
Defining Shipping Costs for Variations
↑ Back to topEach variation can have the same per product shipping options. To enable these costs, go to the Variations tab and Expand. Tick the Per-variation shipping box pictured below:
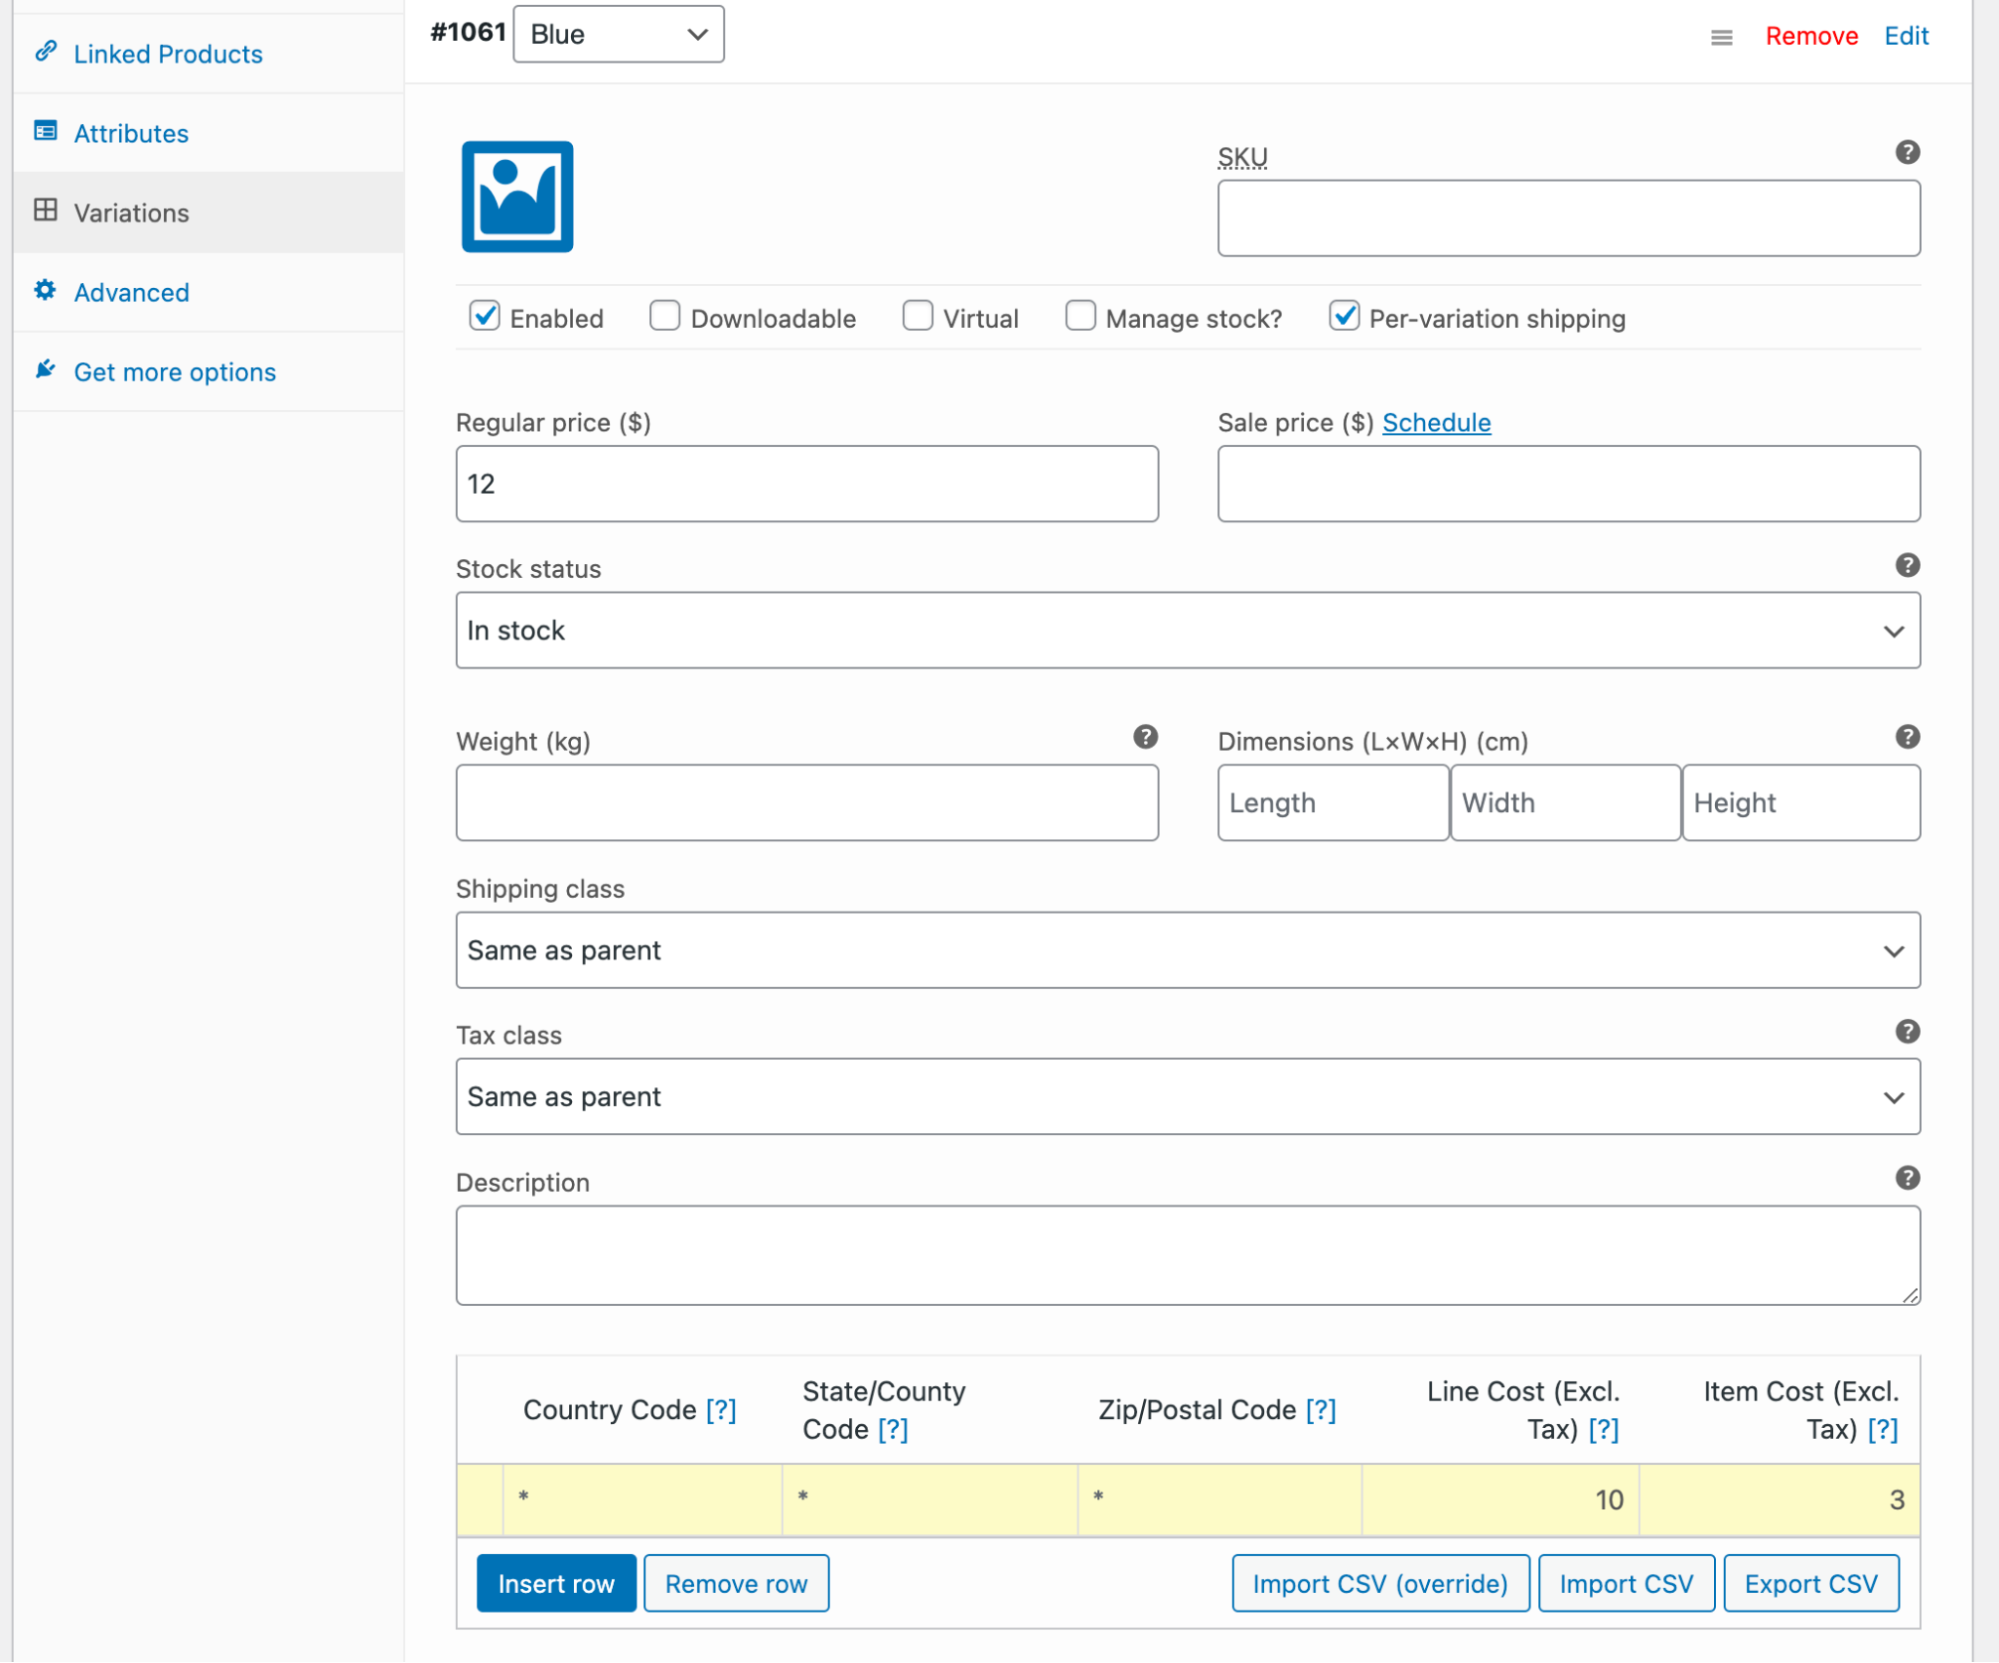
After doing that, the same per product shipping rule table will appear.
Note: Variation rates override product rates.
Using as a Standalone Method
↑ Back to topPer-product shipping can be used as a standalone method whereby all product costs are added together to offer a single rate. When using this method, no other shipping methods are offered by default.
To enable, go to: WooCommerce > Settings > Shipping > Shipping Zones.
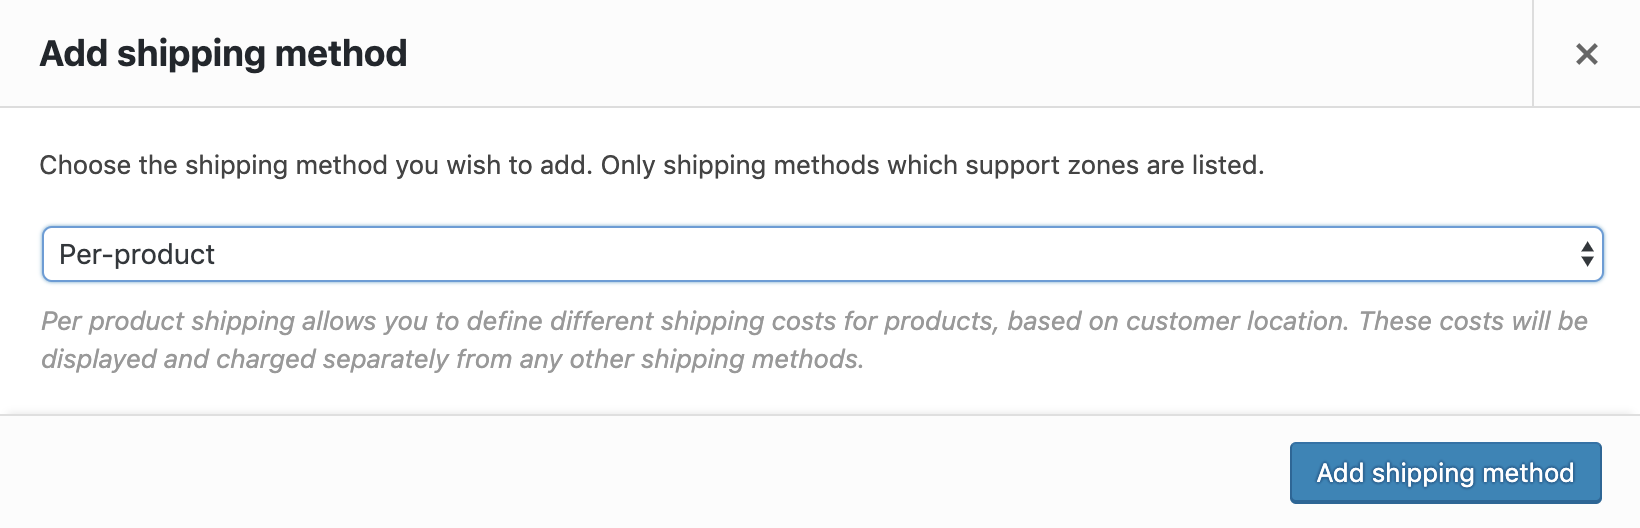
Add the Per-Product Shipping method to a zone. Once you have added the method you can then enter the configuration.
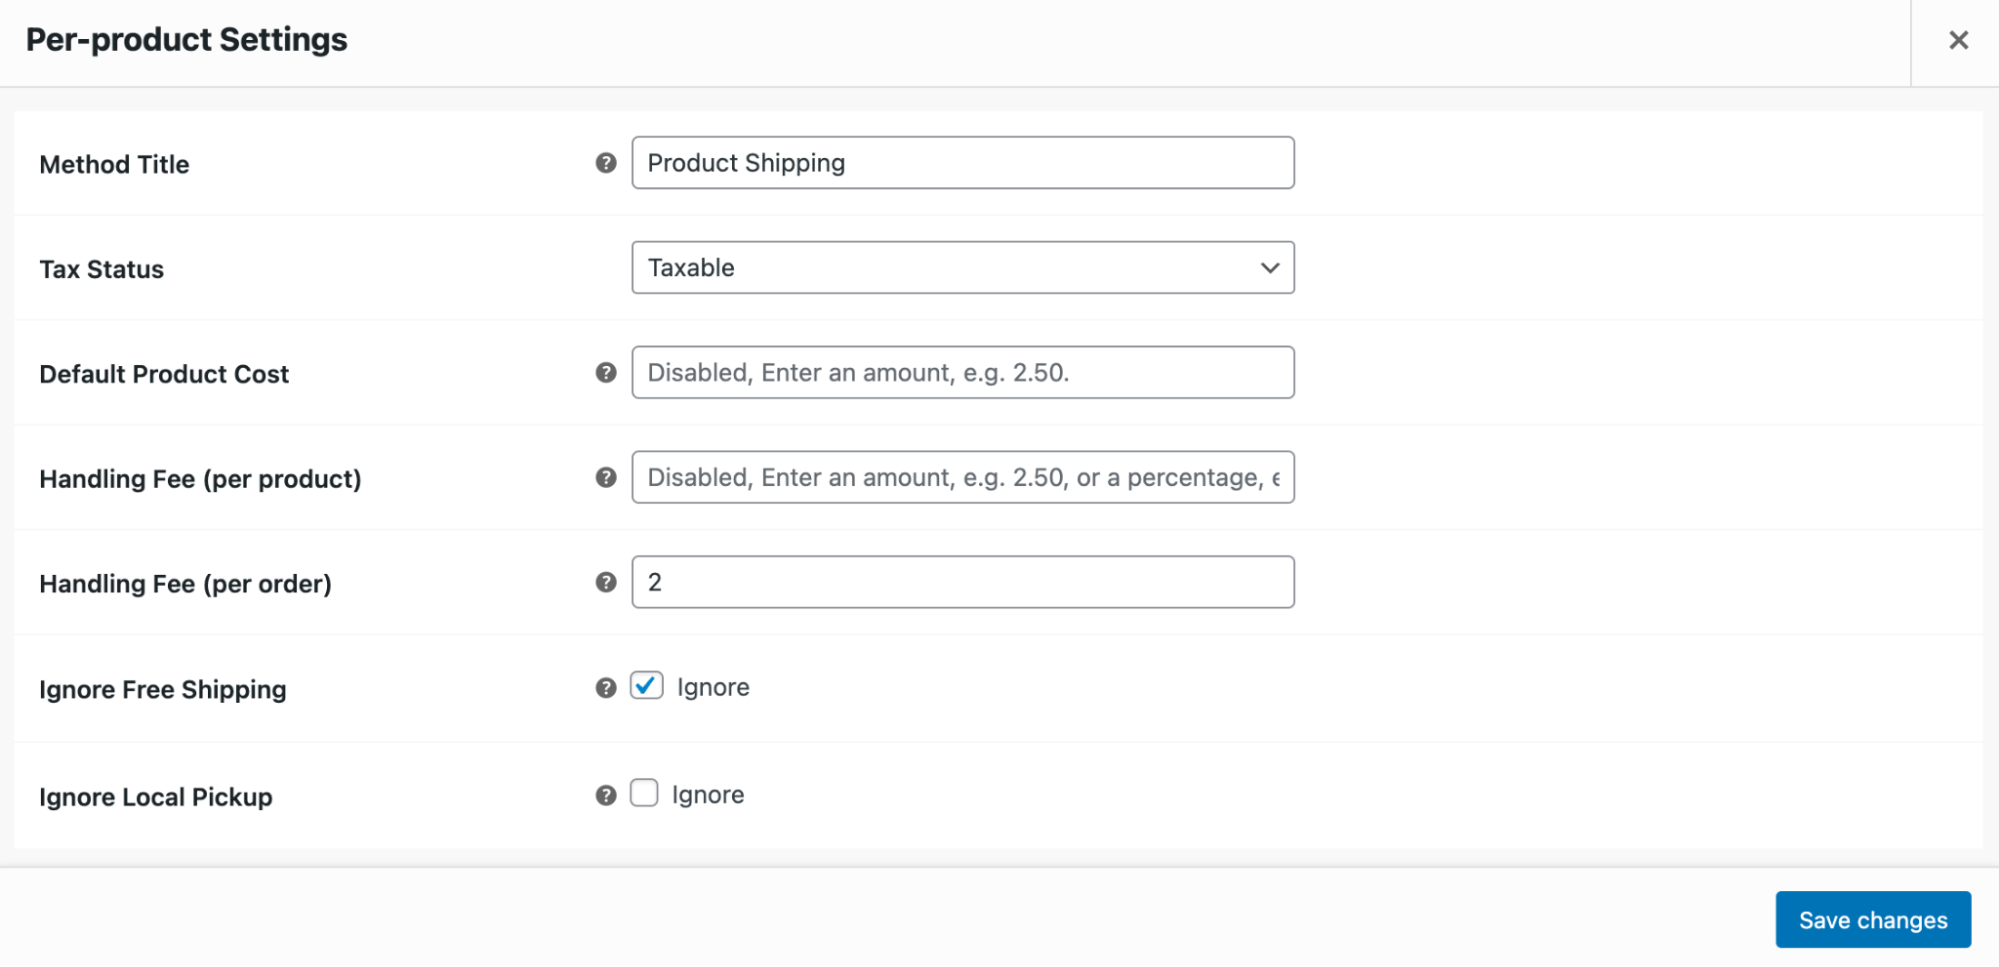
The following options are available:
- Standalone method – Enable this to enable per-product shipping as a separate shipping method.
- Method Title – When standalone, this is the name of this shipping method shown to the customer.
- Tax Status – Whether or not taxes should be added to this method.
- Default product cost – When products don’t have rates setup, they will inherit this cost.
- Handing fee (per product) – Either fixed or percentage, this fee is added to each and every product in the cart.
- Handing fee (per order) – Either fixed or percentage, this fee is applied once to the cart as a whole.
- Ignore Free Shipping – Check this box to prevent the “Free Shipping” option from appearing for packages in the same zone as this “Per Product” method.
- Ignore Local Pickup – Check this box to prevent the “Local Pickup” option from appearing for packages in the same zone as this “Per Product” method.
Save changes.
If merchants want to setup Per Product shipping as a standalone shipping method and still allow customers to select other shipping methods a filter needs to be used to allow these other methods to be chosen. So for the example of allowing flat rate to be chosen in addition to the Per Product Shipping method one could add this filter:
add_filter( 'woocommerce_per_product_shipping_ship_via', function ( $ship_via ) {
	$ship_via[] = 'flat_rate';
	return $ship_via;
} );
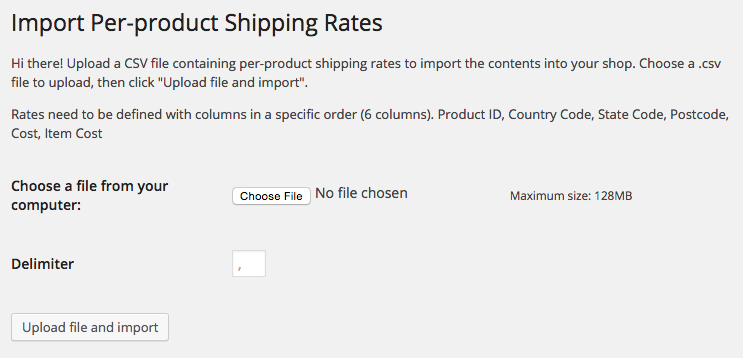
Importing Rates via CSV
↑ Back to topNote: Before uploading rates to a different product from which they were exported, please edit your export file to change the product ID column to be the new product’s ID.
To import rates via a CSV file, you can either go to Tools > Import > Per Product Shipping Rates, or you can click either of the import buttons beneath a rate table:

If Import CSV (override) is selected, lines matching existing imports will be updated. Selecting just Import CSV will add imported values on new lines.
Once on the import screen, upload your CSV file:
Formatting your CSV file
↑ Back to topYour CSV needs to have a set number of columns (6 in total) that include the following:
| product id | country code | state code | postcode | line cost | item cost | |
| Description | ID of the product this rate applies to | 2 Digit country code (if applicable) | 2 Digit state code (if applicable) | A single postcode or wildcard | Cost of shipping each line item | Cost for shipping each individual item |
| Example | 30 | US | AL | PE30* | 9.99 | 2.99 |
Note: Without these columns, the import will fail.
Bulk-enable the Per Product Shipping Setting
↑ Back to topWhile the method above can be used to bulk import Per Product Shipping Rates, the same method doesn’t support turning the Per Product Shipping Setting on or off. However, this can be achieved via WooCommerce’s built-in product CSV Importer and Exporter.
Below is an image illustrating the minimum required columns with which the Per Product Shipping or Per Variation Shipping options can be turned on or off when updating products via the built-in CSV importer.
In the example, the target products are a simple product named Hoodie, and a variable product named T-shirt with S, M, and L variations. They already exist in the store and are identified by the number in the ID column (which is unique to each product and site, and should be changed to match the site you’re working on):
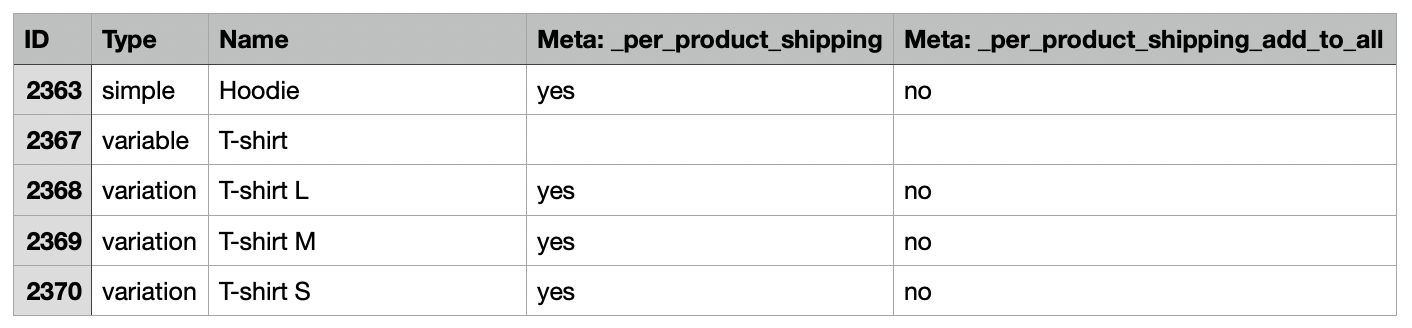
Exported data to your match your products and the image above to a CSV file, and follow the instructions outlined in Update Existing Products section of the doc.
Once the import is successfully completed, the Per Product Shipping setting will be enabled on the products specified in the CSV. Enabled settings appear as pictured in the Defining Shipping Costs for products and Defining Shipping Costs for Variations sections respectively.
Questions and Support
↑ Back to topSomething missing from this documentation? Do you still have questions and need assistance?
- Have a question before you buy this extension? Please fill out this pre-sales form – please include the name of this extension in your query.
- Already purchased and need some assistance? Get in touch with a Happiness Engineer via the WooCommerce.com Support page and choose this extension name from the “I need help with” dropdown