Paysafe Checkout API uses a secure JavaScript-based overlay to allow merchants to collect payments via credit cards and direct debit. The sensitive payment information is only handled by Paysafe and never reaches the merchant store lowering the PCI compliance level for the payments to the least demanding SAQ-A.
The gateway supports the following payment processes:
- Sale and Authorization Only payments
- WooCommerce Subscriptions product payments (requires separate plugin “WooCommerce Subscriptions“)
- Important: WooCommerce Subscriptions version 2.0 and higher are supported only
- WooCommerce Pre-Orders product payments (requires separate plugin “WooCommerce Pre-Orders“)
- Process refunds directly from the Edit Order screen.
- Capture payments directly from the Edit Order screen.
- Pay with tokens. Payment tokenization
Prerequisites
↑ Back to top- WooCommerce version 3.0 or higher
- For WooCommerce Subscriptions, version 2.0 or higher
- PHP version 5.3 or higher
Installation
↑ Back to top- Download the .zip file from your WooCommerce account.
- Go to: WordPress Admin > Plugins > Add New and Upload Plugin with the file you downloaded with Choose File.
- Install Now and Activate the extension.
Quick Setup and Configuration
↑ Back to top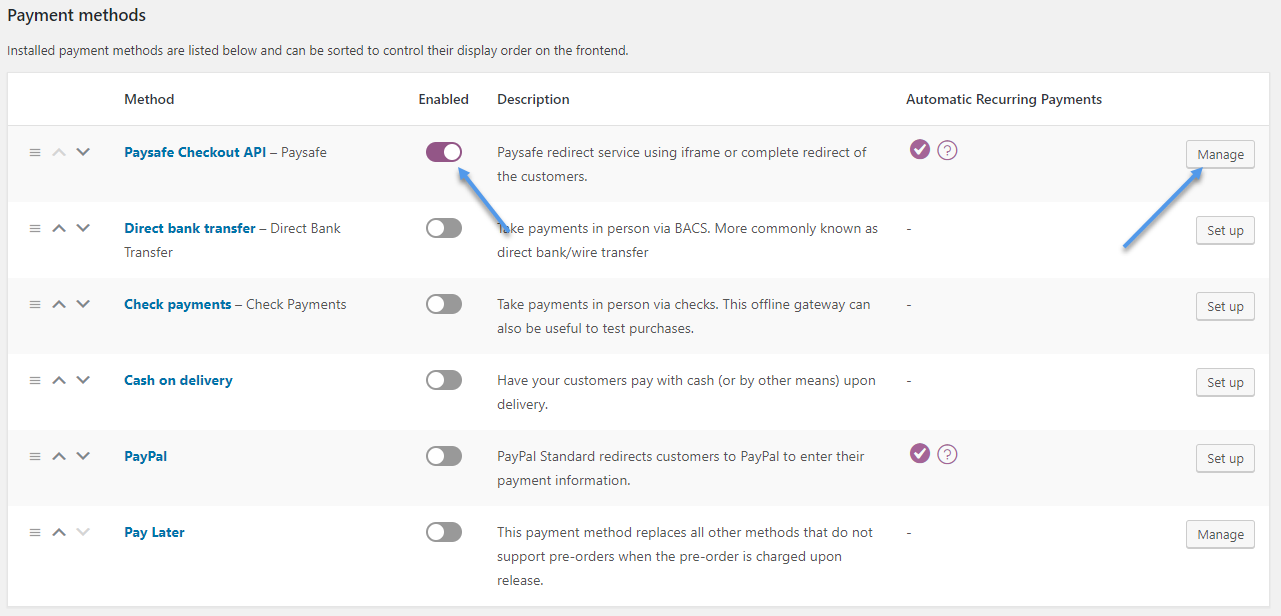
- Login to your WooCommerce store.
- Go to: WooCommerce > Settings > Payments > Paysafe Checkout API.
- Enter Method Title and Method Description
- Under the Credentials Settings, enter your API Keys.
- Under Merchant Accounts Settings, enter at least the Cards Account ID
- Leave everything else as default.
- Start accepting payments
Setting Options
↑ Back to topIntegration Type Settings
↑ Back to top- You choose one of the options from the Integration Type selection setting

- After you change your selection you will see a notice under it prompting you to save the change before you continue.

- When you click the “Save changes” button, the page will refresh and you will be ready to set up your gateway.


General Settings
↑ Back to top- Method Title:
- This controls the title which the user sees during checkout. Also, it is displayed whenever the gateway is referenced.
- Description:
- This controls the description which the user sees during checkout.
Credentials Settings
↑ Back to topNote: Below in the section “How to find my Credentials” you can see how to find your credentials in the Paysafe Dashboard.
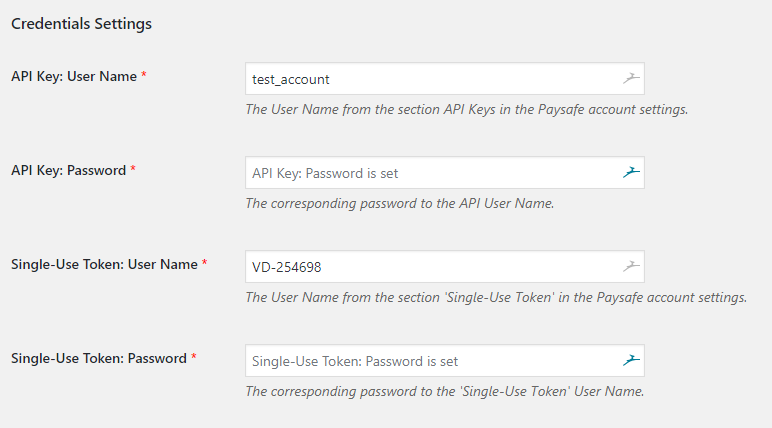
- API Key: User Name:
- This is the API Key User Name found in your Paysafe Dashboard > Settings > API Key.
- API Key: Password:
- This is the API Key Password found in your Paysafe Dashboard > Settings > API Key.
-
Note: The Password will not appear in the text field, but a placeholder will let you know if it is set or not.
- Single-Use: User Name:
- The User Name from the section ‘Single-Use Token’ in the Paysafe account settings
- Single-Use: Password:
- The corresponding password to the ‘Single-Use Token’ User Name.
-
Note: The Password will not appear in the text field, but a placeholder will let you know if it is set or not.
Merchant Accounts Settings
↑ Back to top- Card Account IDs: The IDs are required to process a card payment. Please enter at least one Account ID.
- Please enter one Account ID per store currency.
- Multi-currency stores can set an Account ID for each currency they support
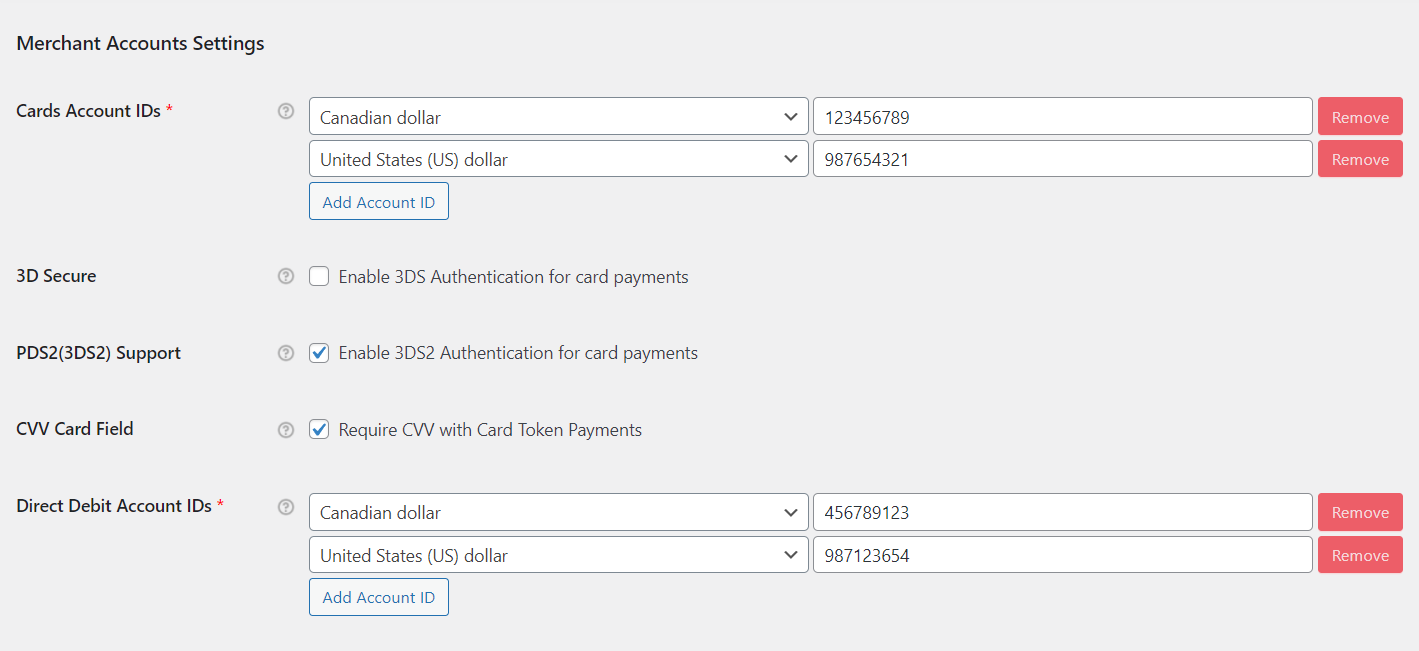
- 3D Secure: If your merchant account is enabled for 3D Secure payment authentication, you can enable the authentication here.
- PDS2(3DS2) Support: Enable 3DS2 for card transactions.
- CVV Card Field: When enabled, the CVV field will appear and be required for payments with saved cards
- Direct Debit Account IDs: The Account IDs here are used to process direct debit transactions. Leave empty, if you are not accepting direct debit payments
Transaction Settings
↑ Back to top- Payment Pages Language:
- Controls the language of the Paysafe payment page. You can choose from 4 languages US English and French Canadian.
- Authorization Type:
- “Sale“, will capture the fund together with the transaction authorization.
- “Authorization Only“, will only perform authorization and let you capture the funds at a later date.
- Accepted Cards
- This setting will allow you to easily display your accepted payment methods on the checkout page payment option. It will not control the actual payment cards accepted on the Paysafe payment page, it is just an easy way to show the correct card icons on the checkout page.
Vault Settings
↑ Back to top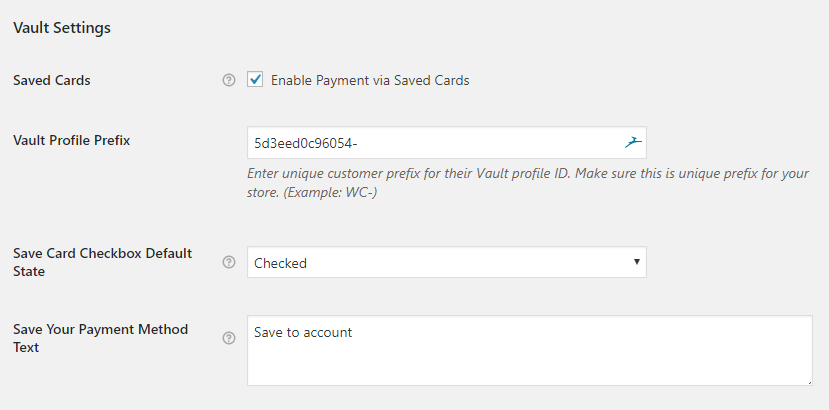
- Saved Cards:
- Enables the vault functionality. When enabled the plugin will display a checkbox to the customer asking for permission to save their card for future payments.
- Vault Profile Prefix:
- For merchants with multiple stores, the prefix is used for the gateway to differentiate between your stores. Enter something meaningful to you or just leave it as default value.
- Save Card Checkbox Default State:
- Controls the state of the checkbox asking the customer to save their information for future payments. As checked or unchecked.
- Save Your Payment Method Text:
- The text to prompt the user to save their payment method for future payments. Default is “Save to Account”, but you can enter anything here letting the customer know what will happen
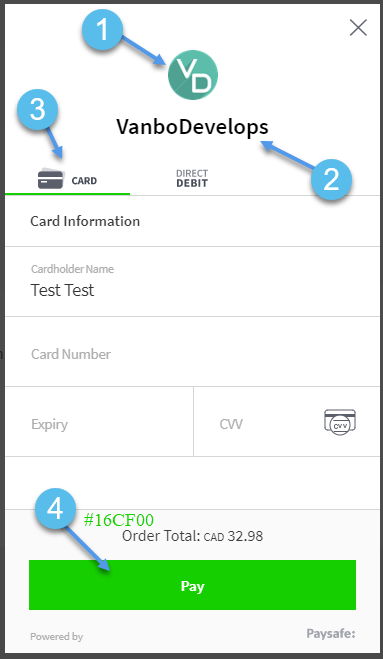
Layover Settings
↑ Back to top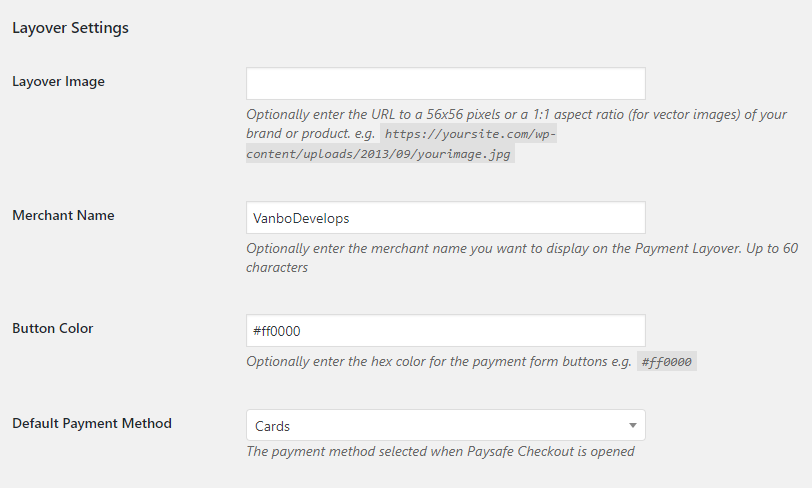
- Layover Image:(1)
- (Optional)This is the logo image displayed on top of the layover. The recommended size of the image is 56px by 56px, but you can also try larger or smaller images cropped to a 1:1 ratio.
- Enter the URL path to the image as you would access it on your website. Example: https://yoursite.com/wp-content/uploads/2013/09/yourimage.jpg
-
Note: It is required that the image is secured with “https://“. Entering an “http://” image will result is a layover load error.
- Merchant Name:(2)
- (Optional) Enter there a merchant name you want to display under the layover image(2). The name should be up to 60 characters.

- (Optional) Enter there a merchant name you want to display under the layover image(2). The name should be up to 60 characters.
- Button Color:(4)
- This is the Pay button color. You should enter the colors in Hex Code RGB, such as #ffffff for white or #000000 for black. There are a number of web colorpickers to help you with the value of your color.
- Default Payment Method:(3)
- Pick which method should be selected by default when the Layover is displayed. For example, is you have Cards and DirectDebit payments, you can choose to display DirectDebit as selected by default, this way urging your customers to pay by this method.
Test and Debug Settings
↑ Back to top- Enable Debug mode
- Debug logs the plugin processes for easier troubleshooting.
- You can see here the location of the generation debug log or you can get the log by going to WooCommerce > Status > Logs > pick the log you want and click View.
Process Refunds
↑ Back to topNote: For more information on how refunds work please visit the WooCommerce Refunds documentation.
Refund steps
↑ Back to top- Go to the “Order Edit” screen
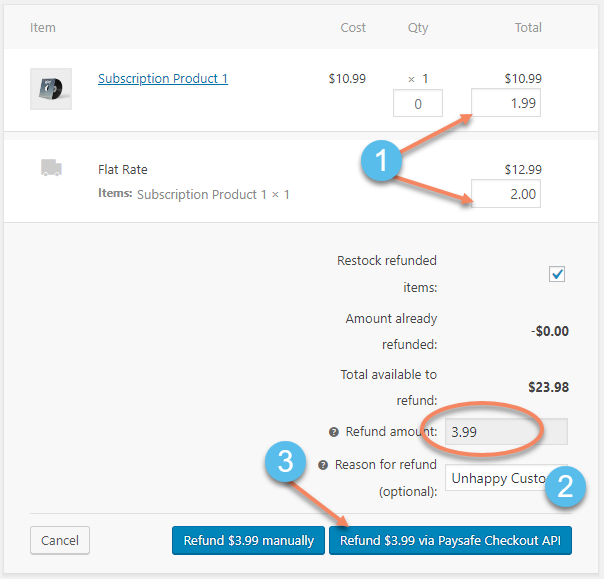
- Under “Items” meta box, in the bottom left corner, you will see a “Refund” button. Click it.
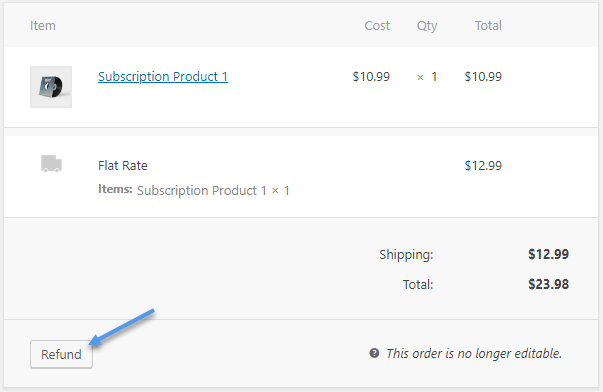
- Entering the refund amount can be a bit confusing. What you have to remember here is that you are refunding an amount from each order item or fee(step 1 in the image below) and not from the order as a whole. This is done so that taxes are refunded appropriately from the item as well. The field “Refund amount” will be automatically populated and you will not be able to enter an amount in it.

- Enter a reason for the refund or a note to remember why was the refund processed (step 2 in the image above)
- Press the “Refund … via Paysafe” button (step 3 in the image in the image above)
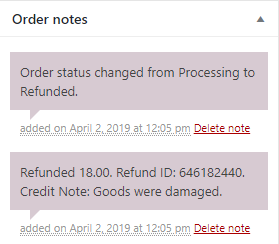
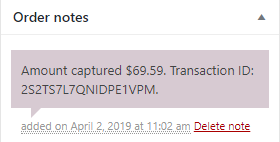
- The refund will be processed and upon page refresh you will see an order note, noting the refund amount, reason and transaction ID.


Refund a Direct Debit transaction
↑ Back to topImportant: Do not refund Direct Debit transactions unless you can review the account you are transferring money to.

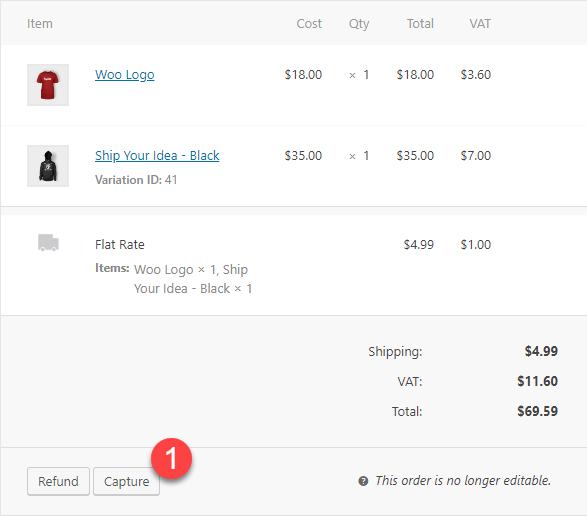
Capture Payments
↑ Back to topNote: Only a single capture is possible per transaction. You can capture up to the initially authorized amount, no matter what the current order total is.
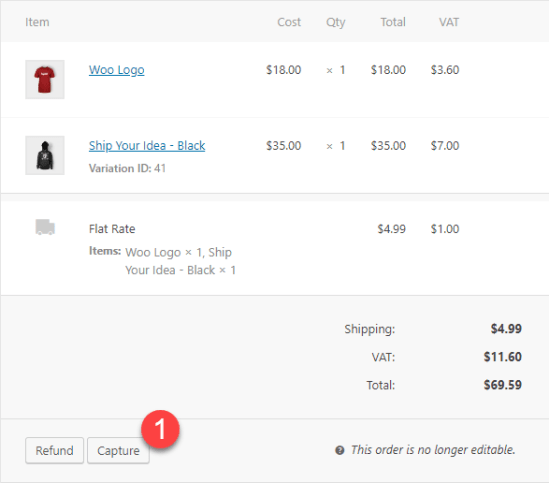
- Go to the “Order Edit” screen
- Under “Items” meta box, in the bottom left corner, you will see a “Capture” button. Click it to expose the capture input fields.
- Enter the amount you want to capture from the order.
Note: You will see how much is authorized, you can’t capture more than that amount.
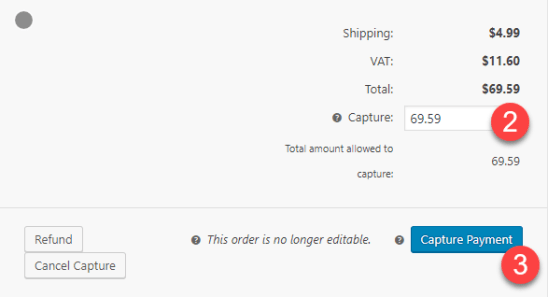
- Press Capture Payment button.
- A note will be left on the order with details about the captured amount and the transaction ID from the process.


How to find my Credentials
↑ Back to top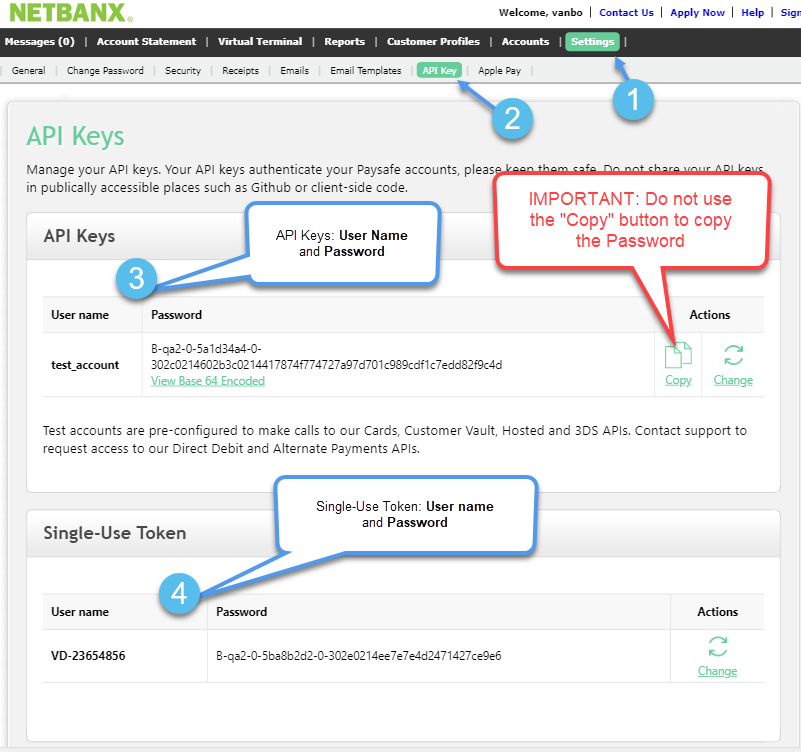
- Under the API Keys section, you will find the API Key User name and Password.
- Under the Single-Use Token section, you will find the Single-Use User name and Password.
- Don’t use the Copy button to copy the API Password. It looks like you are copying the password, but it copies both the username and password in one string.
FAQ & Troubleshooting
↑ Back to topWe have a separate Merchant Account ID for each currency in my store. Can I use my other Account IDs depending on the order currency?
↑ Back to topWe set the integration, but when we attempt to process a transaction, we receive an error 5279. What can we do to fix the issue?
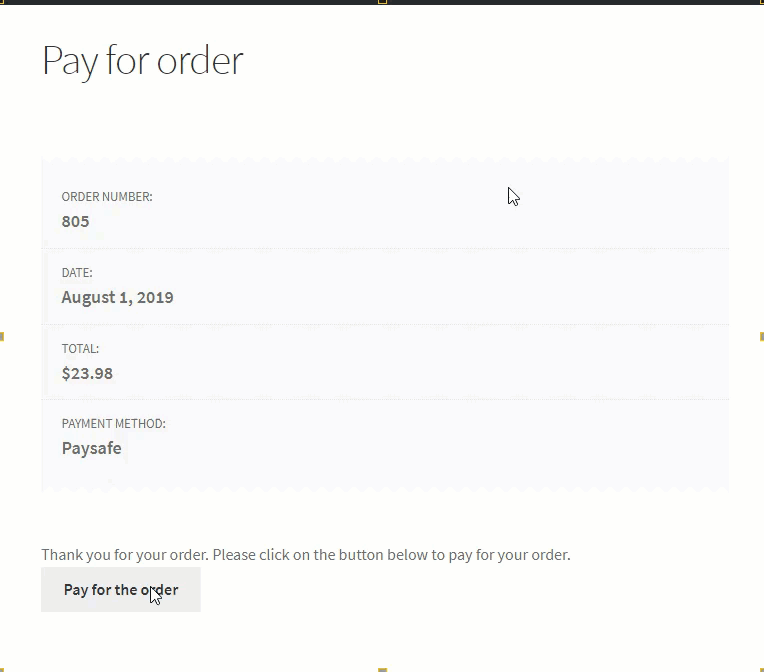
↑ Back to topI want to open the Payment form automatically when the customer reaches the Pay page. How can I do that?
↑ Back to top
This file contains bidirectional Unicode text that may be interpreted or compiled differently than what appears below. To review, open the file in an editor that reveals hidden Unicode characters.
Learn more about bidirectional Unicode characters
| add_action( 'wp_footer', 'prefix_add_script_to_footer' ); | |
| /** | |
| * Adds a script to automatically load the Paysafe Layover on the WooCommerce pay page | |
| */ | |
| function prefix_add_script_to_footer() { | |
| if ( ! is_checkout_pay_page() ) { | |
| return; | |
| } | |
| ?> | |
| <script> | |
| /** | |
| * This is JavaScript code and it should be added to any file that will load it on the WooCommerce "Pay" Page | |
| * | |
| * The code will automatically start the Payment form without requiring the customer to click on the Pay button. | |
| * Important: Keep in mind that if you allow Tokenization, the customer will not be allowed to choose to save their card or not | |
| */ | |
| (function ($) { | |
| $(document).ready(function () { | |
| var isPayPage = $('body').hasClass('woocommerce-order-pay'); | |
| if (true === isPayPage) { | |
| setTimeout(function () { | |
| $('#paysafe_checkout_payment_form').submit(); | |
| }, 800); | |
| } | |
| }); | |
| })(jQuery); | |
| </script> | |
| <?php | |
| } |