Allow customers to place orders on WhatsApp and share the products on with the order on WhatsApp for WooCommerce plugin. Easier order placement results in higher conversions, better customer relationships, and future promotions.
Installation
↑ Back to top- Download Order on WhatsApp for WooCommerce and have your .zip file
- At the WordPress admin panel, go to the Plugins section, and click ‘Add New’ to upload and install the plugin you recently downloaded from WooCommerce.com.
- Upload the .zip file to proceed with the installation.
- Wait until the plugin installs. After successful installation, activate the plugin, and move on to configuration settings.
Configurations
↑ Back to topAt the admin panel WooCommerce > Settings and click Order on WhatsApp tab to configure this extension. Here you will find the three tabs for settings such as Settings, Share Button, & Show/Hide Button.
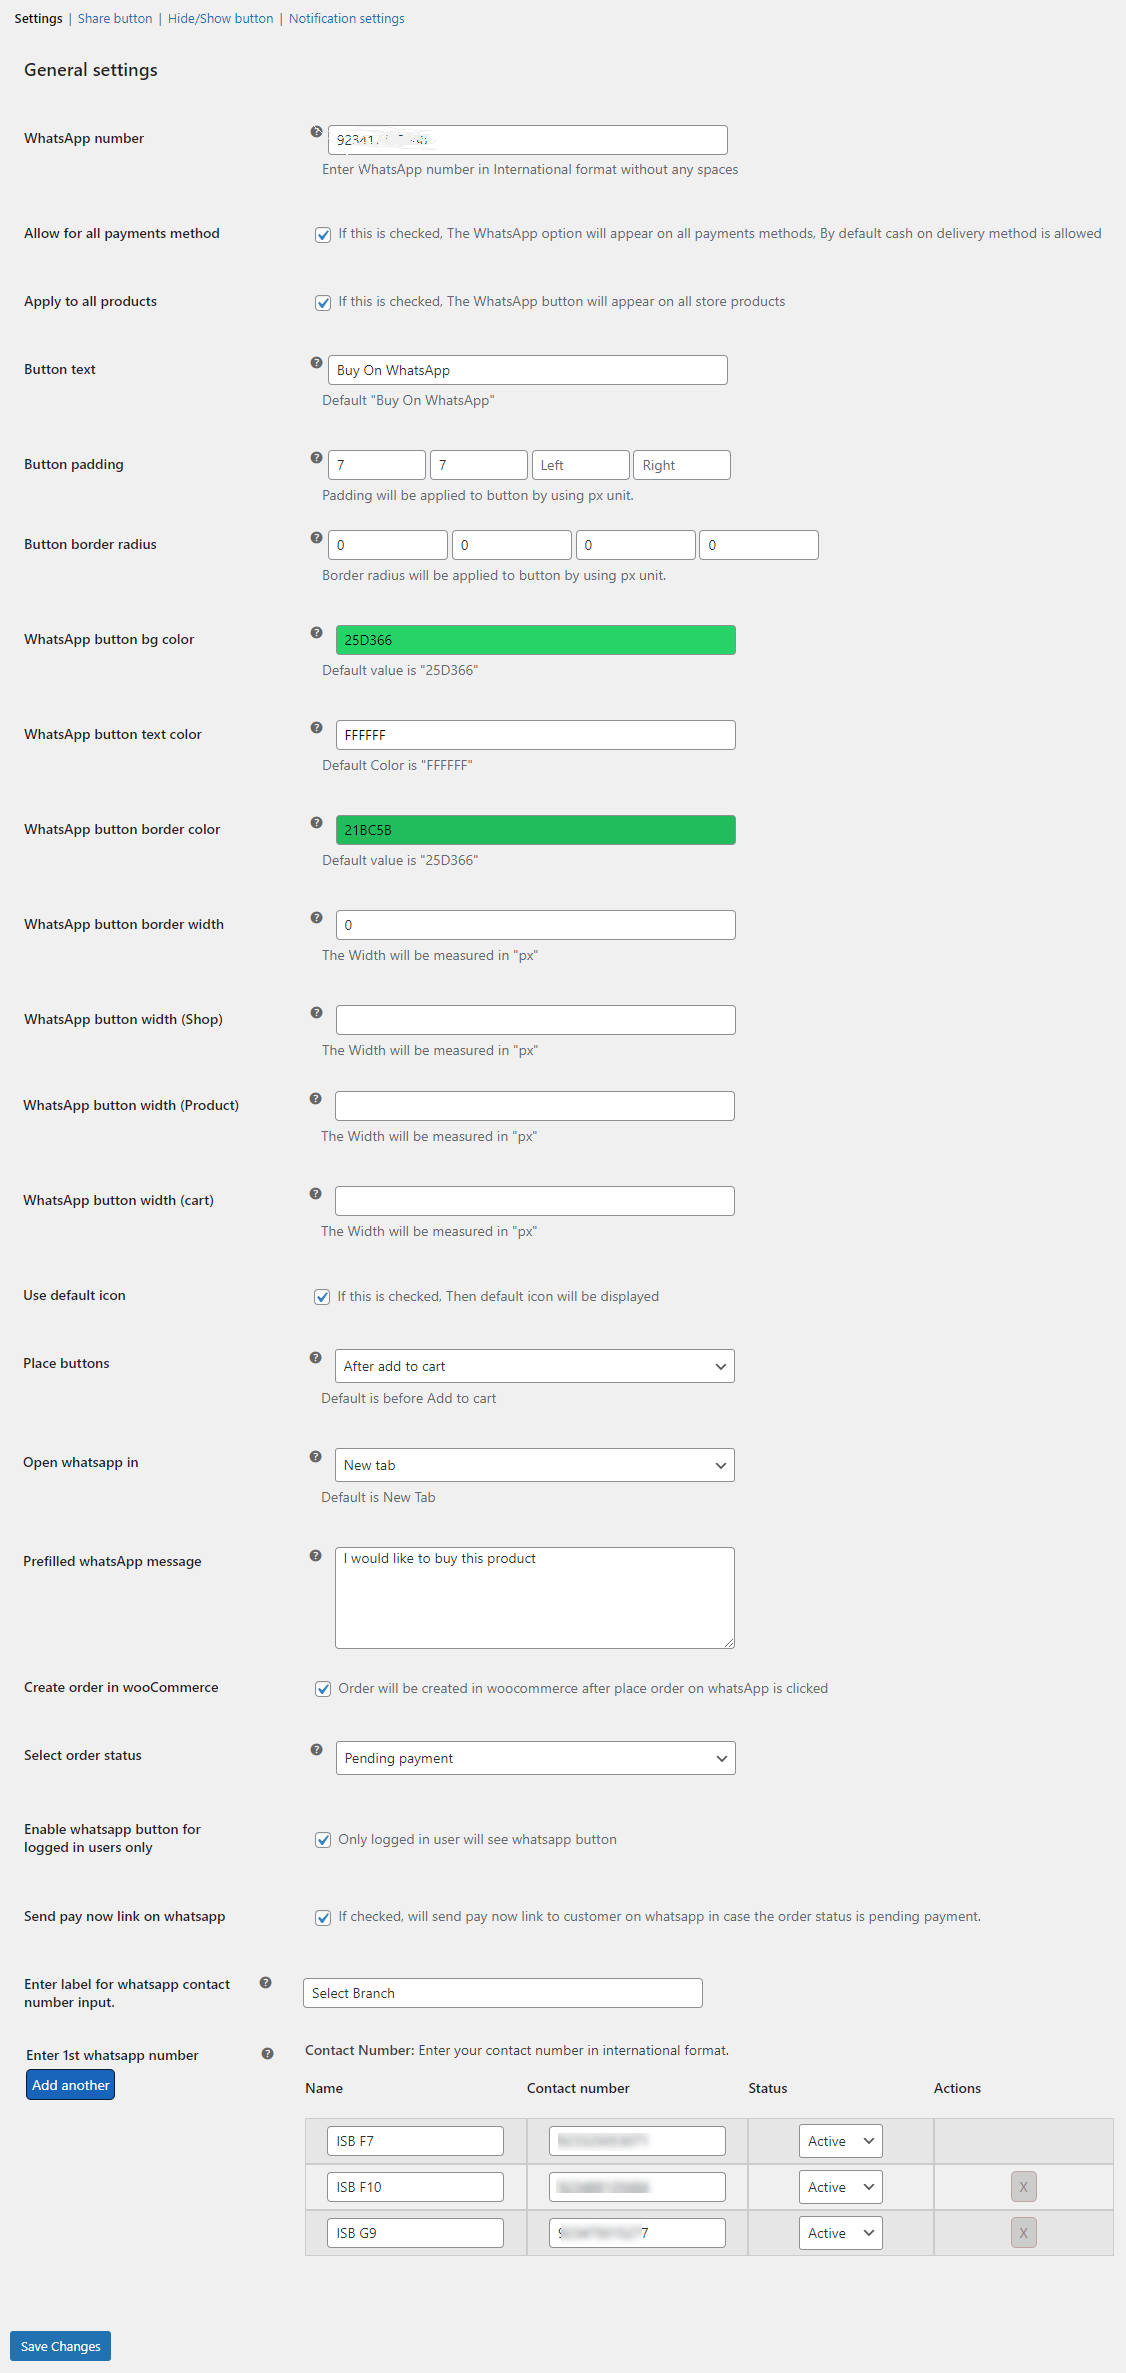
General Settings:
↑ Back to topHere you can configure the following settings for the WooCommerce order on WhatsApp plugin.
- WhatsApp Number (Enter WhatsApp Number in International Format without any sign like + etc)
- Allow for All Payments Method (Enable the checkbox to allow WhatsApp order option for all payment options. By default cash on delivery method is allowed)
- Apply to All Products (Check this option to enable order on WhatsApp option to all shops)
- Button Text (Customize Order on WhatsApp button text)
- Button Padding (Set the padding for the “Order on WhatsApp” button in pixels)
- Button Border Radius (Enter the radius for the WhatsApp order button)
- WhatsApp Button Background Color (Select the background color of the WhatsApp button)
- WhatsApp Button Text Color (Select the text color of the WhatsApp button)
- WhatsApp Button Border Color (Select the border color of the WhatsApp button)
- WhatsApp Button Border Width (Select the border width of the WhatsApp button)
- WhatsApp Button Width (Shop) (Enter the width of the WhatsApp order button for the shop page)
- WhatsApp Button Width (Product) (Set the width of the “Order on WhatsApp” button for the product page)
- WhatsApp Button Width (Cart) (Enter the width of the WhatsApp order button for the cart page)
- Use Default Icon (Click teh checkbox to use the default icon for the WhatsApp order button. If not checked you can select from the given icon options)
- Place Button (Display button after or before Add to Cart button)
- Open WhatsApp in (Select whether you want to open WhatsApp in the new tab or the same tab)
- Prefilled WhatsApp message (Customize auto-filled message when WhatsApp app opens)
- Create Order in WooCommerce (Order will be created in WooCommerce backend if this is checked)
- Select Order Status (Select the default Whatsapp order status. You can select the following order status from the dropdown menu.)
- Pending payment
- Processing
- On hold
- Completed
- Cancelled
- Refunded
- Failed
- Draft
- Enable WhatsApp Button for Logged in Users Only (If this is checked WhatsApp order button will be displayed to logged-in users only)
- Send Pay Now Link on WhatsApp (Enable the checkbox to send a “Pay Now” link to customers on WhatsApp if teh order status is pending payment)
- Enter Label for WhatsApp Contact Number Input (Enter the label for the WhatsApp contact number input field)
- Enter 1st WhatsApp Number (Enter the 1st contact number for WhatsApp order. Enter your contact number in international format.)
- Add Another (Click on the “Add Another” button to add more than one WhatsApp contact number. You can set the name, contact number, and status for each WhatsApp number)
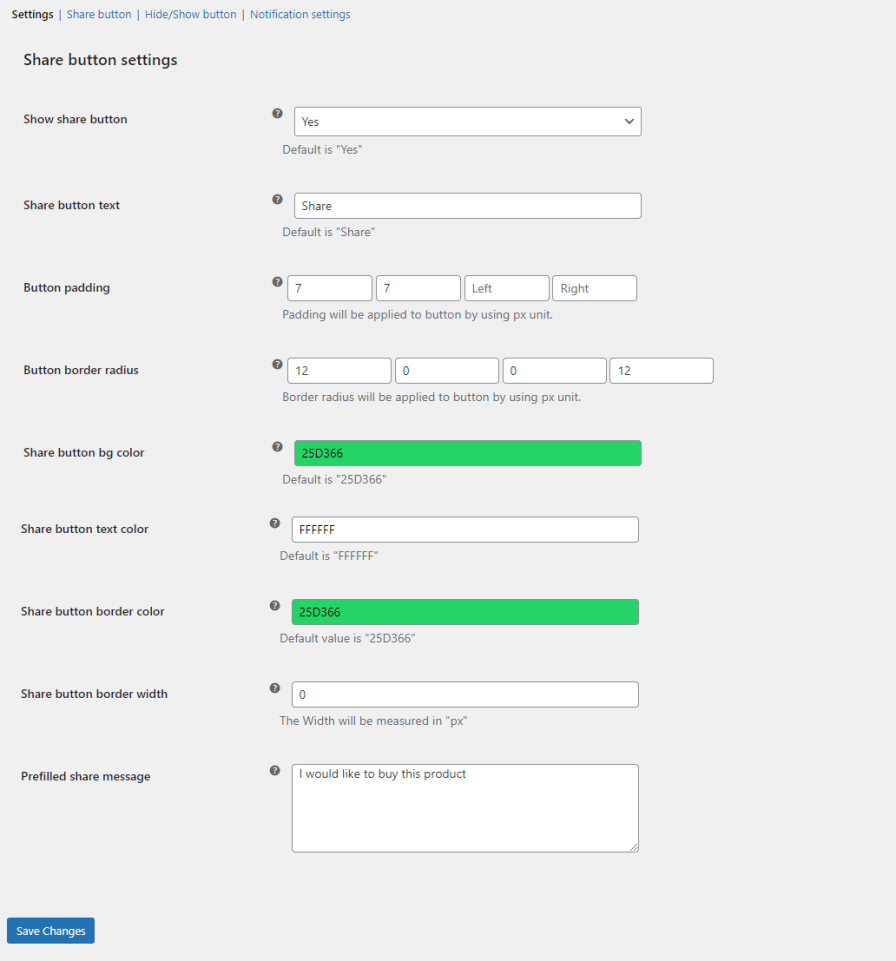
Share Button:
↑ Back to topYou can configure share on WhatsApp button settings in this tab. Here you can find the following settings.
- Show Share Button (Choose “Yes” to enable the WhatsApp share button)
- Share Button Text (Specify WhatsApp share button text)
- Button Padding (Enter the padding for the WhatsApp share button)
- Button Border Radius (Set the border radius for the WhatsApp share button)
- Share Button BG Color (Set WhatsApp share button background color)
- Share Button Text Color (Customize WhatsApp share button text color)
- Share Button Border Color (Select the border color of the WhatsApp share button)
- Share Button Border Width (Choose the border width of the WhatsApp share button)
- Prefilled Share Message (Personalize auto-filled message when WhatsApp app opens)
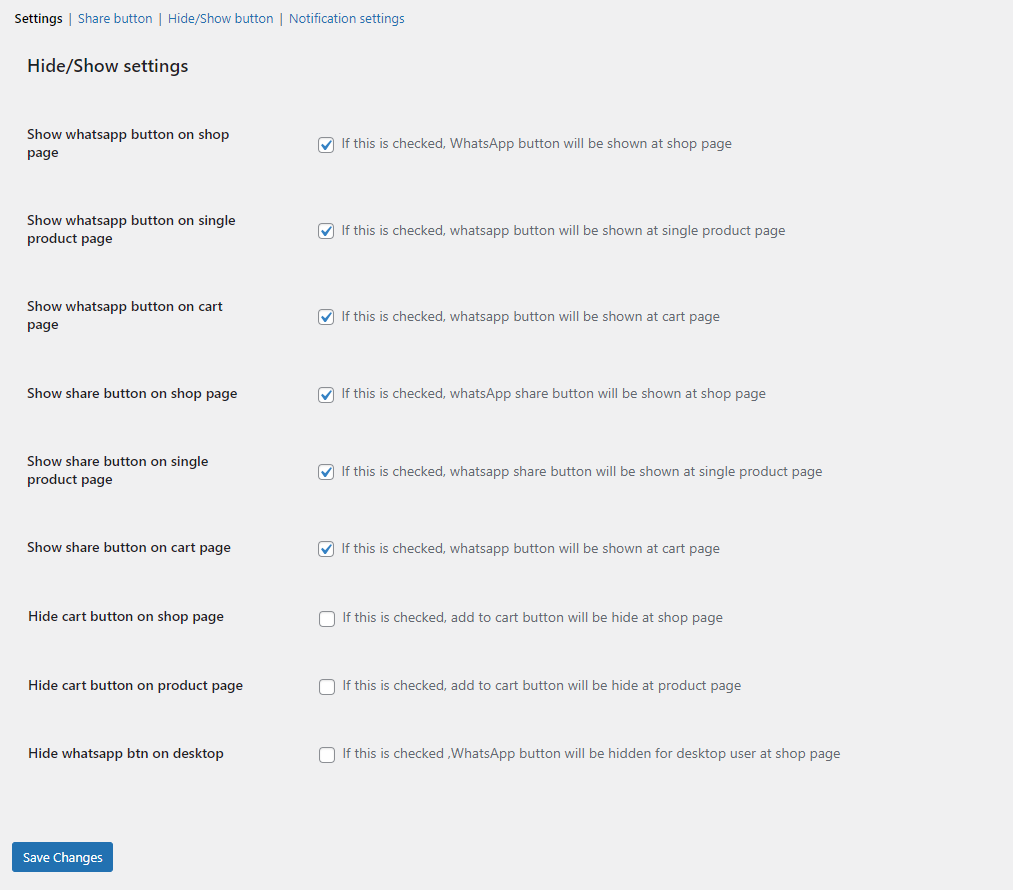
Show/Hide Button:
↑ Back to topIn this tab, you can show/hide the buttons on various pages.
- Show WhatsApp Button on Shop Page (Check this option to display the WhatsApp Order button on the shop page)
- Show WhatsApp Button on Single Product Page (Check this option to display the WhatsApp Order button on the product page)
- Show WhatsApp Button on Cart Page (Check this option to display the WhatsApp Order button on the Cart page)
- Show Share Button on Shop Page (Show WhatsApp share button on the shop page)
- Show Share Button on Single Product Page (Check this option if you want to show the WhatsApp share button on a single product page)
- Show Share Button on Cart Page (Click the checkbox to display the share button on the cart page)
- Hide Cart Button on Shop Page (Hide Add to Cart button from shop page)
- Hide Cart Button Product Page (Hide Add to Cart button from shop page)
- Hide WhatsApp Button On Desktop (Hide WhatsApp button for desktop users)
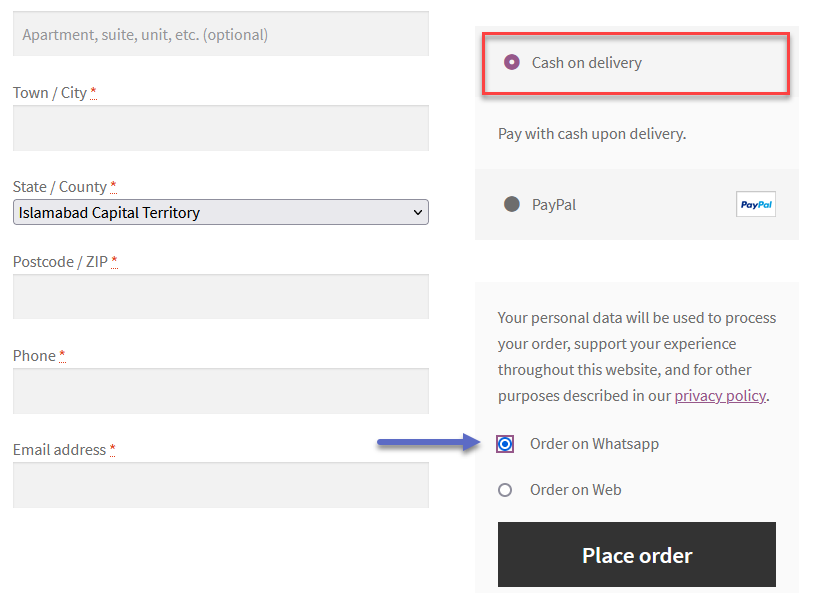
Works with Cash on Delivery & All Payment Method
↑ Back to topOrder on WhatsApp for WooCommerce works for only cash on delivery payment method.
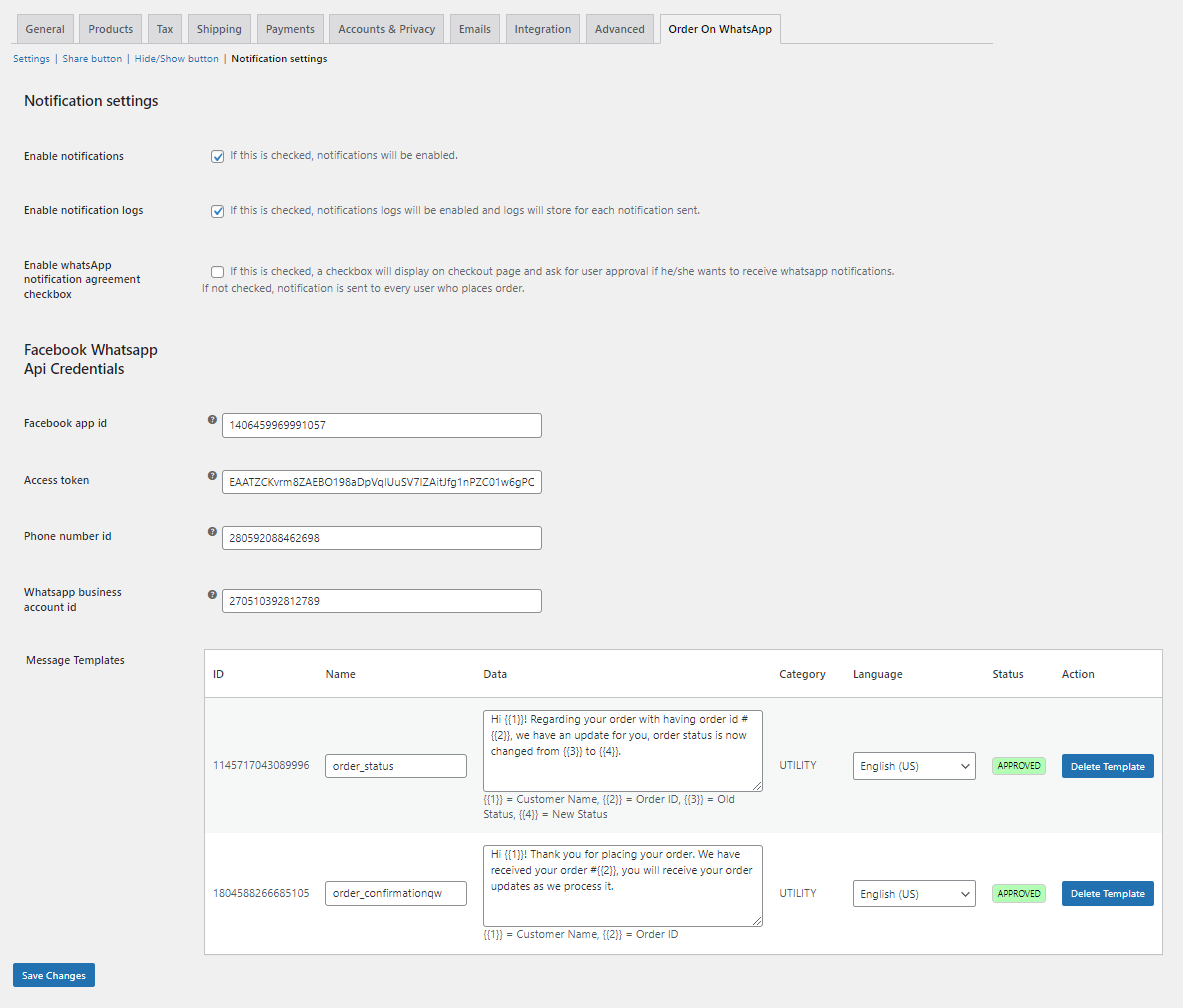
Notifications Settings
↑ Back to top- Enable Notifications (If this is checked, notifications will be enabled.)
- Enable Notifications Logs (If this is checked, notifications logs will be enabled and logs will store for each notification sent.)
- Enable WhatsApp Notification Agreement Checkbox (If this is checked, a checkbox will display on checkout page and ask for user approval if he/she wants to receive whatsapp notifications.
If not checked, notification is sent to every user who places order.)
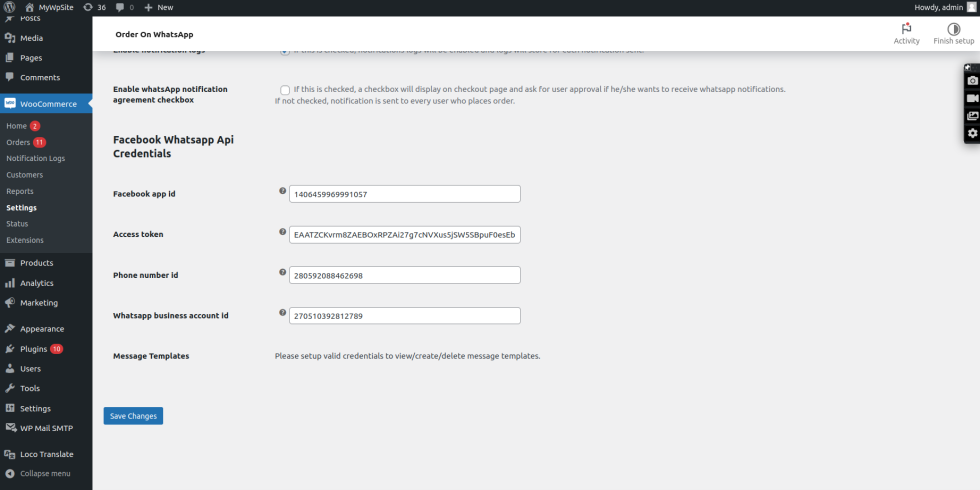
Facebook WhatsApp API Credentials
- Facebook app ID (Add your Facebook app ID)
- Access Token (Enter your whatsapp access token)
- Phone Number ID (Add your phone number ID)
- WhatsApp business account ID (Enter your whatsApp business Account ID)
- Message Template
Note: This Feature is optional because it uses Whats App Business Cloud API (There are charges of using this API which will be paid by Customer)
Configuration Meta Business
↑ Back to topTo ensure the plugin functions properly, you must adjust settings within Meta Business. See the instructions below on how to configure it:
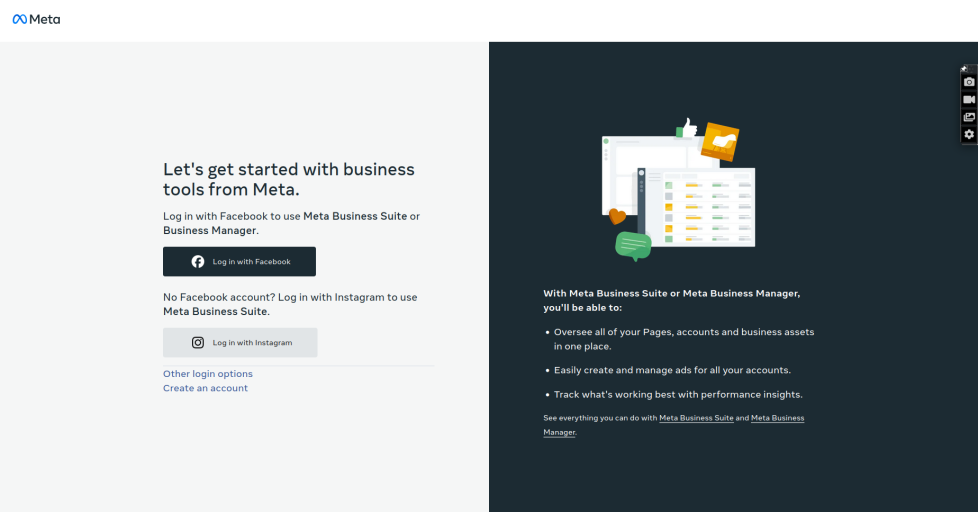
Create a Business Account
Visit https://business.facebook.com to register your company. Afterwards, connect this account to your business’s social networks, including Facebook and Instagram.
To create an account you can also check: Create a Business Account in Meta Business Manager
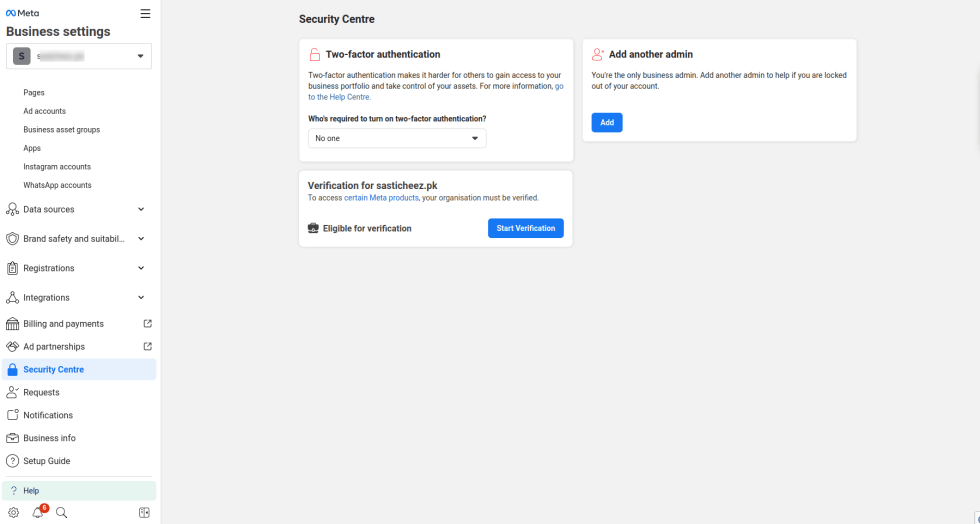
Verify your business
To utilize WhatsApp features, completing a Business verification is essential. This verification allows full utilization of WhatsApp Cloud API credentials directly. Only individuals with complete control of a business account can undergo this process.
For Business verification, refer to: Verify your business.
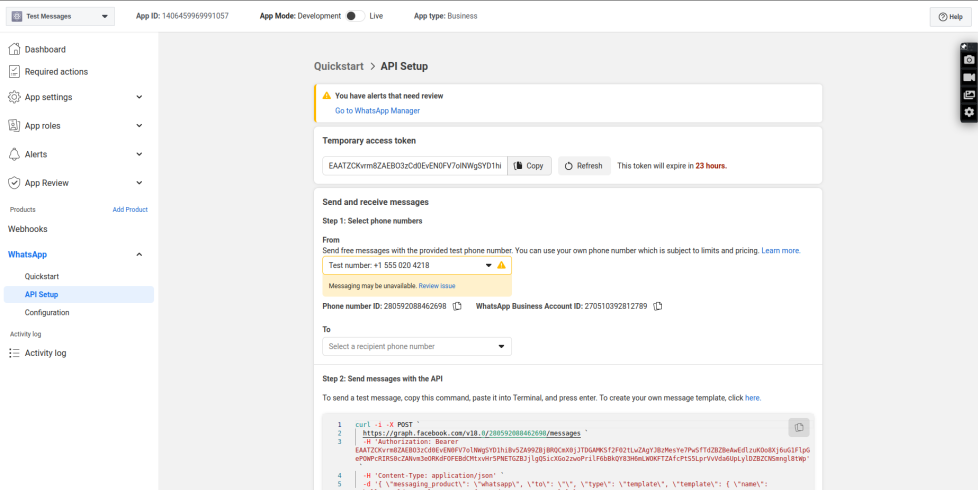
Generate WhatsApp Cloud API credentials
It’s necessary to generate a temporary WhatsApp Cloud API credentials token for testing purposes.
To generate the token, Check: Using Authorization Tokens for the WhatsApp Business Platform or Add The WhatsApp Product To Your App.
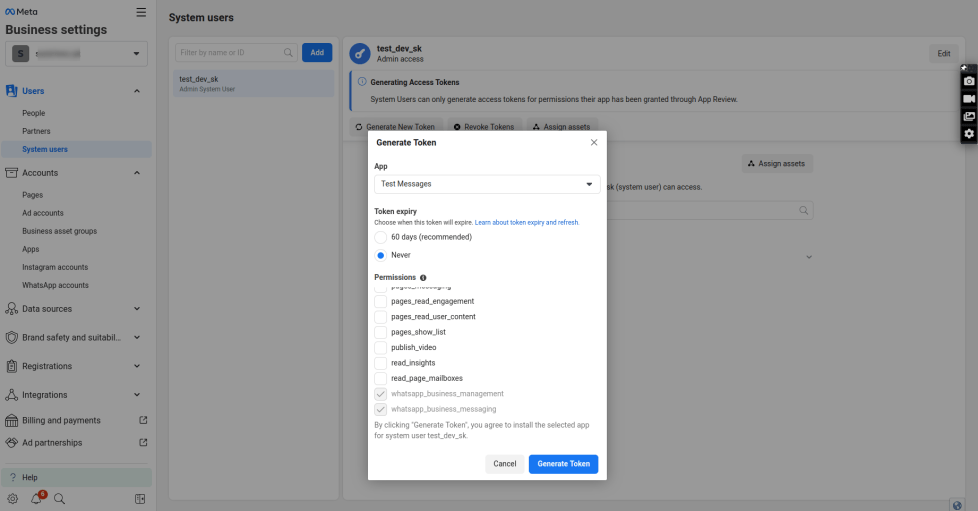
Creating a Permanent Access Token
Understanding the necessity of using a access token in the Authorization header of an HTTP request is crucial. The access token you have seen thus far is likely temporary. If you intend for your app to access the API more than 24 hours, you’ll need to generate a longer-lasting access token.
To create a system user, follow these steps:
- Navigate to Business Settings.
- Choose the business account associated with your app.
- Under Users, select System Users.
- Click on Add.
- Provide a name for the system user, select Admin as the user role, and proceed to create the system user.
- Choose the whatsapp_business_messaging permission.
- Select Generate New Token.
- Copy and securely store your token.
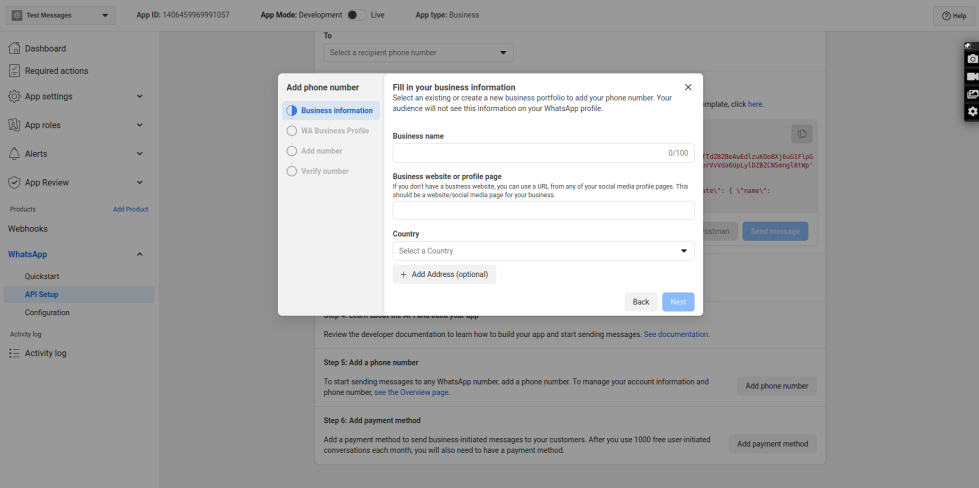
Add a Real Business Number
Start developing your application using your test business number and test WhatsApp business account.
Utilize these test assets without incurring message-sending charges during the app development phase. When you’re prepared to send messages to your customers, add a real business phone number in the API Setup panel and establish a genuine WhatsApp Business Account.
- Access the Meta App configured for WhatsApp by visiting developers.facebook.com > My Apps > Choose your App.
- Navigate to the WhatsApp section using the left menu and select the API Setup panel.
- In the right pane, click on the “Add phone number” button under Step 5: Add a phone number.
If your phone number is presently registered with WhatsApp Messenger or the WhatsApp Business App, you must first remove it. It’s not possible to use the same number on both the WhatsApp Business app and other WhatsApp applications simultaneously. Your number should be exclusively utilized on the Business Platform or Business App.
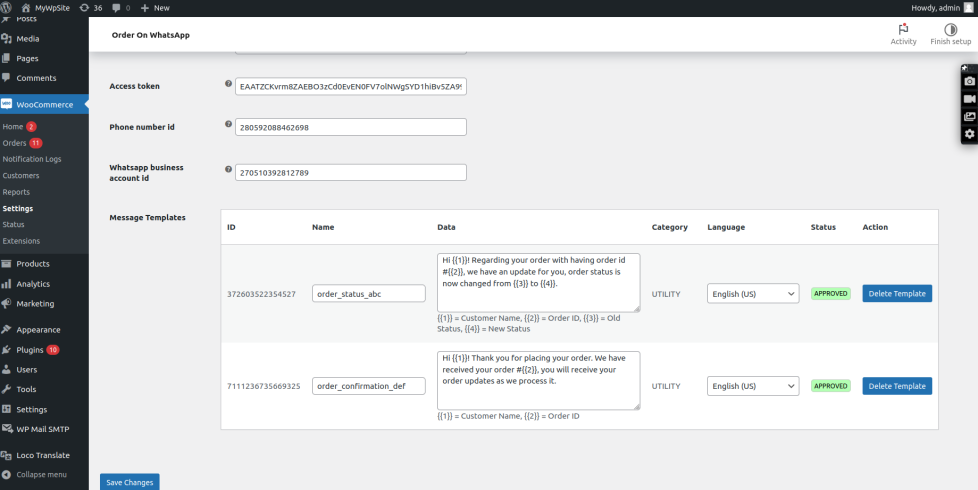
Configure API Credentials in plugin
For configuring API credentials go to Settings in WooCommerce Tab, Here you can see Order on whatsapp tab and a sub-tab(notifications) in which you can add facebook whatsapp API credentials, those are:
Facebook app ID (Add your Facebook app ID)
Access Token (Enter your whatsapp access token)
Phone Number ID (Add your phone number ID)
WhatsApp business account ID (Enter your whatsApp business Account ID)
Configure message templates in plugin
After adding valid credentials and save the settings, A table is created after refreshing page in which you can create templates. You can add following in the table.
• Name
• Data
• Language
You can also create, View or delete template for order status update and order confirmation.
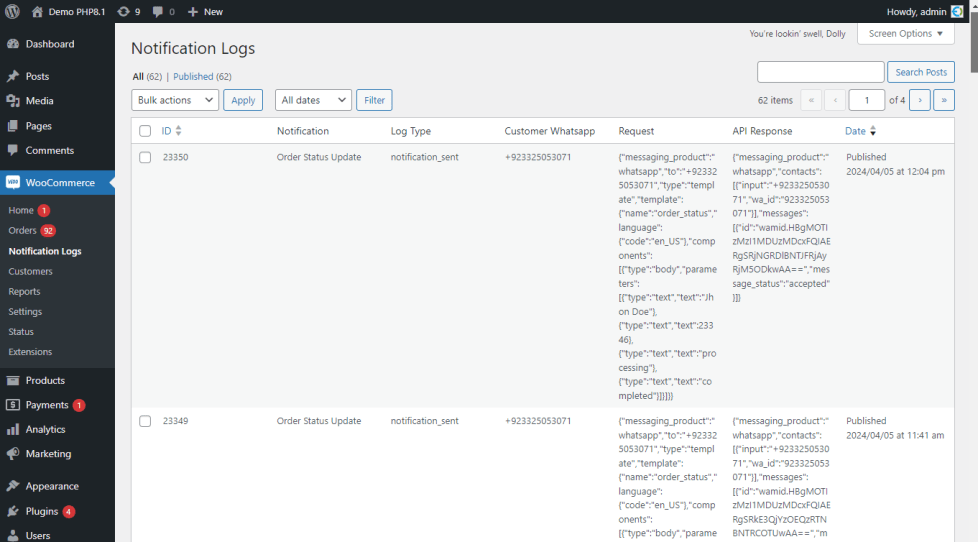
View Notification Logs
Admin can see All Customers WhatsApp Orser status Notifications in Notification Logs Tab Under WooCommerce Option.