Overview
↑ Back to topNote: Moneris is only available for Canadian merchants. Click here for more information.
Requirements
↑ Back to top- PHP 7.1+ (you can see this under WooCommerce > Status
- WordPress 5.0+
- WooCommerce 4.0+
- An SSL certificate
- A Moneris Checkout Profile must be created on your Moneris account
- Navigate to the WooCommerce > Settings > General page and set your WooCommerce store’s currency to Canadian Dollars (CAD)
This extension doesn’t support Hosted Tokenization anymore. To continue using it, you’ll need to follow the instructions in this article on how to create a Moneris Checkout Profile and connect it to your site.
As of WooCommerce 8.3, Cart and Checkout blocks are available as the default experience. WooCommerce Moneris is now compatible with those blocks!
Installation
↑ Back to top- Ensure your store meets the plugin requirements.
- Download the extension from your WooCommerce dashboard.
- Go to Plugins > Add New > Upload and select the ZIP file you just downloaded.
- Click Install Now and then Activate.
- Click Configure and read the next section to learn how to setup the plugin.
Getting started
↑ Back to topCredit card setup
↑ Back to top- Store ID, which your Moneris account representative can provide
- API Token, which you can find by following the steps below
- Checkout ID, which you can find by following the steps below
API Token
Follow these steps to find your API Token:- Login to your Moneris Merchant Resource Center.
- Go to Admin > Store Settings.
- Your API Token should be listed on this page.
Checkout ID
The Moneris Checkout ID is generated after the Checkout Profile is created. To do that, you’ll need to:- Login to your Moneris Merchant Resource Center.
- Go to Admin > Moneris Checkout Config.
- Click on the Create Profile button at the top of the page.
- On the upper right corner, you’ll see the Checkout: section that also includes the ID that you’ll need to use.
- Move to the next section to proceed with configuring the Checkout Profile before connecting it to your shop.
Moneris Checkout Profile Configuration
Note:Some features of the Moneris Checkout Profile aren’t compatible with our plugin, so make sure you follow the instructions below closely to ensure that the payment gateway will work as expected in your shop.
Before you can use the WooCommerce Moneris plugin you’ll need to first correctly configure your Checkout Profile. Kindly note that some of the settings are required to be enabled so make sure to double-check your Checkout Profile configuration before connecting it to your WooCommerce shop so no required settings are missed. Let’s go through the different sections and which features are supported by our plugin:
-
Checkout Type
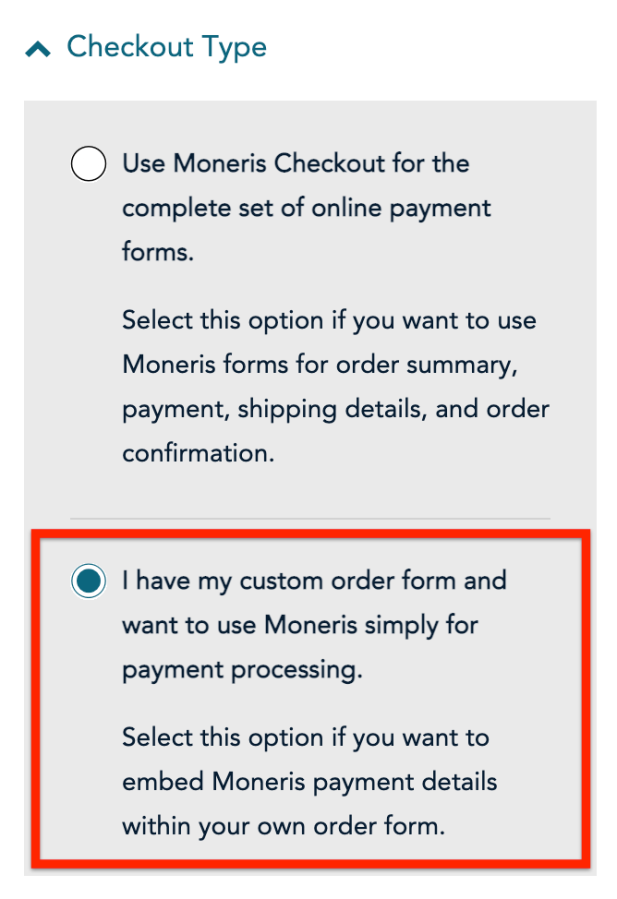 You’ll need to change the checkout type to the one highlighted below. Our extension is using a custom order form and relies on Moneris for payment processing.
 -
Order Summary (Cart)
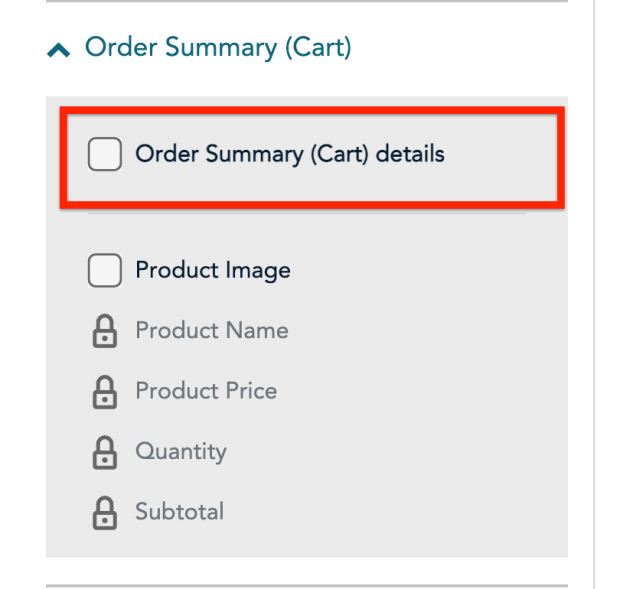
- The Order Summary (Cart) details checkbox should be unchecked as this feauture isn’t compatible with our plugin.
- The Product Image setting can be skipped (recommended to keep or change to unchecked) since the Order Summart (Cart) details setting is disabled and it won’t affect your Checkout Profile.
-
Customer Details
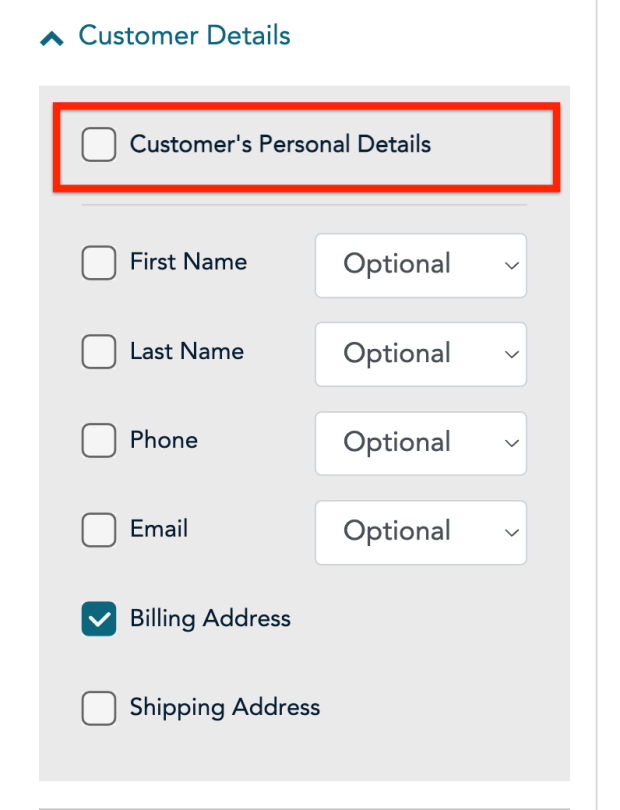 Similar to the previous section, the Customer’s Personal Details checkbox should remain unchecked. The rest of the options in this section can be skipped (recommended to keep or change to unchecked).
 -
Multi-Currency
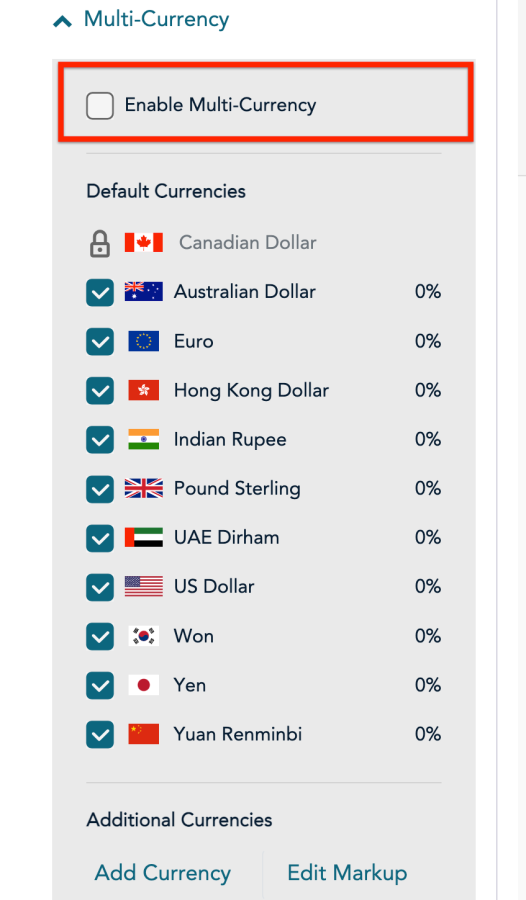 The Enable Multi-Currency setting should remain unchecked. Our plugin doesn’t support the native multi-currency option offered by the Moneris Checkout Profile ID, however, you can follow the instructions here if you’d like to offer an alternative. The Default Currencies can be skipped (recommended to keep or change to unchecked.)
 -
Payment
In this section, you can configure the majority of the payment options for your shop. This is the section where you can enable digital wallets (i.e. Apple Pay, Google Pay), if card logos should be displayed, and more. Let’s go through each section separately:- Accepted Digital Wallets
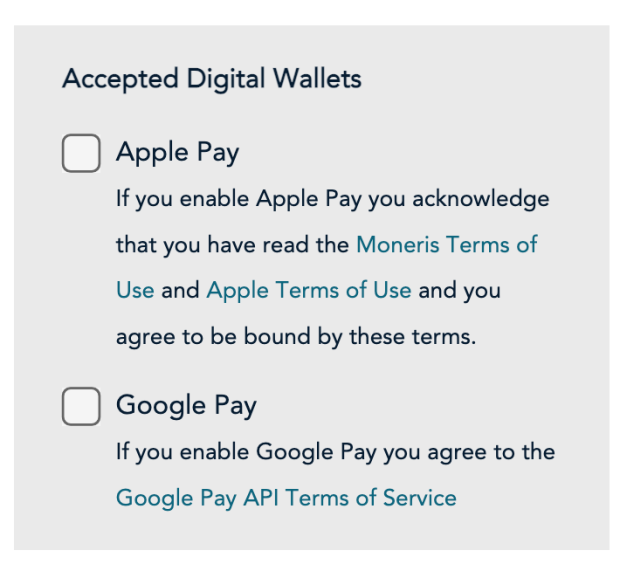 This is where you can enable the Apple Pay and Google Pay digital wallets before you can start using them in your shop. The checkboxes should remain unchecked unless you’re ready to proceed with the set up of any of the wallets. If you’d like to configure them right away, click here for instructions on how to proceed.
 - Card Logos & Card Details
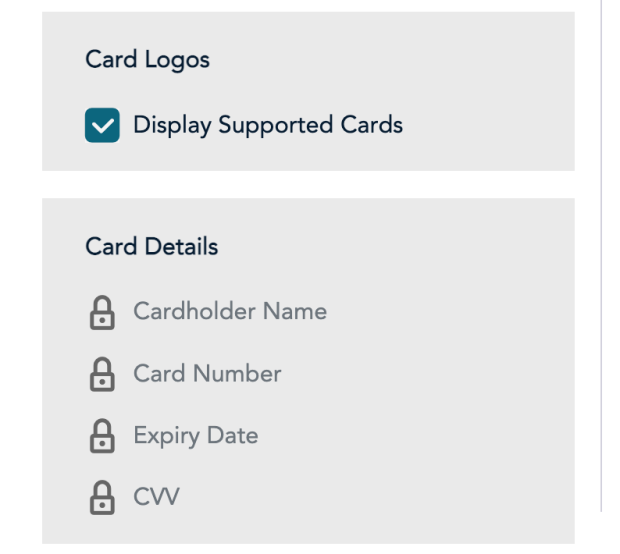 Feel free to enable the Display Supported Cards checkbox if you want to showcase card logos on your checkout page. It isn’t possible to choose which card logos will appear at the moment.Card details are locked in checkout type so you can skip them.
 - Payment Security
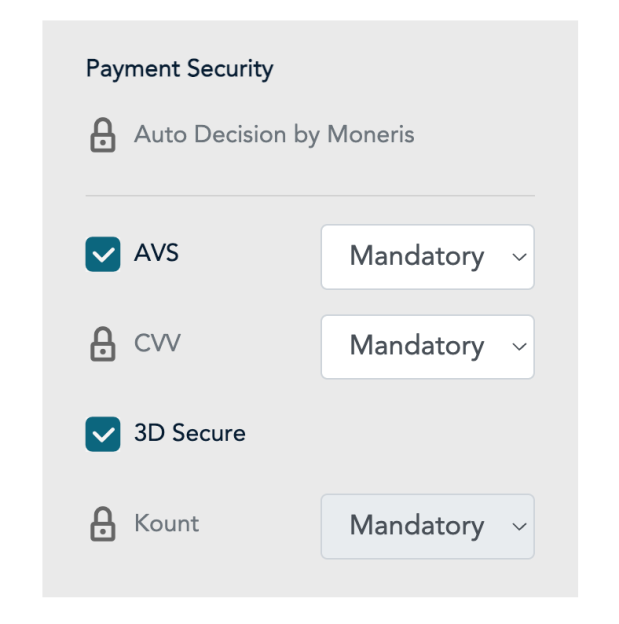 This is where you can enable the Address Verification Service (AVS) and 3D Secure 2.0 (3D Secure) before you can enable them in your shop.
- Auto Decision by MonerisThis setting may be unlocked during the creation of your account. Make sure to keep it unchecked.
- AVSThis setting should always be enabled and the dropdown set to Mandatory. You can configure the Address Verification Service’s behavior in the plugin settings back in your site.
- CVVThis setting is locked, however, you should make sure that the dropdown list is set to Mandatory before moving to the next step.
- 3D SecureEnabling this setting is optional, however, if you decide to use it, you should make sure it’s also enabled in the plugin settings.
- KountThis setting is locked and can be skipped.
- Transaction Type
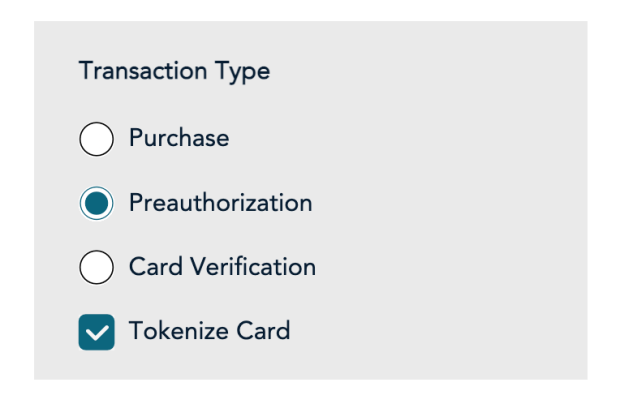 In this section, you should always select the Preauthorization option from the list. Furthermore, this is where you’ll need to select the Tokenize Card option if you’re planning to utilize recurring payments and/or allow your customers to save their payment methods. Remember to also enable tokenization in the plugin settings to ensure it’s working as expected.
 - Gift Cards & Transaction Limits
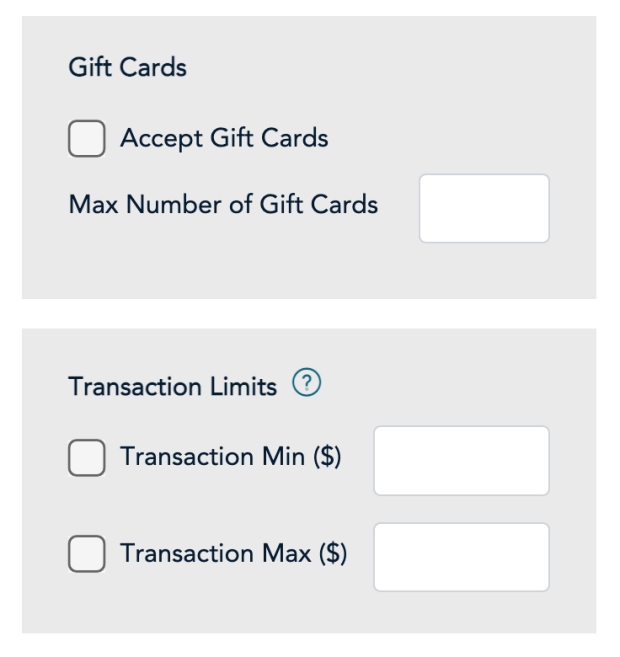 All options in both of those sections should remain unchecked as they aren’t supported by our plugin.
- Accepted Digital Wallets
-
Branding & Design
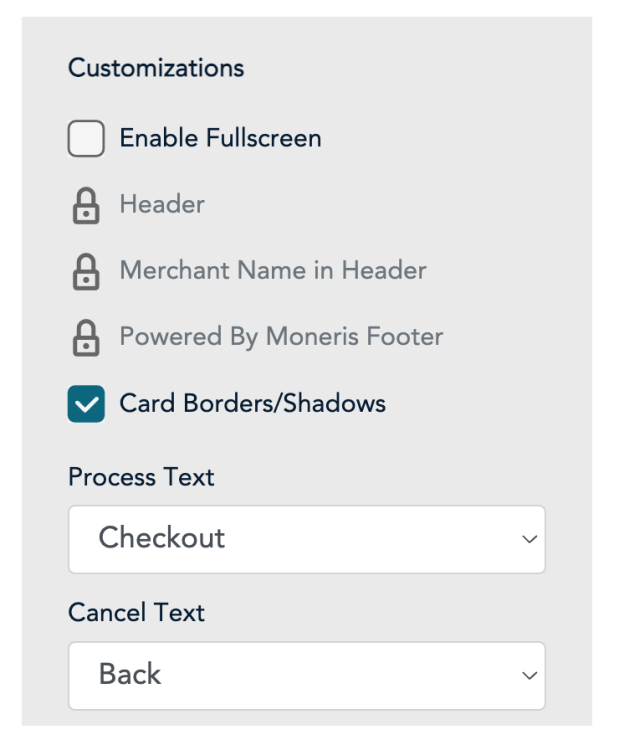 For this section, you can skip the rest of the options except the Enable Fullscreen one under the Customizations sub-section. This option should always be unchecked.
 -
Order Confirmation
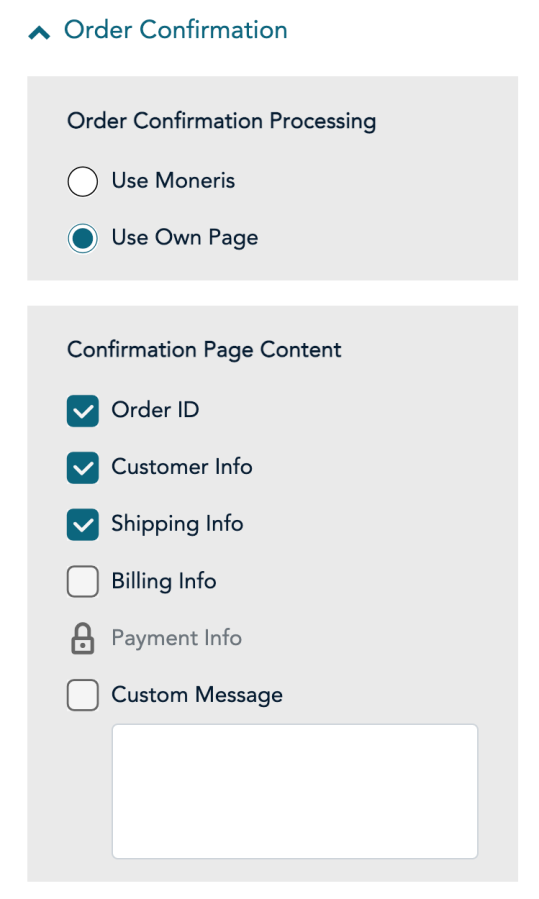 Make sure that under the Order Confirmation Processing sub-section you select the Use Own Page. You can skip and not make any changes to the Confirmation Page Content sub-section.
 -
Email Communications
Deleted: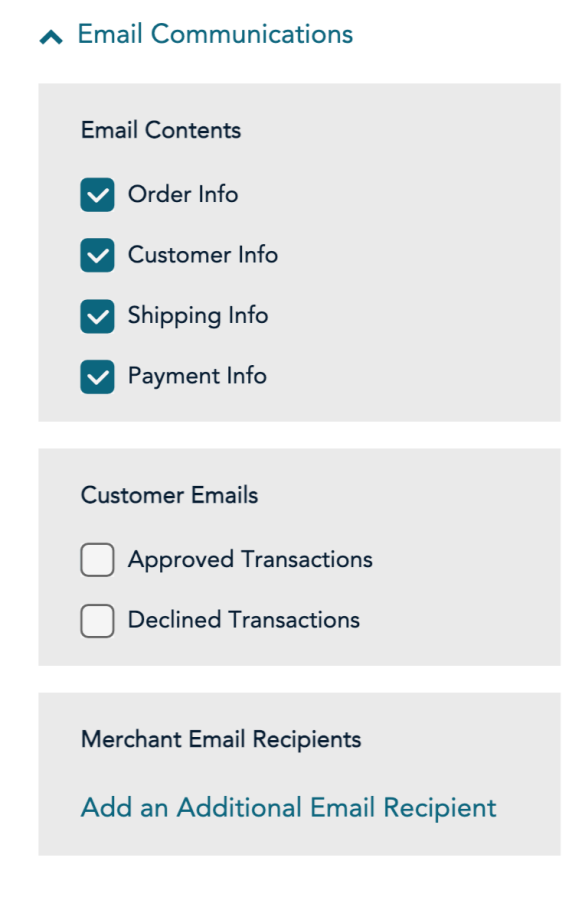 Lastly, the Approved Transactions options should be always deselected under the Customer Emails sub-section.
Credit card settings
↑ Back to top- Enable / Disable: Allow customers to use this gateway to checkout.
- Title: The text shown for the payment during checkout and on the Order Received page.
- Description: The text shown under the gateway’s title during checkout. Limited HTML is allowed.
- Saved Card Verification: Display the Card Security Code field when customers are paying with a saved card.
- Require Card Verification: Enabling this option will require the Card Security Code for all transactions. This must be disabled to support Subscriptions and Pre-Orders.
- Transaction Type: Controls how transactions are submitted to Moneris. Defaults to “Charge” to automatically capture payments. Click here to learn more about capturing payments.
- Charge Virtual-Only Orders: If Transaction Type is set to “Authorization”, enable to automatically capture charges for orders with only virtual products. For downloadable products, this will grant download access right away.
- Capture Paid Orders: If Transaction Type is set to “Authorization”, enable to automatically capture charges when orders move to a paid status (i.e. Processing or Completed).
- Accepted Card Logos: Determines which card logos are displayed during checkout. This has no impact on which cards are accepted by your merchant account.
- Tokenization: Let customers save their payment methods for future use at checkout. Make sure that the relevant options is also enabled in the Checkout Profile ID before it’s enabled in the plugin. You must contact your Moneris representative and ask them to enable the “Vault” option on your account to use this feature. This is required for Subscriptions or Pre-Orders. When enabled, you can manage customer tokens in WooCommerce. Click here to learn more about managing customer tokens.
- Detailed Decline Messages: Display detailed messages to customers to provide reasoning for declines instead of a generic error message when possible. Click here to read more about detailed decline messages.
- Debug Mode: Enable if you’re having issues processing transactions. You can choose to log API requests directly on the checkout page, save them to the WooCommerce > Status > Logs page, or both. As a best practice, please do not enable this setting unless you’re having issues with the plugin.
- Environment: Switch between “Production” and “Sandbox” credentials. Set to “Production” to process payments and “Sandbox” to send transactions to your Moneris sandbox account. Click here for more information about using sandbox mode.
- Store ID: Your Moneris store ID, provided by your Moneris account representative. This should be in the form of
moncawith some numerical value at the end (e.g.,monca12345). Please enter your Store ID in lowercase letters. - API Token: Your Moneris API token, found by following these steps.
- Checkout ID: Enter your Checkout profile ID. Click here to find out how you can create a Checkout ID.
- Additional connection settings: Use these settings to add another Moneris account to the gateway, so that you can route payments in different currencies to different accounts.
- Dynamic Descriptor:Enter what customers should see on their bank statements for charges from your store.
- Address Verification Service (AVS): Perform checks on the customer’s billing address for increased security. This should always be enabled in the Checkout Profile. You can choose how the gateway should respond in different scenarios based on the street address / zip code matching and address verification results.
- Card Verification (CSC): Perform checks on the card security codes. This should always be enabled in the Checkout Profile. You can determine how the gateway should respond in different scenarios based on the CSC match / verification results.
- Enable 3D Secure 2.0 Enable this feature for your site. You must enable 3D Secure on your Moneris Checkout Profile before you can use this feature.
Managing orders
↑ Back to topCapture charges
↑ Back to topAutomatic refunds
↑ Back to topVoid transactions
↑ Back to top- If the Transaction Type is set to “Authorization”, you can void when the transaction has been authorized but not yet captured.
- If the Transaction Type is set to “Charge”, you can void when the transaction has not yet been settled (i.e. funds haven’t been transferred from the customer’s account to your Moneris account).
Gateway features
↑ Back to topSaved payment methods
↑ Back to topDigital Wallets
↑ Back to topApple Pay
To enable Apple Pay in your shop:- Make sure that your Moneris Checkout Profile is created and configured.
- If you didn’t enable the setting before, you’ll need to go to Admin > Moneris Checkout Config and find the Checkout Profile you’re using.
- In the Payment section, click and enable the Apple Pay checkbox.
- A modal will pop up with a list of registered domains (if any) and the option to add a new domain. If your domain isn’t already on the list, click on the Add a new domain button. Note: This action will save the Checkout Profile and redirect you to a different page, so make sure you aren’t working on a different section before proceeding.
- On the next page, make sure you read the notice in the Register for the Apple Pay Enablement Service modal and then add the domain that you’d like to enable Apple Pay to and click Next.
- Then, you’ll need to click on the Download button in the next step. This will download an Apple developer file named
apple-developer-merchantid-domain-association. You’ll need to upload this to your site’s server directory named.well-known. If you aren’t sure how to proceed, your hosting provider should be able to provide you with more information about this process. - If you can upload the file right away, then you can go back to your Moneris dashboard and finish the verification process. Otherwise, go back to your Moneris dashboard and navigate to Admin > Apple Pay. page and find your domain to proceed.
- Click on the Verify button to confirm that the certificate is available.
- After this process is over, you’ll be redirected back to your Checkout Profile you were previously working onto. Make sure to check that the Apple Pay checkbox is enabled on the Payment page.
- Lastly, navigate to your site’s WooCommerce > Settings > Payments page and click on the Moneris option. Enable the Apple Pay checkbox to start using this payment method.
Google Pay
If you want to enable Google Pay in your shop:- Make sure that your Moneris Checkout Profile is created and configured.
- If you didn’t enable the setting before, you’ll need to go to Admin > Moneris Checkout Config and find the Checkout Profile you’re using.
- In the Payment section, click and enable the Google Pay checkbox.
- Join this Google Group to get added to the integration list of card testers.
- Lastly, navigate to your site’s WooCommerce > Settings > Payments page and click on the Moneris option. Enable the Google Pay checkbox to start using this payment method.
Multi-Currency
↑ Back to top In previous versions of the Moneris integration for WooCommerce it was possible to use this plugin to connect to multiple Moneris accounts and use a different one based on the currency. After Moneris’ recent change to only support Canadian merchants, this setup is no longer possible and the feature will soon be retired from our extension.
If you’re looking to allowing your customers to pay in their currency, you can follow the instructions below for a general guideline on how you can set this up using a currency-switcher plugin. We’ll be using the Currency Switcher for Woocommerce as an example, but the following process should work for any extension that converts prices back to Canadian Dollars (CAD) in the checkout:
- Install and configure a currency-switching plugin for WooCommerce (e.g. Currency Switcher for WooCommerce).
- Ensure that prices are converted at checkout back to Canadian Dollars (CAD). This ensures that the total cost will be converted back to the expected denominated amount for checkout in the correct currency. Specifically for the Currency Switcher for WooCommerce this is done with a setting under the plugin’s “General” settings called “Revert to shop’s default currency on checkout”.
Frequently asked questions
↑ Back to top- Have Vault enabled for your Moneris account; contact your Moneris representative for assistance.
- Enable Tokenization in the credit card settings.
- Enable Tokenize Card in your Moneris Checkout Profile based on the instructions here.
- Disable Require Card Verification in the credit card settings; Moneris cannot store CSCs for subscription renewals for PCI compliance and security reasons.
Q: How do I use Sandbox mode for testing? A: Moneris is unique in that it uses a shared set of test accounts for the Sandbox environment. You can select a preset Store ID in the plugin settings and then log in to the Merchant Resource Center with the provided test store credentials to view your test results. You can use Moneris’ Penny Value Simulator to test certain responses based on the test transaction’s payment amount. Use
4502285070000007 to test successful transactions, regardless of the payment amount. To test Address Verification and/or Card Verification while in Sandbox mode, use the store5 ID. Use 4242424242424242 as the card number for these tests. Click here for more information about AVS and CVD testing. Click here for more information about testing in general with Moneris.
Q: Does WooCommerce Moneris support US merchants? A: No, Moneris has fully discontinued support for merchants in the United States. If you were previously using WooCommerce Moneris as a US merchant and haven’t migrated to a new solution yet, please contact your Moneris account representative for further assistance.
Q: Why Interac Online isn’t available anymore? A: Interac Online was retired by Moneris. However, with the new Checkout Profile configuration, you can setup and use alternative online payment methods like Apple Pay and Google Pay. You can find more information on how to configure digital wallets here.
Troubleshooting
↑ Back to top- Please ensure that your site meets the plugin requirements.
- Check the FAQs to see if they address your question.
- Confirm that your Store ID and API Token are correct.
- Please ensure that your Store ID is entered in lowercase letters; Moneris may reject Store IDs that use uppercase letters.
- Make sure that your Checkout Profile is configured as instructed in the relevant section of this document.
- Enable Debug Mode in the plugin settings and review the error codes/messages provided by Moneris under WooCommerce > Status > Logs. In some cases, such as a transaction being held for review or declined, the plugin cannot change the issue and it must be resolved in your Moneris account. If the error code indicates an issue with the plugin, please submit a support ticket and include the logs to help us troubleshoot.