Thanks for purchasing a product from WooCommerce.com! Each purchase from our site is a yearly subscription which you can view and manage under the My Subscriptions section of your WooCommerce.com account dashboard.
From here you can install a purchase on your site, which you can then activate for support & updates. You can also transfer a purchase to another account on WooCommerce.com, or share the subscription with another account. You can also purchase more licenses if needed for other sites too.
So read more below or use the table of contents to jump to the appropriate section.
Install extensions or themes from WooCommerce.com
↑ Back to topThe first step after you’ve completed your order is to get your shiny new product installed on your site and activate your subscription. Purchased products can be installed automatically or manually. We’d recommend one of the automatic options, but if you prefer you can always download the product .zip file and install your purchase manually.
Automatic Installation
↑ Back to topThere are two ways to automatically install your purchase from WooCommerce.com.
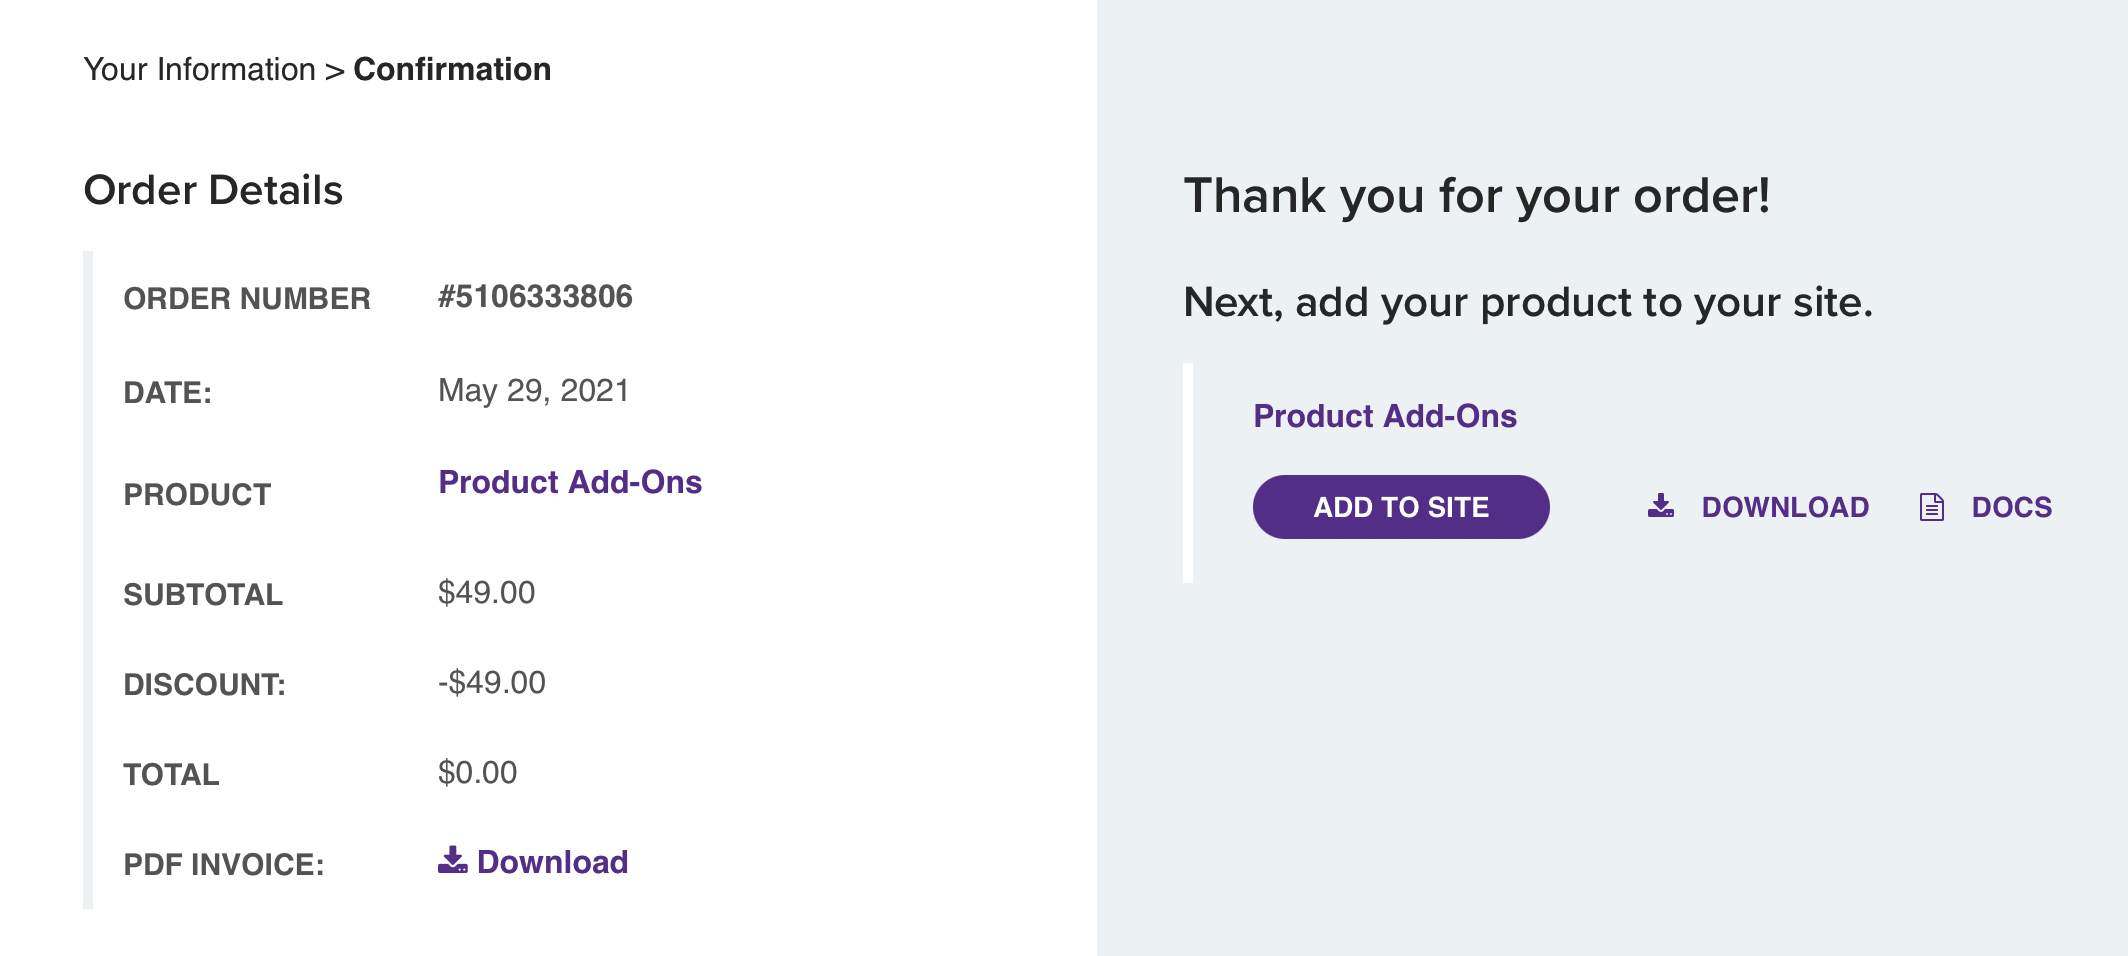
The first comes directly after completing your order on WooCommerce.com. You can install your purchase from the order confirmation page. You’ll see an Add to site button and, if you haven’t connected a site yet, you’ll be prompted for your store URL. You will then be asked to connect this site to WooCommerce.com.
Selecting the Connect Store button will open your site admin page in a new tab. Once connected, it will start installing your purchase on your site. For any future purchases, you’ll be able to select your connected site for auto install.
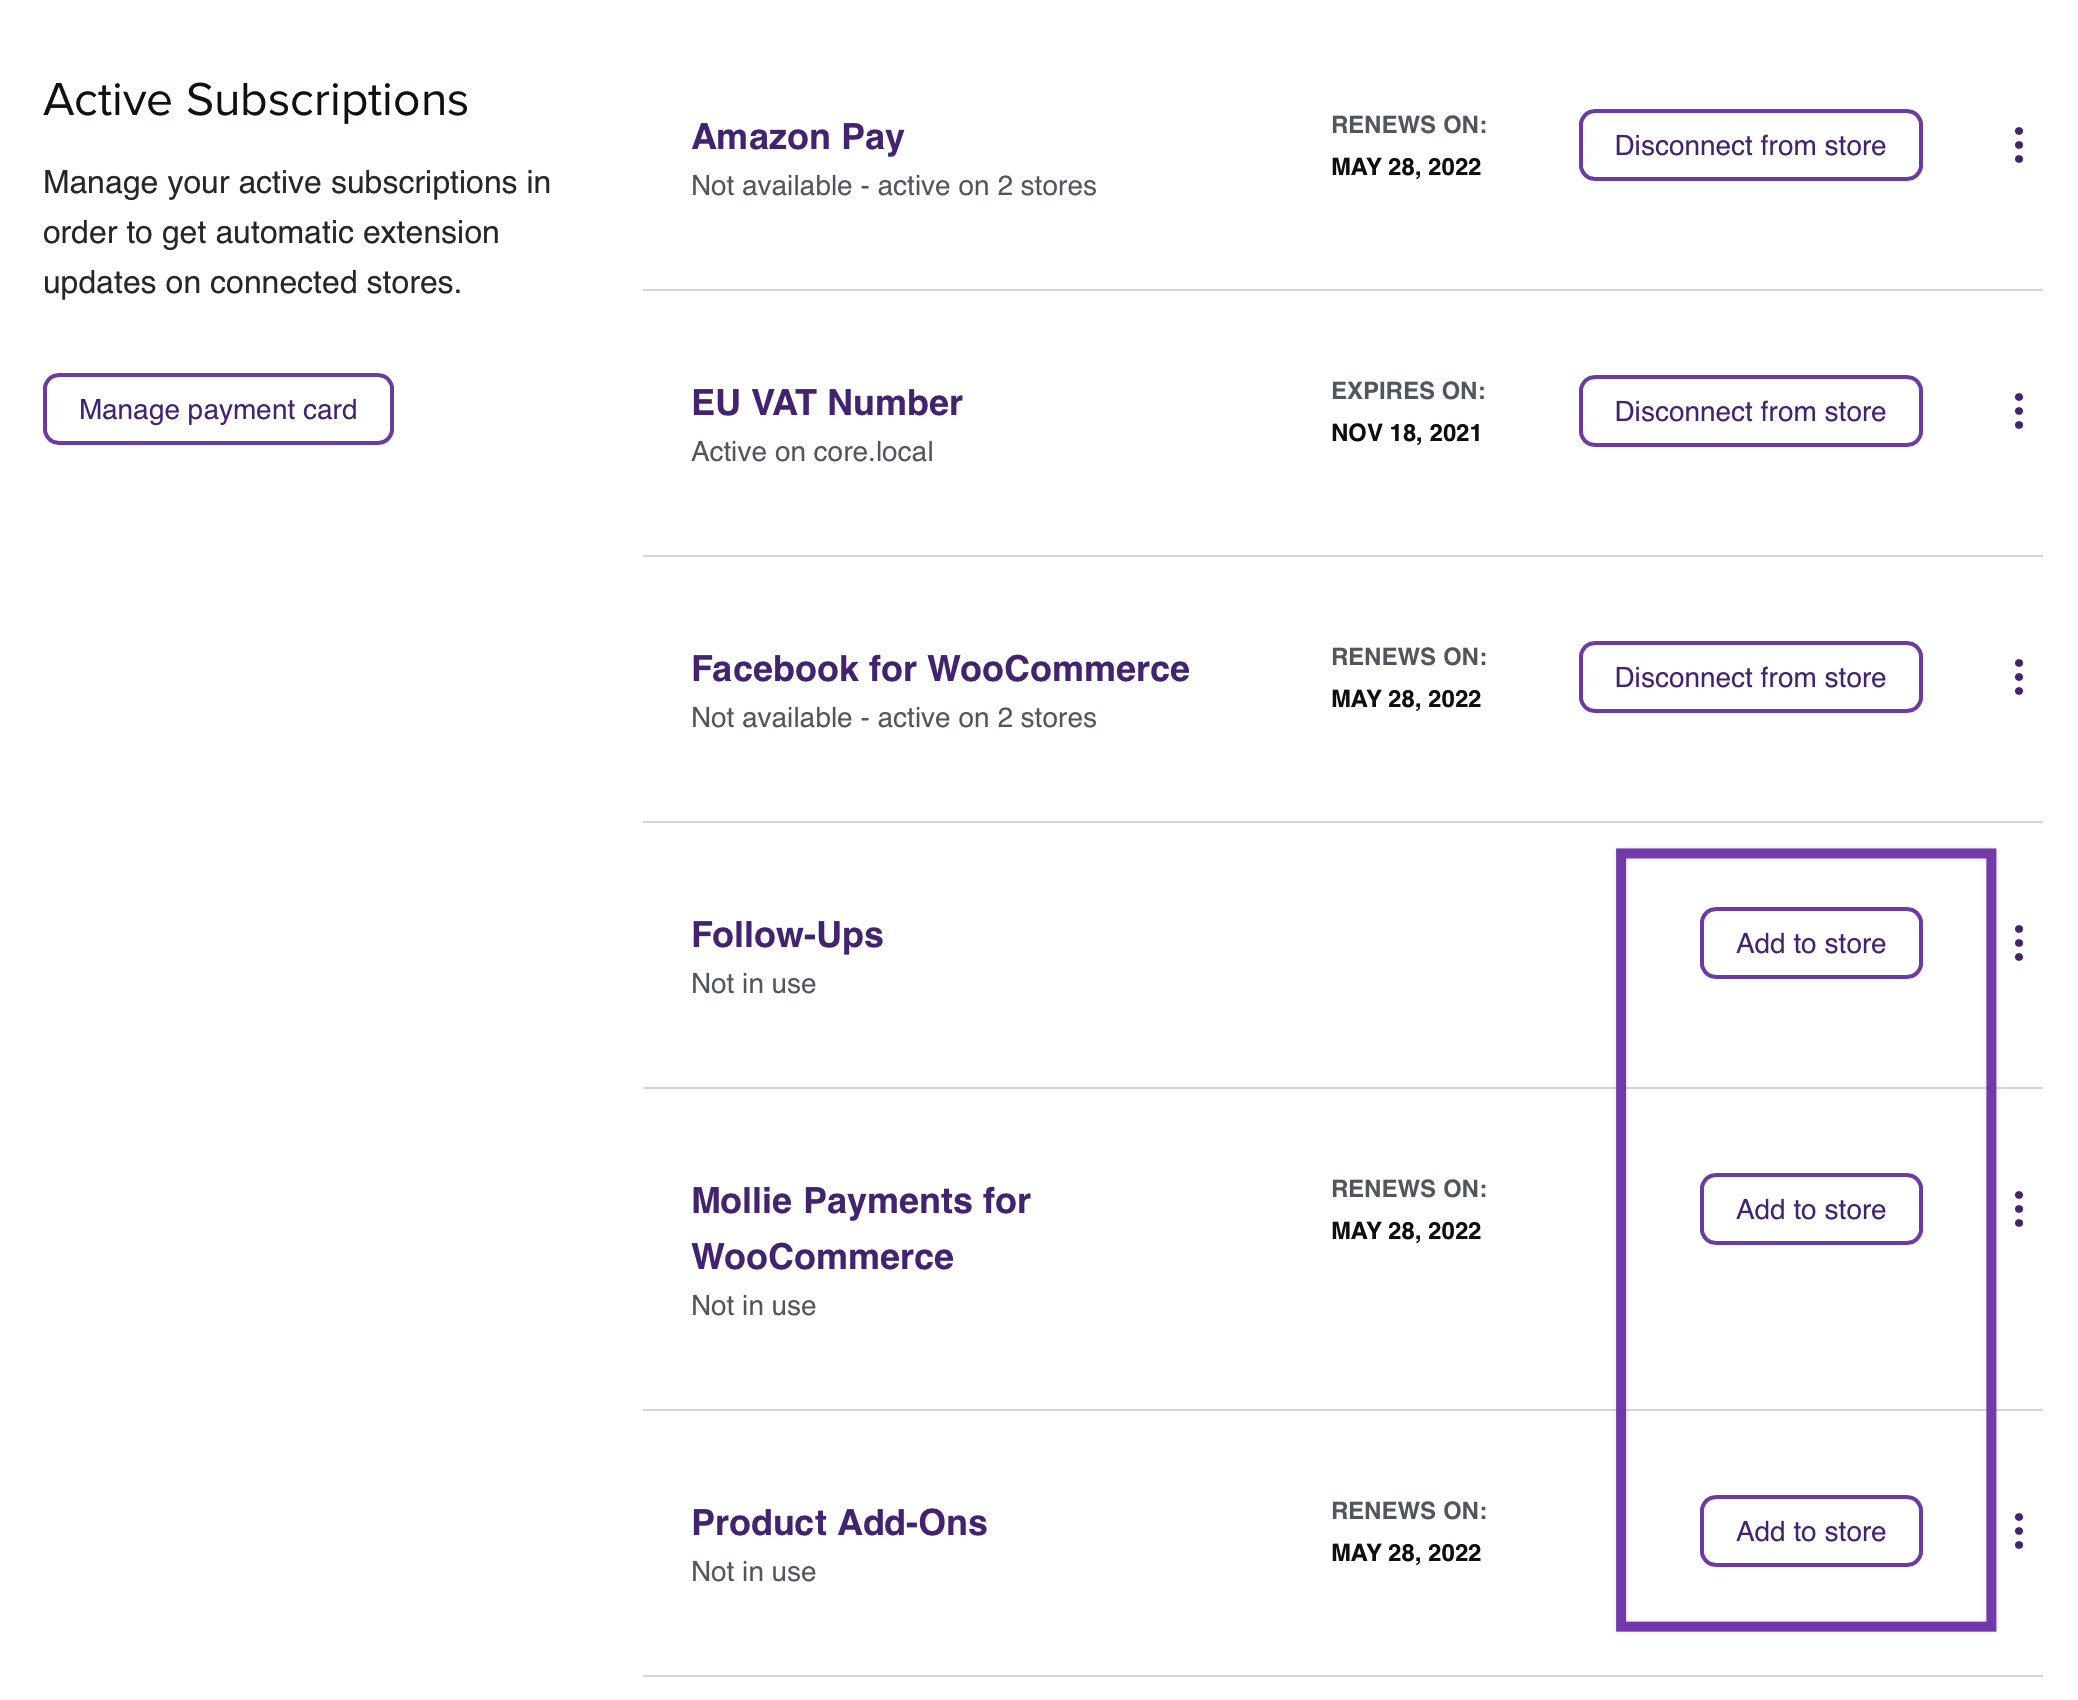
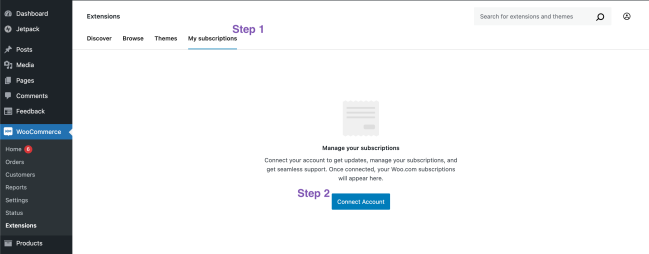
The second option is from the My Subscriptions dashboard on WooCommerce.com. There you can scroll to the product you’d like to install and select Add to store. You’ll see a list of connected stores to choose from, or you can connect a new store. Once you’ve selected a site, the product will be installed. You’ll then be redirected to the chosen site to finish the setup of your installed product.
Automatic Install Steps:
- Head to My Subscriptions section on WooCommerce.com
- Select the Add to store button for a product to install
- Choose a connected store / Connect a new store
- Install and then setup chosen product
Manual Installation
↑ Back to topIf you prefer to install your purchase manually, you can certainly do so.
Manual Install Steps:
Method 1
- Go to the Downloads section of your WooCommerce.com account. There you can find downloads for any active subscriptions from WooCommerce.com. From that page you’ll see a download column with a download icon you can select to then get a
.zipfile of your purchase. - Safari by default will “unzip” the file that is downloaded. To prevent this and keep the .
zipfile as required for WordPress, please head to Safari > Preferences > General > and uncheckOpen "Safe" files after downloading. - Once the
.zipfile is downloaded, install the product appropriately as a plugin or theme.
Method 2
Another option is to download a product directly from your own site. Here are the steps below.
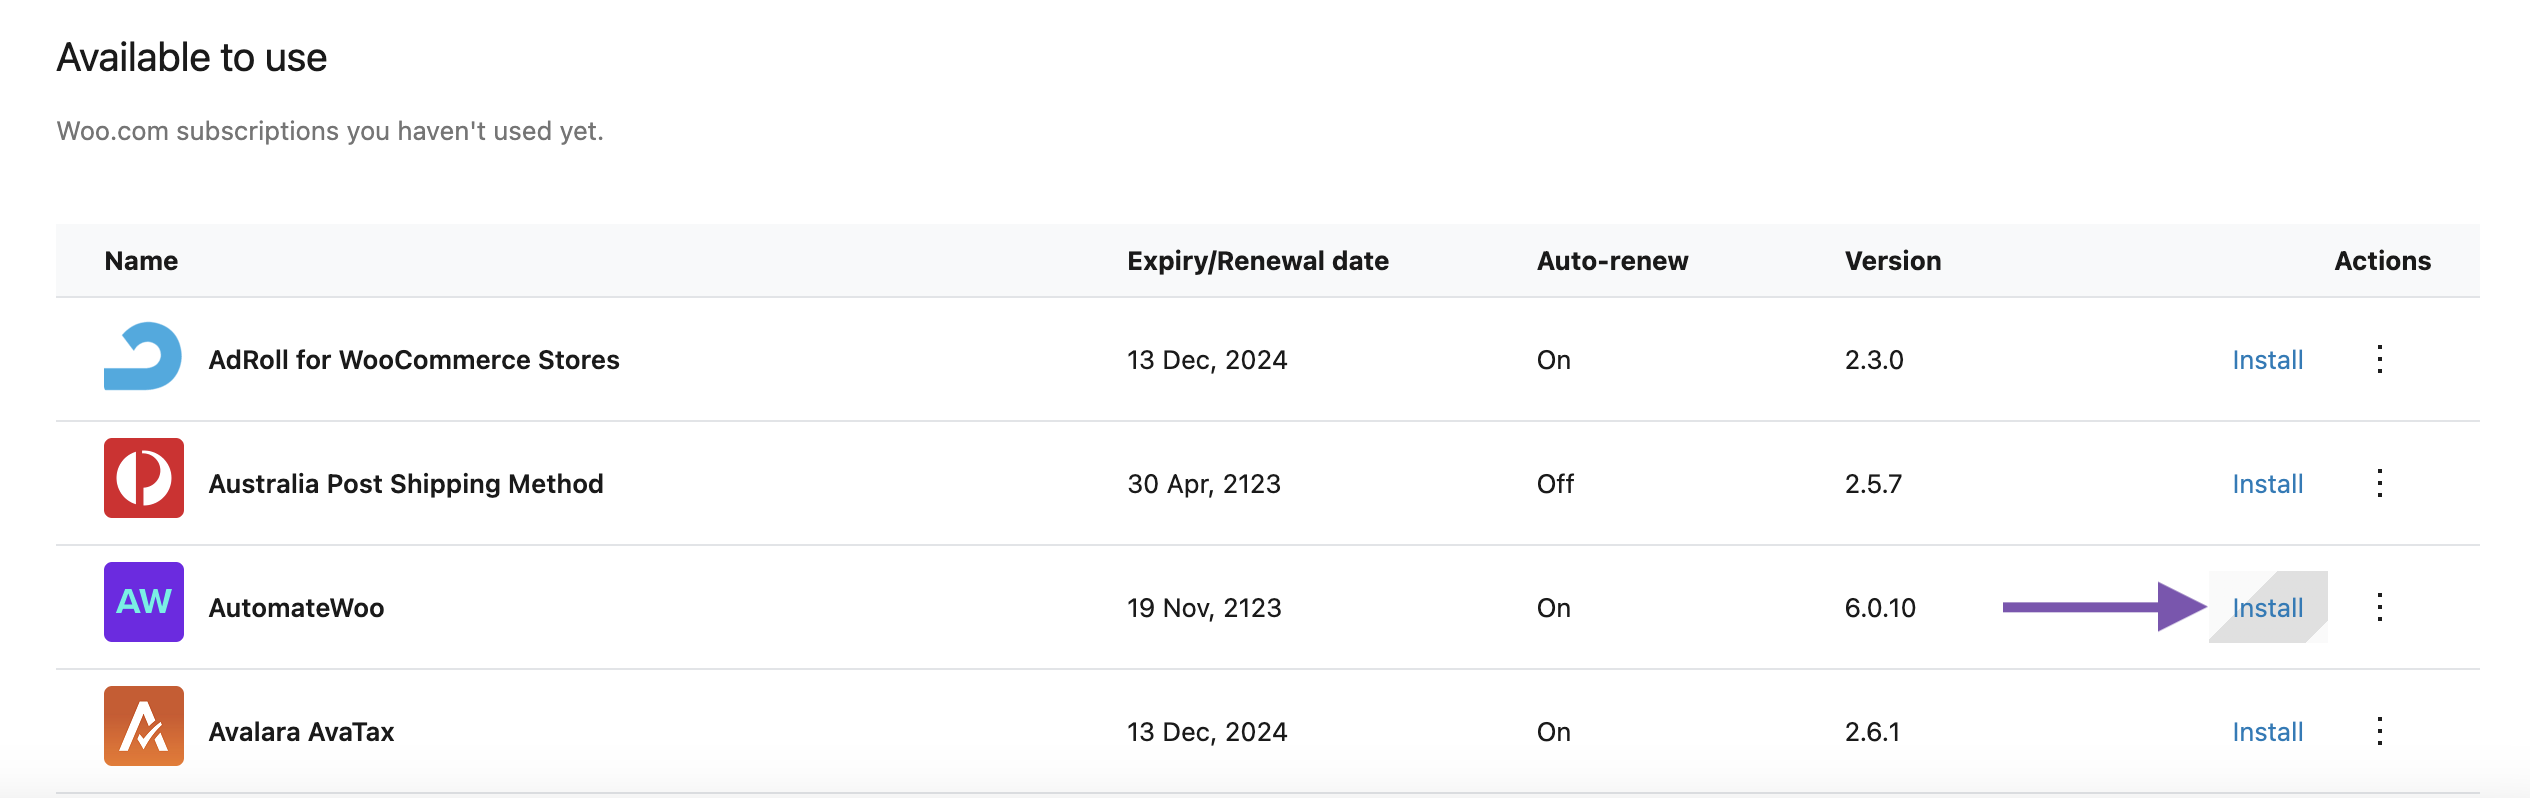
- Logged into your site, head to WooCommerce > Extensions > My Subscriptions.
- Find the product you’d like to install under Available to use
- Click the Install button
- The extension or theme will install automatically.
Connect your site to WooCommerce.com account
↑ Back to topIf you already have a purchase installed on your site and haven’t connected it to your WooCommerce.com account yet, we’d recommend doing so. This way you can get updates and support.
- Log into your site, head to WooCommerce > Extensions > My Subscriptions
- Click on the Connect button
- If you’re not logged into your WooCommerce.com. or WordPress.com account, log in now
- Click the Approve button to connect your site to your WooCommerce.com account

You’ll be asked to log into WooCommerce.com with your WordPress.com login credentials if you aren’t logged in yet.
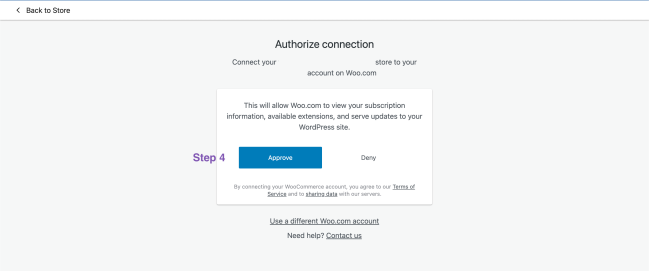
Approve button is shown during the process of connecting your site to your WooCommerce.com account
Once your site is connected to your WooCommerce.com account, the My Subscriptions tab will be populated with your currently active subscriptions and allow you to:
- Automatically install extensions and themes from WooCommerce.com to your site
- Manage subscriptions for extensions
- Renew expired subscriptions
- Jump to documentation
- Receive updates and support for your connected subscriptions
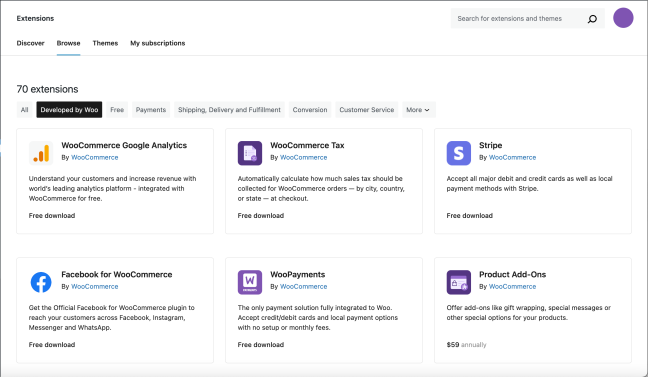
From the adjacent tabs Discover, Browse, and Themes, you can also find new extensions and themes and View Details to learn more about them or purchase them for addition to your site.
Activate a subscription on your site
↑ Back to topActivating a subscription enables updates for extensions installed on your store from the WooCommerce.com Marketplace.
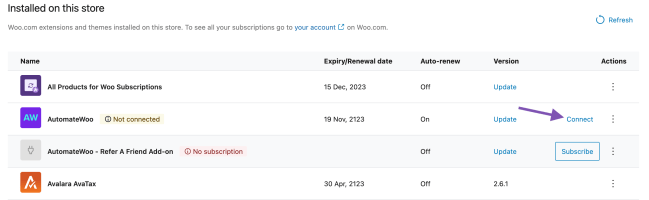
For stores running WooCommerce 8.4.0 and greater, subscriptions should automatically connect once installed. In some cases, such as for inactive extensions installed before updating to WooCommerce 8.4.0, you may see that the extension is not connected. Click Connect to enable updates and support for the extension on that site.
If you are running a WooCommerce version below 8.4.0, to receive the extension updates and receive premium support, you need to activate your subscription.
- If you haven’t connected your site to your WooCommerce.com account, then complete the steps described here: Connect your site & WooCommerce.com account.
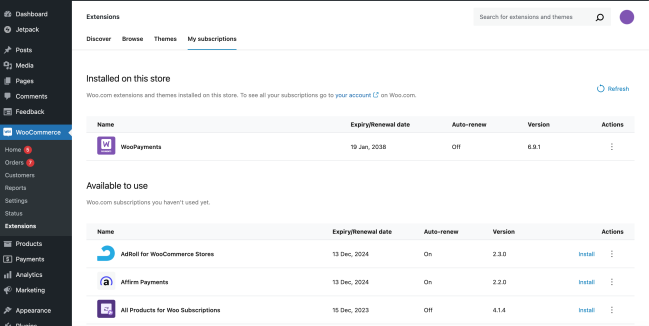
- If you have connected your site to your WooCommerce.com account, you’ll be able to see the list of both your free and premium extensions here: WooCommerce > Extensions > My Subscriptions.
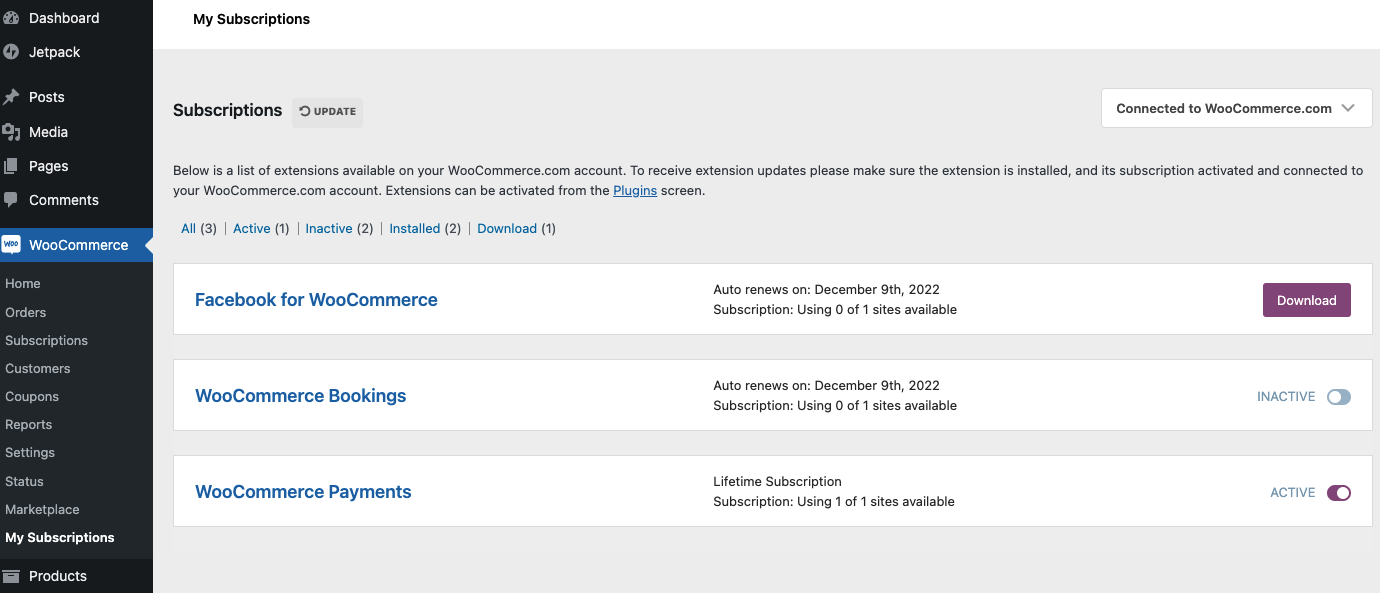
Based on the above sample screenshot, there are three extensions that we purchased either free or paid extensions.
We can see the status of each extension:
- If the Download button is shown, that means the extension hasn’t been installed and/or enabled on the site, or it is a free extension.
- If the Inactive radio button is shown, the extension is enabled on the site, but the subscription is inactive. Click to activate it.
- If the Active radio button is shown, the extension is enabled on the site and the subscription is active.
Transfer a subscription
↑ Back to topTransferring is used to hand over an extension to a new owner. It includes both ownership and billing. Specific use cases would be:
- Consolidating purchases across multiple WooCommerce.com accounts
- Handing over a site to a client once the site/store development is finished
- Transferring ownership of an extension purchased on behalf of someone, a company, or an agency.
How to transfer an extension
↑ Back to top- Log in to your WooCommerce.com account and go to My Subscriptions
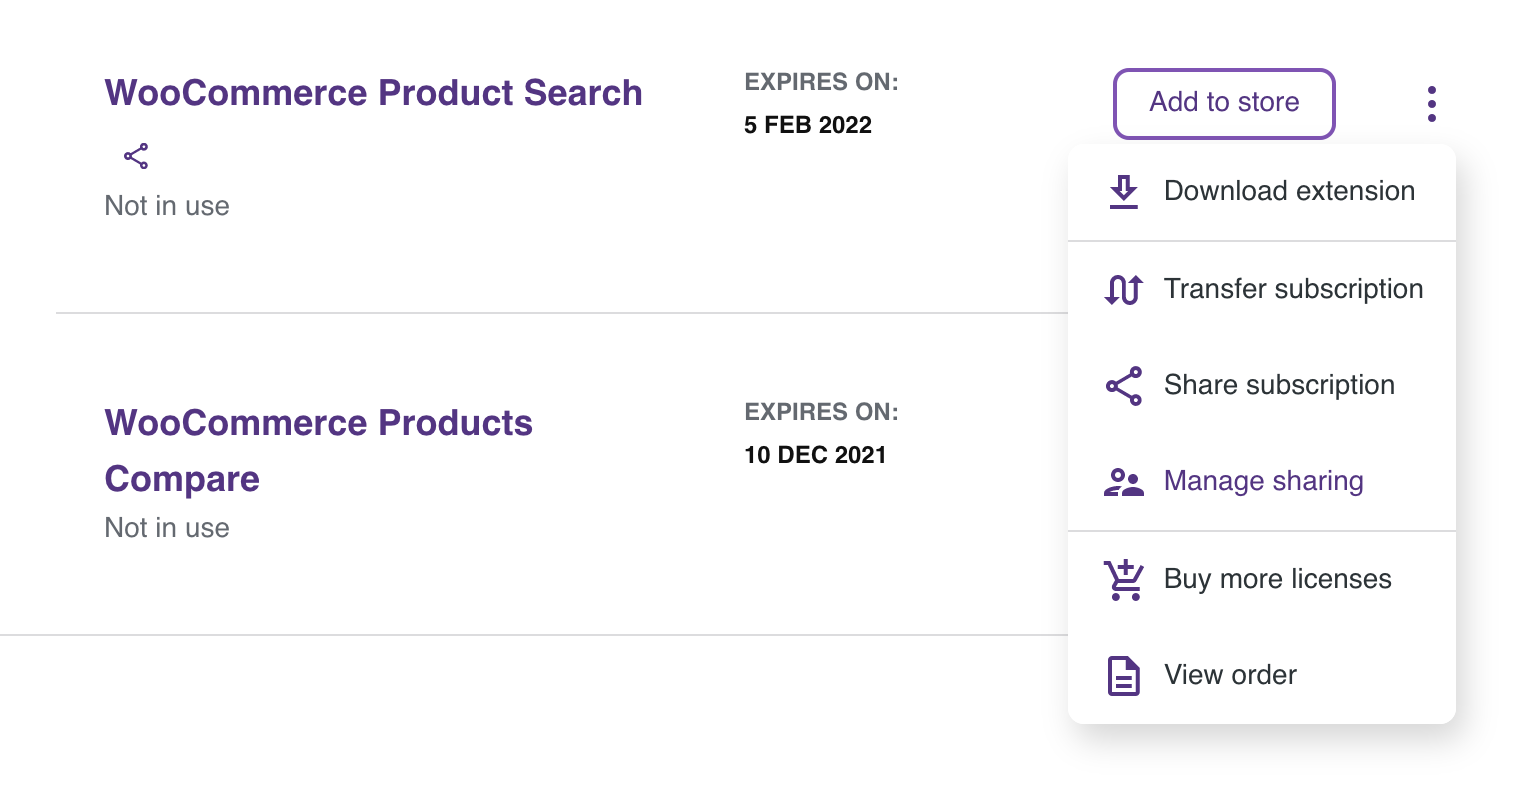
- Click on the three-dot menu icon on the right of the subscription you want to transfer, and choose Transfer subscription from the menu
- Enter the email address of the WooCommerce.com account you want to transfer the extension to
- Click the Transfer button to confirm the transfer of this extension. Please note that this transfers both ownership and billing to the new owner
Receive transfer of an extension
↑ Back to top- A notice will appear at the bottom of your My Account page to confirm the transfer has started.
- You’ll also see a note “Transferring to…” on the subscription, with the email address of the person you’re transferring to.
- The person you’re transferring to will get a notification email, asking them to accept the transfer.
- They’ll also see a notice in their My Account page telling them they have an incoming transfer. They can accept or reject the transfer from here.
- Once the other person has accepted the transfer, the extension is moved from your account to theirs.
How to transfer one key of a multi-site subscription
↑ Back to topIn the past we offered 5- and 25-site subscriptions. It’s not possible to “break off” parts of a 5-site and/or 25-site subscription and transfer those keys to individual clients. Why? Because the key number belongs to the full package.
It is also not possible to link two different WooCommerce.com accounts to the same site as a way to share the ownership of extensions on one site.
You would need to purchase a separate subscription/key for every client or have them purchase it themselves on their own account if they want ownership of the extension. Or you can share a single key in a multi-site subscription using the sharing feature by following these steps; in this case, you retain ownership.
Share a subscription
↑ Back to topWith sharing you can give someone else access to an extension you purchased. You still own the extension, and you keep the billing. If you’re a store builder, sharing allows you to use a subscription you purchased on a client’s site. However, sharing a subscription does not change how many sites it can be used on.
How to share a subscription
↑ Back to top- Log into your WooCommerce.com account, and go to My Subscriptions section
- Click on the menu icon (three vertical dots) on the subscription you want to transfer, and choose Share subscription from the menu
- Enter the email address of the person you want to share the extension with (the email address must be associated with a WooCommerce.com account) and click the Share button
- You’ll see a notice confirming that the subscription has been shared, and a share icon will appear on the subscription
- Please note that this only shares use of the extension. Both the ownership and billing remain with the original owner. If you prefer to transfer the extension, you can do that by following the steps above
What happens next
↑ Back to top- The person who is receiving the shared extension will see it in their My Account subscriptions list, with the email address of the person who shared it with them.
- If you’ve shared an extension with someone else, they won’t be able to share or transfer it – only you can.
- Once the person you shared the extension with has connected their site to WooCommerce.com via the WooCommerce plugin, they should see the subscription in the WooCommerce.com Subscriptions tab of the WooCommerce dashboard in wp-admin. They’ll be able to download it from there and install it, and they’ll be able to download updates as long as the original subscription remains active.
- If you need help connecting a WooCommerce site to a WooCommerce.com account, follow these steps.

How to remove a share
↑ Back to top- If you’ve shared a subscription with someone else, it’ll have a share icon. To check and remove shares, select the menu button on a subscription and select Manage sharing.
- You’ll see a dialog which lists the people you’ve shared the subscription with. Click in the checkbox in under Remove next to the person’s email address, and click the Save button.
- You’ll see a notice confirming that the share has been removed.
Disable a subscription auto-renewal
↑ Back to topTo receive extension updates and our premium support, it’s strongly recommended that you activate auto-renewal for your subscriptions.
However, if you would like to disable an extension subscription auto-renewal, you can do that by going to your My Subscriptions tab within your account area, then disabling the auto-renewal.
Disconnect your site from WooCommerce.com account
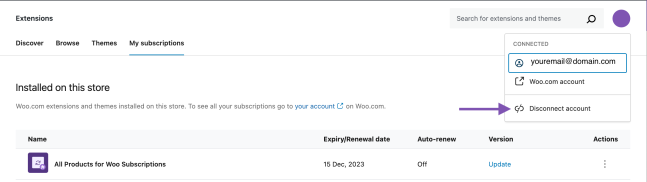
↑ Back to topLogged into your site, head to WooCommerce > Extensions > My Subscriptions and hover over your profile icon at the top right, then select Disconnect account.
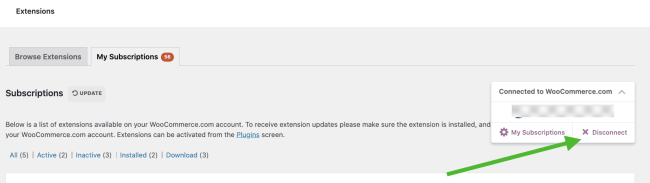
For sites using WooCommerce versions below 8.4.0, hover over the Connected to WooCommerce.com text on the top right corner and select the Disconnect option.
Troubleshooting Automatic Installation
↑ Back to topREST API
↑ Back to topTo enable auto-install, your store needs the WordPress REST API enabled.
The REST API doesn’t support Plain permalinks. Select one of the other permalinks options WP-Admin > Settings > Permalinks to enable auto-install.
In some cases, WordPress sites disable their REST API or restrict access to it by allowing only logged in users to access it. This is usually done either by using plugins or custom code.
How to ensure your site’s REST API is working
To test your REST API just open http://yoursite.test/wp-json/ (replace http://yoursite.test/ with your site’s domain). If the link you opened shows your site’s name, description, etc. this means your REST API is working.
If you get a message similar to Only authenticated users can access the REST API., this means your site’s REST API is restricted to logged-in users only. To fix this simply login to your site and try again.
How to enable your site’s REST API
If the above step doesn’t resolve your issue there is a chance your site’s REST API is disabled. Check your site’s plugins and make sure you don’t use any plugins that are specifically made for blocking the REST API.
If you are using a security plugin check your settings to make sure REST API is enabled.
In some cases, site owners add custom code to the site to disable the REST API. This code should be removed or modified to allow REST API access to all /wp-json/wccom-site/ endpoints. If you are not sure where this code can be, try searching your site’s plugins and theme files for the message, returned by /wp-json/.
Accessibility of the REST API
To connect your site with WooCommerce.com and enable automatic extension installation, ensure that the site’s REST API is accessible.
- For WordPress.com hosted sites, please note that if your site is currently set to “Private,” you won’t be able to use the automatic installation feature. To utilize this functionality, you can set the site to “Coming Soon” per this guide.
- Alternatively, you can manually install WooCommerce.com extensions per this guide.
Refresh connection to WooCommerce.com
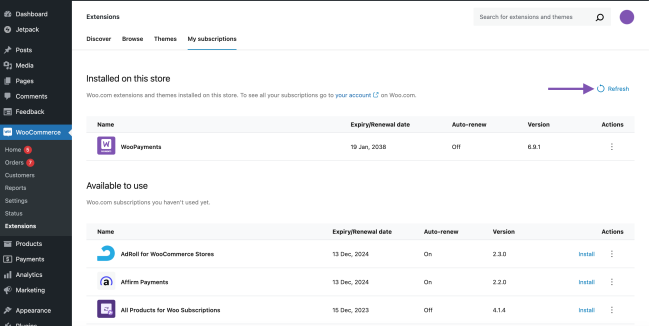
↑ Back to topIf you notice any issue between your site and WooCommerce.com, try updating the connection. Click the Refresh button at the top right of WP Admin → WooCommerce → Extensions → My Subscriptions.
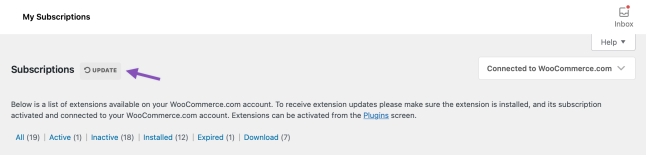
In WooCommerce versions below 8.4.0, you can do this by selecting the Update button in My Subscriptions.
Enable WordPress cron
↑ Back to topAuto-install uses WordPress cron to install plugins. Ensure it is enabled on your site. You can check if cron is enabled in WooCommerce > Status > System status > WordPress cron. If cron is disabled, you should check whether there is the following line in wp-config.php file in your main WordPress folder:
define( 'DISABLE_WP_CRON', true );
If it is present, remove or comment out this line to enable WordPress cron on your site. If you don’t want to activate WordPress cron for some reason, you may use a real cron job instead. Check How to Replace the WordPress Cron with a Real Cron Job Tutorial.
Connect your WordPress.com & WooCommerce.com Account
↑ Back to topYou can only log into WooCommerce.com with a WordPress.com account. If you need some help with that see our resources below for all the information you need.
https://woocommerce.com/document/log-into-woocommerce-com-with-wordpress-com/
Frequently Asked Questions
↑ Back to topSee more common questions about Woo Marketplace subscriptions and WooCommerce.com account management on our Frequently Asked Questions page.
Questions and Support
↑ Back to topDo you still have questions and need assistance?
- Get in touch with a Happiness Engineer via our Help Desk. We provide support for extensions developed by and/or sold on WooCommerce.com, and Jetpack/WordPress.com customers.
- If you are not a customer, we recommend finding help on the WooCommerce Support Forum or hiring a WooExpert agency. They are trusted agencies with a proven track record of building highly customized, scalable online stores. Learn more about WooExpert agencies.