Introduction
↑ Back to topHow can the Megaventory plugin work for you?
↑ Back to topWith Megaventory your WooCommerce site can be upgraded in the following ways:
↑ Back to top- You’ll be able to show in real-time your products’ availability in your WooCommerce frontend based on actual stock levels.
- You can connect more than one warehouses, stores or other types of locations at your disposal and the stock representation in the WooCommerce frontend will be correct.
- Once an order arrives in WooCommerce you’ll have the capability to process it properly from verification to shipment to closing in the Megaventory backend ensuring a best-practices approach in running your eshop.
- A lot of the information in one system is automatically synced to the other as necessary saving you significant time you would otherwise be spending making double entries.
- Additional functionality such as bundling, returns, etc is also seamlessly handled.
How the plugin works
↑ Back to topThe Megaventory Inventory Management extension will create an additional section in your WooCommerce admin panel where you can manage the plugin from. In order to use the Megaventory Inventory Management plugin, it is necessary to enter a few initial settings and perform an initial sync with your Megaventory account (both one-off tasks).
Following a successful sync, you will either access Megaventory to fulfill and manage your orders or login to WooCommerce for the usual functionality. In any case, double entry is eliminated and any relevant information which can be synced is transferred in the background by the plugin.
Example use cases
↑ Back to topTypical use cases of the Megaventory Inventory Management extension are for WooCommerce eshops which have seen significant growth (many orders per day) and need help in tracking the status of each order and the location of its associated products. Managing physical products is the core usefulness of the Megaventory Inventory Management extension (but services are also supported).
Typical examples of using the plugin are either retail or wholesale businesses handling apparel, electronics, hardware, furniture, etc – these are only some of the verticals supported. Businesses needing to track manufacturing are also able to benefit from the production tracking features (which are also applied in scenarios where bundling/kitting products together is necessary).
Account & Pricing
↑ Back to top- Pro (5 Users, 10k Transactions, 20 Locations, 20k Products, 20k Clients, 2 Hours Training, 5 Different Integrations): USD 150 / month with + USD 50 / month / extra User (up to 35) and + USD 50 / month / extra 10K Transactions (up to 100K)
- Enterprise (anything higher than the upper Pro limits): Custom Quote
How to set up the WooCommerce – Megaventory integration
↑ Back to top- Set up a WordPress website.
- Download the WooCommerce extension from WordPress plugin store, add it to your website (wordpress.org/plugins/woocommerce) and activate it.
- Add the Megaventory plugin to your website.
- Go to the Plugins page in your WordPress website.
- Press Add New button. If you don’t have the zip file go to step f.


Initialization Results
↑ Back to top- Finds matching products in WooCommerce and Megaventory (based on SKU) and associates them as the same product
- Finds matching clients in WooCommerce and Megaventory (based on their name and email) and associates them as the same person/account.
- Associates matching taxes between Megaventory and WooCommerce (the ones with the same name and rate) and creates new taxes in Megaventory if needed.
- Creates a guest client in Megaventory which will be assigned all orders made by clients without an account
This step does not create any new product or clients but enables synchronization for products and clients that already exist in both Megaventory and WooCommerce.
How is synchronization between WooCommerce and Megaventory working?
↑ Back to top- Products – changing Megaventory product details imposes the same changes on the corresponding WooCommerce products. Deleting a Megaventory product also deletes its WooCommerce equivalent.Creating new products in Megaventory does not result in any changes to the WooCommerce products database.
- Stock – if the stock levels of any product change, the information is passed to WooCommerce.
- Order status – if the order status is changed in Megaventory, it is also updated in WooCommerce automatically. The plugin does not synchronize returns and refunds – those have to be resolved manually.
- Products – creating, updating or deleting products in WooCommerce results in those changes being immediately performed in Megaventory as well. (Deleting products in WooCommerce is not advised, esp. if stock of that product in Megaventory is not zero. It is suggested to hide (unpublish) the products and delete them in Megaventory after the stock is depleted.)
- Clients – creating, updating clients in WooCommerce results in those changes being immediately performed in Megaventory as well.
- Coupons – creating, updating, using coupons in WooCommerce results in creating, updating discounts in Megaventory. In specific cases, this process may create new discounts which do not exist in WooCommerce,but are necessary to proceed (more on that in Coupons section).
- Taxes – creating taxes in WooCommerce creates corresponding taxes in Megaventory. Updating Taxes is not allowed.
- Orders – any orders placed in WooCommerce create corresponding Sales Orders in Megaventory.
- Importing clients from WooCommerce to Megaventory.
- Importing products from WooCommerce to Megaventory.
- Importing only percentage discounts from WooCommerce to Megaventory.

Troubleshooting using WooCommerce with Megaventory in the WooCoommerce interface
↑ Back to topYou can troubleshoot any issues that arise in the WooCommerce – Megaventory connection in the WooCommerce interface
To do that you need to enter the Megaventory administrator panel in WooCommerce by clicking a link on the sidebar.

On top of the admin panel, you can see three sections: status, setup, and initialization.

The Status section indicates the status of the plugin:
Connection indicates whether a connection with Megaventory servers could be established. If this item indicates an issue, make sure your servers are online. If so, then the problem probably lies on the Megaventory side and you should contact our support.
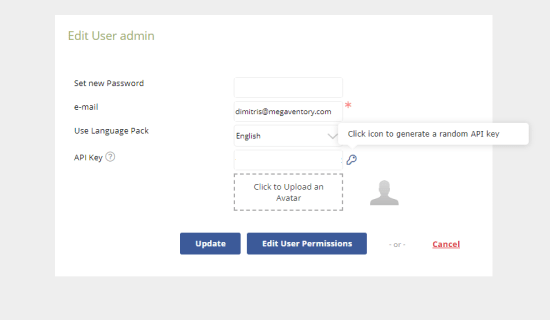
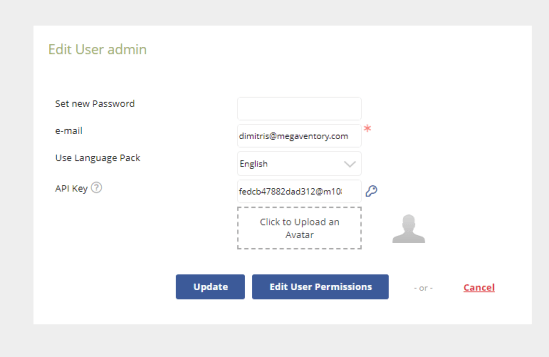
Key indicates whether the API key is correct.
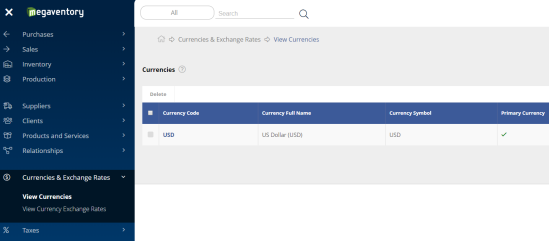
Currency indicates whether the Megaventory and WooCommerce main currencies match.
Initialized indicates whether the plugin has been initiated.
If any of those items does not indicate success, the plugin is completely halted until the issues are resolved. Problems should be taken care of starting from the top of the list – e.g. Problems with connection will also cause other statuses to indicate failure (with no connection, there is no way to check if the API key is correct, or if the currencies match). Taking care of the uppermost problem will often solve the problems below.
The following sections can help identify the cause of any issues that come up and how to address them.
Interface – Error Log
↑ Back to top
Beneath the top of the interface, you can find the error log. It shows all the information about when and where the plugin encountered problems. The list is sorted with the most recent issues on top.
The table consists of the following columns:
ID – the id of the error message
Megaventory ID – The Megaventory ID of the entity the error refers to. 0 or negative values mean that this ID is not relevant (e.g. The entity does not exist in Megaventory yet, or the plugin failed to find ID).
WooCommerce ID – The WooCommerce ID of the entity the error refers to. 0 or negative values mean that the ID is irrelevant in this case.
Created at – Indicates when the error was logged.
Error type – the type of the error. There are three error types:
Warning – This explicitly notifies about some actions that happen behind the scenes but do not necessarily mean that something went wrong.
Error – This indicates that something went wrong, most usually an entity (Client, Product, etc.) failed to be saved for some reason.
Fatal – This causes the whole plugin to halt, instead of affecting just certain processes only. In most cases, such an error means additional notices in the status section of the interface.
Entity name – the name of the entity the error refers to. This may sometimes be empty, when the name of the entity doesn’t exist, etc.
Problem – the description of what the problem is; this description is supposed to quickly and comprehensively describe what happened.
Full Message – the full description of the problem.
Error code – The code of the error. This is aimed to be a reference for programmers or the Megaventory team.
Most often errors appear because an entity (Product, Client, Order, etc.) was not correctly synchronized due to incorrect details (name too long, SKU missing, the product already exists, etc.). In most cases, these issues require a quick manual intervention.
Interface – Taxes Table
↑ Back to topThe following table is available below the error log:

Use this table to make sure that taxes are correctly synchronized:
Every tax should be represented with a separate row in the table
Every tax must have a Megaventory id. If the Megaventory id column is empty, zero, or has a negative value, this tax is not correctly synchronized and will cause problems. Refer to the error log for more information.
Megaventory Features
↑ Back to top- Multiple Locations / Warehouses / Stores
- Stock Alerts
- Returns of Goods from Clients / to Suppliers
- Supplier Availability and Lead Times
- Inventory Changes over Time
- Product Cost Tracking over Time
- Serial Numbers
- Transfer between Locations
Order Fulfillment
- Sales Orders from Clients
- Purchase Orders to Suppliers
- Sales Quotes for Clients
- Shipping Providers
- Partial Shipping / Partial Receiving
- Consignment Sales and Purchases
- Dropshipping Sales and Purchases
- Automated Fulfillment Capability Check
- Services
- Inbound and Outbound Movements
- Availability Levels
- Gross Profit
- Inventory Value
- Business Intelligence ready
- Report Sharing to Users
- Picking and Packing Slips
- Delivery Slips
Manufacturing Tracking
- Bill of Materials
- Allocation of Components to Work Orders
- Full / Partial Receipt of Finished Goods
- Quick / Bulk Manufacturing Updates
- Multiple Level Manufacturing
- Work in Process Cost
- Labor Costs per Work Order
- Work Order Printouts
Data Administration
- Sophisticated User Permissions
- Detailed User Activity Logs
- Backup and Restore at any Time
- Data Import / Data Export
- Drilldown Data Capable
- Multiple Currencies
- Currency Exchange Rates
- Pricing Rules
- Contacts Management
Software Customization
- Localized into Multiple Languages
- User Customizable Texts
- Rich and Straightforward API
- Custom Document and Invoice Templates
- Custom Automatic Invoice Numbering
- Barcode Scanning / Barcode Printing
- Direct Data Access via Intuitive Cards
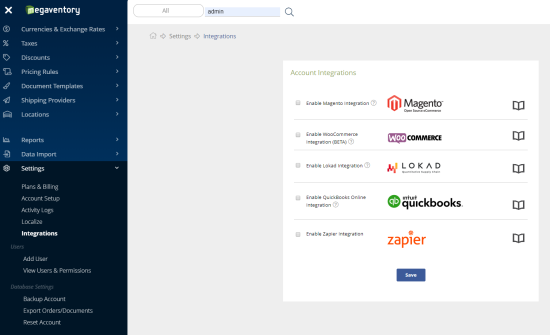
- Multiple Integrations