In a global age, very few store owners only sell to one region, with one language and one currency. Several different things play a role, and below we’ll discuss several of those.
| What you want to offer | Solution | Links |
|---|---|---|
| Multiple taxes and shipping zones | WooCommerce core | Download |
| Multiple currencies | Currency Converter Widget | Purchase |
| Multiple languages and/or store locations | MultilingualPress | Download |
Multiple taxes and shipping zones
↑ Back to topIf the only things that you want to set up differently according to region, are taxes and shipping, then you can just use WooCommerce core for that.
Taxes
↑ Back to top- In your store’s WP Admin dashboard, navigate to WooCommerce > Settings > Taxes > Tax Options.
- Next to “Calculate Tax Based On”, select Customer shipping address.

- Next, go to WooCommerce > Settings > Taxes > Standard Rates.
- Add the tax rates of the different countries you want to sell to

Now taxes will be different if customers purchase from a different location.
Shipping
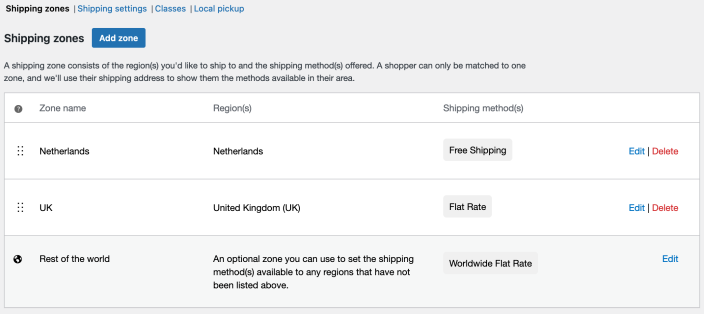
↑ Back to topSimilarly, we can set up shipping zones. In the example below, we’ll set a flat rate shipping to the United Kingdom of £10 GBP, and free shipping to the Netherlands.
- In your WP Admin dashboard, navigate to WooCommerce > Settings > Shipping > Shipping Zones.
- Click Add zone
- Add a Zone Name, Region, and Shipping method.
- Choose Flat Rate for the United Kingdom and Free Shipping for the Netherlands.
You now have set up different shipping for the United Kingdom and the Netherlands.
Multiple currencies with Currency Converter Widget
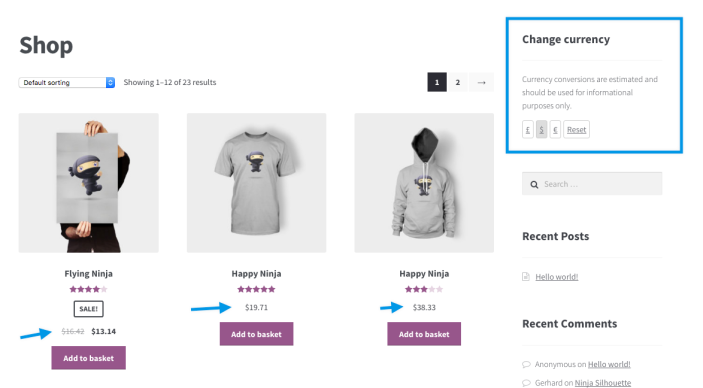
↑ Back to topIf you want to offer different currencies on your platform, use Currency Converter Widget to allow customers to choose their preferred currency.
All currencies are automatically calculated in relationship to the main currency. For example, if you’ve set your main currency to GBP and you allow Euro and USD next to that, you’ll have to enter the prices of your products in GBP and all other prices will be calculated automatically. You cannot manually edit the converted prices.
To use this widget, review the documentation. Once that is done, your customers will be able to change the currency.
Multiple languages with MultilingualPress
↑ Back to topIf you want to offer your store in different languages, one of the best options is MultilingualPress. Let’s start with what it does and doesn’t.
Functionality
↑ Back to topIt does:
- Connect several websites on a WordPress network on the product and page level. For example, you can say that the “Basket” page on the UK store and the “Cart” page on the US store are connected in content.
- Edit the content of all languages in one place. For example, if you’re editing a product in an English store, you can add a translation there for the Dutch product. This will update the product on the Dutch store.
- Allow easy switching between the languages on the product and page level. If you are viewing Product X in English, you can click on a Dutch flag to take you to the Dutch version of Product X. (In this case, I’ve added a flag, but the default option will be a simple link.)
- Configure some settings centrally. With a WordPress network, you can manage a few things on a multisite level: users, themes, plugins, and some settings can be managed across websites at once. MultilingualPress allows you to add quick links to the translations, and setup redirects to the store in the customer’s browser language, to name a few.
- Configure WooCommerce separately. Within each store, you can connect the products, but you can have separate settings regarding the currency, the taxes, the shipping, etc. Each of the WooCommerce settings can be set differently.
- Avoid performance loss. Adding several language versions of the same product to the same website can result in performance loss. MultilingualPress doesn’t do this: the different languages are situated on different websites.
- Optimize SEO for a specific language. MultilingualPress focuses on an individual website per language and that helps the website with search engine optimization.
It does not:
- Automate currency conversion. You can set up separate currencies, but the prices need to be changed manually on the products.
- Centralize stock. Each version of the product will still be managed separately. The language may be connected, but the stock isn’t.
Configuration
↑ Back to topMultilingualPress is a versatile extension with a lot of options. Below, we’ll limit ourselves to a short overview.
1. Create a network
- Set up a WordPress Network. MultilingualPress only works with a Network, so you’ll need to create that first to get started.
- Install both WooCommerce and MultilingualPress on the Network. In WP Admin, navigate to My Sites > Plugins > Add New. From there, search for WooCommerce and install it. Then, do the same for MultilingualPress.
- Network Activate only MultilingualPress. This will make the extension active for all sites on the Network. Do not do this for WooCommerce as this will pose a challenge for taxes and shipping. In combination with MultilingualPress, if WooCommerce is network-activated, taxes and shipping can only be edited on the main store and do not transfer to the secondary store.
- Go to My Sites > Settings > MultilingualPress. Choose which settings you wish to enable. Enable Custom Post Type Translator.

2. Set up the main store
- Create your main store. Go to My Sites > Sites > Add New. Complete all settings. If this is going to be your main store, you can leave the MultilingualPress settings blank for now, apart from the Language. That needs to be selected.

- Then go to My Sites > Sites > All Sites. Go to the Dashboard of your site.
- Go to Dashboard > Plugins and activate WooCommerce.
- Configure WooCommerce.
- Add products.
You can always change settings or add more products later, but with MultilingualPress it’s good to do this as detailed as possible as this extension will allow you to base your second site on this main one, including already copying the settings and the products, and linking the latter.
3. Set up a second store with a different language
- Create a second store. Go to My Sites > Sites > Add New Site. Configure all settings. Make sure to enable the Relationship with the main site, and select that this new site is Based on site. There select the main one. This will allow you to “Activate all plugins that are active on the source site” and this will activate WooCommerce and copy the settings.

- Go to the Dashboard of your second site.
- Next, go to Dashboard > WooCommerce > Settings. From there, configure your secondary site. You may want to set up different locales, taxes, shipping and payment methods.
- If you go to Dashboard > Products, you will see that all products are copied from the main site.
- Now you can edit each of the products. At least have a look at the prices if you’ve changed the currency. The product descriptions can be edited on either of the stores. For example, in the screenshot below, a different Dutch translation has been added.

- Note that you can also change the relationship between two products. At the moment, Flying Ninja in the English store will connect with Flying Ninja in the Dutch version; this can be changed.
- Select Customise. Then go to Widgets > Sidebar > Add a Widget > Language Switcher. Once you’ve configured this, customers will be able to switch between the two stores.
Customer view
↑ Back to topCustomers will now be able to start at the English store, go to a product, and switch back and forth between the two different stores.
When they add the product to the cart in either store, the options in terms of taxes, shipping and payments will be different according to how you have configured the store.
- In the UK store example here, we only send to the United Kingdom, have a flat rate shipping of £5 GBP, UK taxes of 20%, and an option to pay via PayPal or bank transfer.

- In the Dutch store example, we send to both Belgium and the Netherlands, have free shipping, NL taxes of 21%, and only bank transfer as a payment option.

Questions and support
↑ Back to topDo you still have questions and need assistance?
This documentation is about the free, core WooCommerce plugin, for which support is provided in our community forums on WordPress.org. By searching this forum, you’ll often find that your question has been asked and answered before.
If you haven’t created a WordPress.org account to use the forums, here’s how.
- If you’re looking to extend the core functionality shown here, we recommend reviewing available extensions in the WooCommerce Marketplace.
- Need ongoing advanced support or a customization built for WooCommerce? Hire a Woo Agency Partner.
- Are you a developer building your own WooCommerce integration or extension? Check our Developer Resources.
If you weren’t able to find the information you need, please use the feedback thumbs below to let us know.