With WordPress and WooCommerce, PHP error logs can be useful when investigating an issue with a site. This guide will provide steps and information about accessing the PHP error logs either within WooCommerce or on a hosting server.
WooCommerce Logger
↑ Back to topWooCommerce features a logging system accessible via WooCommerce > Status > Logs, which records PHP fatal errors among other pertinent information.
This log serves as a valuable initial resource, mirroring details that would typically be found in the PHP error logs on the server. It is recommended to consult this log first before proceeding to locate the PHP logs on the server for further troubleshooting.
With WooCommerce 8.6, we have revamped the logging system to enhance its utility for all users. This concentrates on the filesystem method of storing logs (as opposed to the database method). A major enhancement includes a new interface that simplifies the process of browsing and viewing log entries.
Log File Browser
↑ Back to topTo access the log files:
- Navigate to WooCommerce > Status > Logs
- On the “Browse Log Files” screen, you will see a list of available log files.
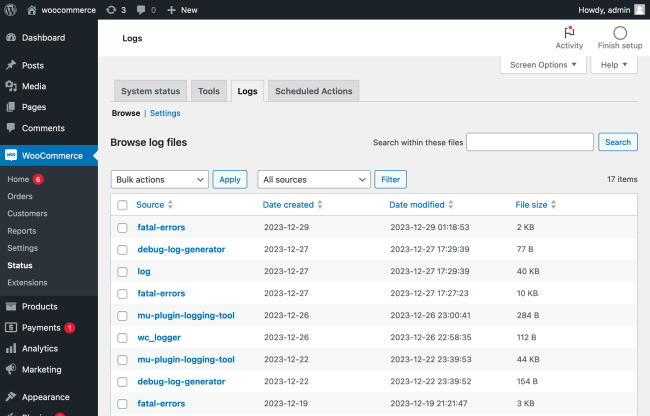
The “Browse Log Files” interface allows you to filter, sort, and manage log files efficiently. Additionally, you can perform bulk actions, such as downloading or deleting multiple log files simultaneously, by selecting the desired files and utilizing the bulk action dropdown menu.

If you are using WooCommerce versions before 8.6, you can access log files by navigating to WooCommerce > Status > Logs. Here, select a log file from the drop-down menu located in the top-right corner of the screen.
We highly recommend upgrading to the latest version of WooCommerce to take advantage of new features, such as the improved WooCommerce Logger interface. Regular updates of WordPress and all associated plugins are crucial for the seamless functioning of your website.
Searching Logs
↑ Back to topYou can now choose a group of files for targeted searches by employing filtering and sorting methods. Subsequently, you can link directly to specific lines within those files that contain the relevant results.

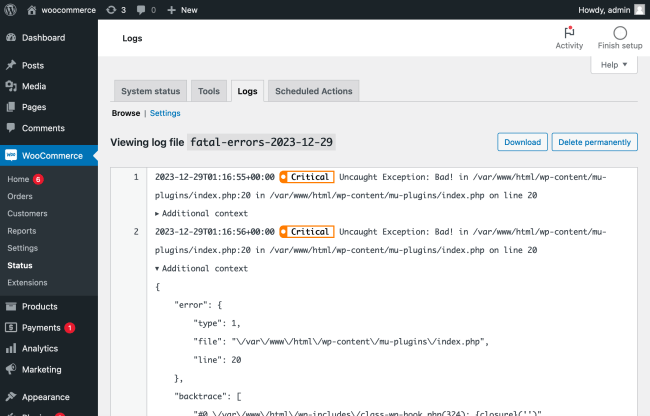
Single file viewer
↑ Back to topThis view presents the content of an individual log file, highlighting the start of new entries and their severity levels. It enables users to highlight and create permalinks for specific lines within a file, as well as to display extra contextual information for each log entry in a clear and readable format.
On this screen, you have the option to either download or delete the log file, using the buttons located at the top of the file viewing interface.
Settings
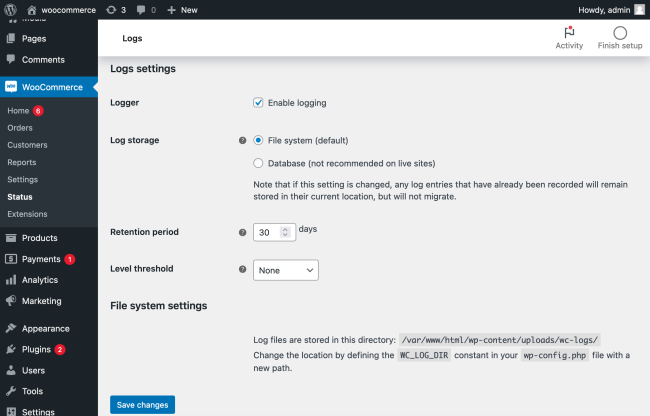
↑ Back to topThe settings for managing log files can be adjusted via the settings page, found at WooCommerce > Status > Logs > Settings. The configurable options include:
- Logger: This option allows you to activate or deactivate logging.
- Log Storage: Determines the location where log entries are stored. By default, “File System” is selected. An alternative option is “Database,” which is not recommended to be used on live sites. It’s important to note that changing this setting will not move existing log entries; they will stay in their original location.
- Retention Period: Defines the duration (in days) that log entries will be retained before automatic deletion. The default setting is 30 days.
- Level Threshold: Specifies the minimum severity level for logs to be recorded, with lower severity levels being omitted. The default setting is “None,” indicating that all logs are stored. Options include Alert, Emergency, Debug, Critical, Error, Warning, Notice, None, and Info.
- File System Settings: This specifies the server location where log files are stored (e.g.,
/srv/htdocs/wp-content/uploads/wc-logs/). You have the option to modify this location by setting theWC_LOG_DIRconstant in yourwp-config.phpfile to a new path.
Fatal Errors
↑ Back to topTo access the fatal errors:
- Navigate to WooCommerce > Status > Logs
- On the “Browse Log Files” screen, click on the file named “fatal-errors” to open and view its contents.
The types of errors caught in the “fatal-error” log are PHP fatal errors, runtime errors, and errors purposely triggered in the code by a PHP function. Runtime errors can occur when there is a typo in the code, for example.
Fatal errors occur when the action in the code cannot be completed. Examples of a fatal error include:
- Calling an undefined function
- Using an undefined variable
- Calling a function on a null or otherwise unusable variable
This does not include web server errors, such as timeouts.
The log will include the:
- Timestamp when the error occurred
- Error that occurred
- File and line in the code for the origination of the error
- Stack trace – a snapshot of the history of the function calls and files leading up to the error
PHP Error Logs on the Server
↑ Back to topYou can find the PHP error logs in a few possible places on the server:
- in your server’s root folder, called
error.log - in
public_htmlor similar folder, callederror.log - in
var/logsor similar, callederror.log - additionally, if you have debugging enabled in WordPress and you have it saved to a file, it will be in the
wp-contentfolder, and calleddebug.log
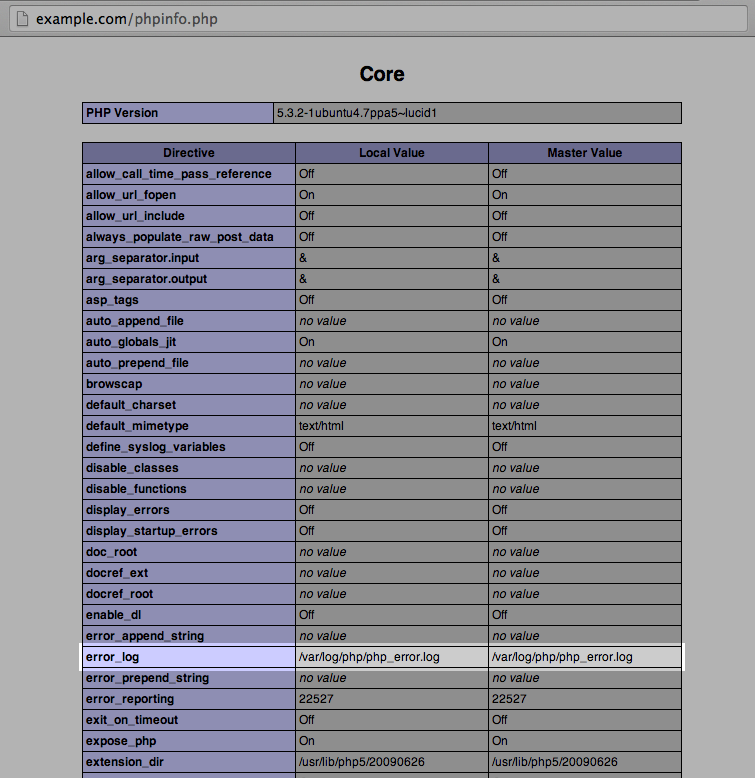
If you’re having trouble finding the file, you can have PHP tell you where it is:
- Create a file named
phpinfo.phpin the root of your WordPress’s directory - Open the
phpinfo.phpfile in a text editor - Insert the following code into the file:
<?php phpinfo(); ?> - Open the file on your site. For example, if your site’s URL is
example.com, you can open the file by visitinghttp://example.com/phpinfo.php - Search the page for the
error_logvalue. The file path listed here is the absolute file path of the PHP error log – visit that address on your server and you should find the PHP error log. If the value is empty, then you need to set a value to log errors on your site. See the picture below for how it should look like: