Please note that Facebook for WooCommerce is currently not compatible with Checkout on Facebook & Instagram.
Following Meta’s announcement to discontinue ‘Checkout on another website’ support for US merchants and only allow ‘Checkout on Facebook & Instagram’ within this region, the plugin cannot be utilized by US merchants to create Facebook/Instagram Shops until further notice.
Nevertheless, US merchants can continue utilizing the plugin for Facebook Ads to promote their product catalogs across Facebook platforms.
Overview
↑ Back to topFacebook for WooCommerce connects your WooCommerce store to Facebook to help people discover your eCommerce shop. You can purchase advertising, find new customers, set up a shop to sell your products on Facebook, and measure the results of the actions customers take on your website.
With this plugin, you can:
- Sync your WooCommerce catalog to Facebook to let customers browse your products from your Facebook Page shop and create product-based ads.
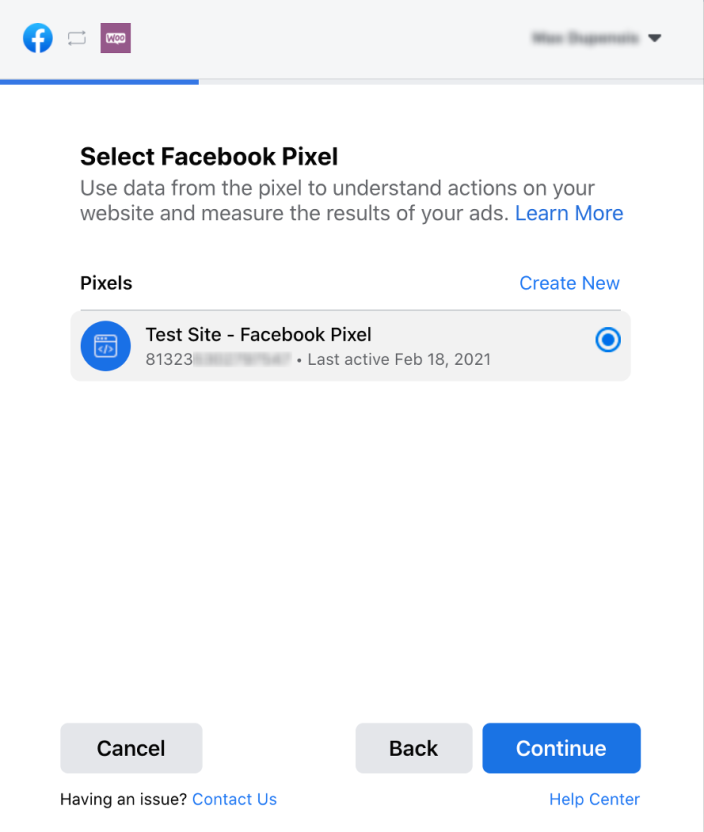
- Install Facebook pixel to support retargeting ads, find new customers, and track ad effectiveness.
Installation
↑ Back to topIf you don’t have Facebook for WooCommerce, you can install and activate the plugin:
- Go to Plugins > Add New and search for Facebook for WooCommerce.
- Click Install Now and then Activate.
- Click Configure and follow the instructions in this document to set up the plugin.
Please keep your Facebook for WooCommerce Plugin updated
↑ Back to topThe latest version number can be viewed on the Facebook for WooCommerce product page under Details and compatibility dropdown on the right side. After this, navigate to Plugins > Installed Plugins it is important to check the version number and update to the latest version.
Getting started
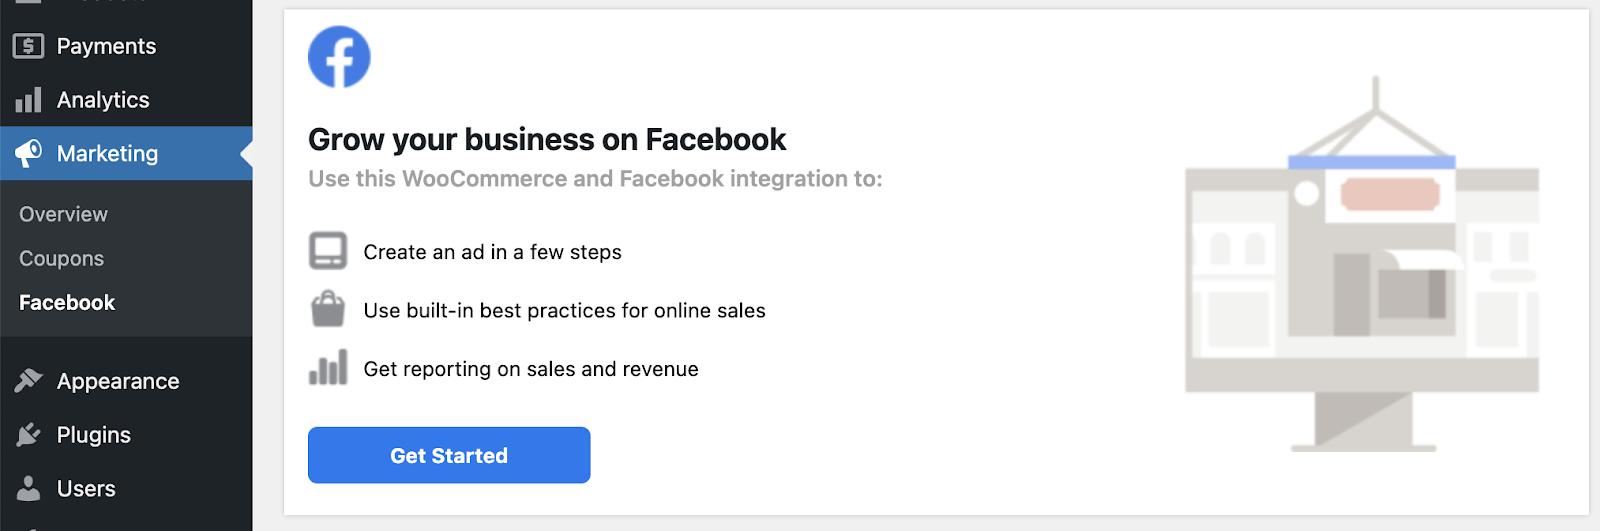
↑ Back to topConnect your Facebook Account
↑ Back to topHead to Marketing > Facebook, then click Get started and follow the steps below.
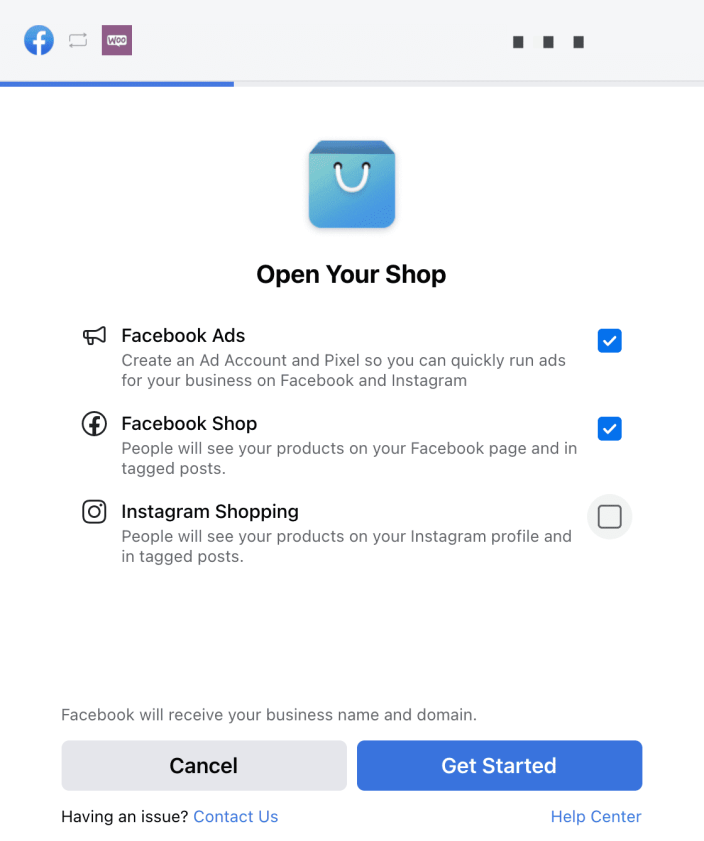
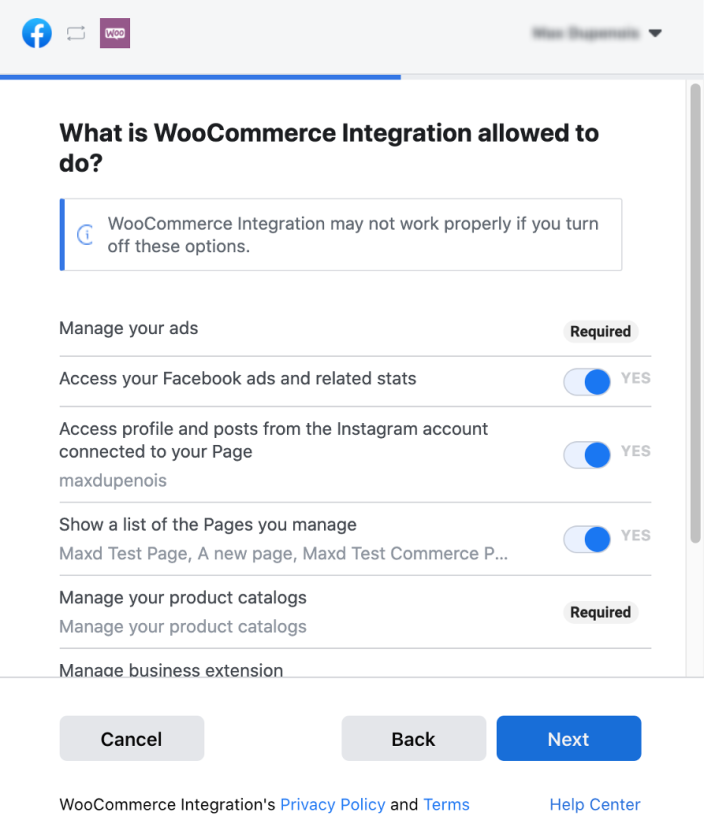
This will launch the Facebook setup wizard, which will ask you to:
- Log in to Facebook, if you’re not already logged in elsewhere.
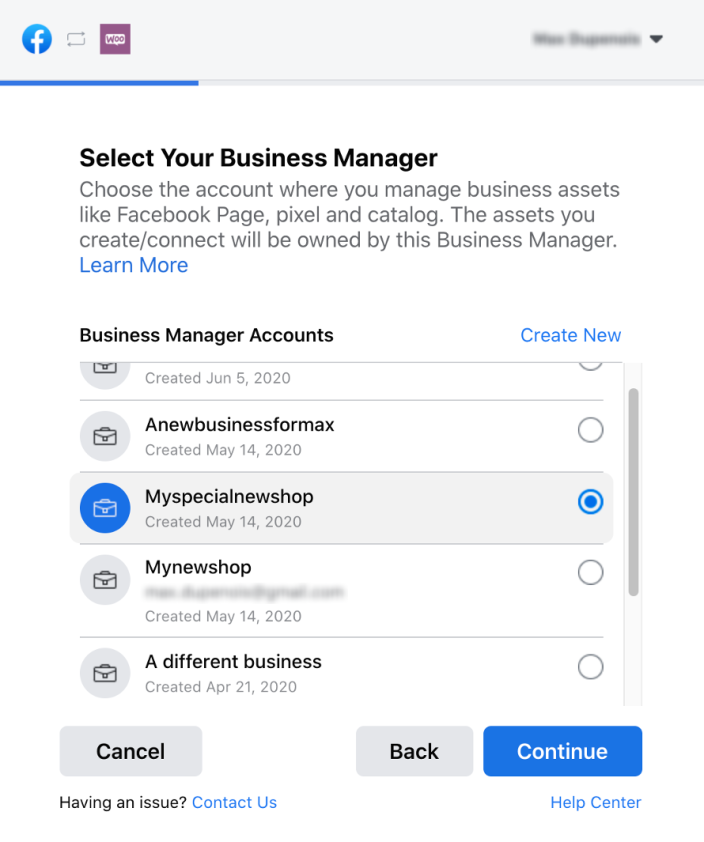
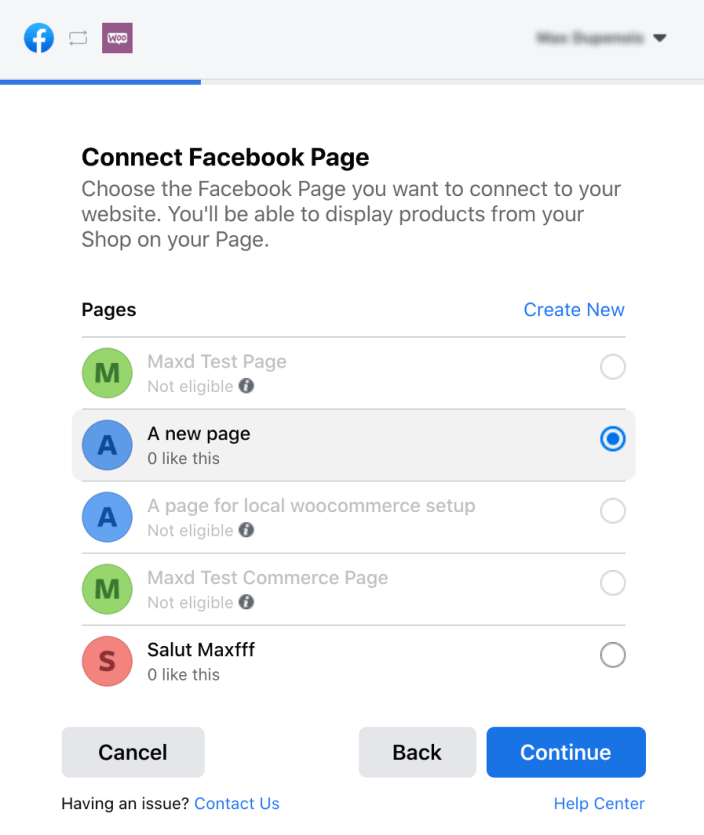
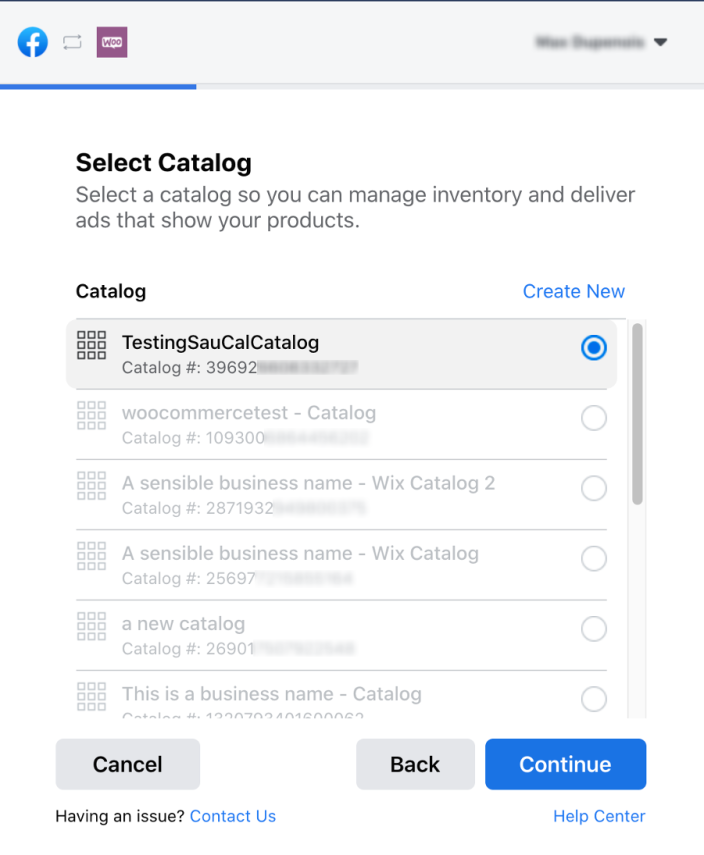
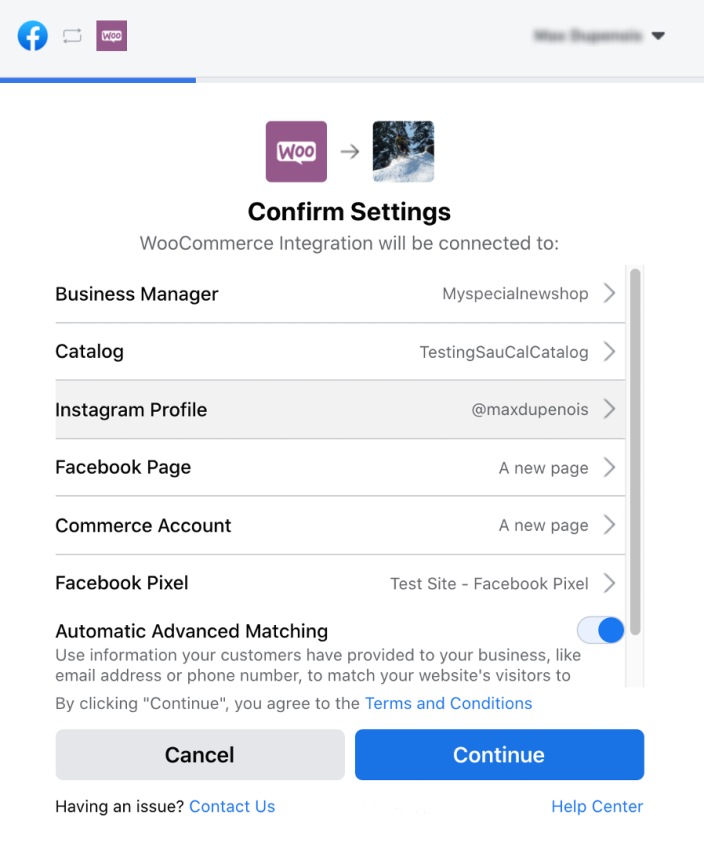
- Create new or choose existing Facebook assets to connect to this store:
- Authorize the connection between WooCommerce and Facebook for your business.
Once setup is complete, you can go back to your site admin to configure other settings and features.
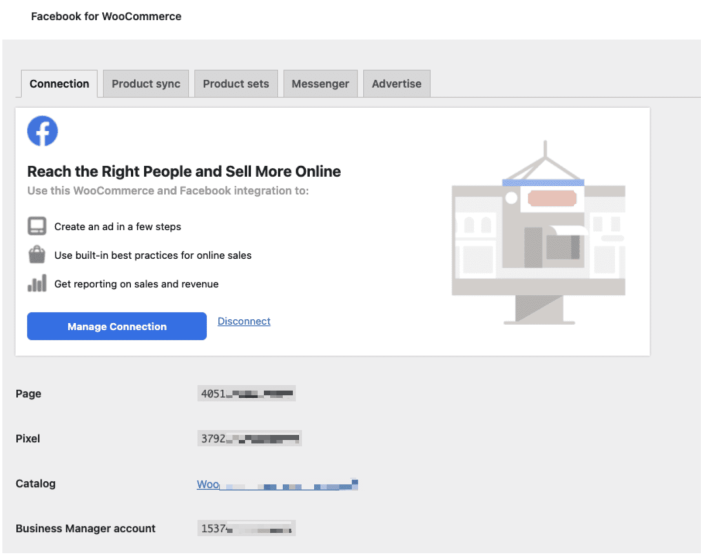
You can view your connected assets at any time from the Marketing > Facebook > Connection tab. To manage your connected assets and enable other features, such as setting up your Facebook Page Shop, click Manage Connection to open the Facebook Business Extension tool.
Please leave “Instagram Shopping unchecked.
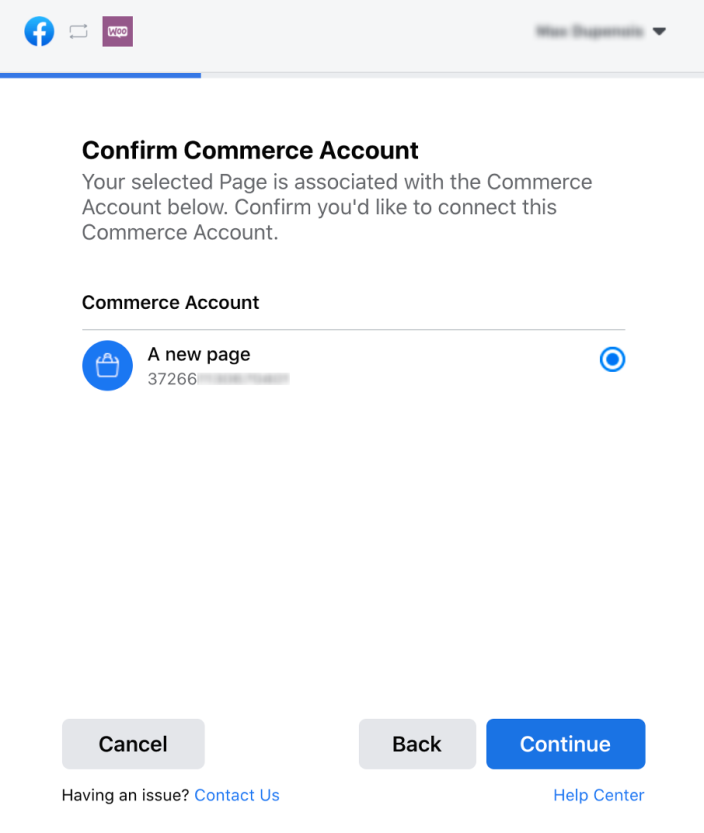
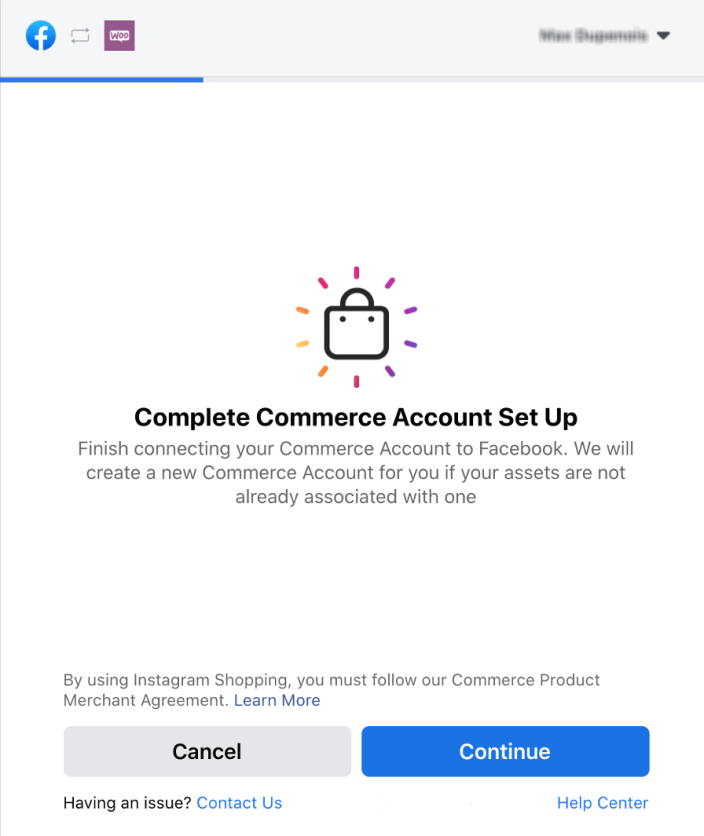

You may experience a slightly different set of screens if you do not already have a Commerce Account. However, the flow offers users the opportunity to create new assets when needed.
You may also need to verify the domain attached to your account before you are allowed to progress. In this instance, please press the back button until you get to the Open Your Shop screen, uncheck the ‘Instagram Shopping’ box and continue through the steps above.
You’ll be redirected to a WooCommerce hosted endpoint that confirms that the URL is actually for your shop.

Click on ‘THAT’S MY SITE – REDIRECT ME’.
Your Facebook connection page should look something like this; you are now connected.
Sync Products to Facebook
↑ Back to topHow to manage your WooCommerce Catalog
↑ Back to topTo make your shop more discoverable and easier to navigate, you will need to have a complete commerce catalog. The search, sort and filter controls rely on high-quality catalog data to make it easier for buyers to consider a broad range of items and find the exact product they want.
To start setting up your catalog go to Products > Categories.

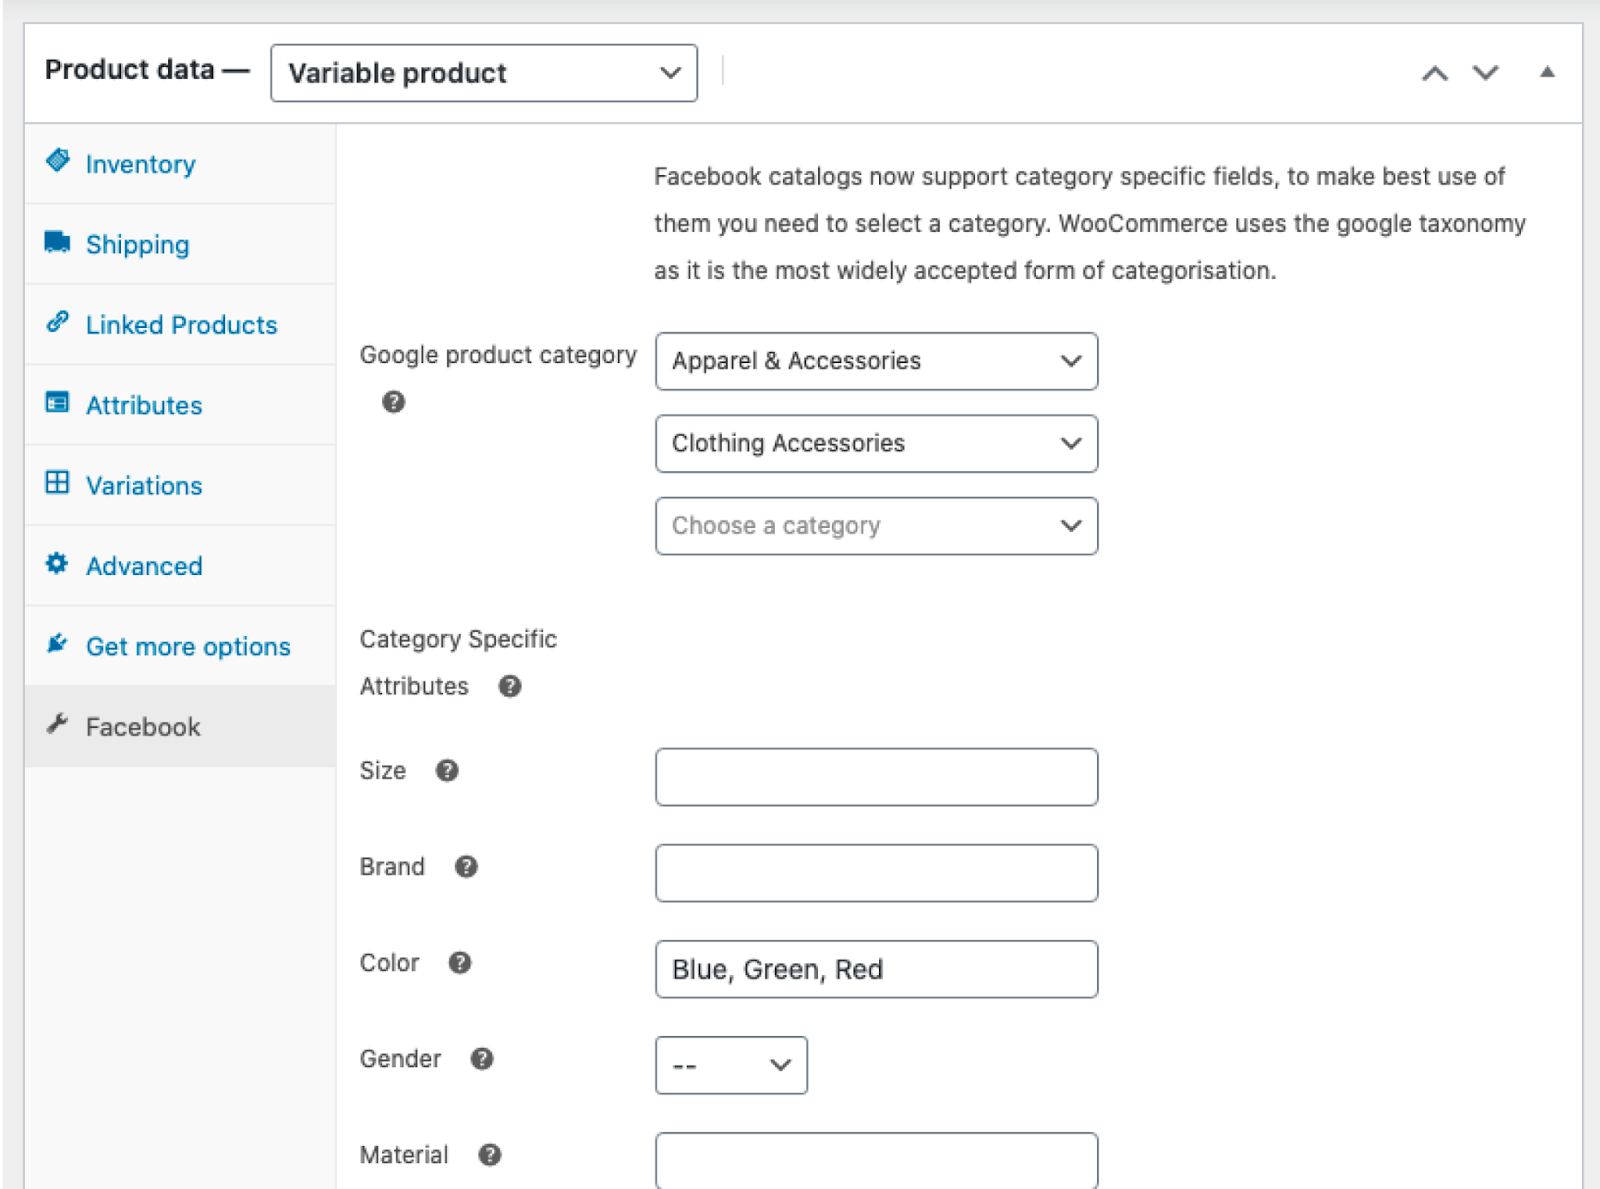
You should map a WooCommerce category to a Facebook category (using the Google Product Category Taxonomy). Google Product Category (GPC) codes are required for the proper calculation of tax. GPC information can be set at both the global and individual product levels. To assign a default GPC to all products in your catalog, navigate to Marketing > Facebook > Product Sync tab and select the appropriate primary and secondary GPC in the section titled Default Google Product Category. A minimum of two category levels are required.

This allows you to:
- Provide category specific fields to Facebook, e.g. material, size, color, style.
- Have Facebook apply tax correctly to your items when they’re displayed in Shops
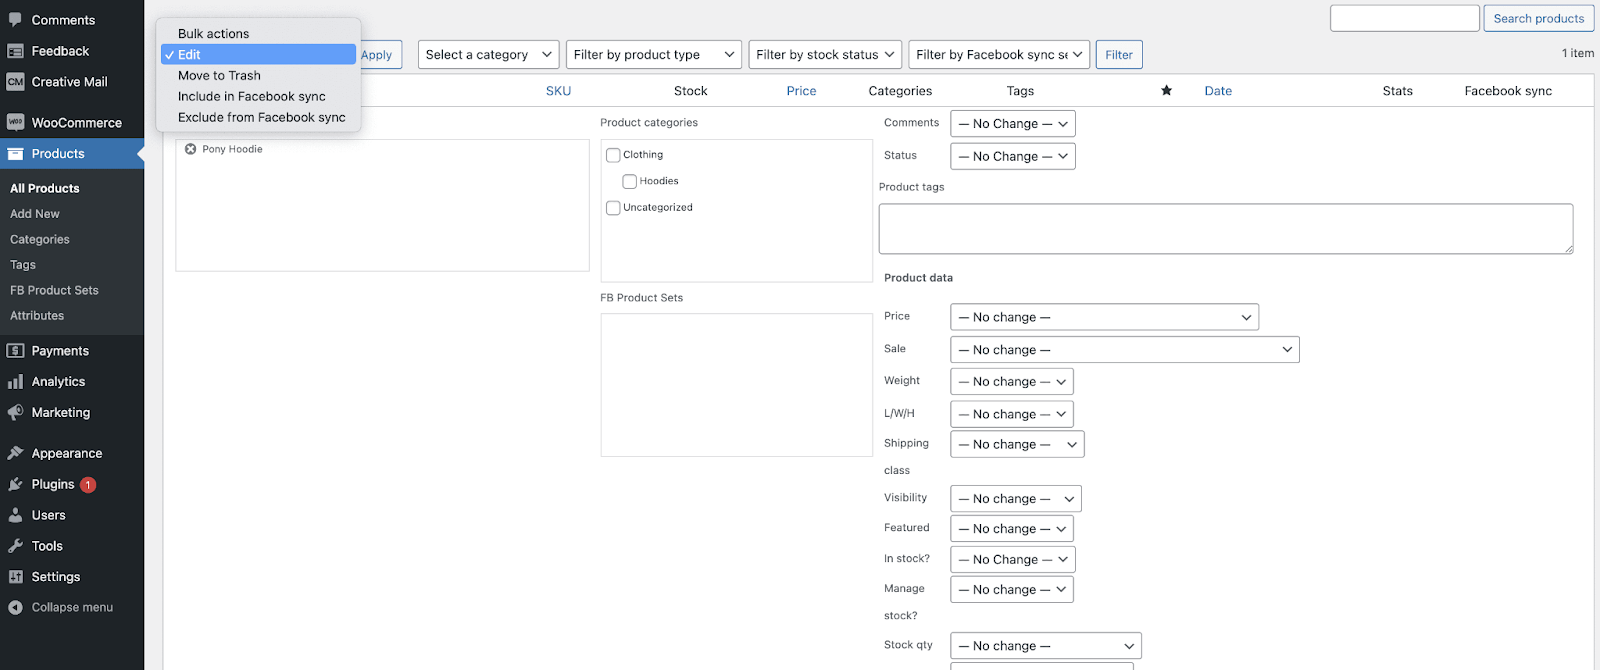
These default values will apply to any product within that category, but, you can also override these on the individual product level by navigating to Products > All Products and clicking the Edit option underneath a particular product.

Please select two categories. You’ll then see a dropdown with more detailed attributes to complete should you wish to do so:

Click on ‘Show advanced options’’ and complete these additional categories:

Product Sync Settings
↑ Back to topThere are a few key configuration settings in Marketing > Facebook > Product sync:
- Enable product sync – Uncheck this to disable product syncing entirely. If this option is unselected, an alternate data source must be provided to ensure your catalog has all of the fields required for Checkout, e.g. GPC, inventory, and variant attributes.
- Exclude categories from sync – Enables you to quickly filter out products for a given category from your Facebook catalog.
- Exclude tags from sync – Enables you to quickly filter out products with a given tag from your Facebook catalog.
- Product description sync – Allows you to customize whether a short or standard description should be used for each product.
Catalog Syncing
↑ Back to topOnce your catalog has been set up, all that remains is a full product sync. In most cases, all products will have already been synced when the plugin is first connected to Facebook.
Subsequently, products will be synced any time a new product is created or an existing product is changed. In the event products are not syncing as expected, a sync can be triggered manually via the Marketing > Facebook > Product Sync tab by clicking the Sync products button.

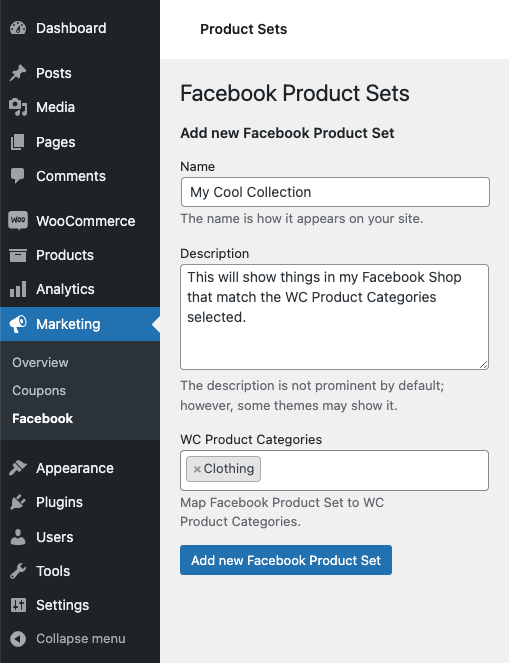
How to create a Collection / Product Set
↑ Back to topCollections are a way to group your products within your shop (e.g. curating items based on top trends or seasons). They are called Product Sets within WooCommerce, you’ll need to create your own Collections to group specific products together. You can manage your Collections in the plugin from Marketing > Facebook > Product sets (tab).
Give your product set a name and description, then assign it a category or multiple categories. Any products with the assigned WooCommerce Product Categories will automatically be added to that Collection / Product Set.
Variable Products / Variants
↑ Back to topAlmost there! Now you’ll want to ensure all attributes for your variable products are set up to sync to Facebook correctly. Variant information is required to display the correct options to buyers during checkout. (Learn more about product variants).
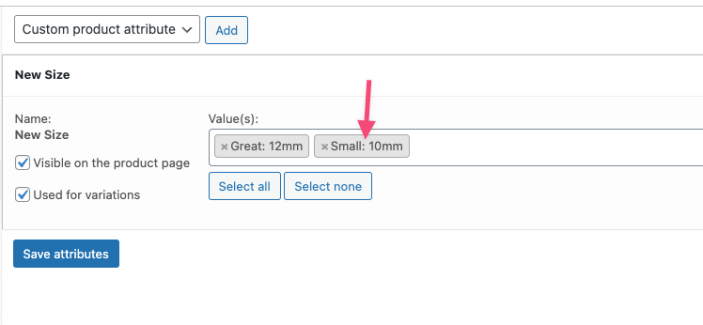
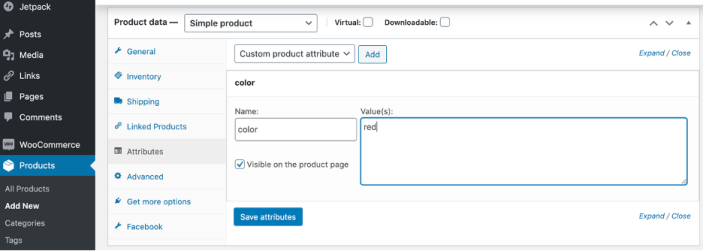
In WooCommerce, attributes can be defined at both the global and product levels. Global attribute definitions can be found at Products > Attributes and assigned a list of potential values, known as “Terms.”
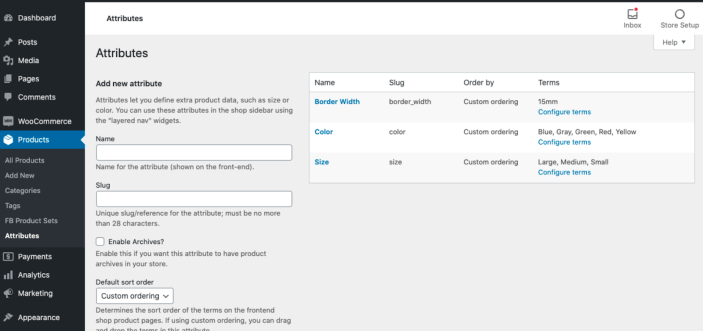
Once defined, these attributes can then be assigned directly to a simple product, e.g.

Global attributes can also be assigned to variable products to be used for individual variations.


IMPORTANT: Note that every variation must have a single value for a given attribute. In the above example, the variation with ID #78, would need to be expanded into distinct products corresponding to each of the available sizes. Attempting to sync with a value of “Any Size…” would result in an invalid Checkout product.
In addition to standard WooCommerce attributes, the plugin also supports setting particular category specific variant attributes using the “Facebook” tab on the “Edit Product” page. NOTE: For variable products, category specific attribute values set at the parent level will override the attributes for any child variations.
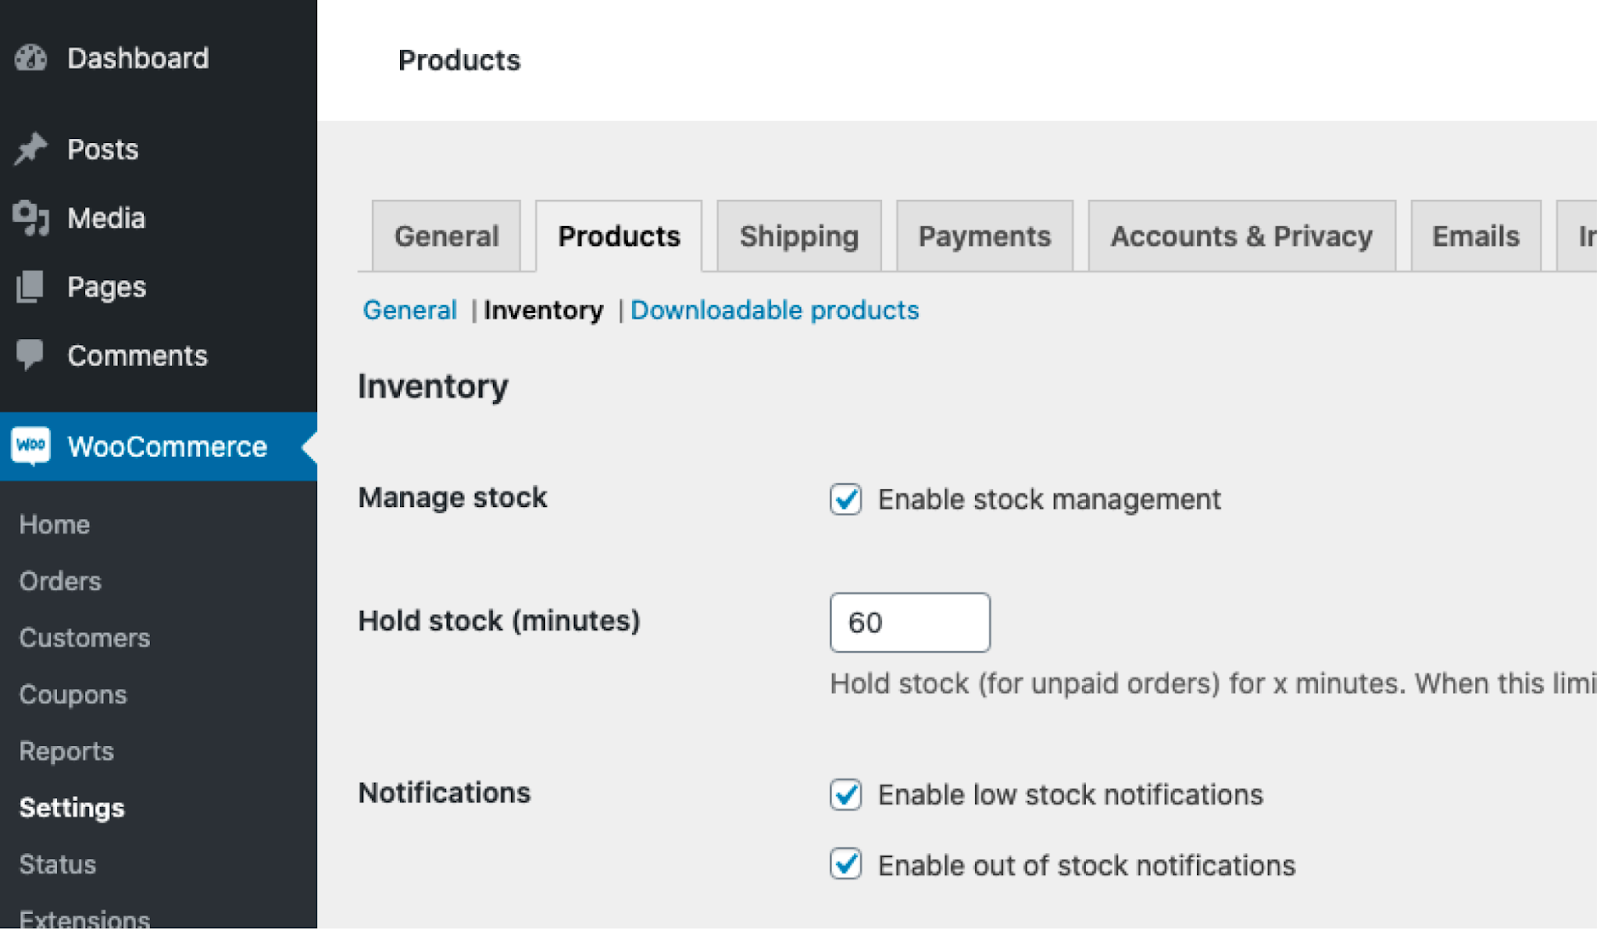
An additional inventory field is required for checkout to let buyers know when products are running low or out of stock. In order to set up your product inventory, stock management must first be enabled for WooCommerce. Confirm this setting is checked under WooCommerce > Settings > Products > Inventory.
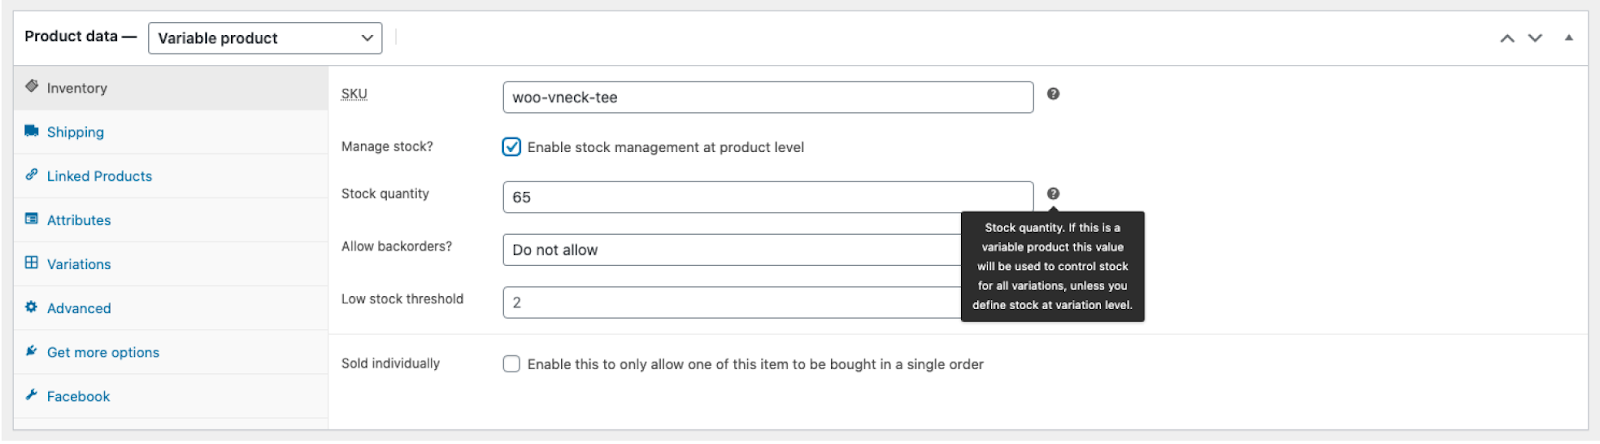
Once this setting has been enabled, inventory counts can be set as follows:
1. From the Edit Product page for a Simple Product.

2. From the Edit Product > Inventory page for a Variable Product (global). NOTE: For variable products, stock quantities can be set at both the global or individual variation levels.
3. From the Edit Product > Variations page for a Variable Product (individual).

4. Lastly, from the Bulk Edit > Product Data section.
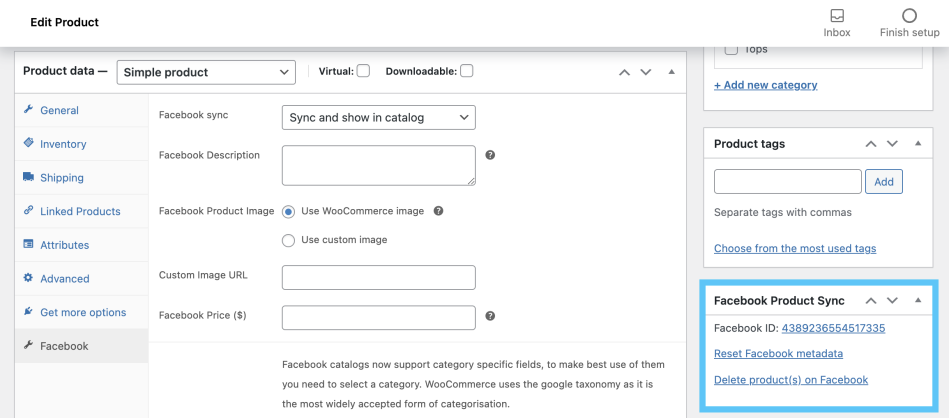
Facebook Product Data
↑ Back to topOn the Edit Product page, a new tab called “Facebook” is visible. Here, you can decide whether to enable Facebook sync to your Facebook catalog or not. By default, when you’re creating a new product, “Sync and show in catalog” will be selected. Also, there are a couple of other useful settings.

Please note that the Facebook Price field is used when you set a different price for the product to be shown on Facebook. The price will be different compared to the one shown on your WooCommerce store.
This is applicable only when you select Checkout with Facebook or Instagram.

Since the Checkout with Facebook or Instagram option isn’t supported yet, we recommend that you leave the Facebook Price field empty to avoid confusion.
NOTE: Facebook sync setting for variable product type is available on the Variations tab.
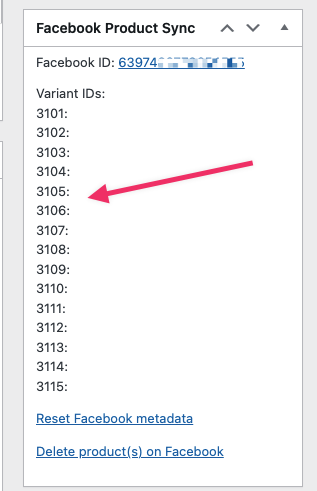
When you have published a product, and Facebook sync is enabled, the plugin will automatically sync the product to your Facebook catalog. The corresponding metadata will be generated and visible on the sidebar.
Facebook Product Validation
↑ Back to topBesides showing the metadata ( mentioned in the Facebook Product Data ), the sidebar Facebook box is used to display product validation issues. Some of the settings of a product may cause it not to synchronize correctly with the Facebook catalog. The plugin is able to find some of the issues and inform the user about what the problem is. To find more about the types of validation performed please check the Product validation issues section.
How to Create Ads on Meta Technologies
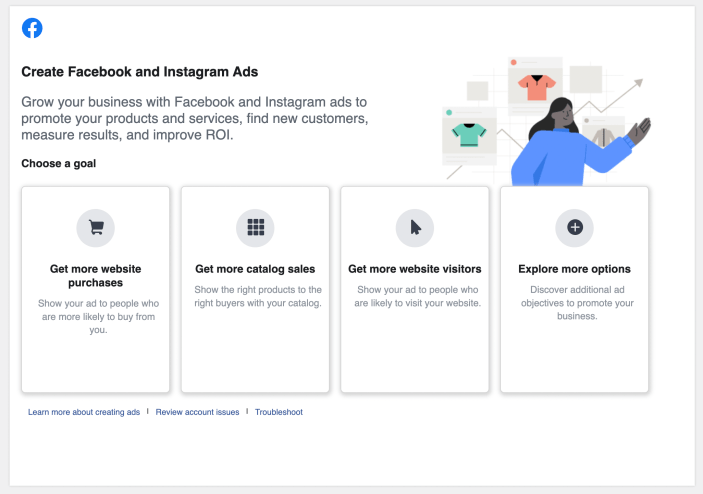
↑ Back to topFrom your site dashboard, go to Marketing > Facebook. You’ll be presented with the Facebook Ad interface from where you can create Facebook and Instagram ads right in your store dashboard. Next, choose a goal for your Facebook Ad campaign.
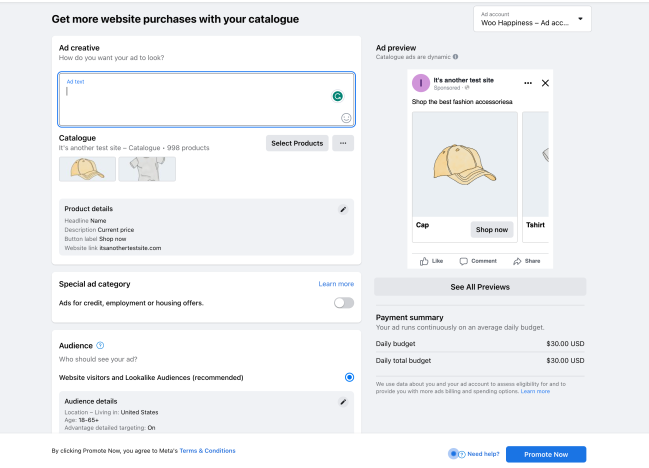
After choosing the applicable goal for your needs, you will be asked a few quick questions about your audience and have the opportunity to upload more images relevant to your campaign, set your ad budget, audience, duration, and see Estimated Daily Results. Once you’re done setting up your ad, add your preferred payment method and click the Promote Now button to activate your Facebook Ad campaign.
Use Facebook Messenger
↑ Back to topThe Chat Plugin was disabled by Meta on May 9, 2024. The related Facebook Messenger feature was removed from Facebook for WooCommerce in version 3.2.0 (May 2024).
Troubleshooting
↑ Back to topAccount quality
↑ Back to topSome of the problems regarding your Facebook business accounts are related to insufficient account quality. Facebook checks your account to verify that it is compliant with Facebook terms and policies. If it detects issues your account may be restricted or disabled. More information and link to the Account Quality review can be found in About Account Quality at the Facebook Business Help Center. One of the most common issues is account blocked because two-factor authentication was not enabled.
Two-Factor Authentication
↑ Back to topFacebook requires that every Business Manager older than 90 days had two-factor authentication enabled. Two-factor authentication is a layer of security that prevents unauthorized access to your Business Manager. More information and setup instructions can be found in How to Turn On the Two-Factor Authentication Requirement in Your Business Manager at the Facebook Business Help Center.

It is advised to proceed with the two-factor authentication set up during the initial plugin setup because it is easy to miss the 90 days grace period that does not require the setup.
Feed Generation memory issues
↑ Back to topSometimes, if your shop has big products catalog the feed generation process may fail due to limited server memory. The error visible in the logs will look similar to this:
unexpected shutdown: PHP Fatal error Allowed memory size of 419430400 bytes exhausted (tried to allocate 20480 bytes) in /wp-includes/functions.php on line 624
This stops your site’s ability to generate the product feed required for some of the synchronization processes between your WooCommerce site and Facebook Business Manager. Even if the feed generation process would not fail it still could cause slowness of the admin interface.
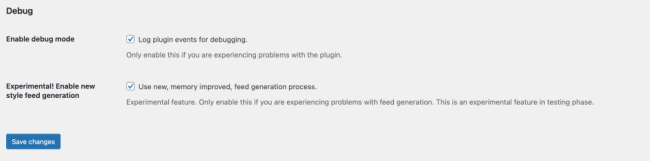
In Facebook For WooCommerce version 2.6.6, a new feed generation process was added. It should be free of the memory issues that the old generator was experiencing. To enable the new process please go to Facebook plugin settings in wp-admin Marketing > Facebook and stay on the Connection tab, then scroll to the bottom to the Debug section.

Enable the Experimental! Enable new style feed generation option. As the description points out this feature is still in the experimental phase. As soon we will confirm that it fixes the problem we will enable it for all the users and we will remove the old feed generator.
There are no other steps required. After you enable the option and click Save changes, the next scheduled feed generation will use the new process.
The new feed generator processes the catalog in batches in the background. This allows avoiding the server memory limitation.
Sync Issues
↑ Back to topWPEngine runs a script that terminates processes taking longer than 60 seconds, which might stop the sync process. This only impacts clients on their shared hosting. A temporary workaround is to reach out to WPEngine and ask to have the script turned off for the duration of the sync.
Product validation issues
↑ Back to topThe Facebook Product Sync sidebar box is able to perform basic validation of the product. In case a problem is detected the information about the problem will be displayed in the box. For example:
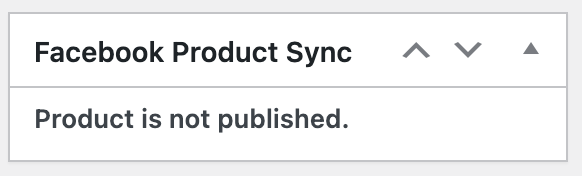
Not published products are not synchronized to the Facebook Catalog. Or:
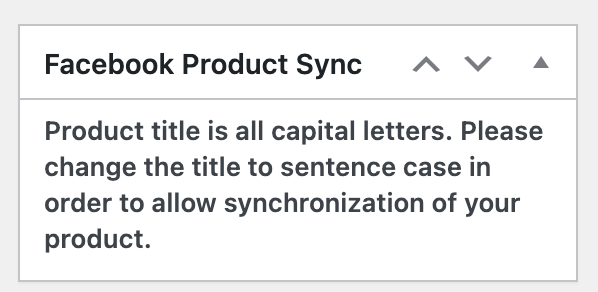
Facebook does not accept products with capital letters only titles.
Other possible statuses:
- Product sync is globally disabled.
– enable globa sync setting to allow products sync - Product must be in stock.
– if WooCommerce hide out of stock option is selected the product must be in stock in order to sync - Product is hidden from catalog and search.
– product is set to one of the not visible settings in the product Publish > Catalog visibility section - Product excluded because of categories.
– product is in one of the excluded categories - Product excluded because of tags.
– product is in one of the excluded tags - Sync disabled in product field.
– product is not set to sync in the product Facebook tab - Product description is all capital letters.
– product description must not be capital letters only - Product description is too long. Maximum allowed length is 5000 characters.
– product description is too long - Product title is all capital letters.
– product description must not be capital letters only - Product title is too long. Maximum allowed length is 150 characters.
– product title is too long
Other sync issues
↑ Back to topAn additional cause of a product (especially variable product) isn’t synced properly to the Facebook catalog is that when we create a global product attribute and the attribute name contains a disallowed character :.
If we use the global attribute name that contains such disallowed character in the variable product Product data > Attributes tab when we publish or update the product, the product variations Facebook metadata are broken.
Debug Tools
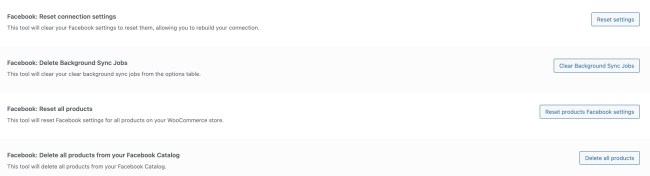
↑ Back to topAs of version 3.0.5, Facebook for WooCommerce provides a set of tools to help with some of the most common troubleshooting tasks:
- Facebook: Reset connection settings will clear your Facebook settings to reset them, allowing you to rebuild your connection.
- Facebook: Delete Background Sync Jobs will clear background sync jobs (wc_facebook_background_product_sync) from the options table.
- Facebook: Reset all products will reset Facebook metadata for all products on your WooCommerce store.
- Facebook: Delete all products from your Facebook Catalog will delete all products from your Facebook Catalog.
To enable these tools, you will need to enable Debug mode by navigating to Facebook plugin settings in wp-admin Marketing > Facebook and stay on the Connection tab, then scroll to the bottom to the Debug section.
Once you’ve confirmed Debug mode is enabled, navigate to WooCommerce > Status > Tools:
Note:
- The tool to delete/ reset products might take some time, depending on the number of products in your catalog.
- The tool to delete catalog products only deletes products in the WooCommerce store due to limitations in the Meta API. Products added to the Facebook catalog by other sources or currently unlinked cannot be deleted by this tool. You might need to contact Meta support to have these deleted.
Common errors and how to resolve them
↑ Back to topOops, something went wrong.
↑ Back to top
While this error can occur for a few different reasons, the most common seems to be in relation to Facebook’s supported currencies.
If your WooCommerce default currency is not on this list, some folks have had success temporarily changing their currency to a supported one (USD, CAD, GBP, EUR) to connect and then changing it back afterwards.
Could not retrieve Facebook Business Extension System User
↑ Back to top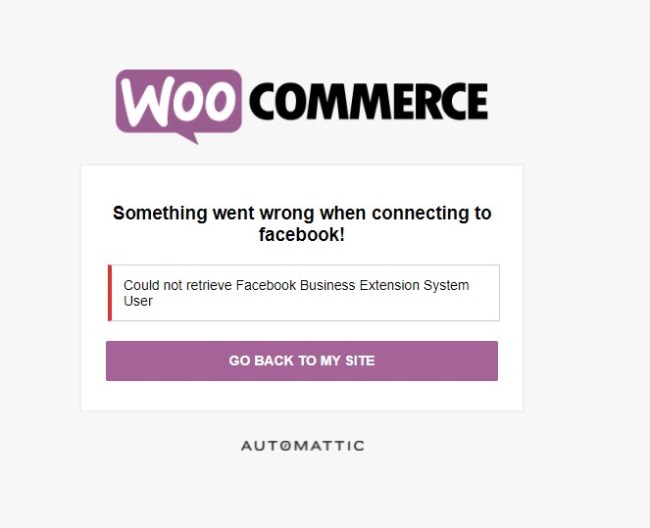
The Could not retrieve Facebook Business Extension System User seems to be affecting users who have existing connections to the WooCommerce Integration Facebook business app. The Meta team is investigating the issue. Users have confirmed resolving the by either of these approaches:
Setting up two-factor authentication
Some users have confirmed setting up two-factor authentication (2FA) on their Facebook account resolved the error and allowed them to finish the setup. If 2FA is already enabled on your account, you should deactivate it and set it up afresh.
Initiating the setup on Facebook
Another known solution for the Could not retrieve Facebook Business Extension System User error is to connect to WooCommerce directly from Facebook by:
- Navigate to https://business.facebook.com/latest/business_app_store/
- Select the WooCommerce Integration and click on Manage
- Where you see the text “There are more features available to you” click on See features
- Connect to WooCommerce Integration window pops up
- Click continue, enter your website URL, click connect and complete the setup steps
Permissions error: access_denied, reason: user_denied
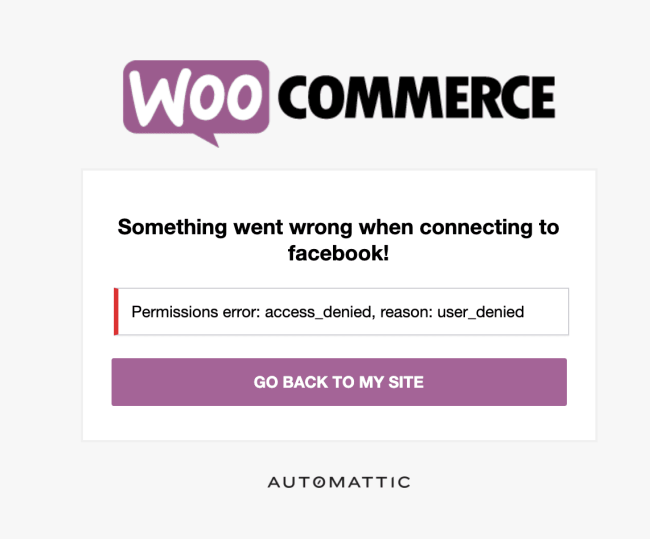
The error user_denied usually points to a permission issue. Deleting the associated catalog on Facebook and creating a new catalog during the extension setup is known to resolve the issue. After deleting the associated catalog, you’ll be prompted to create a new catalog when you reinitiate the setup.
External business ID is missing
↑ Back to topThis error External business ID is missing is occasionally returned during the extension setup and disrupts the setup process. Users have confirmed resolving it by following either of these methods:
Editing the business ID in the options table
↑ Back to top1. Go to https://example/wp-admin/options.php (Replace example.com with your domain)
2. Search for wc_facebook_external_business_id.
3. Update the field to include only supported characters and save (best practice: storename-dfsdc3lck9k6q ← 13-digit random string. e.g, woo-dfsdc3lck9k6q)
4. Double-check the wc_facebook_external_business_id to make sure changes have been saved, in case changes haven’t been saved you will need to update this through the database.
5. Once changes have been saved, navigate to Marketing > Facebook, click “Get Started” and attempt the setup again.
Please keep in mind that the wc_facebook_external_business_id WordPress option cannot be blank or contain non-Latin characters.
Initiating the setup on Facebook
↑ Back to top- Navigate to https://business.facebook.com/latest/business_app_store/
- Select the WooCommerce Integration and click on Manage
- Where you see the text “There are more features available to you” click on See features
- Connect to WooCommerce Integration window pops up
- Click continue, enter your website URL, click connect and complete the setup steps
Frequently Asked Questions
↑ Back to topWhat Facebook policies or processes should I be aware of before setting up my store?
↑ Back to topProducts sold on Facebook must comply with Facebook’s Commerce Policies. If you intend to advertise your products you must also comply with Facebook’s Advertising Policies.
Uploaded products go through a review process and your product may be removed if found to be in violation of Facebook’s policies. If you believe a product was incorrectly rejected, you can request a second review.
Facebook also collects feedback from people who make purchases on Facebook Products, including the Audience Network and this feedback is translated into a feedback score.
When a business receives poor feedback scores on topics such as delivery speed, product quality or customer service, ads that the business runs may see reduced delivery. If the business receives a significantly high proportion of negative feedback, it may experience a temporary or permanent loss of advertising and/or access to Facebook Commerce surfaces.
You can find more information on the Feedback Score here.
Why should I not use the same value for categories and attributes?
↑ Back to topWooCommerce provides a way for a user to set attributes already:
If we see an attribute with the same (case insensitive) name as a category specific one (like ‘color’ in the example above) then, unless it is explicitly overridden in the above shown product level view, we’ll send that value.
If you have two WooCommerce categories that both set a default value or google product category and they both get applied to a product, what do you do if they disagree? We find the first non-conflicting value by traversing up the tree (WooCommerce categories are also hierarchal). If you do not find a non-conflicting version we assume there’s no valid default.
How can I tell if the Facebook Pixel has been properly installed on my site?
↑ Back to topThe Pixel Helper is a small Chrome extension provided by Facebook which will allow you to verify that your pixel has been properly installed and works as expected. Learn more about the extension here and download it here.
How can I set up Facebook conversion API?
↑ Back to topThe Conversions API creates a direct connection between marketing data such as website events and conversions from your server to Meta. This marketing data helps power ad personalisation, optimisation and measurement on Meta so that your ads are shown to people who are more likely to find them relevant.
The Facebook conversion API is integrated out of the box in the Facebook for WooCommerce extension. This means that once you set up the extension, the conversion API is automatically implemented and no additional setting is required from you. The data that flows through Conversions API and the Facebook Pixel is deduplicated based on a unique event ID, so there’s no concern about the same events being counted twice.
Help! I’ve been locked out of my Facebook account. What should I do?
↑ Back to topWe’re so sorry about that! This should now be a rare occurrence in the plugin but can occur if you create a Facebook account immediately before setting up business accounts, pages, and other assets. You can fill out this form so the Facebook team can begin recovering your account.
Why are my products not displayed on my shop after installing the plugin?
↑ Back to topIf none of the products have synced to Facebook, the most likely reason for this issue is due to the Facebook shop having been set up outside of our plugin’s wizard causing your Facebook page to link to a Facebook catalog other than the one our plugin uses. You can find out more about this configuration issue along with steps for how to address it in this document.
If only some of your products are missing from your Facebook shop, then this may be due to some of your products being out of stock, being virtual products, or there being too many variations.
My pixel is missing or not available. How can I see all the pixel’s through the plugin setup window?
↑ Back to topAs of version 2.0 of the plugin, only pixels created through the business manager can be selected through the plugin setup window. Personal ad pixels will not be available.
Versions prior to 2.0 were the opposite: Only personal ad pixels were available, and business manager pixels were not.
Customers are being sent directly to checkout when choosing to purchase a product. How can I send them to the product page instead?
↑ Back to topBy default, the link that is shared with Facebook is an “Add to Cart” URL for your product to speed up the checkout process.
You may want this to be the product URL for a number of reasons. If so, you can use this code snippet to send the product URL to Facebook instead:
How do I re-connect the plugin to my shop’s Facebook page?
↑ Back to topA frequent troubleshooting step when encountering issues with product sync or the connection, in general, will be to re-connect the plugin to Facebook. Learn More
Facebook shows “Sorry, this content is not available right now”. How can I re-configure the plugin?
↑ Back to topIf you lose access to the account that configured the plugin, or Facebook invalidates the account or merchant settings configuration, this message will be displayed.
In this case, you may need to re-connect the plugin.
How can I get Facebook to display prices including tax?
↑ Back to topThe price synced to your Facebook catalog should include tax if your WooCommerce shop is set to display prices including tax. You can find this option available at WooCommerce > Settings > Tax and select “Including tax” from the Display prices in the shop drop-down option.

That said, there are other tax options at play here. For instance, if you have the store set to “Entered prices exclude tax” yet the Display options are both set to “Including tax”, WooCommerce will need to generate tax on the product price before sending this across to Facebook. If the tax option is set to generate taxes from the “Customer’s address” then this might not work, as the Facebook sync has no specific customer address.
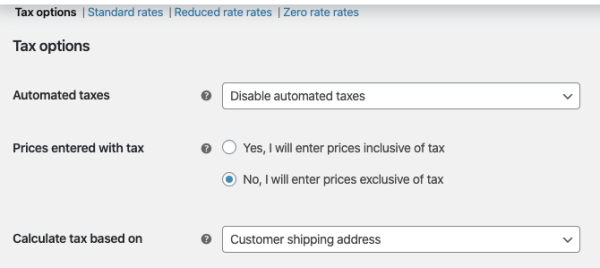
In this case, you’ll need to work out the best workaround:
- Setting the “calculate tax based on” to the shop address
- Enter prices inclusive of tax
Some events are not triggering with caching plugins (Breeze, SG Optimizer, Asset CleanUp, etc). How can I fix this?
↑ Back to topSome caching plugins have some optimization settings that cause a conflict with the pixel tracking code that will result in the event not being triggered. This can be tested with the pixel helper Chrome extension and seeing that the ViewContent (as an example) is not triggered on the view product page.
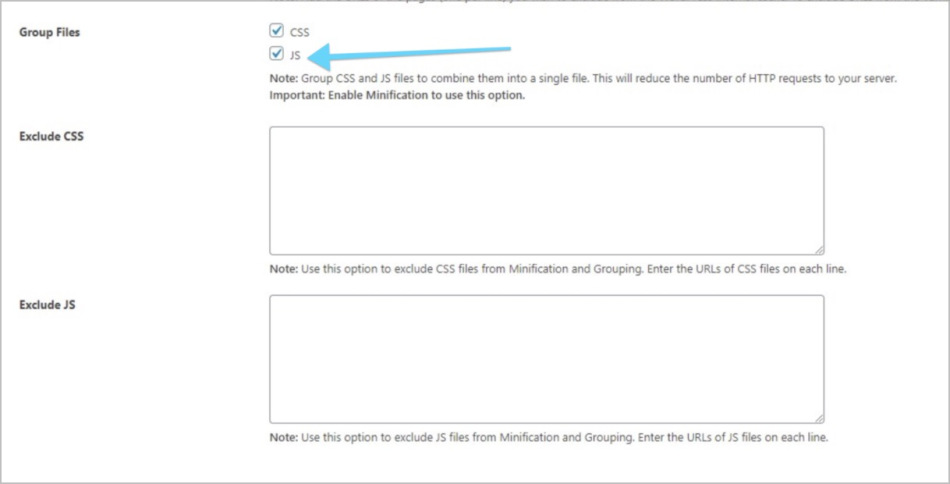
The fix is to disable grouping of JS.
Is it possible for me to bulk delete or reset all of the products in my store that are synced to Facebook?
↑ Back to topOccasionally, deleting or resetting all products from the Facebook catalog and then letting things sync again is the only way to fix strange issues. This requires a code snippet, which you can read more about here.
How do I remove the plugin, WooCommerce Facebook app, and created system users?
↑ Back to topClicking the “Uninstall” link in your settings will not remove the app from Facebook and any associated system users. Find out how to remove these as well here.
How do I disable Facebook Pixel generated by Facebook for WooCommerce?
↑ Back to topYou can use the following code snippet to disable the extension’s Facebook Pixel and Conversion API (CAPI):
add_filter( 'facebook_for_woocommerce_integration_pixel_enabled', '__return_false' );Can I use Instagram Shopping with Facebook for WooCommerce?
↑ Back to topAt the moment Instagram shopping support is not available. You can use Instagram Shopping extension if you need users to checkout from Instagram.
With this extension, merchants can link an Instagram Business Account to the Facebook account and then sync the products to the Facebook catalog. This catalog can be shared between Facebook and Instagram.
Is checkout on Facebook and/or Instagram supported?
↑ Back to topCheckout with Facebook and/or Instagram isn’t supported yet. We highly recommend not selecting the Facebook/Instagram checkout option when creating a Faceook/Instagram shop or commerce account associated with the Faceook for WooCommerce extension catalog. As this feature isn’t supported, you may not be able to fulfil customers’ orders if you attempt to use the extension’s catalog for Facebook/Instagram checkout.
How to enable logs with headers?
↑ Back to topThe plugin logging system has stopped printing the logs headers. This was done to allow easier logs analysis. If for any reason the content of the logs headers will be required this can be enabled by setting the following option wc_facebook_request_headers_in_debug_log to true. After this is no longer needed please remove the option to restore the minified logs.
Is Facebook for WooCommerce compatible with Product Bundles/Composite Products?
↑ Back to topFacebook for WooCommerce is compatible with Product Bundles and Composite Products extensions, products created with these extensions can be synced to your Catalog. While earlier versions of Facebook for WooCommerce didn’t support syncing “Unassembled” bundles, newer versions from v2.6.28 support syncing Product Bundles in Assembled and Unassembled shipping modes.
Is it possible to unlink a Facebook page linked to a Commerce account created through Facebook for WooCommerce?
↑ Back to topWhen you install and connect your Facebook account through Facebook for WooCommerce plugin, a Commerce account is created and linked to the Facebook page selected during the connection onboarding process.
To unlink a Facebook page that is linked to a Commerce account, you need to unlink it first from the catalog used within the Commerce account:
- Go to your Business Settings on Facebook, and choose the Business Manager previously selected for the Facebook for WooCommerce.
- Under Data Sources, click on the catalog that was selected before during the plugin’s connection onboarding process, and click Remove to remove it, this will delete the catalog contents (please be aware of this). Then the page won’t be associated with this catalog anymore.
- Under Accounts, now select the page you want to remove from your Business Manager, click Remove, to remove it.
Why aren’t my product page built with Divi Builder syncing to my Facebook catalog?
↑ Back to topThe Divi theme and page builder formats your content using custom shortcodes. The Facebook for WooCommerce extension removes all known shortcodes from product descriptions when syncing your catalog. However, in some cases, the Divi Builder doesn’t register its shortcodes with WordPress in time for them to be visible to our Facebook extension for cleaning before synchronization. This can lead to very large product descriptions and errors like “the description is too long (over 5000 characters)”.
There are several workarounds for this issue:
- In Marketing > Facebook > Product sync, set the Product description sync setting to “Short description”, which will tell Facebook for WooCommerce to always use your products’ Product short description when syncing your catalog.


- Use the Facebook Description on the product editor > Product data > Facebook to specify a custom Facebook description (or product editor > Product data > Variations > [variation] for Variable products).


- Disable the Divi Builder and return to the Standard Editor. MAKE SURE YOU COPY ANY PRODUCT DESCRIPTION CONTENT YOU WANT TO KEEP as it will be permanently deleted after making the switch.
How to get the Facebook Product Feed URL
↑ Back to top- Navigate to the Facebook settings page under Marketing > Facebook
/wp-admin/admin.php?page=wc-facebook&tab=connection - View the page source to see the feed script.
- Copy the URL from the
feedUrl:object.

Questions
↑ Back to topDo you still have questions and need assistance?
- Get in touch with a Happiness Engineer via our Help Desk. We provide expert priority support for WooCommerce.com and Jetpack customers but not other third-party plugins.
- If you are not a customer at WooCommerce.com, we recommend finding help on the Facebook for WooCommerce Support Forum or hiring a recommended expert on our customizations page.