Overview
↑ Back to topWooCommerce Elavon Converge lets your customers pay for orders with a credit card or eCheck on your WooCommerce store via Checkout.js for additional security. This gateway supports tokenization for full support of WooCommerce Subscriptions and WooCommerce Pre-Orders, in addition to letting your customers save their credit cards for easier checkout.
Requirements
↑ Back to top- WooCommerce 3.5+
- WordPress 5.2+
- PHP 7.0+ (you can find this under WooCommerce > Status)
- An SSL certificate
- An active Elavon account. Contact Elavon to open an account.
⚠️ There are also some additional requirements related to your Elavon merchant account:
- Your Elavon account must be set up for eCommerce, not only Phone / Catalog. Contact your merchant representative for assistance.
- Your Elavon account must be set up to support SSL. Contact your merchant representative for assistance.
- Elavon requires that your store have a “Shipping Policy” page.
- In your Elavon account, ensure that only fields sent to Elavon by this plugin are required. You don’t have to require these fields, but you must not require fields that the plugin does not send.
- If you intend to use the following features, they must first be enabled in your Elavon account by contacting your Elavon representative:
- Use tokenization to support Subscriptions, Pre-Orders, and saved payment methods. Ask your representative about any other account settings that are required to support tokenization to ensure it’s fully supported by your merchant account.
- Allow payment authorizations instead of immediately capturing payment.
- Process refunds in WooCommerce.
- Accept eCheck payments.
- Support multi-currency transactions.
- To use Checkout.js for improved PCI compliance, call Elavon support at 1-800-377-3962 | option 2 | option 2, and ask to add your URL and IP address to the allowed list and set your API user with permission to post a session token request.
You’ll need your account ID handy! Make sure to ask about any other settings you’ll need to take care of for Checkout.js.You can locate the IP address and URL address to whitelist with Elavon Converge on the plugin settings page below the Account ID field. - You’ll also want to verify the IP Address API settings in your Elavon merchant account by going to Converge Account > Settings > Fraud Prevention Rules >API IP Address Allowed List.
Here you’ll see a list of approved IP addresses with checkboxes for the XML and Checkout.js API levels. Only the Checkout.js level should be checked. If you see that the Enable IP Address Settings for XML API is also checked, you’ll need to contact Elavon support and request that they disable this.
Installation
↑ Back to top- Ensure your store meets the plugin requirements.
- Download the extension from your WooCommerce dashboard.
- Go to Plugins > Add New > Upload and select the ZIP file you just downloaded.
- Click Install Now and then Activate.
- Click Configure and read the next section to learn how to set up the plugin.
Getting started
↑ Back to topFollow the steps below to find the credentials required to connect your site to Elavon:
- Login to your Converge account.
- Go to Employees and select the employee with the name “apiUser”
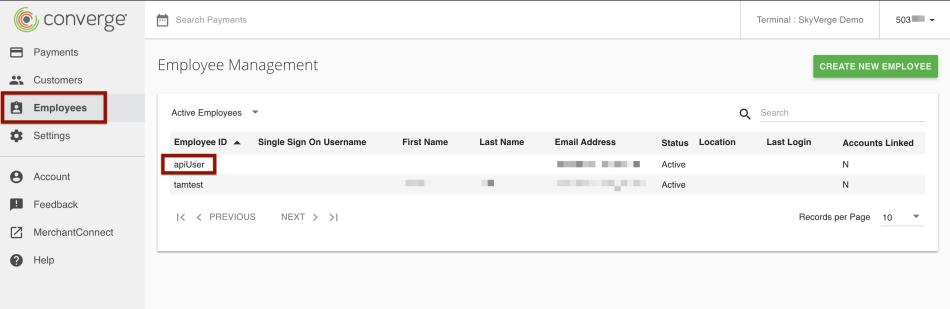
- On this page, you can find the Account ID in the top-right corner, the User ID in the User Information section, and the PIN by clicking Show PIN.
- Copy these credentials to paste in the plugin settings.

Credit card settings
↑ Back to topYou can configure the following settings for the Elavon Converge credit card gateway:
- Enable / Disable: Allow customers to use this gateway to checkout.
- Title: The name shown for the payment during checkout and on the Order Received page.
- Description: The text shown under the gateway’s title during checkout. Limited HTML is allowed.
- Card Verification (CSC): Require customers to enter their card security codes when checking out. This can be useful if you have requirements in your Elavon account for CV2 verification.
- Saved Card Verification: Display the Card Security Code field when customers are paying with a saved credit card.
- Transaction Type: Controls how transactions are submitted to Elavon. Select “Charge” to automatically capture payments. If you select “Authorization”, you must manually capture and settle payments in your Elavon control panel or on the WooCommerce orders screen after the transaction has been submitted. Your Elavon account must allow “Authorize Only” transactions to use the “Authorization” setting. Click here to read more about capturing transactions.
- Charge Virtual-Only Orders: If Transaction Type is set to “Authorization”, enable this to automatically capture charges for orders with only virtual products. For downloadable products, this will grant downloads access right away.
- Capture Paid Orders: If Transaction Type is set to “Authorization”, enable this to automatically capture charges when orders move to a paid status.
- Accepted Card Logos: Determines which card logos are displayed during checkout. This has no impact on which cards are accepted by your merchant account.
- Tokenization: Let customers save their payment methods for future use at checkout. This is required for Subscriptions or Pre-Orders. This must be enabled in your Elavon account before you can support tokenization in WooCommerce. Click here to read more about saving payment methods.
- Detailed Decline Messages: Display detailed messages to customers to provide reasoning for declines instead of a generic error message when possible. Click here to read more about detailed decline messages.
- Debug Mode: Enable when you’re having issues processing transactions. You can choose to log API requests directly on the checkout page, save them to the WooCommerce > Status > Logs page, or both. As a best practice, please do not enable this setting unless you’re having issues with the plugin.
- Environment: Switch between “Demo” and “Production” credentials. Set to “Demo” to send transactions to an Elavon demo account for setup / troubleshooting. Ask your Elavon representative for test credit card numbers to use in demo mode.
- Share connection settings: If using the credit card and eCheck gateways, select this setting to share credentials between the gateways so you don’t have to enter them twice.
- Account ID: Follow the steps above to retrieve your account ID.
- User ID: Follow the steps above to retrieve your user ID.
- PIN: Follow the steps above to retrieve your PIN.
- Multi-Currency: Enable process transactions in a currency other than your terminal currency for Visa and Mastercard only. Multi-currency must be enabled in your Elavon account before you can support it in WooCommerce.Click here to read more about multi-currency.
- Merchant Terminal Currency: If Multi-Currency is enabled, select your terminal currency so the plugin knows when to use multi-currency versus running the transaction normally.
eCheck settings
↑ Back to topYou can configure the following settings for the Elavon Converge eCheck gateway:
- Enable / Disable: Allow customers to use this gateway to checkout. Your Elavon account must have eChecks enabled to enable this payment method.
- Title: The name shown for the payment during checkout and on the Order Received page.
- Description: The text shown under the gateway’s title during checkout. Limited HTML is allowed.
- Detailed Decline Messages: Display detailed messages to customers to provide reasoning for declines instead of a generic error message when possible. Click here to read more about detailed decline messages.
- Debug Mode: Enable when you’re having issues processing transactions. You can choose to log API requests directly on the checkout page, save them to the WooCommerce > Status > Logs page, or both. As a best practice, please do not enable this setting unless you’re having issues with the plugin.
- Environment: Switch between “Demo” and “Production” credentials. Set to “Demo” to send transactions to an Elavon demo account for setup / troubleshooting.
- Share connection settings: If using the credit card and eCheck gateways, select this setting to share credentials between the gateways so you don’t have to enter them twice. We strongly recommend enabling this if you’re using both gateways!
- Authorization Terms: Enter an authorization message that your customers will see at checkout. You can optionally use
{order_total}to insert the total order value in the message.
Managing orders
↑ Back to topAs a site administrator, you can use the WooCommerce Elavon Converge gateway to manually capture charges and automatically refund/void transactions as needed.
Capture charges
↑ Back to top⚠️ Your Elavon account must allow payment authorizations to capture charges through this process. Contact your Elavon representative for assistance.
If the Transaction Type setting is set to “Authorization”, you can manually capture these payments from the WooCommerce Orders page. Click here to read more about capturing charges.
Automatic refunds
↑ Back to top⚠️ Your Elavon account must allow refunds in WooCommerce to support automated refunds. Contact your Elavon representative for assistance.
You can process credit card refunds directly in WooCommerce without needing to log into your Elavon account. Click here to read more about issuing automatic refunds from WooCommerce.
Void transactions
↑ Back to topYou can void transactions directly in WooCommerce in the following circumstances:
- If your Transaction Type setting is set to “Authorization”, you can void when the transaction has been authorized but not yet captured.
- If your Transaction Type setting is set to “Charge”, you can void when the transaction has not yet been settled (e.g. funds haven’t been transferred from the customer’s account to your Elavon account).
Elavon does not accept partial voids. If a transaction is no longer eligible to be voided, you must refund the order. Click here to read more about voiding transactions in WooCommerce.
Gateway features
↑ Back to topYour customers can take advantage of the following features when your site uses WooCommerce Elavon Converge.
Saving payment methods
↑ Back to top⚠️ Your Elavon account must support tokenization to allow customers to save payments or support Subscriptions / Pre-Orders. Contact your Elavon representative for assistance.
Customers can save payment methods during the checkout process or from their My Account area. This lets them quickly select payment details during future checkouts and also lets your site support Subscriptions and Pre-Orders.
- Only credit cards can be saved, Elavon does not support tokenization for eChecks.
- When using WooCommerce Subscriptions, customers cannot delete payment methods that are associated with active subscriptions. Click here to read more about saving payment methods with Subscriptions.
Multi-currency support
↑ Back to topVersion 2.0+ supports multi-currency via Elavon, which lets merchants run transactions in currencies other than their terminal’s base currency. This ensures your customers won’t incur foreign transaction fees when making purchases on your store, and then Elavon will convert to your account currency after processing.
Please note the the following requirements to use multi-currency:
- You must have multi-currency enabled for your Elavon account before you can use this feature in WooCommerce. Contact your Elavon representative for assistance. If you try to run transactions when this feature isn’t enable on your Elavon account, you may see the following error at checkout:
Transaction currency not allowed for this terminal. - Multi-currency is only available for VIsa and Mastercard transactions. If the plugin detects the order is using multi-currency, only these card icons will be displayed at checkout.
- If your shop base currency is not USD or CAD, multi-currency support is required. The Elavon payment gateway won’t show at checkout until this is enabled, as Elavon only provides accounts in USD or CAD.
Rate limiting
↑ Back to topStarting in version 2.14.1, rate limiting is enabled by default in our Elavon Converge plugin to help combat certain kinds of malicious activity on your site. Our rate limiter allows you to restrict the number of transaction requests that can be made within a certain timeframe to protect from abusive behavior like card testing or spam orders, similar to Elavon’s Velocity Filter but now enforced at the website level. For security purposes, this feature is enabled by default and set to allow 4 transaction requests per visitor, per minute.
Of course, the exact balance of security and functionality will be different for each store, so if you’d like to adjust the behavior of the rate limiter for your site, the following code snippets show how the limit can be modified to suit your needs:
add_filter('woocommerce_elavon_rate_limit_options', function($options) {
	$options['enabled'] = false;

	return $options;
});add_filter('woocommerce_elavon_rate_limit_options', function($options) {
$options['limit'] = 3; // max amount of requests allowed in the timeframe (below)
$options['seconds'] = 45; // number of seconds before rate limits are reset
return $options;
});
Frequently asked questions
↑ Back to topQ: What level of PCI compliance does this plugin provide?
A: If you’re setting up the plugin, you’ll need to use Checkout.js. This is a tool from Elavon that reduces your security liability, helping your site meet SAQ A-EP levels of PCI compliance. Click here to read more about Checkout.js requirements. (For developers: the card details are sent client side via the browser to Elavon, rather than being posted through the site’s server.)
For users who have upgraded from an older version and are not using Checkout.js, it will be enabled automatically with the updated plugin. Makes sure to follow the steps here for whitelisting your IP and URL.
Q: Can I capture a higher amount than was authorized, like a restaurant?
A: Elavon, along with many other ecommerce payment processors, can’t do this for card-not-present transactions, such as online payments. You may only capture up to the value of what was authorized.
Q: What is a velocity filter?
A: If transactions are getting declined and there’s a velocity filters message. You can check this by going to their Settings > Fraud Prevention Rules, and check the following filters: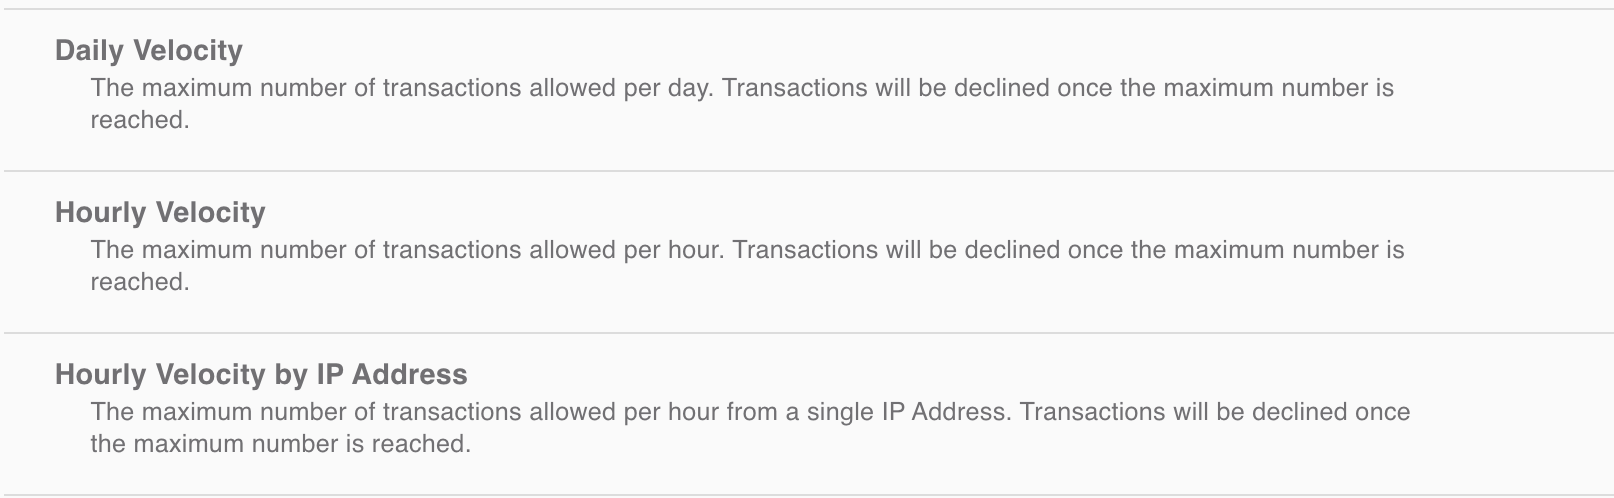
Q: Why have the credit card fields moved from the Checkout page to a separate payment page since I switched to Checkout.JS?
A: With the introduction of Checkout.JS, the ability to have a one-page checkout is no longer possible. This is primarily because we require the order to be created first before the request for payment is sent to Elavon.
An order within WooCommerce doesn’t get created until you get through checkout, so the order object data (including order number, for example), won’t be available until someone gets through the first checkout page. The plugin creates the order in WooCommerce and then moves the customer to the order-pay page, where the Checkout.JS payment fields will be located. This is so that we can send all the necessary data Elavon requires to process the payment.
As a result of the order creation, if the payment isn’t made on the payment page, an order will still be created and remain in the Pending Payment status for review.
Q: What security options do you recommend to prevent malicious behavior on my site?
A: The most comprehensive starting point for addressing this malicious behavior is at the server-level with solutions from your website host. Specific offerings will vary between hosts and hosting plans, but features like IP address and geo-blocking will allow you to block traffic from specific regions or repetitive IP addresses before they even reach your site. On the site itself, tools like reCAPTCHA can help protect against spam and abuse by verifying human versus bot interactions.
Troubleshooting
↑ Back to topDecoding error messages
↑ Back to top“An error occurred while trying to get a transaction token for Checkout.js. Please make sure you have registered your server’s IP address with Elavon and that the configured User ID belongs to a user with permission to request Hosted Payments transaction tokens.”
There seems to be two parts to this error that need to be updated on Elavon Converge side to remove this error. These are settings that you will need contact Elavon Converge to have them update on their end.
Elavon Converge (Phone: 1-866-671-1583)
Part 1: You will need to find your hosting IP address for your website and reach out to Elavon Converge and have them update that IP address in their system. You can find this information in the plugin settings at WooCommerce > Settings > Payments > Elavon Converge Credit Card under the Account ID field.
Part 2: You will also need to have Elavon Converge make sure that they have configured your account so that the userID permissions belong to the user to request Hosted Payment transaction tokens.
[4009] Required Field Not Supplied
This indicates that you’ve required a field in your Elavon account that the plugin cannot include. Click here to view a list of all fields that WooCommerce Elavon Converge will send, and please check your merchant account to ensure fields that don’t appear on this list are not required.
Tokenization Request Failed: [4014] Not Permitted – This terminal or user id is not permitted to process this transaction type
This indicates that your Elavon account is not set up to support tokenization / saving payments. Please contact your Elavon representative to fix this.
This error can also occur when the PIN is incorrect, or an API user isn’t being used or doesn’t have the correct permissions. To check this in your Elavon Converge merchant account:
- Log into your Converge account.
- Go to Employees and click on the user that you’re using for the plugin. This needs to be an API user, which is called apiUser by default, though it may be another name.
- Go to the User Rights tab, and make sure the user has Administrator permissions.
- While you’re in there, please also reset your pin and update the plugin’s settings with the updated pin.
PIN Invalid [4015] The PIN supplied in the authorization request is invalid.
This may be due to your PIN number being entered incorrectly in the plugin settings. Click here for instructions on finding your PIN. If that doesn’t resolve the issue, please contact your Elavon representative or technical support to ensure your account is enabled for eCommerce, not just Phone / Catalog.
HTTP POST transactions are not allowed for this account
This means your Elavon account does not have SSL support enabled. Please contact your Elavon representative for assistance.
An error has occurred, please try again or try an alternative form of payment
This generic error message could be receive in a few different circumstances, such as:
- Your credentials are invalid. Click here for steps on retrieving your account credentials.
- If your Transaction Type setting is set to “Authorize”, you may need to confirm with your Elavon representative that your account can authorize payments without immediate capture.
- If neither of these explain the issue, please enable the Debug Mode setting and try again to get a more specific error message. If the error message isn’t clear, please contact support and share the error with our team!
When submitting a payment in the production environment, there is an endless spinner on the payment page.
Our current implementation doesn’t support surcharges. If surcharges are active in your Elavon/Converge account this is most likely the cause of this issue.
You can check for surcharges under Converge Account > Settings > Card Payment Options in your merchant account. If you see that surcharges are active, contact Elavon and ask to disable surcharges on your account.
Other issues
↑ Back to topHaving a different problem? Follow these steps to make sure everything is setup correctly before posting a support request:
- Please ensure that your site meets the plugin requirements — please pay special attention to the special Elavon requirements!
- Check the FAQs to see if they address your question.
- Confirm that your credentials are correct.
- Contact Elavon support and ask them to double-check that the ‘XML’ security level is disabled. When enabled, this security level can interfere with transaction processing, particularly through Checkout.js.
- Enable the Debug Mode setting and review the errors codes/messages provided by Elavon. If the error code indicates an issue with the plugin, please contact support and include the logs to help us troubleshoot.
Questions & support
↑ Back to topHave a question before you buy? Please fill out this pre-sales form.
Already purchased and need some assistance? Please check out our troubleshooting tips and frequently asked questions for common issues or contact support via the help desk if you need more help.