The integration extension from CedCommerce will help sellers export product details and other crucial information from their WooCommerce Store to eBay and import their eBay Products to WooCommerce. The seller can manage the orders from a centralized order management dashboard and begin selling on eBay.
Adding your eBay Account
↑ Back to top
After installing the plugin, you can access it by clicking or hovering over the Marketplaces menu present in the left sidebar and then clicking on eBay in the submenu which appears.
You’ll be presented with a section, as shown in the below image, where you can add your eBay Seller Account.
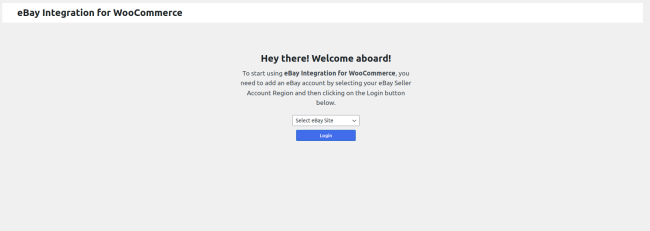
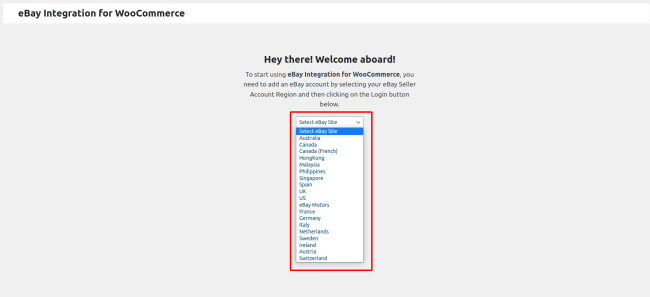
Now you need to select the region where you’re actively selling through your eBay account. Select your region and click the login button. You’ll be redirected to the eBay login page, where you need to enter your eBay account credentials and approve our app to access your eBay account. Once approved, you’ll be redirected back to the plugin’s Account Settings section.
Note – The eBay integration plugin only supports a single eBay account or region at the moment.
Account Settings – Shipping, Return, and Listing Description Template
↑ Back to topConfigure the various options in this section if you are going to use our plugin to list your WooCommerce products on eBay.
Shipping Settings
↑ Back to top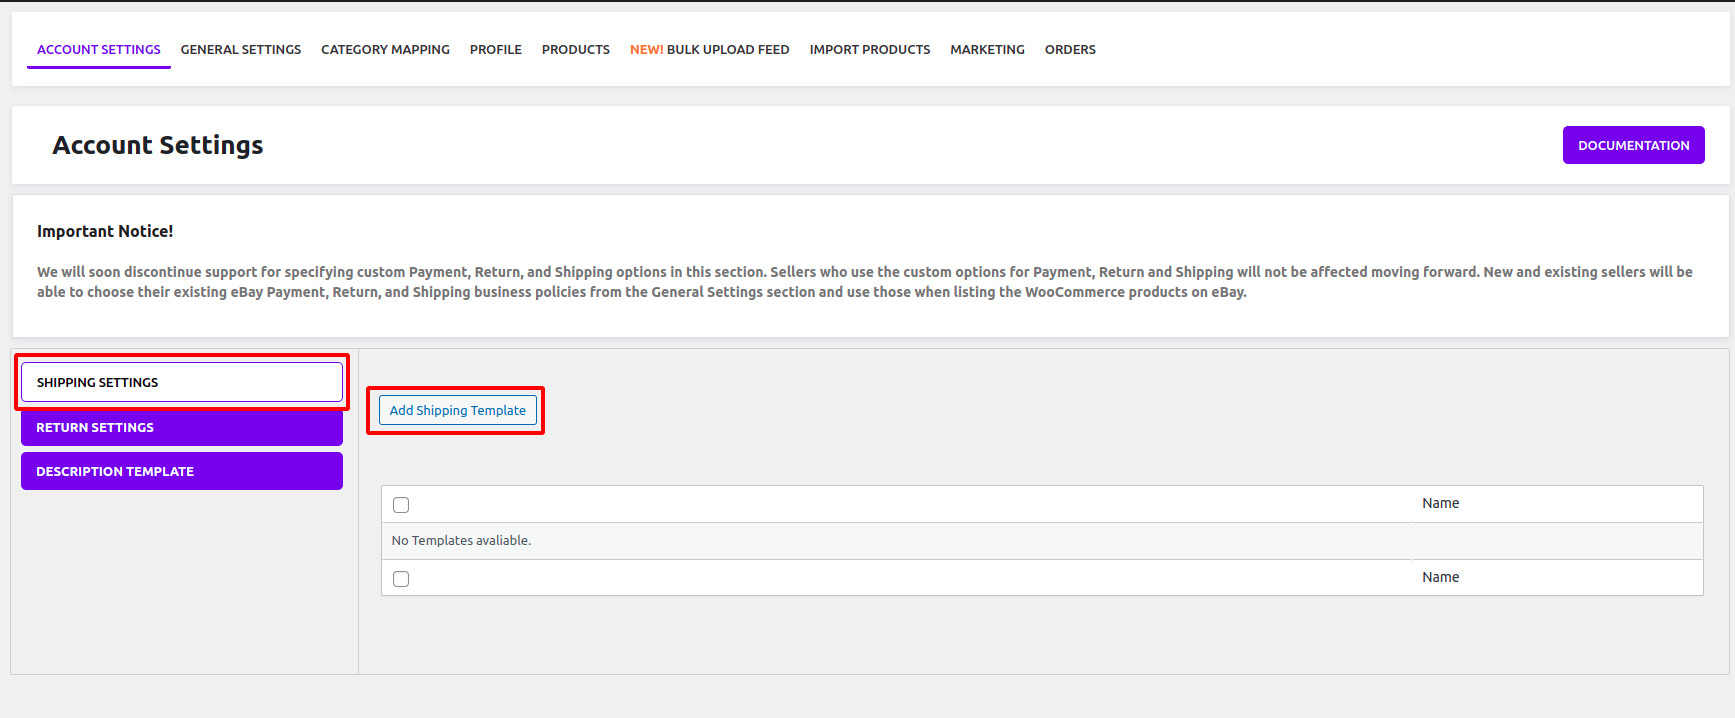
In this section, you can create shipping templates to be used to specify shipping options for your listings on eBay.
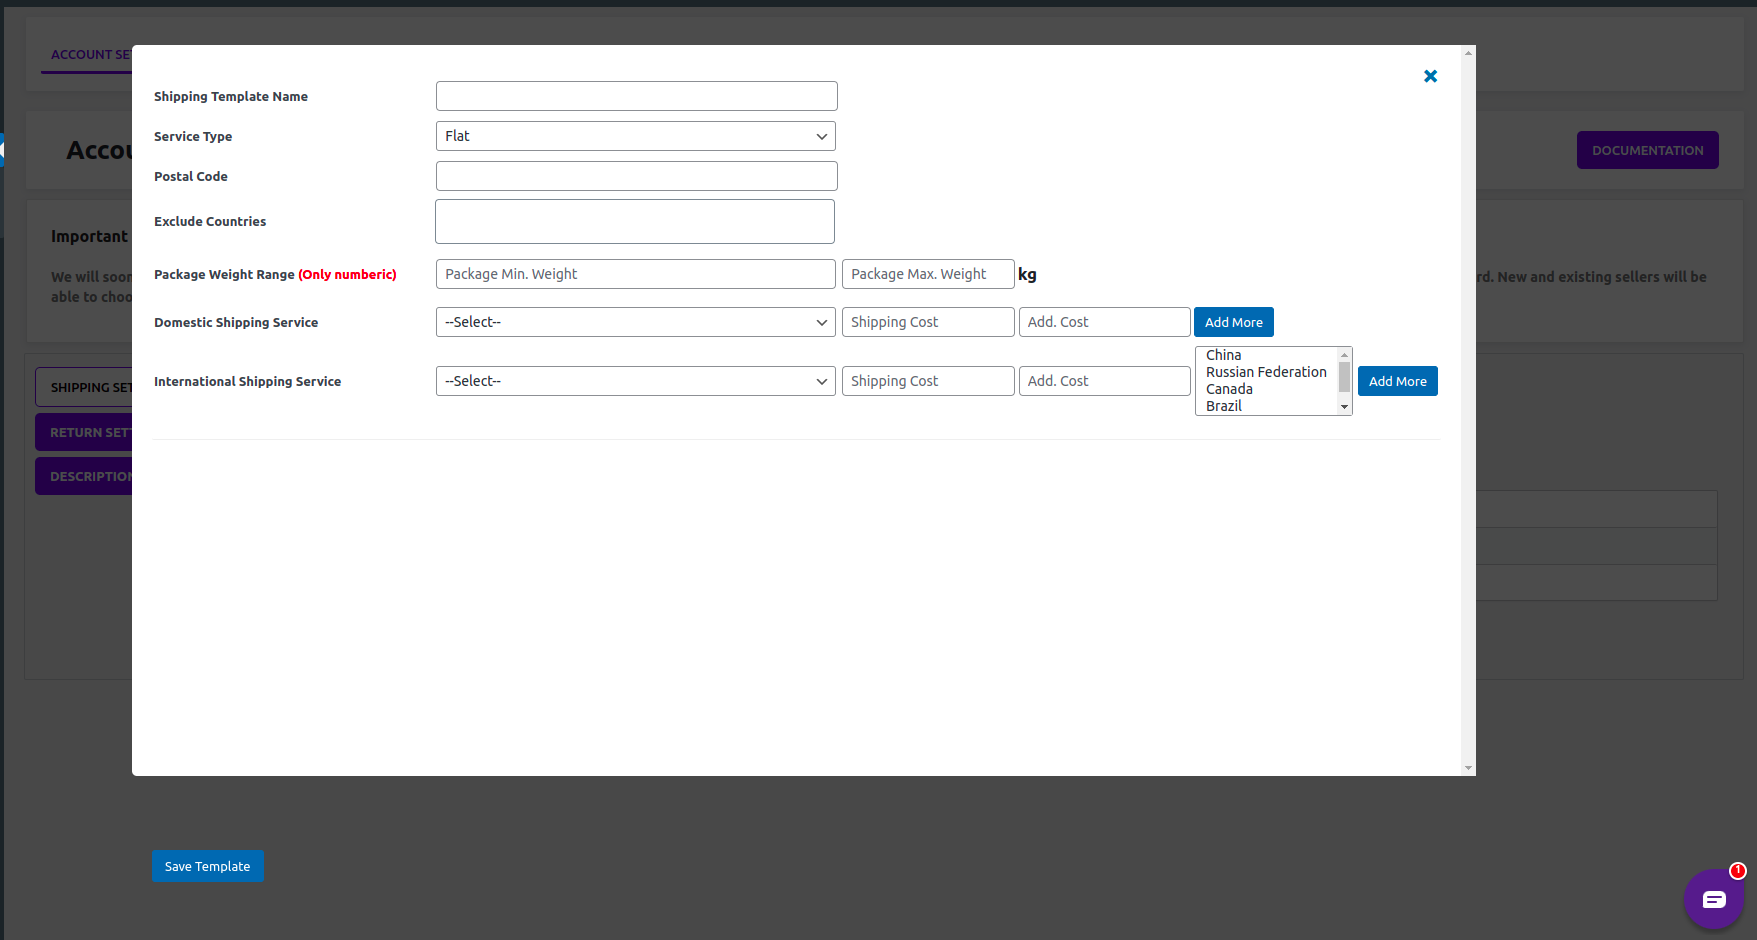
To create a shipping template, click the Add Shipping Template button and follow the steps below –
- Fill in the name of the shipping template.
- Choose if you are going to opt for a Flat or Calculated shipping method. In the calculated shipping method, your WooCommerce products should have weight and dimensions for eBay to calculate shipping. You don’t need to specify any Shipping cost when you have selected the shipping method as calculated. In the flat shipping method, you can specify the shipping cost for your products.
- Fill in the zip code of the area from where you will ship your product. If you are unsure, enter the zip code of your location. The zip code is used to show the item’s location to the buyers when it’s listed on eBay.
- If you are going to ship internationally, you can exclude certain countries.
- Fill in the weight range of the products for which you want to use the template. Only numeric values are allowed. Defaults to 0 and 100 minimum and maximum weight, respectively.
- Select the desired shipping method, either Domestic or International.
- Select the shipping carrier and enter the shipping cost as well as any additional item cost. If you use multiple carriers for domestic or international shipping, you can add them by clicking on Add More button.
All the fields in the shipping template are mandatory. If you leave any, the product will fail to upload.
Please keep in mind certain countries put restrictions on shipping to some countries. For example, you can’t ship an eBay Product from the UK to Brazil. If you have selected any such country while adding an International Shipping carrier, the product will fail to upload.
If you are getting the error “A valid shipping service must be defined”, then double-check the specified package weight range in the template and check that the product you are trying to upload lies within the specified package weight range.
You can create multiple shipping templates, and our plugin will automatically choose the template on the basis of the product weight and the weight range defined in the template.
We will be migrating away from the Shipping Templates in the near future and switching to eBay business policies which you have specified in your eBay account. You will be notified before the rollout.
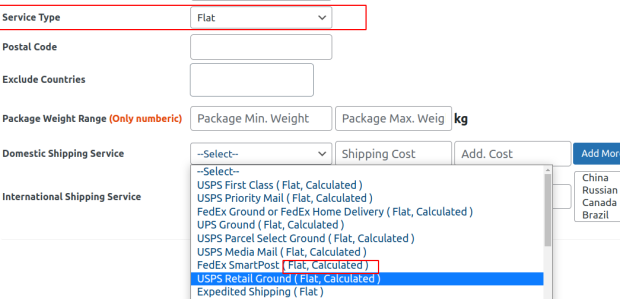
As highlighted in the image below, make sure that the Service Type you have selected in the shipping template matches the service type of the shipping carrier which you are going to use for your listings on eBay. If a shipping carrier has (Flat, Cacluated) after its name, it means that it supports both service types, and you can choose either one in the template. If it has only one, either (Flat) or (Calculated), after its name, that means it only supports one service type, and you must use that type else you will get an error while trying to list your products on eBay.
Once done, hit the Save Template at the bottom left to save all the shipping details.
Return Settings
↑ Back to top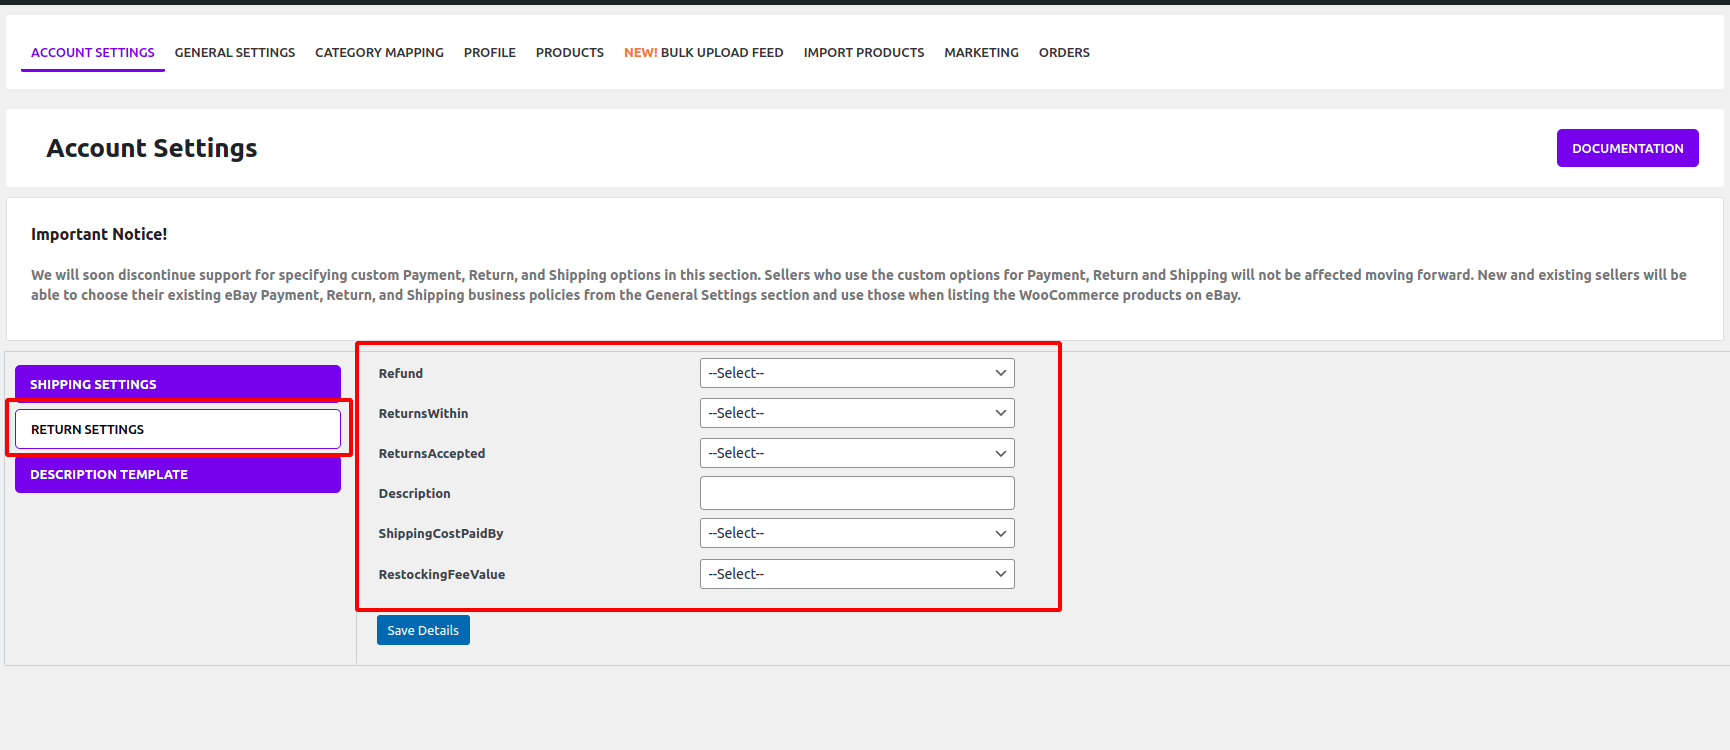
Under the return settings, you can specify the return options for your eBay products.
To set Return options for your eBay listings –
- Select your preferred refund type.
- Select the days within which a buyer can return the product.
- Select whether the return is acceptable or not. If you are not willing to accept the return, you can set No returns accepted and leave the rest of the fields blank.
- Enter the detailed description for the acceptable return.
- Select who will pay the shipping cost.
- Select the restocking fee percentage for the product.
Once all the steps are performed, hit the Save Details button.
Some eBay categories require a return policy to be able to list a product in that category. Listing in categories which require a return policy with No returns accepted set in this section will throw an error.
At the moment, our plugin doesn’t notify you about which categories require a return policy, but this feature is being worked on and will be available in the next few updates.
Description Template
↑ Back to top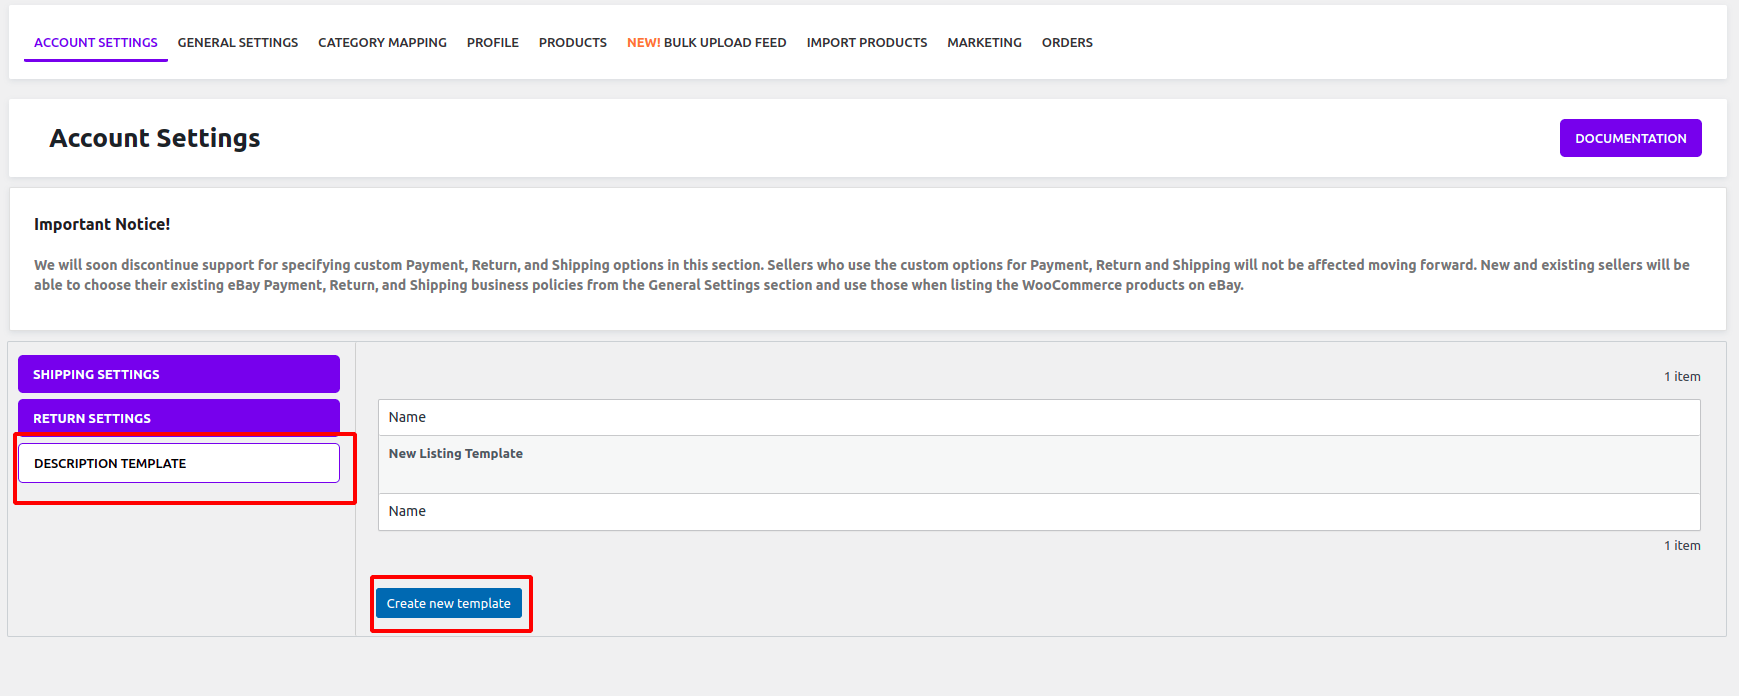
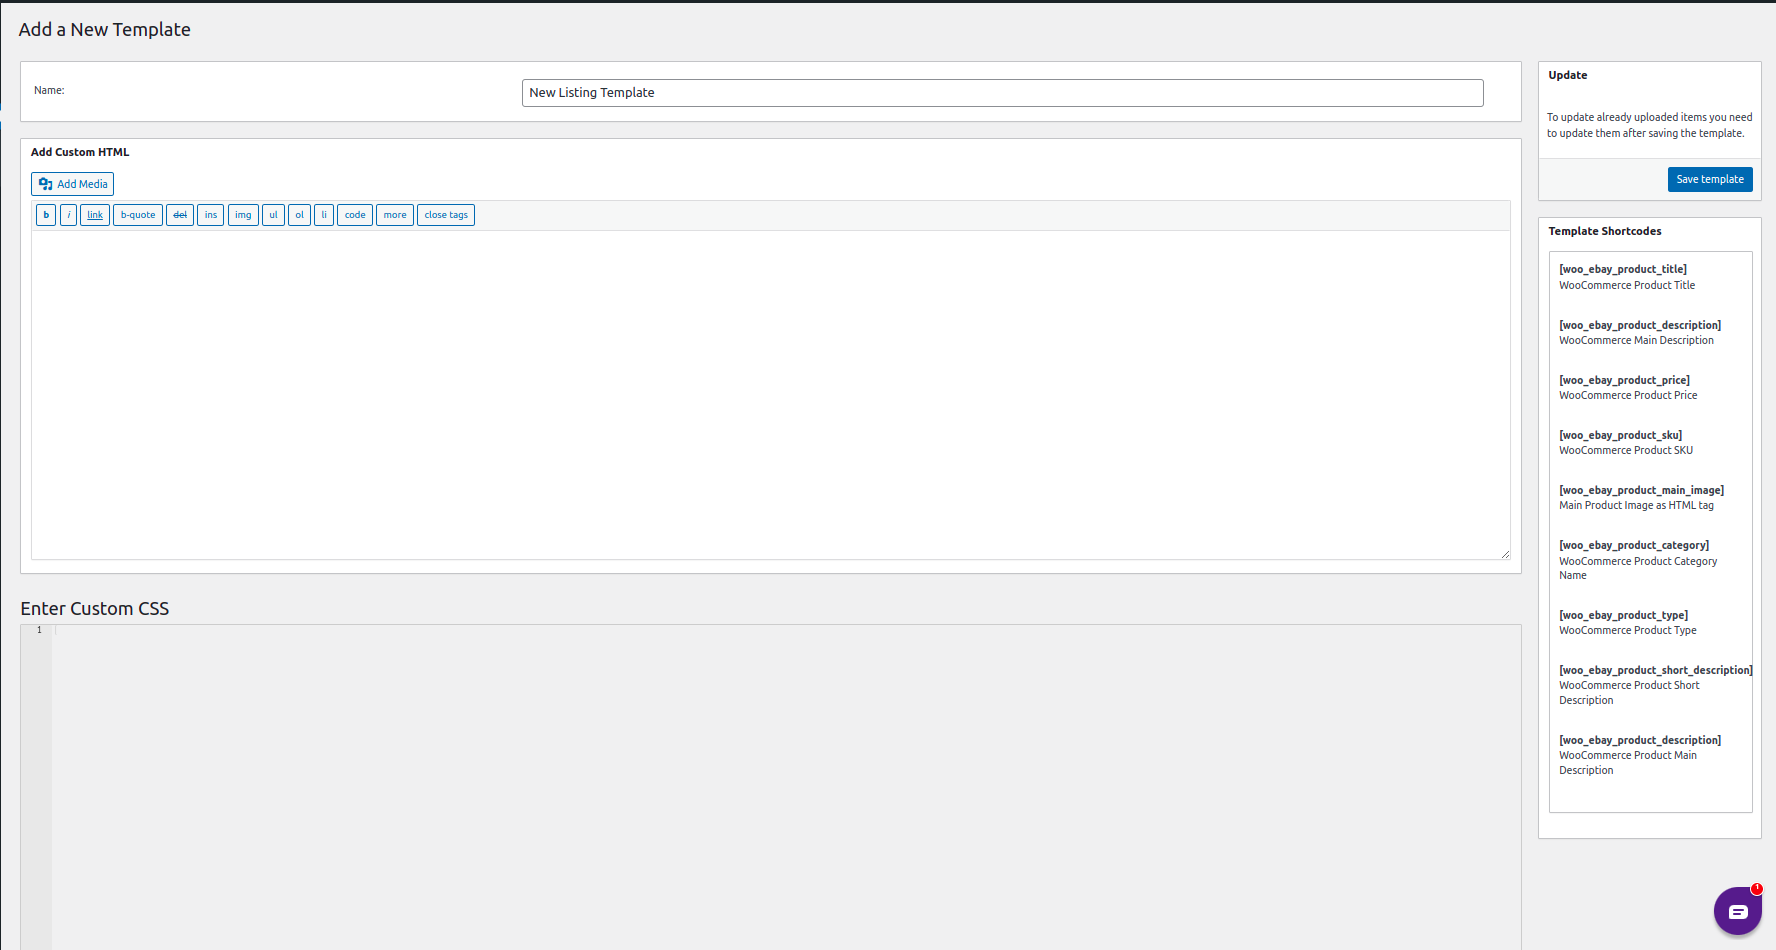
In the Description Template section, store owners can use custom-designed templates to make their product descriptions on eBay stand out. You can use HTML and CSS to style your product description and add elements such as images to make it appealing to potential customer. To create and use a description template –
- Enter the name of your description template.
- Paste your description HTML which you have prepared in the Add Custom HTML field.
- Applying styling to your HTML elements using CSS in the Enter Custom CSS field.
- Use our predefined shortcodes to fill in the product-relevant detail in your description automatically.
- Save the template by clicking the Save Template button on the same page.
Once you have created the template, you can select it in the General Settings section of our plugin to be able to use it for your listings on eBay. Don’t forget to save your selection by clicking the Save Configuration button at the very bottom of the General Settings page.
We don’t provide any pre-made description templates at the moment.
General Settings
↑ Back to topIn the settings section, the store owners have to select some commonly applicable settings on the eBay marketplace. The General Settings Section of our plugin includes four sections:
- Listings Configuration
- Order Sync Configuration
- Scheduler Configuration
- Miscellaneous Configuration
Listings Configuration
↑ Back to top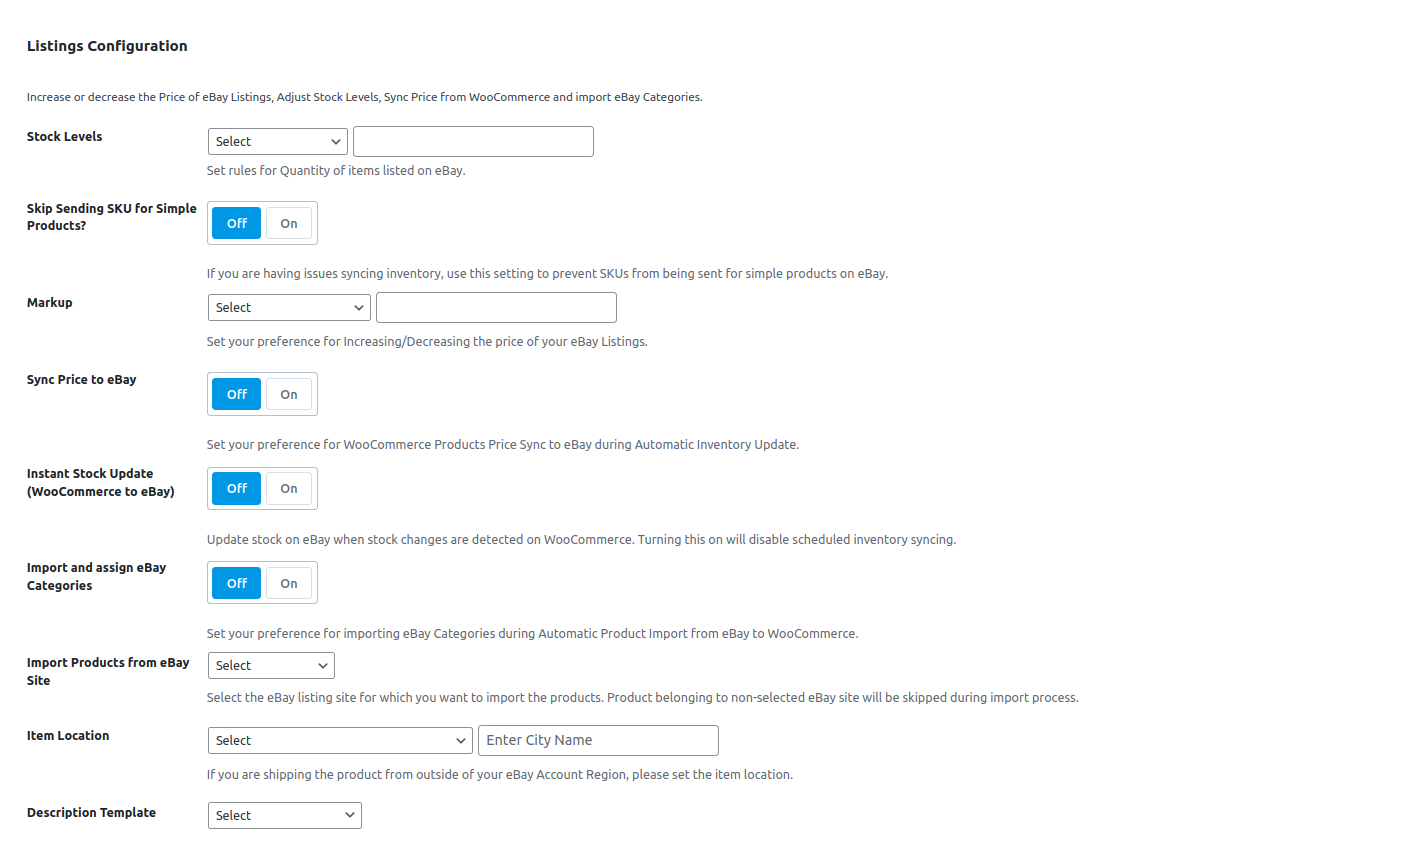
- Stock Levels – This field controls the amount of stock you can list on eBay. You can select Maximum Stock from the dropdown and enter a number in the adjacent field. By doing this, you can set a cap on the amount of stock to be listed on eBay for all your WooCommerce products. For example, if you set a Maximum Stock of 5 and you’re trying to upload a product/variation with more than 5, then the product will be listed with a stock of 5. If the stock you are trying to list is less than 5, then the product will be listed with the default stock and not the maximum stock. Use this option if you are starting to sell on eBay since your eBay account will have lower stock limits, and you will be able to list a lot more WooCommerce products by using a Maximum Stock value of 1, for example.
- Skip Sending SKU for Simple Products – If your simple products on WooCommerce don’t have SKUs while the eBay listings have them, then turning this toggle to On will make sure that the WooCommerce to eBay inventory syncing process doesn’t error out and fails.
- Markup – Control the price of your listings on eBay by selecting the Markup type and specifying a corresponding markup value in the adjacent field. There are two supported markup types – fixed and percentage. The price of your WooCommerce products will remain unchanged.
- VAT Percent – This setting is only applicable to the eBay UK site and can be used to specify the VAT percentage for the listings on eBay.
- Sync Price to eBay – Turning this toggle On will also sync any changes in your WooCommerce product prices to their counterpart on eBay. This setting works in conjunction with Instant Stock Update (WooCommerce to eBay) & Sync Stock Levels from WooCommerce to eBay settings therefore, either one should be enabled for the Sync price setting to work.
- Instant Stock Update (WooCommerce to eBay) – If you’d like to sync any WooCommerce stock changes to the corresponding eBay listing, turn this toggle ON. Any new orders for products in WooCommerce or any manual adjustments to the stocks in WooCommerce will be instantly synced to eBay.
- Import and assign eBay Categories – This setting can be used to assign the imported products, from eBay to WooCommerce, to their eBay store categories or eBay site categories in WooCommerce. If the eBay categories don’t exist, they will be created in WooCommerce in the same hierarchy as on eBay. Turn the toggle ON and from the dropdown, which appears, select whether you want to import eBay site categories or eBay store categories.
- Import Products from eBay Site – You can choose which eBay site you would like to import products from using this setting. This setting is only useful if you are listing on different eBay sites from your eBay account.
- Item Location – Specify the item location when listing your product on eBay. If you don’t set this up, our plugin will use the postcode field in the shipping template to set the item location once an item is listed on eBay.
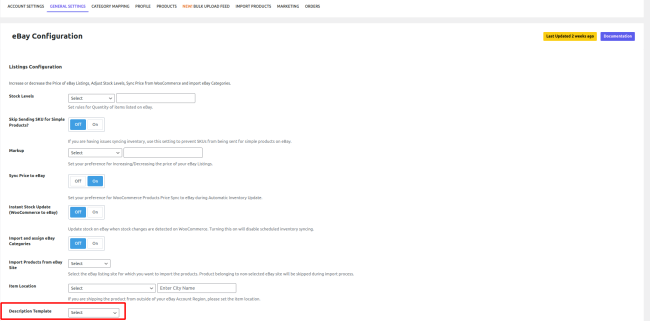
- Description Template – You can choose the description templates created in the Account Settings section of the plugin with this setting. The selected description template will be used for all your WooCommerce products listed on eBay. Make sure that you have created at least one description template to be able to choose it in this setting.
Order Sync Configuration
↑ Back to top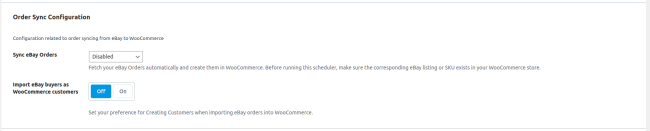
- Sync eBay Orders – Enable the background process for syncing eBay orders in WooCommerce at the interval selected by you. To sync orders successfully, make sure that the corresponding eBay product exists in WooCommerce, either imported through our plugin or linked with our plugin, else while the ordered eBay product should have the same SKU in WooCommerce.
- Import eBay buyers as WooCommerce customers – If turned on, the eBay buyers will be created in WooCommerce as customers once an eBay order is imported. The WooCommerce customers will have a fake email since eBay doesn’t provide the real email address of the buyer.
- Exclude Order Product VAT – This setting is only applicable to eBay UK & eBay Italy sites at the moment. If toggled ON, the VAT of the ordered eBay product will be removed from the WooCommerce order details once the eBay order is synced.
Scheduler Configuration
↑ Back to top
- Bulk Upload (Server Scheduler) – When turned ON, you can run the Bulk Upload process using an external cron job. Use this only if you are having issues running native Bulk Upload. Turning this on will automatically disable the Bulk Upload background process.
- Sync Stock Levels from WooCommerce to eBay – Enable the background process for syncing stock levels from WooCommerce to eBay at the interval selected by you.
- Link Existing eBay Products (Using same SKUs) – Enable the background process to link WooCommerce & eBay products having the same SKUs at the interval selected by you. Once the products have been linked, you can begin syncing orders & stock levels between WooCommerce & eBay.
- Import eBay Products to WooCommerce – Enable the background process to automatically import all your eBay listings from eBay to WooCommerce at the interval selected by you. You can use this in combination with the “Import and assign eBay Categories” feature to categorize the imported products in WooCommerce.
- Sync Manually Ended eBay Listings – Enable the background process to remove the product from WooCommerce if the corresponding eBay listing has been removed from the eBay seller hub and not through our plugin.
Category Mapping
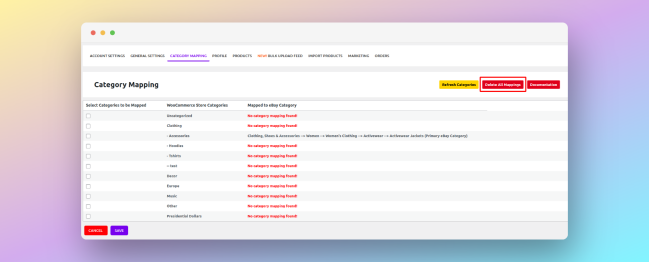
↑ Back to topTo begin mapping your WooCommerce store categories to your eBay categories, click on the Refresh Categories button shown in the image below. Our plugin will then fetch the categories corresponding to your eBay region. You will see the progress, so please wait until all the eBay categories have been fetched and the page refreshes.
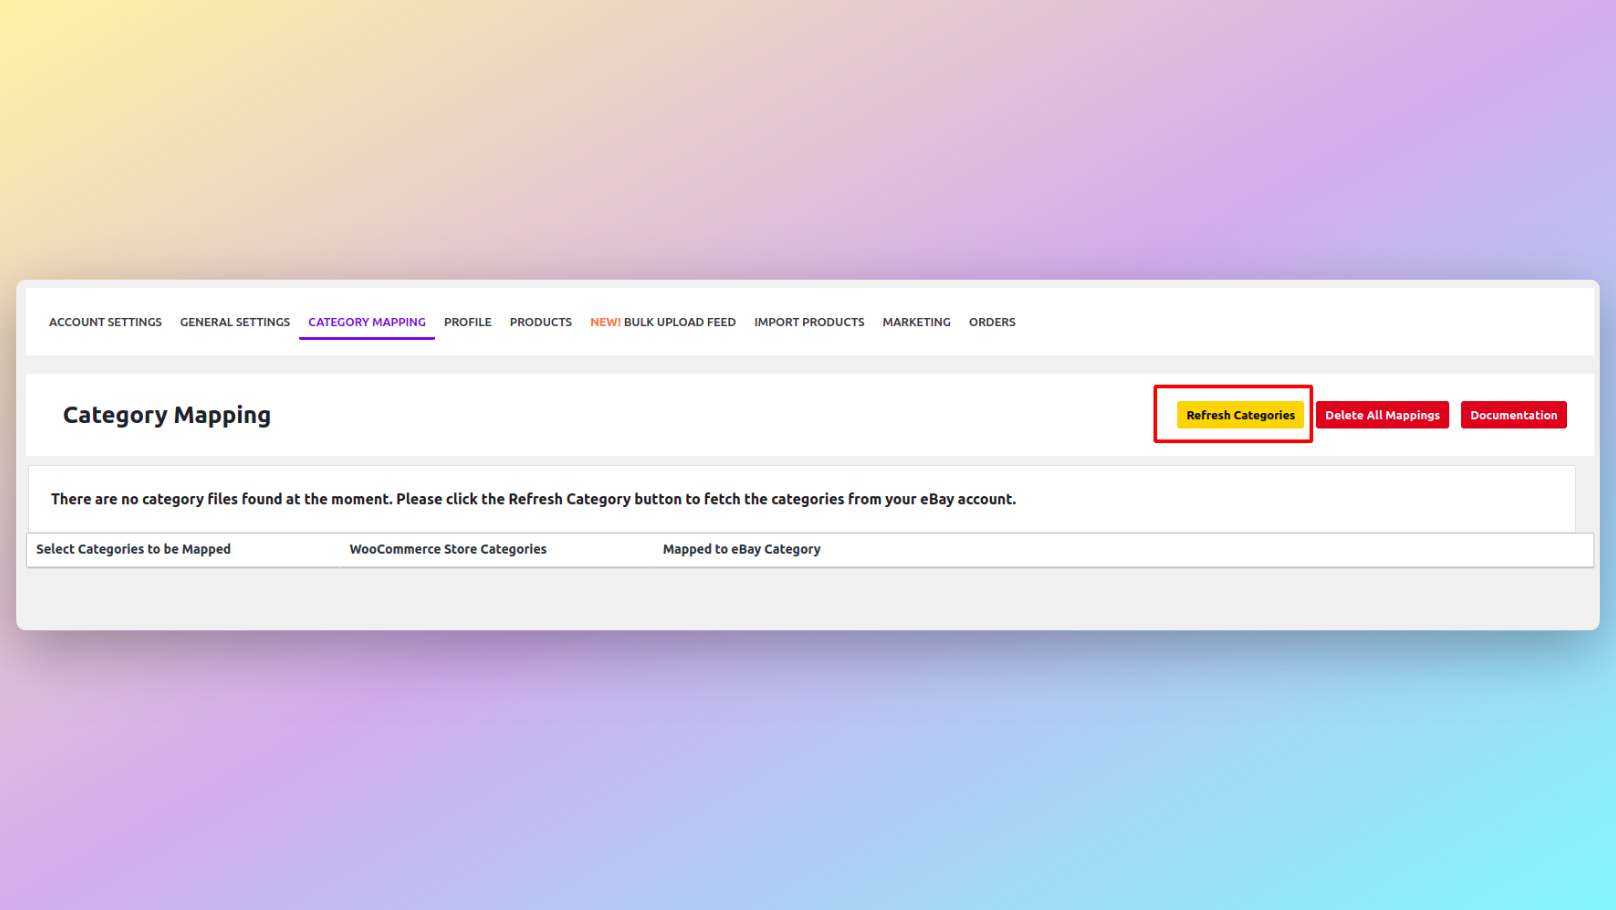
Once the process is complete, you can begin mapping your categories, as demonstrated below.
In the category section, the store owners are required to map their WooCommerce store product categories with the categories on the eBay marketplace. It’s a mandatory step if you would like to use the plugin to list products on eBay since eBay requires products to be uploaded to categories specified by them. You can map multiple WooCommerce categories to a single eBay category, but each WooCommerce category can be mapped to a single unique eBay category only. Based on the category mapped, a profile is created for you which contains all the WooCommerce products listed under that category. To begin mapping categories –
- Click the Refresh Category button, which will fetch all the categories for your connected eBay marketplace.
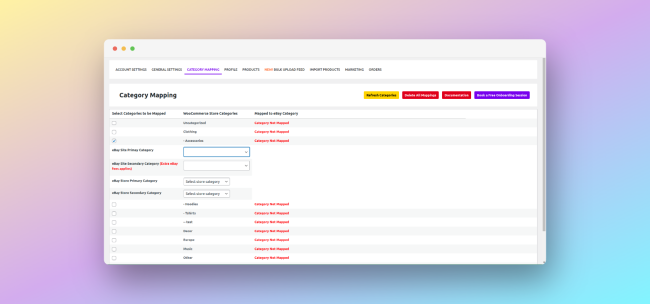
- After that, click the checkbox next to your WooCommerce category, and a section will be revealed with multiple dropdowns (2nd image below).
- Select the respective eBay Site Primary Category from the dropdown and continue the process until there are no categories left to select. If you try to save an incomplete eBay category structure, an error will occur, and the incomplete category structure will be highlighted.
- You may also select eBay Site Secondary Category, but extra eBay fees will apply to your listing. If you have an active store subscription and custom store categories, you can also select eBay Store Primary Category and eBay Store Secondary Category for your listings.
- After you have mapped all the WooCommerce categories by following the above steps, click the Save button at the bottom. Upon saving, eBay listing profiles will be automatically created and can be viewed in the Profile Section.

Profile Management
↑ Back to topeBay Listing Profiles are used to save our plugin users from manual work by allowing them to fill in the product-level data required for the product to be listed on eBay once and upload the products by grouping them under a profile based on the eBay category to which they belong. eBay Marketplace requires a lot of data for its listing, but we have made it easy by specifying the data fields which are mandatory for the product to be able to list on eBay. These fields are labeled with Required in front of them.
We have also made it possible to use your product attributes and custom fields at the profile level by mapping them with the respective profile data field. To do so, just select the attributes from the dropdown corresponding to the profile field.
Profiles are automatically created once you map your WooCommerce categories to your eBay categories in the Category Mapping section of the plugin.
Setting Up The Profile
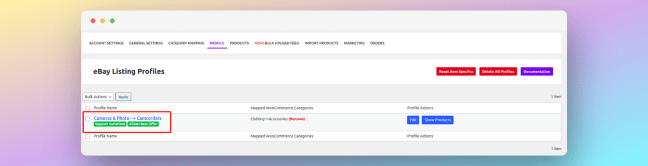
↑ Back to top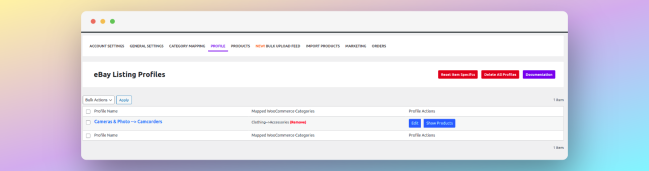
In the above screenshot, you can view the name of the profile under the Profile Name column. The profile name will be the name of the eBay category you mapped in the Category Mapping section. You can check which WooCommerce categories belong to the profile under the Mapped WooCommerce Categories column. Lastly, you can use the Edit & Show Products button to edit the profile and filter WooCommerce products belonging to the profile, respectively.
To edit a profile, click on the Blue Edit button. A new tab will open, as shown in the screenshot below.
There are different sections in the profiles which are as follows –
- General Details
- Item Aspects
- Framework Specifics
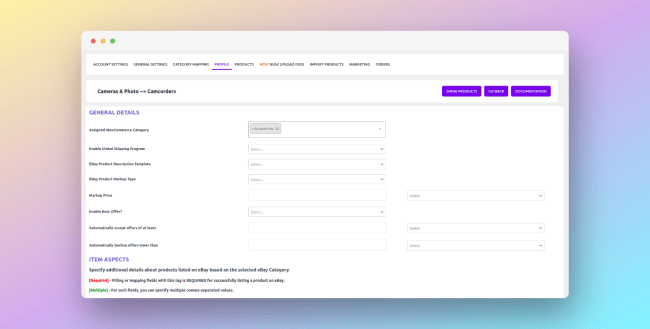
You can add, update or remove WooCommerce categories assigned to a profile using the Assigned WooCommerce Category field.
You can also markup the price of your products on eBay using the Ebay Product Markup Type and Markup field in the profile.
To add offers to your eBay listings, use the Enable Best Offer field.
Once you have opened up any profile for editing, the next time you will visit the Profile section it will display, underneath the profile name, if the particular eBay category or profile Allows Best Offer & Variations as shown in the below screenshot.
Setting Up Item Aspects & Other Fields
↑ Back to topItem aspects are used to specify additional details about products listed on eBay based on the selected eBay Category. The Item Aspects you see in the profile vary on the basis of the eBay category. To be able to list products on eBay, you need to add a value for Required Item Aspects, as shown in the below screenshot.
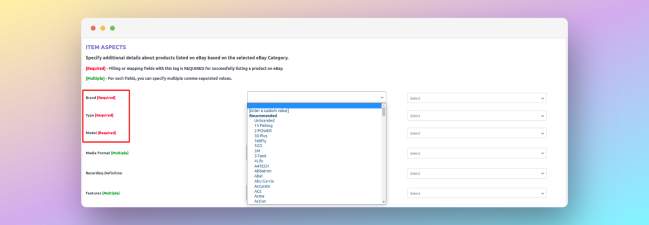
In order to assign values to Item Aspects, you can click on the dropdown as shown in the above image. In the dropdown, you’ll see some Recommended values for that particular Item Aspect which you can choose by clicking on them or you can click on [Enter a custom value] option and the dropdown will be converted into an Input field where you can enter any custom value you prefer for that particular Item Aspect. You can do this for all the Item Aspects in the profile or at minimum, only for Required Item Aspects.
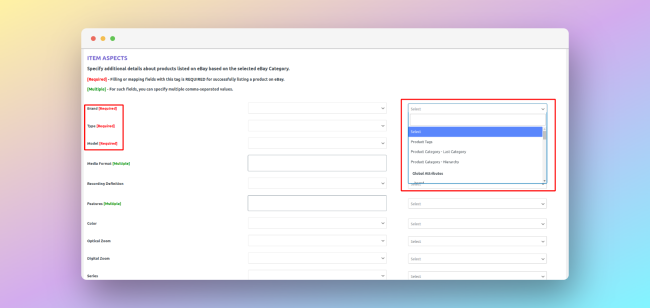
Another way to setup values for Item Aspects is by mapping them to your Products categories, Attributes or Custom Fields. You can select the relevant field to pick the value from the dropdown shown in the above image. Only a single selection is allowed at the moment. By selecting the relevant field for mapping, each product will have a different value for the Item Aspect.
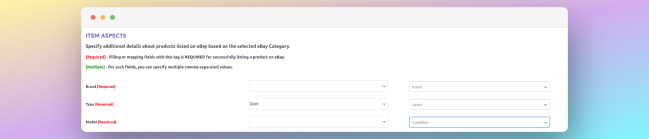
You can combine both the above approaches for setting up your Item Aspects as shown in the above image.
The same approach can be used for all the other fields in the Profile – either enter a custom value or map them to your product attributes, categories or custom fields.
Deleting The Profile & Category Mappings
↑ Back to topAs shown in the video, you can simply go to the Profile section in our plugin, click on the checkbox to select all profiles, or if you want to delete individual profiles click the checkbox in the corresponding profile row, and from the Bulk Actions, select Delete. This will delete all the selected eBay profiles.
Once you delete any eBay listing profile, the corresponding category mapping also gets deleted. To remove all the mapped categories from the plugin, click on the Delete All Mapping button in the Category Mapping Section, as shown in the image below.
Products Management
↑ Back to top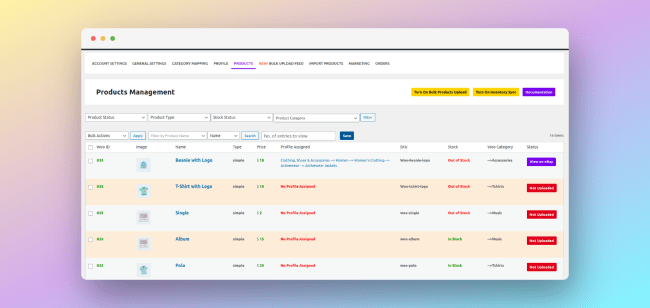
Bulk Actions
↑ Back to topThe plugin supports the following Bulk Actions for WooCommerce products, as shown in the video –
- Upload – This action is used to list the WooCommerce products from WooCommerce to eBay. Select the products you want to upload by clicking the checkbox alongside each product row, and from the dropdown, select Upload and click on Apply button.
- Relist – This action will end the listing on eBay and upload it again.
- Update Product – If you have made any changes to the products in WooCommerce, such as the title and description, then you can use this action to update the product on eBay.
- Update Inventory – This option will update the stock levels on eBay. If the product is out of stock in WooCommerce, it will be ended on eBay automatically.
- End/Reset Product – This action will remove the WooCommerce product from eBay. If the product has already been ended from the eBay Seller Hub, then it will be unlinked (or reset) from our plugin using this action as well.
Product Filters
↑ Back to top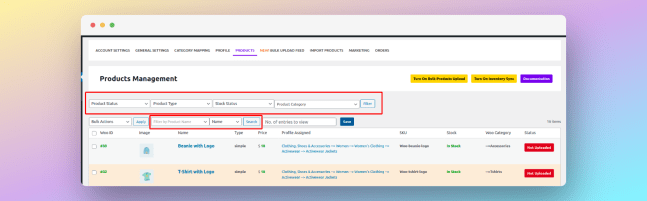
There are multiple ways you can filter products that you want to upload to eBay or perform any other actions. Different product filters, shown in the image above, are –
- Product Status – With the help of this filter, you can filter the WooCommerce products which have been listed on eBay, and products that are not yet listed. To filter the products which are listed on eBay, select Uploaded from the dropdown and click on the Filter button at the very last, and to filter products that are not listed on eBay, select Not Uploaded from the dropdown.
- Product Type – You can use this filter to filter Simple and Variable WooCommerce products.
- Stock Status – To filter products that are in stock or out of stock, you can use this filter. Then, you can, for example, end all the out-of-stock products from eBay with the help of End/Reset bulk action.
- Product Category – This filter helps you to filter products belonging to a specific WooCommerce category. You can only filter one category at a time.
You can always use a combination of the above filters to filter, for example, Not Uploaded, Simple, in-stock products belonging to the Clothing category, as shown in the below image.

Product Search
↑ Back to top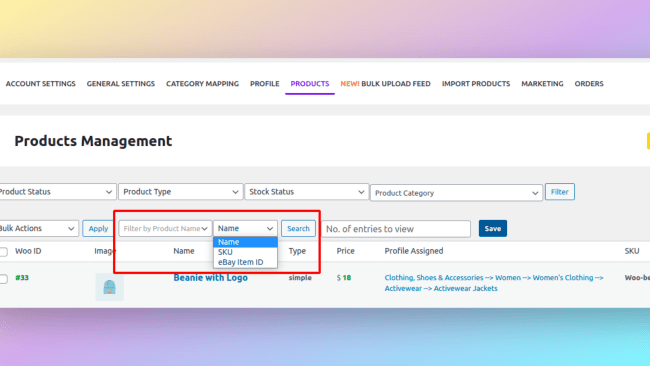
The plugin comes with in-built Product Search functionality, as shown in the image. You can search for products using the Product Name, SKU, and eBay Listing ID. To search for products, select the search parameter from the dropdown, enter a keyword, and the search results will be shown. Please refer to the video below on how the product search works.
Automatic (Or Bulk) Products Upload
↑ Back to top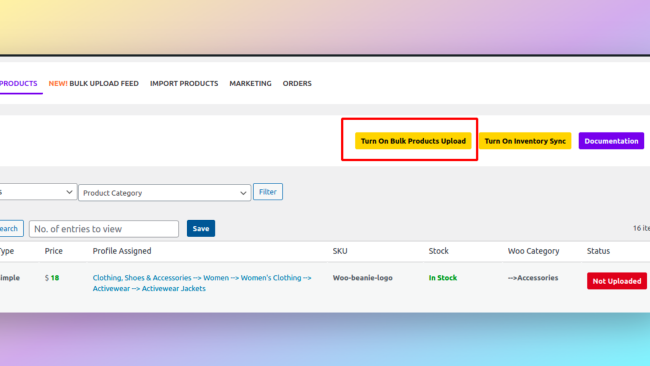
Automatic (Or Bulk) Products Upload is used to list all your eligible WooCommerce products on eBay with minimal user intervention. For the automatic upload to work, you need to make sure the following –
- You have set up the profiles in our plugin.
- The profiles should have item aspects set up for a successful upload to eBay.
- Only the in-stock products will be listed on eBay by default.
To turn on the automatic upload, click on the button highlighted in the above image, and our plugin will fetch the eBay listing profiles and the corresponding products. Once it’s done, a popup will open, which will show you the number of eligible profiles and products which will be automatically listed on eBay. If the profiles are missing item aspects, they will be skipped during the automatic upload process. After the initial batch is listed on eBay, the automatic upload will keep running in the background and automatically list any new WooCommerce product to eBay. To view the progress of Bulk Upload, you can visit the Bulk Upload Feed section in the plugin. The complete process is shown in the video below.
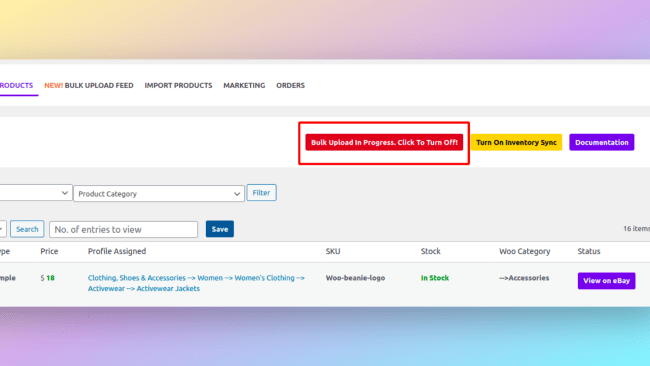
To turn off the automatic product upload, simply click the button highlighted in the image below.
Import Products From eBay
↑ Back to top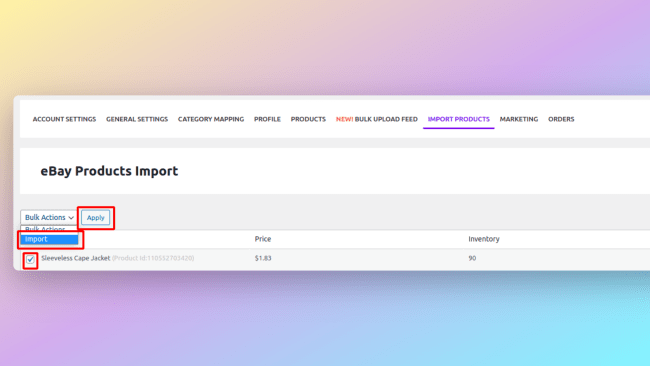
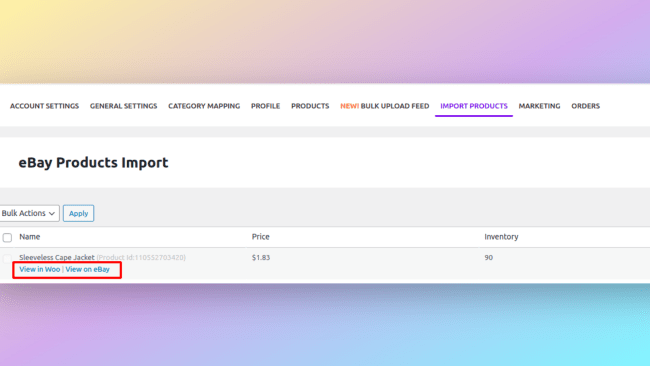
In the Import Products section, store owners can import their listings from eBay to WooCommerce. Simply click on the checkbox corresponding to the eBay listing you want to import, then from the Bulk Actions dropdown, select Import and click on Apply button. The eBay listing will be imported into WooCommerce with its title, description, images, and Item Aspects as WooCommerce attributes.
The imported product will not be imported with eBay shipping, and you’d have to set up the shipping in WooCommerce separately.
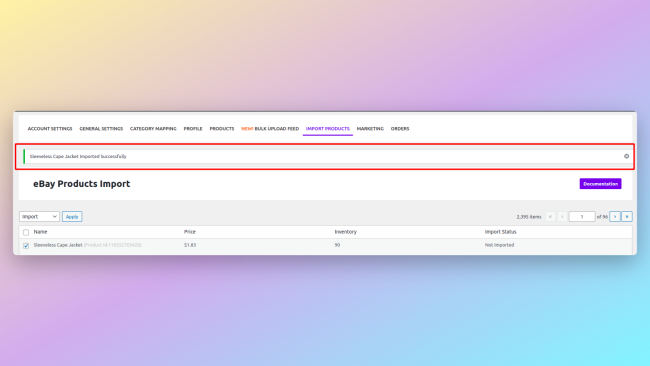
Once a listing has been imported successfully, you can view the success message as shown in the first image below. After refreshing the page, you will see links to View the listing in WooCommerce and View the listing on eBay if you place your mouse over the listing name, as shown in the second image below
Sync & Fulfill eBay Orders
↑ Back to top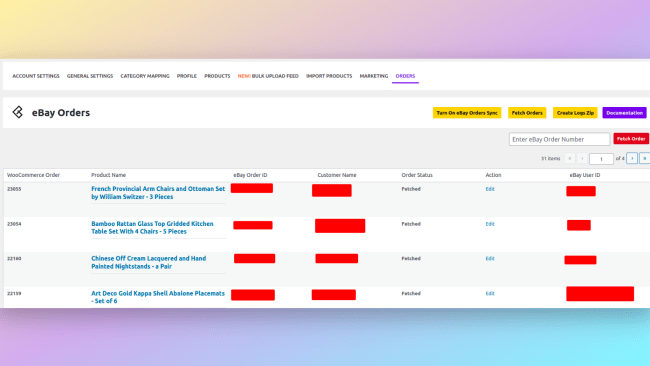
Effortlessly sync your eBay Orders into WooCommerce and view them in this section. At a glance, you can view information such as Ordered products, WooCommerce Order ID, eBay Order ID, Customer Name, and eBay buyer ID. You can also click on the Edit link under the Action column, which will take you directly to the imported WooCommerce order.
If, for some reason, automatic order syncing is not running, you can manually click the Fetch Orders button to fetch the latest orders. You can also click on the Turn On eBay Orders Sync button to turn ON automatic order syncing.
If you want to fetch any particular eBay order, you can enter its order ID and click the Fetch Order button in the same section.
By default, we only fetch orders placed in the last 2 days. If you want to fetch older eBay orders, kindly get in touch with us. Our plugin only fetches PAID & NOT SHIPPED orders from eBay. If an eBay order is paid for, its created in the Processing state in WooCommerce.
eBay doesn’t give out the real buyer’s email address but instead an alias email. Our plugin inserts a fake email address into the WooCommerce order and not the alias email so as to prevent any automated promotional email from landing in the eBay buyer’s message inbox, which is against eBay ToS. Apart from this, all other information from eBay is fetched as it is and inserted into the WooCommerce order.
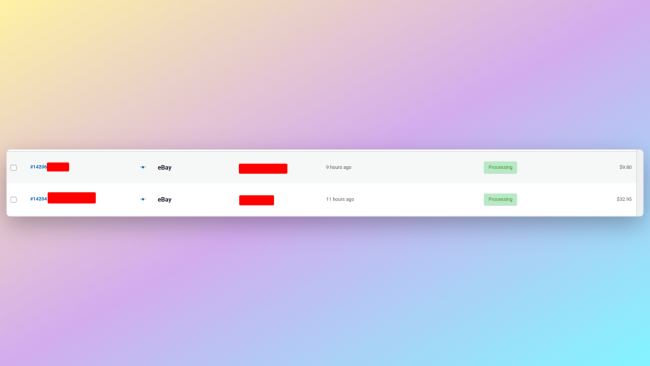
You would be able to distinguish your WooCommerce store orders from your eBay imported orders, as shown in the image below. Each eBay imported order in WooCommerce will have eBay as Order Source in the Order table.
Once an eBay order is imported into WooCommerce, you can manually fulfill your order by sending the tracking information right from within the WooCommerce order. To do so, open the Order Edit page and enter the tracking information and select the Shipping service in the section shown below and click on the Submit Shipment button. If the order is successfully dispatched on eBay, it will be marked as completed in WooCommerce.
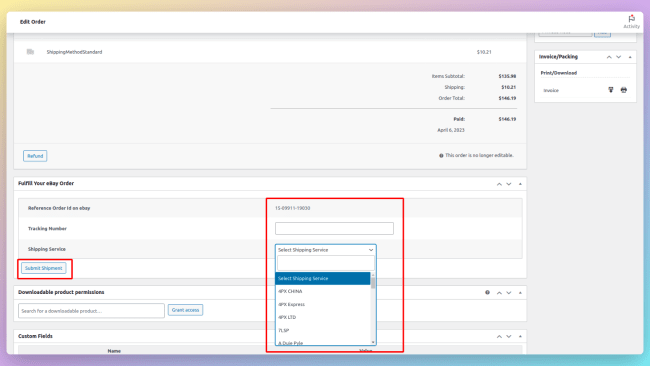
At the moment, we don’t provide automatic order fulfillment on eBay due to the variety of plugins our sellers use to get the tracking info into their WooCommerce orders. However, we have planned to support WooCommerce Shipment Tracking plugin for automatic order fulfillment officially.
FAQs
↑ Back to top1. What is eBay Integration for WooCommerce?
The eBay integration for WooCommerce is a plugin that connects your eBay store to WooCommerce, making the selling process on eBay effortless. With a single click, you can automate your eBay store with the WooCommerce store.
2. What are the requirements for using eBay Integration?
You need an eBay Seller Account and a catalog that you want to sell. Our integration will do the rest for you. And whenever you are stuck, we are here to help you 24×7.
3. I am already selling on eBay. How does this integration help me?
Our integration will seamlessly pull all your products from eBay into WooCommerce, and you are then all set to sell on your WooCommerce store. If a product gets sold anywhere, our integration will automatically adjust the stock for you, pull orders from eBay, and fulfill the eBay Order.
4. What eBay Marketplaces does your integration support?
Our integration will work with any eBay Marketplace officially supported by eBay, including eBay Motors.
5. Do you provide a demo for the integration?
Yes, we provide a demo for the integration. Our pre-sale team will help you out with any queries and arrange a demo for you at your convenience.
Do you still have questions and need assistance?
Get in touch with our dedicated account managers, who will assist you throughout the onboarding process. Or, you can schedule an onboarding call using this link. Our team will be available 24*7 for your support.