Overview
↑ Back to topAs of WooCommerce 8.3, Cart and Checkout blocks are available as the default experience. WooCommerce CyberSource Payment Gateway is now compatible with those blocks!
Requirements
↑ Back to top- A CyberSource account (fees apply)
- WooCommerce 4.3+
- WordPress 5.2+
- PHP 7.0+ (you can view this under WooCommerce > Status)
- An SSL certificate
Installation
↑ Back to top- Ensure your store meets the plugin requirements.
- Download the extension from your WooCommerce dashboard.
- Go to Plugins > Add New > Upload and select the ZIP file you just downloaded.
- Click Install Now and then Activate.
- Click Configure and read the next section to learn how to setup the plugin.
Getting Started
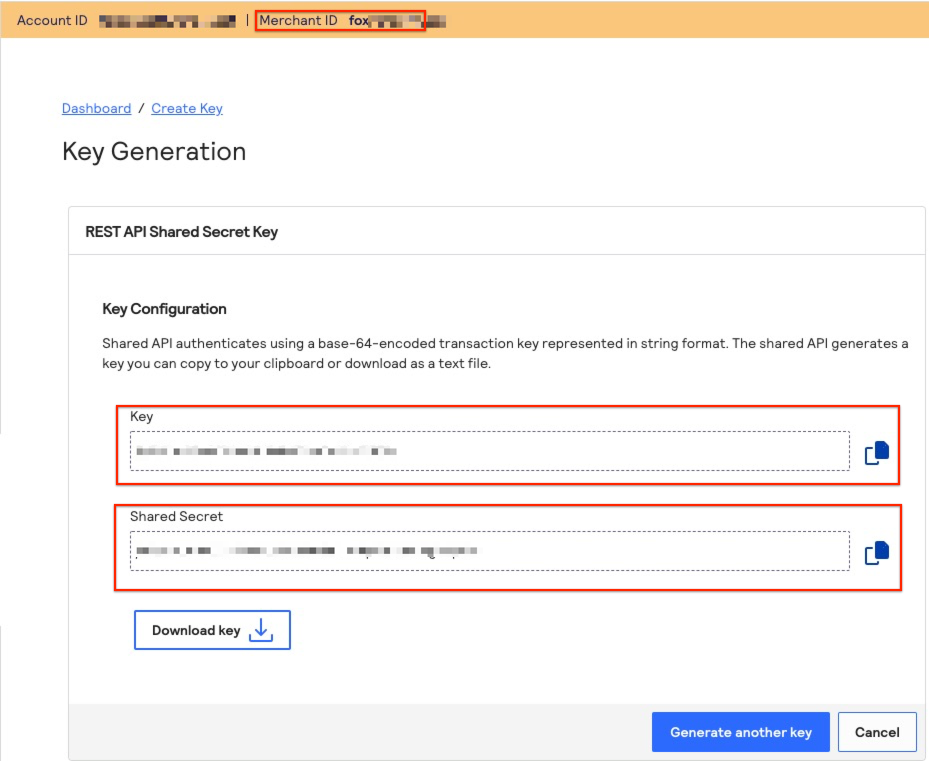
↑ Back to topGenerate Security Keys
↑ Back to top-
- Log in to the CyberSource business center with your CyberSource merchant ID.
- Go to Payment Configuration > Key Management.
- Click Generate Key.
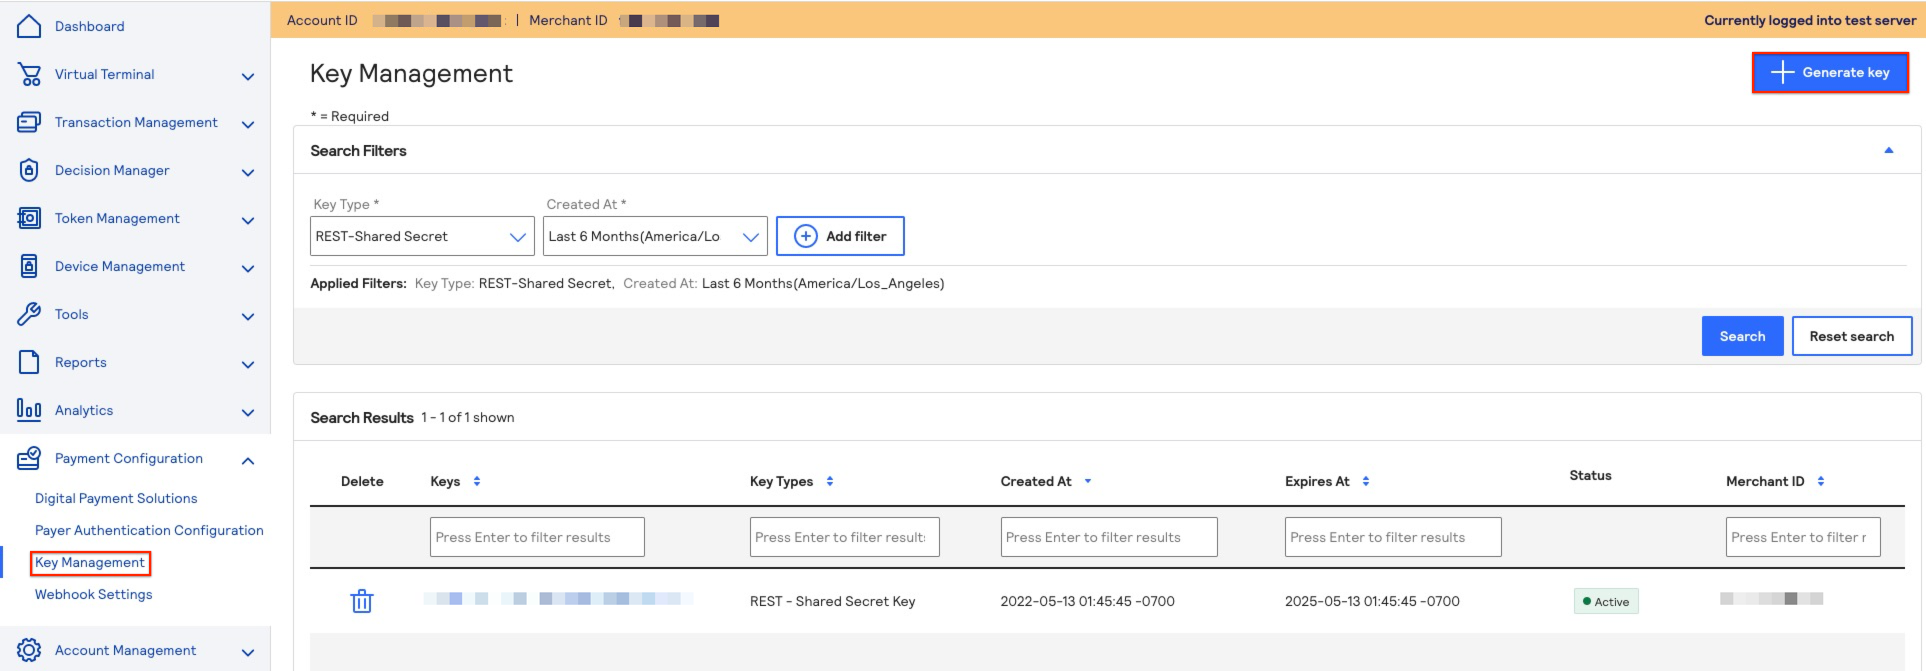
-
- Select REST – Shared Secret as the key type and click Generate key.
- Copy the Key, Shared Secret and Merchant ID to add to the plugin settings. You can also click Download Key if you’d like to save this key for future reference.
Visa Checkout setup
↑ Back to top-
- Log in to the CyberSource business center with your CyberSource merchant ID.
- Go to Payment Configuration > Digital Payment Solutions.
- Click Configure next to Visa Checkout.
- Follow CyberSource’s steps for generating the API key.
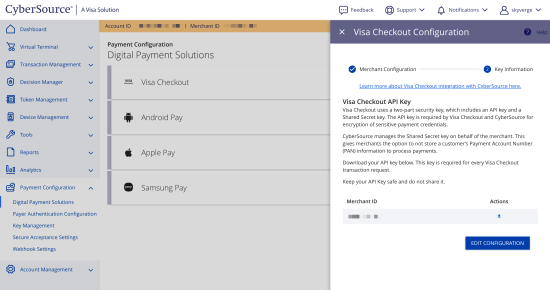
- Download the API Key.
- In your site admin, go to WooCommerce > Settings > Payments > CyberSource Visa Checkout and paste your API key into the Visa Checkout API Key field.

Google Pay setup
↑ Back to top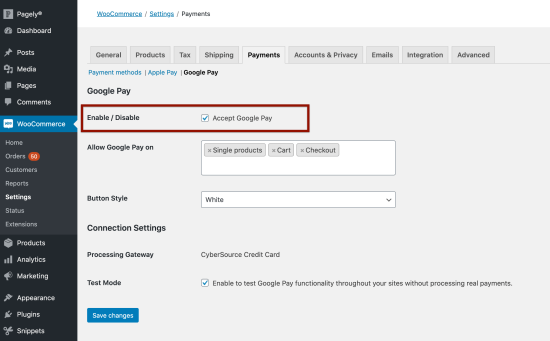 You can then update other settings to determine how and where the Google Pay buttons appear on your site.
Extension Settings
↑ Back to topNote: If you would like to accept eCheck payments, please contact CyberSource to ensure that your account is setup with one of the correct processors to handle eChecks.
Credit Card Settings
- Enable / Disable: Allow customers to use this gateway to process credit cards at checkout.
- Title: The text shown for the payment during checkout and on the Order Received page.
- Description: The text shown under the gateway’s title during checkout. Limited HTML is allowed. If you enable test mode, this section will also display a notice along with test credit card numbers.
- Card Verification (CSC): Display the card security/verification code field at checkout.
- Saved Card Verification: Display the card security/verification code field when using a saved card at checkout.
- Transaction Type: Controls how transactions are submitted to CyberSource. Select “Charge” to automatically capture payments. If you select “Authorization”, you must manually capture and settle payments in your CyberSource account or on the WooCommerce orders screen after the transaction has been submitted. This defaults to “Charge”.
- Charge Virtual-Only Orders: If Transaction Type is set to “Authorization”, enable this to automatically capture charges for orders with only virtual products. For downloadable products, this will grant downloads access right away.
- Capture Paid Orders: If Transaction Type is set to “Authorization”, enable this to automatically capture charges when orders move to a paid status.
- Accepted Card Logos: Determines which card logos are displayed during checkout. This has no impact on which cards are accepted by your merchant account.
- Tokenization: Let customers save their payment methods for future use at checkout. This is required for Subscriptions or Pre-Orders.
- Tokenization Profile ID: The Token Management Server profile ID, which CyberSource can provide for you.
- Detailed Decline Messages: Display detailed messages to customers to provide reasoning for declines instead of a generic error message when possible. Click here to read more about detailed decline messages.
- Debug Mode: Enable when you’re having issues processing transactions. You can choose to log API requests directly on the checkout page, save them to the WooCommerce > Status > Logs page, or both. As a best practice, please do not enable this setting unless you’re having issues with the plugin.
- Environment: Switch between “Test” and “Production” credentials. Enable “Test” to send transactions to your CyberSource Test Account.
- Merchant ID: The ID assigned to you by CyberSource, which you use to log into the Business Center.
- API Key Detail: Follow the steps above to retrieve your API Key Detail.
- API Shared Secret Key: Follow the steps above to retrieve your API Shared Secret Key.
- Fraud management: Use CyberSource’s Decision Manager tools to avoid fraudulent transactions. This must be enabled on your CyberSource merchant account.
- Organization ID: If Fraud management is enabled, enter your Organization ID, provided by CyberSource, here to use Decision Manager.
- 3D Secure: Enable 3D Secure for added security and compliance. This must be enabled on your CyberSource merchant account.
- Card types: When 3D Secure is enabled, use this setting to manage the card authentication services you want to support.
eCheck Settings
- Enable / Disable: Allow customers to use this gateway to process eChecks at checkout.
- Title: The text shown for the payment during checkout and on the Order Received page.
- Description: The text shown under the gateway’s title during checkout. Limited HTML is allowed. If you enable test mode, this section will also display a notice along with test credit card numbers.
- Detailed Decline Messages: Display detailed messages to customers to provide reasoning for declines instead of a generic error message when possible. Click here to read more about detailed decline messages.
- Debug Mode: Enable when you’re having issues processing transactions. You can choose to log API requests directly on the checkout page, save them to the WooCommerce > Status > Logs page, or both. As a best practice, please do not enable this setting unless you’re having issues with the plugin.
- Environment: Switch between “Test” and “Production” credentials. Enable “Test” to send transactions to your CyberSource Test Account.
- Share connection settings: If using multiple CyberSource gateways, select this setting to share credentials between the gateways so you don’t need to enter and maintain them in two locations. If disabled, you’ll need to enter the Merchant ID, API Key Detail, Shared Secret Key, and Fraud management settings here as well.
- Check Number Field: Decide whether to display the Check Number field at checkout and if it should be required.
- Authorization: Display an authorization message during the checkout process.
- Authorization Message: If Authorization is enabled, enter the message you want to show to your customers. You can use the following merge tags:
{merchant_name}: Your store name{order_date}: Date of purchase{order_total}: Total order value
Visa Checkout Settings
In CyberSource 2.3+, you can configure Visa Checkout payments.- Enable / Disable: Allow customers to use Visa Checkout to process credit cards at checkout.
- Title: The text shown for the payment during checkout and on the Order Received page.
- Description: The text shown under the gateway’s title during checkout. Limited HTML is allowed. If you enable test mode, this section will also display a notice along with test credit card numbers.
- Transaction Type: Controls how transactions are submitted to CyberSource. Select “Charge” to automatically capture payments. If you select “Authorization”, you must manually capture and settle payments in your CyberSource account or on the WooCommerce orders screen after the transaction has been submitted. This defaults to “Charge”.
- Charge Virtual-Only Orders: If Transaction Type is set to “Authorization”, enable this to automatically capture charges for orders with only virtual products. For downloadable products, this will grant downloads access right away.
- Capture Paid Orders: If Transaction Type is set to “Authorization”, enable this to automatically capture charges when orders move to a paid status.
- Accepted Card Brands: Determines which card types are accepted by Visa Checkout – note that this is different from the credit card gateway, where this setting only determines the logos shown at checkout.
- Detailed Decline Messages: Display detailed messages to customers to provide reasoning for declines instead of a generic error message when possible. Click here to read more about detailed decline messages.
- Debug Mode: Enable when you’re having issues processing transactions. You can choose to log API requests directly on the checkout page, save them to the WooCommerce > Status > Logs page, or both. As a best practice, please do not enable this setting unless you’re having issues with the plugin.
- Environment: Switch between “Test” and “Production” credentials. Enable “Test” to send transactions to your CyberSource Test Account.
- Share connection settings: If using multiple CyberSource gateways, select this setting to share credentials between the gateways so you don’t need to enter and maintain them in two locations. If disabled, you’ll need to enter the Merchant ID, API Key Detail, Shared Secret Key, and Fraud management settings here as well.
- Visa Checkout API Key: Your API Key for Visa Checkout transaction requests. Click here for instructions on generating this key.
Google Pay settings
In CyberSource 2.3+, you can configure Google Pay payments.- Enable / Disable: Allow customers to use Google Pay to process credit cards.
- Allow Google Pay on: Choose where customers may place orders via Google Pay by determining where the Google Pay buttons appear.
- Button Style: Determine the style of the Google Pay buttons across your store.
- Test Mode: Enable to test Google Pay functionality without processing real payments. This should be disabled on your live site, if you have active customers, to avoid customer confusion.
Managing Orders
↑ Back to topDecision Manager
↑ Back to top- Approved orders will go directly to Processing status.
- Held orders will go to On Hold status until they are reviewed and approved or rejected in your CyberSource dashboard.
- Rejected orders will go to Failed status, with more details available in the order notes.
Note: If your Transaction Type setting is set to “Authorize”, your approved orders (whether approved directly or approved after review in CyberSource’s Decision Manager) will go to On Hold status until you manually capture them in WooCommerce.
WooCommerce CyberSource will check for updates to orders in the CyberSource Decision Manager every 15 minutes, so you may notice a slight delay between when an order is approved or rejected in the CyberSource dashboard and when the order is updated in WooCommerce. If you need to trigger the check right away, you can do so by follow these steps:
- Go to Tools > Scheduled Actions > Pending.
- Find the
wc_cybersource_update_ordersaction. You may see multiple actions if you are using multiple CyberSource gateways (e.g. credit card, Visa Checkout, echeck). - Click the Run action.
📚 Click here to view CyberSource’s Decision Manager documentation for information on setting up decision manager rules and managing orders. You must be logged into your CyberSource dashboard to view this document.
Capture Charges
↑ Back to topNote: If your Transaction Type setting is set to “Charge”, you cannot use the Capture button.
Automatic Refunds
↑ Back to topVoid Transactions
↑ Back to top- If your Transaction Type setting is set to “Authorization”, you can void when the transaction has been authorized but not yet captured.
- If your Transaction Type setting is set to “Charge”, you can void when the transaction has not yet been settled (e.g. funds haven’t been transferred from the customer’s account to your CyberSource account).
Gateway Features
↑ Back to top3D Secure Support
↑ Back to top- American Express SafeKey
- Diners International
- Discover ProtectBuy
- JCB J-Secure
- MasterCard SecureCode and Identity Check
- Verified by Visa
Visa Checkout and Google Pay
↑ Back to top- If your Calculate tax based on setting (WooCommerce > Settings > Tax) is set to “Customer shipping address” and the customer order contains only virtual products, the order’s taxes will be calculated based on the store address instead.
- If your Calculate tax based on setting (WooCommerce > Settings > Tax) is set to “Customer billing address”, the order’s taxes will be calculated based on…
- The customers shipping address, if the order includes at least one shippable product (i.e. not a virtual product).
- The store address, if the order includes no shippable products (i.e. only virtual products).
Saving Payment Methods
↑ Back to top
Notes:
- Credit card information isn’t stored on your site’s server, but is tokenized and stored on CyberSource’s secure servers. This reduces your site’s PCI compliance burden. Click here to read more about CyberSource tokenization.
- When using WooCommerce Subscriptions, customers cannot delete payment methods that are associated with active subscriptions. Click here to read more about saving payment methods with Subscriptions.
Enhanced Checkout Form
↑ Back to topFrequently Asked Questions
↑ Back to top- Card Number: 4111111111111111
- Card Type: VISA
- Expiration Date: Enter any future date
- Card Security Code: Enter any three-digit string (e.g. 123)
- Card Number: 4456530000001005
- Card Type: VISA
- Expiration Date: The month of January and the current year plus three.
- Card Security Code: Enter any three-digit string (e.g. 123)
Q: CyberSource supports Apple Pay for web payments. Can I use this in my store? A: CyberSource contains a framework for Apple Pay, but it can only be enabled by developers, as the certification process requires developer-only tools. If you work with a developer and would like to add Apple Pay to your store, please click here to review the setup instructions and requirements. Please note that configuring Apple Pay support for this plugin is considered a customization and is not covered by our support policy.
Q: Why am I seeing errors similar to “An error occurred, please try again or try an alternate form of payment” when attempting to process a transaction? A: The latest versions of our CyberSource plugin uses Flex Micoroform in order to provide additional security. In order for Flex Microform to function properly, tokenization must be enabled in your CyberSource merchant account. You will need to reach out to your Cybersource merchant account contact to request to have tokenization enabled on your account.
Q: Which API methods does your CyberSource plugin use? A: The CyberSource plugin uses the Payments REST API with Flex MicroForm support. It does not use the Secure Acceptance Hosted Checkout API. For 3D Secure, it uses the Cardinal Cruise Hybrid approach via songbird.js in combination with the CyberSource REST API to make the server-side API calls.
Q: I am seeing “Status code INVALID_REQUEST: Declined” when I try process a payment. Why? A: This error means that your CyberSource account doesn’t support the currency that WooCommerce is currently set to use. This can happen with many currencies outside of the US. Please contact your CyberSource sales representative to make sure your currency is supported.
Troubleshooting
↑ Back to top- Please ensure that your site meets the plugin requirements.
- Check the FAQs to see if they address your question.
- Confirm that your credentials are correct.
- Enable the Debug Mode setting and review the errors codes/messages provided by CyberSource. Click here to learn more about CyberSource error/response codes. Sometimes more detailed error information/messages can be found by logging into your CyberSource Business Center and viewing transaction reports. In some cases, such as a transaction being held for review or declined, the plugin cannot change the issue and it must be resolved in your CyberSource account. If the error code indicates an issue with the plugin, please submit a support ticket and include the logs to help us troubleshoot.