The WooCommerce Customer / Coupon / Order CSV Import Suite allows you to easily import customer, coupon, and order data from a CSV file into your shop. A minimum of fields are required for a successful import, yet nearly all customer, order, and coupon fields are supported, allowing you to determine the level of detail you wish to import. This is particularly useful when migrating shops and importing from a different eCommerce platform, which may or may not use exactly the same fields as WooCommerce, or when mass-creating coupons (for a Groupon-style sale for instance). Orders can be mapped to existing users (or assigned to ‘guest’), and order items are mapped to existing products via SKU or product_id. In addition to standard WordPress / WooCommerce user and order fields, arbitrary meta fields may also be set, giving you complete control over the import process.
Installation
↑ Back to top- Download the extension from your WooCommerce dashboard
- Ensure your site uses WordPress 4.4 or newer.
- Go to Plugins > Add New > Upload, then select the ZIP file you just downloaded
- Click Install Now, and then Activate
- Go to WooCommerce > CSV Import Suite (or click the “Import” link) to start importing your data
Best Practices (Please Read!)
↑ Back to topRead through this entire documentation so you know exactly what needs how the import process operates. There is no substitution for this step; yes reading documentation takes time, but it will actually save you time in the end.
Export your Customers, Coupons, and Orders from wherever they are currently stored, or build your import files by hand.
Set the column names and data formats for the files as described below in this documentation.
If transferring data between sites while merging, please be cognizant of your user IDs and order IDs, as you may not want them in an import file. THIS IS IMPORTANT, especially if the site you’re importing to already contains data. See more under Merging Data Between Sites.
Do an import dry run. This is especially important for Order data to avoid having to upload the same data file multiple times which could result in duplicate order records.
Use the “Dry Run” option found after the file upload step to first check your data format. Enabling this option puts the plugin into a test mode where no records will be inserted or modified.
Fix any errors with your import file and repeat until the dry run completes cleanly. If this dry run looks okay, you’ll be able to click a link to use a real import for the same data / settings. Then do a live import of the customer, coupon, or order data.
Sample CSVs
↑ Back to topImporting: An Overview
↑ Back to top- Each Customer, Coupon, or Order belongs on its own row.
- The first row must include column headers – this is so the plugin knows where to map the fields.
- Values must be separated by a delimiter, which is expected to be a comma “,” by default, though this can be set during the import process to a tab or semicolon. If you’re importing a file from Google Sheets or Excel, for example, a comma is used automatically.
- Date fields can use most formats, but if you can build your CSV by hand, YYYY-MM-DD HH:MM:SS (24-hour, with the time optional) format is best. If you don’t want to use that format, then dates in the MM/DD/YYYY or DD-MM-YYYY formats are disambiguated by looking at the separator between the various components. If the separator is a slash (/), then the American MM/DD/YYYY is assumed; whereas if the separator is a dash (-) or a dot (.), then the European DD-MM-YYYY format is assumed.
- Locality fields: two-letter country and state / county abbreviations should be used when available
- Order notes support multiple items separated by a ‘|’ (pipe) character; for instance, Order status changed from pending to processing|Order exported from WP eCommerce
Selecting Import Source
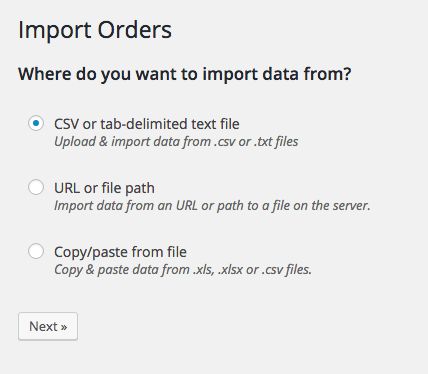
↑ Back to top For any type of import, you’ll be asked to choose the source for your import file:
- CSV or tab-delimited text file – Upload a properly-formatted import file from your computer
- URL or file path – Upload a file directly from an external site or a path on your server (ie an upload folder)
- Copy / paste from file – Paste data from a properly formatted file
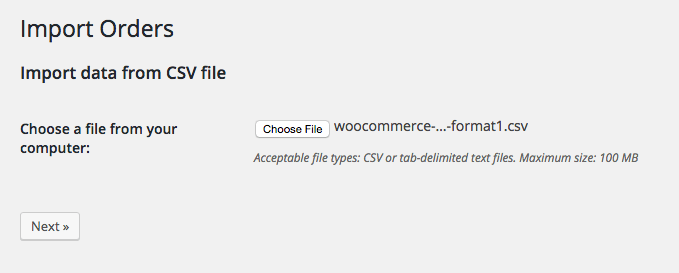
 If you upload a file, you’ll be taken to a screen to select your import file and upload it.
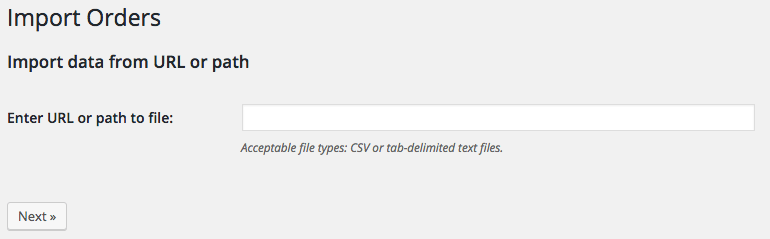
 If you opt to use a URL or file path, you’ll be able to enter the absolute path (full URL) and continue to pull in the import data.
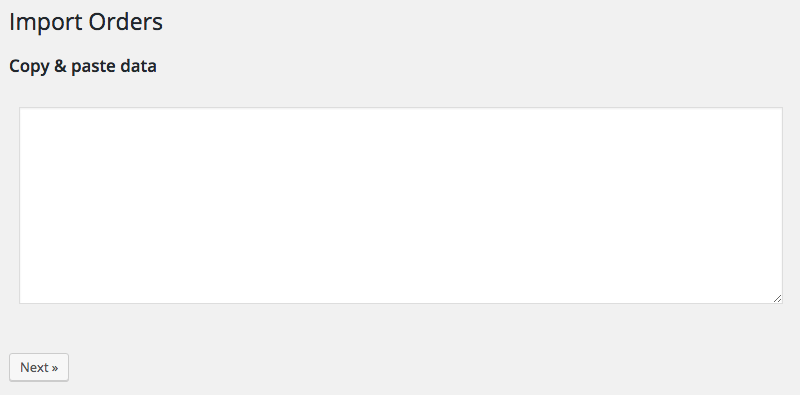
 If you want to copy and paste data, you’ll be given a textarea to enter your import data.
Preview Format and Select Options
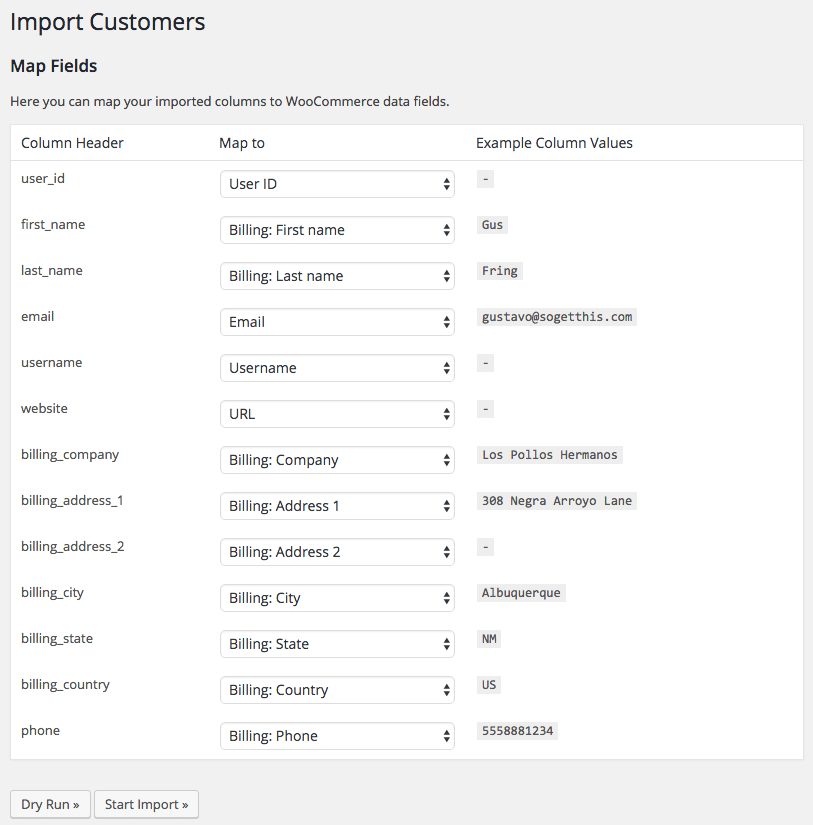
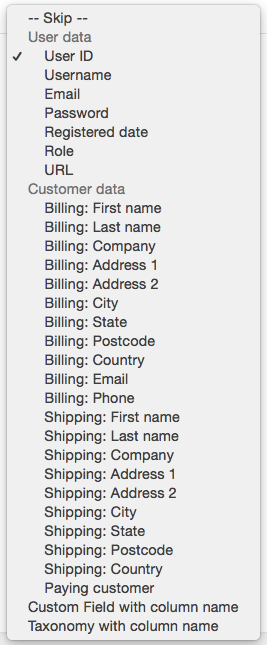
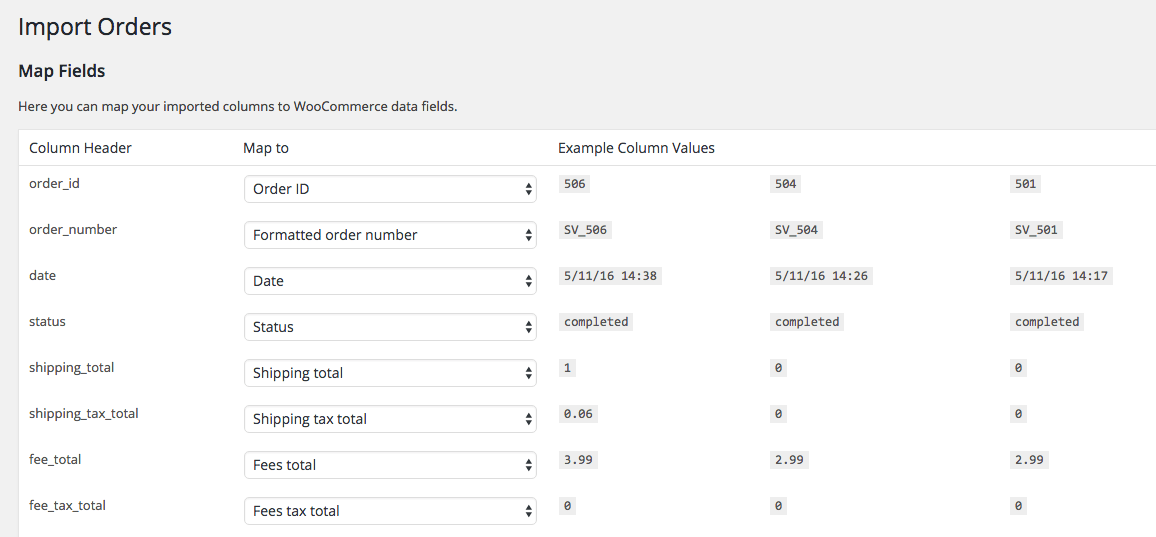
↑ Back to top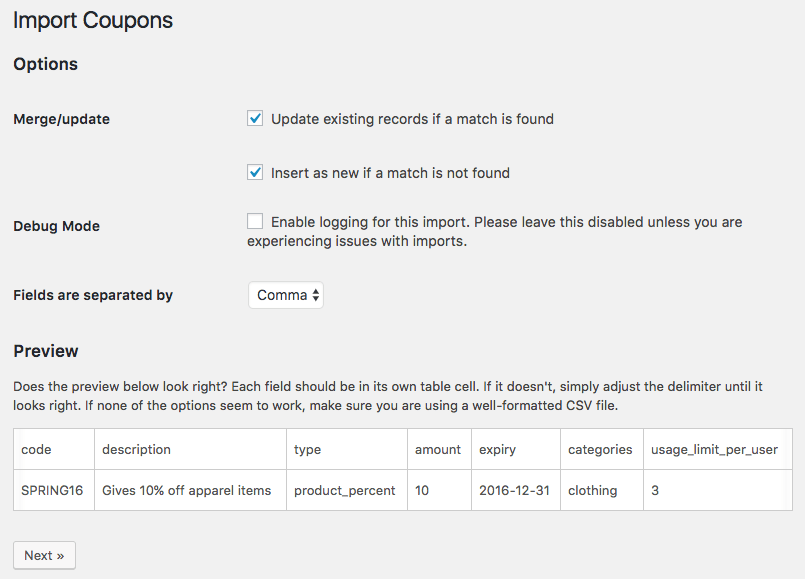 Once you’ve configured options, you’ll then map your import columns to the data they represent. The plugin will try to auto-match these if possible, but you should check that each column is mapped to the appropriate WooCommerce data.
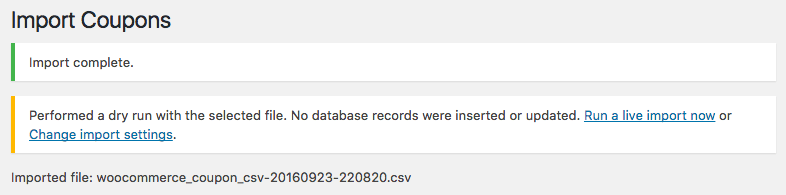
Dry Run and Live Import
↑ Back to top If this data looks good, you can click the “Run a live import now” link in the notice to use your data and settings for a live import instead. If not, you can also go back to the import settings to re-configure your import and try again.
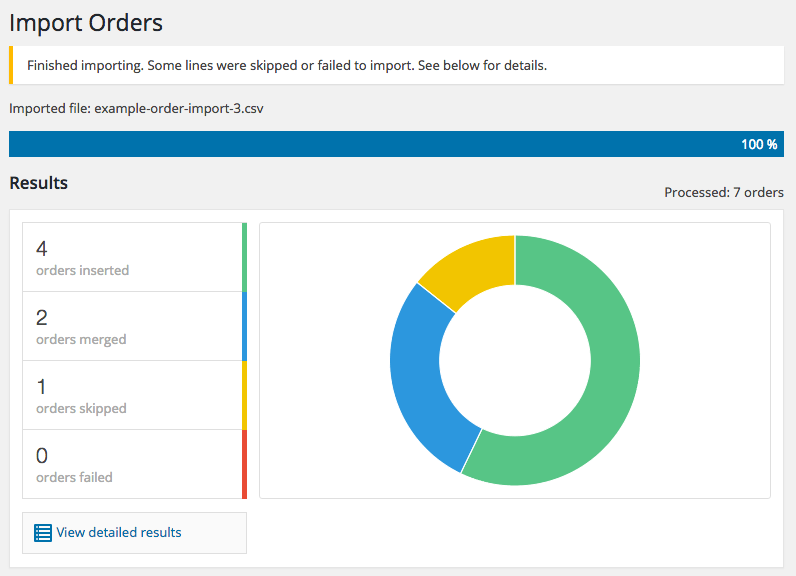
 Following a live import, you’ll see a status summary of imported, merged, skipped, and failed rows for your import file to notify you of progress.
Import Completed Notices
↑ Back to top You can continue to work on other areas of your store, and can even leave the site completely while your import processes.
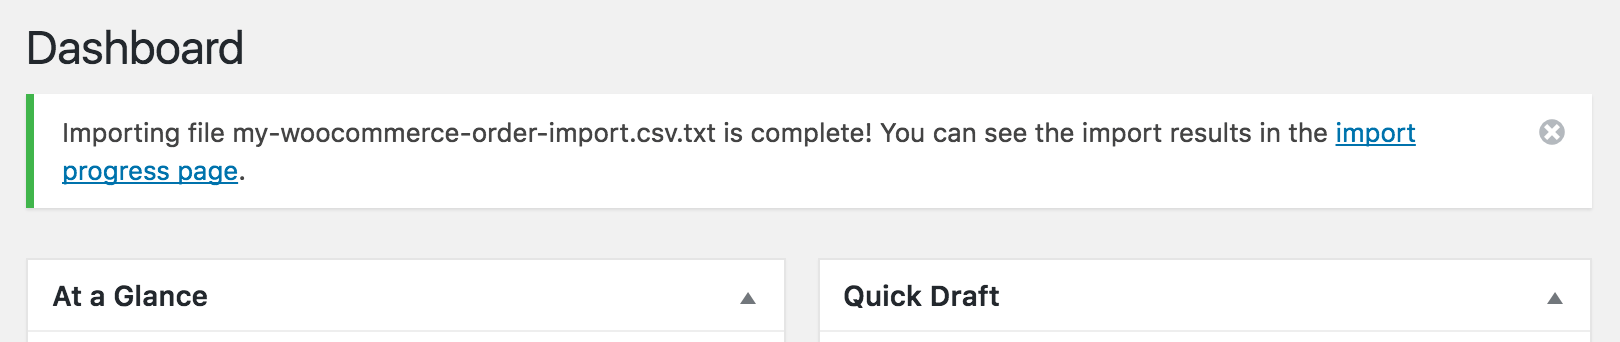
For both dry runs and live imports, you’ll see a notice pop up in the admin area when your import has been completed. For dry runs, this will let you see results and then run your live import.
You can continue to work on other areas of your store, and can even leave the site completely while your import processes.
For both dry runs and live imports, you’ll see a notice pop up in the admin area when your import has been completed. For dry runs, this will let you see results and then run your live import.
 For live imports, you’ll have a link to the progress results page to let you review the updated, created, merged, and skipped files in more detail.
Importing Customers
↑ Back to topAccepted Customer Data
↑ Back to top| Customer columns / data | ||
|---|---|---|
| user_id | billing_last_name | shipping_first_name |
| username | billing_company | shipping_last_name |
| billing_address_1 | shiping_company | |
| password | billing_address_2 | shipping_address_1 |
| date_registered | billing_city | shipping_address_2 |
| role | billing_state | shipping_city |
| url | billing_postcode | shipping_state |
| paying_customer | billing_country | shipping_postcode |
| billing_first_name | billing_phone | shipping_country |
- date_registered – If not set, the current date / time will be used when creating new customers.
- username – This is a good idea to provide for easier login, but if not supplied then it will be set to the email.
- password – You can provide plaintext or pre-hashed passwords (if importing from another WordPress site / CSV Export).
- Passwords exported from a much earlier version of WordPress may use a different hash, and therefore would need to be reset or imported as plaintext.
- Passwords exported from an existing WordPress install 3.x or higher should use the same hash, and so the “Don’t hash user passwords” import option can be used.
- Any other passwords not from a WordPress environment would need to be reset, or use plaintext to be re-hashed on import, and so the “Don’t hash user passwords” import option must not be used.
- role – The WordPress user role. This defaults to ‘customer’ on import.
- paying_customer – This should be “yes” or “no”
- billing_country/shipping_country – This should be the two-letter country code. You can find a list of official codes here.
Customer Meta (custom fields)
↑ Back to topcustomer_contacted
When you map your columns, you can then select “Custom field with column name” for this while importing.
Customer Import Process
↑ Back to top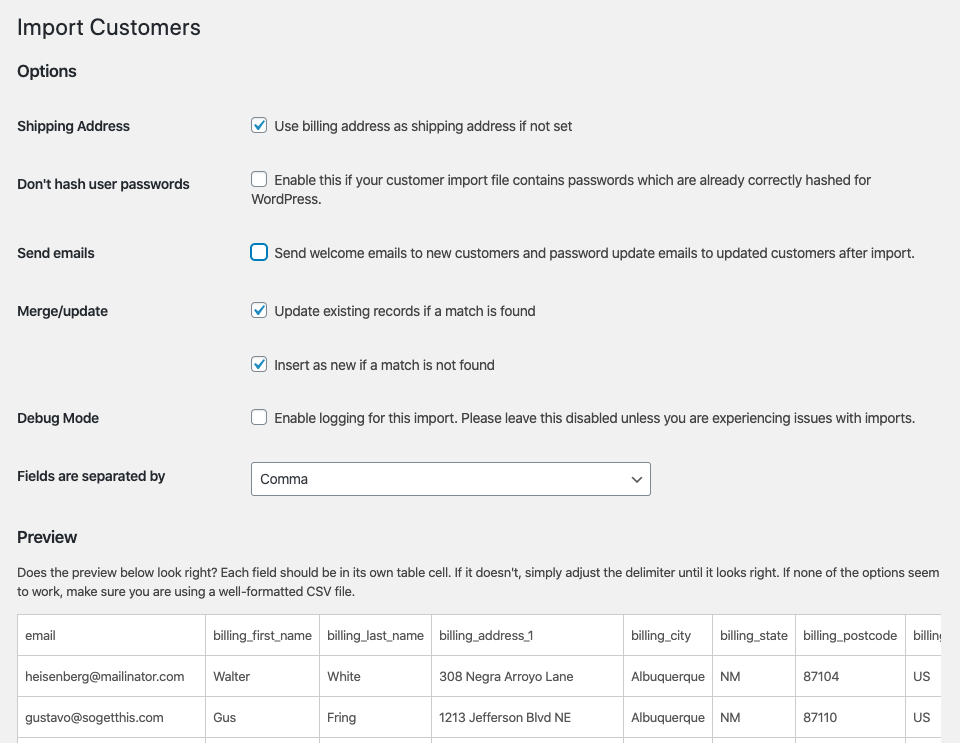
- Shipping Address – Enable this to use the billing address as the customer shipping address if shipping columns are not set. If they are included in the CSV, but simply blank, this setting will not take effect.
- Don’t hash user passwords – If your CSV file already contains hashed passwords (for example, passwords exported by the Customer / Order CSV Export plugin), then you can enable this. Otherwise, the importer will assume the password is plaintext and should be hashed.
- Send Emails – Enable this to send the WooCommerce “new account” emails to newly created customers, and WordPress password reset emails to update customers, after the import.
- Merge Update –
- Update existing records if a match is found – Enable this to merge customer data on import. The plugin tries to match a customer by the user ID, username, then the email.
- Insert as new if a match is not found – Enable this to create new customers if the importer can’t match a row to an existing customer. When disabled, non-matched rows are skipped.
- Debug Mode – Enable this to log import rows as they’re added. As a best practice and for maximum performance, please only enable this if you experience issues with imports.
- Fields are separated by – If your preview looks incorrect, the plugin may not have detected the delimiter properly. Try to switch delimiters to fix the preview; if no delimiters look correct, you will need to reformat your file.
Importing Coupons
↑ Back to topAccepted Coupon Data
↑ Back to top| column | required? | default | values |
|---|---|---|---|
| code | yes | n/a | identifies the coupon; must match an existing coupon to merge |
| type | for new coupons | n/a | represents coupon type; can be:fixed_cart (cart $)percent (cart %)fixed_product (product $)or plugin custom type |
| description | no | – | optional coupon description |
| amount | for new coupons | n/a | the amount / value of the coupon |
| expiry_date | no | – | the date the coupon expires |
| enable_free_shipping | no | “no” | “yes” if the coupon grants free shipping |
| minimum_amount | no | 0 | the minimum subtotal needed to use the coupon |
| maximum_amount | no | – | the maximum subtotal allowed to use the coupon |
| individual_use | no | “no” | “yes” if the coupon cannot be used with others |
| exclude_sale_items | no | “no” | “yes” if the coupon should exclude sale items |
| products | no | – | comma-separated list of SKUs for products that need to be in the cart to use this coupon For product discount: products the coupon applies to |
| exclude_products | no | – | comma-separated list of SKUs for products that cannot be in the cart to use this coupon For product discount: products the coupon will not discount |
| product_categories | no | – | comma-separated list of product category slugs, ie: ‘games, t-shirts’; product must be in this category for the coupon to remain valid For product discount: products in these categories will be discounted. |
| exclude_product_categories | no | – | comma-separated list of product category slugs, ie: ‘games, t-shirts’; product must not be in this category for the coupon to remain valid For product discount: products in these categories will not be discounted. |
| customer_emails | no | – | comma-separated list of email addresses to restrict this coupon to specific billing and user emails |
| usage_limit | no | – | number of total coupon uses |
| limit_usage_to_x_items | no | – | maximum number of individual items the coupon can apply to when using product discounts |
| usage_limit_per_user | no | – | number of times this coupon can be used by an individual user. |
| usage_count | no | 0 | number of times the coupon has been used |
Coupon Meta (custom fields)
↑ Back to topcoupon_url
When you map your columns, you can then select “Custom field with column name” for this while importing.
Coupon Import Process
↑ Back to top
- Merge Update –
- Update existing records if a match is found – Enable this to merge coupon data on import. The plugin tries to match a coupon by the coupon code.
- Insert as new if a match is not found – Enable this to create new coupons if the importer can’t match a row to an existing coupon. When disabled, non-matched rows are skipped.
- Debug Mode – Enable this to log import rows as they’re added. As a best practice and for maximum performance, please only enable this if you experience issues with imports.
- Fields are separated by – If your preview looks incorrect, the plugin may not have detected the delimiter properly. Try to switch delimiters to fix the preview; if no delimiters look correct, you will need to reformat your file.
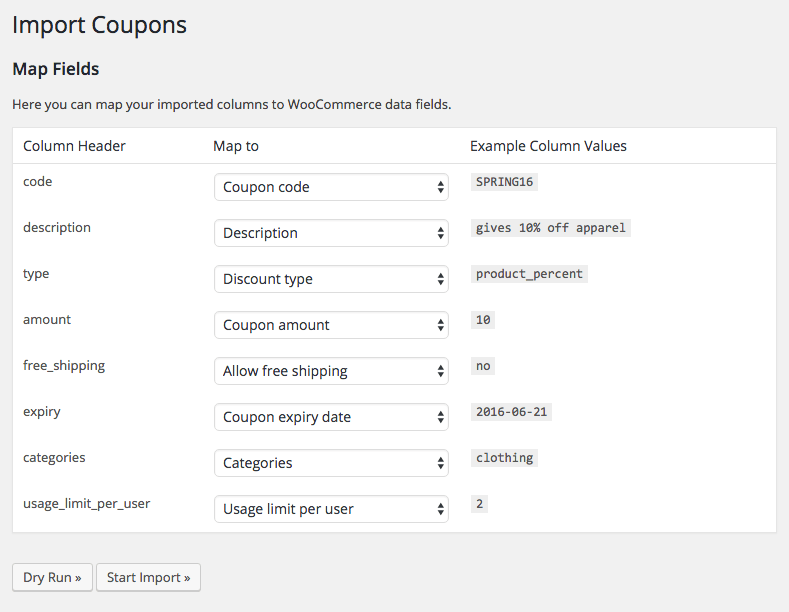 You can choose any of the coupon data fields we’ve listed above for each column.
Importing Orders
↑ Back to topAccepted Order Data
↑ Back to top| Order Data | ||
|---|---|---|
| column header | default (if creating orders) | values |
| order_id | automatically generated | integer – (only needed for merging, not inserting, orders) the post ID of the order, typically how the order is identified. Must match an existing order to merge, this will not be used for inserting new orders. |
| order_number | – | if provided, this must be an integer and is the numerical incrementing portion of your order number. See the Custom Order Numbers section for a discussion of the limitations on order numbers. |
| order_number_formatted | – | (optional) formatted order number. If your order numbers consist of an incrementing number portion and some letters/characters, this is the entire order number. For instance, you might have order_number: 817 and order_number_formatted: WT-817-UK. See the Custom Order Numbers section for a discussion of the limitations on order numbers. |
| created_at | import’s current date / time | the date & time the order was placed. The timezone of the date must match the WordPress timezone setting of the site the order is imported into. See the helpful tips section for further information. |
| status | processing | order status; this must match one of the order statuses defined in your shop. In a default WooCommerce installation this will be one of “pending”, “failed”, “on-hold”, “processing”, “completed”, “refunded”, or “cancelled”. |
| currency | shop currency | the currency in which the order was placed |
| shipping_total | – | the total order shipping amount, ie “5.65”. If not provided, this can be calculated based on your import settings. |
| shipping_tax_total | – | the total order shipping tax, ie “0.21”; if not provided, this can be calculated based on your import settings. |
| fee_total | – | the total fees amount, ie “3.99” |
| fee_tax_total | – | The total tax on fees, ie “0.42” |
| tax_total | – | this is the total order tax; if not provided, this can be calculated based on your import settings. |
| cart_discount | – | the sum of all cart discounts applied |
| order_total | – | the overall order total; if not provided, this can be calculated based on your import settings. |
| refunded_total | – | the total of all refunds for the order |
| payment_method | – | this should be the payment method name as seen in the Order admin, ie “cheque”, but can be any string that identifies the payment method to you. |
| shipping_method | – | this should be the shipping method name as seen in the Order admin, ie “free_shipping”, but can be any string that identifies the shipping method to you. |
| customer_note | – | any notes added by the customer for the order |
| order_notes* | – | order notes support multiple items separated by a ‘|’ (pipe) character; for instance, Order status changed from pending to processing|Order exported from WP eCommerce |
| download_permissions_granted | 0 | set this to “1” to grant access to downloadable products in the order |
| refunds | – | refund lines for the order |
- order_id – Order ID’s cannot be imported. WooCommerce will insert the order and assign a new ID during the import. The Order ID field is only used for updating/merging existing orders on your site.
- created_at – The date used in the CSV file should match the same timezone of the site the order will be imported into. This is typically set from the WordPress settings > general page in admin. If the export was taken from a different site, with different timezone settings, the CSV file should be modified before import to avoid incorrect order dates in the new system. The format of the date value should match ‘Y-m-d H:i:s’ (e.g. 2000-01-20 12:00:00)
See the notes below for formatting order item cells properly.
| Order Items | ||
|---|---|---|
| column header | values | data needed |
| line_items | all line items purchased in the order, such as products. This must contain at least the following data for each item: product ID or SKU, quantity purchased, and total price for the line (qty x unit price). | product_id or sku, quantity, total, subtotal*/td>
|
| shipping_items | all data for each shipping method, just contain at least method ID, total cost | method_id (ie flat_rate), method_title, total |
| tax_items | all tax items for the order, must contain tax code and total | code, title, total |
| fee_items | all fee items for the order | name, total |
| coupons | all coupon data for the order, each coupon must have a code and amount | code, amount |
- JSON – can accept data in JSON format, such as:
[{"product_id":99,"product_name":"Woo Album","quantity":1,"total":19.99}]Please ensure that the required data listed above is included. - Pipe-delimited – data divided by pipe characters, such as:
product_id:99|sku:woo-album|name:Woo Album|quantity:1|total:19.99
Multiple items can be divided by a semi-colon (;) delimiter. Please ensure that the required data listed above is included.
Order Refund Data
A special case to mention is refund data. If you need to include refunded items in your import, there are a couple steps to take:- Include additional information for each product in the
line_itemscolumn.refunded– the cost refunded for this item, ierefunded:35.00refunded_qty– the quantity refunded as a negative integer, ierefunded_qty:-1
- Include the
refundscolumn if you want to add further data on the refund (without this column the refund is assumed to happen with the import itself).date– The date on which the refund was processed, iedate:2016-09-01 10:00:00amount– The total amount processed in this refund, ieamount:35.00reason– The reason this refund was processed (optional), iereason:No longer wanted
| Customer Data | ||
|---|---|---|
| column header | default | values |
| customer_user | guest | optionally links this order to a customer; this can be the customer ID, email, or username. If not provided, the order will be marked as a guest purchase. If the customer is found they will be marked as a “paying_customer” |
| billing_first_name | – | customer billing first name |
| billing_last_name | – | customer billing last name |
| billing_company | – | customer billing company |
| billing_address_1 | – | customer billing address – line 1 |
| billing_address_2 | – | customer billing address – line 2 |
| billing_city | – | customer billing city |
| billing_state | – | this should be the two-letter state / county code when available. |
| billing_postcode | – | the customer billing postcode |
| billing_country | – | this should be the two-letter country code. You can find a list of official codes here. |
| billing_email | – | customer billing email |
| billing_phone | – | customer billing phone |
| shipping_first_name | billing first name if column not set | customer shipping first name |
| shipping_last_name | billing last name if column not set | customer shipping last name |
| shipping_company | billing company if column not set | customer shipping company |
| shipping_address_1 | billing address 1 if column not set | customer shipping address – line 1 |
| shipping_address_2 | billing address 2 if column not set | customer shipping address – line 2 |
| shipping_city | billing city if column not set | customer shipping city |
| shipping_state | billing state if column not set | this should be the two-letter state / county code when available. |
| shipping_postcode | billing postcode if column not set | the customer shipping postcode |
| shipping_country | billing country if column not set | this should be the two-letter country code. You can find a list of official codes here. |
Order Item Meta
Arbitrary order item meta can be added to an order item by using the following syntax:meta:meta_key=meta_valueAs an example, to add the item meta MANUFACTURER: APPLE you could use the following:
meta:MANUFACTURER=APPLENote that any number of item metas can be added in this manner, and they may include any character, except the meta name may not contain a colon (:) or pipe (|). Within the meta value the special characters (:) and (|) are allowed but must be preceded by a backslash (\). For instance:
meta:MANUFACTURER=APPLE \| APPLE INC.Will set the order item meta named “MANUFACTURER” to “APPLE | APPLE INC.” To add multiple meta items to a line_item, and using the pipe separated format, you should use the “,” character as a separator. For example:
meta:MANUFACTURER=APPLE,DEVICE=IPHONEwill add both MANUFACTURER and DEVICE meta data to the line item.
Custom Order Numbers
↑ Back to topOrder Meta (custom fields)
↑ Back to toporder_delivery_date
When you map your columns, you can then select “Custom field with column name” for this while importing.
Order Import Process
↑ Back to top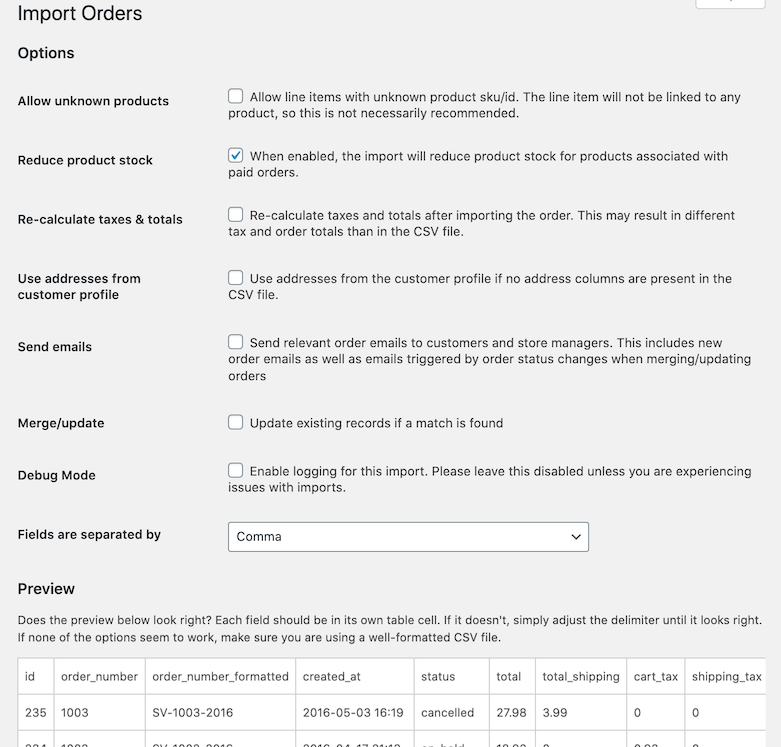
- Allow Unknown Products – Enable this to allow line items with unknown product IDs or SKUs to be included (not recommended).
- Reduce product stock – Enable this to reduce the stock for products associated with paid orders.
- Recalculate taxes & totals – Enable this to use WooCommerce core functions to recalculate order, shipping, fee, and tax totals upon import for the order record. This may change the data from what you’ve included in your import file. This will not match new shipping zones based on current site settings, as only the totals will be adjusted.
- Use addresses from customer profile – Enable this setting to use the billing and shipping details from the customer profile. This will only use customer details from the user profile if none of the billing or shipping columns are set for orders (useful if you only want to import customer IDs and use saved information).
- Send Emails – Enable this option to send new order emails to customers when inserting new orders. It will also email store managers for any status changes due to order updates/merges.
- Merge Update –
- Update existing records if a match is found – Enable this to merge order data on import. The plugin tries to match an order by the order ID, order number, then the formatted order number.
- Insert as new if a match is not found – Enable this to create new orders if the importer can’t match a row to an existing order. When disabled, non-matched rows are skipped.
- Debug Mode – Enable this to log import rows as they’re added. As a best practice and for maximum performance, please only enable this if you experience issues with imports.
- Fields are separated by – If your preview looks incorrect, the plugin may not have detected the delimiter properly. Try to switch delimiters to fix the preview; if no delimiters look correct, you will need to reformat your file.
 You can choose any of the order data fields we’ve listed above for each column.

Importing from Shopify
↑ Back to topShopify Order Differences
First, Shopify has concepts of an order “Fulfillment status” and “Financial status” (which are available for each line item in an order), whereas WooCommerce does not manage orders in this fashion. Instead, WooCommerce has one overall “order status” that indicates both the payment and shipment status for the order. (Read more about WooCommerce order management.) As a result, you cannot preserve fulfillment status for your line items upon import. We recommend fulfilling all paid Shopify orders before migrating, and then these orders can be imported with the “completed” status. For orders that have not yet been paid, you can import these as “pending payment” or “on hold” depending on your workflow.Shopify Column Names
You may want to make some cosmetic changes to your CSV file, such as breaking the Shopify “billing name” column up into “billing first name” and “billing last name” columns. However, there are a few changes you must make to the default Shopify order export. The WooCommerce Order CSV Importer doesn’t recognize one-row per item formats well (it expects one-row per order formats), but we can force it to recognize Shopify’s format by using some very specific column names. Adjust some columns in your Shopify export to use these column names exactly while importing, and when the importer maps them automatically for you, do not change them to map the columns to other values.| Shopify column name | Represents? | WooCommerce column name |
|---|---|---|
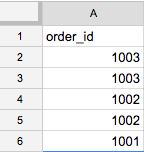
| Name | the order ID / reference number. Must not contain “#” symbol, see note below | order_id |
| Id | the shopify order ID | n/a – remove column from file |
| Lineitem price | the price of the line item. Used to calculate the item_total for WooCommerce | n/a – leave as is |
| Lineitem quantity | quantity of the item purchased | item_quantity |
| Lineitem name | the name of the product | item_name |
| Lineitem sku | the SKU for the product (must match new WooCommerce SKU) | item_sku |
| n/a | this column must exist in the file – create this as a new column, even if empty | item_meta |
| Tax 1 Value | the tax for the item (you should combine all applicable tax into this column) | item_tax |
- Add a new column to your sheet and label it item_total.
- Create a function to calculate the value in this column, which should use the existing Shopify Lineitem price × item_quantity.
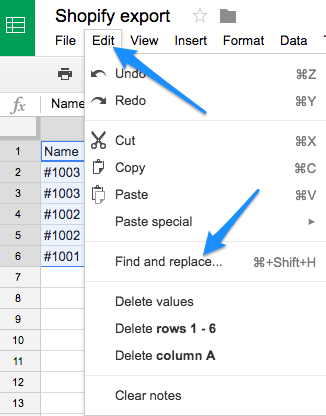
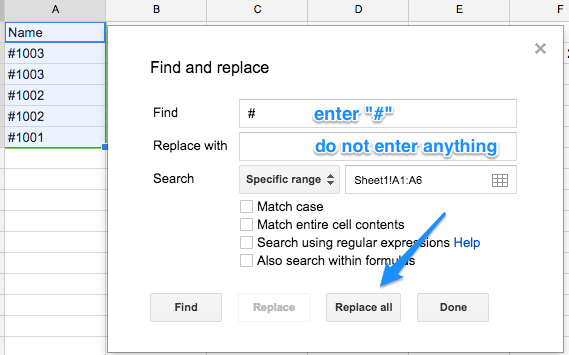
# symbol in the Name / order_id row. Typically, most programs have a way to find / replace this value. For example, if you edit the file with Google Sheets, you can follow these steps:
Highlight your “Name” / order_id column and go to Edit > Find and replace…

In the “Find” field, enter:
#In the “Replace with” field, do not enter anything. Click “Replace all”.
Don’t forget to rename your column to
order_idif you haven’t done so already.
item_meta column if you’d like (it makes your order data a bit nicer), but it’s not necessary; the item_meta column just has to exist. You could also consider renaming the Vendor column to item_meta if this would make sense for your store.
Once you’ve edited your CSV, you should now be able to begin the import, and map your Shopify data to the desired WooCommerce data.
Managing Imports
↑ Back to top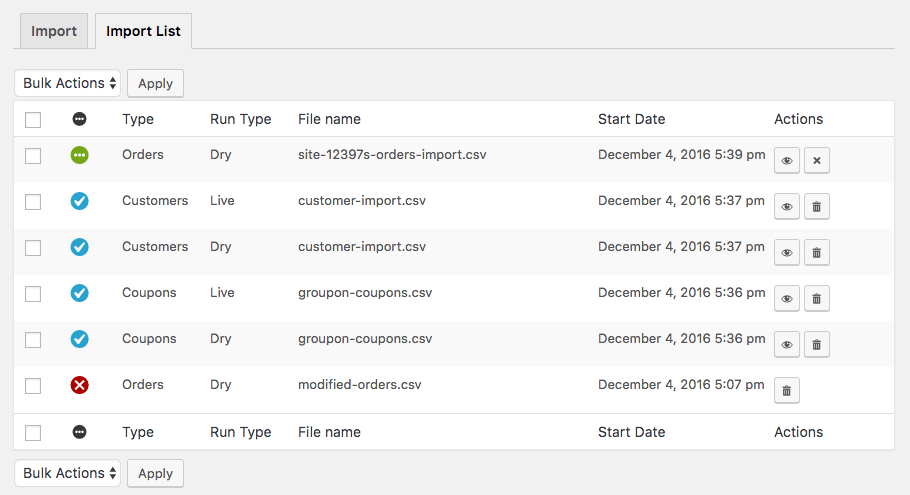 This allows you to view the progress page for a previous import or delete the progress data for an old import. You can also use this to stop and delete an import while it’s running.
To view the progress page for a previous import or a currently running import, click the “eye” or View action for that import. To delete progress results for an import, click the “trash” or delete icon. This will not delete imported data. It is not an “undo” button — you should always perform dry runs to confirm data is as expected, since once it’s created or updated, there is no going back. Deleting a job simply deletes the progress data associated with it.
If you click the “x” or stop icon, this can halt a processing import. It will fail the job and delete the progress information. This does not delete data that was already processed. Since imports are processed in batches, any information that was already processed will be on your site. This action lets you stop a running import if needed. We do not recommend using it unless an import appears to be stuck, as this can result it incomplete data merge or creation.
This allows you to view the progress page for a previous import or delete the progress data for an old import. You can also use this to stop and delete an import while it’s running.
To view the progress page for a previous import or a currently running import, click the “eye” or View action for that import. To delete progress results for an import, click the “trash” or delete icon. This will not delete imported data. It is not an “undo” button — you should always perform dry runs to confirm data is as expected, since once it’s created or updated, there is no going back. Deleting a job simply deletes the progress data associated with it.
If you click the “x” or stop icon, this can halt a processing import. It will fail the job and delete the progress information. This does not delete data that was already processed. Since imports are processed in batches, any information that was already processed will be on your site. This action lets you stop a running import if needed. We do not recommend using it unless an import appears to be stuck, as this can result it incomplete data merge or creation.
Plugin Compatibility
↑ Back to topURL Coupons
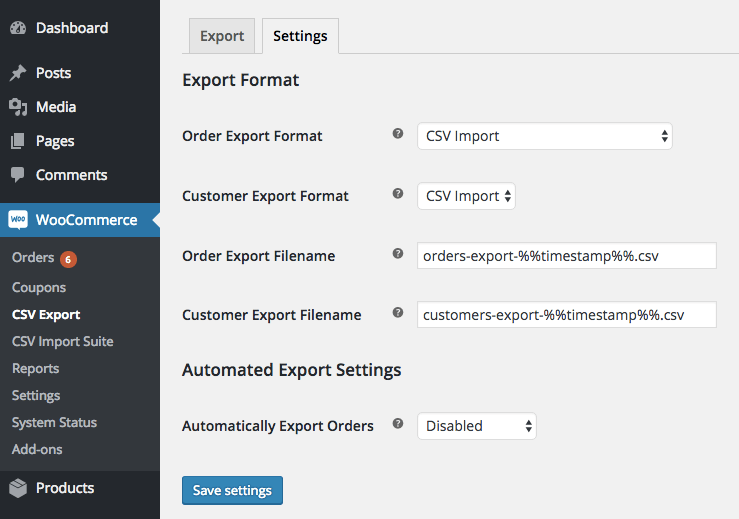
↑ Back to topCustomer / Order CSV Exporter Compatibility
↑ Back to top- Go to WooCommerce > CSV Export
- Click on the ‘Settings’ tab at the top
- For the Orders and Customer Export Formats, select CSV Import
 If you have old CSV Export data with one row per item instead of one row per order, the CSV Importer will try its best to detect this, and provide you with mapping options.
 However, for best performance, you should be using the Exporter’s “CSV Import” format, which is what this plugin expects.
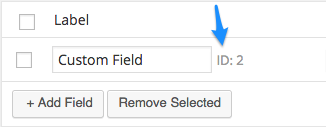
Admin Custom Order Fields
↑ Back to top_wc_acof_{id}
You can determine a field’s ID by viewing your list of order fields, and hovering on the order field to view the ID. For example, if a field has ID: 2, then you should name your column: _wc_acof_2
Cost of Goods
↑ Back to top_wc_cog_order_total_cost order meta, and map this to “Custom field with column name” on import. This represents the total cost for all order items. You’ll also need two meta fields for each order line item:
_wc_cog_item_cost — the unit costs of the product
_wc_cog_item_total_cost — the total cost for the line item (product cost x quantity)
For example, an imported line item may look like this:
product_id:75|name:Woo Logo|quantity:2|total:30|meta:_wc_cog_item_cost=10|meta:_wc_cog_item_total_cost=20
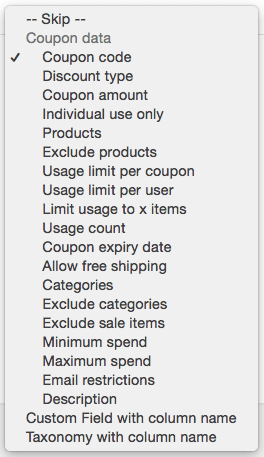
Custom Taxonomies Support
↑ Back to topcoupon_cat). The value for each row should be a list of terms, separated by a pipe (“|”) character. Example:
Groupon|Spring Sale
Points and Rewards
↑ Back to topMerging Data Between Sites
↑ Back to top- user ID
- username
- order ID
- order number formatted
- order number
| order ID | order number | customer | status |
|---|---|---|---|
| 300 | 1500 | John Smith | refunded |
| 308 | 1502 | Jane Doe | completed |
| order ID | order number | customer | status |
|---|---|---|---|
| 300 | 1502 | Jane Doe | completed |
| 312 | 1510 | Joe Black | processing |
Troubleshooting
↑ Back to topImports Remaining Queued
↑ Back to top- Are you using a maintenance mode or blocking plugin? For example, the “Airplane Mode” plugin for developers will block HTTP requests. Please disable the maintenance mode plugin to process imports.
- Similarly, if your site is behind BasicAuth, background requests will fail to complete. For example, WP Engine staging sites often use basic authentication to block site access (you see a popup for credentials when you try to access the site):
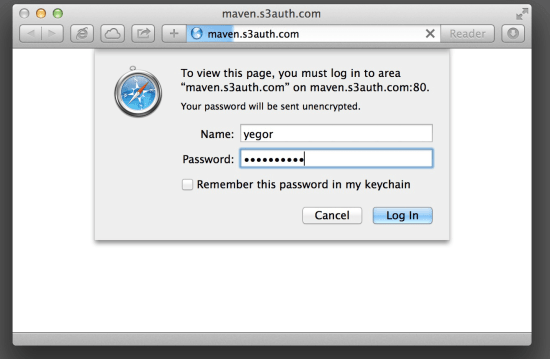 Please see the notes here to correct this issue, or disable basic authentication while testing imports.
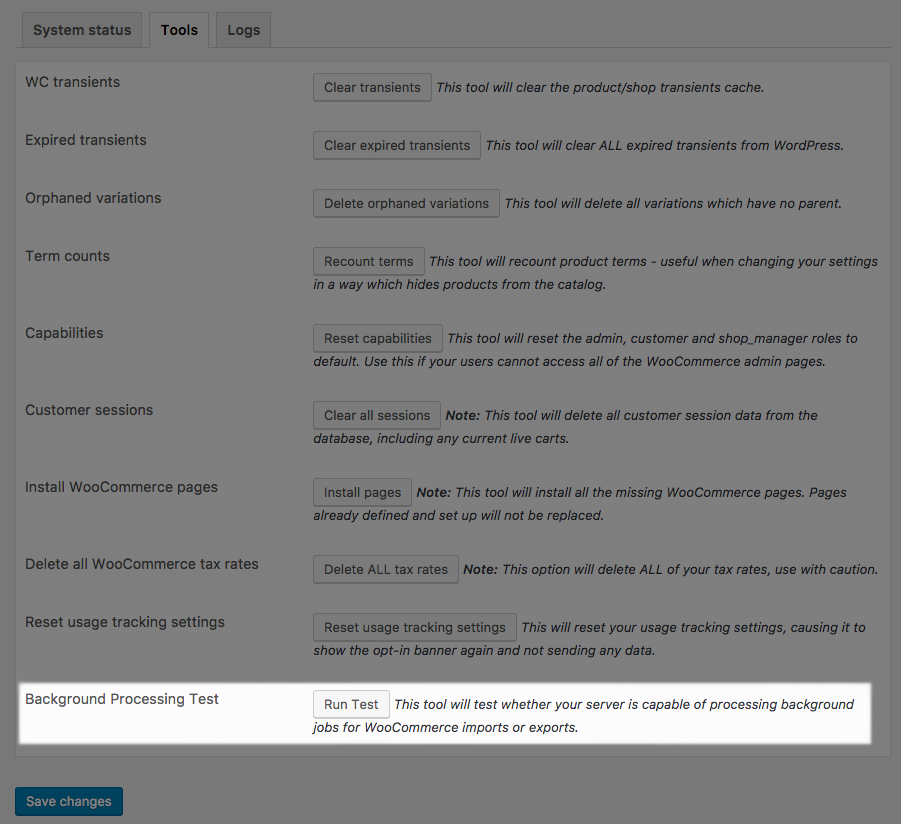
 - Finally, some hosts will block the requests from servers to themselves. You can test this by going to WooCommerce > Status > Tools and run the Background Processing Test. This tool will simulate the import process:
- Host files: For developers – hosts files to resolve a site to a different domain can’t be used with Customer/Order/Coupon Import and many other WooCommerce plugins. Customer/Order/Coupon Import Suite uses
wp_safe_remote_*requests to get data from itself, and these requests require a domain name. If your site is pointing to a domain from a hosts file, rather than a public site, these requests will fail.


Other Issues
↑ Back to topFrequently Asked Questions
↑ Back to topQ. I’ve imported my customers, but none are showing up under WooCommerce > Customers! What’s going on? A. If you haven’t yet imported any order data for your customers, WooCommerce doesn’t recognize them as customers, so they won’t show up here yet. Once you import associated order data for these users, WooCommerce will designate them as customers and they’ll appear here.
Q. Does this extension import Subscriptions? A. No, this extension will not help import Subscriptions.
Q: Why won’t my special / accented / foreign characters import properly? A: The file you are importing must be properly encoded as UTF-8. One way to easily do this is to import or create it in Google Sheets, and download from there before importing. Open office also works well, but MS Excel most likely will not work. (#)
Q: I don’t want to send welcome emails, but I do want to send ‘password reset’ emails if relevant. Is this possible? It looks like they’re controlled by the same setting. A: Yes, you can enable password reset emails, regardless of your settings, with a one-line snippet — add this where you keep custom code:
add_filter( 'wc_csv_import_suite_send_password_reset_emails', '__return_true' );
Q: Help! How do I stop a frozen import? A: Don’t worry! Sometimes there are conflicts with the imported data that prevent an import from processing, or background processing may not be working as expected. To stop or cancel an import, you can follow the steps listed in our “managing imports” section.
Q: Will the customer importer create and assign new roles? A: While you can assign / update a user role, the role must already exist in your WordPress install (currently available roles can be found by logging into the WordPress admin, editing your profile, and clicking the “Role” dropdown). You can use a plugin like the User Role Editor to create custom roles, which then can be assigned to customers using the Customer CSV Importer.
Q: Why do I receive an import error when I try to import products with quotes in their names? A: When attempting to import a product or products with quotes listed directly in their names, e.g., Ollivander 12” Rosewood Wand, neither the use of a single quote nor the use of an escaped quote will work. Instead, we recommend using the syntax, ", within the import file for the product name, e.g., Ollivander 12" Rosewood Wand.