The Currency Switcher For WooCommerce plugin will help you to change the currency while shopping. Currency can be switched at Shop, Cart and Checkout pages.
Admin can set a list of currencies that can be placed on the shop page as a sticky switcher. Moreover, currency switchers can be placed as a Menu Item where exchange rates can be displayed against selected currency.
Admin can either manually set the exchange rate of currencies or can configure it through API.
Store Owner’s Guide
↑ Back to topKey Features
↑ Back to top- Admin can set multiple currencies from backend so that the frontend user can select his desired currency for transaction.
- Admin can manually set fixed exchange rate of all the added currencies with respect to primary selected currency
- Admin can set currency exchange rate option via API that will update the currency exchange rate on specified time interval
- Admin has an option to show the flag of countries with respect to currencies
- Admin has an option at backend to allow or un-allow the execution of purchase in selected currency by customer. If it is un-allowed from backend so whatever the currency has selected by customer, final payment will be made in backend default currency.
- Admin can add currency switch option in widget
- Frontend User can change the currency on Shop page
- Frontend User can change the currency on cart page
- Frontend User can change the currency on checkout page
- Currency Switcher can be shown as Menu Item
- Currency Exchange rate can be displayed on Menu
- Multiple layout options for Currency Switcher menu item
- Currency can be displayed at frontend by using IP Address of current location
- Selected Payment Gateways can be shown against each currency
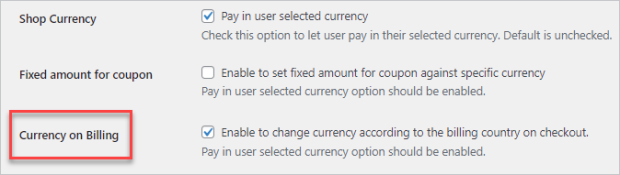
- Admin can set Currency on Billing option
- Admin can set the Fixed amount for a Coupon
- Admin can set the Minimum amount and Maximum amount spent
- Admin can set the Currency by languages (WPML Pro version and WooCommerce Multilingual plugins are required for this feature)
- Convert currency based on zone pricing by location
- Set multiple pricing zones
- Zone pricing on simple and variable products
Pre-Requisites
↑ Back to top- WooCommerce Plugin
- Currency Switcher Plugin
Installation of Plugin
↑ Back to topOnce the plugin is downloaded then:
- Log in to your WordPress Admin Panel.
- Navigate to the WordPress Admin Dashboard → Plugins.
- Click the Add New button in the top left corner of your screen.
- Next, click the Choose file button in the box that appears below.
- Select the zip file that you have downloaded and upload it.
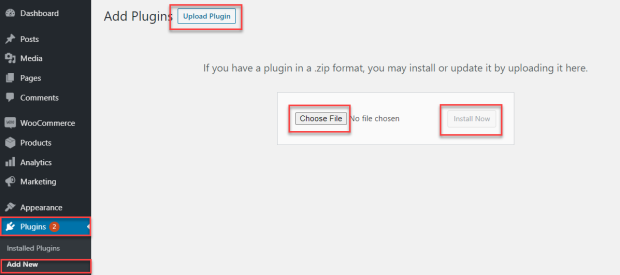
- Click on ‘Activate’
Configuration of Plugin
↑ Back to top- Go to ‘WooCommerce’ tab
- Then ‘WCCS Settings’ tab
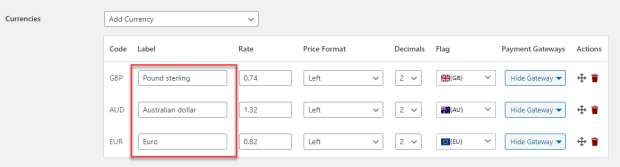
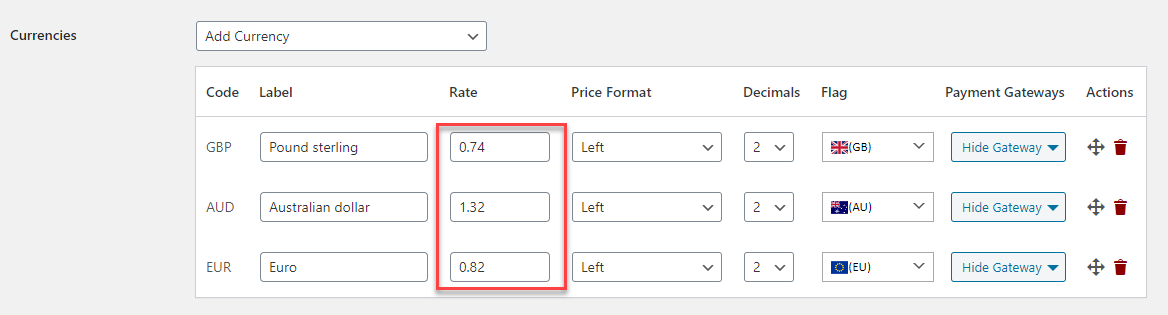
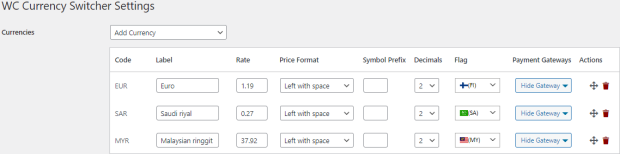
- In ‘Currencies Section’, select as many currencies as you require from the dropdown button. Once you select a currency so it will get listed
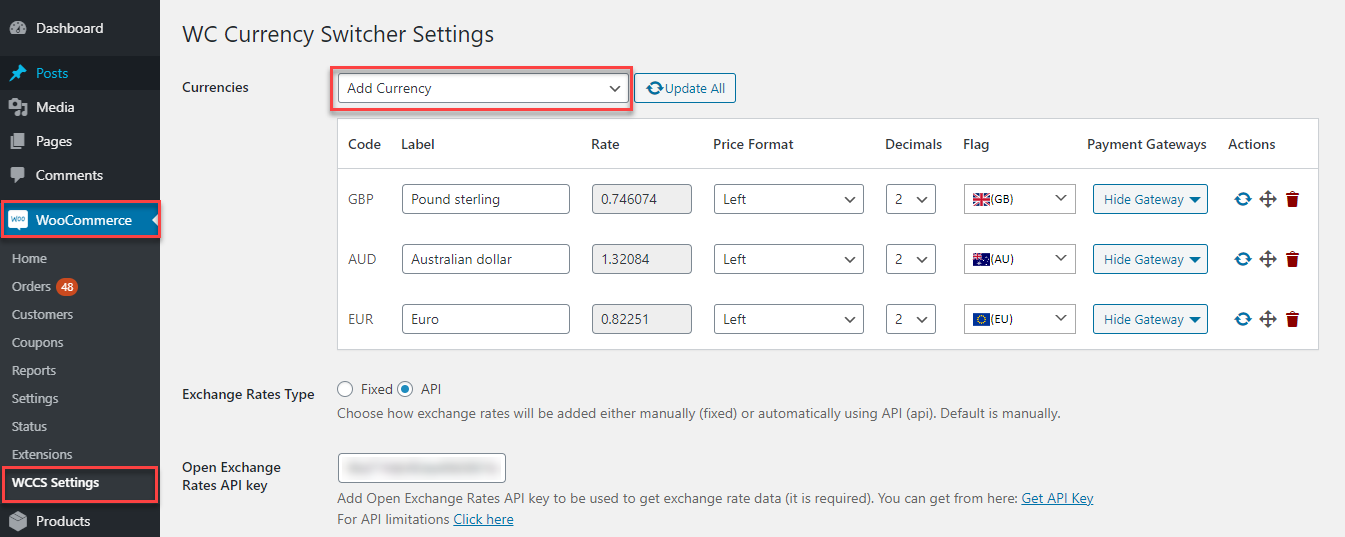
- Now, you may type the ‘Label Name’ for selected currency
Frontend Impact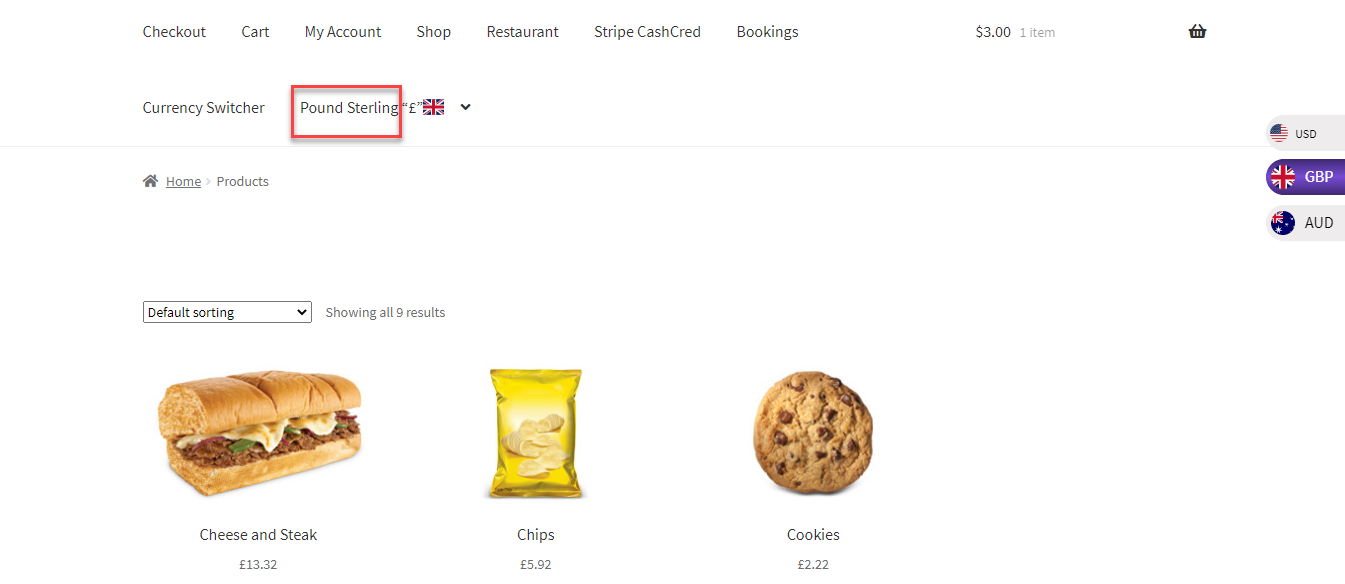
- Set the ‘Exchange Rate’ of each currency manually. Exchange Rate will be compared as value ‘1’ of default currency of your WordPress environment. If exchange rate has been fetched from API so it will be displayed automatically
- In ‘Price Format’ set the alignment of currency from dropdown option
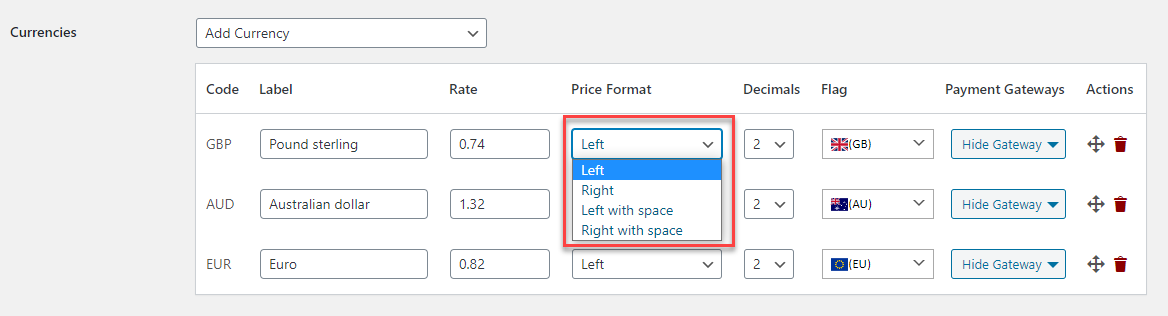
Frontend Impact
Currency value been placed on left hand side i-e: after currency symbol
- Select ‘Decimals’ option from dropdown that how much decimal points you want to show against exchanged currency
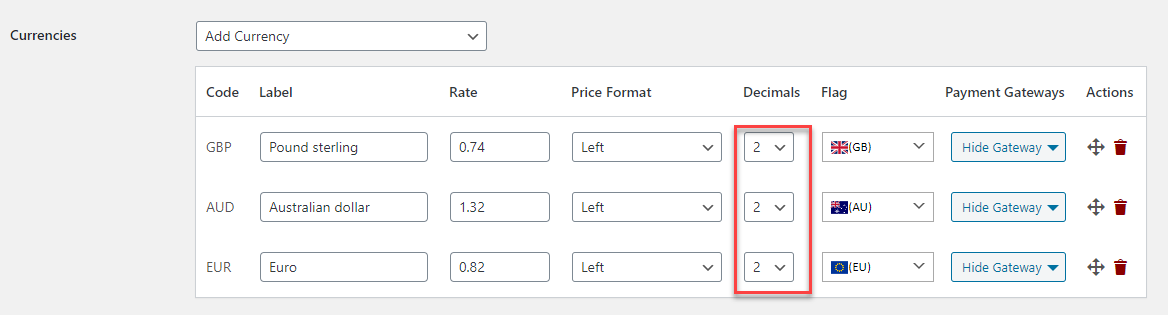
Frontend Impact
All exchanged values are showing results in two decimal values
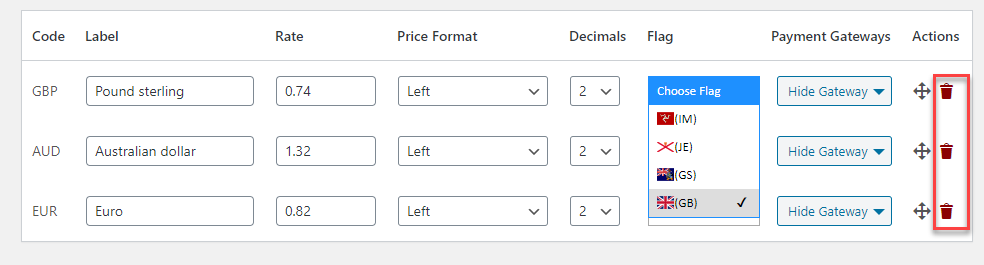
- Set ‘Flag’ of your currency from dropdown list
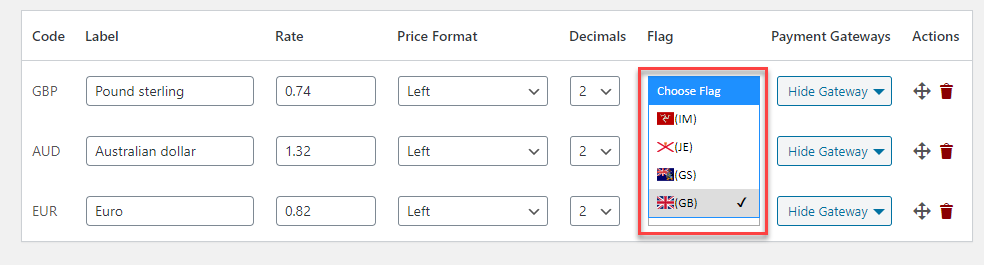
Frontend Impact

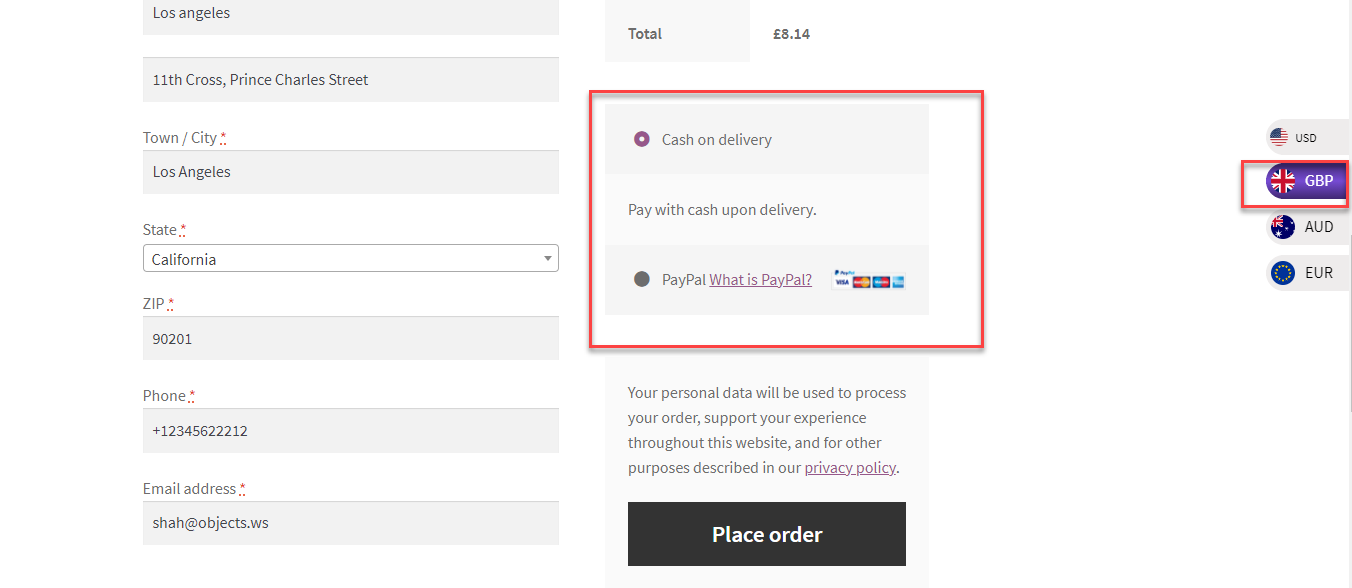
Configure Payment Gateway Option. In dropdown you will get the options for installed payment gateways. Checkmark on those options to which you want to hide for each specific currency.
Frontend Impact
While switching on GBP, we can see that there is no option of Direct Bank Transfer at checkout
- Shuffle the currencies in sequence. At frontend currencies will get listed in same order after default currency
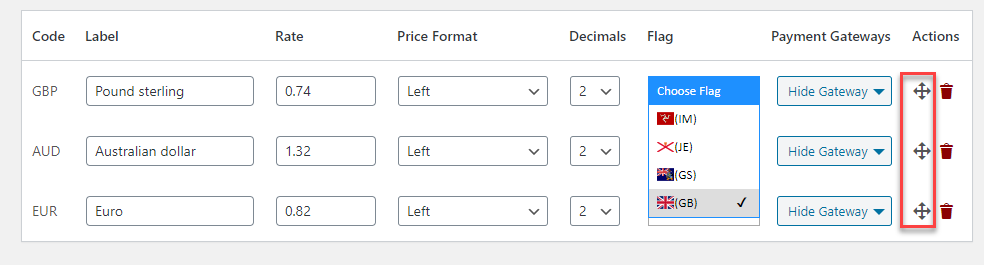
- Delete a specific currency
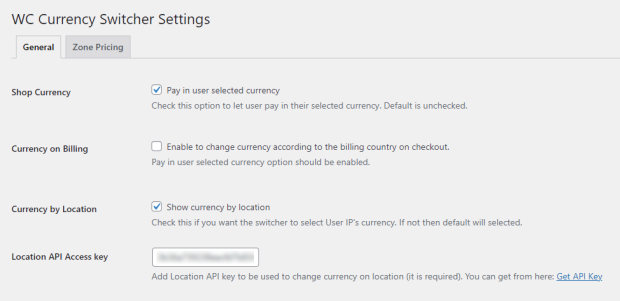
Currency by Location
↑ Back to topNOTE: The Admin has to purchase the API Access Key to use this feature.
BACK-END CONFIGURATION
- Go to the Admin Dashboard → WooCommerce → WCCS Settings.

- WC Currency Switcher Settings page would open.
- Checkmark the Currency by Location option to enable it.
- Once done, an option will appear titled Location API Access Key.

- To get the API key, click on the hyperlink Get API Key.
- This will redirect towards the ipapi dashboard.
- If you don’t have an account, click on the Signup button and select the plan according to your requirement.
- Once the signup process is complete, you’ll get your API Access Key.
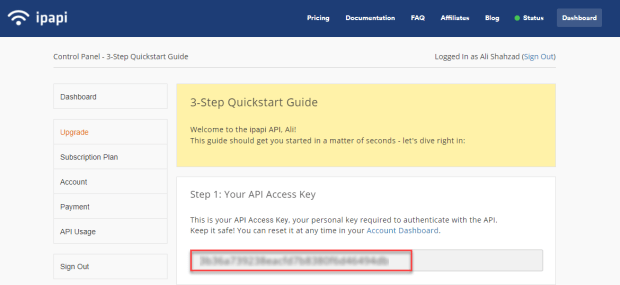
- Copy the API Access Key and go to the WCCS Settings page.

- Click on the Save Changes button.
NOTE: The Admin has to add the currency of all the locations where the website is being used to activate the currency according to the location otherwise the Default currency would be displayed.

Front End Impact
- The user will go to the website and visit the shop.
- The currency which would be active would be according to his location.

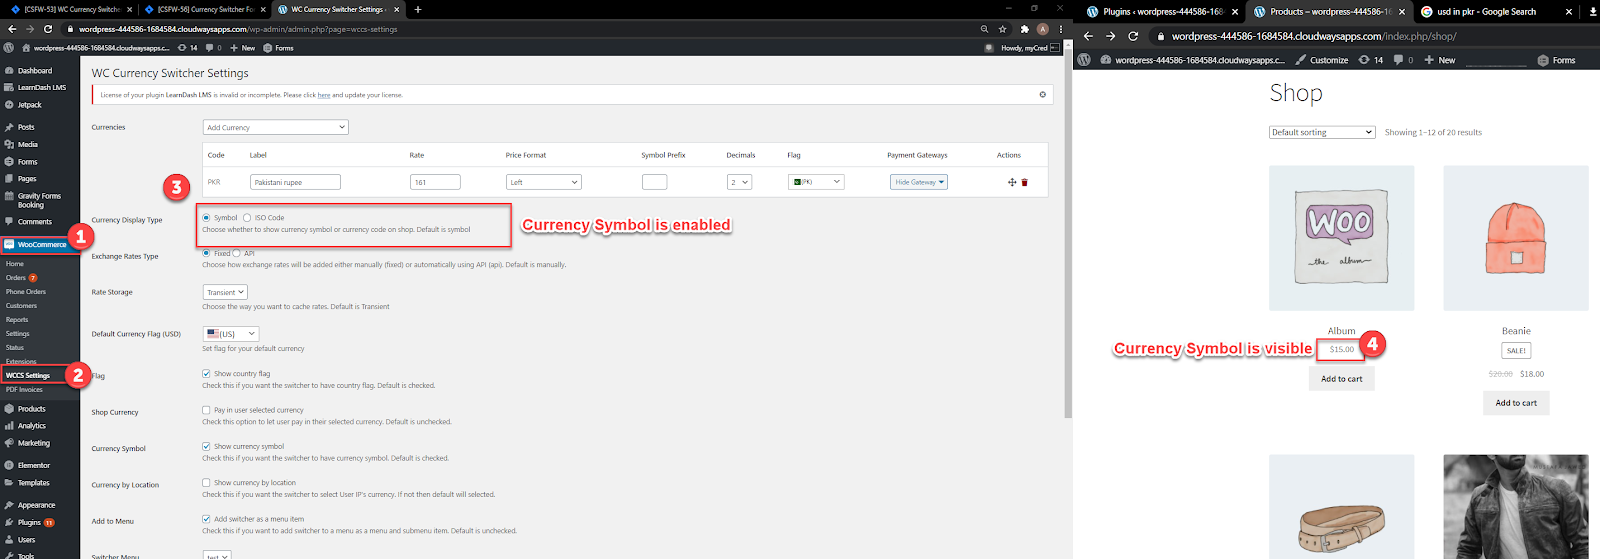
You can switch from setting whether to show currency symbol or currency ISO code.
Currency Symbol:
- Dashboard > WooCommerce > WCCS Settings
- Select Symbol in Currency Display Type.
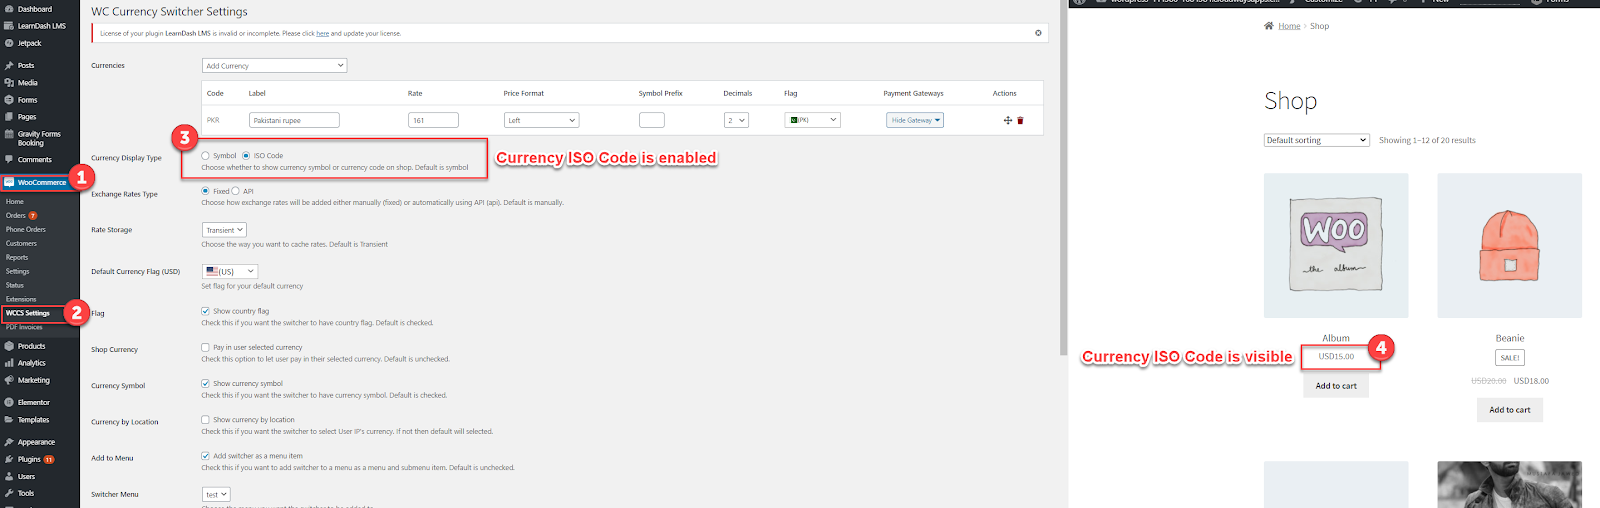
Currency ISO Code:
- Dashboard > WooCommerce > WCCS Settings
- Select ISO Code in Currency Display Type.
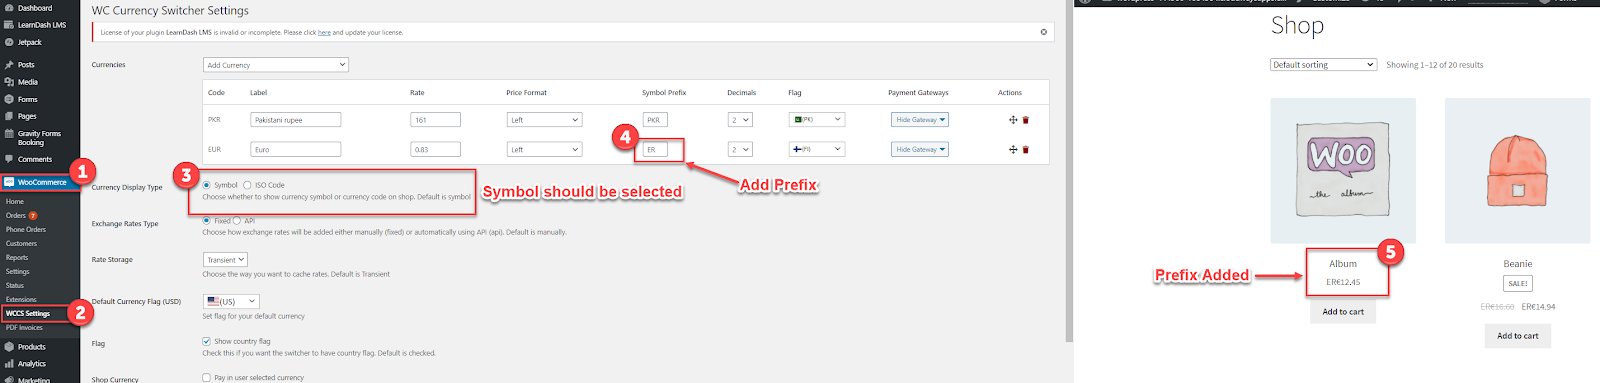
You can add a prefix before the currency symbol.
- Dashboard > WooCommerce > WCCS Settings
- Select Symbol in Currency Display Type.
- Add prefix in the Currencies section
- We added PKR the as symbol prefix
‘Rate Storage Section’
Select Rate Storage option as ‘Transient’ or ‘Session’ time
Transient time is ’24 hours’ while Session time will be fetched from your browser
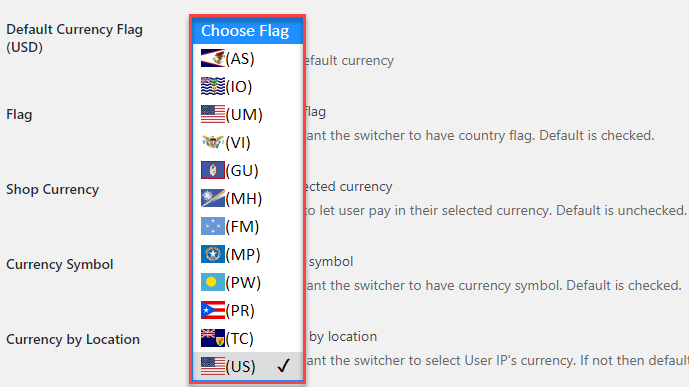
‘Set Default Currency Flag’
Set flag of default currency from the drop-down list
Frontend View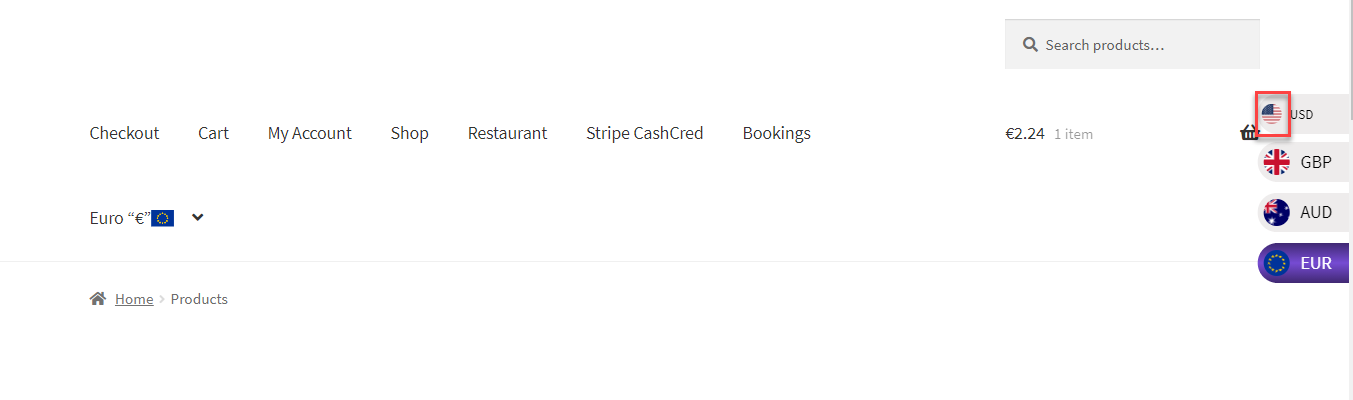
Flag Section
Checkmark on this option to show the flags for all currencies
Frontend Impact
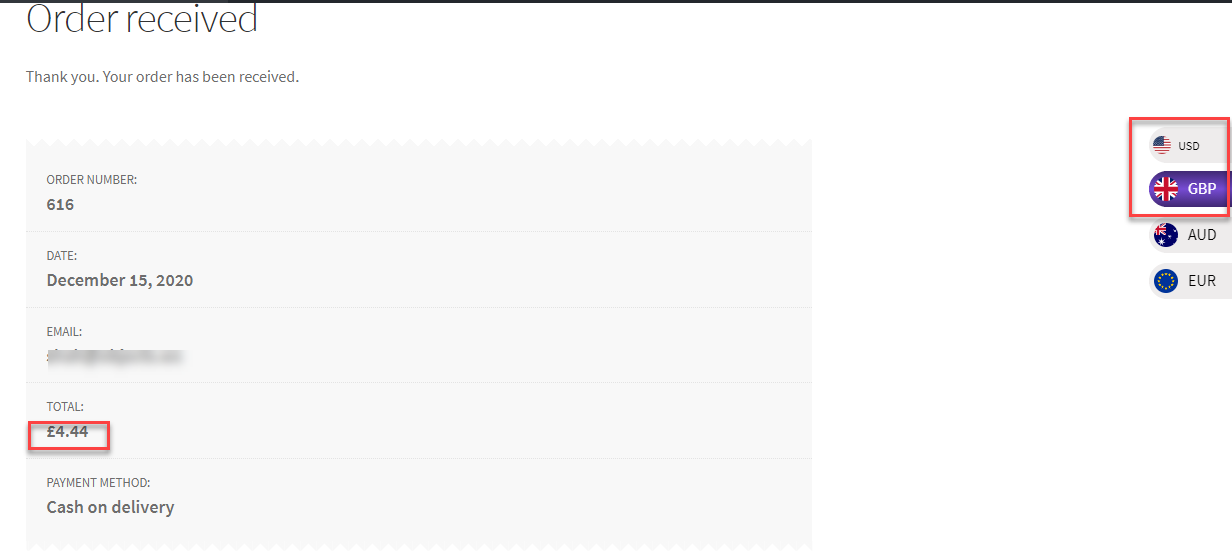
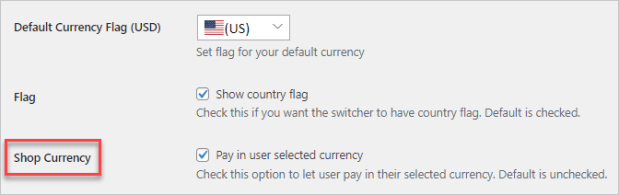
‘Shop Currency Section’
Checkmark this option if you want to let your customers to execute the purchase in their selected currency, if it has been unchecked and your customer has selected some other currency then the transaction will get executed in default currency

Frontend Impact
As we can see that the default currency is ‘USD’ and selected currency is ‘GBP’. Final transaction has been placed in GBP
‘Currency Symbol Section’
Checkmark this option if you want to display the currency symbol at frontend Menu of currency switcher
Frontend Impact
We can see currency symbol at frontend option of currency switcher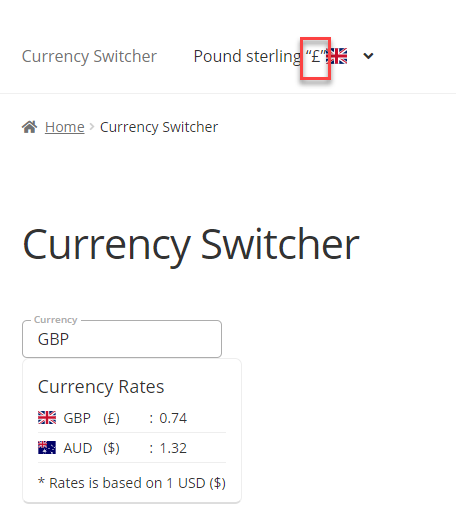
‘Currency By location Section’
Checkmark this option to get the currency from IP address of your current location. Let’s suppose your general currency has been set as USD and you have logged in from Singapore so the shop will show products in ‘Singaporean Dollar’.
Note: Singaporean Dollar should have been added in currency list of WCCS Settings

Frontend Impact
Products now automatically showing currency in Singaporean Dollar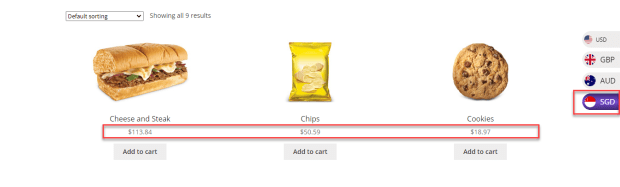
‘Add Menu Section’
Checkmark this option if you want to show ‘Currency Switcher’ tab as a Menu. Here we can switch the currency and its impact will select and change the currency
Frontend Impact
Currency On Billing
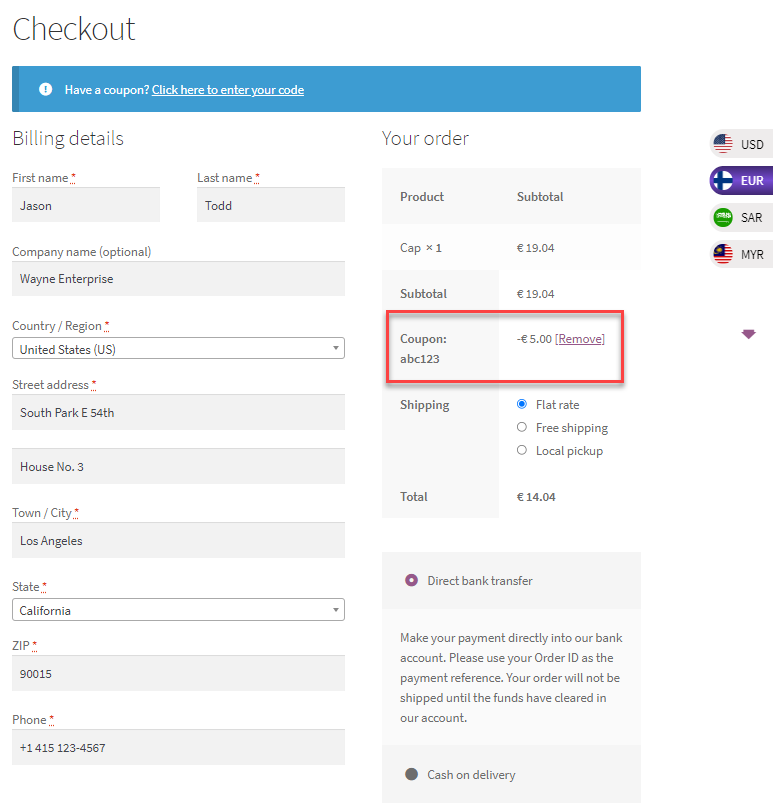
NOTE: To use the coupon features you must enable the Shop Currency option from the WC Currency Switcher Settings.
Back-end Configuration
- Go to the Admin Dashboard → WooCommerce → WCCS Settings.
- WC Currency Switcher Settings page would open.
- Checkmark the Currency on Billing option to enable it.
- Click on the Save Changes button.
Front-end Impact
- The user will go to the website and visit the shop.
- Once the user has selected the item and is on the Checkout page.
- When the user selects the country in the Country / Region field so the currency will be switched accordingly to the country selected.
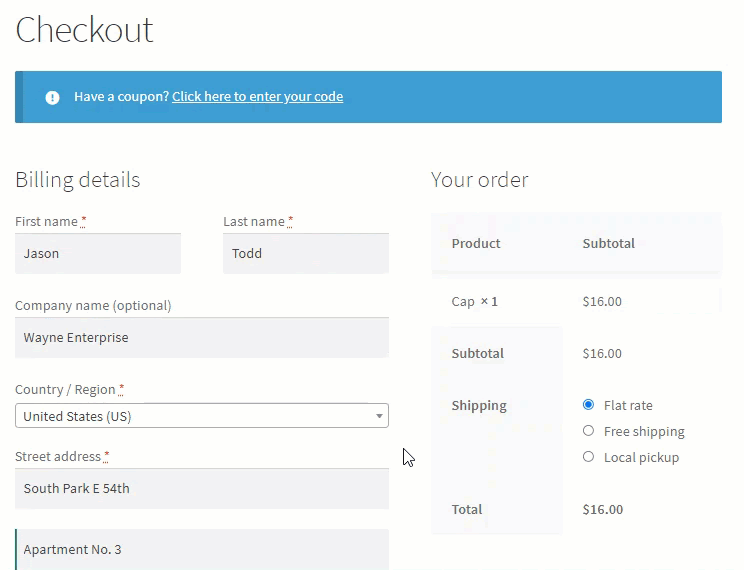
NOTE: To switch the currency when selecting a country, the exchange rate of that country must be added in the Currencies option on the WC Currency Switcher Settings page.
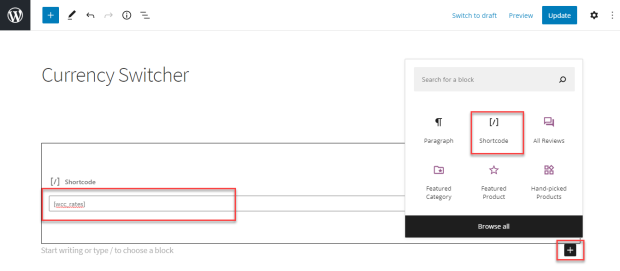
‘Shortcode Section’
Copy below mentioned shortcodes and paste it on a page. It will show the exchange rate of Currencies on a separate menu.
Frontend Impact
‘Switcher Style Section’
Select style options from dropdown menu to change the layout styles of ‘Currency Switcher Menu’
Frontend Impact
By clicking on the header of the Currency Switcher option, a dropdown option will appear from where we can change the currency. The exchange rate will be shown according to the selected currency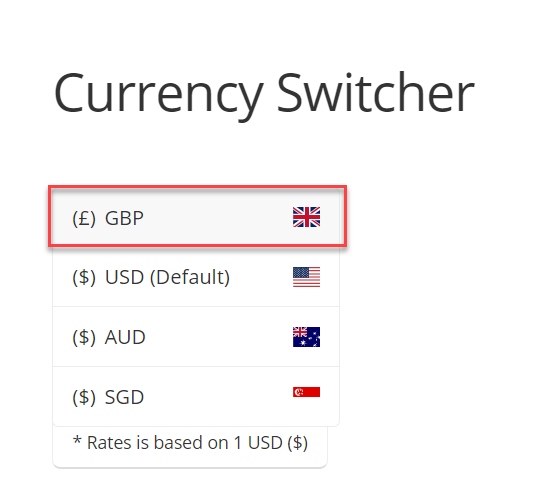
The exchange rate will be shown according to the selected currency
Style 2
Frontend Impact
By clicking on header of Currency Switcher option, a dropdown option will appear from where we can change the currency. Exchange rate will be shown according to the selected currency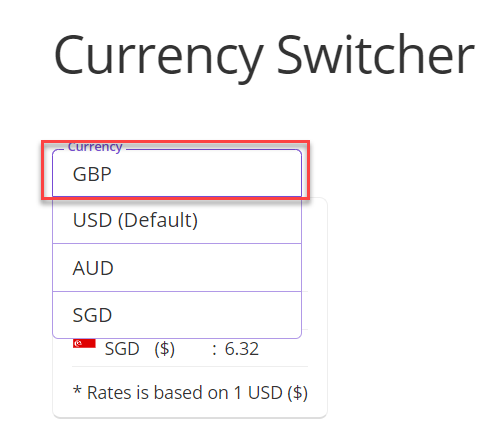
Style 3
Frontend Impact
By clicking on header of Currency Switcher option, a dropdown option will appear from where we can change the currency. Exchange rate will be shown according to the selected currency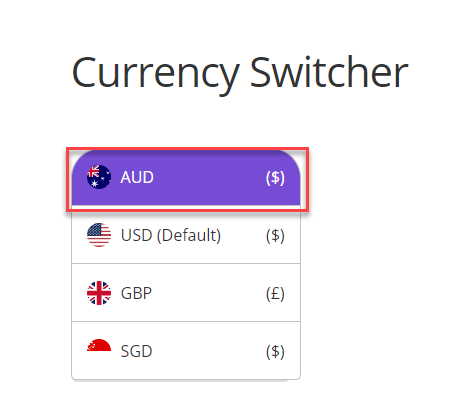
Style 4
Frontend Impact
By clicking on header of Currency Switcher option, a popup option will appear from where we can select the currency. Exchange rate will be shown according to the selected currency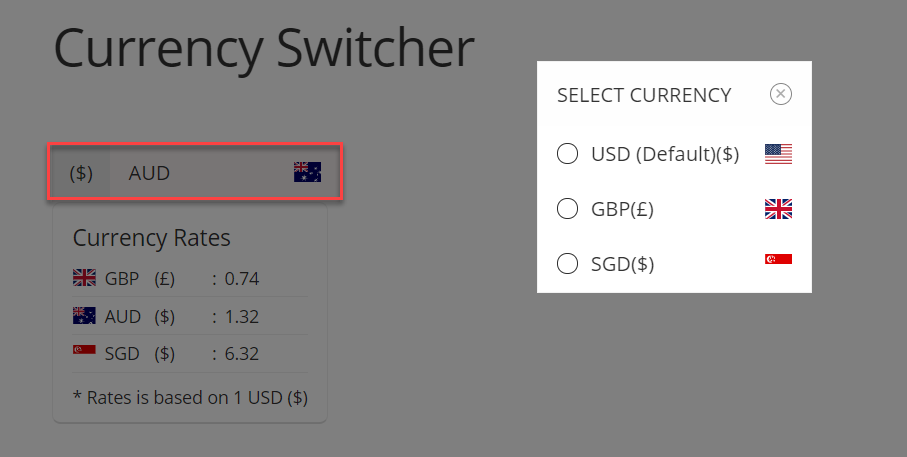
‘Sticker Switcher Section’
- Checkmark this option if you want to show the currencies on frontend pages and can be switched from sticky option
- Select alignment ‘Right’ or ‘left’ where you want to get it displayed

Frontend Impact
Widget Settings
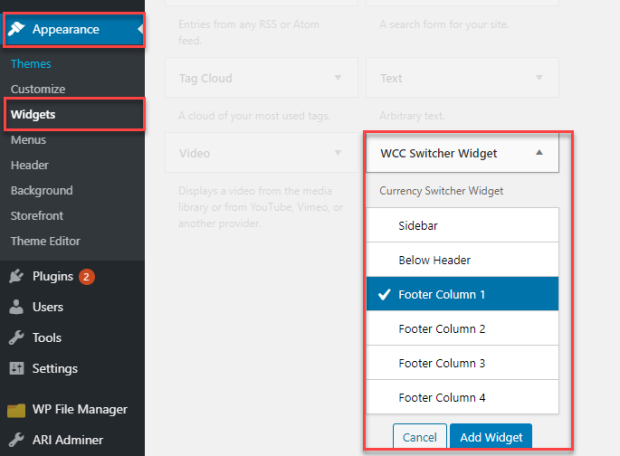
↑ Back to top- Go to ‘Appearance’ tab
- Then ‘Widgets’
- Now scroll down and go to ‘WCC Switcher Widget’ option
- Set the style where you want to display the currency switcher option as Widget
- Click on ‘Add Widget’
- Next Step is to give ‘Title’ and ‘Select Style’ from dropdown option
- Click on ‘Done’
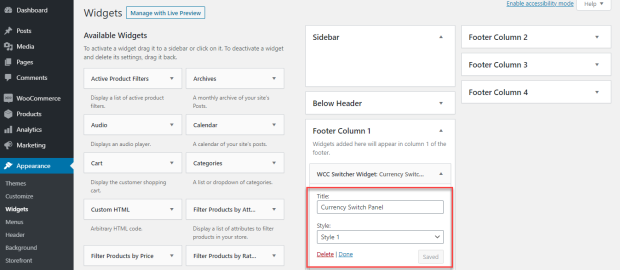
Frontend Impact
At footer area of frontend window, we can see the widget for Currency Switch has been appeared
Frontend Functionality
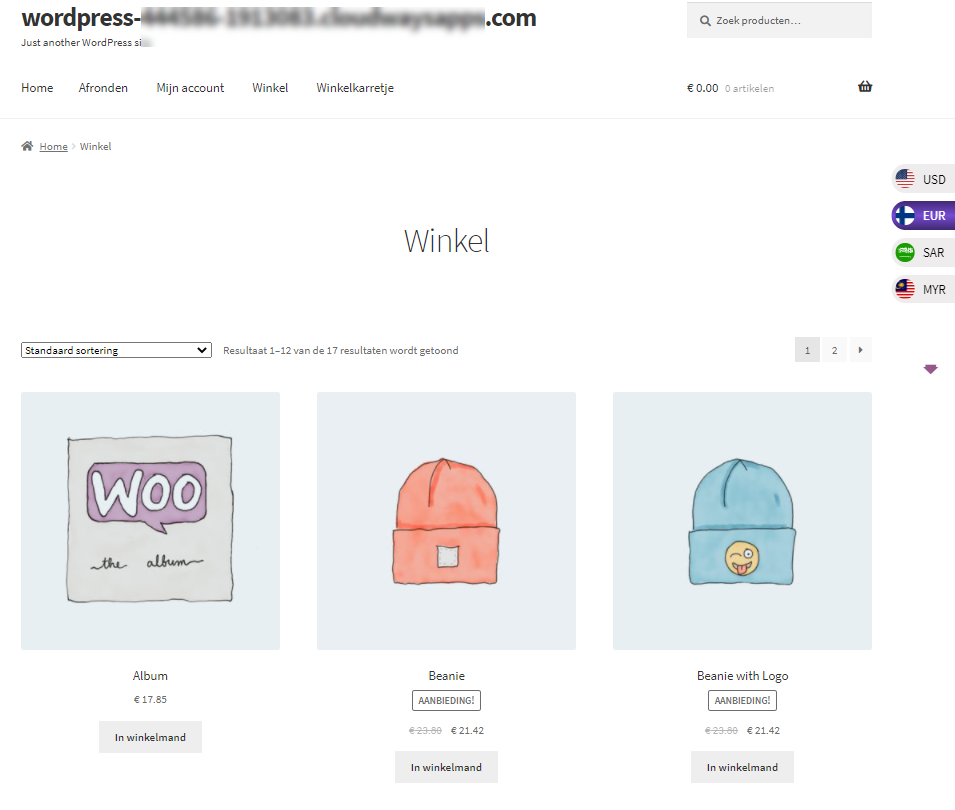
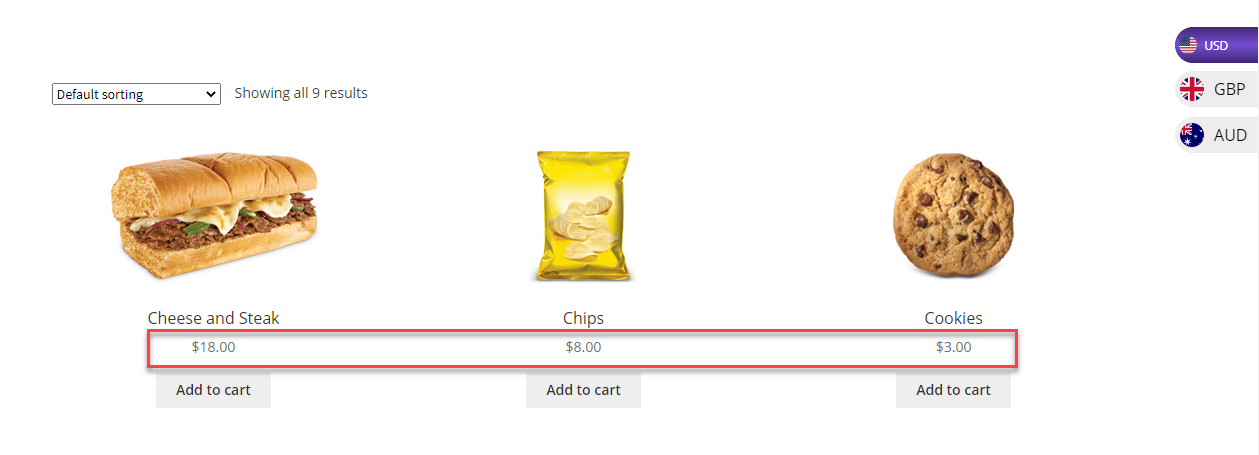
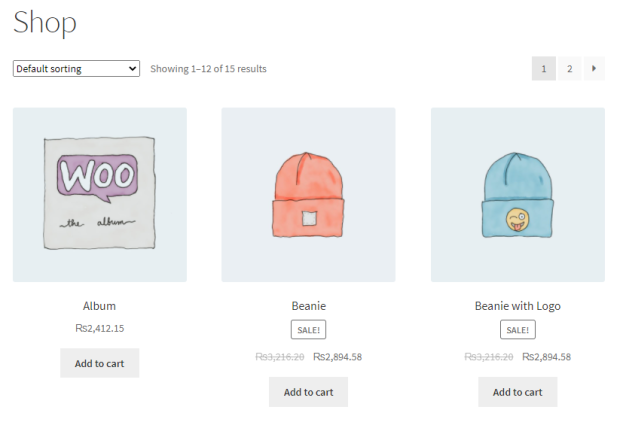
↑ Back to top- Go to shop page
- All the products will be listed along with their prices
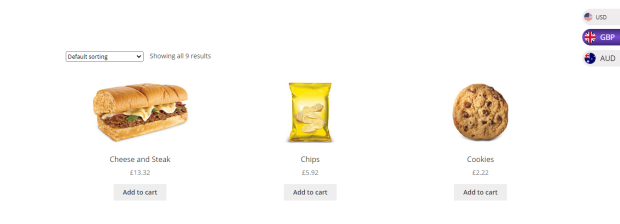
Shop Page
- Currency can be switched on Shop page. Here we are switching it from ‘GBP’ to ‘USD’
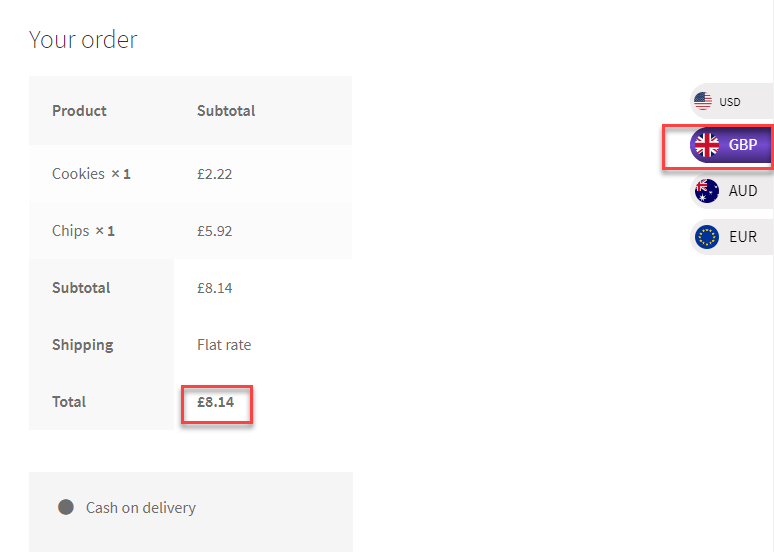
Cart Page
Currency can be switched from ‘USD’ to ‘GBP’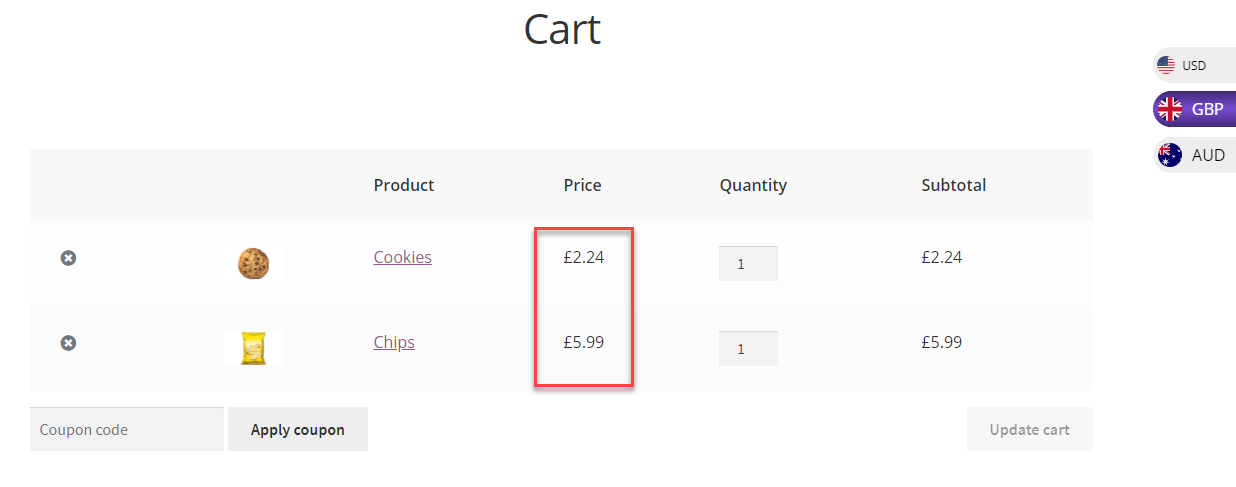
Checkout Page
Currency has been switched from ‘GBP’ to ‘AUD’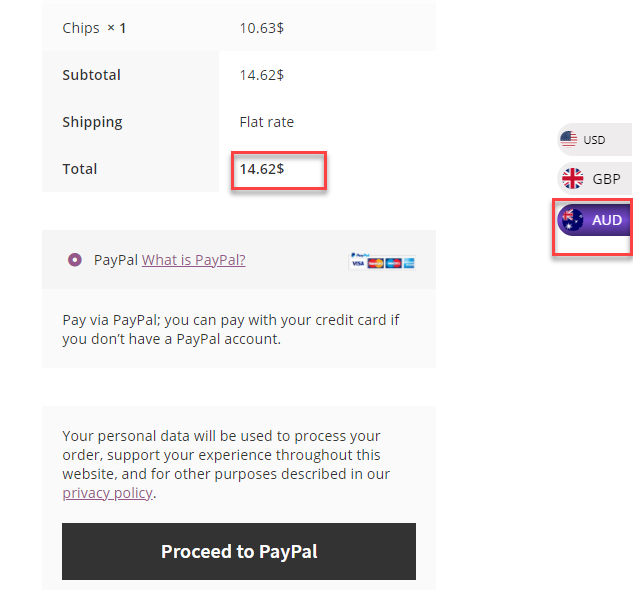
General Guidelines
- If you change the default woocommerce currency, you need to update rates in your currencies settings (either automatically “by updating all buttons in case API option is selected” or manually “in case Fixed option is selected”). Also if the newly chosen woocommerce currency also exists in currencies settings, it will be removed from currencies settings.
- When you add new currency in settings page and API option is enabled, the new currency will not automatically have an exchange rate.
- Transient currency storage expiration time is one day (24 Hours).
- Note: We use woocommerce currency setting as the base currency for open exchange rates API. If you use any currency other than USA Dollar (USD), make sure your account is not free, otherwise it will not work (see API limitation at:https://openexchangerates.org/signup).
Coupon
↑ Back to topFixed Amount For Coupon
↑ Back to topBack-end Configuration
- Go to the Admin Dashboard → WooCommerce → WCCS Settings.

- WC Currency Switcher Settings page would open.
- Checkmark the Currency on Billing option to enable it.

NOTE: Disable the Currency on Billing option when using this functionality.
- Click on the Save Changes button.
1. Coupon Fixed Amount
Back-end Configuration
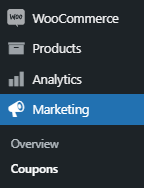
- Now go to the Admin Dashboard → WooCommerce → Coupon or Admin Dashboard → Marketing → Coupon.

- Click on the existing coupon or create a new one by clicking the Add Coupon button.

- In the General section, go to the WC Currency Switcher – the coupon fixed amount option.
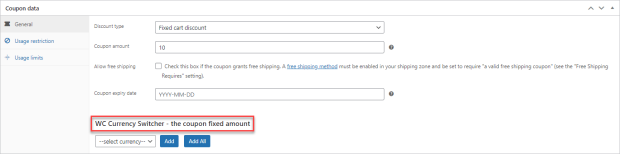
- In this option, we can select the currencies of the countries which were added in the Currencies option on the WC Currency Switcher Settings page.
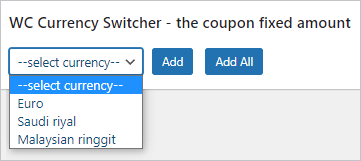
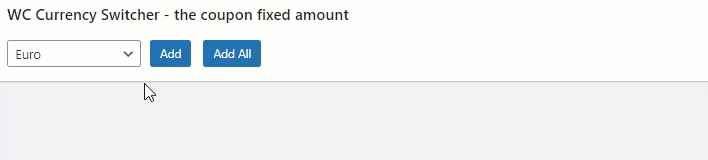
- The admin will select the currency and click on the Add button.
- The admin can also add all the currencies by clicking on the Add All button and delete any currency by clicking the Remove button.
- Now add the amount that would be offered when that respective coupon would be applied for that respective currency when it is active.

- Click on the Update / Publish button.
Front-end Impact
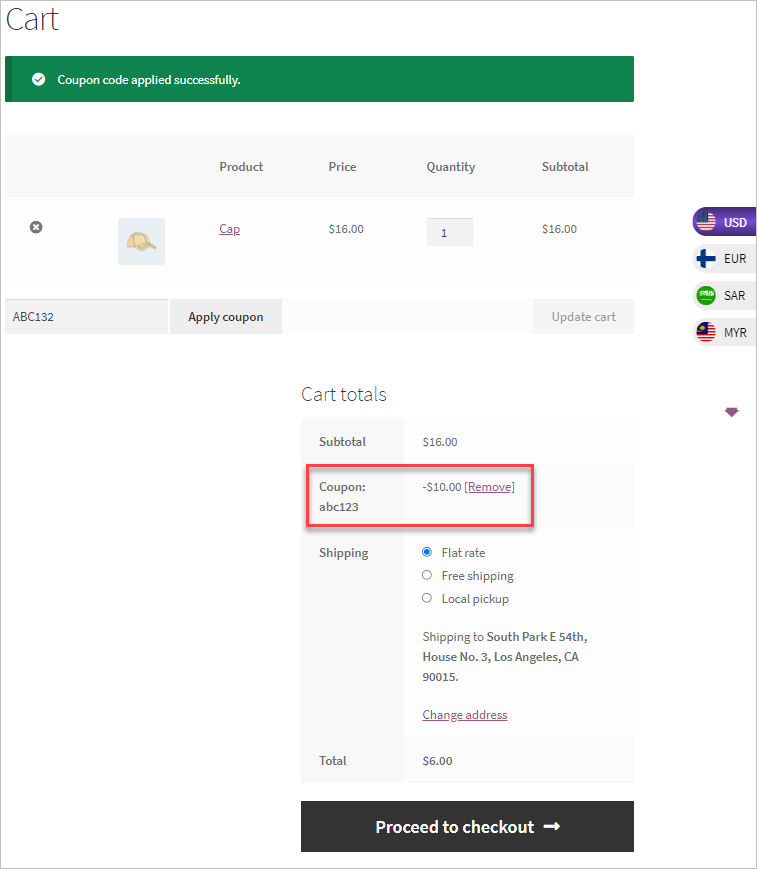
- The user will go to the website and visit the shop.
- Once the user has selected the item and is on the Cart page.
- The user will enter the coupon and click on the Apply coupon button.
- Once done, the user will be notified that the coupon has been applied.
- In the Cart total section, we can see which coupon has been applied and how much amount is deducted from the original total.
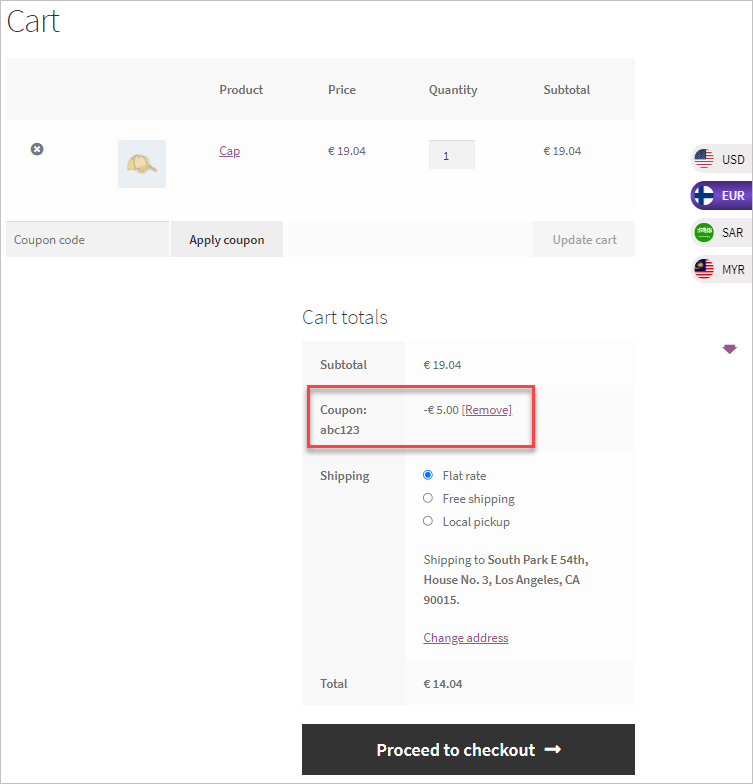
- Now when we’ll switch to Euro so the amount which is deducted from the original total is € 5.00 which we configure.
- When the user will click on the Proceed to checkout button, he will be redirected to the Checkout page.
- Also on the Checkout page, the user will be able to apply the coupon to view the total amount deducted from the original amount by applying the coupon.
2. Coupon Usage Restriction
Back-end Configuration
- Now go to the Admin Dashboard → WooCommerce → Coupon or Admin Dashboard → Marketing → Coupon.
- Click on the existing coupon or create a new one by clicking the Add Coupon button.

- In the Usage restriction section, go to the WC Currency Switcher – the coupon Minimum and Maximum amount option.
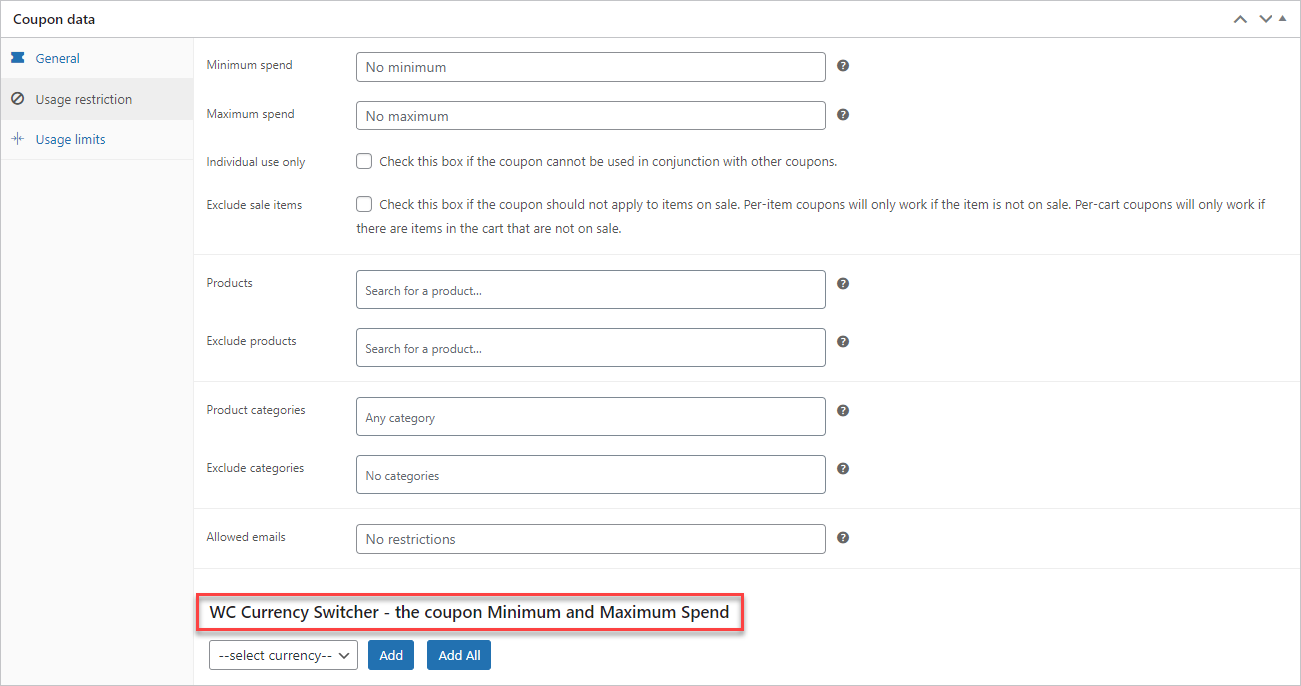
- In this option, we can select the currencies of the countries which were added in the Currencies option on the WC Currency Switcher Settings page.
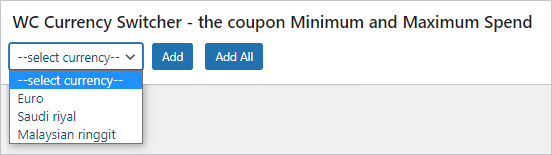
- The admin will select the currency and click on the Add button.
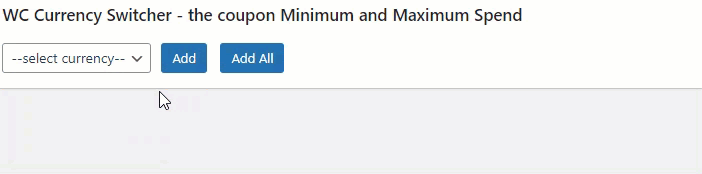
- The admin can also add all the currencies by clicking on the Add All button and delete any currency by clicking the Remove button.
- Now add the Minimum spend amount and the Maximum spend amount for the currency which is selected.
- The coupon will now be applied only when the price will fall between the Minimum spend amount and the Maximum spend and that respective currency is active.
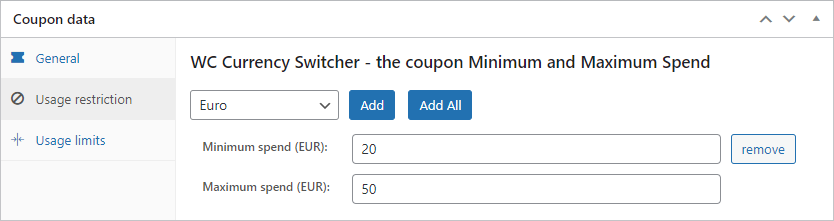
- Click on the Update / Publish button.
Front-end Impact
- The user will go to the website and visit the shop.
- Once the user has selected the item and is on the Cart page.
- The user will enter the coupon and click on the Apply coupon button.
- If the Subtotal price is between the Minimum spent and the Maximum spent amount then the coupon will be applied.
- Once done, the user will be notified that the coupon has been applied.
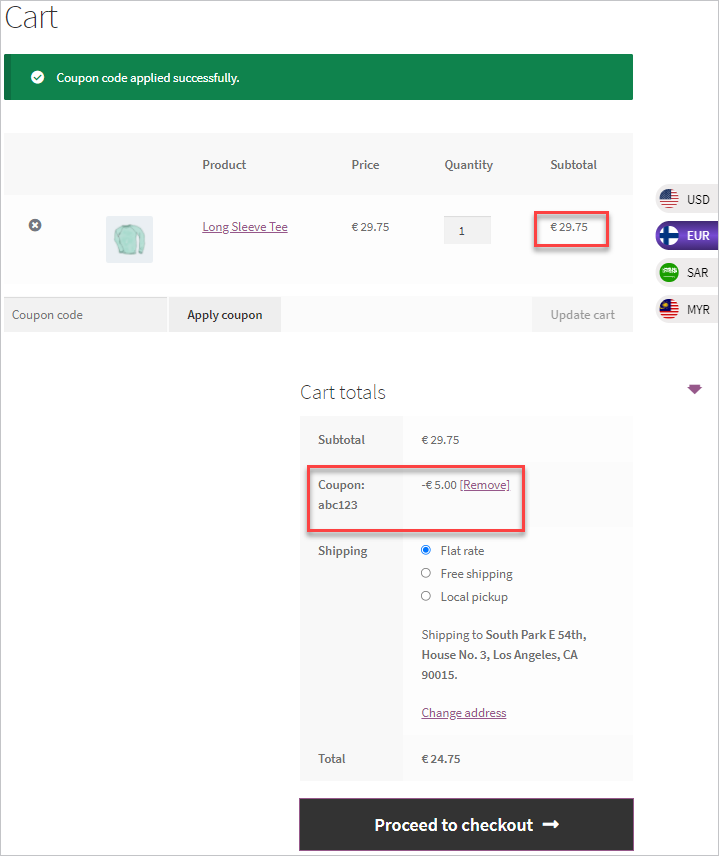
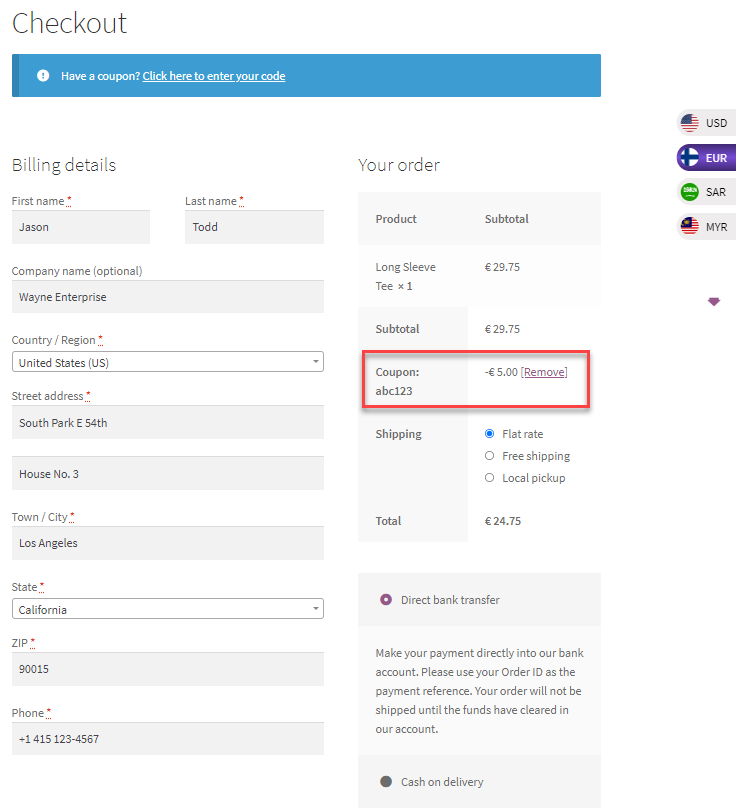
- When the user will click on the Proceed to checkout button, he will be redirected to the Checkout page.
- Also on the Checkout page, the user will be able to apply the coupon to view the total amount deducted from the original amount by applying the coupon.
- If the Subtotal price is less than the Minimum spent amount then the coupon will be not be applied and a message would appear at the top.

- If the Subtotal price is more than the Maximum spent amount then the coupon will be not be applied and a message would appear at the top.
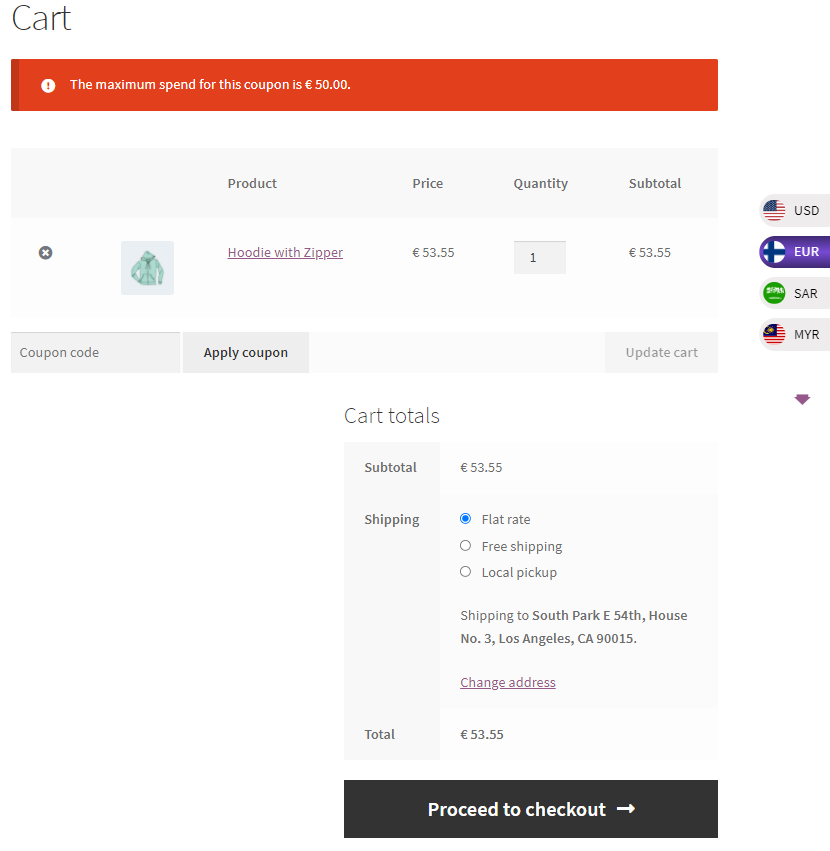
NOTE: The Minimum spent and Maximum spent amount function will only function when the currency on which it is configured at the back-end is active.
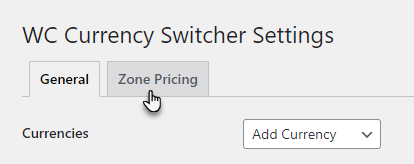
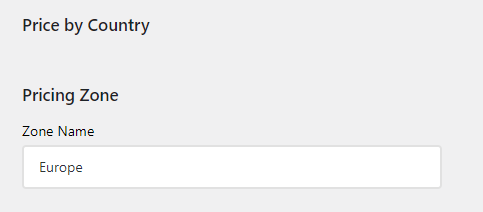
Zone Pricing
↑ Back to topConfiguration
- Go to Admin Dashboard → WooCommerce → WCCS Settings.

- Click on the Zone Pricing tab.
NOTE: To use this feature, Go to General Settings. The user must Enable the Shop Currency and Currency by Location options and Disable Currency on Billing option.
Back-End Configuration
- Once you’re on the Zone Pricing settings page, click on the Enable Zone Pricing checkbox.

- Now go to the Pricing Zone settings.
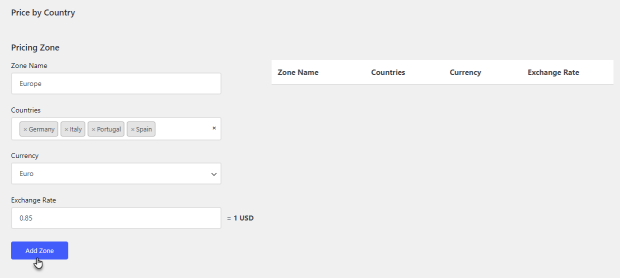
- Zone Name
- Enter the title of your zone.
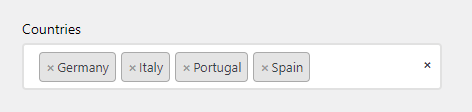
2. Countries
- Select the countries you want to add in that respective zone from the dropdown menu.
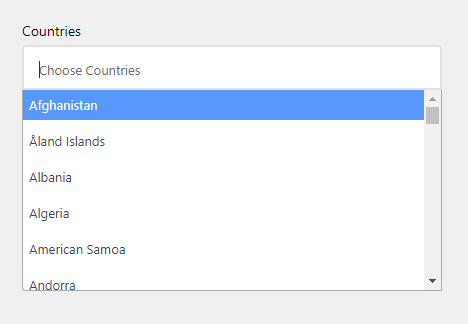
- Multiple countries can be added to this option.
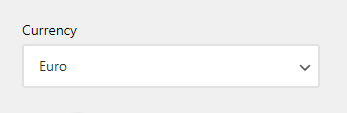
3. Currency
- Select the currency for that respective zone from the dropdown menu.
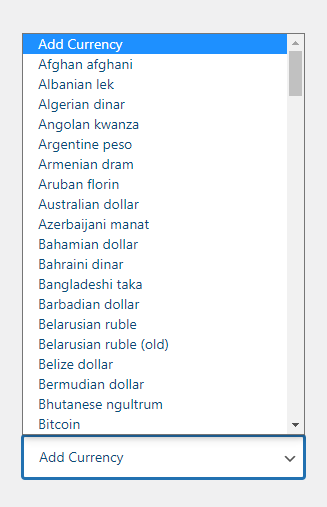
- Only one currency can be selected in this option.
4. Exchange Rate
- Enter the exchange rate of the currency which is selected above in the Currency option.

- Once all the required fields are filled, click on the Add Zone button.
- A zone would be added in the column present on the right side of the page.
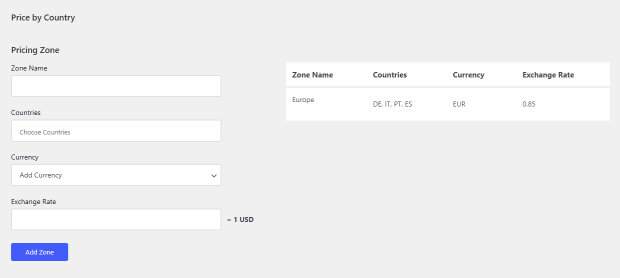
- Hover over the respective zone to view further options.
- You can edit the zone by clicking on the Edit option.
- You can remove the zone by clicking on the Delete option.

Front-End Impact
- When a user visits the website and his location will be in any country mentioned in the Pricing Zone configuration, the currency mentioned in that respective zone will appear for that user.
- For example, A user who lives in Germany visits the website, so the website’s currency would appear in EUR since it is configured in the Pricing Zone settings.

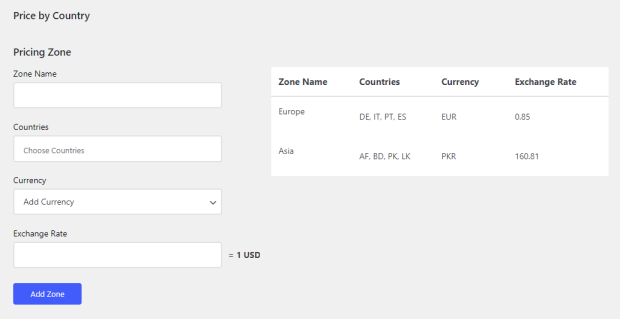
- We can add multiple zones in Pricing Zone settings.
Back-End Configuration
Front-End Impact
- The currency would appear according to the user’s location. According to the user’s location, the system will check in which zone his country is mentioned, and according to that, the currency will appear to the user.
- For example, A user who lives in Sri Lanka visits the website so the currency on the website would appear in PKR since it is configured in the Pricing Zone settings.
Product Zone Pricing
↑ Back to topBack-End Configuration
- Go to Admin Dashboard → WooCommerce → WCCS Settings.
- Hover over any product to view the further options.
- Click on the Edit option.
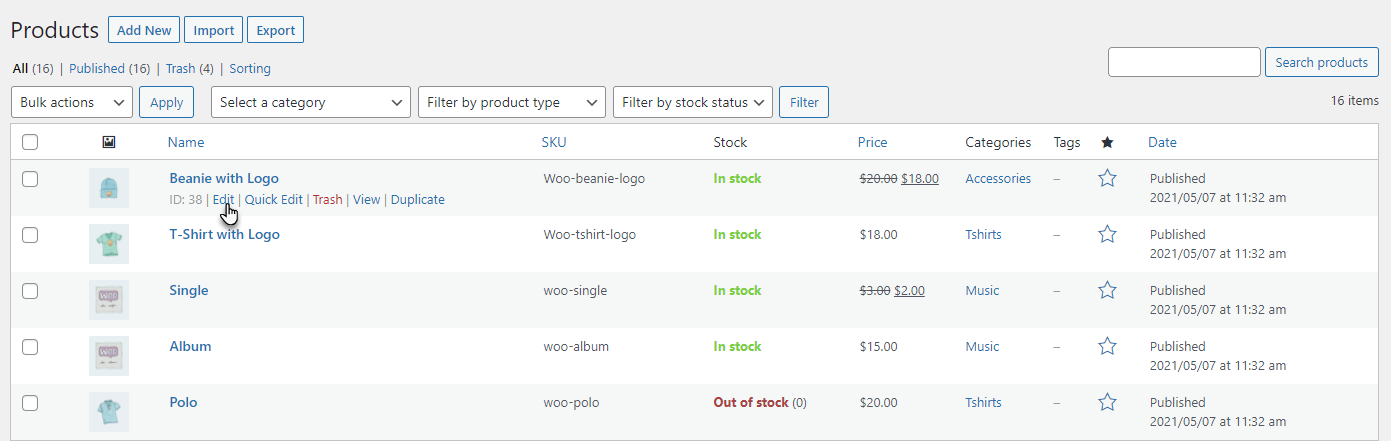
- Click on the Edit option.
- Once you’re on the Edit Product page, go to the Product Data section.
- Go to the WCCS Zone Pricing tab.
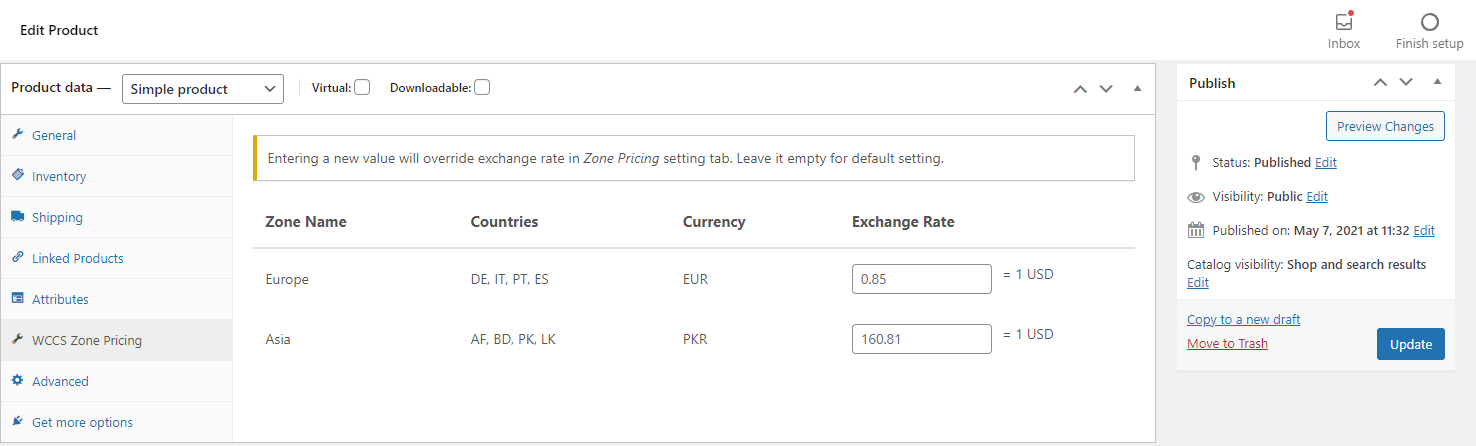
- We can see the exchange rate of that respective products in different zones.
- Enter a new value in the exchange rate field according to your requirement.
- Entering a new value will override the exchange rate in the Zone Pricing setting tab.
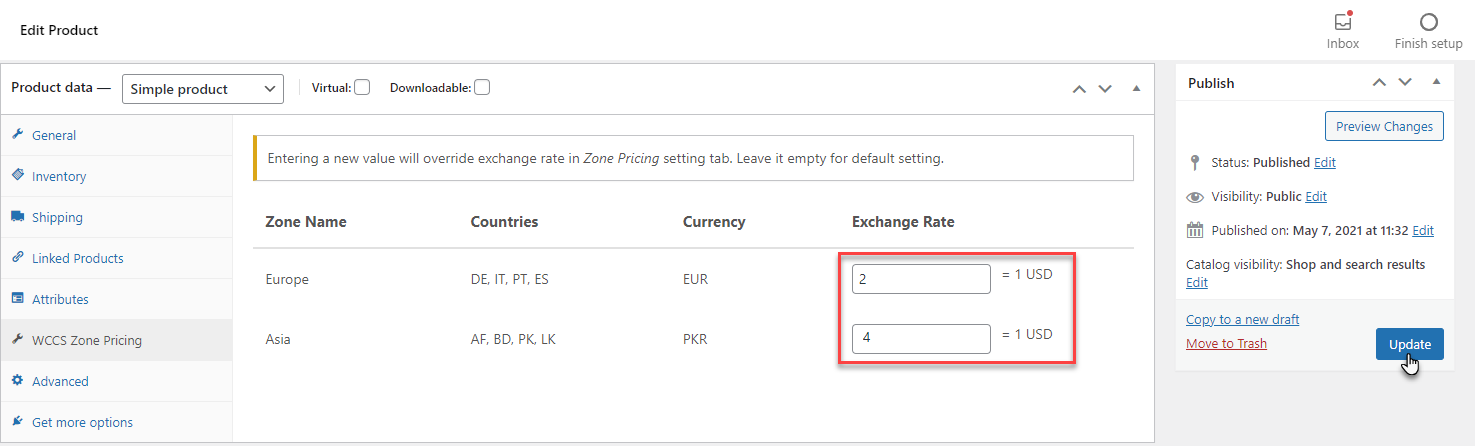
- Click on the Update button.
Front-End Impact
a. Before – Default Value
b. After – Override Value
Price Rounding
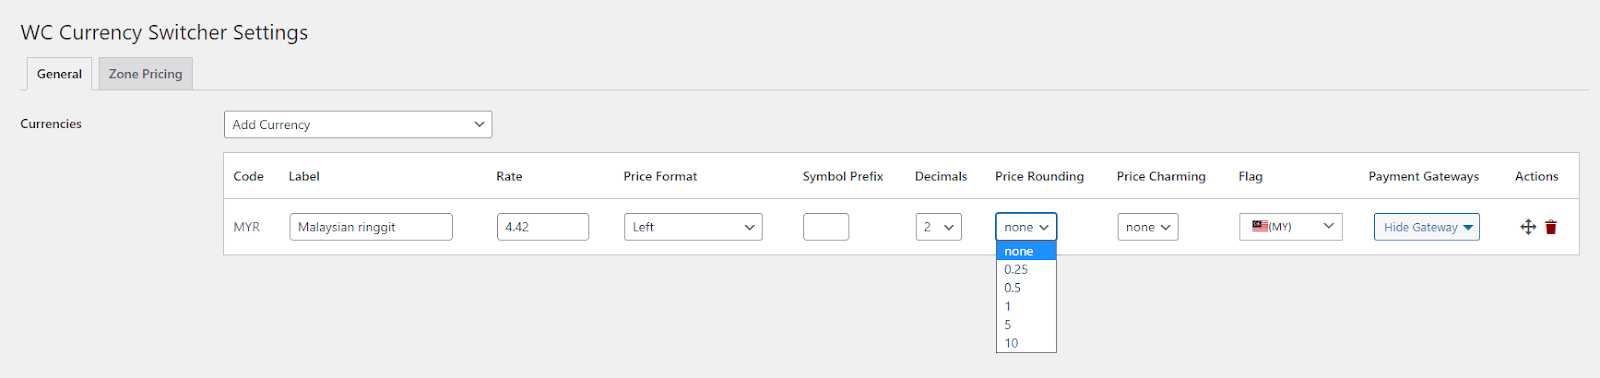
↑ Back to top- Navigate to Admin Dashboard → WooCommerce → Settings.
- The price rounding field in the currency table. It will be a dropdown field.
- Every Currency has its own price rounding dropdown. So every currency can have different rounding settings.

- There will be a pre-defined option in the dropdown for the admin to select. (None, 0.25, 0.5, 1, 5, 10).
- None will have no effect on the price rounding on the front-end.
- When 0.25 is selected, the system will round the price by 0.25. For example, after converting the price to another currency USD to MYRM and the price is in decimal, then the price will be rounded by 0.25, like after converting if the price is RM2.17, then the price will be automatically rounded to 2.25 as 0.25 is the rounding factor. If the price is already in the rounding factor, like 2.25, 2.5, 2.75, or 3, then there will be no change to the price.
- When 0.5 is selected, the rounded price of RM2.17 will be RM2.50, as 0.50 is the rounding factor. If the price is already in the rounding factor, like 2.5 or 3, then there will be no change to the price.
- When 1 is selected, the rounded price of RM2.17 will be RM3, as 1 is the rounding factor. If the price is already in the rounding factor, like 2 or 3, then there will be no change to the price.
- When 5 is selected, the rounded price of RM2.17 will be RM5 as 5 is the rounding factor. If the price is already in the rounding factor, like 5, 10, or 15, then there will be no change to the price.
- When 10 is selected, the rounded price of RM2.17 will be RM10 as 10 is the rounding factor. If the price is already in the rounding factor, like 10 or 20, then there will be no change to the price.
Front-End Impact
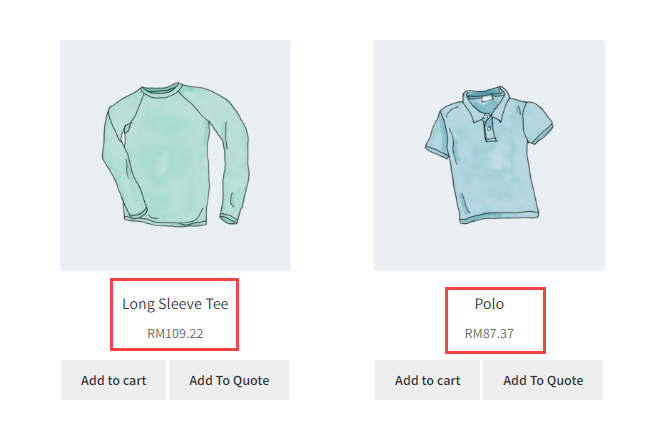
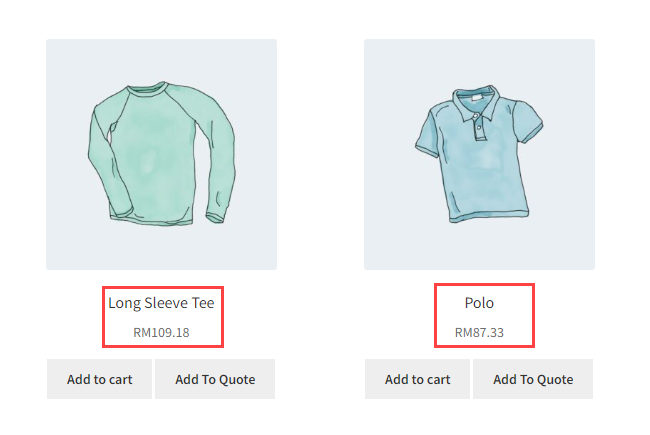
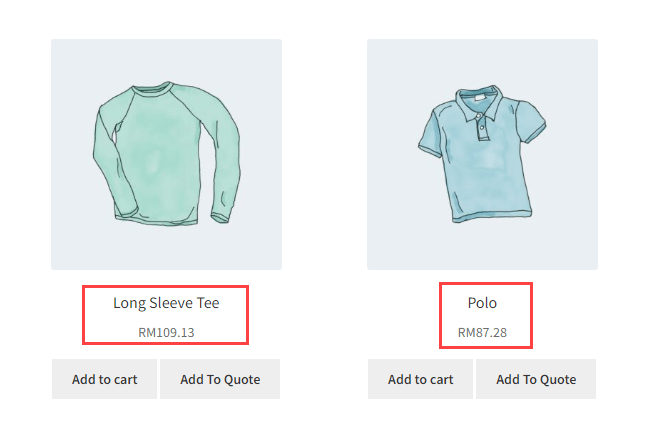
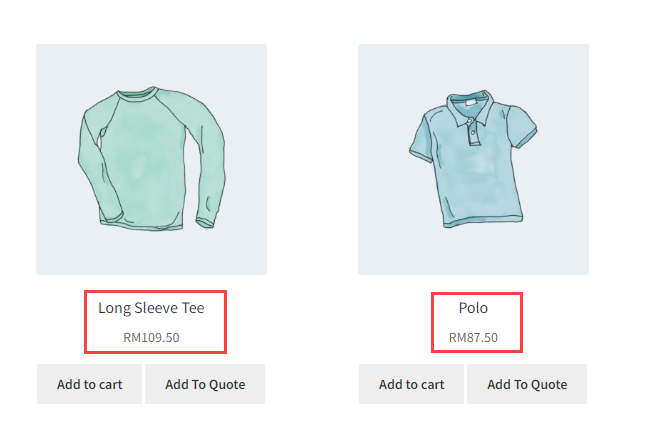
↑ Back to topPricing Round – None

Pricing Round – 0.25

Pricing Round – 0.5

Pricing Round – 1.0
Pricing Round – 5 & 10
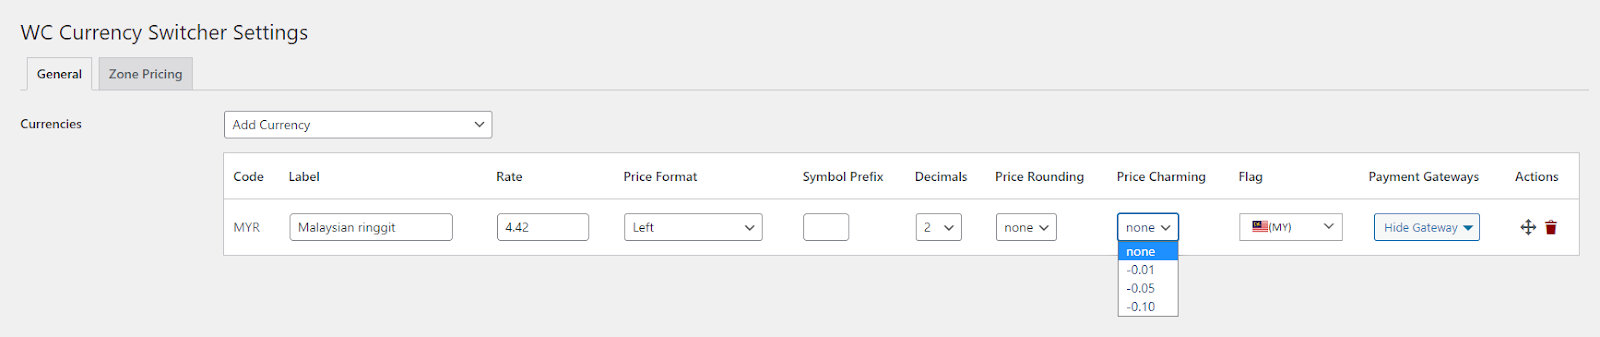
Price Charming
↑ Back to top- Navigate to Admin Dashboard → WooCommerce → Settings.

- The price charming field in the currency table. It will be a dropdown field.
- Every Currency has its own price charming dropdown. So every currency can have different charm settings.

- There will be pre-defined options in the dropdown for the admin to select (None, -0.01, -0.05 and -0.10).
- None will have no effect on the price on the front-end.
- When the 0.01 value is selected, then reduced the converted price to -0.01. For example if the converted price USD to RM is RM2 then reduce the converted price to -0.01 that will be RM1.99 in this case.
- When the 0.05 value is selected, then reduced the converted price to -0.05. For example RM2 will be reduced to -0.05 that will be RM1.95 in this case.
- When the 0.10 value is selected, then reduced the converted price to -0.10. For example RM2 will be reduced to -0.10 that will be RM1.90 in this case.
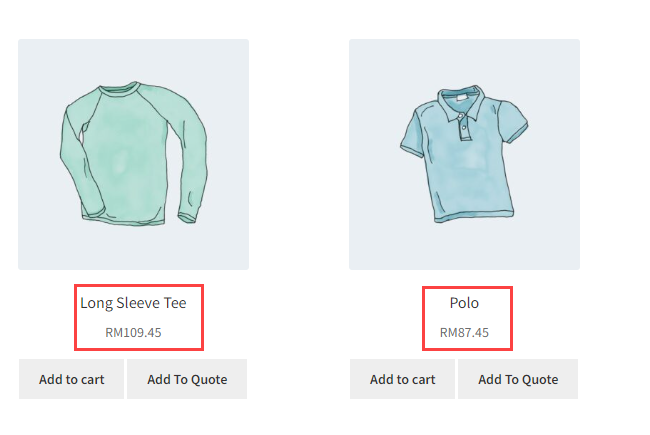
- If the rounding price and price charm both are applied. Then first the round the price and then reduce the price. For example if the Price Rounding on back-end is 0.50 and Price Charm is set to -0.05. If the converted price is RM87.20. The system first will round the price to nearest 0.50 which will be RM87.50. After that the system will apply the Price Charm and reduce the price by -0.05 which will be RM87.45 in this case.
Front-End Impact
↑ Back to topPricing Charming – None
Pricing Charming – (-0.01)
Pricing Charming – (-0.05)
Pricing Charming – (-0.10)
NOTE: If both the Price Rounding and the Price Charming options are active then the sequence of the workflow would be that first the Price Rounding value will be applied and then the Price Charming value will be applied.
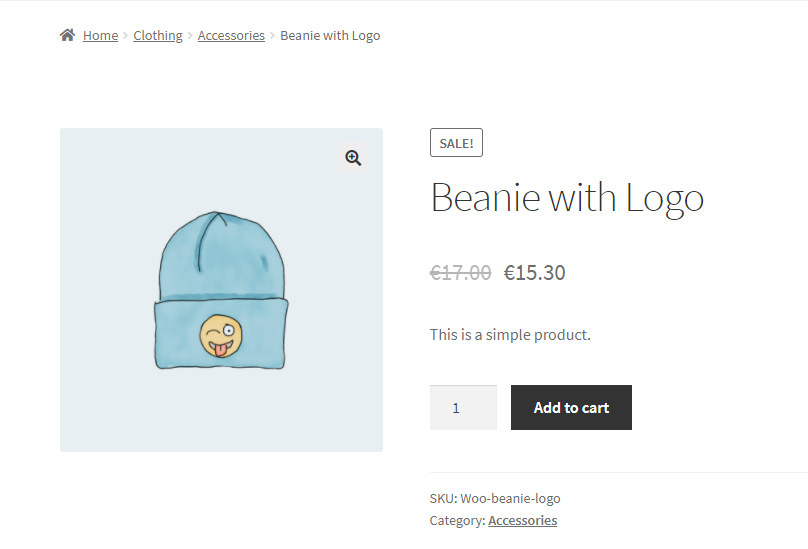
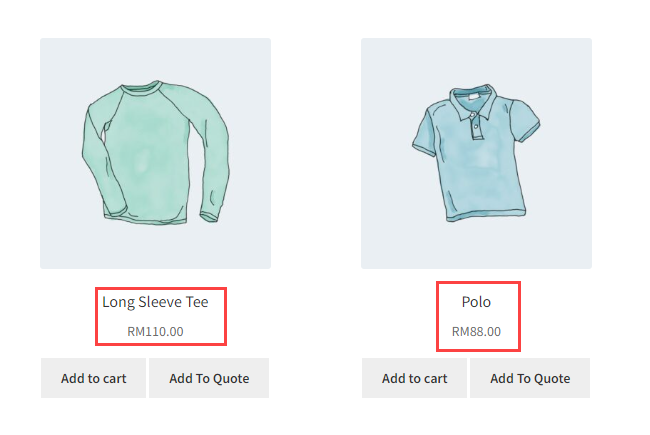
We can see that the values in the Price Rounding and the Price Charming option is None.

According to this configuration, we can see that in Front-End Impact the prices are not changed.

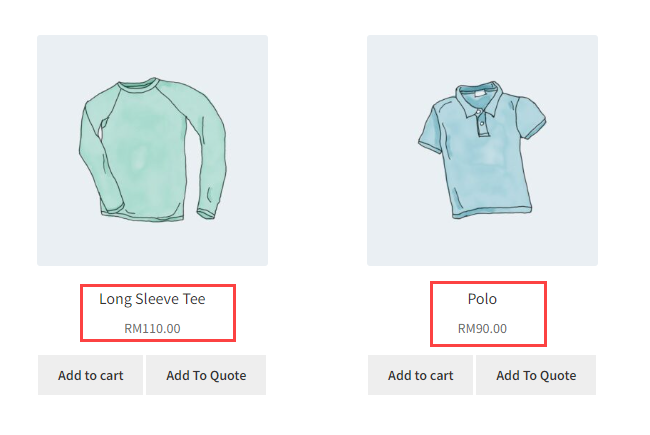
Now when set the Price Rounding option value to 0.5 and the Price Charming option value to None.

According to this configuration, we can see that in Front-End Impact the prices are rounded off to the value 0.5.
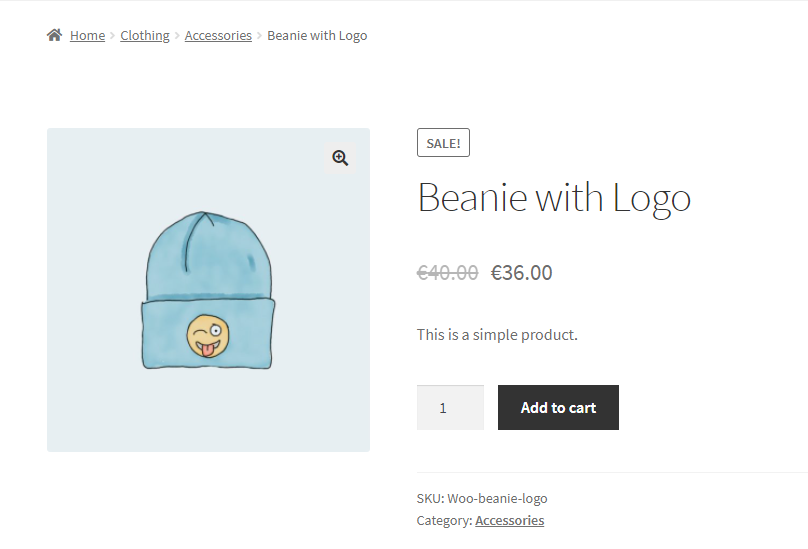
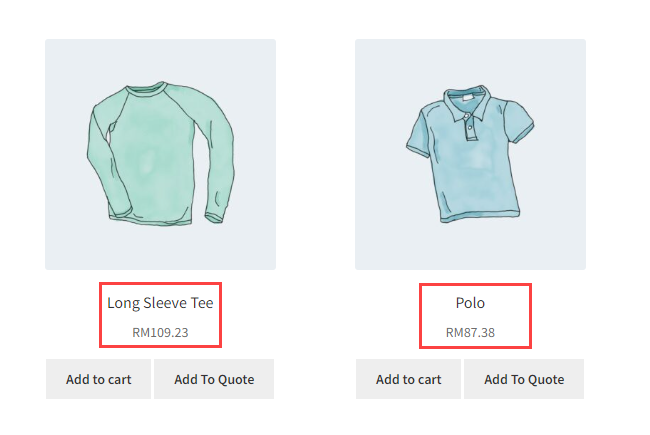
Now when set the Price Charming option value to -0.05 and the Price Rounding option value was already set to 0.5.

According to this configuration, we can see that in Front-End Impact the prices which were rounded off to the value 0.5 now will be price charmed to the value of -0.05.
Compatibility with Donation Feature
↑ Back to topUser went for a donation of 10 GBP with default currency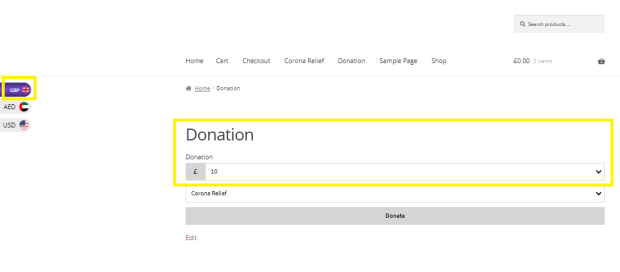
But at the time of checkout he swtiched the currency to USD

The donation was made in USD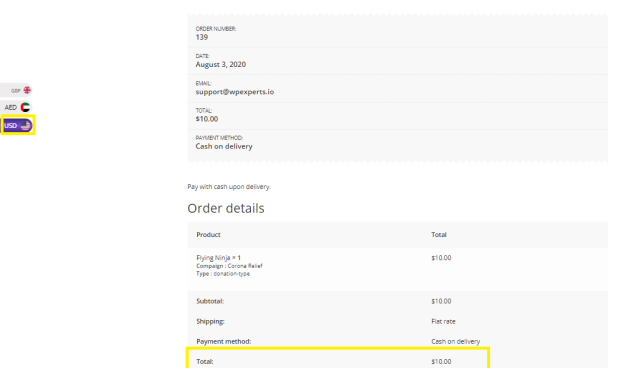
Donation from Widget
↑ Back to topUser selected by default GBP currency in widget to donate: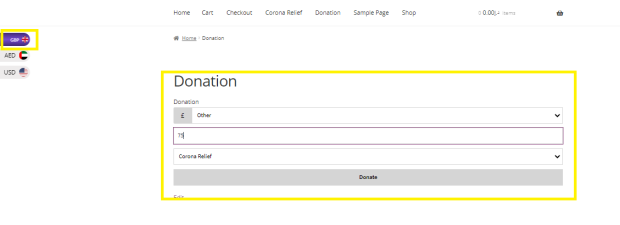
But on checkout option he switched the currency to USD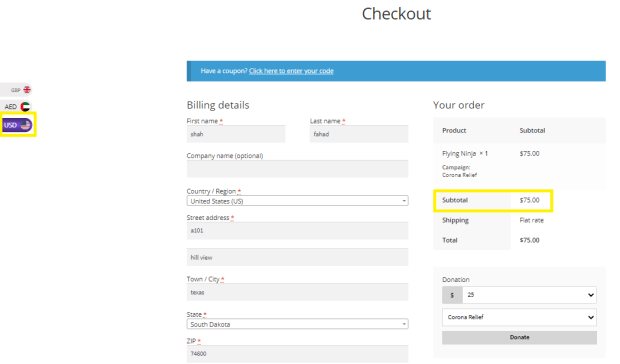
Payment was made in USD as we can see in below image

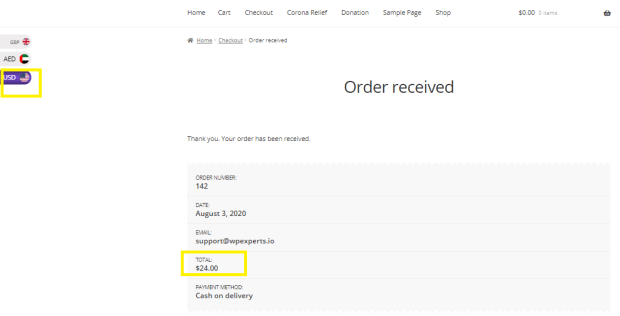
Currency Switcher at Round off Donation
↑ Back to topCustomer went for a purchase with default GBP currency
But at the time of checkout it gave an option to round off the value by giving donation
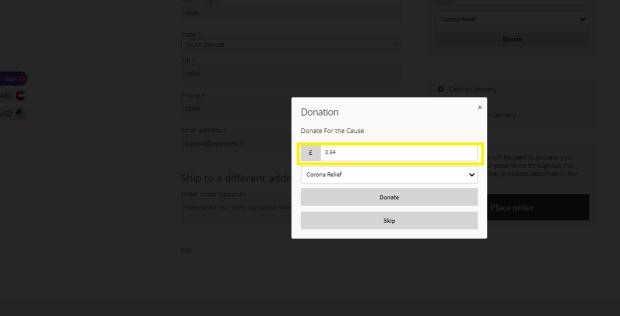
User changed the currency here: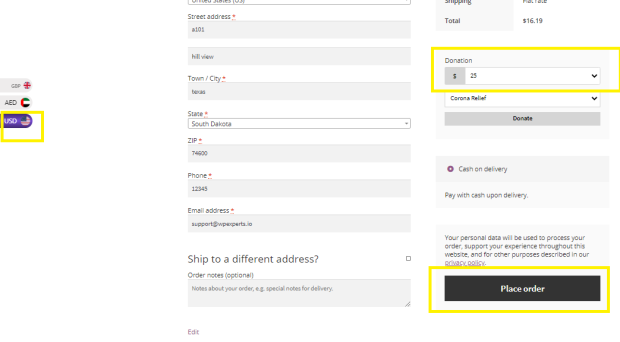
The final transaction has processed with USD
Compatibility with Wholesale
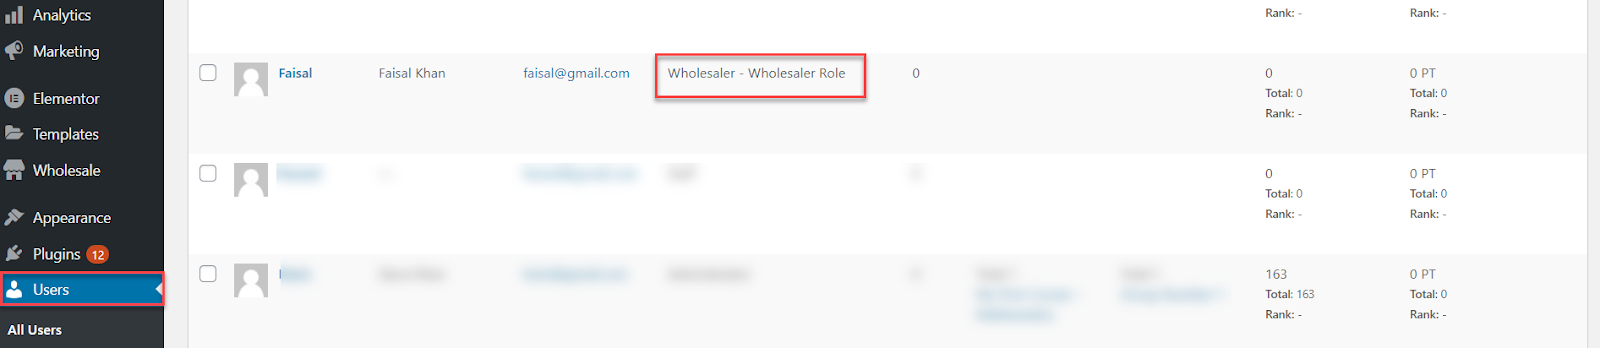
↑ Back to top- Set up a Wholesale User
- After login go to SHOP
- Select any Wholesale Product
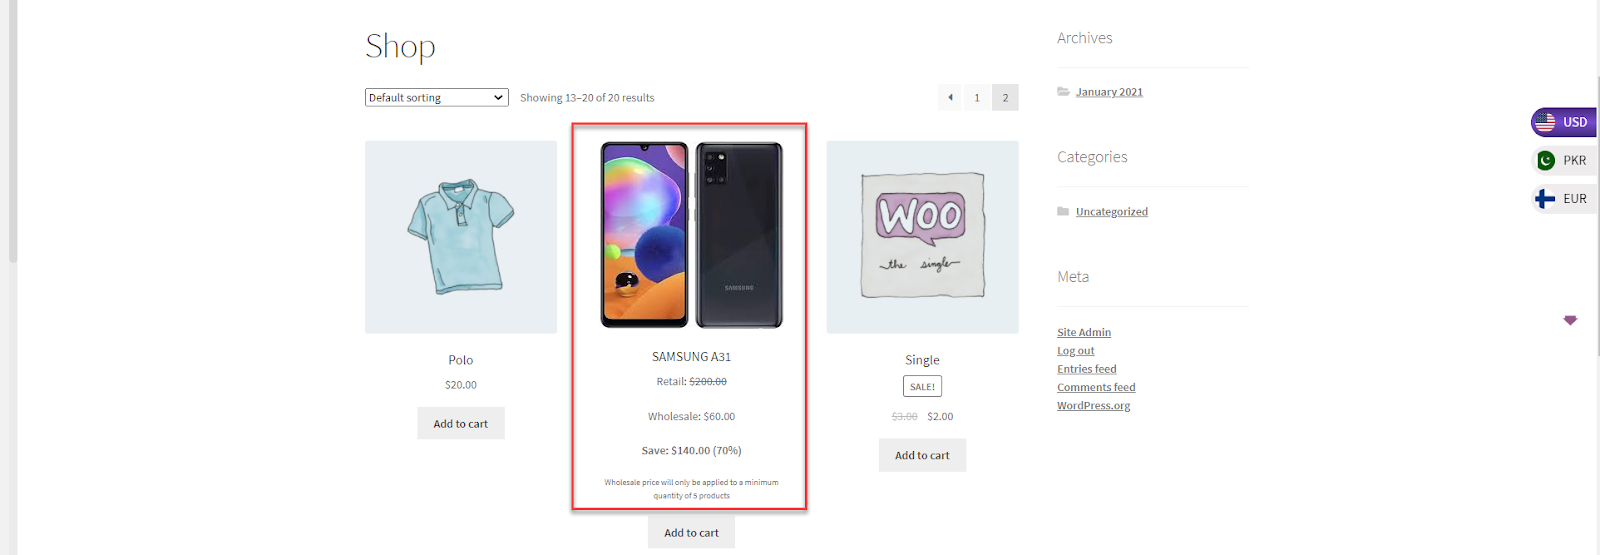
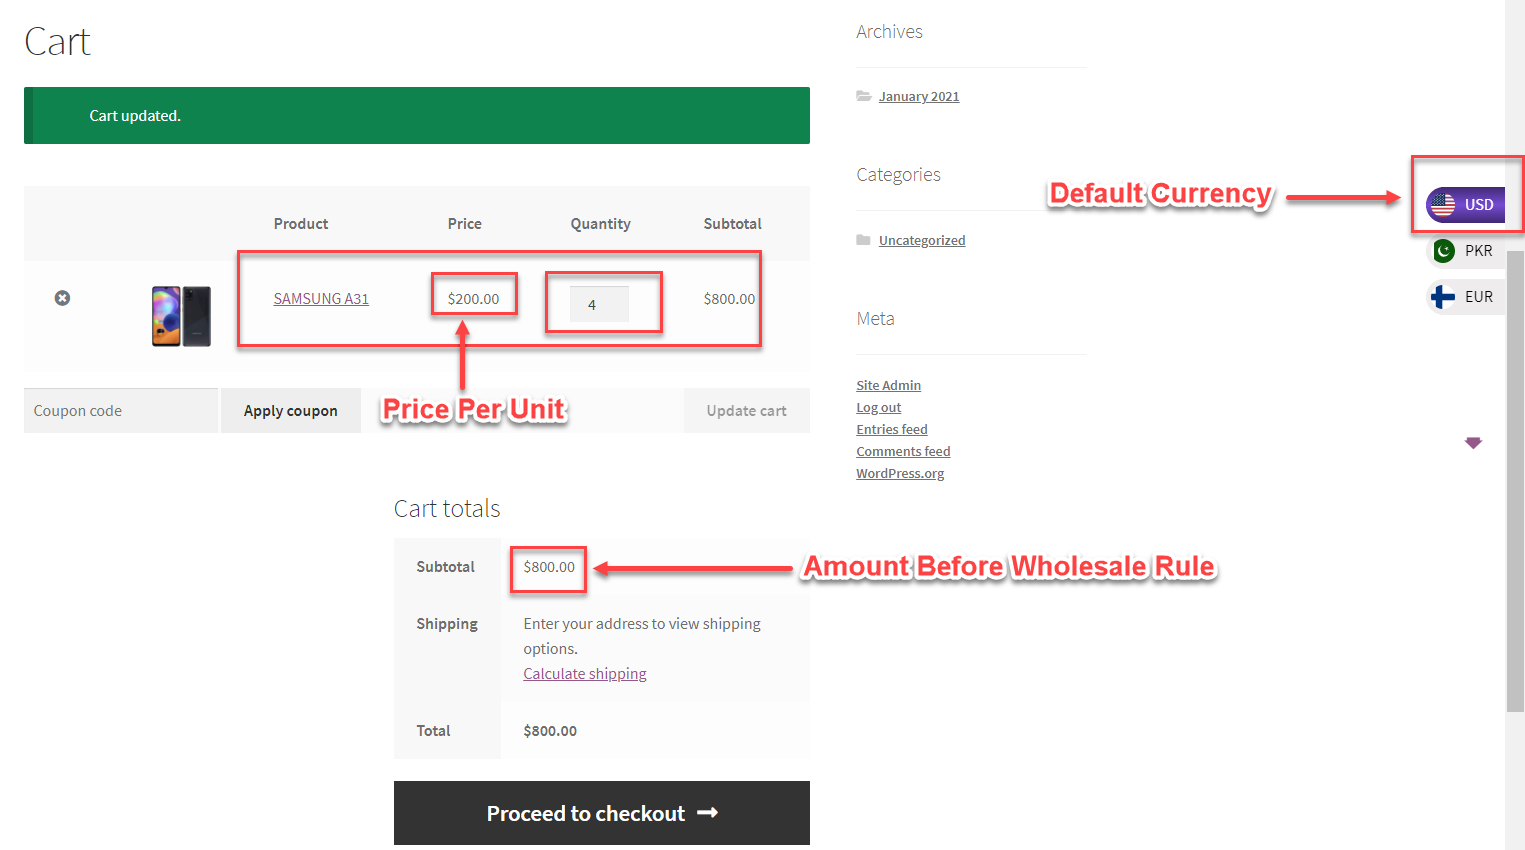
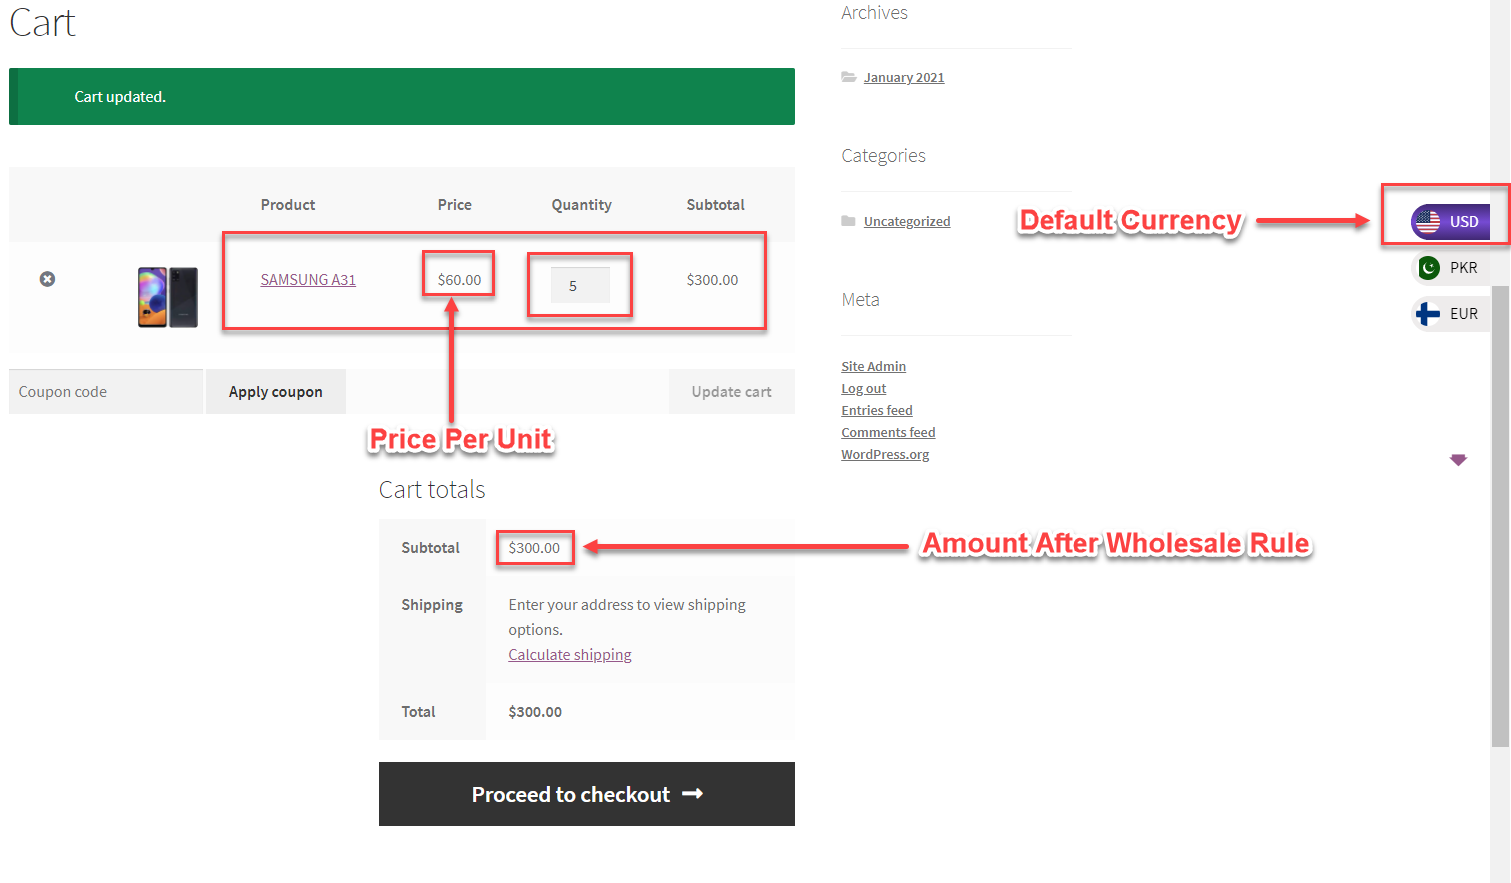
- Default Currency (USD Dollar)
- Minimum 5 Quantity required to apply the Wholesale price
- Before Wholesale price is applied
- After Wholesale price is applied
- Currency Switched (Euro)
- Minimum 5 Quantity required to apply the Wholesale price
- Before Wholesale price is applied
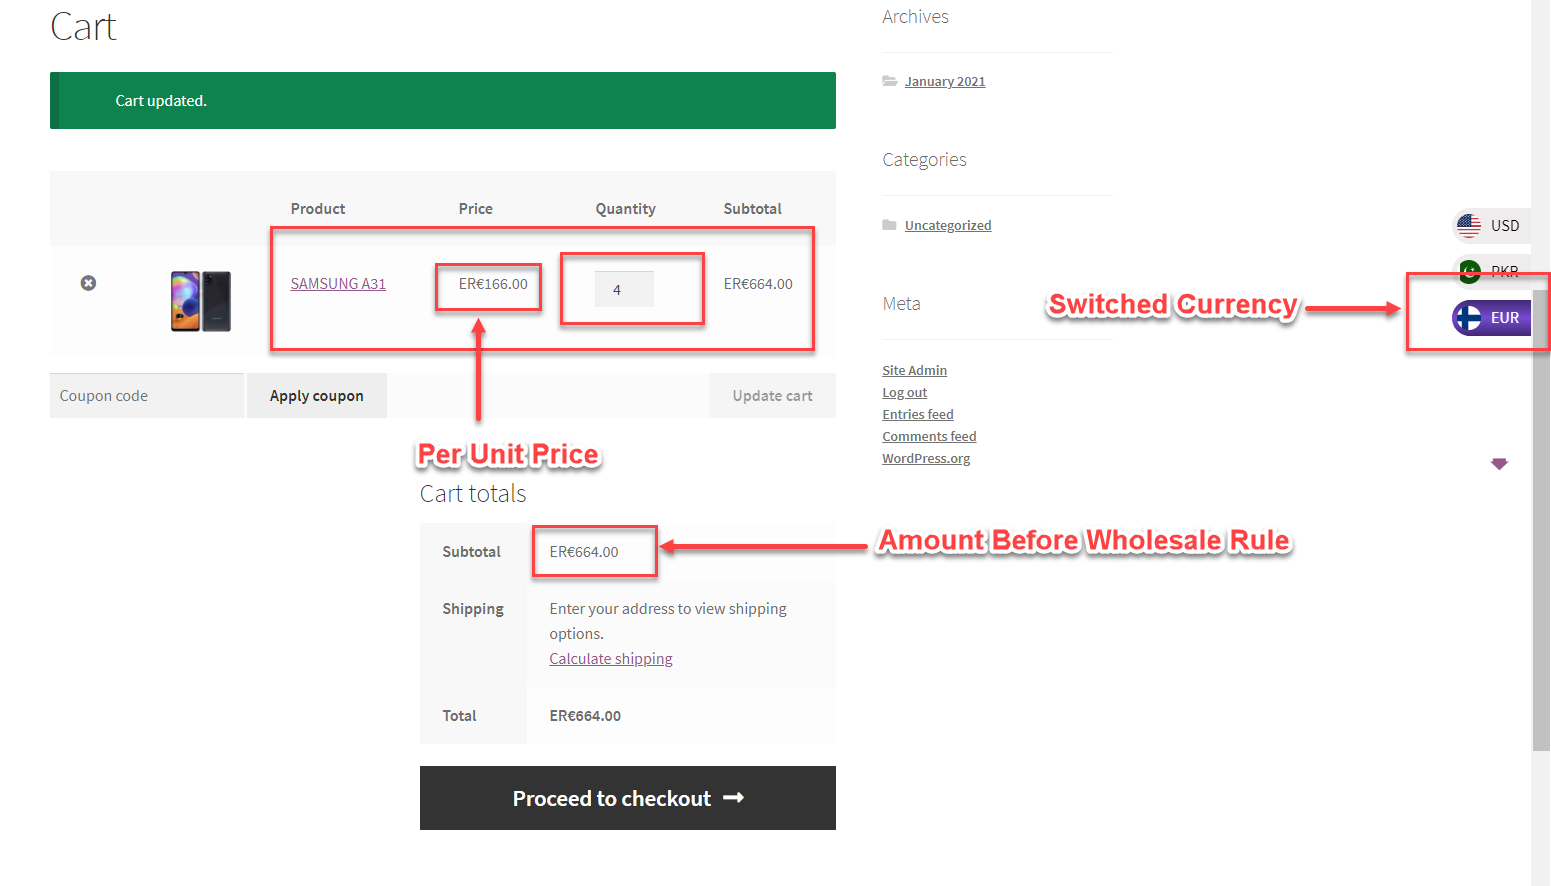
- After Wholesale price is applied

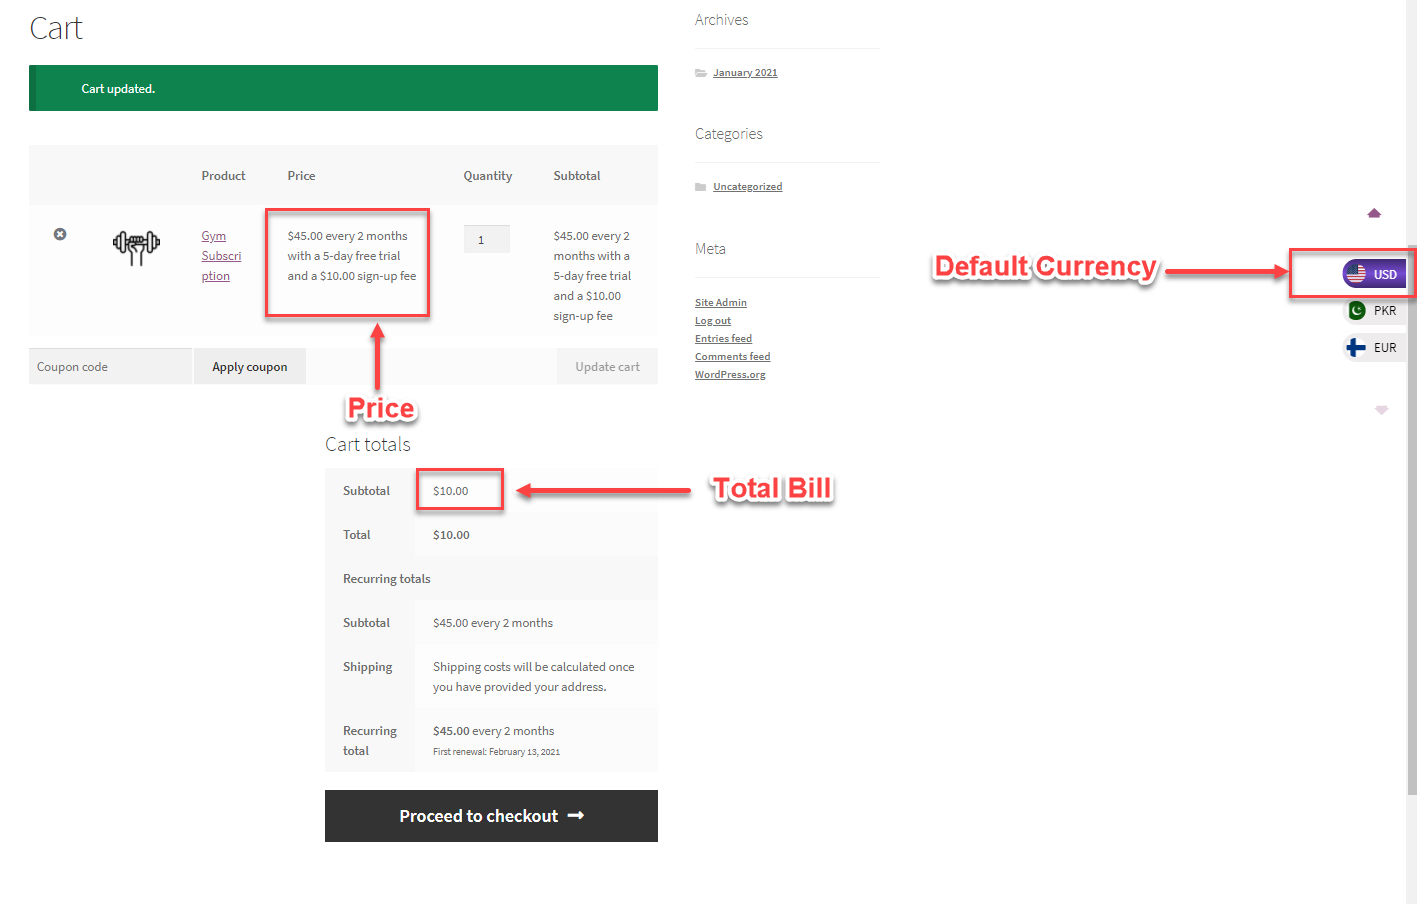
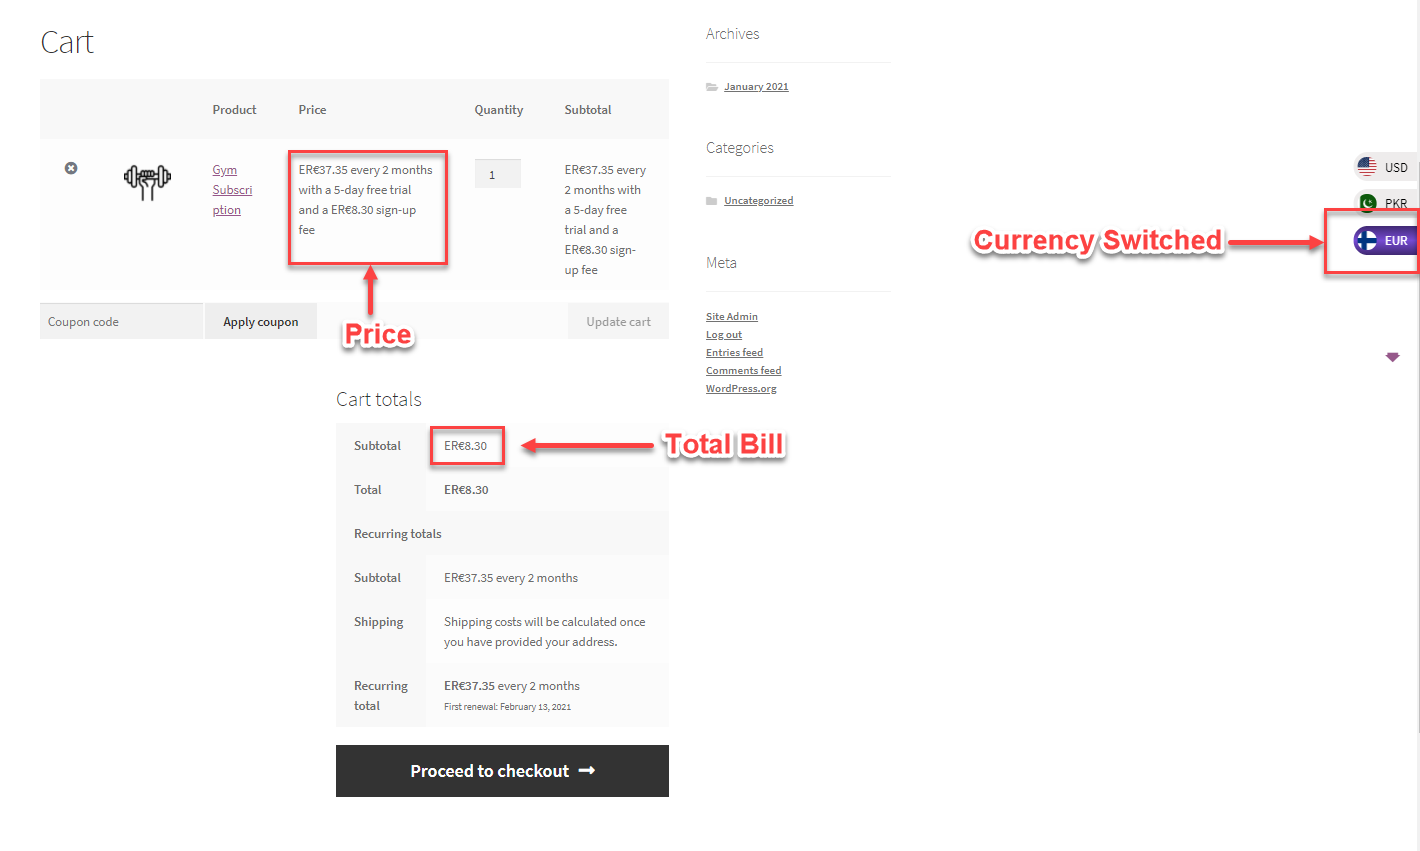
Compatible with All product Subscription plugin
↑ Back to top- Create a subscription product

- Once published, go to SHOP
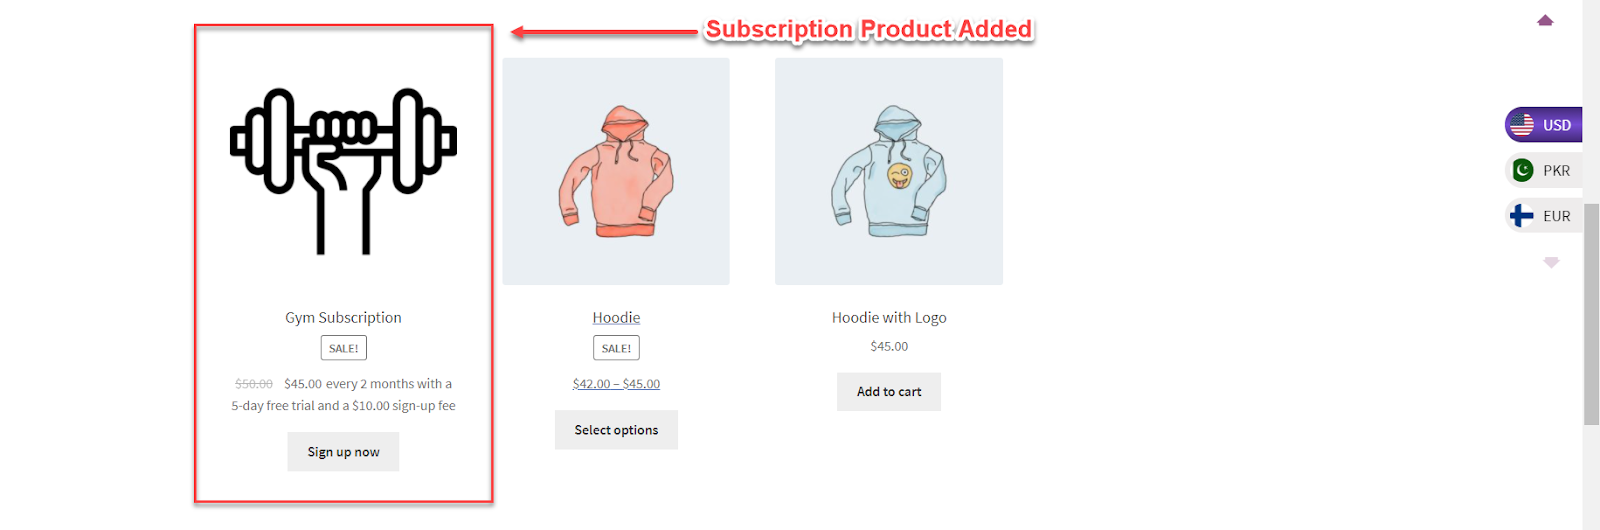
- Default Currency (USD Dollar)
- Currency Switched (EURO)
Compatibility with WPML
↑ Back to topCurrency By Languages
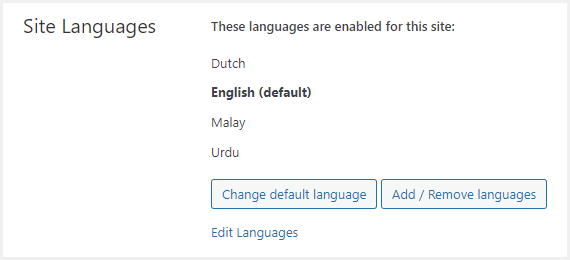
↑ Back to topNOTE: WPML Pro and WooCommerce Multilingual plugins are required to use this option. Go to Admin Dashboard → WPML → Languages and Add languages in the Site Languages section.
Back-end Configuration
- Go to the Admin Dashboard → WooCommerce → WCCS Settings.

- WC Currency Switcher Settings page would open.
- Checkmark the Currency by Language option to enable it.
- Once you’ll checkmark the Currency by Language option checkbox, the Languages option would appear right below it.
- Select the currency against each language.

- Click on the Save Changes button.
Front-end Impact
- The user will go to the website and visit the shop.
- At the bottom of the page, we can see all the available languages.
- Click on any other language available.
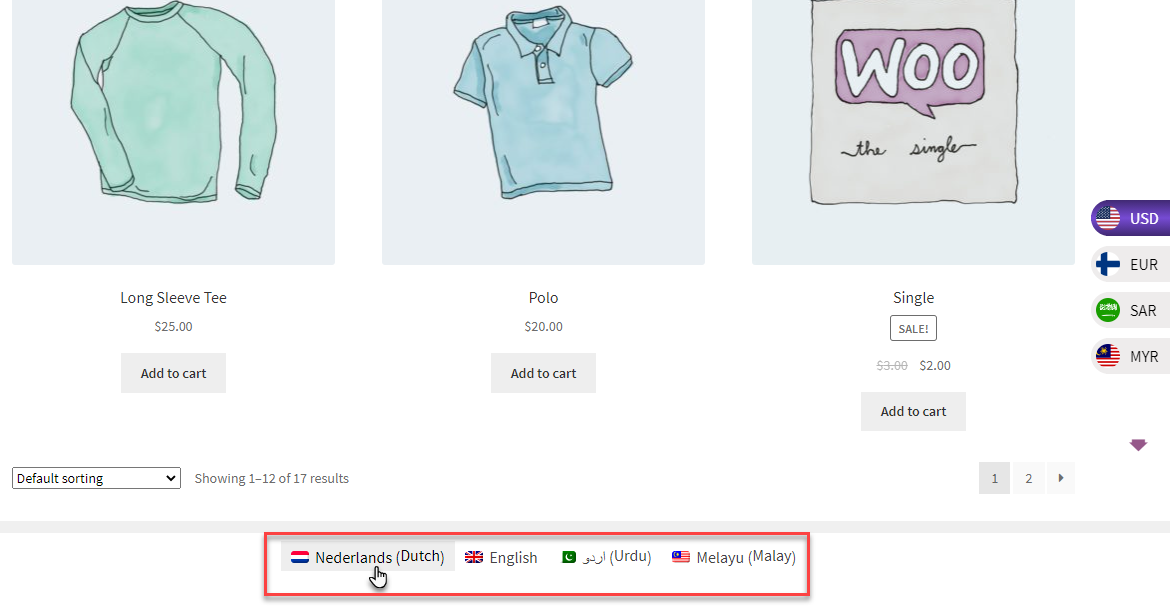
BEFORE
- The website when the language is English and it was configured against USD currency (default currency).
AFTER
- The website when the language is changed to Dutch and it was configured against Euro currency.