Credit Line or Credits for WooCommerce allows you to offer credits to your customers. Your customers can use the credits to make purchases in your site and the credits can be repaid later.
Installation
↑ Back to top
- Download the .zip file from your WooCommerce account.
- Go to: WordPress Admin > Plugins > Add New and Upload Plugin with the file you downloaded with Choose File.
- Install Now and Activate the extension.
Fund Types
↑ Back to topVirtual Funds
↑ Back to top- In this method, Site Admin can issue Credit Line to their customers without using money.
- When a customer is issued a Credit Line, that will be recorded in the Virtual Funds log.
Admin Funds
↑ Back to top- In this method, Site Admin has to first load their Admin Funds Wallet themselves/assign a user to load the Admin Funds Wallet with money before they can start issuing Credit Line to their customers.
- When a customer is issued a Credit Line, the approved Credit Line will be debited from the Admin Funds Wallet and will be credited to the Customer.
Approval Modes
↑ Back to topApplication Based Approval
↑ Back to top- In this Approval Mode, the customers will have to submit an application to receive a Credit Line.
- Once an application is submitted, the Site Admin will be notified by email. If the application is approved by the Admin, the user will be issued a Credit Line. Optionally, site admin can set to automatically approve the application once it is submitted.
- By default, the predefined Rules will suggest a Credit Line for the customer based on their eligibility. Site Admin can choose to assign the suggested Credit Line or they can set a Credit Line of their own.
- While approving the Credit Line, if the Site Admin approves the suggested Credit Line, then that user is eligible for a future automatic Credit Line increase.
- The Credit Line will be automatically increased if a customer with an existing Credit Line matches with another higher predefined eligibility Rule.
- If the Site Admin modifies the suggested Credit Line and sets a value of their own, then that customer will not be eligible for an Automatic Credit Line increase. The Credit Line can only be modified manually.
Auto Approval
↑ Back to top- In this Approval Mode, the Credit Line will be issued to the eligible customers automatically by the system. The customers don’t have to submit an application.
- The eligibility for receiving a Credit line will be decided based on the Predefined Rules set by the Site Admin. When a user is automatically eligible to receive a Credit Line, a Credit Line will be issued to them and they will be notified by them.
Setup and Configuration
↑ Back to topGeneral
↑ Back to topGeneral Settings
- By Default, a user has to Submit an application to the Site Admin to receive a Credit Line. If you want your customers to receive a Credit Line automatically without they having to submit any application, then select “Auto Approval” in the Credit Line Approval Mode option.
- By default in “Application Based Approval” mode, the application will have to be manually approved by the admin. If you wish to automatically approve the application, you can do so by customizing the “Approval After Application Submission” option.
- By default, the Credit application form will be displayed for all users. If you want to restrict/display the form only for specific user/user roles, then using User Filter option it is possible. If you want to display the form only for specific users, then select Include User(s) option and select the users in Select User(s) option. If you want to hide this form for specific users, then select Exclude User(s) option and select the users in Select User(s) option. If you want to display the form only for specific user roles, then select Include User Role(s) option and select the user roles in Select User Role(s) option. If you want to hide this form for specific user roles, then select Exclude User Role(s) option and select the users in Select User(s) option.
- You can also display the Credit application form for the users based on their site activity. In Site Activity of User option, select Min No. of Orders Placed if you want to display the form only for the users who have placed more than the specified number of orders on the site previously. Select Min Amount Spent on Site if you want to display the Credit application form only for the users who have spent more than the specified amount on the site previously.
Billing Date Settings
Whenever your customers use their credit limit, a bill will be generated at a specified date. This date can be customized. By default, the billing date is 1st of every month. What this means is that your customers can purchase products from your shop using their credits between 2nd of every month to the end of the month. A bill will be generated on 1st of every month. This bill will have the transactions made between the period (2nd of the previous month – End of the previous Month). When you customize the billing date, the spending duration will vary accordingly. You can also set a threshold date to decide the first billing date of a newly approved customer. By default, the value of the Threshold Date is set to 15. What this means is that suppose when a new customer is getting approved before 15th December, their first bill will be generated on January 1. In case, if the customer was approved after 15th of December, their 1st bill will be generated only on February 1.Repayment Date Settings
Once the bill is generated, the customer will have a specified number of days before which they have to complete their repayment. By default, the Date is set to “This Month 20th”. What this means is that when a bill is generated on the 1st of December, the repayment has to be paid on or before 20th of that month(December). When you set the value as “Next Month 20th”, what this means is that when a bill is generated on the 1st of December, the repayment has to be paid on or before 20th of next month(January). Note The availability of a repayment date is based on the Billing date chosen.Fee Settings
If you want to charge an interest fee whenever your customer uses their credit limit, then enable Charge Interest for Credit Usage option and set the interest. The Interest fee will be debited from the user’s available credit limit and has to be paid in the next bill. If you want to charge late payment fee if the payment is not been paid before the due date, then enable Charge Late Payment Fee and set the fee. The Late Payment fee will be debited from the user’s available credit limit and has to be paid in the next bill. You can optionally enable/disable Late Fee for each user. The settings can be found in Credits > Credits > Edit User > Late Fee Actions.Email Notification Settings
By default, when a user places an order with Credits Payment Method, you cannot restrict the emails sent by WooCommerce. You can optionally restrict the following emails in the “Disable WooCommerce Emails for Orders Placed using Credits Payment Method” option, • New Order • Processing Order • Completed Order Set on how many days before the due date the users have to be notified by email in Send Repayment Notification Emails option. If set as 3,2,1 users will be notified before 3rd, 2nd and 1 day before the payment due date.Repayment Settings
Repayments have to be processed through WooCommerce checkout and hence a product is needed for that. Select an old product or create a new product in Repayment Product Type option. Select the payment gateways to hide at checkout page for the customer while making their repayment in Disable Payment Gateways for Repayment option.Credits Dashboard Settings
When the plugin is activated, dashboard page will be automatically created and selected here. In dashboard page, customers can see their Credits related information.Statement Settings
The selected logo in Statement Header Logo option will be displayed in the header of credit statements.Rules
↑ Back to top-
Rules are needed for deciding the Credit Line Eligibility of your customers.
-
Auto Approval mode is completely dependent on the Rules. So, the system cannot issue Credit Line to your customers if the Rules are not configured.
-
Rules are also used for suggesting the Credit Line in Manual Approval mode. But, it is entirely upto the admin to decide how much Credit Line has to be issued to the customer.
-
To configure a Rule navigate to Credits > Settings > Rules and click the Add Rule button.
-
In the Rule Name field, give a name for the Rule. In the Criteria section, configure the rule as per your preference.
-
You can configure complex Criteria by combining multiple conditions based on your needs and preferences.
-
If you want to configure a rule with multiple conditions, use the AND option. You can create any number of AND conditions within one rule. Your customers must satisfy all the conditions to receive a Credit Line.
-
You can also create two or more sets of conditions within one Rule. If your customers match with any one set, they will be eligible to receive a Credit Line. To create more than one set of conditions, use the OR option.
-
In the Credit Limit field, input the Credit Line you want to issue when your customers match with this rule.
By default, when a user receives a Credit Line in Auto Approval Mode, their Credit line will not be increased automatically even if they are eligible for a Higher Credit Limit from another Rule. If you want to automatically increase the Credit Limit when they are eligible, enable the “Switch Between Rules based on Priority” option.
When this option is enabled and the user is matching with 2 or more rules, the credit limit from the rule with the lowest priority will be assigned to the user. If there is no overlap between the rules, the credit limit from the matching rule will be applied to the user.
Advanced
↑ Back to topAdvanced Settings
-
By Default, in order to issue a Credit Line no money is needed. The Credit Line is issued as Virtual Funds. If you want to change this behavior and set it such Admin has to Add funds to their Admin Funds wallet in order to issue Credit Line, you can do so by modifying the “Credit Line has to be Given to Users” option and setting it to “From Admin Funds”.
-
By default, the Site Admin can issue Credit Line to Customers without using money. If the settings is set such that money is needed to issue Credit Line, then the Site Admin must have sufficient funds in their Admin account. By default, only site admin can add funds to the Admin account. If you want to change the user who can add funds to the admin account, you can do so by selecting a different user in the “User to Add Funds” option in General > General Settings section.
-
In order to add funds to the Admin account, a product will be needed. You can create a new product / select an existing product from the shop. The product can be configured in “Funds Addition Product Type” option in General > General Settings section.
-
You can place restrictions on the minimum amount, the maximum amount for funds addition.
-
You can also send a Low Funds Threshold email notification to admin when their Admin Funds runs below the value set in “Low Funds Threshold” option in General > General Settings section.
-
You can also restrict certain payment gateways from being displayed in the checkout during admin funds addition. To exclude a payment gateway, choose a payment gateway in “Disable Payment Gateways for Funds Addition” option in General > General Settings section.
The Admin Funds addition settings in General Section will be visible only when the Fund Type is set to Admin Funds in the Advanced Settings.
-
Orders Placed through Credits Payment Gateway will go to the status selected in Orders placed through Credits Payment Gateway will go to option.
-
By Default, the funds from the user’s account will be debitted once the order reaches the Processing status. If you wish to debit the funds on a different status, you can do so by customizing the Debit Funds from User Account when Order Status becomes option.
-
By default, the Biiling Statement will be sent to the user in HTML format, if you wish to change the format to PDF, you can do so by customizing the “Billing Statement File Format” option.
-
In Minimum Cart Total to Use Credits Payment Gateway option set the minimum cart total needed for the customer to place the order using the Credits payment gateway. If the cart total is below the specified value, the gateway will not be displayed for the customer.
-
By default, users will not be allowed to use their credit line when their account is in overdue status. If you wish to allow your users to use their credir line when in overdue status, you can do so by customizing the “Allow Credits Usage in Overdue Status” option.
Messages and Localization
↑ Back to topIn this section, you can customize all the labels, notices and error messages which are displayed in the frontend.
Credits Payment Gateway Settings
↑ Back to topTo configure Credit Limit payment gateway, go to WooCommerce > Settings > Payments > Credits
Enable the payment gateway and customize the labels as per your needs.
Frontend Form
↑ Back to topCustomers have to submit the form with necessary details in order to get the Credits. Enable the fields that has to be displayed in the frontend form and select which fields are mandatory to be filled by the customers.
The settings for the frontend form can be found in Credits > Form Fields. You can optionally add your own fields by clicking the “Add form field”.
Once the customer submits the form, admin has to review it from Credits > Credits
By default, the frontend form will be automatically displayed on the “Credits Dashboard” page. This page will be automatically created by the plugin. To display the frontend form on a different page, use the shortcode [wc_cs_dashboard] and select that page in Credits > Settings > General > Credits Dashboard Settings > Credits Dashboard Page.
Usage
↑ Back to topVirtual Funds with Manual Approval
↑ Back to topa. Customer Requesting for a Credit Line
- The Credit Request form will be visible to the users based on the restrictions set in the user filter option in Credits > Settings > General > User Restrictions > Display Credit Form for option.
- Now, when a valid logged-in customer accesses the Credit Request form, they will have to fill-in all the mandatory fields and submit the application.
- The customer will receive the acknowledgement for the Credit Request submission.
b. Credit Approval Process
- When a customer submits a Credit Line Application, the Admin will be notified by email.
- When the Admin reviews the application, the system will suggest the eligible Credit Line.
- Admin can approve the suggested Credit Line or they can set a Credit Line themselves.
- If the suggested Credit Line is modified by the admin, then that user will not be eligible for future Automatic Credit Line Increase. Credit Line can only be manually increased for those customers.
- Once the customer’s application is approved, a Credit Line will be issued to them.
c. Credits Usage and Bill Generation
- Credit Line or Credits for WooCommerce comes bundled with a payment gateway which allows your customers to use their credits for purchasing products from your site.
- When your customers use the Credit payment gateway for placing orders, the credits needed for placing the order will be deducted from their account.
- The credits deducted from your customer’s account will be recorded as an unbilled transaction.
- Your customers can place any number of orders using their available Credit limit. Every time an order is placed using the Credits payment gateway, the credits will be deducted from the customer’s account.
- Once the billing date is reached, a bill will be generated. This bill includes all the unbilled transactions of the customer.
- Your customer will be notified by email about the bill generation.
- Your customers can continue to use their available credits for placing the orders.
- The Transactions made after the bill generation will be billed only in the next billing cycle.
d. Credits Repayment
- Once a bill is generated, the repayment for the used credits has to be paid before the due date.
- Your customers can make payment for the bill by accessing their Credits dashboard and clicking the “Make Payment” button.
- Once clicked, your customers will be redirected to the checkout page for making the repayment.
- Once the payment is successful, the used credits will be added back to the available credits.
- Your customers can continue to place orders using their available Credits and repay for the purchase after the bill is generated.
Virtual Funds with Auto Approval
↑ Back to topa. Customer Receives the Credit Line
- The Credit Line System will automatically assign Credit Line to all the users who are eligible.
- The eligibility is decided based on the predefined rules configured in the Credits > Settings > Rules.
b. Credits Usage and Bill Generation
- Credit Line or Credits for WooCommerce comes bundled with a payment gateway which allows your customers to use their credits for purchasing products from your site.
- When your customers use the Credit payment gateway for placing orders, the credits needed for placing the order will be deducted from their account.
- The credits deducted from your customer’s account will be recorded as an unbilled transaction.
- Your customers can place any number of orders using their available Credit limit. Every time an order is placed using the Credits payment gateway, the credits will be deducted from the customer’s account.
- Once the billing date is reached, a bill will be generated. This bill includes all the unbilled transactions of the customer.
- Your customer will be notified by email about the bill generation.
- Your customers can continue to use their available credits for placing the orders.
- The Transactions made after the bill generation will be billed only in the next billing cycle.
c. Credits Repayment
- Once a bill is generated, the repayment for the used credits has to be paid before the due date. Your customers can make payment for the bill by accessing their Credits dashboard and clicking the “Make Payment” button.
- Once clicked, your customers will be redirected to the checkout page for making the repayment.
- Once the payment is successful, the used credits will be added back to the available credits.
- Your customers can continue to place orders using their available Credits and repay for the purchase after the bill is generated.
Admin Funds with Manual Approval
↑ Back to topa. Funds Addition to Admin Account
- The first step in using Credit Line or Credits for WooCommerce plugin is Admin Funds addition. In this step, the site admin should have some funds in their Admin Funds section before they can approve any Credit applications.
- By default, only the Site Admin can add funds to the Admin Funds section. To modify the user for funds addition, go to Credits > Settings > General > General Settings > User to Add Funds and select another user.
- Now, when the site admin/any other designated user for Fund Addition access their My Account page, they can see an “Add Funds” section. Funds can be added to the Admin’s Account by using the form in this section.
b. Customer Requesting for a Credit Line
- The Credit Request form will be visible to the users based on the restrictions set in the user filter option in Credits > Settings > General > User Restrictions > Display Credit Form for option.
- Now, when a valid logged-in customer accesses the Credit Request form, they will have to fill-in all the mandatory fields and submit the application.
- The customer will receive the acknowledgement for the Credit Request submission.
c. Credit Approval Process
- When a customer submits a Credit Line Application, the Admin will be notified by email.
- When the Admin reviews the application, the system will suggest the eligible Credit Line.
- Admin can approve the suggested Credit Line or they can set a Credit Line themselves.
- If the suggested Credit Line is modified by the admin, then that user will not be eligible for furture Automatic Credit Line Increase. Credit Line can only be manually increased for those customers.
- Once the customer’s application is approved, a Credit Line will be issued to them.
d. Credits Usage and Bill Generation
- Credit Line or Credits for WooCommerce comes bundled with a payment gateway which allows your customers to use their credits for purchasing products from your site.
- When your customers use the Credit payment gateway for placing orders, the credits needed for placing the order will be deducted from their account.
- The credits deducted from your customer’s account will be recorded as an unbilled transaction.
- Your customers can place any number of orders using their available Credit limit. Every time an order is placed using the Credits payment gateway, the credits will be deducted from the customer’s account.
- Once the billing date is reached, a bill will be generated. This bill includes all the unbilled transactions of the customer.
- Your customer will be notified by email about the bill generation.
- Your customers can continue to use their available credits for placing the orders.\
- The Transactions made after the bill generation will be billed only in the next billing cycle.
e. Credits Repayment
- Once a bill is generated, the repayment for the used credits has to be paid before the due date.
- Your customers can make payment for the bill by accessing their Credits dashboard and clicking the “Make Payment” button.
- Once clicked, your customers will be redirected to the checkout page for making the repayment.
- Once the payment is successful, the used credits will be added back to the available credits.
- Your customers can continue to place orders using their available Credits and repay for the purchase after the bill is generated.
Admin Funds with Auto Approval
↑ Back to topa. Funds Addition to Admin Account
- The first step in using Credit Line or Credits for WooCommerce plugin is Admin Funds addition. In this step, the site admin should have some funds in their Admin Funds section before they can approve any Credit applications.
- By default, only the Site Admin can add funds to the Admin Funds section. To modify the user for funds addition, go to Credits > Settings > General > General Settings > User to Add Funds and select another user.
- Now, when the site admin/any other designated user for Fund Addition access their My Account page, they can see an “Add Funds” section. Funds can be added to the Admin’s Account by using the form in this section.
b. Customer Receives the Credit Line
- The Credit Line System will automatically assign Credit Line to all the users who are eligible.
- The eligibility is decided based on the predefined rules configured in the Credits > Settings > Rules.
c. Credits Usage and Bill Generation
- Credit Line or Credits for WooCommerce comes bundled with a payment gateway which allows your customers to use their credits for purchasing products from your site.
- When your customers use the Credit payment gateway for placing orders, the credits needed for placing the order will be deducted from their account.
- The credits deducted from your customer’s account will be recorded as an unbilled transaction.
- Your customers can place any number of orders using their available Credit limit. Every time an order is placed using the Credits payment gateway, the credits will be deducted from the customer’s account.
- Once the billing date is reached, a bill will be generated. This bill includes all the unbilled transactions of the customer.
- Your customer will be notified by email about the bill generation.
- Your customers can continue to use their available credits for placing the orders.
- The Transactions made after the bill generation will be billed only in the next billing cycle.
d. Credits Repayment
- Once a bill is generated, the repayment for the used credits has to be paid before the due date.
- Your customers can make payment for the bill by accessing their Credits dashboard and clicking the “Make Payment” button.
- Once clicked, your customers will be redirected to the checkout page for making the repayment.
- Once the payment is successful, the used credits will be added back to the available credits.
- Your customers can continue to place orders using their available Credits and repay for the purchase after the bill is generated.
Credits Workflow Flowchart
↑ Back to topVirtual Funds with Manual Approval – Flowchart
↑ Back to top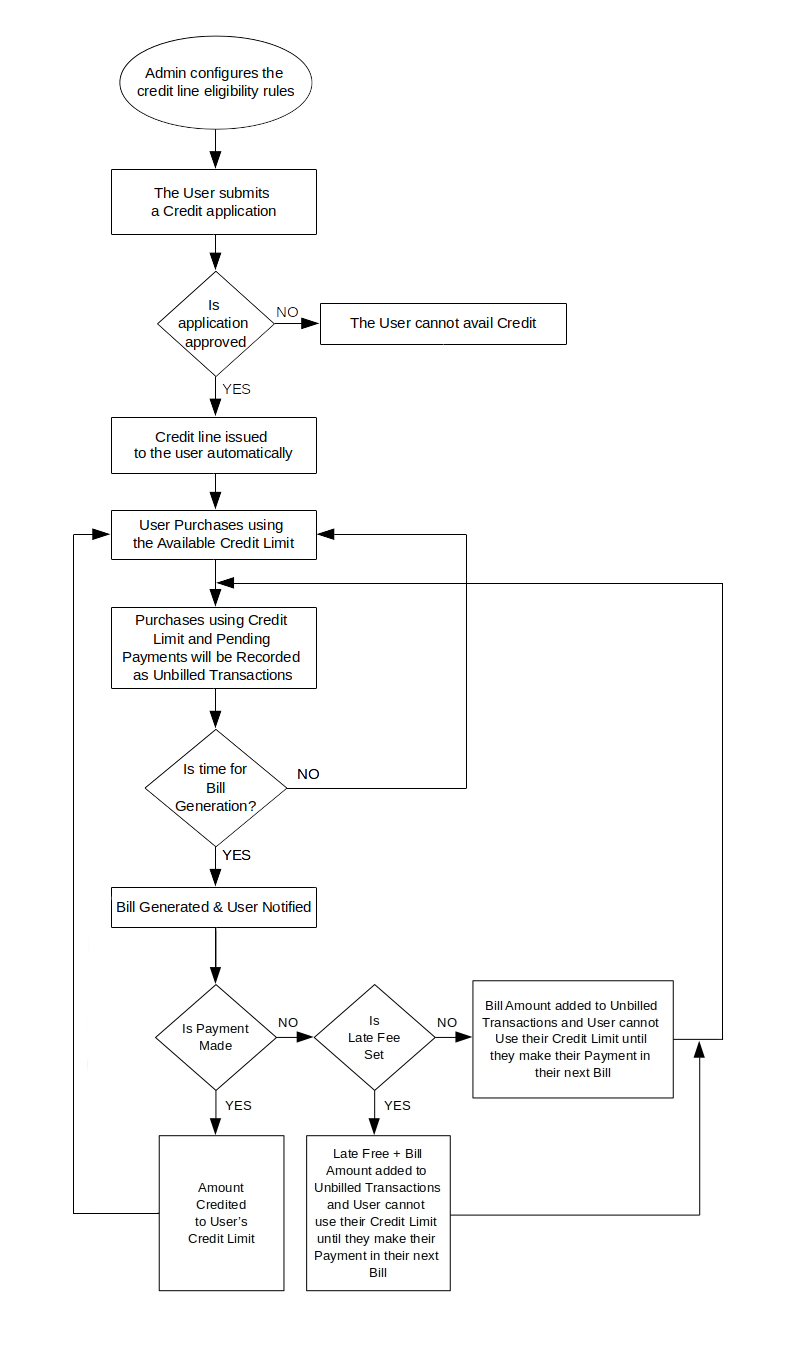
Virtual Funds with Auto Approval – Flowchart
↑ Back to top
Admin Funds with Manual Approval – Flowchart
↑ Back to top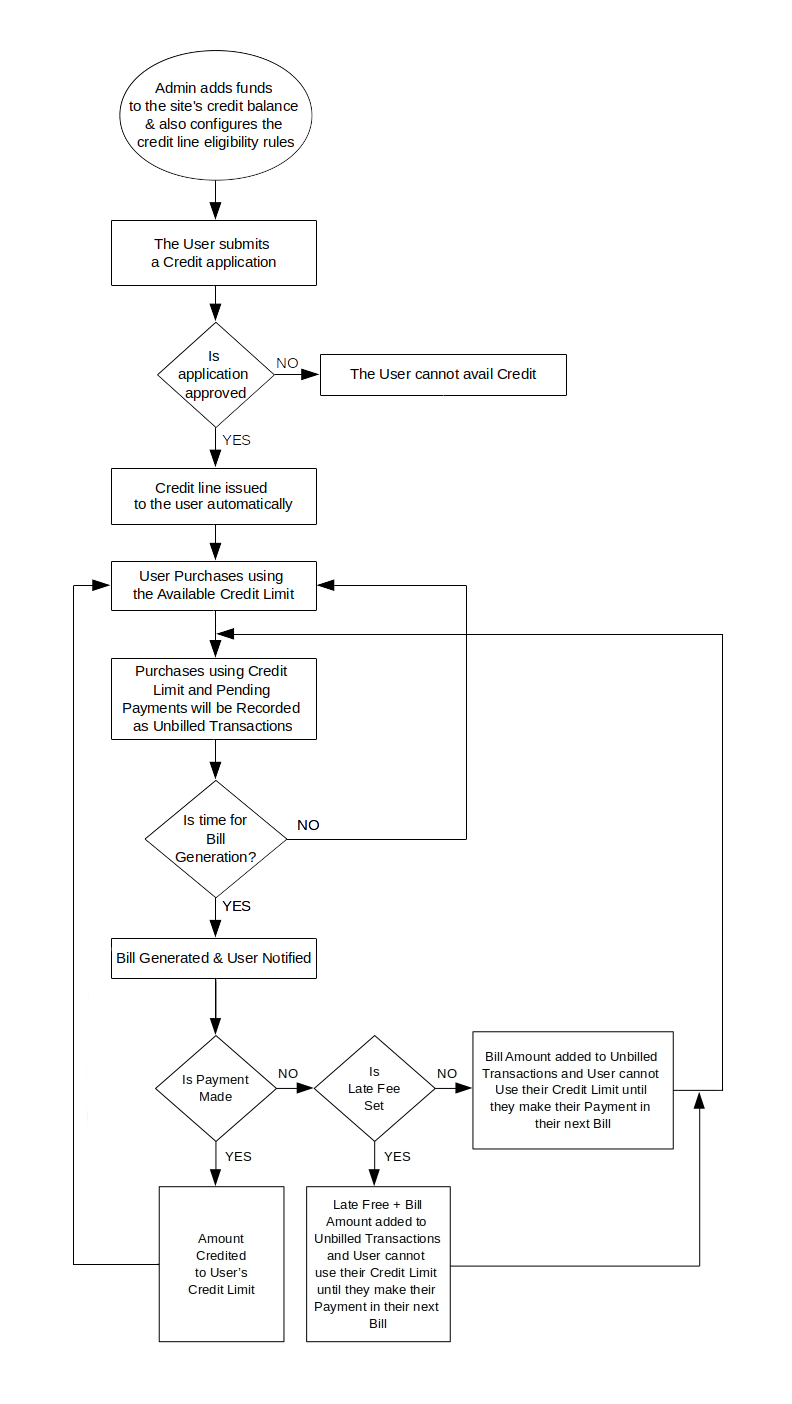
Admin Funds with Auto Approval – Flowchart
↑ Back to top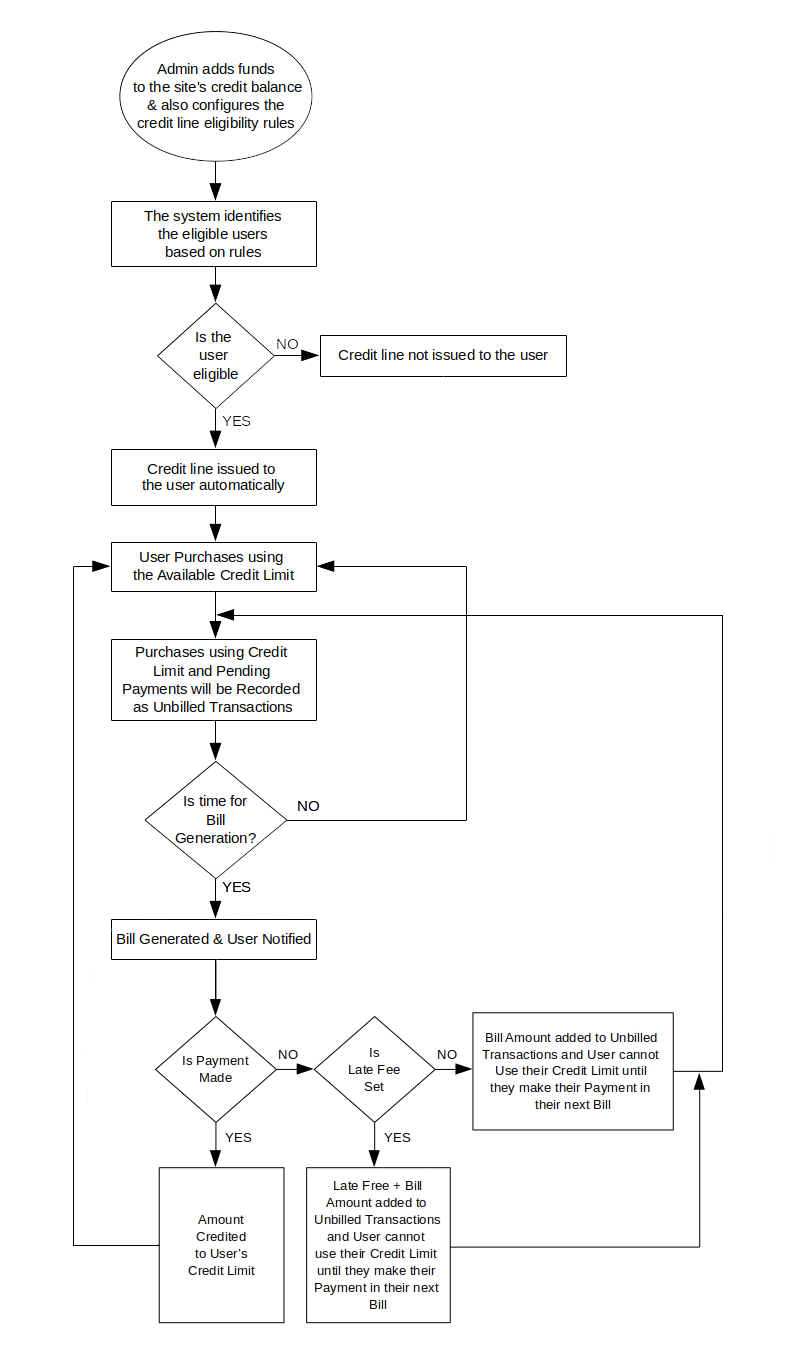
Credits Repayment by Admin
↑ Back to topTranslation
↑ Back to top- Download and install Poedit
- Open the file credits-for-woocommerce > languages > credits-for-woocommerce.pot using Poedit.
- Create a new translation file by clicking Create new translation button.
- Choose the Source text and set its corresponding French text in Translation Text Area.
- Save the changes.
- Save the file name as credits-for-woocommerce-fr_FR.po.
- If you are using WordPress Version 3.9.13 or below, then in wp-config.php define the WPLANG as French. Syntax is define(‘WPLANG’, ‘fr_FR’);
- If you are using WordPress Version 4.0 or above, then go to WordPress dashboard > Settings > General and select the Site Language as French.
FAQ
↑ Back to topQ: What’s the difference between “Admin Funds” and “Virtual Funds”?
In “Admin Funds”, the site admin has to load credits to their own account in order to give credit line to other customers. In case if there is no enough credits in your account, you won’t be able to give a credit line to the customers.
In “Virtual Funds”, site admin doesn’t need to load credits to their account. A Credit line can be given to customers.
Q: How to style the bill statement?
It is not possible to style the bill statement.
Q: Refunds are not credited to the customer account. Why?
Updating the status to “Refunded” won’t credit the refund amount to the customer account. Follow the below steps while processing the refund to credit the refund amount directly to the customer’s account.
-
Edit the order that you want to refund.
-
Click the “Refund” button.
-
Update the refundable product quantity.
-
Click the “Refund $x.xx via Credits” button.
Q: Why bill is not generated from the plugin?
Bill will be generated automatically using cron. Please cross check whether cron is running properly on your site. If the cron is not running, then that is the reason why the bill is not generating.
Q: Is it possible to get the application form submitted with the phone number field as mandatory instead of the email address field?
We are getting customer details using the Email address and hence it is not possible to disable the email address field and it is not possible to give the email address field as optional.
Q: How to generate bill every week instead of every month?
Weekly billing is not possible. Only monthly billing is possible.
Q: I need to set the repayment date exactly after specific days of purchasing date. Is that possible?
It is not possible. Only a specific date of the month can be set as a repayment date.
Questions and Feedback
↑ Back to topHave a question before you buy? Please fill out this pre-sales form.
Already purchased and need some assistance? Get in touch with us via the Help Desk.