This guide provides an overview of the features available to a store manager with the WooCommerce Bookings extension to create and manage bookings.
Answers not found here may be located at Bookings FAQ.
Creating a Bookable Product
↑ Back to topTo accept bookings, you need to create a bookable product. Bookable Products are different than simple products of WooCommerce. Bookable products are specifically designed for businesses that offer time-based services or rental options. These products allow customers to book and schedule appointments, rentals, or reservations for specific dates and durations.
You can create a booking product from pre-defined templates located at Bookings > Add Product or from within the “Templates” tab on the “Edit Product” page. You can read more about it here.
If you are looking to create a booking product from scratch, please follow the below steps:
- Go to: Products > Add New. A familiar WooCommerce interface for product creation appears.
- Enter a title and description for your product.
- Scroll down to Product Data and select Bookable Product in the dropdown menu.
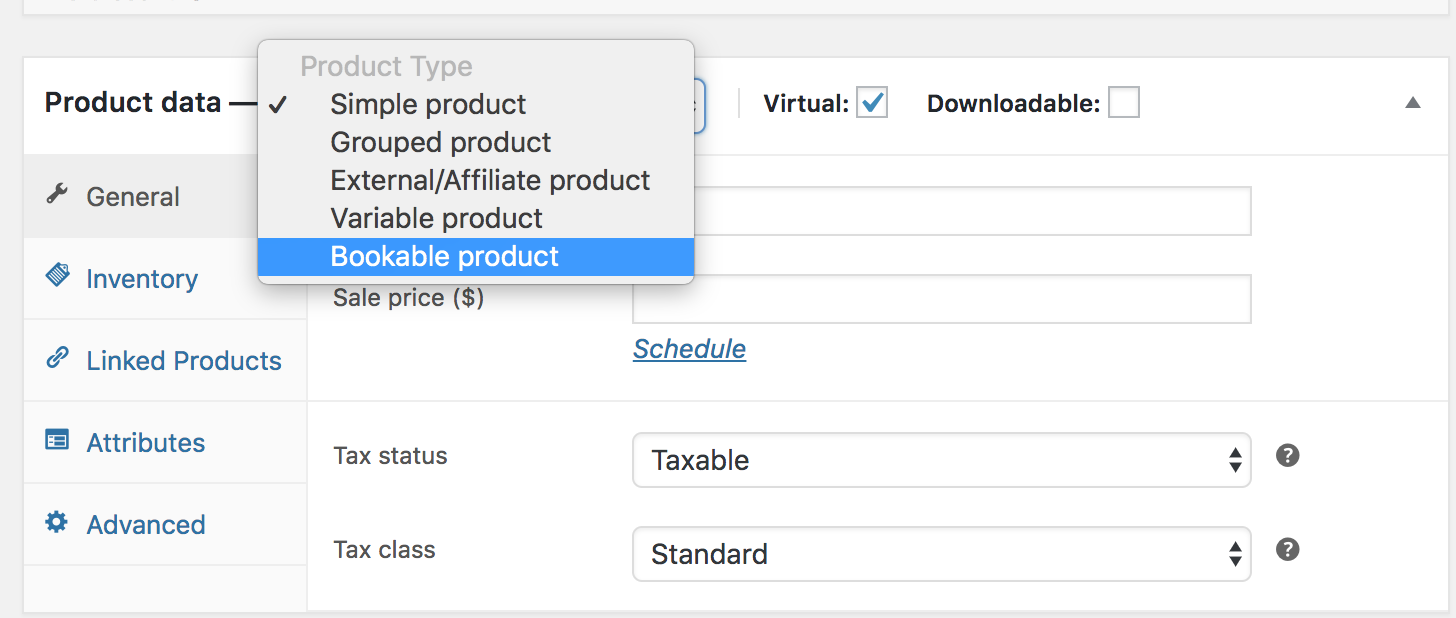
- Tick the Virtual checkbox, if your product does not require shipping. This omits the Shipping Costs tab from your product.
- Fields will change to reflect bookable products.
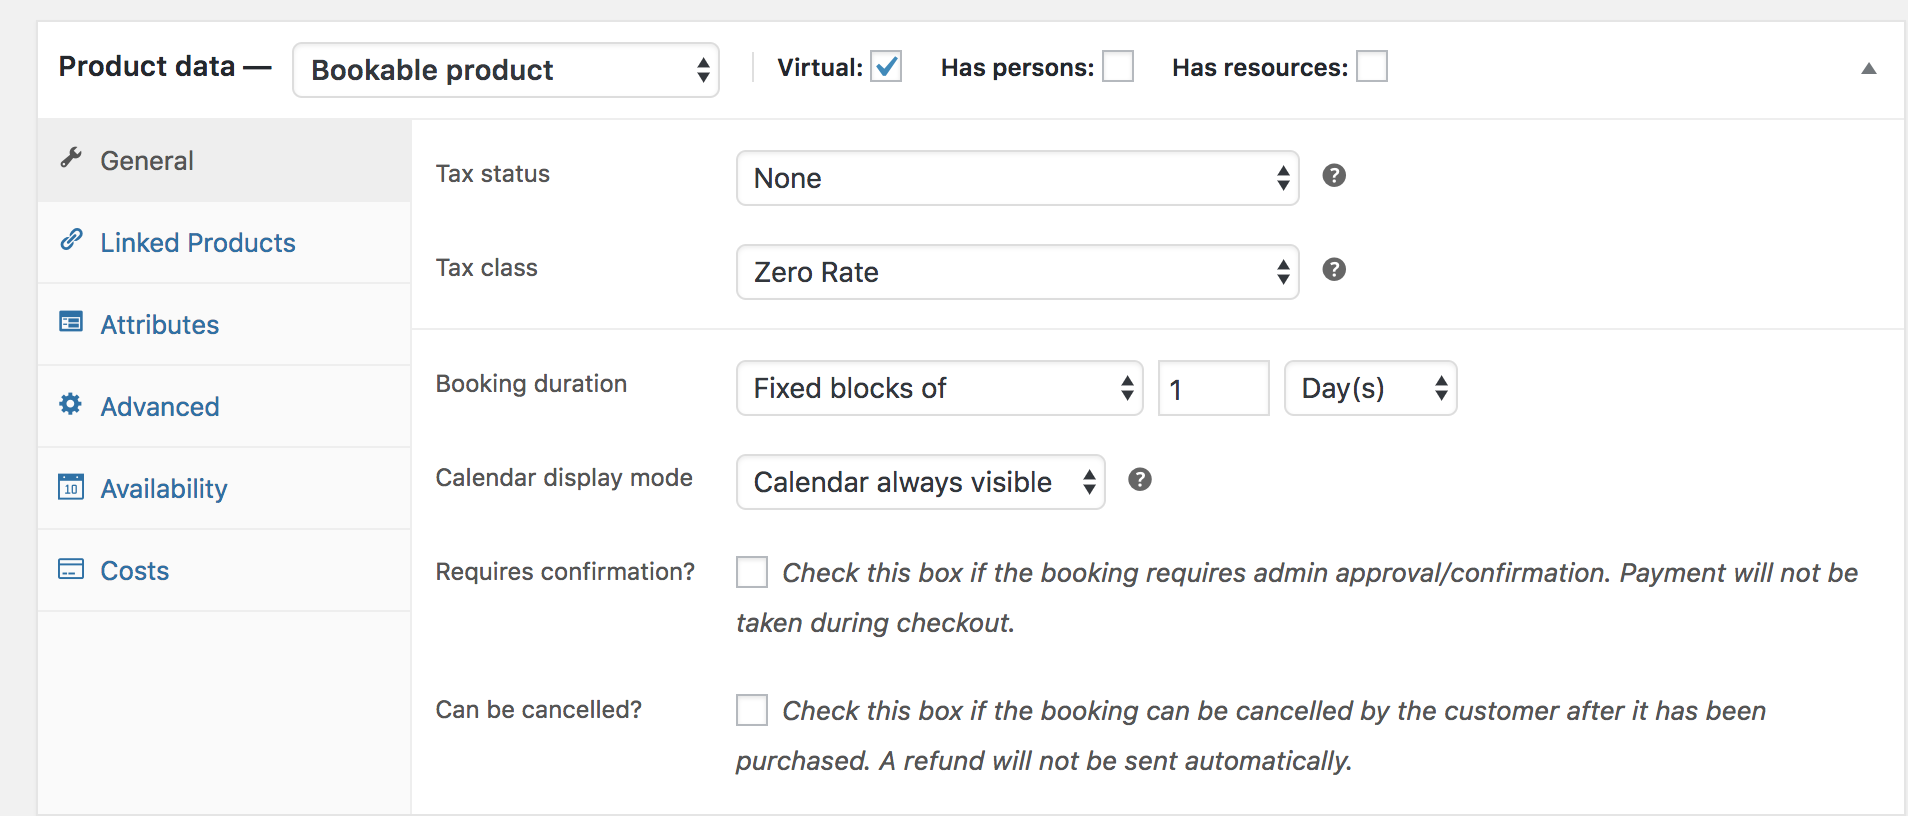
The General settings include information about tax, booking duration, calendar display, confirmation, and cancellation preferences.
Taxes
↑ Back to topSelect the appropriate Tax status and Tax class for this product, should you need to charge tax or not.
Booking duration
↑ Back to topThis determines how long a booking lasts. The duration can be admin-defined (fixed block) or customer defined (they need to input on the front-end). Duration units can be Hours, Minutes, Days, or Months.
- Fixed blocks have a set duration that you define. The customer can only choose one block which will last the defined amount of time. For example, a hairdresser appointment lasts one hour and you can only book one at a time.
- Customer-defined blocks have a set duration, but the customer can choose how many blocks they want. For example, the co-working space is rented out in hourly intervals, and the customer can define how many 1-hour blocks they would like to rent.
- If you set your Booking duration to be customer defined:
- A minimum and maximum allowed value can be included in the General tab. This sets the minimum duration the booking product can be booked by a customer. (It is possible to use 30-minute blocks and set the minimum to 2 blocks. Your customers now need to book at least one hour and can add increments of 30 minutes).
- A customer-defined duration with blocks in minutes/hours will display a dropdown.
Calendar display mode
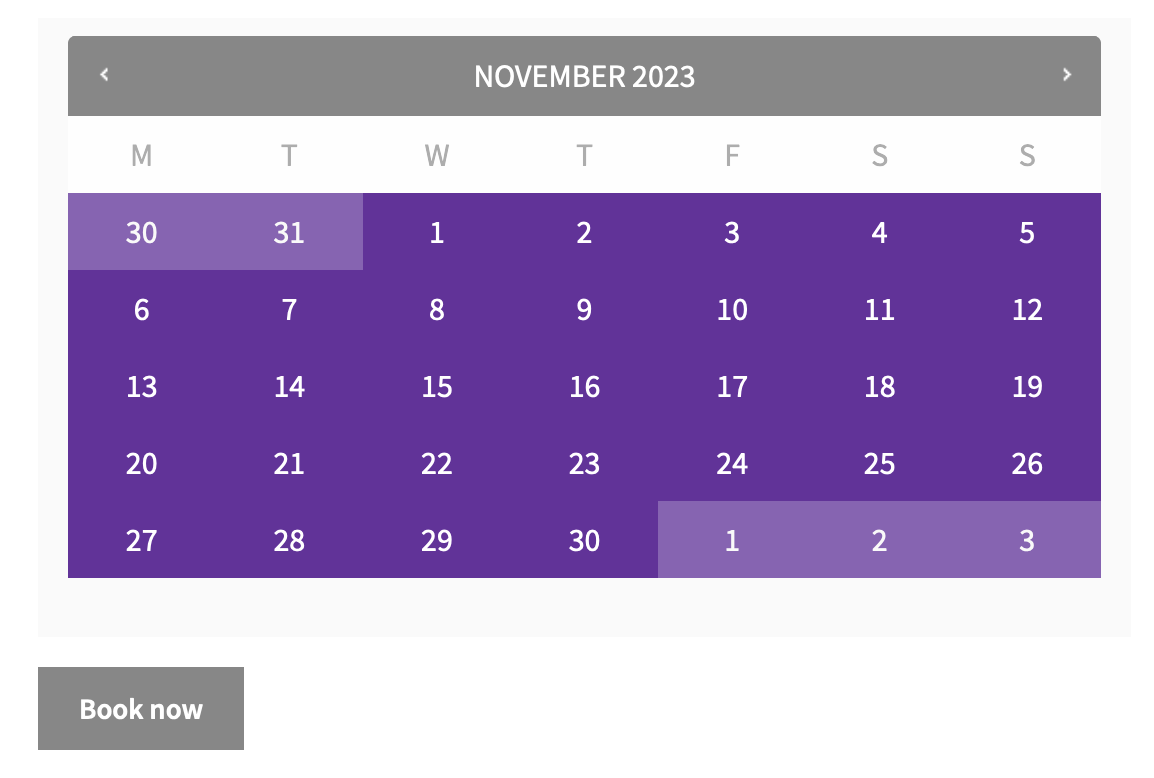
↑ Back to topSelect Calendar always visible or Display calendar on click. By default, the calendar is set to always show.
Enable Calendar Range Picker
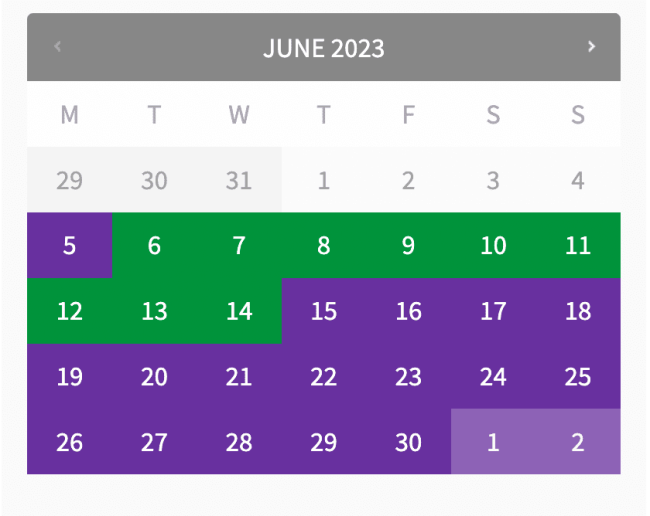
↑ Back to topIf the Booking duration is set to be Customer defined with a unit of Days, then another option will be shown to “enable the calendar range picker” within the General settings.
Enabling this allows customers to select a start date and an end date for their booking within the calendar itself.
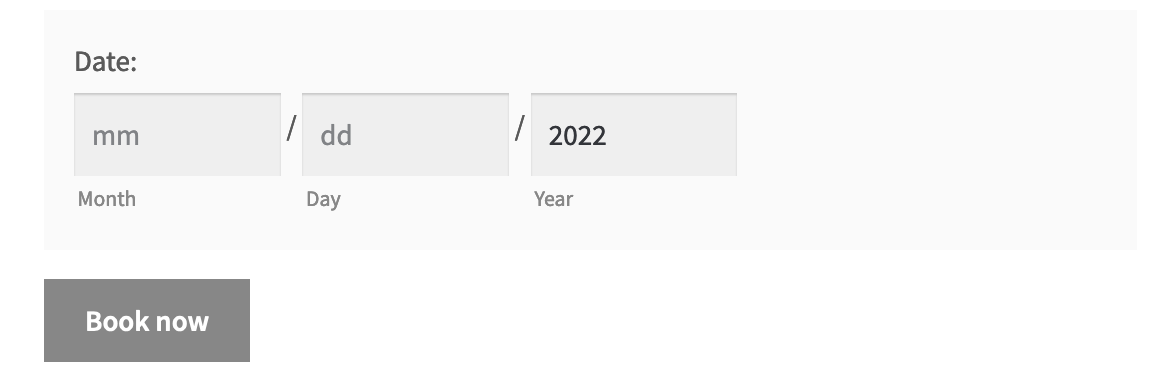
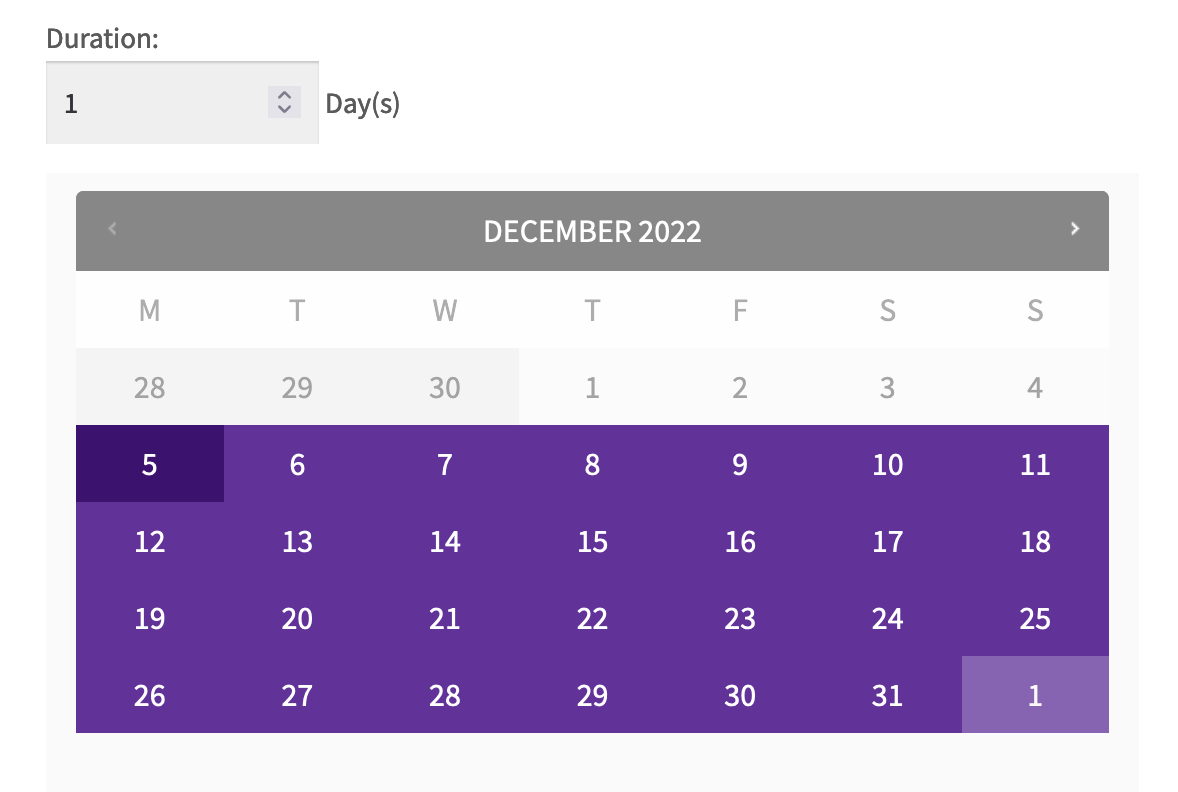
When Enable Calendar Range Picker? is not enabled, the Duration selector indicates the number of days required.
Requiring Confirmation
↑ Back to topIf the booking needs to be reviewed by an admin before confirmation, tick the “Requires confirmation?” checkbox. Rather than taking the payment at checkout directly, the user inputs details, and submits them for approval.
To learn more, see Managing Bookings.
If the “Requires Confirmation?” checkbox is ticked:
- Check Availability option will be the only payment gateway presented when checking out
- other items will be removed from the Cart when this bookable product is added to the Cart
Please note that the Check Availability “payment gateway” can’t be enabled/disabled under WooCommerce > Settings > Payments like other gateways can, and is displayed/hidden based purely on a Bookable Product requiring confirmation being in the Cart.
Once the booking is approved by the admin from the backend, the customer receives another email to then submit payment.
Allowing Booking Cancellation
↑ Back to top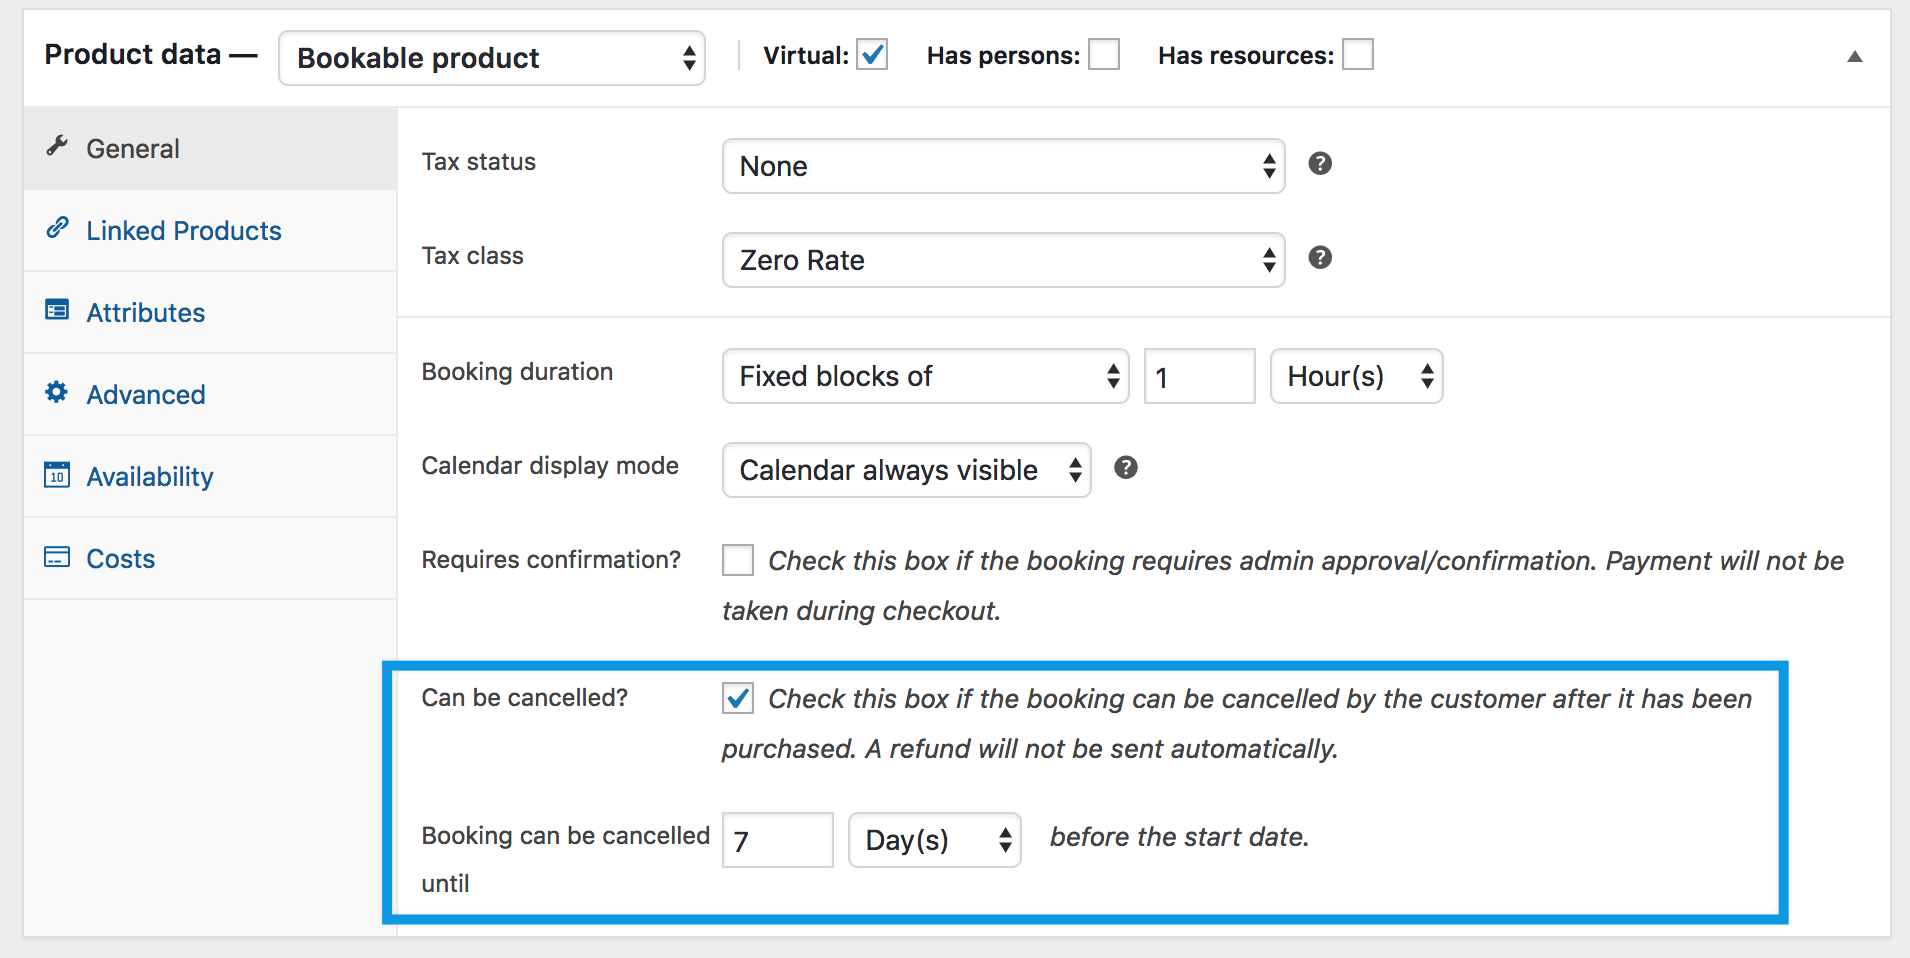
You may choose whether you want the customer to have the option to cancel their booking. After selecting the option “Can be cancelled?“, two fields appear that allow you to choose how many Minutes/Hours/Days/Months prior to the start date customers can cancel a booking.
Availability settings
↑ Back to topAvailability (what slots can be booked) can be controlled via the Availability tab. The first options allow you to define dates that can be booked:
Max bookings per block
↑ Back to topThis setting allows you to limit the number of bookings that can be made for a single block of time (time slot). This can be useful for a variety of reasons, such as:
- Preventing overbooking: If you have limited availability, you can use the maximum bookings per block setting to prevent customers from booking too many blocks of time at once. This will help you ensure that you have enough availability for all of your customers.
- Managing demand: If you know that your product is in high demand, you can use the maximum bookings per block setting to limit the number of bookings that can be made per day or week. This will help you manage demand and ensure that everyone has a chance to book your product.
- Creating a sense of urgency: If you want to encourage customers to book your product sooner rather than later, you can use the maximum bookings per block setting to set a maximum number of bookings that can be made for a single block of time. This will create a sense of urgency and make customers more likely to book your product right away.
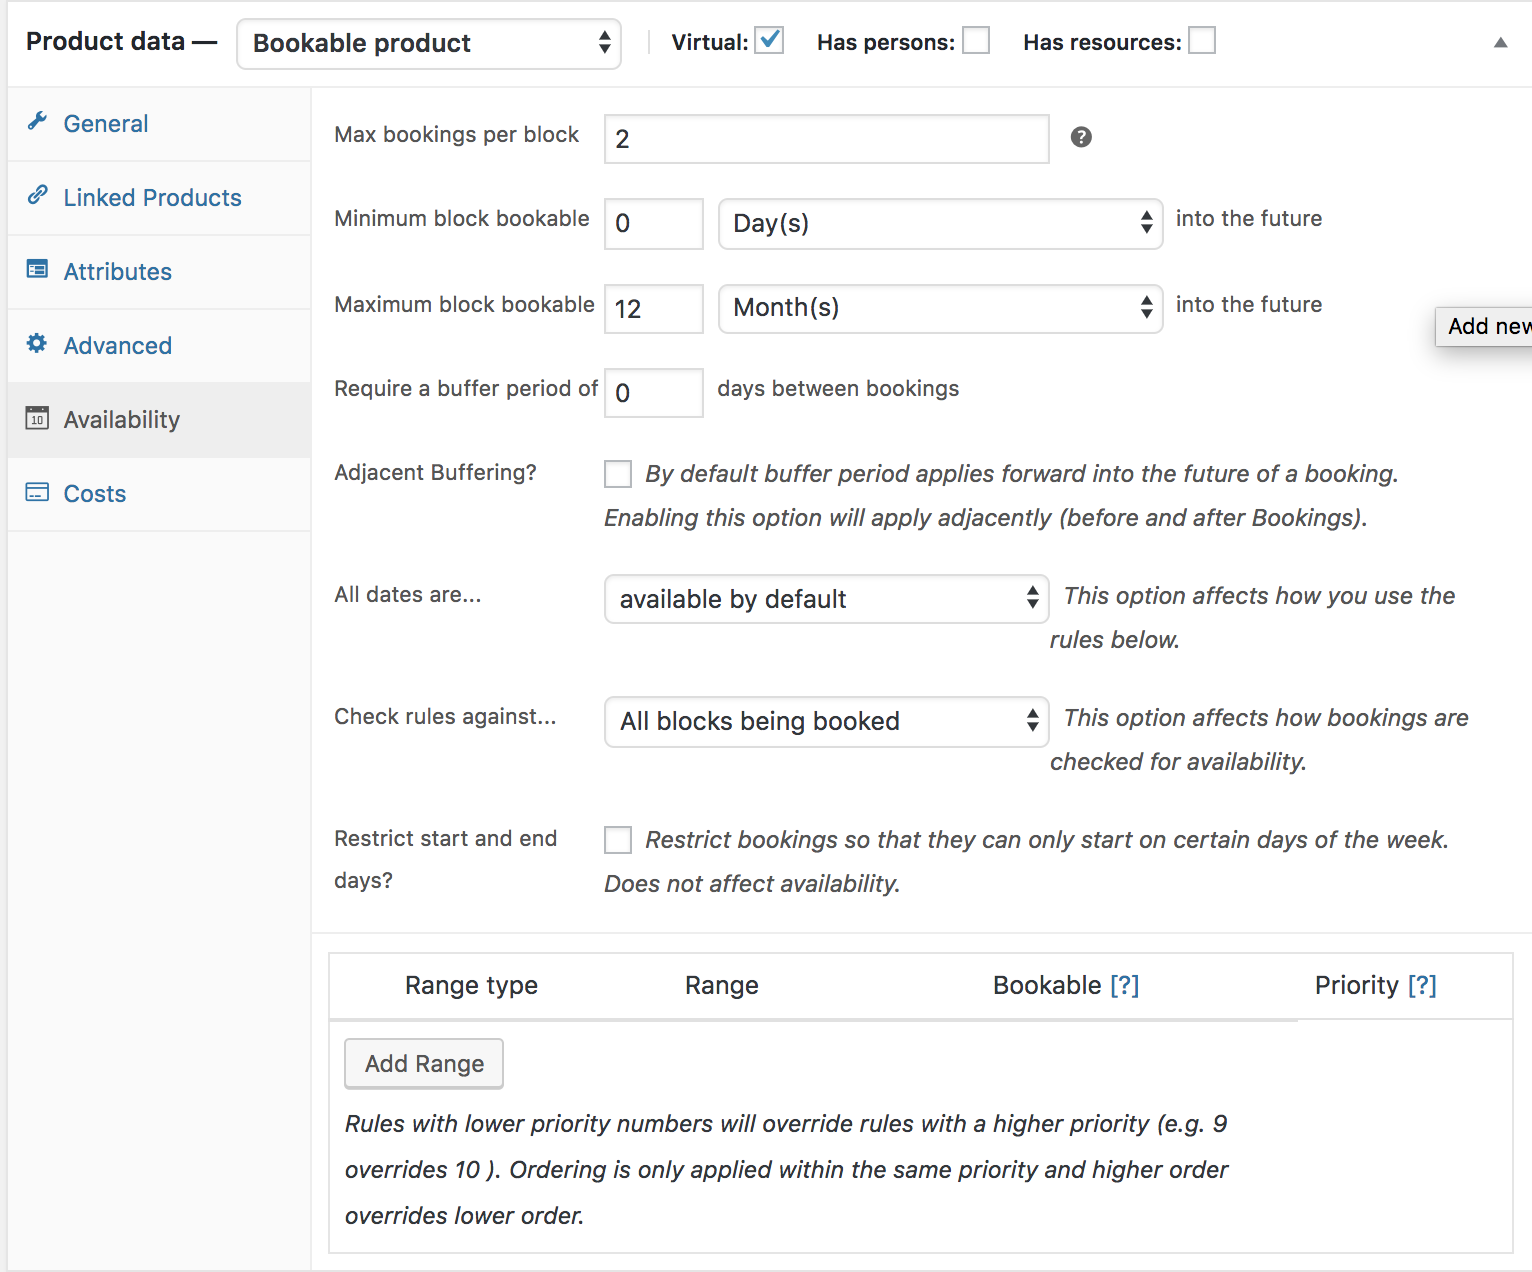
Under the Availability tab, you will see the Maximum bookings per block field. Enter the maximum number of bookings that you want to allow for a single block of time in this field.
For example, with a fixed booking of 1 day and maximum bookings per block set to 2, then each day you can accept two bookings.
The maximum bookings allowed for each block can be overridden at the Resource level.
Minimum/Maximum block bookable into the future
↑ Back to topThe minimum and maximum block bookable in the future settings allows you to control how far in advance customers can book your products.
Under the Availability tab, you will see the Minimum block bookable and Maximum block bookable fields. Enter the number of days or weeks in advance that you want customers to be able to book your product in these fields.
For example, if you want customers to be able to book your product at least 3 days in advance, but no more than 2 weeks in advance, you would enter 3 days in the Minimum block bookable field and 2 weeks in the Maximum block bookable field.
Once you have set these settings, they will be applied to the bookable product.
Another example: If today is March 1 and you set the minimum block bookable to 1 month into the future, then the first date a customer could book would be April 1. The same applies to the maximum date bookable.
Require a buffer period between bookings
↑ Back to topDepending on the chosen unit of time for booking (minutes, hours, or days) under general settings, you have the ability to designate a specific duration of unavailability (buffer time) after each bookable slot. This ensures that no one else can book during that period. For instance, suppose you offer appointments in 1-hour increments and desire a 1-hour break (buffer) between each appointment. In that case, you can set a buffer period of 1 hour.
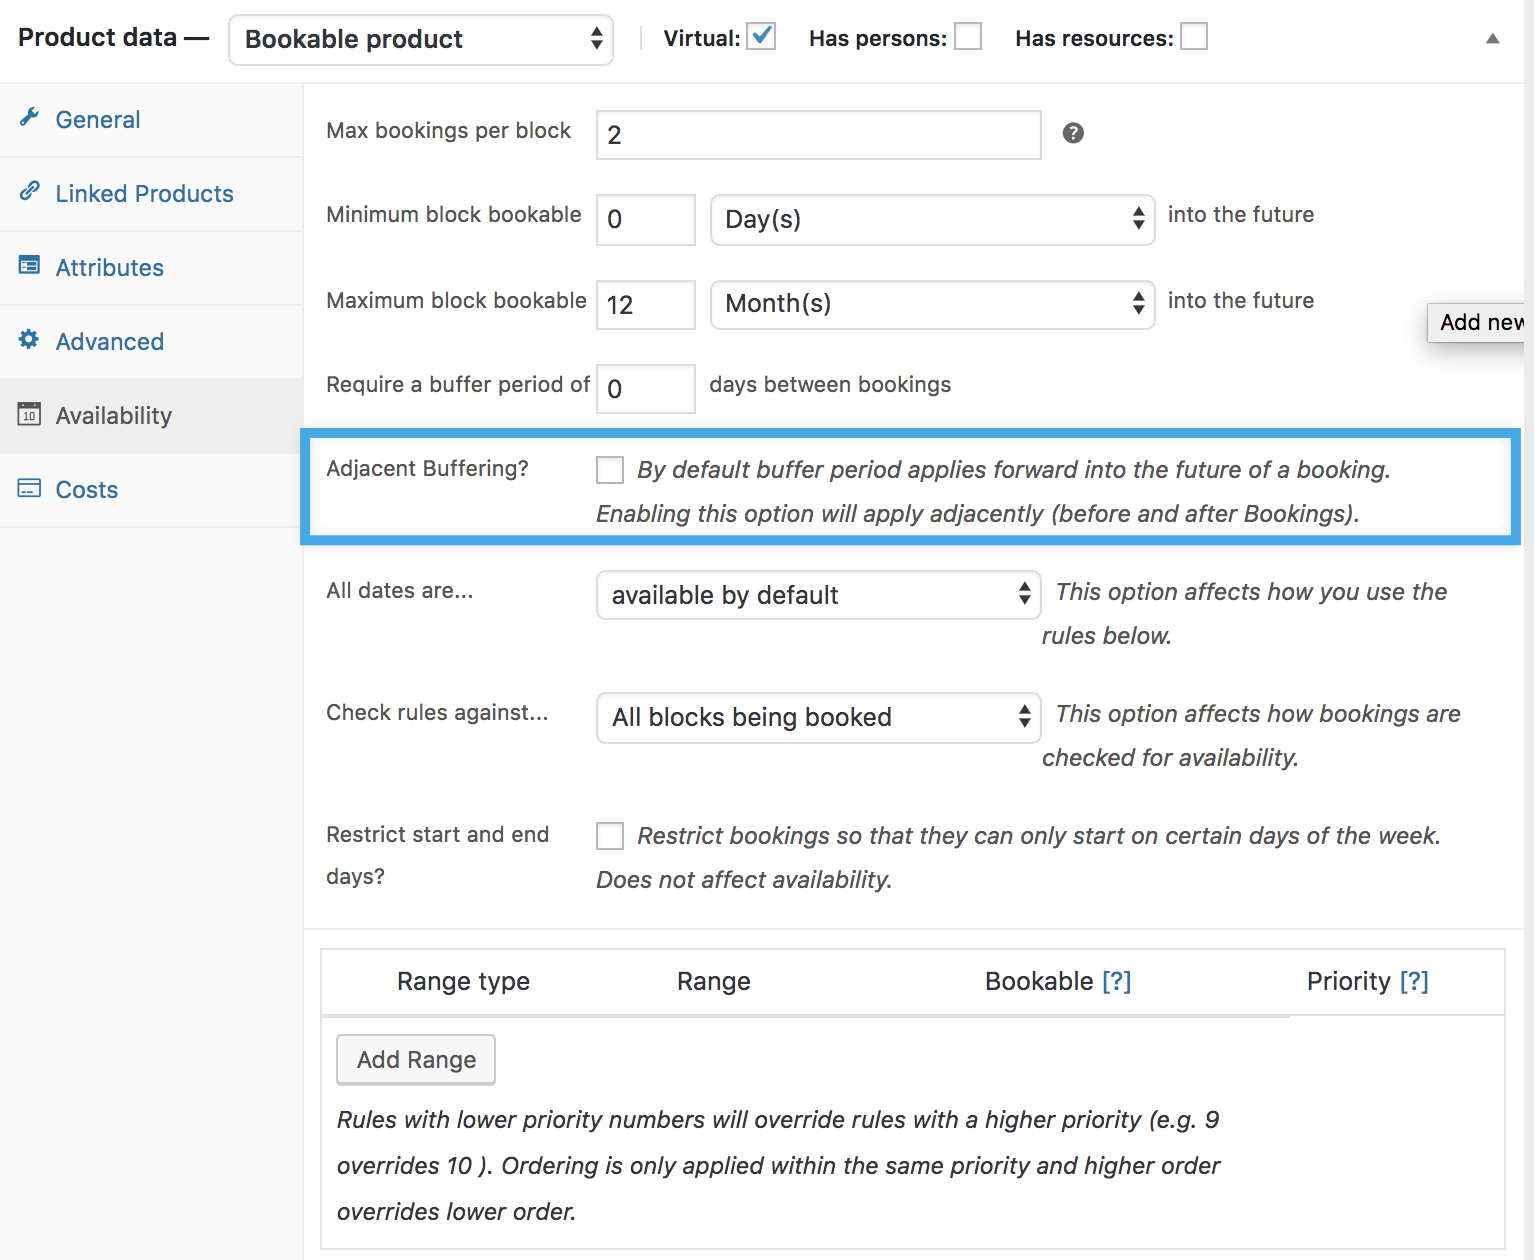
If you prefer to include a buffer both before and after your appointments, you can select the “Adjacent Buffering” checkbox. By enabling this option, the specified buffer duration (which cannot be booked) will be added both before and after each appointment. For example, if you define a buffer period of one hour between bookings with adjacent buffering, there will be a total of 2 hours between appointments.
It is important to note that buffer periods should always be defined using the same unit of time (minutes, hours, or days) as the chosen booking blocks. To illustrate, if you wish to have a 30-minute buffer between your 1-hour appointments, ensure that you use 60-minute blocks instead of 1-hour blocks.
All dates are
↑ Back to topDepending on how you want to set up availability, this option allows you to:
- Set available by default: Available by default means all blocks are available and you can specifically turn some time slots off with rules
- Not available by default: Not available by default means all blocks are not available and must be turned on through availability rules.
Check rules against
↑ Back to topYou have two options:
- All blocks being booked: This checks all available blocks within a duration. For example, if a customer chooses to book for 5 days and 1 block is equal to 1 day, it will check availability for all 5 days.
- Starting block only: This checks the first block the user selects. For example, if a customer chooses to book for 5 days and 1 block is equal to 1 day, it will only check availability for the first day.
Restrict selectable days
↑ Back to topThe “Restrict Selectable Days” setting allows you to limit the days on which customers can select on the calendar and book appointments or reservations. By enabling this setting and configuring the specific restrictions, you can control the availability of your bookable time slots based on the days of the week.
For example, let’s say you have a business that offers weekend activities such as guided tours or workshops. If you only want customers to be able to book appointments on Saturdays and Sundays, you can enable the “Restrict Selectable Days” setting and specify the allowed days as Saturday and Sunday.

By restricting selectable days, you can effectively manage your availability and prevent customers from booking appointments on days that are not suitable for your business operations. This setting provides flexibility for businesses that have specific opening hours or operate on a limited schedule, ensuring that customers can only choose from the available days when making their bookings.
This does not affect availability; other days are still available, they just cannot be selected as the day(s) that bookings start on.
Custom Availability Range
↑ Back to topYou can set up specific availability rules, such as availability for:
- Months
- Day of the week
- Time Range
- Specific date
To add a rule, select Add Range:
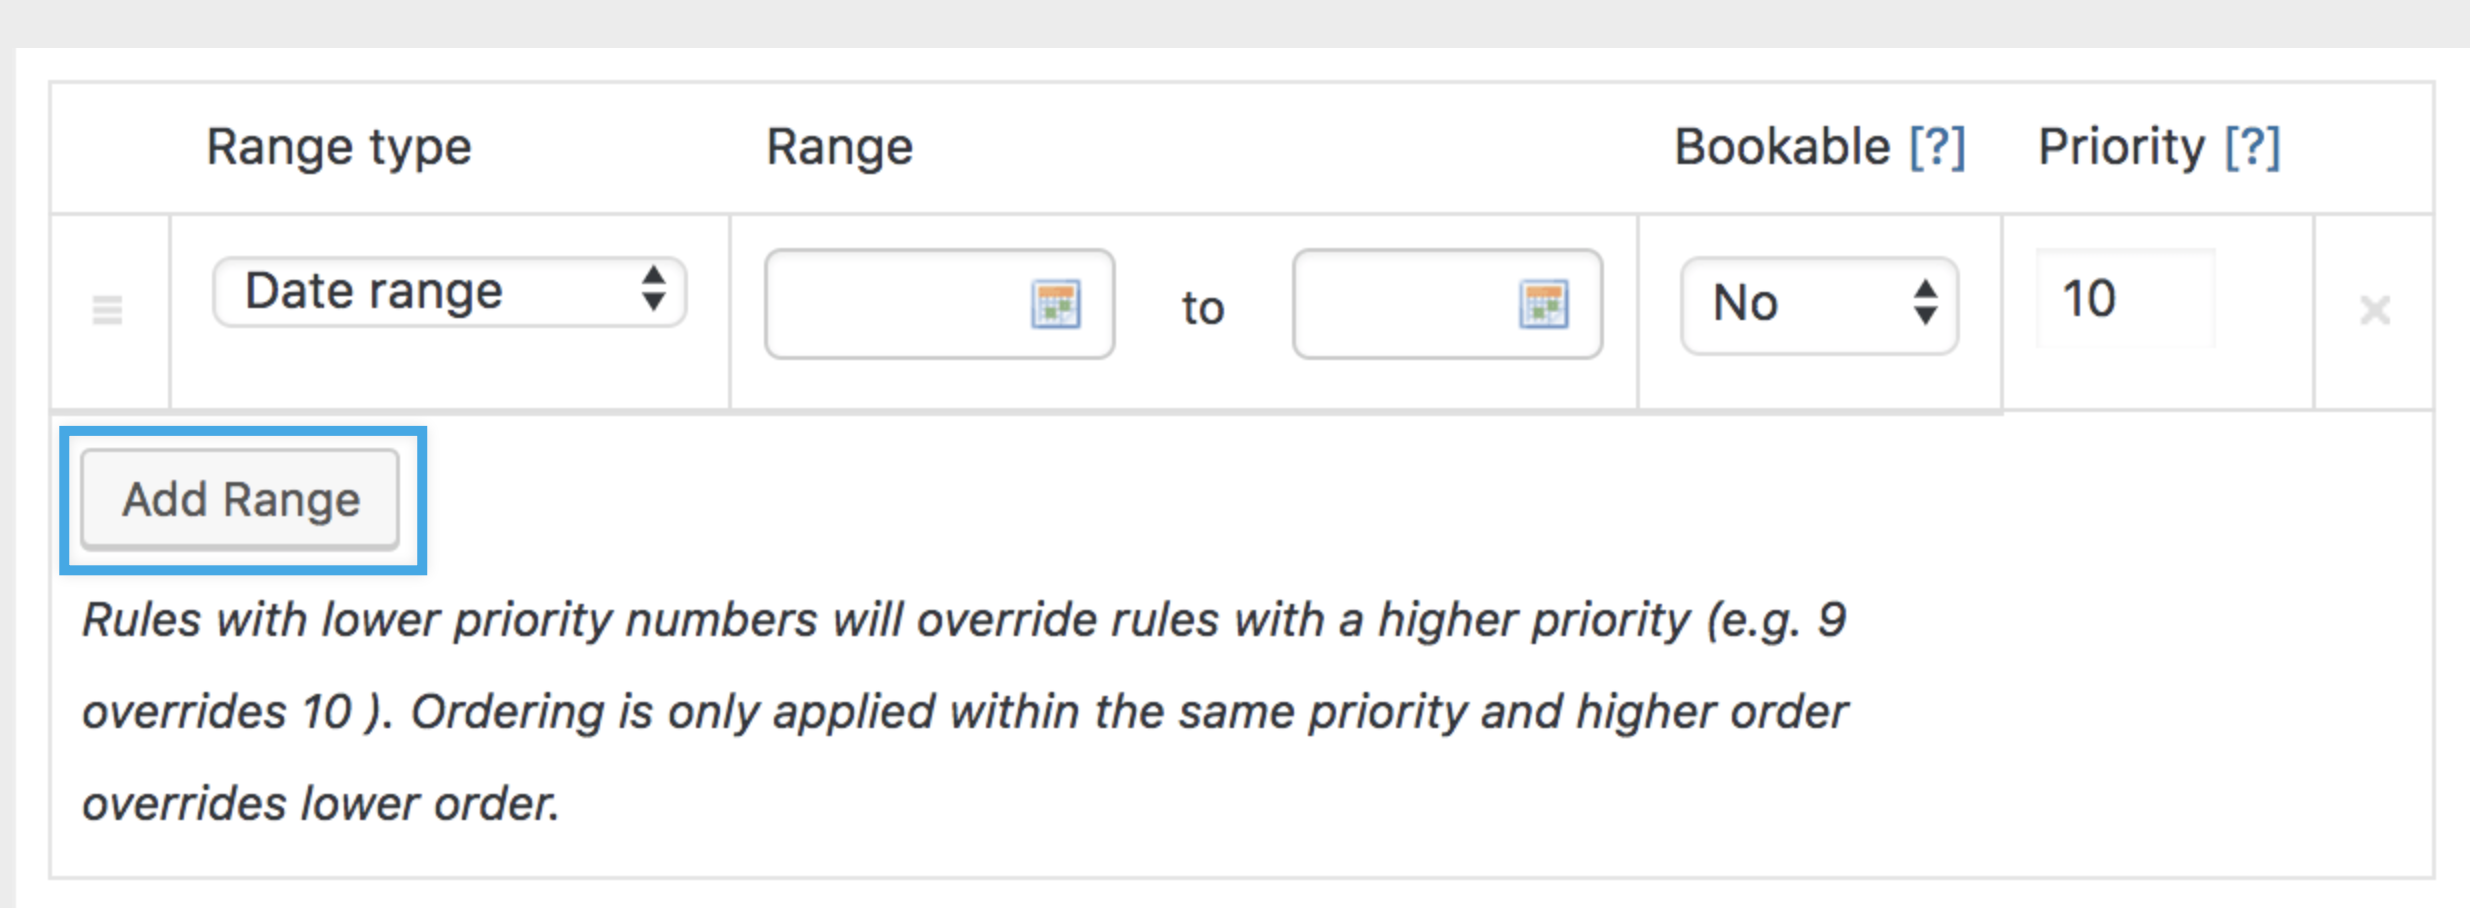
A new row is created, where you can choose a range type, from/to, whether it’s bookable or not – yes or no, and a priority number.
The from/to values differ based on the range type:
- Date range: from/to will show a datepicker/calendar selection field
- Range of days: from/to will show a dropdown of days of the week (Monday to Sunday)
- Range of months: from/to will show a dropdown of months (January to December)
- Range of weeks: from/to will show a dropdown of weeks (1 to 52)
- Date Range with time: period with a start date/time and an end date/time. Range applies from start time on the start day to end time on the end date.
- Time ranges: from/to will show time inputs. (You can also set it to a specific day of the week from the options available in the dropdown)
- Date Range with recurring time: set based on a custom date range. The range is repeated on each day in the date range.
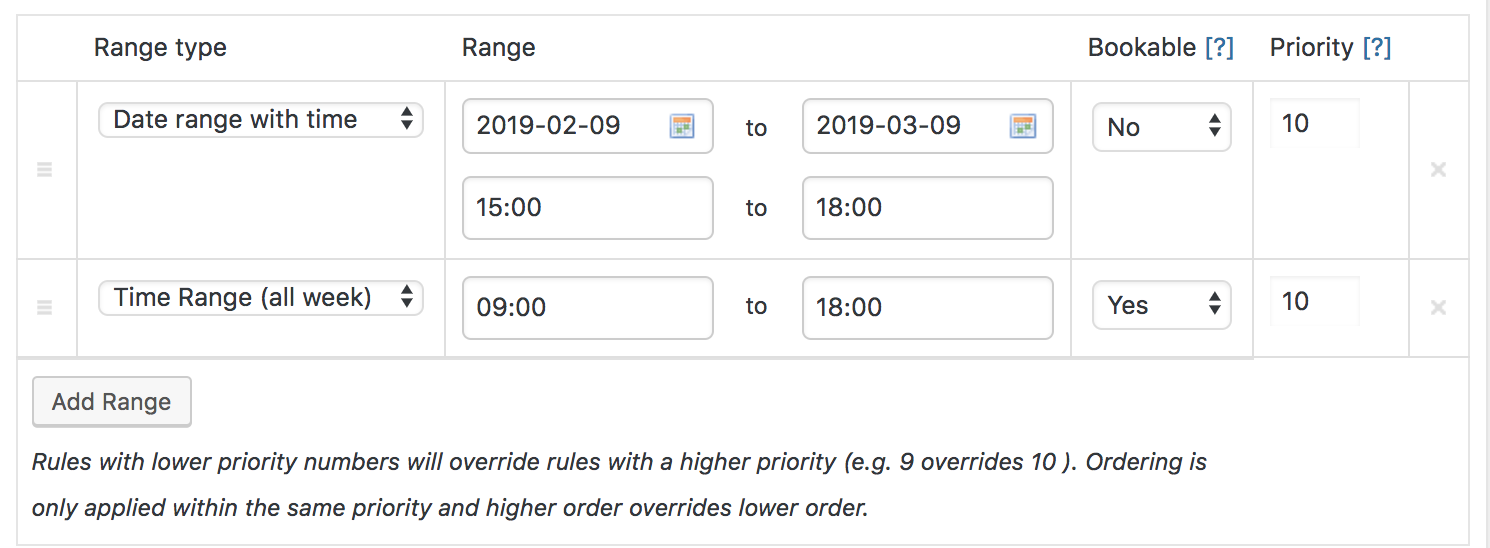
Please keep in mind that the time ranges specified in the booking system do not necessarily represent the opening hours of your shop but rather the available booking hours. To illustrate, suppose your shop operates from 9:00 am to 6:00 pm and offers appointments in 1-hour time blocks. In this case, the last available booking slot would be at 5:00 pm, not 6:00 pm.

Note: By default, the global availability rules take precedence over the availability rules set at the product level, and the product availability rules take precedence over the resource-priority rules. The priority numbers can be adjusted to modify this order. When determining availability, a lower priority number will always override a higher priority number, regardless of the context. For instance, even if a rule with a priority of 10 exists at the global level, a rule with a priority of 9 at the product level will take precedence over it.
Understanding the priority system allows you to fine-tune and control the availability of your resources and ensure that the desired rules are applied accurately based on their priority levels. More at: Understanding How Priority Affects Availability Rules.
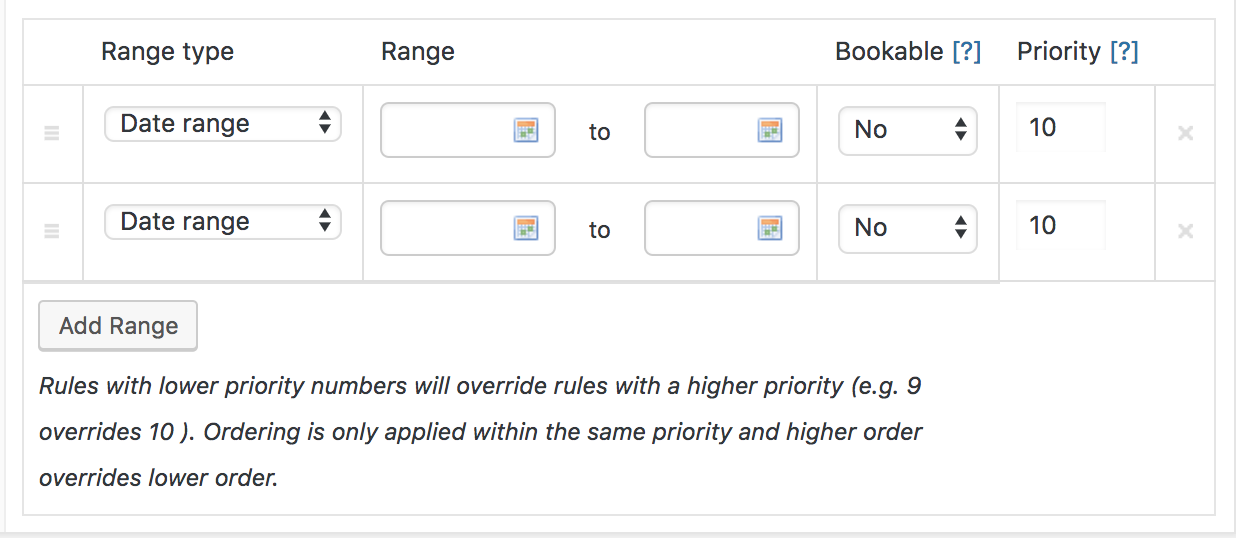
Rows can be removed by clicking the X on the far right or dragged and dropped to sort using the handle on the far left.
Also, be aware that availability options can be set up globally if all bookable products share some dates. To read more about Global availability, refer to the Booking Settings – Store Availability documentation.
Costs for Bookable Products
↑ Back to topCosts for specific slots are controlled from the Costs tab.
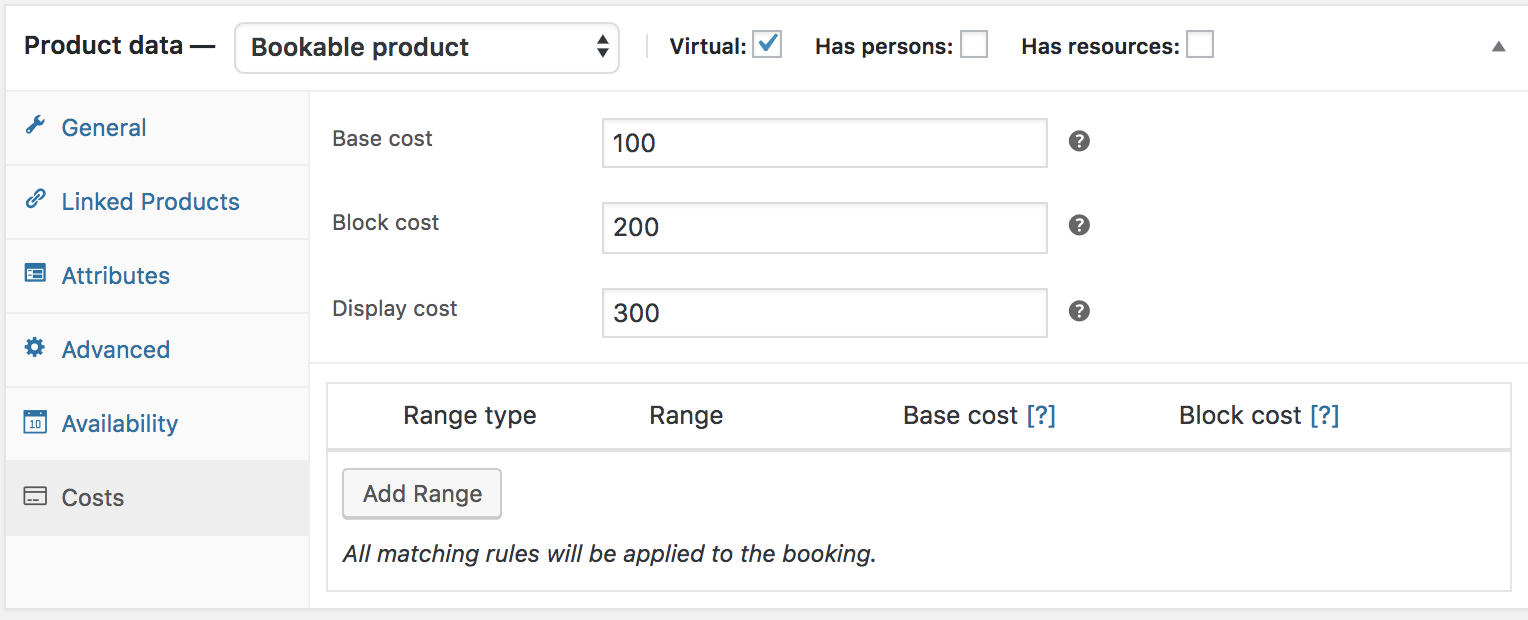
The two main costs you can add are Base cost and Block cost.
Base Cost
↑ Back to topBase cost is applied to the booking regardless of a customer’s choices on the booking form.
Block Cost
↑ Back to topBlock cost is the cost per block that was assigned in the General tab. If a customer books multiple blocks, this cost is multiplied by the number of blocks booked.
Display Cost
↑ Back to topDisplay cost does not affect the actual cost of the product. In the example above, the product page displays 300 on the frontend. The cost is displayed to the user on the front end. Leave blank to have it calculated for you. If a booking has varying costs, the lowest available cost is shown and is prefixed with the word “From:”
Custom Cost Range
↑ Back to topBeneath the display cost, you have an area where you can define extra costs. This works similarly to availability. Click Add Range to begin:

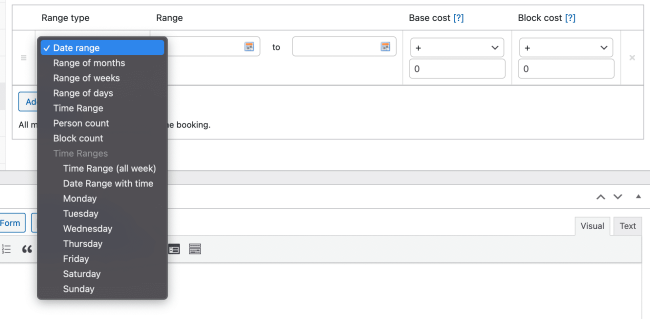
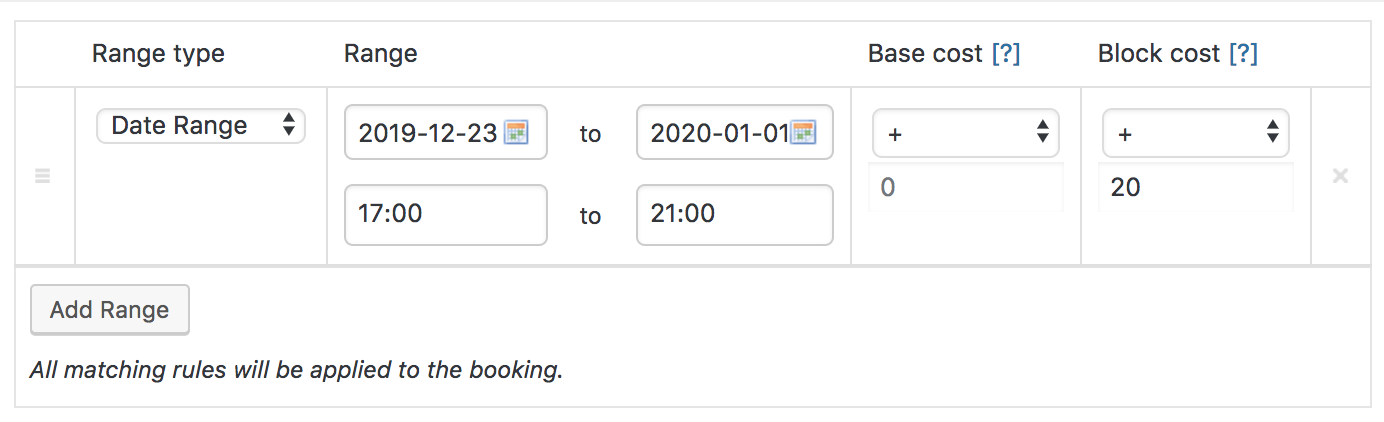
A row appears where you can input the range type, from/to and cost:

The from/to values differ based on the range type:
- Date range: from/to will show a date picker field
- Range of months: from/to will show a dropdown of months (January to December)
- Range of weeks: from/to will show a dropdown of weeks (1 to 52)
- Range of days: from/to will show a dropdown of days of the week (Monday to Sunday)
- Time range: from/to will show time inputs (You can also set it to a specific day of the week from the options available in the dropdown)
- Date range with time: set based on a custom date range
- Persons count: from/to will show the number inputs (Applies only if the “Has Person” option is enabled)
- Block count: from and to will show the number inputs
Base cost and Block cost can be added, subtracted, multiplied, or divided by the amount you enter. You can also directly set the costs applied for the rule.
Rows can be removed by clicking the X on the far right or dragged and dropped to sort using the handle on the far left.
Persons
↑ Back to topIf the booking can be made for multiple persons at once, tick the “Has Persons” checkbox. Once selected, a new tab appears:

Min and Max Persons
↑ Back to topYou can set a min and maximum for persons. Similar to duration, the customer can input a value on the frontend booking form, if enabled.
Multiple all costs by person count
↑ Back to topIf “Multiply all costs by person count” is enabled, all costs are multiplied by the number of persons the customer selects.
Count persons as bookings
↑ Back to topIf “Count persons as bookings” is enabled, the person count is used as the quantity against the block. The “Max bookings per block” setting above under Availability determines the upper limit for allowed persons per block. Once the limit is reached, more persons cannot be booked.
Person Type
↑ Back to top
The Person Type setting allows you to create different types of people that you can disable on the product page. This can be useful for setting Different pricing depending on the Person type. You can set different prices for different person types. For example, you might want to charge a higher price for adults than for children.
To set up different person types, tick the Enable Persons Type checkbox in your Persons Tab. Once you tick this checkbox, you have the option to add multiple types.
- Give your Person type a name and define the cost for the type. Adding a description is optional.
- You can define a minimum and a maximum number for each person type. For example, you could require at least one adult for each booking while making children optional (minimum 0). If you leave Max blank, there are no other restrictions than those of the bookable product itself.

Clicking the Unlink button will remove the person type from the product. The person type will still exist, but be hidden, this is so previously created bookings are not broken.
Resources
↑ Back to topThe “Resources” setting refers to a feature that allows you to define and manage the various resources required for your bookable products or services. Resources can represent anything necessary for fulfilling a booking, such as rooms, equipment, staff members, or any other tangible or intangible assets.
By setting up resources, you can effectively allocate and manage the availability and capacity of these resources in relation to your bookable products or services. Each resource can have its own unique characteristics, availability schedule, and capacity limitations, and it can also be shared between multiple bookable products.
Examples:
- You own a yoga studio and you want to offer yoga classes that include the use of yoga mats. You could create a resource called “Yoga Mat” and assign it to your yoga classes (booking product). You could then set the price of the yoga mat resource to $2 and the availability of the yoga mat resource to be limited to 10 bookings per day.
- You own a restaurant and you want to offer table reservations that include the use of a highchair. You could create a resource called “Highchair” and assign it to your table reservations. You could then set the price of the highchair resource to $5 and the availability of the highchair resource to be limited to 2 bookings per table.
Tick the Has resources checkbox to enable a new tab:
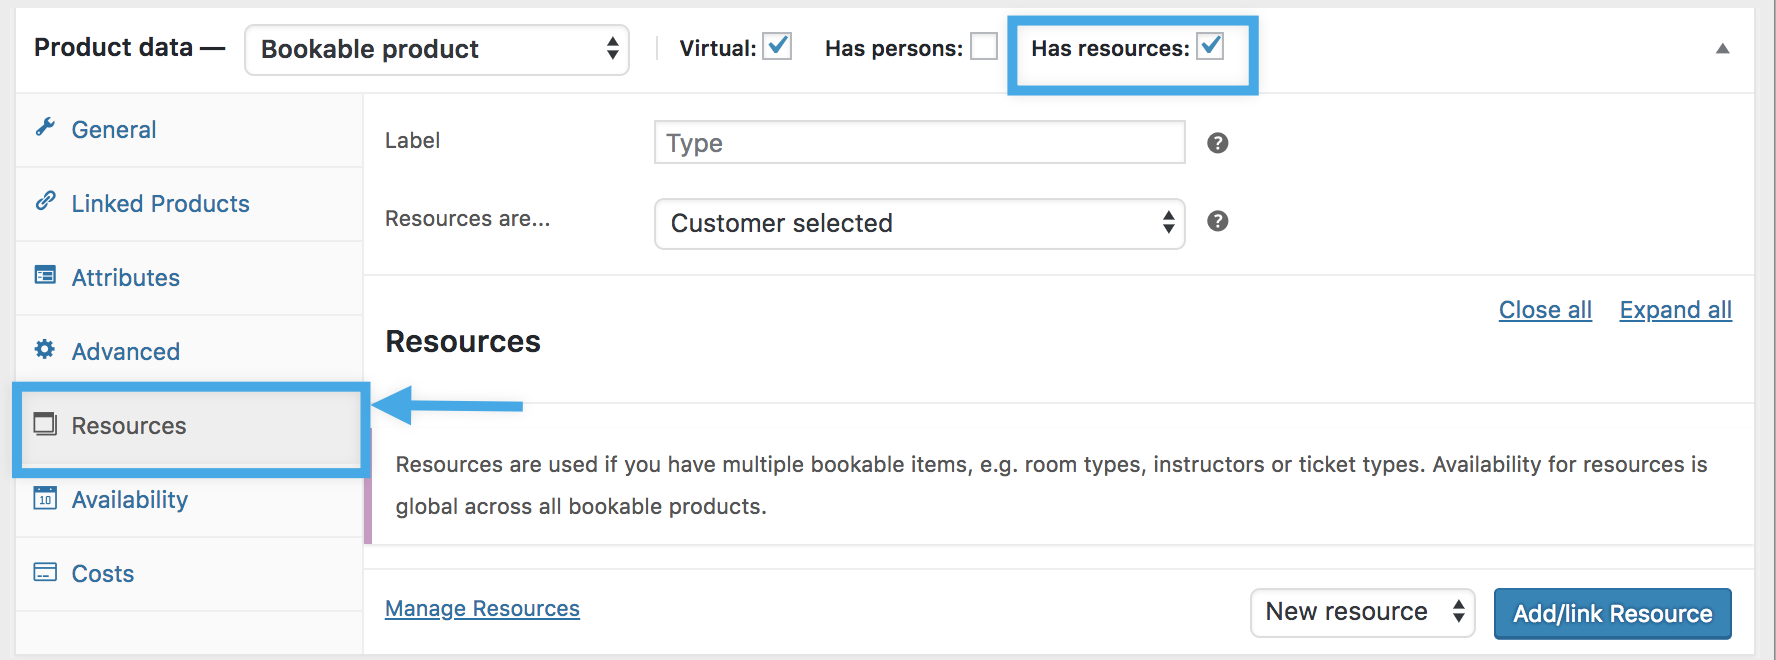
Resources are
↑ Back to topThere are two types of bookable resources:
- Customer selected: A booking form shows a dropdown list of resources that the customer can select.
- An example use case for a customer-selected resource would be a room type, such as single and twin rooms that the customer can select from the product page while booking.
- Automatically assigned: A resource is automatically assigned to a customer booking if available.
- An example use case for an automatically assigned resource would be a hair salon where the resources are staff and someone is assigned a booking. More at: Hair Salon – Bookings Use Case.
After enabling resources, choose your type. If you have chosen Customer selected be sure to give your resource a label. This is what is shown on the frontend booking form.
Resources can be used globally across multiple products. Even though a bookable product can have multiple resources associated with it, only one resource can be assigned per booking.
Adding & Managing Resources
↑ Back to topPlease learn more about Resouces at: Resources in Bookings
Export Booking Product
↑ Back to topTo troubleshoot Booking issues faster in support, it is helpful to share the Bookable product with WooCommerce.com support by following the below steps:
- Go to the Bookable product you want to export.
- Under Product Data, click on the Export tab.
- Now, click the “Export” button to export this product, its settings, as well as any applicable resources, persons, and global availability rules.
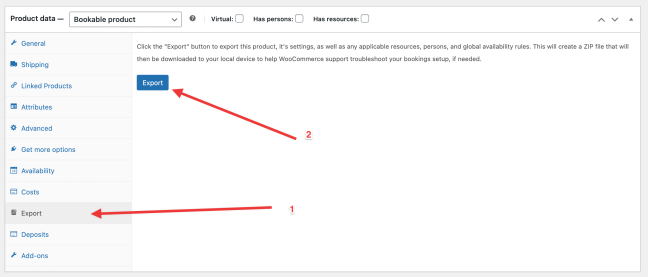
This will create a ZIP file that will then be downloaded to your local device to help WooCommerce.com support troubleshooting your bookings setup. You can share this file with us by uploading it to a file-sharing service like Google Drive or Dropbox.
Managing Bookings
↑ Back to topPlease refer to the documentation at: Managing Bookings
Bookings Settings
↑ Back to topPlease refer to the documentation at: Booking Settings
Use Cases
↑ Back to topPlease refer to the documentation at: Use Cases
Questions and Support
↑ Back to topSomething missing from this documentation? Do you still have questions and need assistance?
- Have a question before you buy this extension? Please fill out this pre-sales form – please include the name of this extension in your query.
- Already purchased and need some assistance? Get in touch with a Happiness Engineer via the WooCommerce.com Support page and choose this extension name from the “I need help with” dropdown