This WooCommerce extension focus on prices, using purchase price, cost of goods and markup to identify the profit of your products. It comes with handy bulk functions and makes calculations easy on products and variations. Sales reports is included and shows order and product list.
Previous name on this extension: Calculate Your Price for WooCommerce
Installation
↑ Back to top- Download the .zip file from your WooCommerce account.
- Go to: WordPress Admin > Plugins > Add New to upload the file you downloaded with Choose File.
- Activate the extension.
More information at: Installing and Managing Plugins.
Setup and configuration
↑ Back to topSettings for Cost & Reports
To find the settings, go to: WooCommerce > Settings > Cost & Reports
Cost & Reports has tree sections. General, Integration and Reports, read below the screenshot to know more about the options.

- Products per page: Number of product rows in the table is used in the paging function, default 50 product rows
- Automatic stock management: If you want to turn off stock management i.e you do not use stock for some or all items but still want stock status to be in stock or other options you have set.
- Disable autofocus: Select this option if you do not want autofocus when the mouse is over an input field i.e search.
- Other cost: name: If you like to rename the Other cost field to something else, enter a (short) name here
- Shipping cost: name: If you like to rename Shipping (default) to something else, enter a (short) name here
- Show shipping cost: Check this option to show shipping cost in Cost & Reports table.
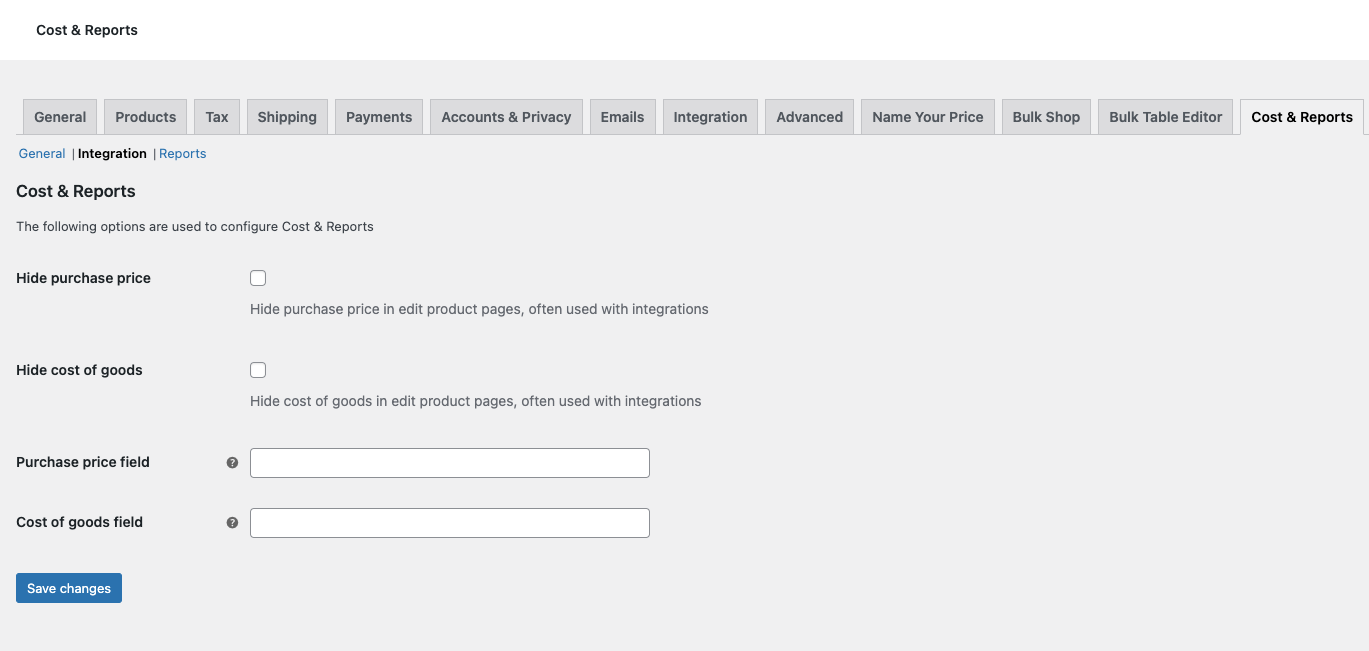
- Hide purchase price: If you want hide Purchase price in edit product views just set this checked. Useful when i.e you have integration with other extension that uses a purchase price you want to use.
- Hide cost of goods: If you want to hide Cost of goods in edit product views just set this checked. Useful when i.e you have Cost of goods integrated and do not want two cost of goods fields showing in edit product view.
- Purchase price field: If integration with other extension that already use a purchase price field like: _purchase_price
- Cost of goods field: If integration with other extension that already use a cost of goods field like: _wc_cog_cost
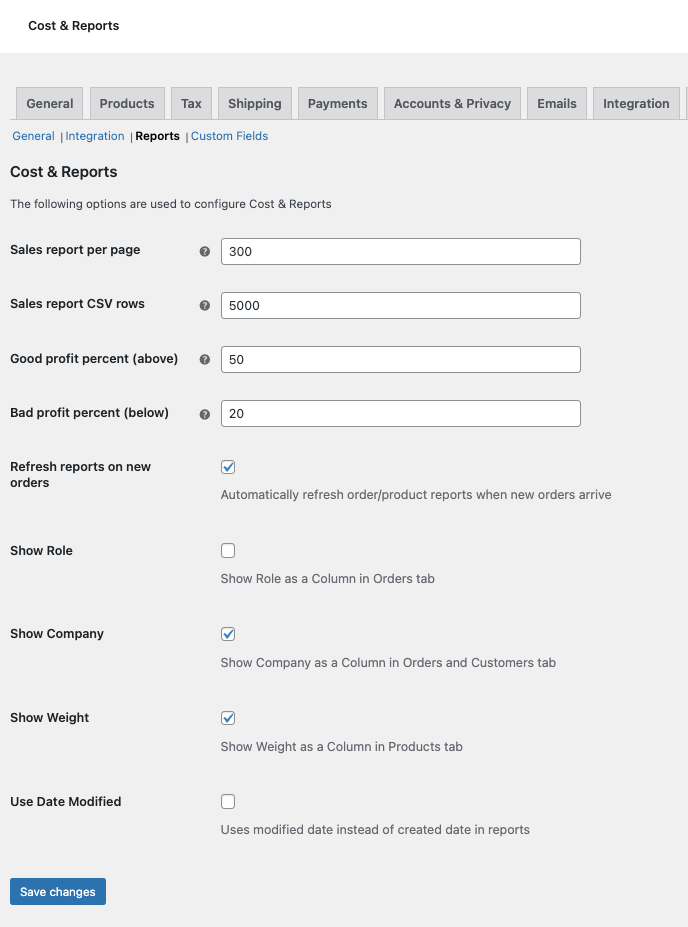
- Sales report per page: The paging option for sales reports. Recommended to set this high when aggregated values is based per page.
- Sales report CSV rows: Set the number of order rows you max want to download. When downloading products the row count can be i.e 10x off this value.
- Good profit percent(above): This option sets a light green background colour in sales reports where profit is i.e 60% or more. Set the % in number that fits your store.
- Bad profit percent(below): This option sets a light red background colour in sales reports where profit is i.e 10% or less. Set the % in number that fits your store.
- Refresh reports on new orders: Check this option if you want to update the reports automatically when new orders arrive.
- Show Role: Check this option if you want to show the customers role in the orders table
- Show Company: Check this option if you want to show the company in the orders and customers table
- Show Weight: Check this option if you want to show weight in the products table
- Use Date Modified: By default we use date created to get order reports, if you like to use date modified instead, check this.
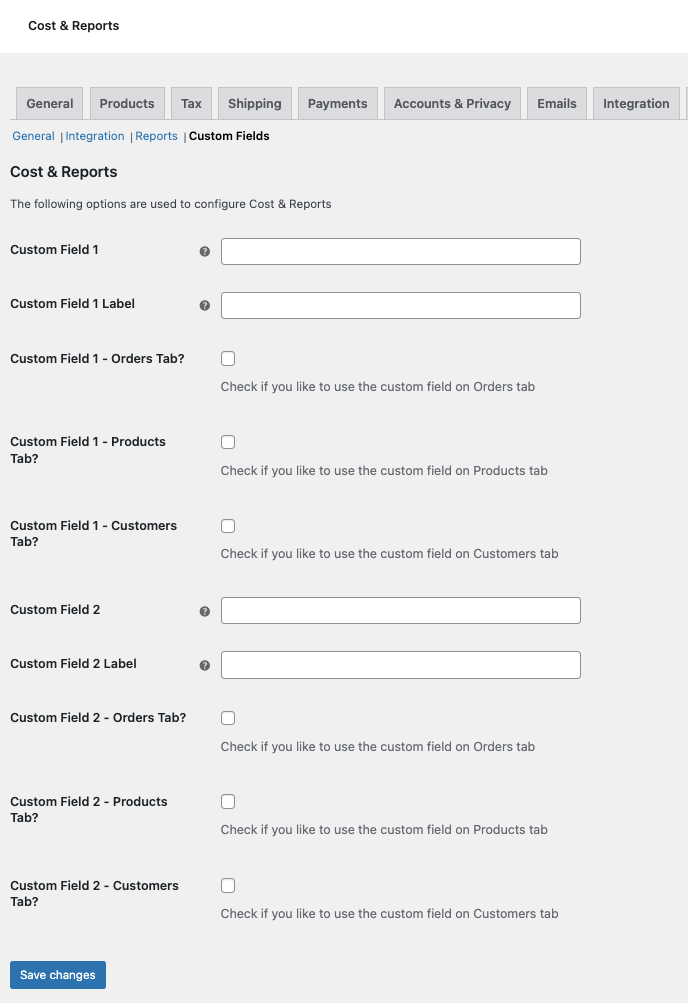
Options to configure custom order fields in the reports.
- Custom Field 1: Enter your custom field (e.g. find the slug you used in the edit order page (bottom of the page))
- Custom Field 1 label: Enter the name you want to have for this custom field (will be used as table column name)
- Custom Field 1 – Orders tab: Check this if you want it on the orders table
- Custom Field 1 – Products tab: Check this if you want to use the field on the products table
- Custom Field 1 – Customers tab: Check this if you want to use the custom field on customers table
- Custom Field 2: Enter your custom field (e.g. find the slug you used in the edit order page (bottom of the page))
- Custom Field 2 label: Enter the name you want to have for this custom field (will be used as table column name)
- Custom Field 2 – Orders tab: Check this if you want it on the orders table
- Custom Field 2 – Products tab: Check this if you want to use the field on the products table
- Custom Field 2 – Customers tab: Check this if you want to use the custom field on customers table
Recommended configuration
↑ Back to topIt is recommended to set products per page to a number that make sense for your amount of products.
Usage
↑ Back to topYou are now ready to use Cost & Reports. To start Cost & Reports, in the admin menu find WooCommerce > Cost & Reports.
How to use
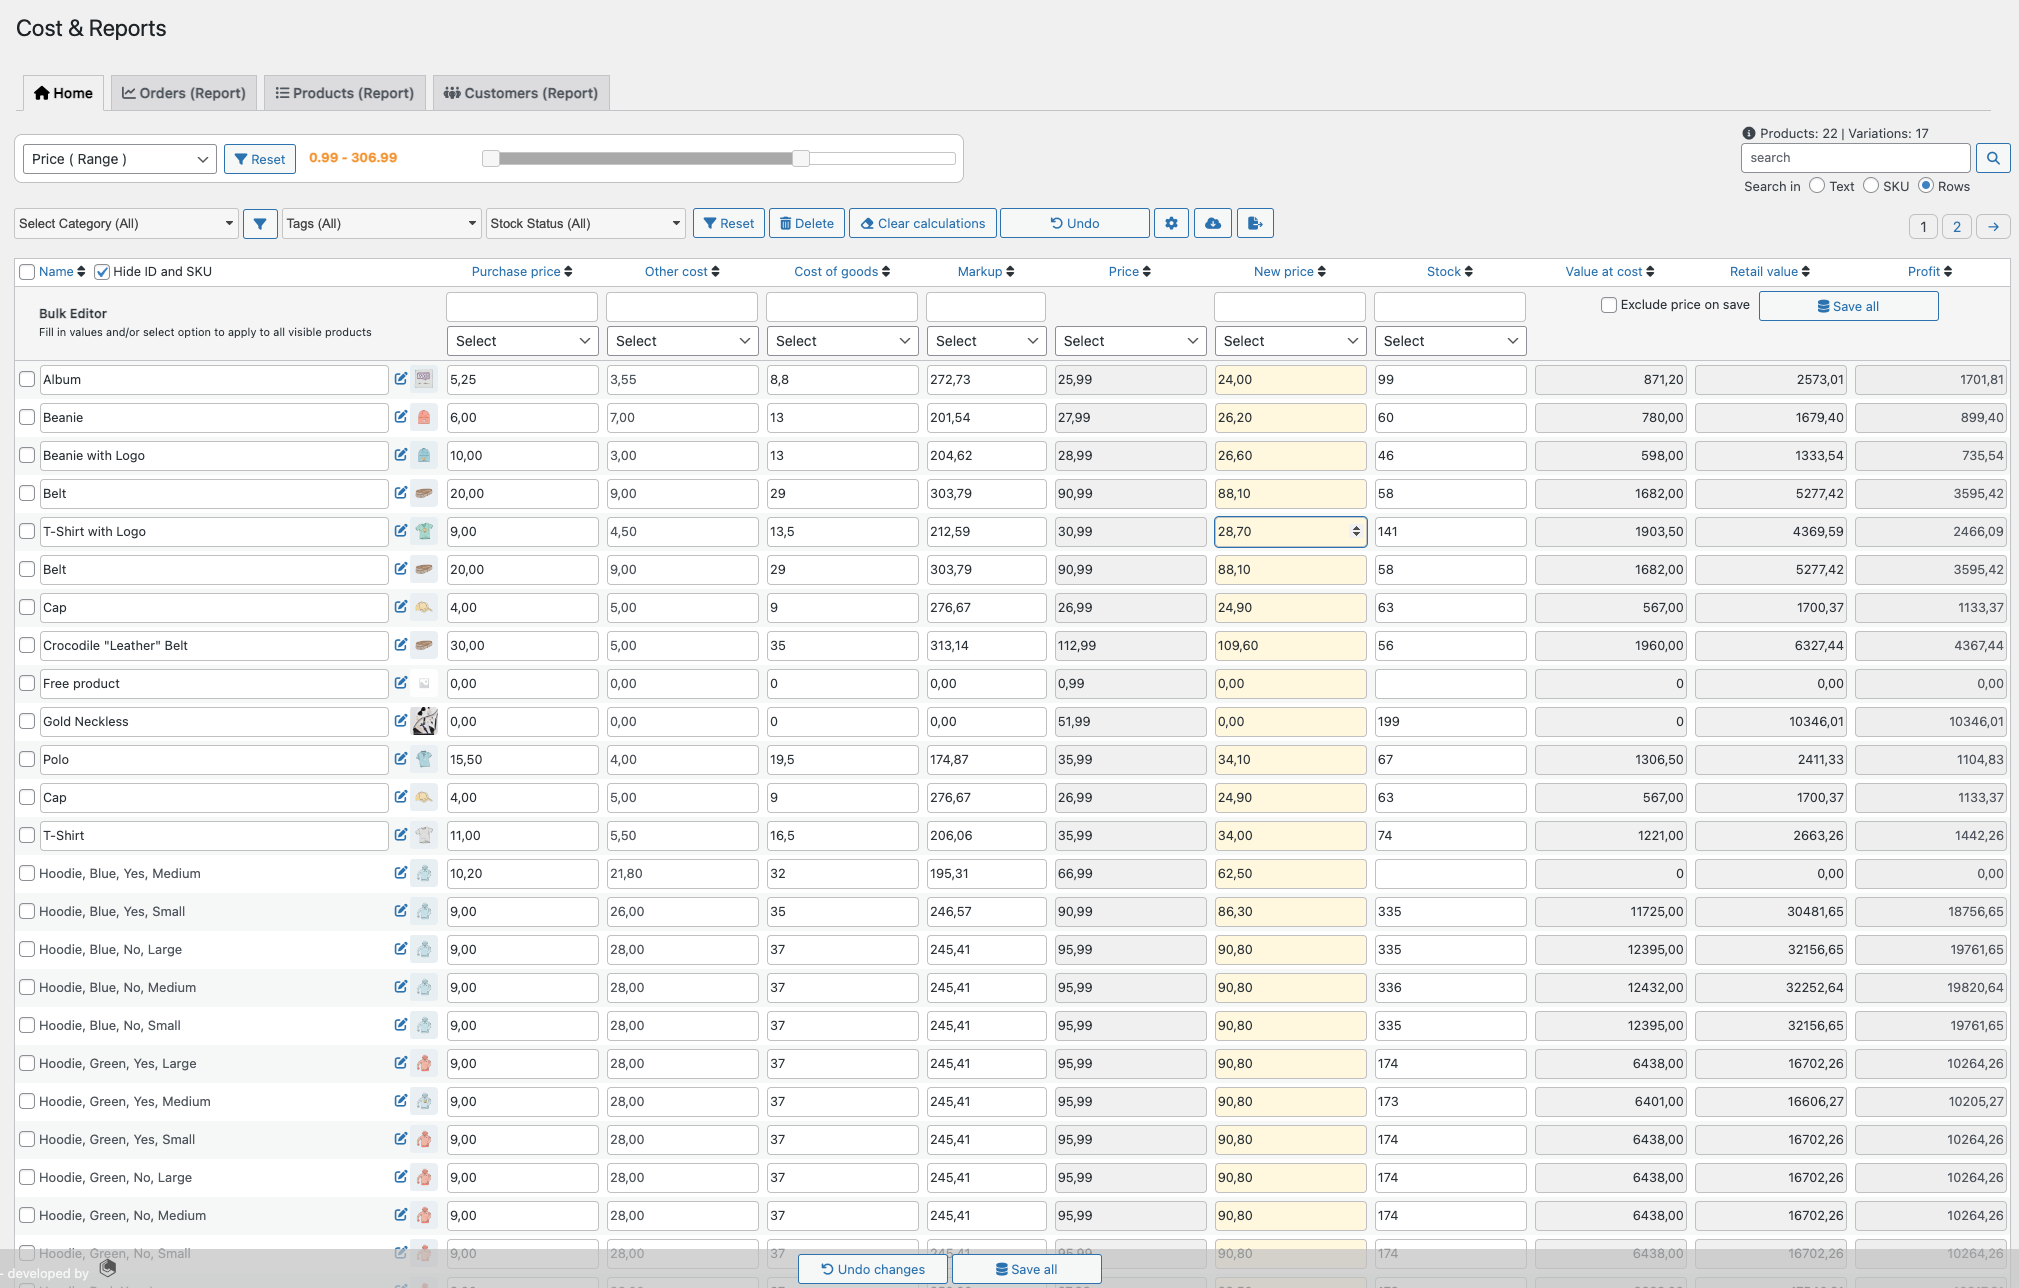
On the top, below the name, you find buttons for Home, Sales Reports, Settings, Download and Bulk Table Editor (if subscribed). To the top right you find the search function. Using this you can easily search in rows on the name to filter products / variations you want to update. It is also possible to do database search in text and SKU, just check the radio button for text or SKU. Below the search function you find the paging buttons (if you have several pages).
Right above the table, top left, you find a Category dropdown select, makes it easy to filter out products. Then there is buttons for delete rows (moves products to trash) and the clear calculations. The headings in the table has arrows and is for ordering the rows on the column heading. Right below the named headings you find the bulk functions of the extension. They work like this: enter a value in the input field, then use the select box to select i.e Set fixed amount. The exception here is when you want to use the round functions then it is just to select the one you want. More about the round functions in the FAQ section.
The table editor
If you want to change single values in the table you can simply enter every input field that is not readonly (gray). After you have changed a value and leave the field the checkbox on the left side of the row is checked. This means it will be saved when you click the save all button. In other words, every row that is checked will be saved, so it easy to just uncheck rows that you do not want to update. One tip is to use the search in rows to get the products you want to update, edit in bulk and save.
Example of usage
First we set the purchase price, then other cost (like handling), this two fields now equals cost of goods. Now we have cost of goods. Let us say our t-shirt cost of goods is $10 and we want to have a markup of 100% so we just enter 200 in the input field for markup + enter. In the new price field you will now see $20 as a suggestion for price, you will also see that the value at cost, retail value and profit has got values. If you think $20 is a good price, the just click the save all button.
How does the table calculations work?
- Purchase price: This is your purchase price and do no calculations but could be important to find cost of goods
- Other cost: Typically this is handling, shipping and other costs you may have after purchase on a product. It is the difference between purchase price and cost of goods. If you have set cost of goods and purchase price the extension set the difference in this field.
- Shipping: If you want to separate shipping cost this field can be added in settings and will be calculated together with other cost to make the sum of cost of goods.
- Cost of goods: This is purchase price + other cost (+ shipping cost) per product. This field does no calculations but is essential for further calculations of the price.
- Markup: This is the percentage markup on your product. Cost of goods + markup = new price (sales price). If you want 20% markup on your product you need to enter 120 in the markup field. If you know what the new price will be and set it direct, the markup will adjust according to your new price.
- Price: This is the current sale price on you product and is mostly there to show you what your current price on the product is. Does not do any calculations.
- New price: This is the sum of cost of goods + markup. If this field has a yellow background it is different than the current price. If you want to use it as the current price, make sure the row is checked and save.
- Stock: This field show current stock on the product and is used for calculation of value at cost, retail value and profit.
- Value at cost: Is the sum of cost of goods * stock.
- Retail value: Is the sum of current price * stock.
- Profit: Is the sum of retail value – value at cost. If negative profit the numbers are shown in red.
- Table footer fields with values: Show the totals of the current column, updates if you do updates in the table or search in rows.
Reports

This report view shows all sales in a date range, set your own using the date selectors or use the predefined ranges. In the table you find order id (link to the order page), customer, date, status, quantity of items, profit, cost of goods, net sales and taxes for the selected period. On the right side of the table you find the key values and averages from the period. After selecting a date range (or are happy with current range) you are able to download the table data as a .csv file. This file can be opened in applications like Apple Numbers or MS Excel for further processing i.e making charts and so. The headings (with arrows) can be used for sorting i.e on Gross sales or Profit if you like. This makes it easy to see the top orders and customers in the selected period. Color indicators in the table for high and low profit, easy to adjust in settings.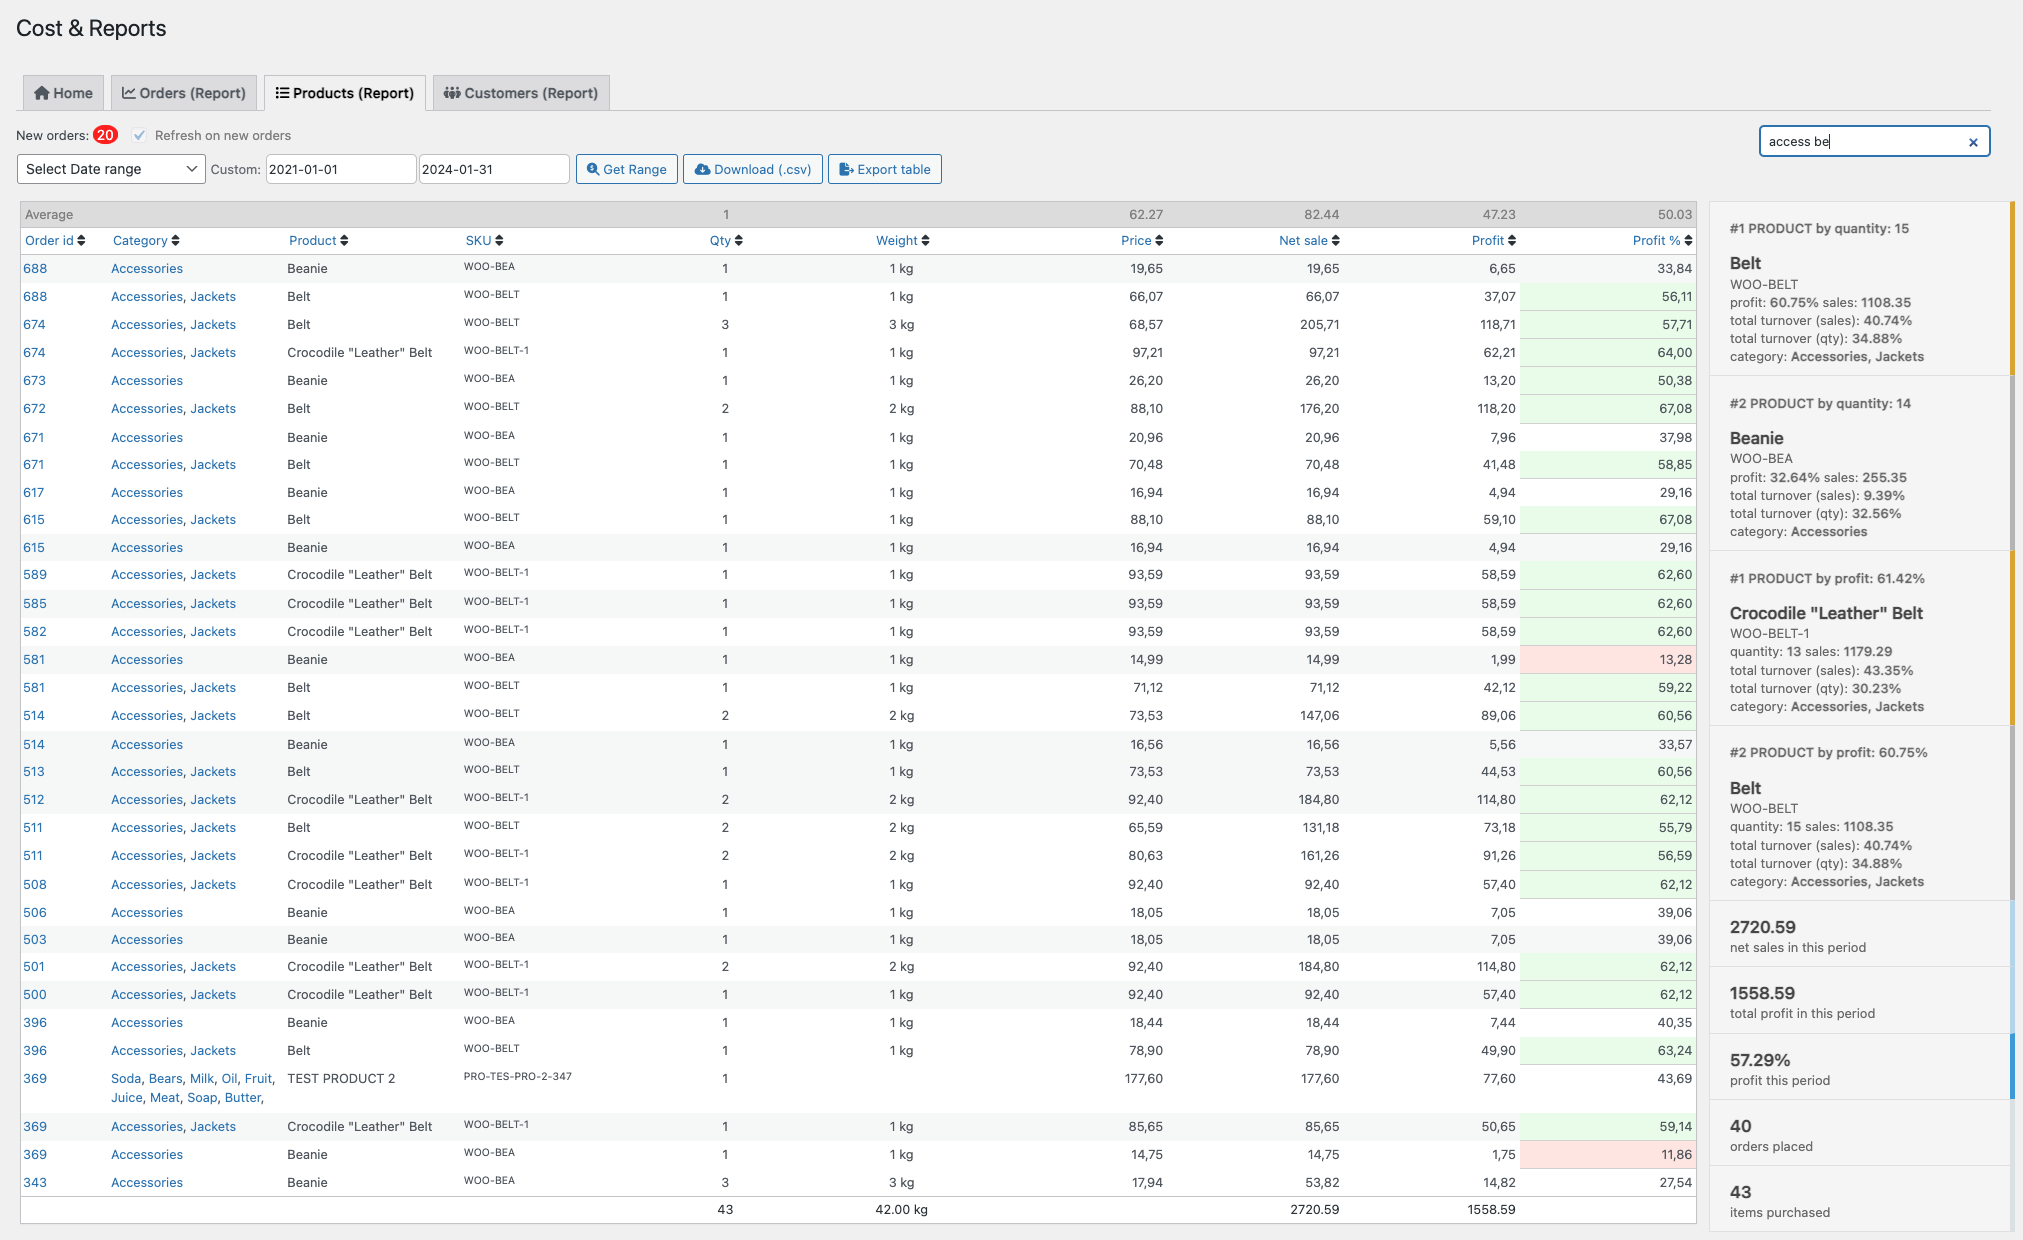
The products view has the same features for selecting date ranges and the download .csv button. This table starting by showing averages then order id, category (link to edit products in category), product/variation name, SKU, quantity, price (when purchased), gross sale and profit (including percent). Sort the columns as you like. On the right side of the table is a top products in period based on quantity and profit. And other key values and averages from the selected period. After selecting a date range (or are happy with current range) you are able to download the table data as a .csv file. This file can be opened in applications like Apple Numbers or MS Excel for further processing i.e making charts and so. The headings (with arrows) can be used for sorting i.e on Category, Product or Profit if you like. This makes it easy to see the products performing best in your store for the selected period. The top selling products is also presented on the right list and also totals and averages for selected period.
Download sales reports
↑ Back to top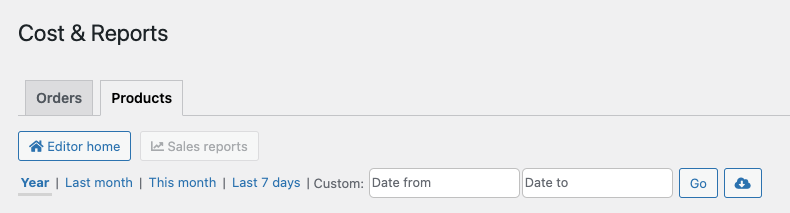
To download the sales reports find the button to the right (with the cloud icon). Before using this you need to select a date range if you do not want the current range to be downloaded. The download button creates a .csv file, and can be opened in i.e MS Excel or Apple Numbers.
Download calculations as .csv file
↑ Back to top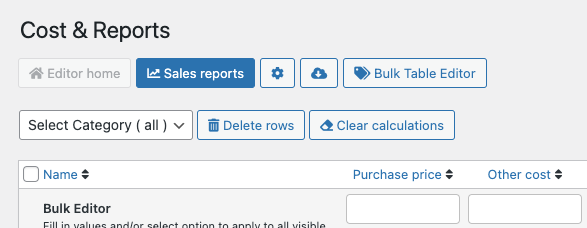
The button below Cost & Reports, named Download (.csv) enables you to get a copy of your products and calculations. The download button creates a csv file, download it to you and you can open it in i.e MS Excel or Apple Number. This file can then be used for other calculations / reports. The number values use decimals and separators from WooCommerce > Settings.
Search
↑ Back to topThe search function has radio buttons below. If you use the default option Text you search in product name and description, if you select SKU your search is only finding items that matches your input. I.e woo- finds all items that contains woo-, example woo-cap. If you select Rows you will only search/filter in current product rows, this can be handy if you have a lot of variations and want to filter out some of them. After a search you can just click the search icon again to view all your products.
Stock
↑ Back to topTo bulk-update stock, enter an amount in the input field for stock, then find the select option box below.
In the dropdown, select increase or decrease then the amount will be added to all visible products in the table. On the left side in the table you will see that the checkboxes has been checked of, if there is products you do not want to update – just uncheck them.
You can also set a fixed value if you do not want to, set the value and in the dropdown box select set fixed, now all rows has this value. When ready, select the Save all button at the top right off the table.
Automatic stock management
Automatic stock management is an option set in settings. This can be used if you do want to automatically turn off stock management on items with null values and default set in stock on these products. If you for some reason decide that a product now needs to use stock, just enter the stock value i.e 10 then stock management automatically is turned on again and set the default in stock status.
Delete rows
↑ Back to topTo delete products, check products using the left checkbox on every product row. To check all use the checkbox in the table header. Uncheck products you do not want to delete then click the Delete rows link and in the dialog select OK. PS! products will be moved to trash and will be found there if you deleted some products by mistake.
Clear calculations
↑ Back to topThe function clear calculations removes all visible calculations in the table. If you regret just click the function again and your current calculations shows up again, this is only possible if you do not save after clear calculations. The function can become handy if you want to start from scratch with your calculations. Please note that nothing is saved until you click the save all button.
Integration: Bulk Table Editor for WooCommerce
↑ Back to top
The extension is automatically integrated with Bulk Table Editor if subscribed, the integration let you jump from Cost & Reports to Bulk Table Editor and enables better decisions when setting up sales. Just click the link Set up sales and you will be in the same category as in Cost & Reports, now you can easy set up your sales. Bulk Table Editor also has a link Calculate prices that let you jump back to Cost & Reports.
Integration: Cost of goods for WooCommerce
↑ Back to topIf you already have a subscription of Cost of goods for WooCommerce you can use this value instead of the Cost of goods field created by Cost & Reports. Please note that you do not need the Cost of goods extension to use Cost & Reports.
Start by go to WooCommerce > settings > Cost & Reports > Integration. Set the following options:
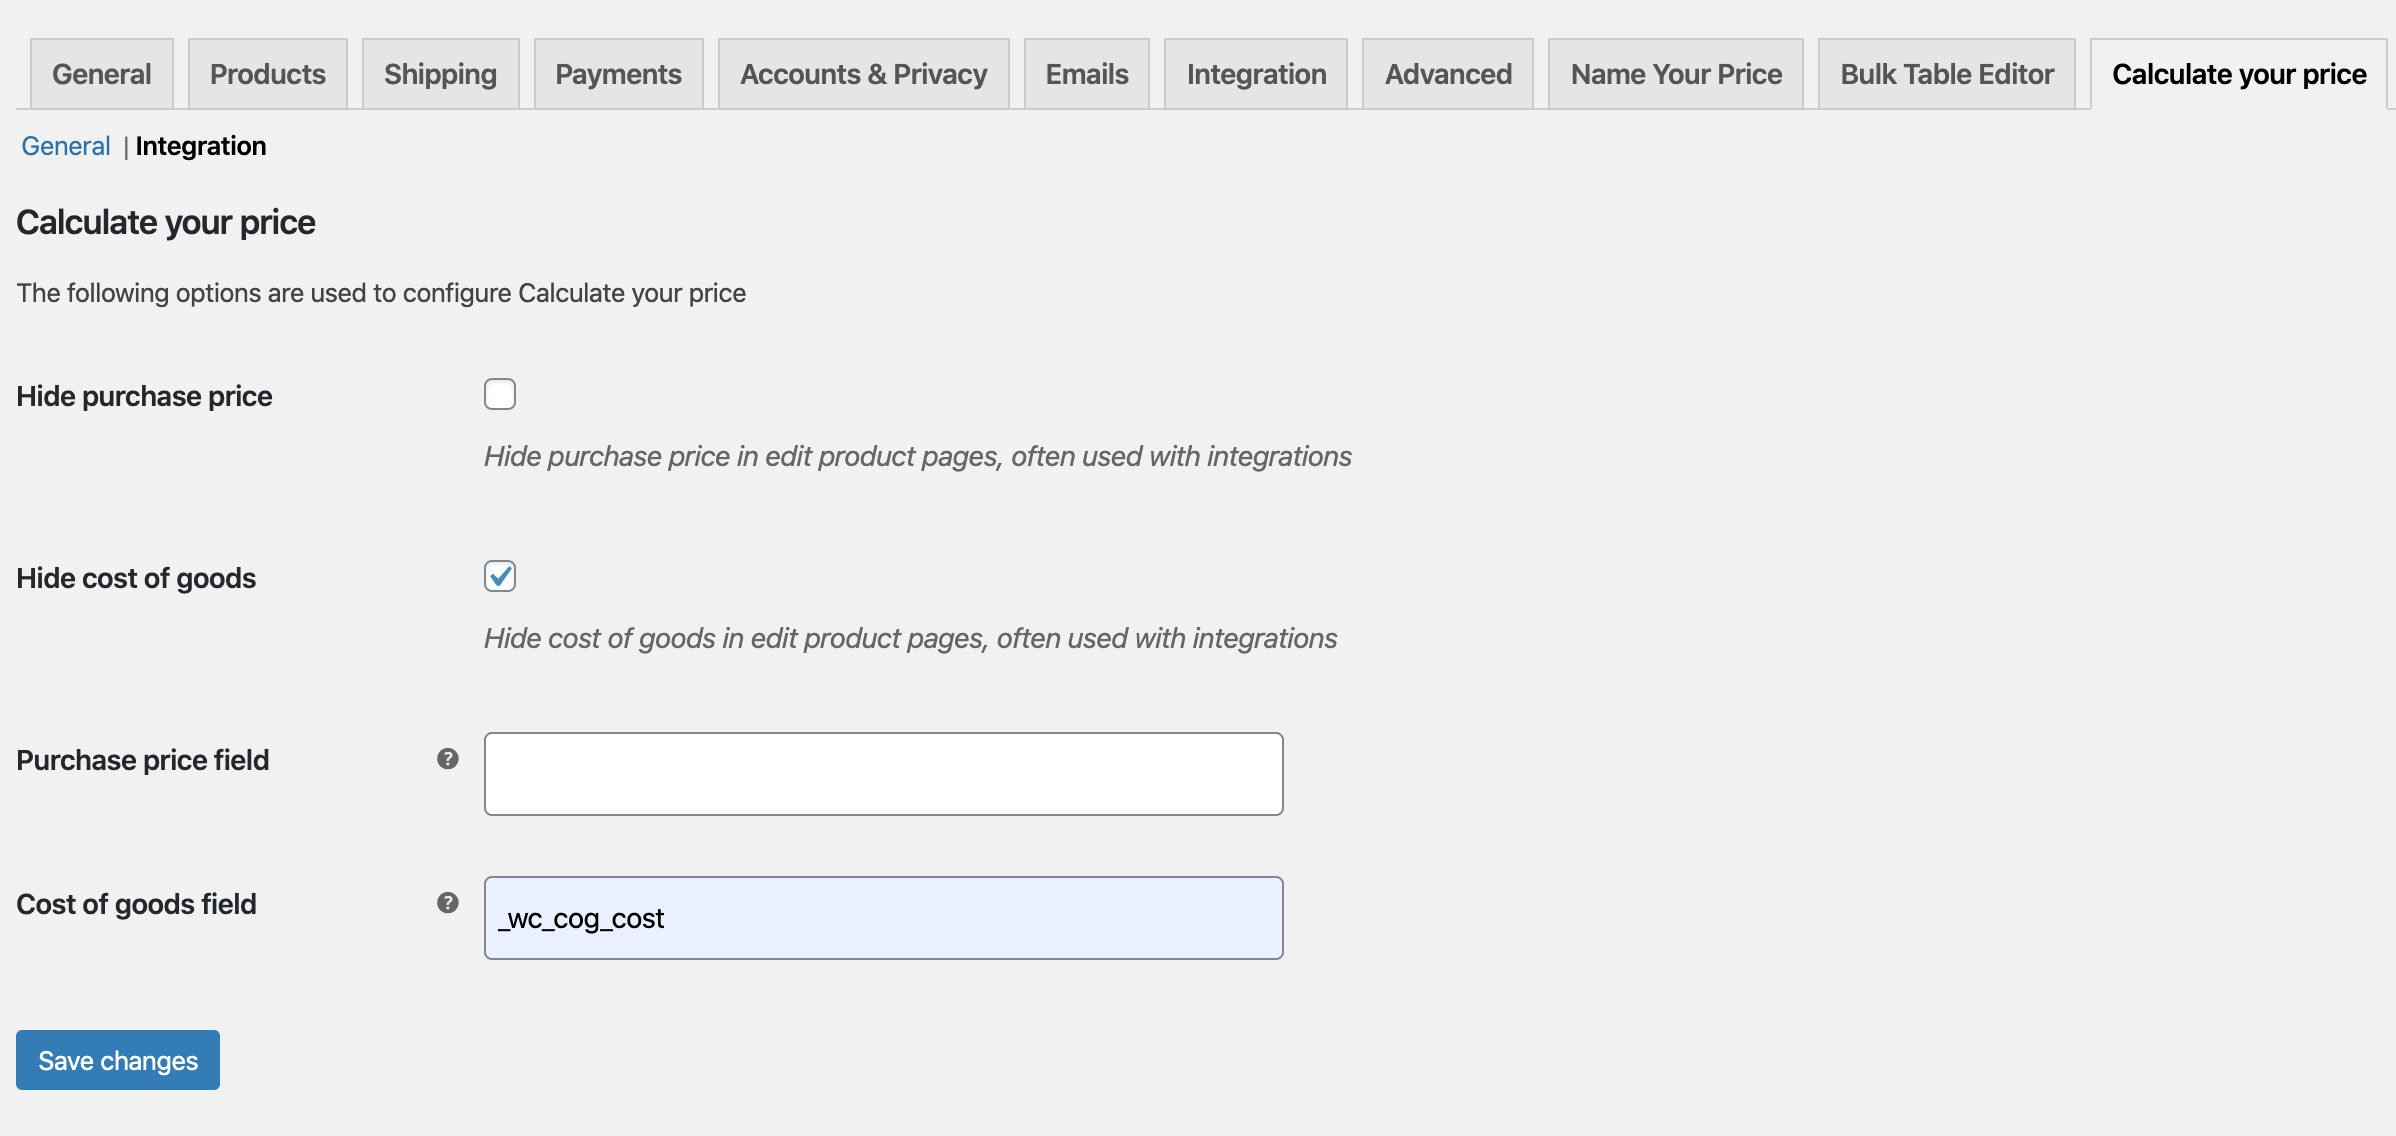
When you have done this and saved you can go back to Cost & Reports. Now you will see all your cost of goods values is on the products and can use them for the calculations of your products and variations.
FAQs
↑ Back to topCost of goods, what does it contain?
↑ Back to topThe columns: Purchase price + cost = Cost of goods. The Cost of goods value is the key for any calculation in Cost & Reports. If you only have Cost of goods the plugin will try to calculate backwards then you see that cost = cost of goods and purchase price is empty. If you know purchase price and then add this the cost field will automatically adjust its value. But you can use Cost & Reports without setting purchase price and cost if you like.
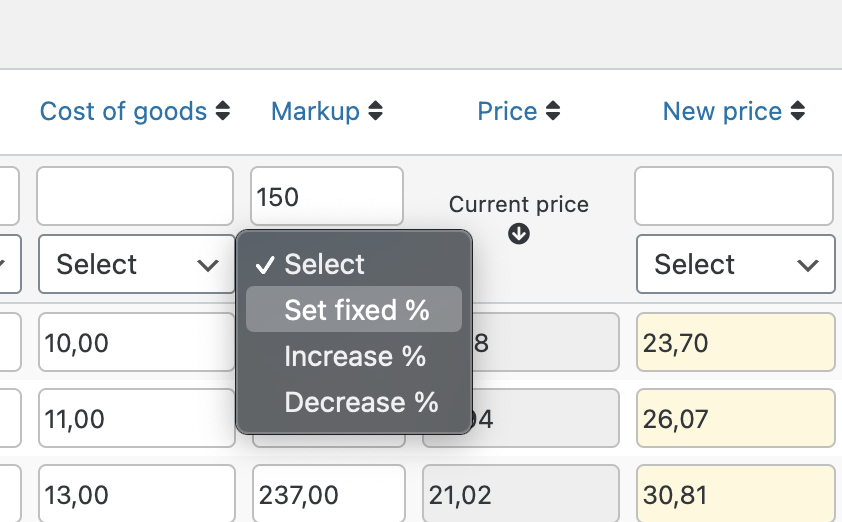
I want to bulk update my products with 50% profit, how do I do that?
↑ Back to topI have values in Cost of goods so then we enter 150 in the bulk input field for Markup (100 + your profit i.e 50). Select the Set fixed and now you will see the New price (suggested price) has a 50% profit. So compare it with the current price and if OK click the “Save all” button. This changes your current price to equal the New price.
I want to increase each price by 18.5% for freight then double the resulting price to give me a new sell price.
↑ Back to top
To do this we need to figure out the Markup (for bulk set Markup on every product). So we start by adding 118.5 in Markup (then the suggested new price has added 18.5%). So we want to double (add 100%), then in New price we add 100 (increase by %). Now we see that Markup is 237 so this Markup is the number we now can add (set fixed) as Markup for the rest of our products – then all our prices will have this calculation.
I want to round my prices, how does it work?
↑ Back to topThe round functions is found in the dropdown select box for price values. Round upwards function will set the price up from i.e 19.51 to 20.00 and if round downwards from 19.30 to 19.00. Round two decimals does this type of rounding: 19.63 becomes 19.60, it uses the logical round up or down based on the decimals. Just use the functions on your prices or i.e after you have bulk created new sales prices. Remember to save when done.
How does the bulk function: copy purchase / copy current price work?
↑ Back to topOn the bulk functions for Cost of goods and New price there is a copy function. This function copies purchase price to Cost of goods or Current price to New price. This can be handy if you i.e have imported products and want to do some adjustments to your prices or if purchase price is equal to cost of goods. We recommend to use the copy function found in cost of goods first so the calculations will be correct.
I want to import data, what custom fields is created?
↑ Back to topThe fields that is created and possible to map in an import is: _purchase_price, _cost_of_goods and _cyp_shipping_cost . If you have i.e use Cost of goods for WooCommerce and want to continue using the values from this extension set _wc_cog_cost in settings (see above – Integration Cost of goods).
Can I find more documentation for Cost & Reports?
↑ Back to topYes, we have also created documentation pages here: https://www.consortia.no/docs/calculate-your-price/
Compatibility
↑ Back to topThe extension is compatible with:
↑ Back to top- WooCommerce Products and variations
- WooCommerce Subscriptions and variations
Integrations:
↑ Back to top- Bulk Table Editor for WooCommerce
- Cost of goods for WooCommerce
- Integration fields for other extensions
Languages:
↑ Back to top- English is default
- Norwegian
- Includes a POT file for easy translation to other languages
Uninstalling
↑ Back to topIn WordPress > plugins find Cost & Reports and deactivate and if you want – delete. If deleting the plugin, the plugin files will be removed from your WordPress installation.