The tax scenarios in this document are step-by-step guides that show how to configure specific tax setups in WooCommerce. They provide all the steps needed to achieve a particular outcome but without going into detail. Due to the uniqueness and variety of stores out there, the scenarios are not exhaustive and for illustration purposes only.
Refer to these additional guides for detailed descriptions of settings:
- Setting up Taxes in WooCommerce
- How Taxes Work in WooCommerce
- Setting Up EU VAT Rates for Digital Products
The team at WooCommerce.com can help with setting up tax rates in the WooCommerce settings and how the platform handles taxes/VAT/GST based on these settings, but not when or what to charge.
We’re not tax professionals so our advice is how to use our software. For specific advice when it comes to what or when to charge tax/VAT/GST etc, we recommend consulting with a tax professional or an accountant on what may be your best options.
Each business is unique, and there’s no way we can cover every possibility.
Common Scenarios
↑ Back to topScenario 1: Charge customers the same tax rate as the Store Address
↑ Back to topThis example store is based in South Africa. It charges one rate of 15% VAT to all customers regardless of where they’re buying from or shipping to. It shows all its product prices including tax.
The outcome of this setup is that all customers see and pay the same tax-inclusive prices for products throughout the store.
To achieve this outcome, follow the steps below. Use the default values where settings are not specifically mentioned.
Scenario 1 General Settings
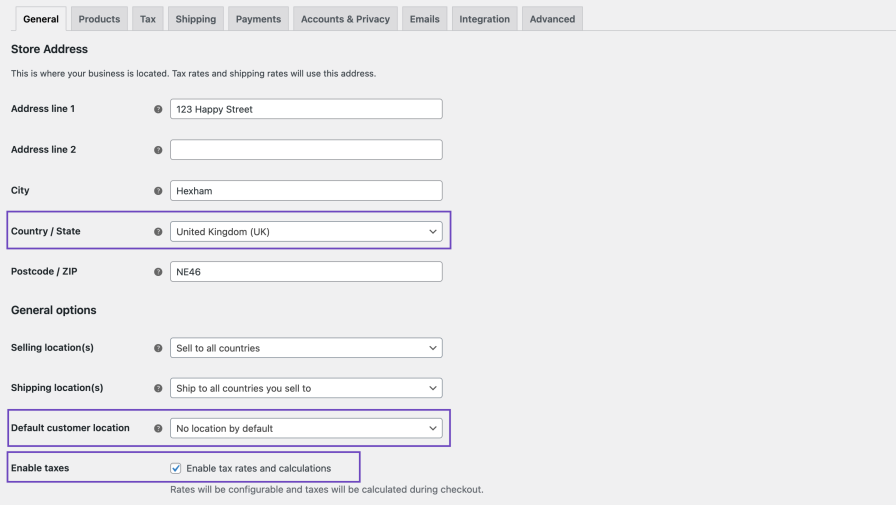
- Go to WooCommerce > Settings > General and set Store Address to Cape Town, South Africa.
- Set Default customer location to Shop country/region.
- Enable taxes by checking Enable tax rates and calculations.
- Scroll to the bottom and click Save changes.

Scenario 1 Tax Settings
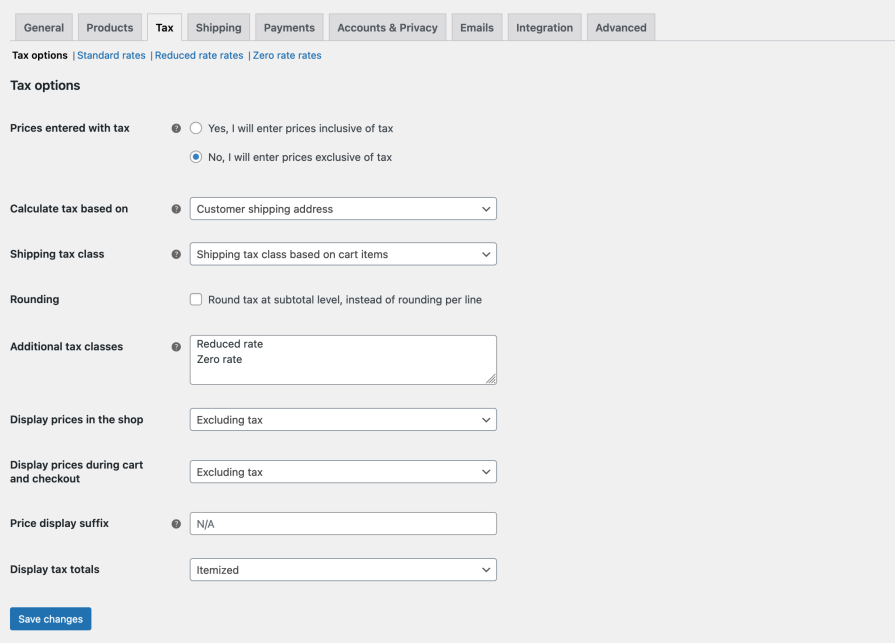
- Go to WooCommerce > Settings > Tax > Tax Options.
- Set Prices entered with tax to Yes, I will enter prices inclusive of tax.
- Set Calculate tax based on to Shop base address.
- Set Display prices in the shop to Including tax
- Set Display prices during cart and checkout to Including tax.
- Set Display tax totals to As a single total.
- Click Save changes.

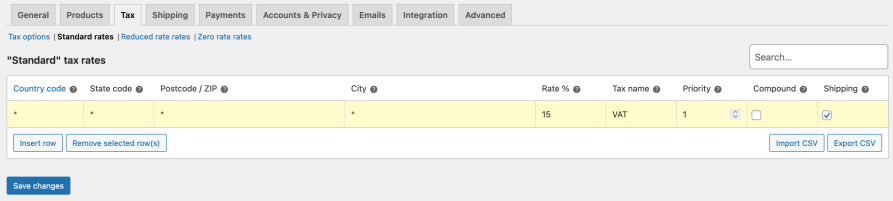
Scenario 1 Tax Rates
- Go to Standard rates (the subtab near the the top of the screen)
- Click the Insert row button.
- In the Rate % column enter 15.
- In the Tax name column enter VAT.
- Click Save changes.
Verify that taxes work as you expect by running tests with a variety of addresses, both inside and outside of the store’s base country.
Scenario 2: Tax only certain countries based on customer shipping address
↑ Back to topIn this scenario the example store is based in the UK and sells world-wide. It taxes purchases for customers from only 3 countries based on their shipping address: 20% in the UK, 19% in France, and 25% in Norway. It does not collect tax for customers shipping anywhere else. Because of the varying taxes, it displays product prices excluding tax.
The outcome of this setup is that first-time visitors all see the same tax-exclusive prices for products. Once a shipping country is added to the address field on the cart/checkout page, taxes are calculated according to the respective tax rate for one of the 3 countries. If a customer’s shipping address is no in one of the 3 countries, prices continue to show as tax-exclusive and taxes are not charged.
To achieve this outcome, follow the steps below. Use the default values where settings are not specifically mentioned.
Scenario 2 General Settings
Scenario 2 Tax Settings
- Go to WooCommerce > Settings > Tax > Tax options.
- Set Prices entered with tax to No, I will enter prices exclusive of tax.
- Set Calculate tax based on to Customer shipping address.
- Set Display prices in the shop to Excluding tax.
- Set Display prices during cart and checkout to Excluding tax.
- Set Display tax totals to Itemized (to show the tax rate names).
- Click Save changes.
Scenario 2 Tax Rates
- Go to Standard rates (the subtab near the the top of the screen).
- Click the Insert row button to enter the 1st tax rule.
- In the Country Code column enter GB (the 2-digit code for the UK).
- In the Rate % column enter 20.
- In the Tax name column enter VAT.
- Click the Insert row button to enter the 2nd tax rule.
- In the Country Code column enter FR (the 2-digit code for France).
- In the Rate % column enter 19.
- In the Tax name column enter TVA.
- Click the Insert row button to enter the 3rd tax rule.
- In the Country Code column enter NO (the 2-digit code for Norway).
- In the Rate % column enter 25.
- In the Tax name column enter MVA.
- Click Save changes.

Verify that taxes work as you expect by running tests with a variety of addresses, both inside and outside of the store’s base country.
Scenario 3: Use a countrywide tax, except in a specific state, add additional tax for a specific ZIP
↑ Back to topThe example store in this scenario is based in California. It sells and ships within the U.S. only. It charges 7% for sales that ship within the state, plus an additional 2% for shipping to specifically the 90210 ZIP code. Sales shipped to any other state are charged 6% tax. The order in which tax rules appear among priorities are important as the 1st rule that matches is used.
The outcome of this scenario is that all visitors see prices excluding tax until they enter their shipping details on the cart/checkout page, after which one or more taxes apply as determined by the tax rates.
To achieve this outcome, follow the steps below. Use the default values where settings are not specifically mentioned.
Scenario 3 General Settings
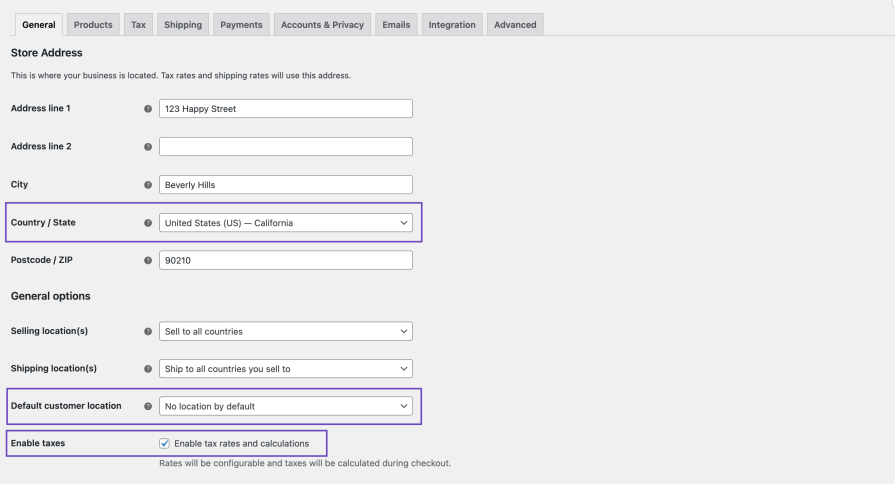
- Go to WooCommerce > Settings > General and set Store Address to a California-based address.
- Set Default customer location to No location by default (first-time visitors will not see any tax info until they enter a shipping address).
- Enable taxes by checking Enable tax rates and calculations.
- Scroll to the bottom and click Save changes.
Scenario 3 Tax Settings
- Go to WooCommerce > Settings > Tax > Tax options.
- Set Prices entered with tax to No, I will enter prices exclusive of tax.
- Set Calculate tax based on to Customer shipping address .
- Set Display prices in the shop to Excluding tax.
- Set Display prices during cart and checkout to Excluding tax.
- Set Display tax totals to Itemized (to show the tax rate names).
- Click Save changes.
Scenario 3 Tax Rates
- Go to Standard rates (the subtab near the the top of the screen).
- Click the Insert row button to enter the 1st tax rule.
- In the Country Code column enter US (the 2-digit code for the U.S.).
- In the State Code column enter CA (the 2-digit code for California).
- In the Rate % column enter 7.
- In the Tax name column enter Tax.
- In the Priority column enter 1.
- Click the Insert row button to enter the 2nd tax rule.
- In the Country Code column enter US.
- In the Postcode / ZIP column enter 90210* (we add the wildcard (*) to apply this rule to ZIP+4 codes as well).
- In the Rate % column enter 2.
- In the Tax name column enter BH Tax.
- In the Priority column enter 2.
- Click the Insert row button to enter the 3rd tax rule.
- In the Country Code column enter US .
- In the Rate % column enter 6.
- In the Tax name column enter Tax.
- In the Priority column enter 1.
- Click Save changes.
You’ll notice that the rules are automatically rearranged and grouped by priority once saved.

Here is how the tax rules are evaluated when a customer enters their address:
- All Priority 1 taxes are evaluated first, from the top down as the rules appear in the table.
- The 1st criteria from the 1st rule is that the address is U.S.-based.
- If it is, the 2nd criteria is that the address is California-based.
- If it is, the 7% rate is applied, and the evaluation moves on to Priority 2 taxes.
- If the address is not California-based, it moves on to the next Priority 1 tax rate, and applies that instead.
- Next, Priority 2 taxes are evaluated.
- WooCommerce checks if the address is U.S.-based.
- If it is, it checks if the ZIP code starts with 90210.
- If it does, it applies the 2% rate (alongside the Priority 1 tax).
- If the ZIP code does not start with 90210, the rate is ignored and only the one Priority 1 tax applies.
The below illustrations show how the different tax rates apply to various addresses.
First, Hiouochi is in California, but outside the specific ZIP code, so only the 7% tax applies.

Next, 90210 is in both California and match the specific ZIP code we targeted with the 2nd tax rate. As intended, this address gets 2 taxes applied.

Our last address is in Ann Arbor, Michigan, so only the more general U.S. tax applies to it.

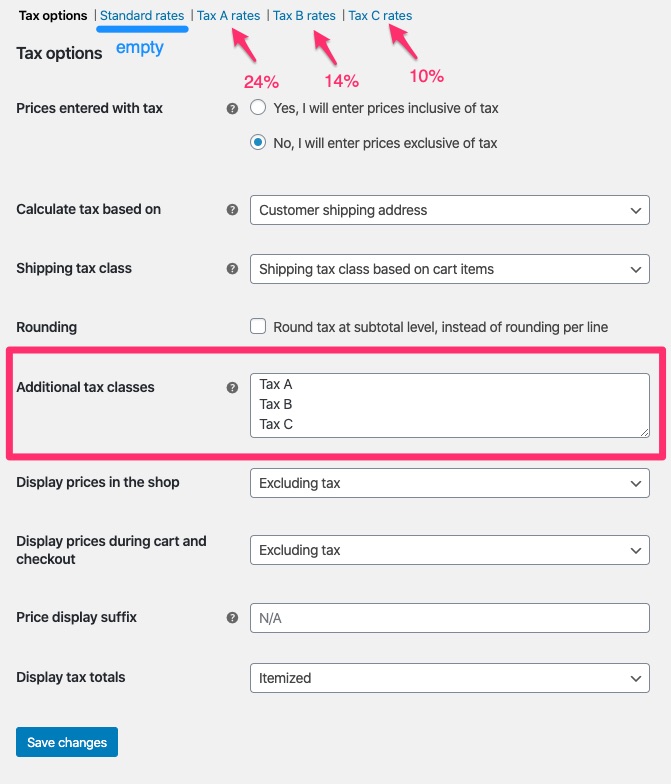
Scenario 4: Use the highest Additional tax rate for shipping when Standard rate tax is not used
↑ Back to topBy default, shipping taxes rely on the Standard rate class. If no Standard rate products are present in an order, or you do not use that tax class, then the first rate in Additional tax classes is used. In that case, make sure that your highest rate is listed first in the Additional tax class section as illustrated below.
Note the additional classes: Tax A, Tax B, and Tax C. Create them by adding the names in the Additional tax class setting and Save changes. The names will appear as sub-tabs at the top of the screen. The Standard rates class cannot be deleted, but if left blank, it will be ignored.
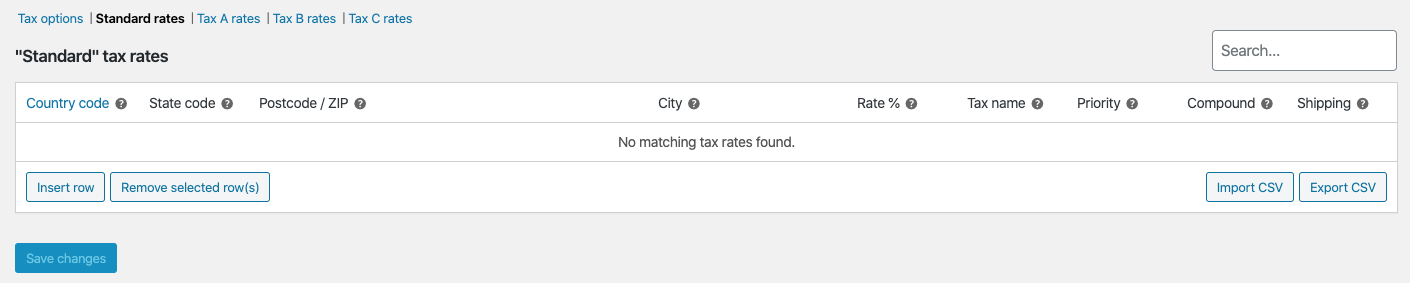
The illustration below shows the Standard rates class without any tax rules, thus empty.
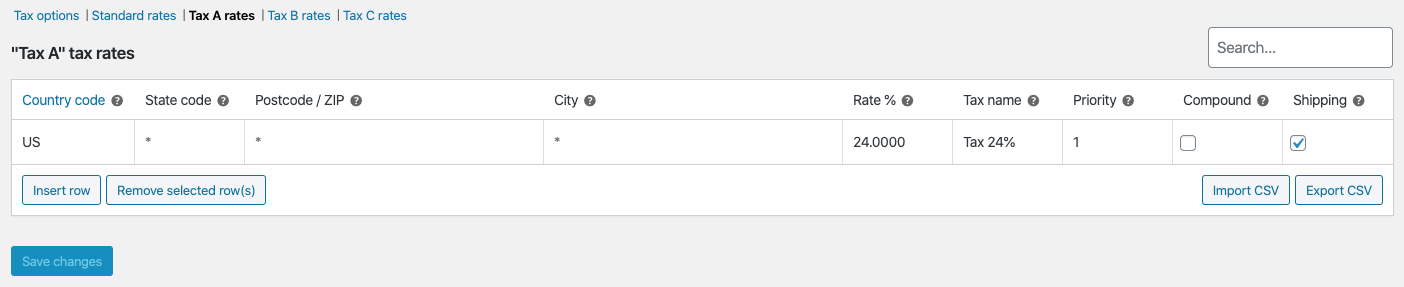
In the illustration below, the Tax A class is shown with the highest rate of 24%, so it’s positioned first on the list. One row is added to the rates table with the Country code set to US, Rate % set to 25, Tax name set to Tax 24%, and Priority set to 1. The rest of the columns have default values.
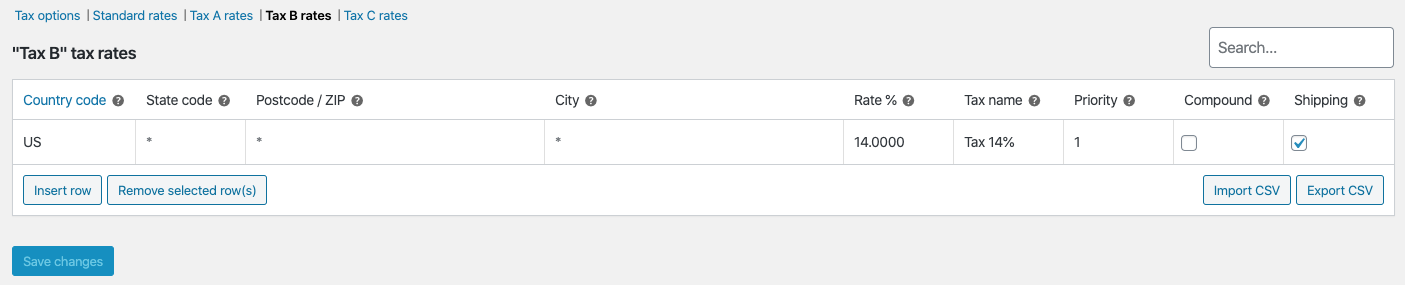
The next illustration shows that the Tax B class is next. It’s the same as Tax A, except here the Rate % is 14 and the Tax name is Tax 14%.
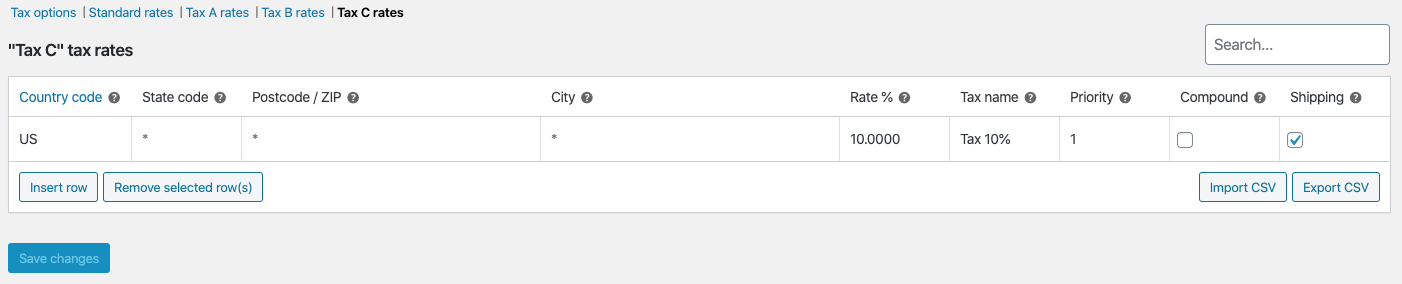
In this illustration the Tax C class is entered last and the settings are the same again as Tax B, except the Rate % is 10% and the Tax Name is Tax 10%.
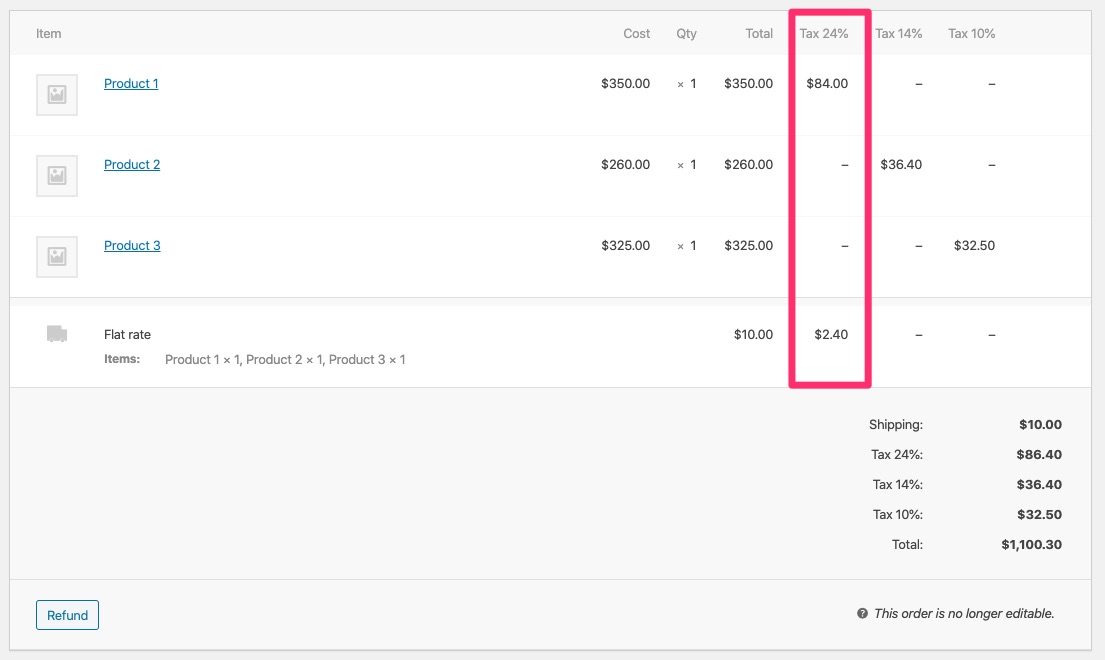
The outcome of this scenario is that the highest tax rate is applied to shipping when an order with multiple products is created, each product with one of the above tax rates assigned.
In the illustration of the order below, we see that the tax for Product 1 is $84 (on a $350 product). The Flat rate shipping of $10 is $2.40. Where the total for this 24% tax rate appears, we see that together it’s the sum of those parts, or $86.40, confirming that the 24% tax rate applied to the shipping, as we intended.
Scenario 5: Tax physical goods in one location, but virtual goods everywhere
↑ Back to topThe store in this scenario is based in the U.S. state of Kentucky where there’s a 6% state tax for physical goods shipped within the state. The store does not collect taxes on those same goods if shipped to outside the state. However, it also sells virtual goods for which it needs to collect taxes regardless of the customer’s shipping address.
The outcome of this setup is that all products for a Kentucky address are taxed, whether that product is virtual or physical, but for addresses elsewhere, only virtual products are taxed.
Scenario 5 General settings
- Go to WooCommerce > Settings > General and set Store Address to a Kentucky-based address.
- Set Default customer location to No location by default (first-time visitors will not see any tax info until a shipping address is entered).
- Enable taxes by checking Enable tax rates and calculations.
- Scroll to the bottom and click Save changes.

Scenario 5 Tax settings
- Go to WooCommerce > Settings > Tax > Tax options.
- Set Prices entered with tax to No, I will enter prices exclusive of tax.
- Set Calculate tax based on to Customer shipping address.
- In Additional tax classes add a new class e.g. Virtual Goods (we’ll assign this to products later).
- Set Display prices in the shop to Excluding tax.
- Set Display prices during cart and checkout to Excluding tax.
- Set Display tax totals to Itemized (optional, this setting shows tax rate names).
- Click Save changes.

Scenario 5 Tax rates
- Go to Standard rates (the subtab near the the top of the screen).
- Click the Insert row button to enter the 1st tax rule.
- In the Country Code column enter US (the 2-digit code for the U.S.).
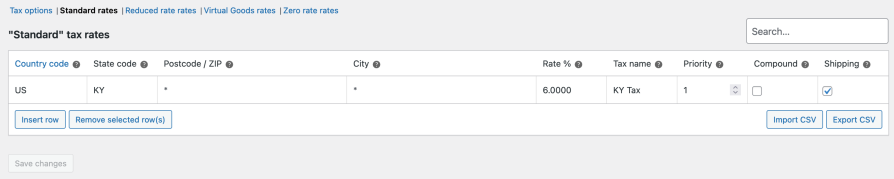
- In the State Code column enter KY (the 2-digit code for Kentucky, now the rate applies to Kentucky only).
- In the Rate % column enter 6.
- In the Tax name column enter KY Tax (optional).
- Click the Save changes button.
- Next, go to the tax class we created in the previous section, Virtual Goods rates (appears as a link near the top)
- Click the Insert row button to enter the 1st tax rule in this class.
- In the Rate % column enter 6.
- In the Tax name column enter Tax (optional).
- Click the Save changes button.

This tax rate applies to all customers, but because its an Additional tax class, and the Standard rates are used by default, it only applies to products we specifically apply it to. We’ll do that next.
Scenario 5 Product Settings
- Go to Products and either Add new or edit existing products.
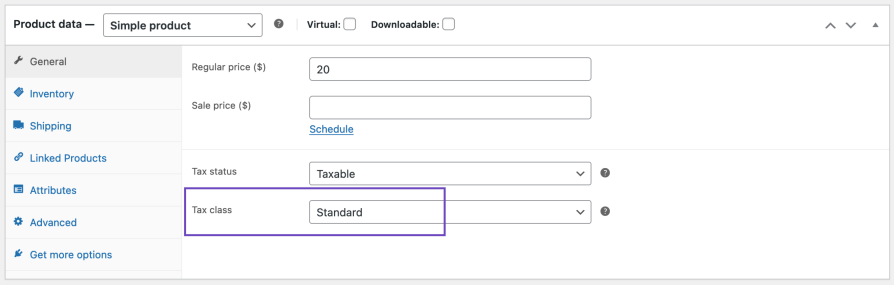
- Any physical products that are shipped can continue to use Standard rates taxes.
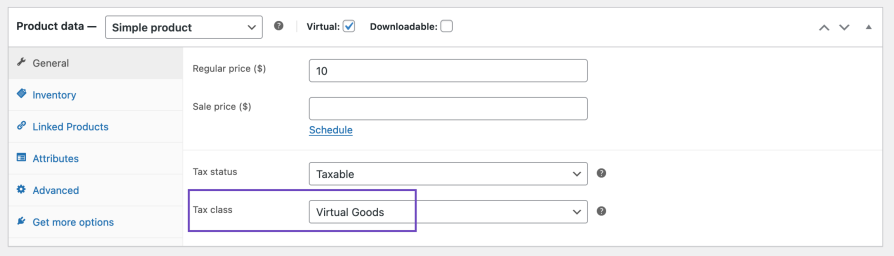
- For virtual products, set their Product > Product data > General > Tax class to Virtual Goods.
- Click Update after editing a product to save the changes.
Below is an image showing a shippable product’s Tax class is set to Standard.
Below is another image, this time showing a virtual product’s Tax class set to Virtual Goods.
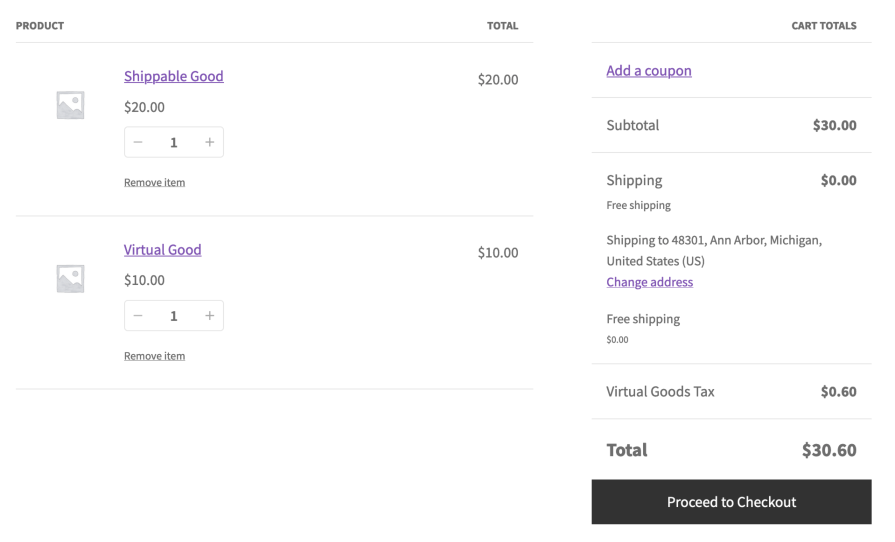
With the above settings in place, the shop is ready to collect taxes. Below illustrates the cart page with two products, aptly named Shippable Good ($20) and Virtual Good ($10). The address entered into the shipping calculator is Lexington, Kentucky. The itemized taxes show both KY Tax and Virtual Goods Tax apply.

The next illustration shows the same cart as above, except the address is now set to Ann Arbor, Michigan. The itemized taxes show that only the Virtual Goods Tax applies and, at $0.60, is applied to the Virtual Good product only.
Code snippets for configuring special tax scenarios
↑ Back to topNote: We are unable to provide support for customizations under our Support Policy. If you need to further customize a snippet, or extend its functionality, we highly recommend Codeable, or a Certified WooExpert.
Scenario A: Charge the same price regardless of location and taxes
↑ Back to topIf a store enters product prices including taxes, but levies various location-based tax rates, the prices will appear to change depending on which tax rate is applied. In reality, the base price remains the same, but the taxes influence the total. Follow this link for a detailed explanation.
Some merchants prefer to dynamically change product base prices to account for the changes in taxes and so keep the total price consistent regardless of tax rate. Enable that functionality by adding the following snippet to your child theme’s functions.php file or via a code snippet plugin.
Scenario B: Charge tax based on the subtotal amount
↑ Back to topThe following snippet is useful in case where a store only ads taxes when the subtotal reaches a specified minimum. In the code snippet below that minimum is 110 of the store’s currency. Adjust the snippet according to your requirements.
Scenario C: Apply different tax rates based on the customer role
↑ Back to topSome merchants may require different tax rates to be applied based on a customer role to accommodate for wholesale status or tax exemption.
To enable this functionality, add the following snippet to your child theme’s functions.php file or via a code snippet plugin. In this snippet, users with “administrator” capabilities will be assigned the Zero rate tax class. Adjust it according to your requirements.
Scenario D: Show 0 value taxes
↑ Back to topTaxes that have 0-value are hidden by default. To show them regardless, add the following snippet to your theme’s functions.php file or via a code snippet plugins:
add_filter( 'woocommerce_order_hide_zero_taxes', '__return_false' );Scenario E: Suffixes on the main variable product
↑ Back to topOne of the tax settings for WooCommerce enables the use of suffixes to add additional information to product prices. It’s available for use with the variations of a variable product, but is disabled at the main variation level as it can impact website performance when there are many variations.
The method responsible for the related price output can be customized via filter hooks if needed for variable products. This will require customization that can be implemented via this filter:
add_filter( 'woocommerce_show_variation_price', '__return_true' );Questions and Support
↑ Back to topDo you still have questions and need assistance?
This documentation is about the free, core WooCommerce plugin for which support is provided in our community forums on WordPress.org. Searching there you’ll often find that your question has been asked and answered before.
If you haven’t created a WordPress.org account to use the forums, here’s how.
- If you’re looking to extend the core functionality shown here, we recommend reviewing available extensions in the Woo Marketplace.
- Need ongoing advanced support, or a customization built for WooCommerce? Hire a WooExpert agency.
- Are you a developer building your own WooCommerce integration or extension? Check our Developer Resources.
If you weren’t able to find the information you need, please use the feedback thumbs below to let us know! 🙏