The Product Bundle type gives you the option to create downloadable item packages, handy in cases that require offering a single download for the entire bundle, in addition to individual downloads.
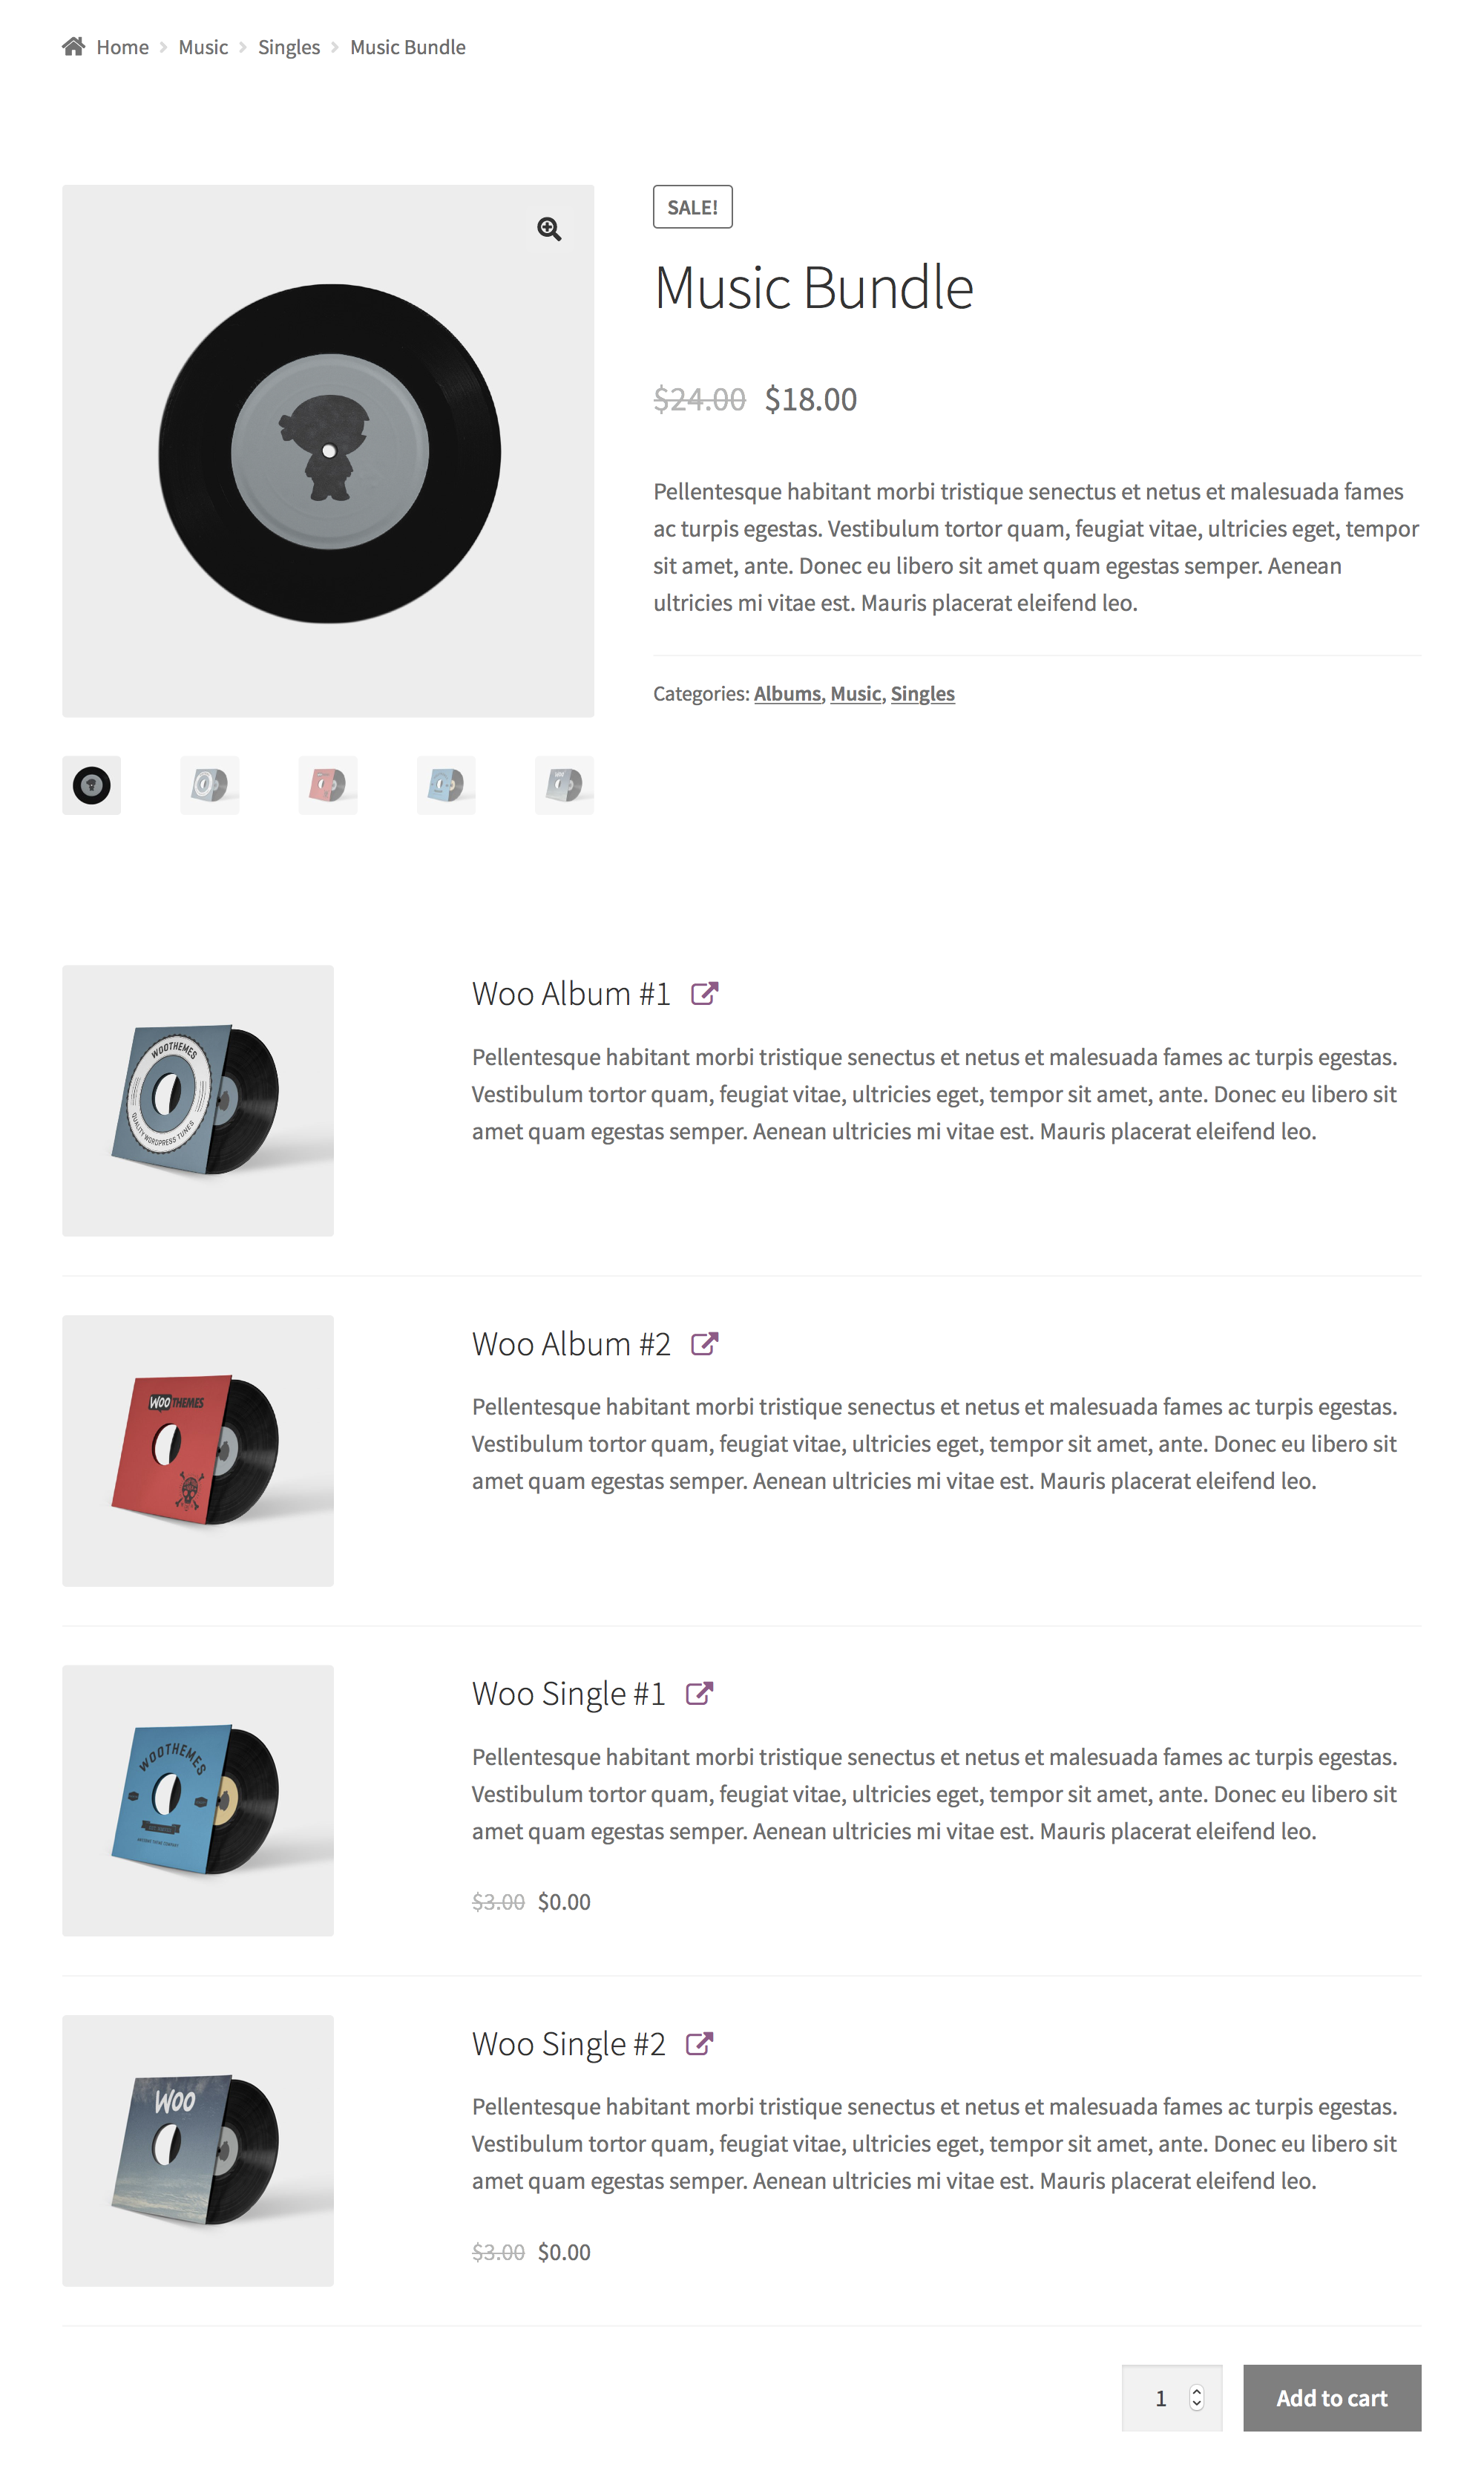
This guide shows you how to create the Music Bundle — a virtual bundle that contains 2 downloadable albums and 2 singles available in the Dummy Woo Store catalog. To make the package more appealing, the two singles are included in the bundle for free.
Plugins/Extensions Used
↑ Back to topConfiguration
↑ Back to topTo configure the Music Bundle:
- Create a Bundle
- Go to WooCommerce > Products and click Add Product.
- Enter a Title, Description and Short Description.
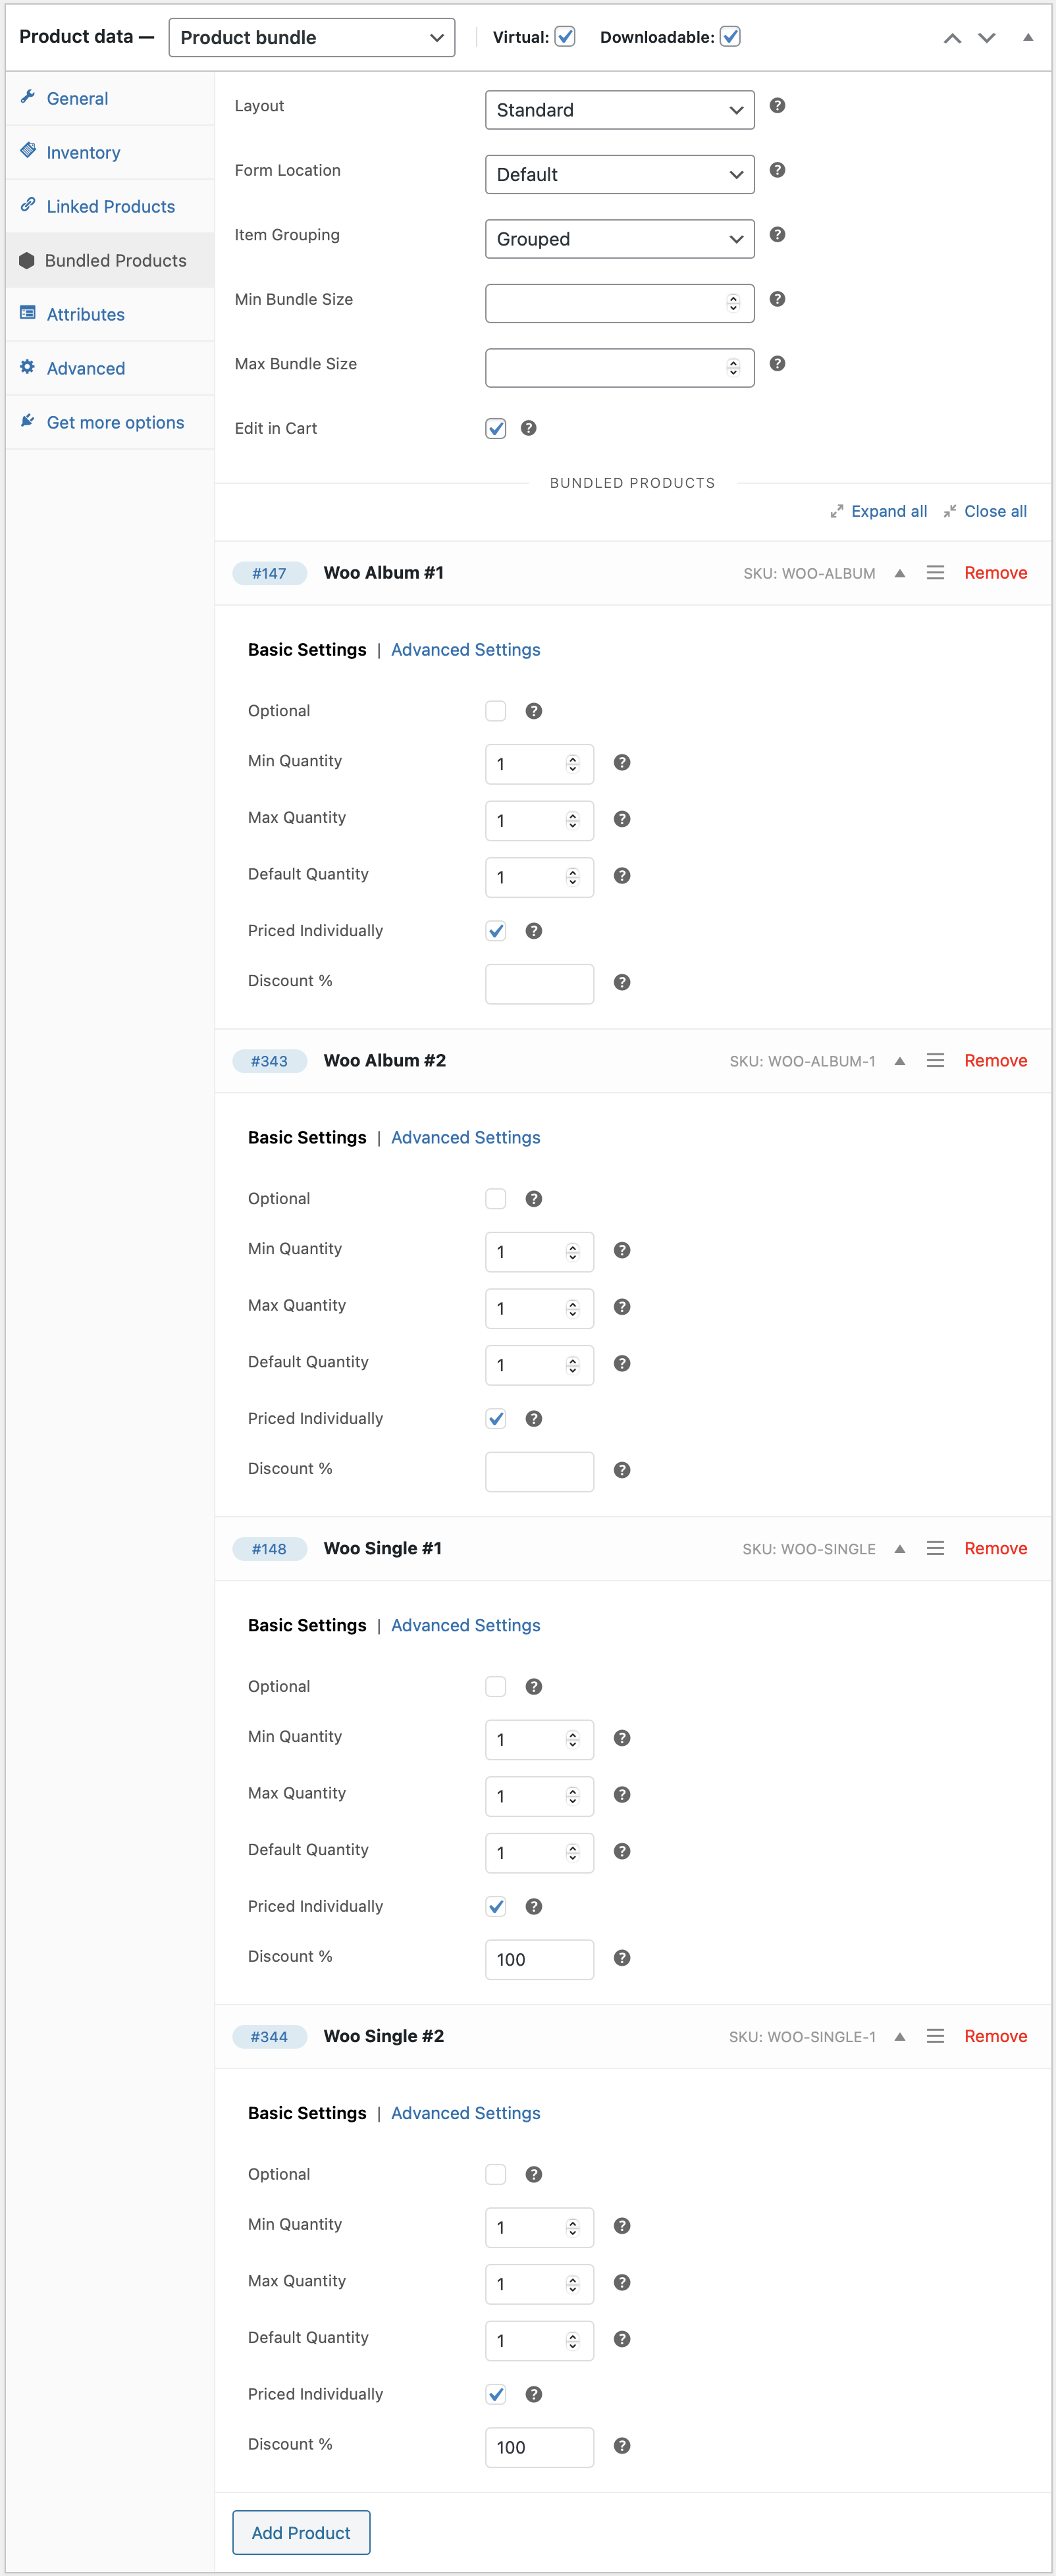
- Locate the Product Data panel and select the Product bundle type.
- Tick/check the Virtual checkbox.
- Add Bundled Products
- Go to the Bundled Products tab in the left menu.
- Use the search field to find Woo Album #1.
- Click its title to add it.
- Repeat the second and third steps to add the second album.
- Repeat the second and third steps to add the 2 singles.
This example assumes that all albums and singles already exist in your store’s catalog.
- Configure Pricing Options
All products included in the Music Bundle are Priced Individually:
- Go to the General tab in the left menu and ensure that the Regular Price and Sale Price fields are blank.
- Go to the Bundled Products tab in the left menu and check the Priced Individually checkbox for every bundled item.
- Locate Woo Single #1 and enter 100 in the Discount % field that appears after checking the Priced Individually checkbox. Repeat for Woo Single #2.
- Configure Bundled Product Options
The free inclusion of two singles is an important element of our value proposition. Communicating this clearly is a good idea:
- Go to the Bundled Products tab and locate Woo Single #1.
- Under Advanced Settings > Price Visibility, ensure that the Product Details checkbox is checked. Repeat for Woo Single #2.
- Locate Woo Album #1. This time, uncheck the Product Details checkbox under Advanced Settings > Price Visibility. Repeat for the remaining Woo Albums.
- Add a Download to the Bundle
To offer the contents of the Music Bundle as a single download:
- Tick/check the Downloadable checkbox.
- Go to the General tab, and add a downloadable file. This process is no different to setting up a simple downloadable product — only in this case, the file needs to include the downloadable content of all bundled items. Note that this is a manual process — the extension does not automatically generate this file for you.
- Add Finishing Touches
Choose a Product Image, add some Gallery items and – finally – tweak the layout of the Music Bundle product page.
Layout Tweaks
Most WooCommerce-compatible WordPress themes default to a two-column product page layout: The first column contains the main product image and gallery, while the second one is reserved for product details and options. This space-conserving approach works well for Simple and Variable products, which usually contain only a few form elements.
In contrast, Product Bundles tend to have longer forms requiring multiple interactions to complete. Sometimes you may find that your theme’s two-column layout makes Bundles look space-constrained and hard to interact with. Some themes allow you to modify the layout of individual product pages to display product details and options in a single column. For example, if you are using Storefront, the Storefront Powerpack plugin includes options for:
- allocating more width to product form content, or
- stacking product form content below the main product image and gallery.
If you are experiencing layout issues with a Product Bundle and your theme does not provide any per-product layout options:
- Navigate to Product Data > Bundled Products.
- Locate the Form Location option.
- Choose Before Tabs to stack form content after the product image and summary.
In most cases, choosing Before Tabs will allocate the entire page width to the form contents of your Bundle. However, note that the Before Tabs option is not guaranteed to work reliably with all themes!
A similar result can be achieved with the free WooCommerce Stacked Product Layout plugin.
- Save
Click Publish or Update to save your changes.
Result
↑ Back to top

Questions & Support
↑ Back to topHave a question before you buy? Please fill out this pre-sales form.
Already purchased and need assistance? Get in touch with us via the Help Desk!