Installation
↑ Back to top- Download the .zip file from your WooCommerce account.
- Go to WordPress Admin > Plugins > Add New.
- Click Upload Plugin at the top.
- Choose File and select the .zip file you downloaded in Step 1.
- Click Install Now and Activate the extension.
Getting Started
↑ Back to topCreating Bundles
↑ Back to topTo create a product bundle:
- Go to Products > Add New.
- Select the Product Bundle type in the Product Data panel.
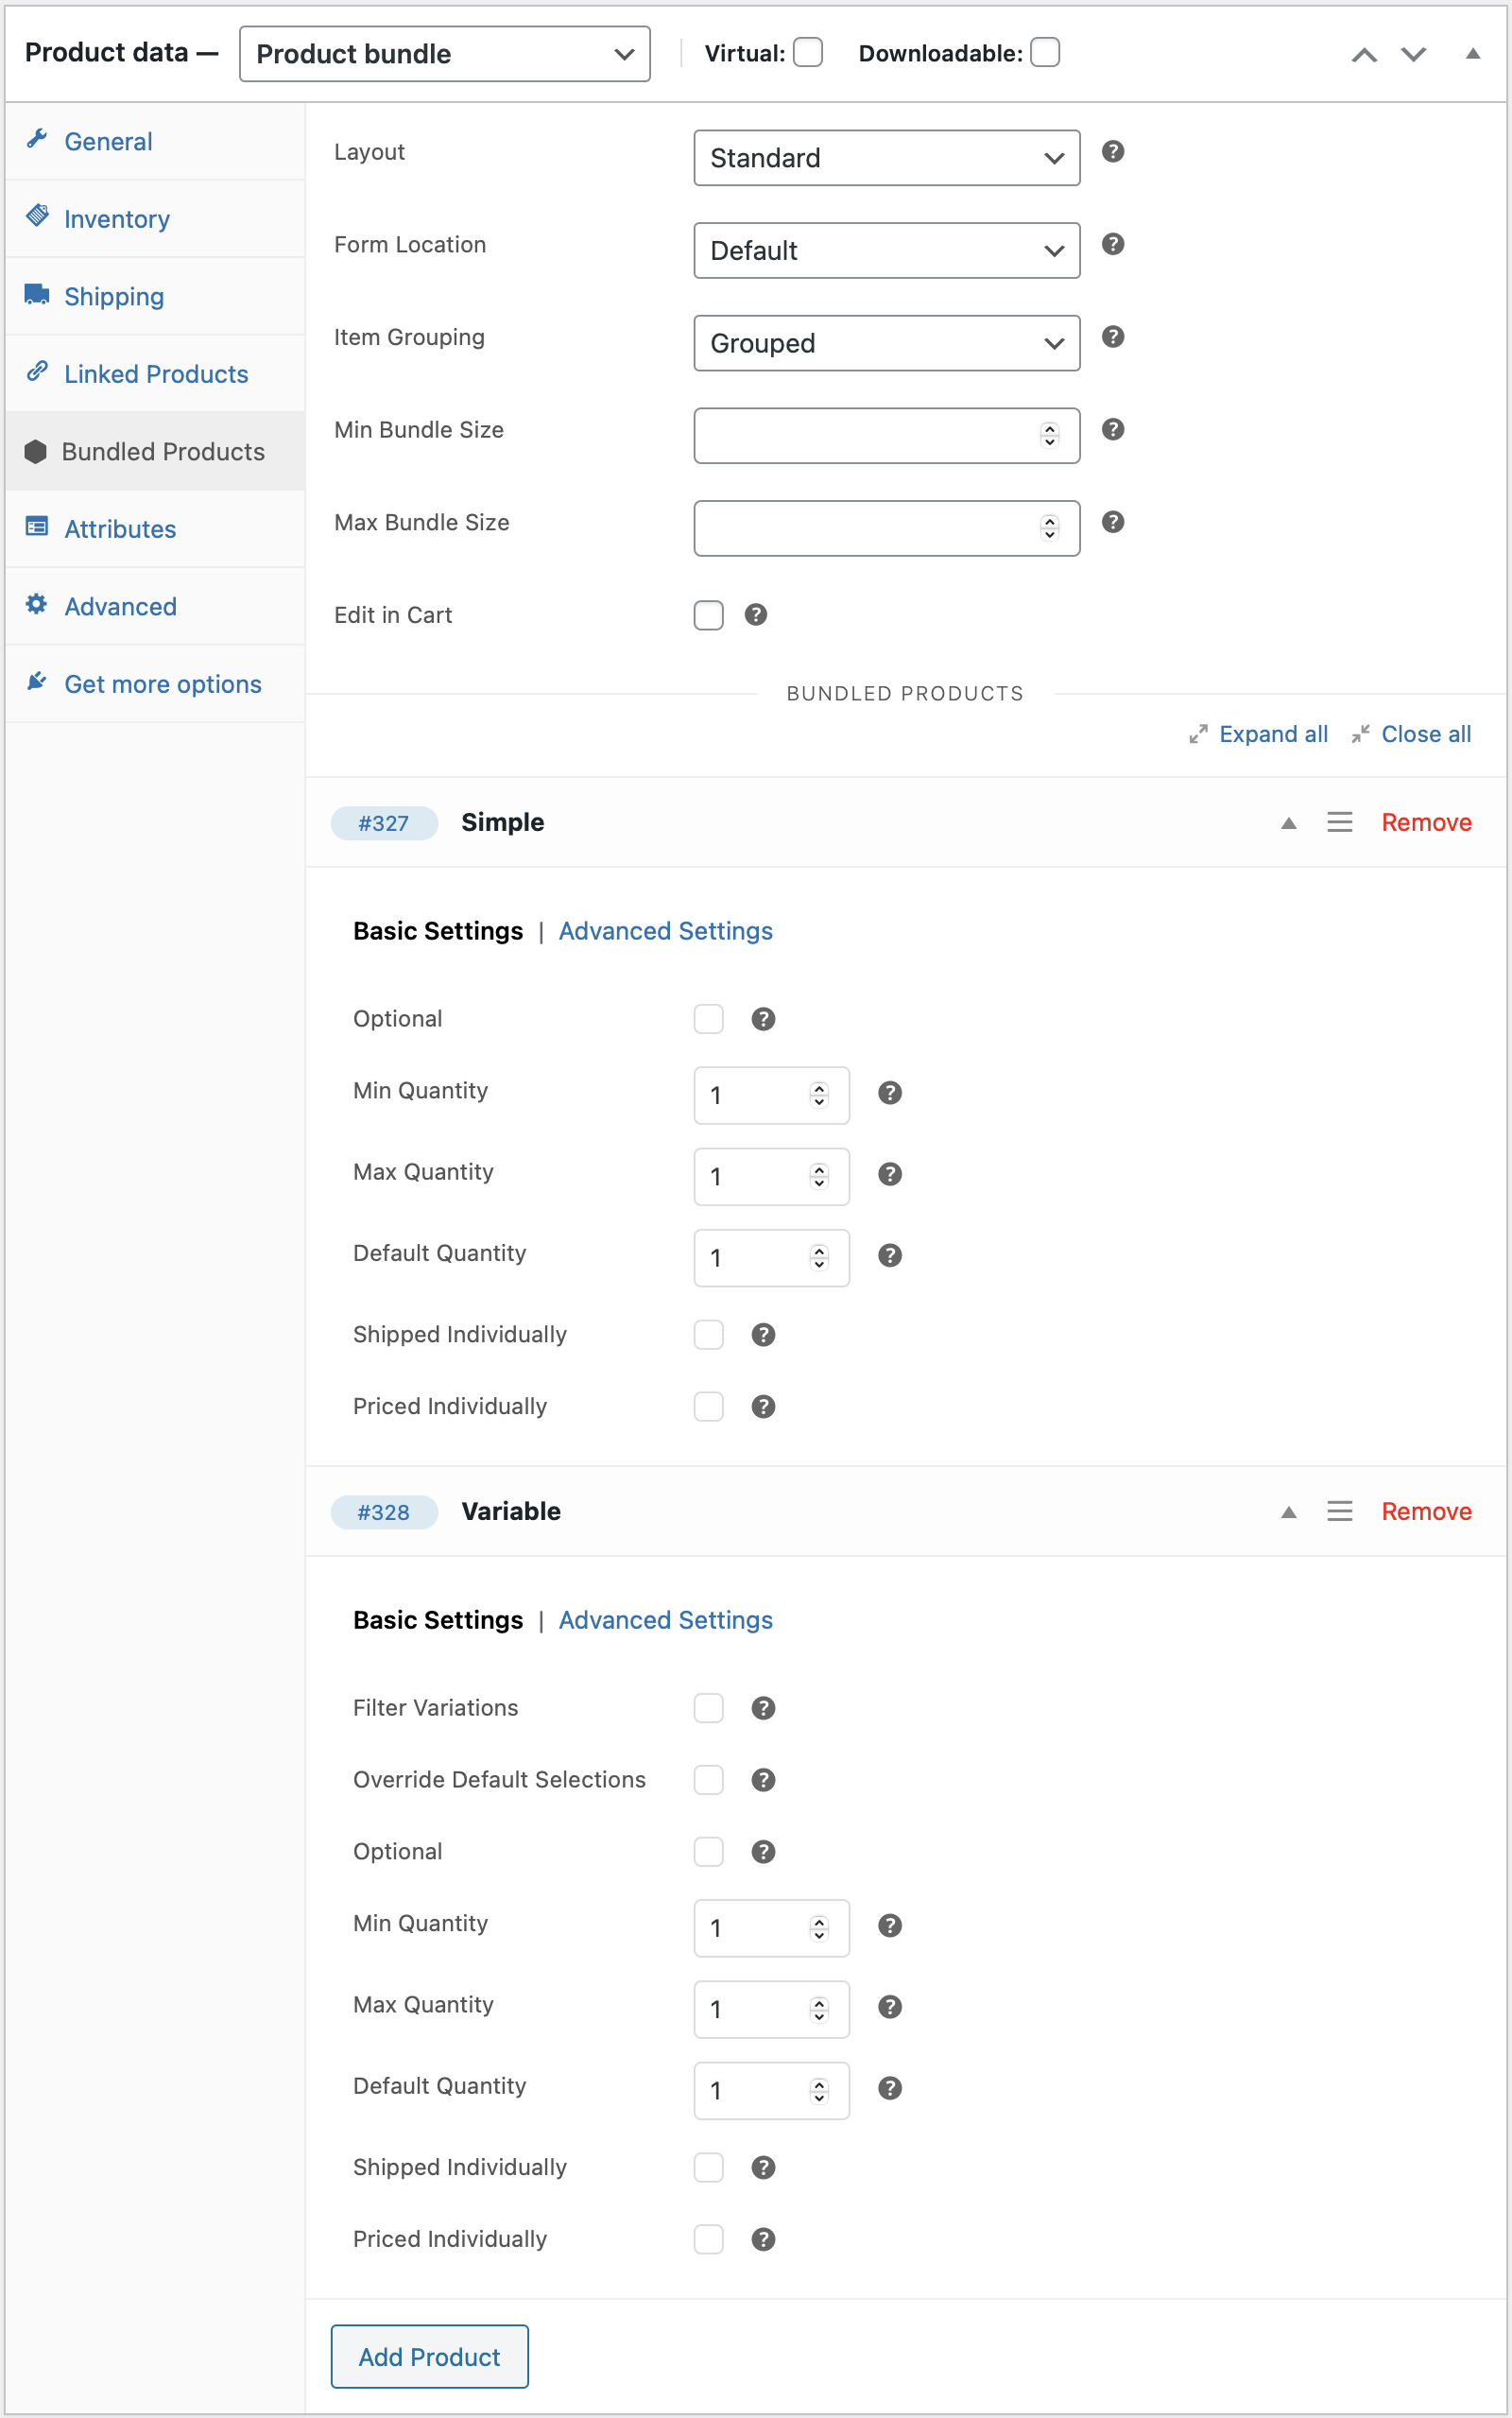
- Go to the Bundled Products tab.
- Click Add Product and use the search field to find and add products to the bundle. Repeat as many times as needed, each time clicking on a search result to add it.
- Publish to save.
Every product you add under the Bundled Products tab has a dedicated set of options that allow you to control various parameters, such as its minimum and maximum quantity. These options are explained in Bundled Product Settings.
Note that it’s possible to bundle multiple instances of the same simple or variable product. This creates many possibilities — for example, you can bundle together multiple variations of the same variable product.
The plugin supports simple products, variable products and simple/variable subscriptions. Grouped and external products are not supported and cannot be bundled.
Product bundles cannot be bundled. Additionally, bundles will not work correctly when added to Grouped products.
Product Bundles in the Cart
↑ Back to topWhen a bundle is added to the cart, it creates:
- A parent line item.
- Some child line items grouped under it — one for each bundled item.
This approach makes it possible to define a base price for an entire bundle, and/or to preserve the prices and tax rates of individual bundled items when needed.

Note: Looking for a way to hide the parent item in cart/order templates? Choose Item Grouping > None option.
Pricing
↑ Back to topThe Product Bundle type allows you to:
- set a base price for entire Product Bundles; and/or to
- preserve the prices of individual bundled products.
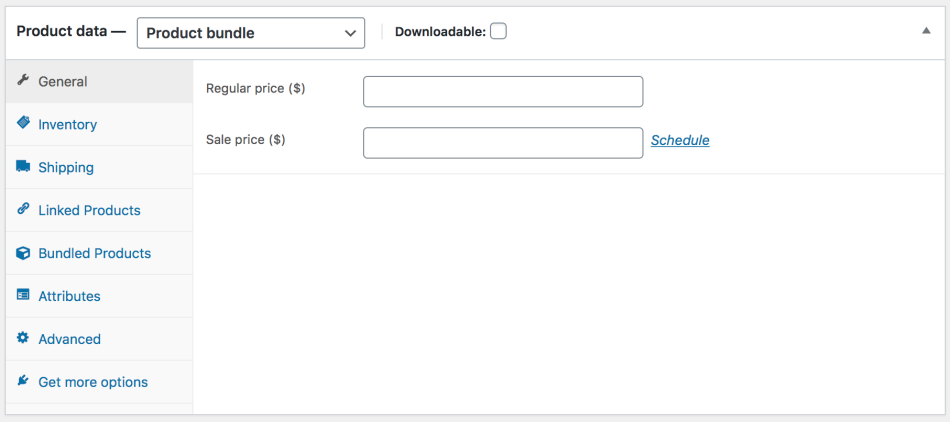
Setting a Base Price
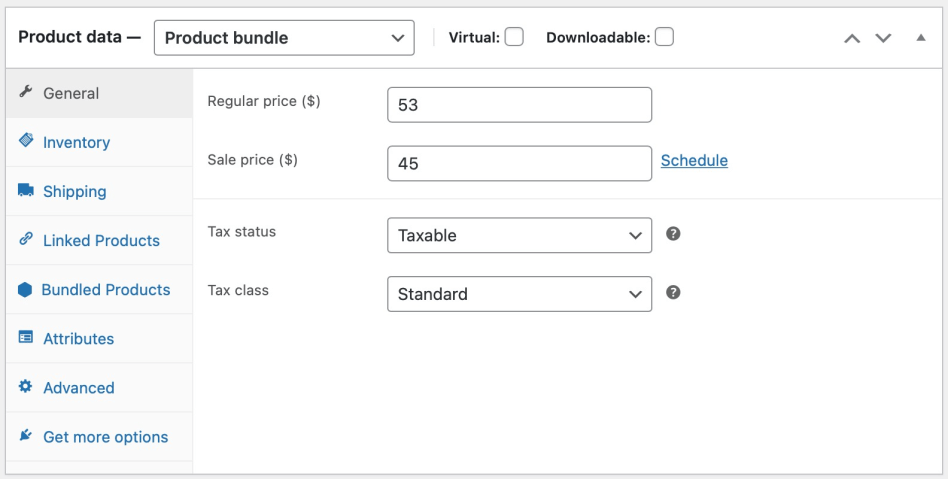
↑ Back to topTo set the base price of a bundle:
- Go to Products > All Products and select the bundle you wish to edit.
- Select the General tab in the left menu.
- Enter a Regular Price and if needed, a Sale Price.
- Update.
If you only set a base price for a bundle, its configuration will have no effect on its price.


Preserving Bundled Item Prices
↑ Back to topTo preserve the price and tax rate of a bundled product:
- Locate the bundled item under Product Data > Bundled Products.
- Tick the Priced Individually box in the Basic Settings section.
When Priced Individually is enabled, it is also possible to define a % Discount. Discounts provide an incentive for purchasing items in bulk and/or purchasing optional “add-ons”, such as accessories.
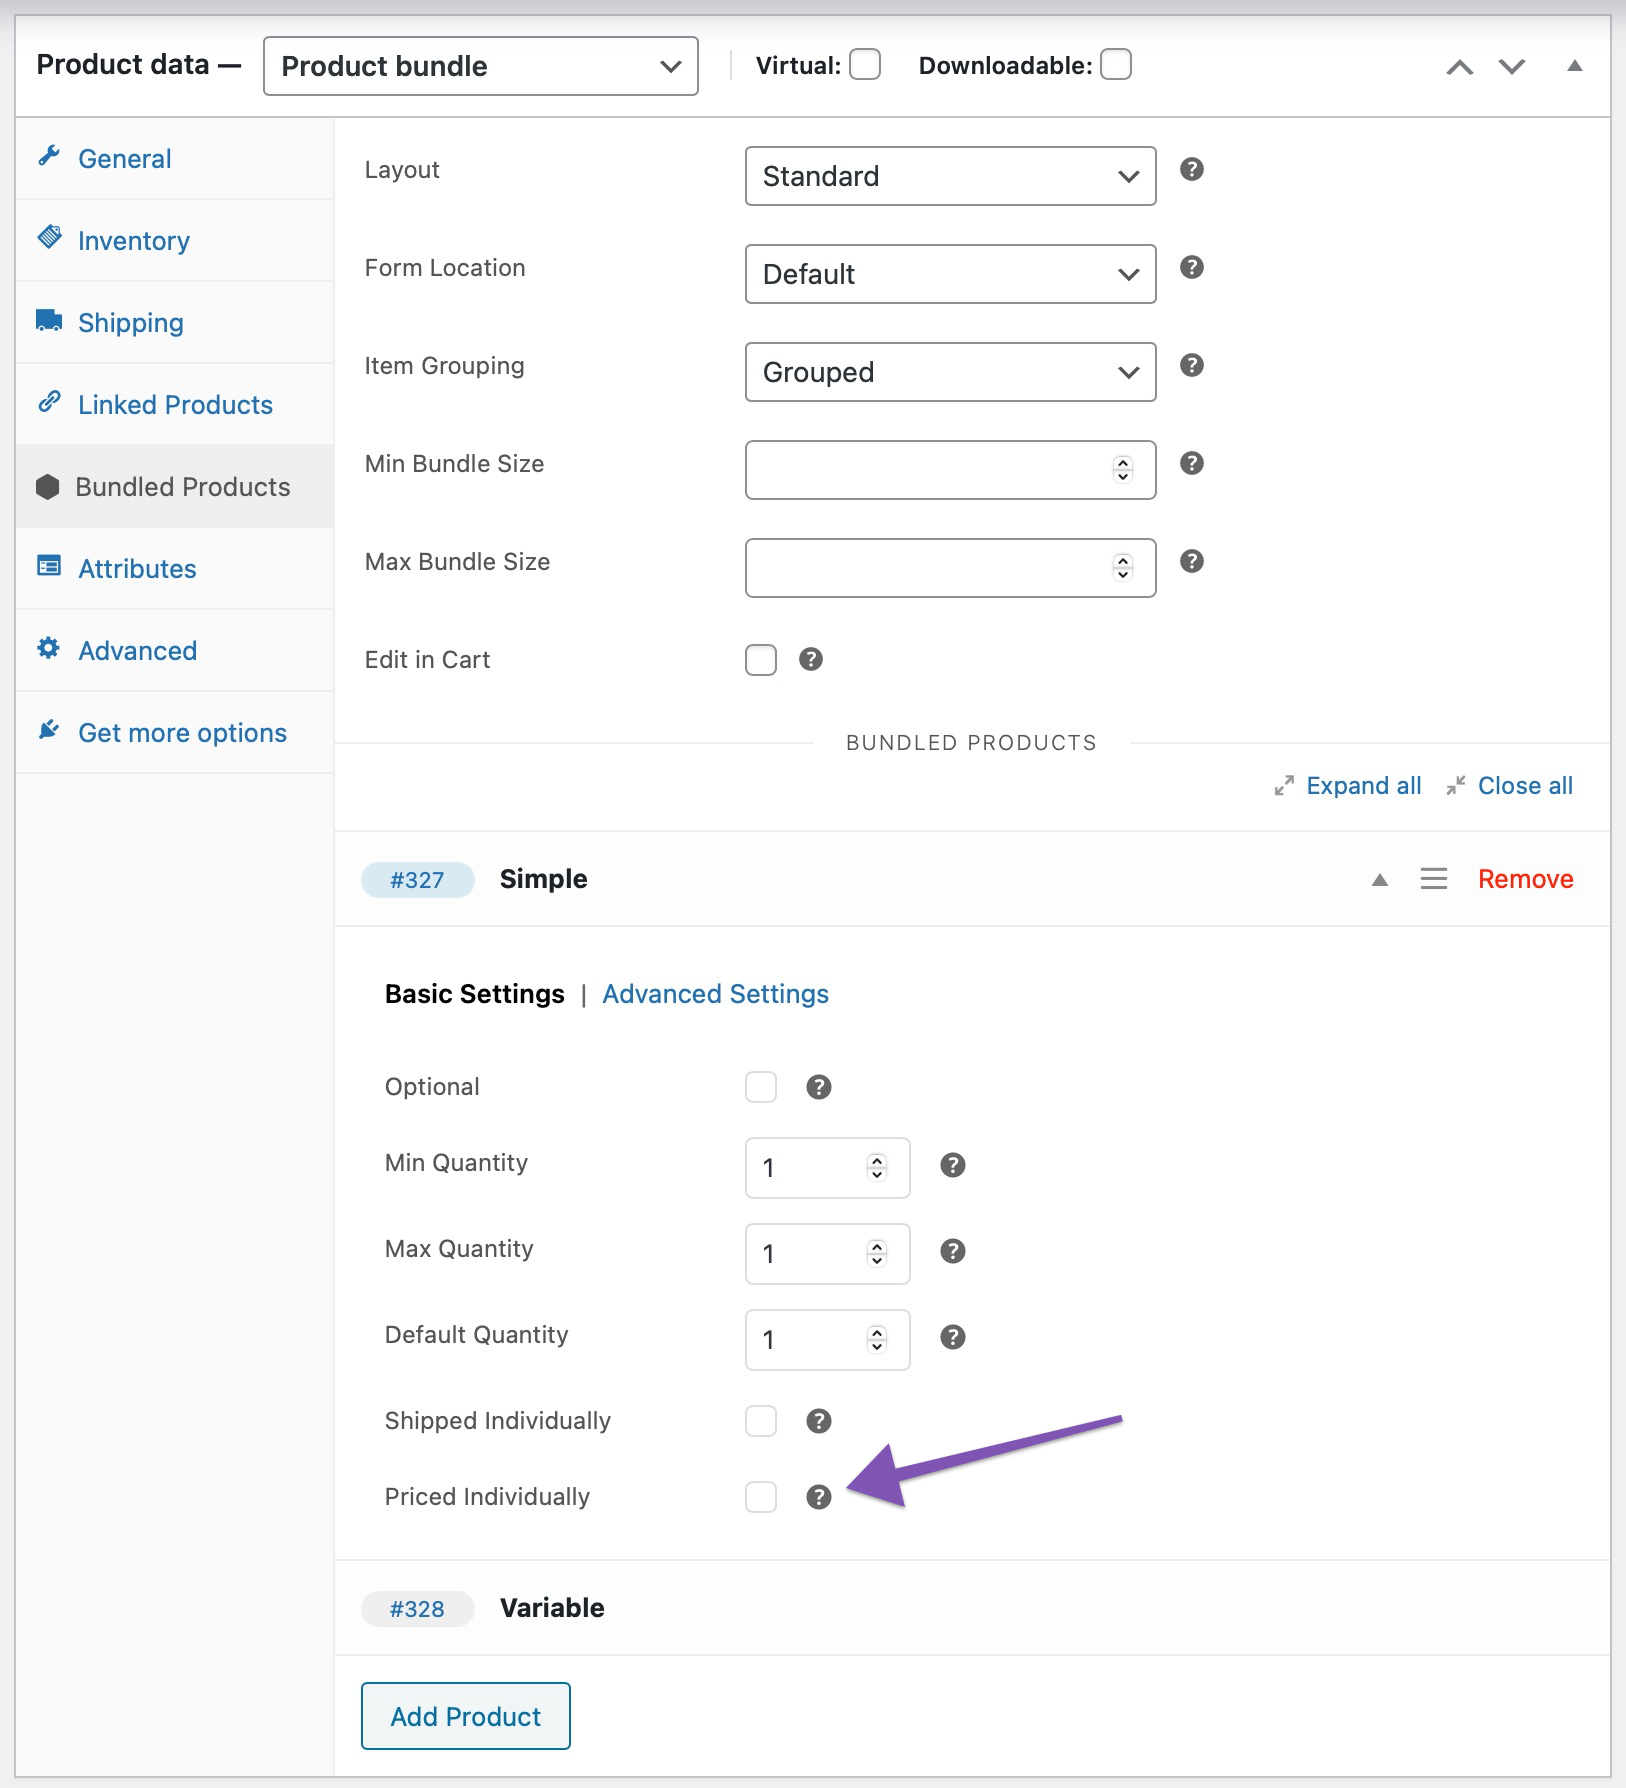
Priced Individually usually needs to be checked if the quantity of a bundled item is configurable — this is common when selling items in bulk.


Notes
↑ Back to topBundled Products With Empty Prices
All products contained in a bundle must have a price set, even when Priced Individually is disabled. WooCommerce does not allow products with a blank price to be purchased.
Controlling the Visibility of Bundled Item Prices
When Priced Individually is enabled, the bundled product price is visible in i) the product details page of the bundle, ii) the cart and iii) order details by default. To change this behavior, use the Price Visibility options found in the Advanced Settings tab.
Individual Pricing and Cart/Order Totals
When the Grouped selection is active under Item Grouping, the subtotal displayed next to the parent cart/order item includes the subtotals of any individually-priced child items. This behavior can be changed with this snippet.
Bundling Subscription Products
When a Subscription product is added to a bundle, the Subscription product must be Priced Individually if you would like a subscription to be created. Otherwise, the Subscription product will be treated as a one-time purchase.
On Sale
When all bundled products are Priced Individually and Discounted, the bundled product would be considered On Sale. It will then be shown wherever on-sale products are exhibited, including via blocks and shortcodes.
On the other hand, if any of the bundled products are either not Priced Individually or Priced Individually but not discounted, then the bundle is not considered On Sale by bundled products’ setting alone.
Shipping
↑ Back to topIntroduction
↑ Back to topMuch like simple products and product variations, bundles can be classified as:
- Physical — bundles that need to be physically shipped or picked up.
- Virtual — bundles that do not require shipping.
The plugin allows you to add physical products in virtual bundles. However, when a virtual bundle is purchased, all physical products contained in it will be treated as virtual.
From a shipping point of view, physical bundles are classified as assembled or unassembled:
- Assembled bundles consist of multiple products that are physically assembled in a common container.
- Unassembled bundles group together some products that do not require assembly.
Example: An Assembled Bundle
Woo Tech is using WooCommerce to sell computers online. Its entry-level desktop PC, Woo Basic, is assembled from a list of inventory-managed components. Once a Woo Basic PC is assembled, the original packaging of the assembled components is discarded, and the PC is packaged and shipped in one box along with all product manuals and accompanying material.

Configuration
↑ Back to topTo configure a physical bundle for shipping, follow these steps:
- Determine if the bundle you are creating is an assembled, unassembled, or partially assembled one:
- Assembled bundles, such as the build-to-order Woo Basic PC we saw earlier, are shipped in a single box.
- Unassembled bundles are collections of products that do not require assembly. Their shipping properties (weight, dimensions) are preserved.
- Partially assembled bundles have a common physical container. Some bundled items are assembled in it, and some are shipped in their original boxes.
- Navigate to the Shipping tab in the left menu, and choose a Bundle Type. There are two options to choose from: Assembled or Unassembled. If your bundle is a partially assembled one, choose the Assembled option at this point.

- If you selected the Assembled option in the previous step, go on and configure the Weight, Dimensions and Shipping Class of the common container.
If your assembly has a static weight, choose the Assembled Weight > Ignore option. If you prefer to calculate its weight dynamically, choose the Assembled Weight > Preserve option. When Preserve is selected, the Weight field is treated as a container weight, and the weight of the assembly is calculated by adding:
- the specified container Weight; and
- the weight of all assembled bundled items.
- If your bundle is partially assembled, go to the Bundled Products tab and enable Shipped Individually for every bundled product that does not require assembly.
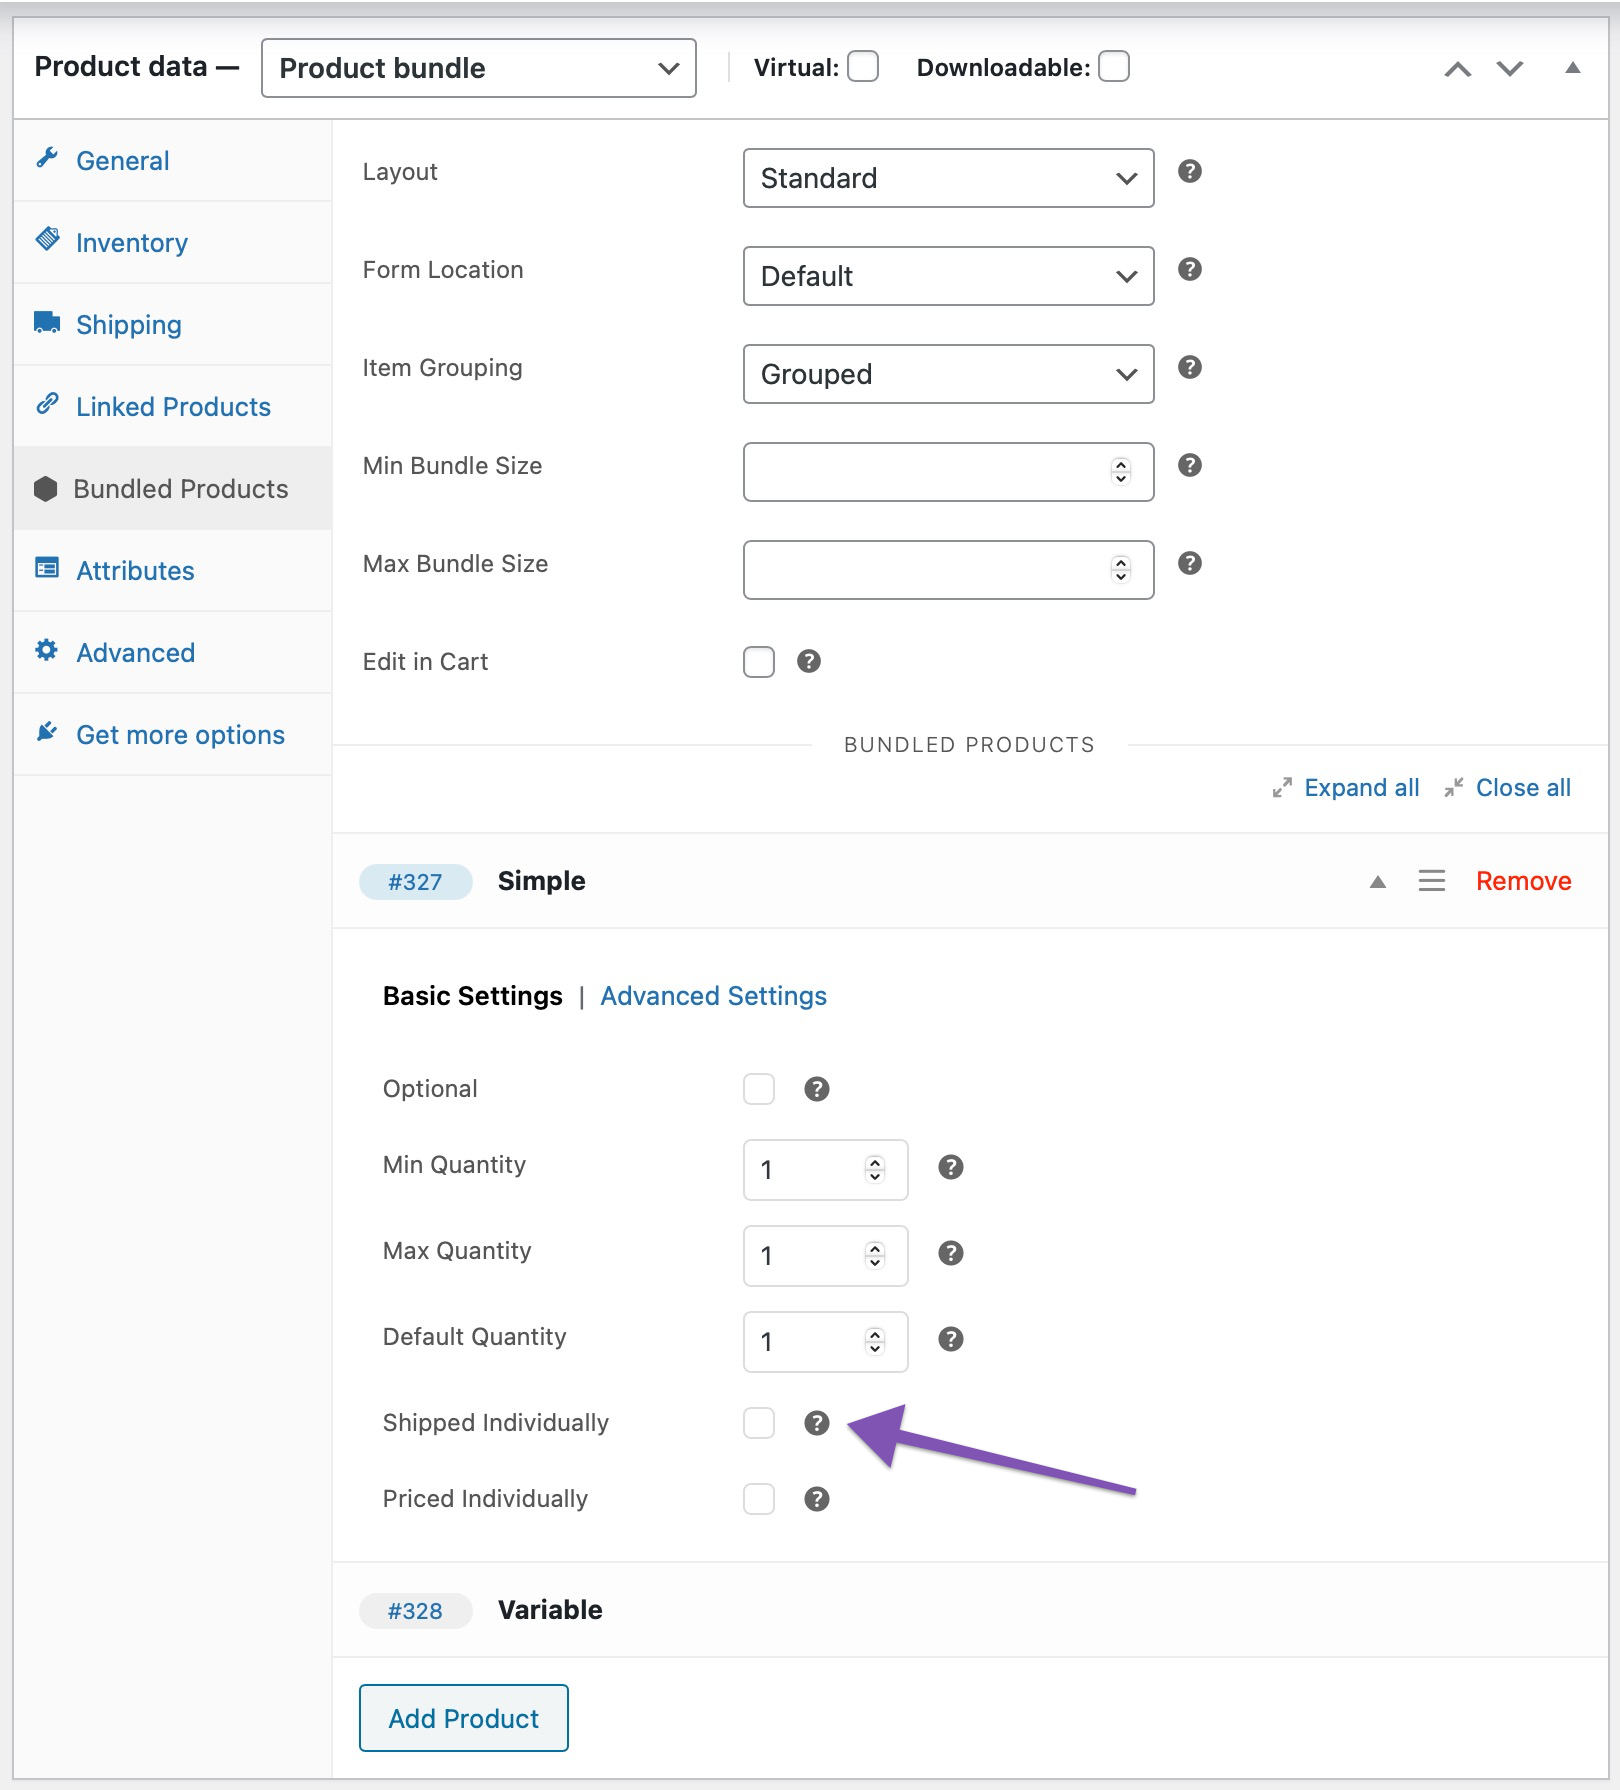
Shipped Individually does not mean “split across different shipments”. For example, a Desktop PC may include some assembled parts, but it may also come with an external monitor that is shipped in its own box, in the same shipment. In this scenario, the monitor will need to be set up as Shipped Individually.
Notes on External Order Fulfillment, Shipping and Inventory Management Services
The shipping configuration options of the Bundle type allow shipping methods and other business logic that relies on the WooCommerce Shipping API to calculate shipping costs accurately.
WooCommerce gives developers a lot of flexibility to customize the shipping properties of the items contained in the cart: When you add an assembled bundle to the cart, it is seen by WooCommerce as a single physical item with an aggregated value and weight. Shipping costs are calculated based on this physical representation.
However, this flexibility is not preserved when working with order data. If you are using an external fulfillment, shipping, or inventory management service that reads order data from WooCommerce, please be aware that an assembled bundle may not be imported as a single item.
Product Bundles provides an API that allows developers to modify the physical representation of your bundles when synchronizing order data with external systems.
We are unable to provide assistance with customizations/integrations under our Support Policy. For WordPress/WooCommerce customizations and custom integrations, we highly recommend a Certified WooExpert.
Bundled Product Settings
↑ Back to topEvery product you add under the Bundled Products tab reveals a dedicated set of options. These are divided into two tabs: Basic Settings and Advanced Settings.
Basic Settings
↑ Back to topMin Quantity and Max Quantity — Used to define an allowed quantity range for the bundled product: Customers are able to choose any quantity within the specified min/max range. Leave the Max Quantity field blank for an unlimited maximum value.
When the Sold individually option is enabled, the Min Quantity and Max Quantity of a bundle cannot be greater than 1.
Product Bundles does not support decimal quantities.
Optional — When enabled, customers may choose whether to include the bundled product in their bundle or not. This checkbox is hidden when the Min Quantity of a bundled product is equal to 0. Bundled products with Min Quantity equal to 0 are automatically considered optional.
Filter Variations — Makes it possible to make specific variations available for purchase. Applicable to variable products only.
Override Default Selections — Used for overriding the pre-selected attribute values of bundled variable products.
Adding Individual Variations
To add a single variation to a Bundle without requiring customers to choose attributes, Filter Variations must be used in combination with Override Default Selections:
- Enable Filter Variations and search for a variation, then add it.
- Enable Override Default Selections and choose specific values for all variation attributes. This step is necessary if you want to hide the attribute selection drop-downs of this bundled product — even if the active variation is already mapped to specific attribute values.

Priced Individually — Adds the price of the bundled product to the base bundle price. With the option enabled, a Discount can be defined. Both options are documented in the Pricing section.
Shipped Individually — Controls how the bundled product is shipped in relation to the entire bundle (assembled or unassembled) when Bundle Type > Assembled is chosen under Product Data > Shipping. Documented in the Shipping section.
Advanced Settings
↑ Back to topVisibility — Controls the visibility of the bundled product: i) in the single product page of the bundle, ii) in the cart/checkout pages, and iii) when displaying order details (including order details displayed in e-mail notifications).
Visibility in Payment Gateway Transactions
Marking a bundled product as hidden in the order/e-mail templates will not prevent payment gateways from listing it in their transaction details archives and customer notification e-mails.
Price Visibility — Controls the visibility of the bundled product price: i) in the product details page of the bundle, ii) in the cart and iii) when displaying order details. Applicable when Priced Individually is ticked.
Override Title and Override Short Description — Used for modifying or hiding the original titles and/or short descriptions of bundled products. Note that overridden product titles will replace the original product titles in all template locations, including the cart/checkout and order details.
The Override Short Description field supports shortcodes, as well as HTML markup.
Hide Thumbnail — Controls the visibility of bundled product thumbnails, displayed by default when viewing the single-product details page of a bundle.
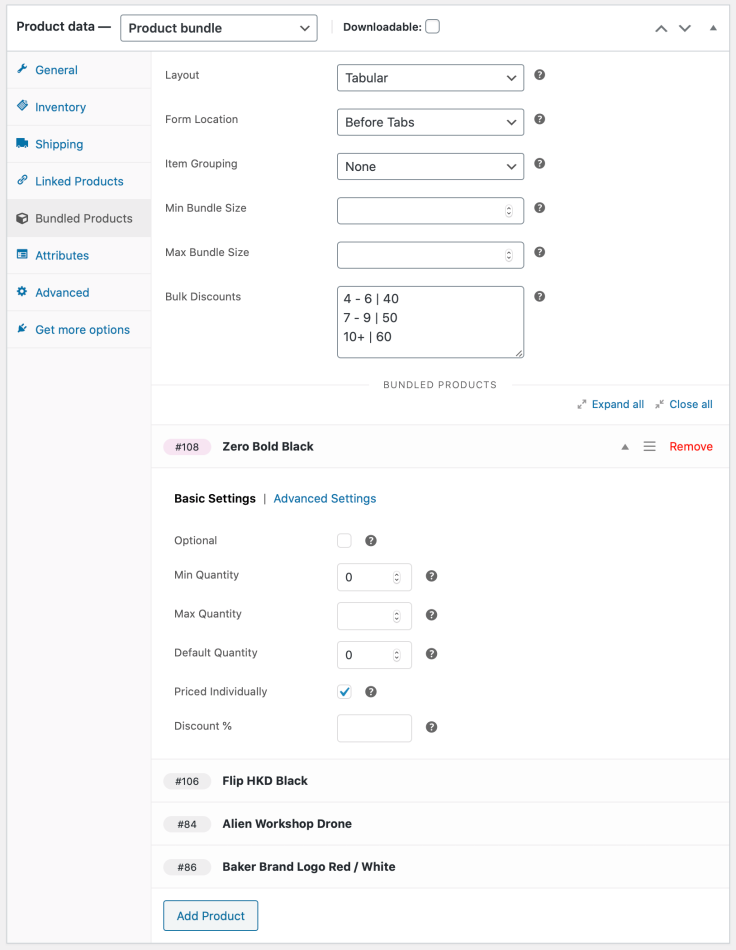
Layout
↑ Back to topThe Layout option controls the appearance of bundled product details in single-product pages. There are 3 alternatives to choose from: Standard, Tabular and Grid.
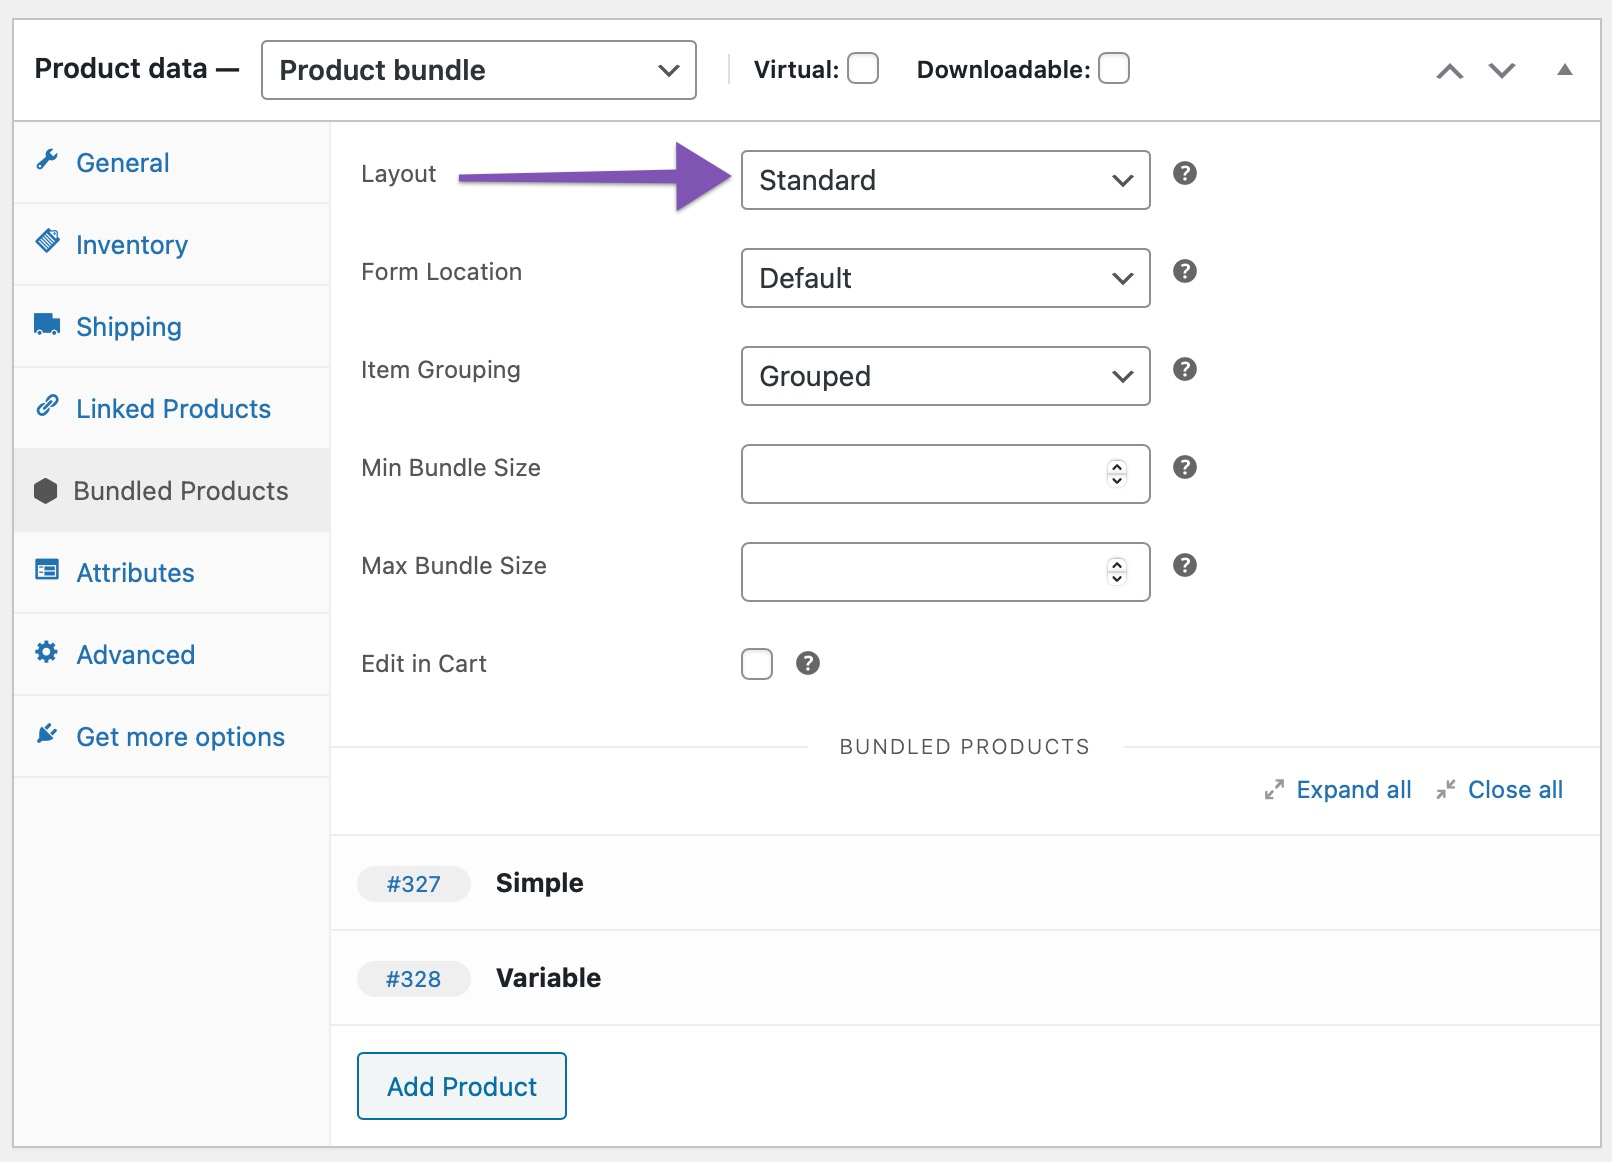
The Tabular option is recommended for bundles that contain multiple bundled products with configurable quantities as it makes viewing/comparing item quantities easier.


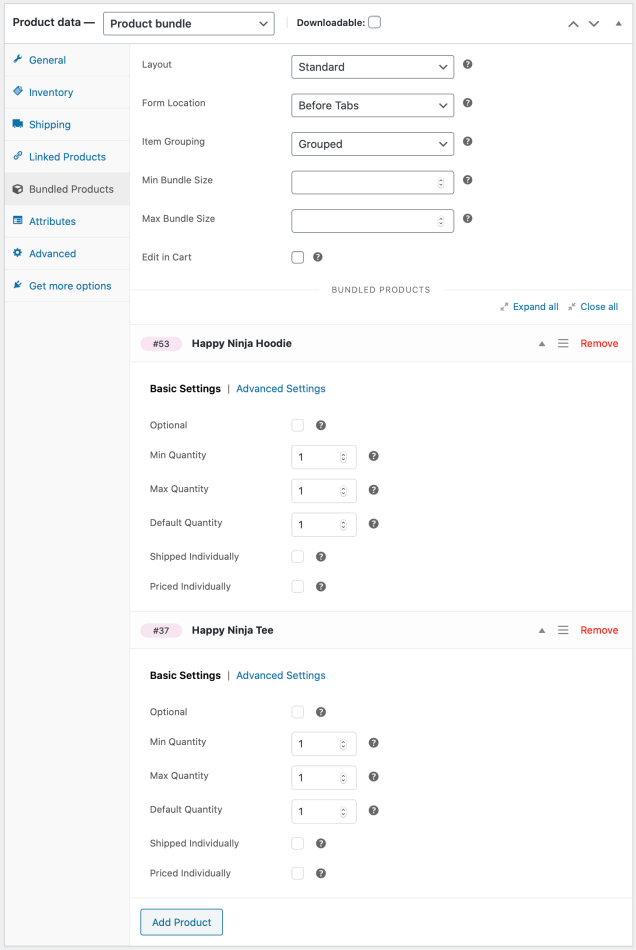
Form Location
↑ Back to topMost WooCommerce-compatible WordPress themes default to a two-column product page layout: The first column contains the main product image and gallery, while the second one is reserved for product details and options. This space-conserving approach works well for Simple and Variable products, which usually contain only a few form elements.
Product Bundles tend to have busier forms that require multiple steps/interactions to complete. Sometimes you may find that your theme’s two-column layout makes Product Bundles look space-constrained and hard to interact with. Some themes may allow you to modify the layout of individual product pages to display product details and options in a single column. For example, if you are using Storefront, the Storefront Powerpack plugin includes options for:
- allocating more width to product form content, or
- stacking product form content below the main product image and gallery.
If you are experiencing layout issues with a Product Bundle and your theme does not provide any per-product layout options:
- Navigate to Product Data > Bundled Products.
- Locate the Form Location option.
- Choose Before Tabs to stack form content after the product image and summary.
In most cases, choosing Before Tabs will allocate the entire page width to the form contents of your Bundle.
The Before Tabs option is not guaranteed to work reliably with all themes!
The Form Location option is not available when using a block theme.
Item Grouping
↑ Back to topThe Item Grouping option controls the visibility and indentation of parent/child line items in cart/order templates:
Grouped — Bundled items in cart/order templates are grouped under a parent line item named after the product bundle itself. Bundled items are indented and bundled item quantities are kept in sync with the quantity of their parent. Must be selected when creating assembled bundles and/or bundles with a base price.
When the Grouped option is active, the subtotals of parent/child line items in cart/order templates are added together and the actual subtotal of the parent item is replaced by the aggregated subtotal. Additionally, the subtotals of individually-priced items are indented and displayed with a Subtotal: prefix. This behavior can be changed with this snippet.
Flat — Similar to Grouped, however instead of being indented, bundled cart/order items include a reference to the bundle they belong to.
None — Hides the parent item in all cart/order templates. Bundled cart/order items include a reference to the bundle they belong to. Makes Bundles resemble Grouped Products in all customer-facing templates.
Item Grouping > None only works with unassembled bundles without a base price. To choose this option:
- Go to Product Data > Shipping and choose the Unassembled Bundle Type.
- Navigate to Product Data > General and make sure that the Regular/Sale Price fields are empty.
- Finally, go to Product Data > Bundled Products and make sure that at least one bundled item is Priced Individually.
When Item Grouping > None is active, a bundle can be purchased only if at least one bundled item is included or selected.


Bundle Size
↑ Back to topWith Product Bundles, you can create and sell personalized bundles with a fixed or variable number of “slots”, such as cases of wine, six-packs of soap, or candy boxes.
To create a pick-and-mix bundle, use the Min Bundle Size and Max Bundle Size options to define the minimum and/or maximum quantity of products that customers must choose to purchase their personalized bundle.
Cart Editing
↑ Back to topConfigurable bundles, such as the Bulk Discount Deck Pack bundle, can be edited from the cart page by enabling the Edit in Cart option.
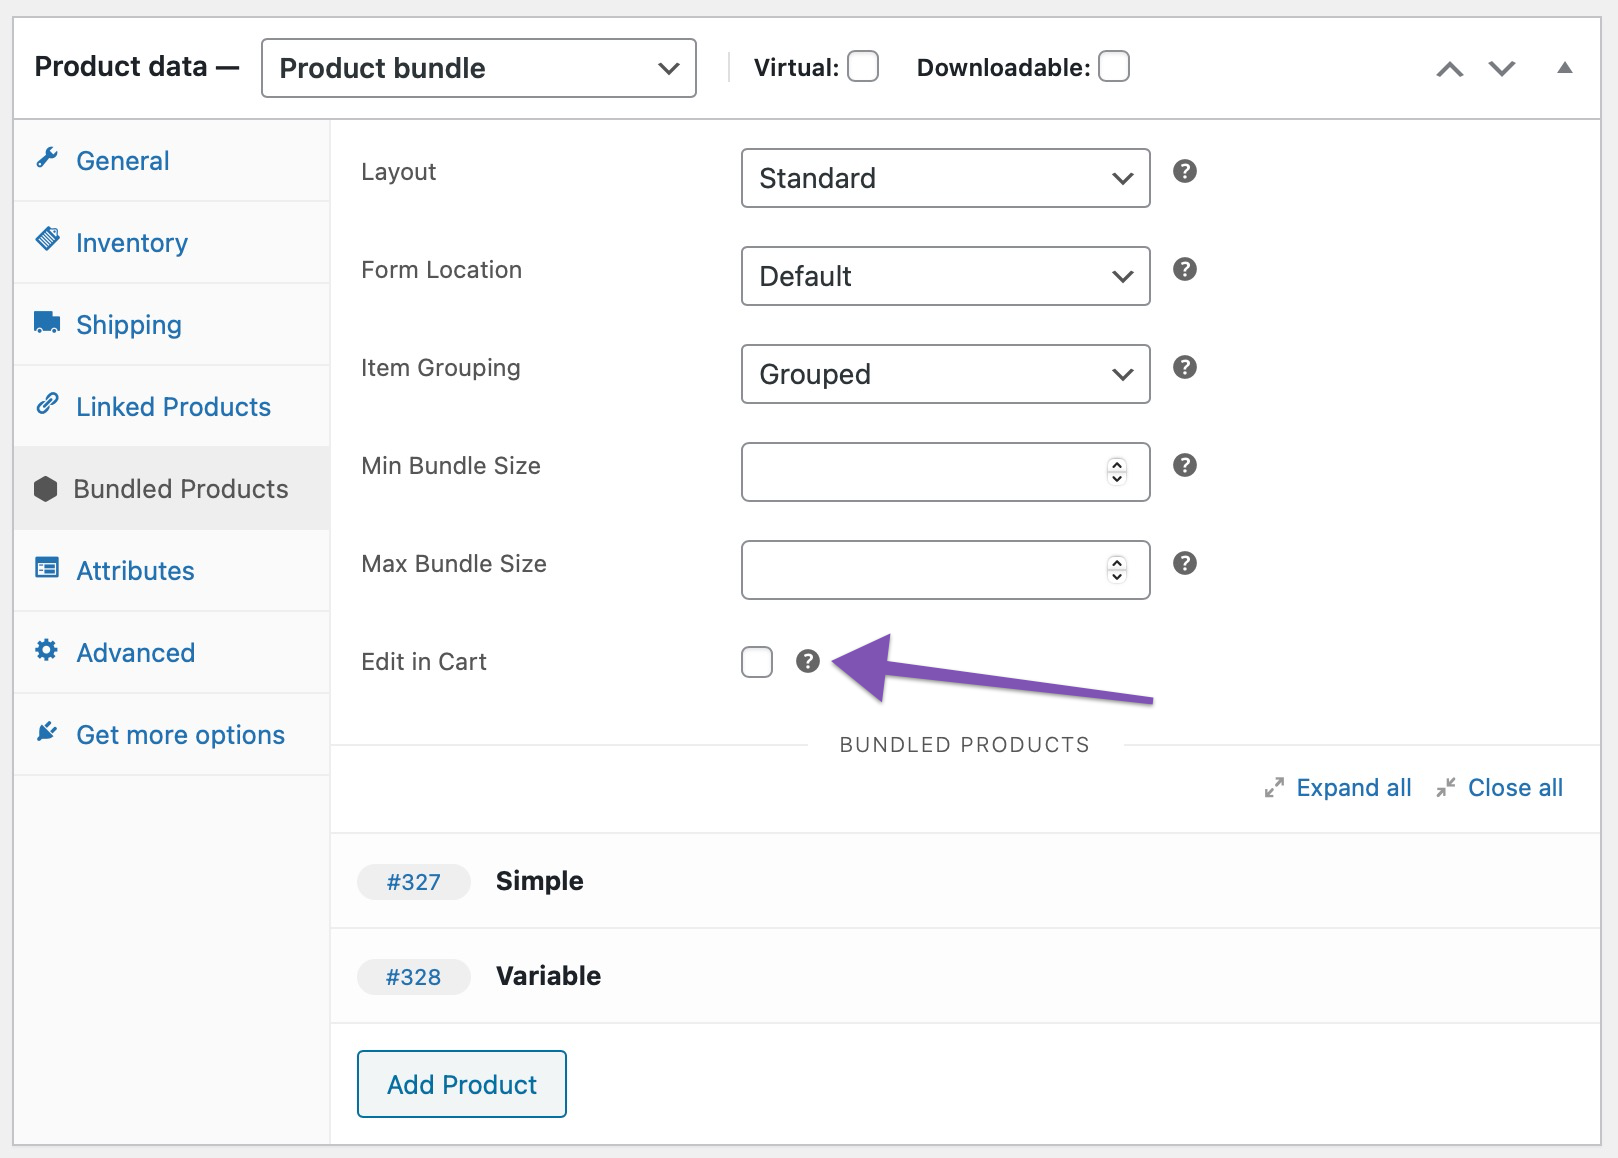
When Edit in Cart is enabled for the Bulk Discount Deck Pack bundle, an additional “Edit” link is appended to its title in the cart. Following this link allows you to reconfigure the bundle using its current configuration as a starting point. When finished, click Update Cart to replace the configuration in your cart with the new one.


Bundle-Sells
↑ Back to topYou have probably seen bundle-sells before: Much like a cross-sell, a bundle-sell is an offer to purchase a helpful add-on along with the currently viewed product.
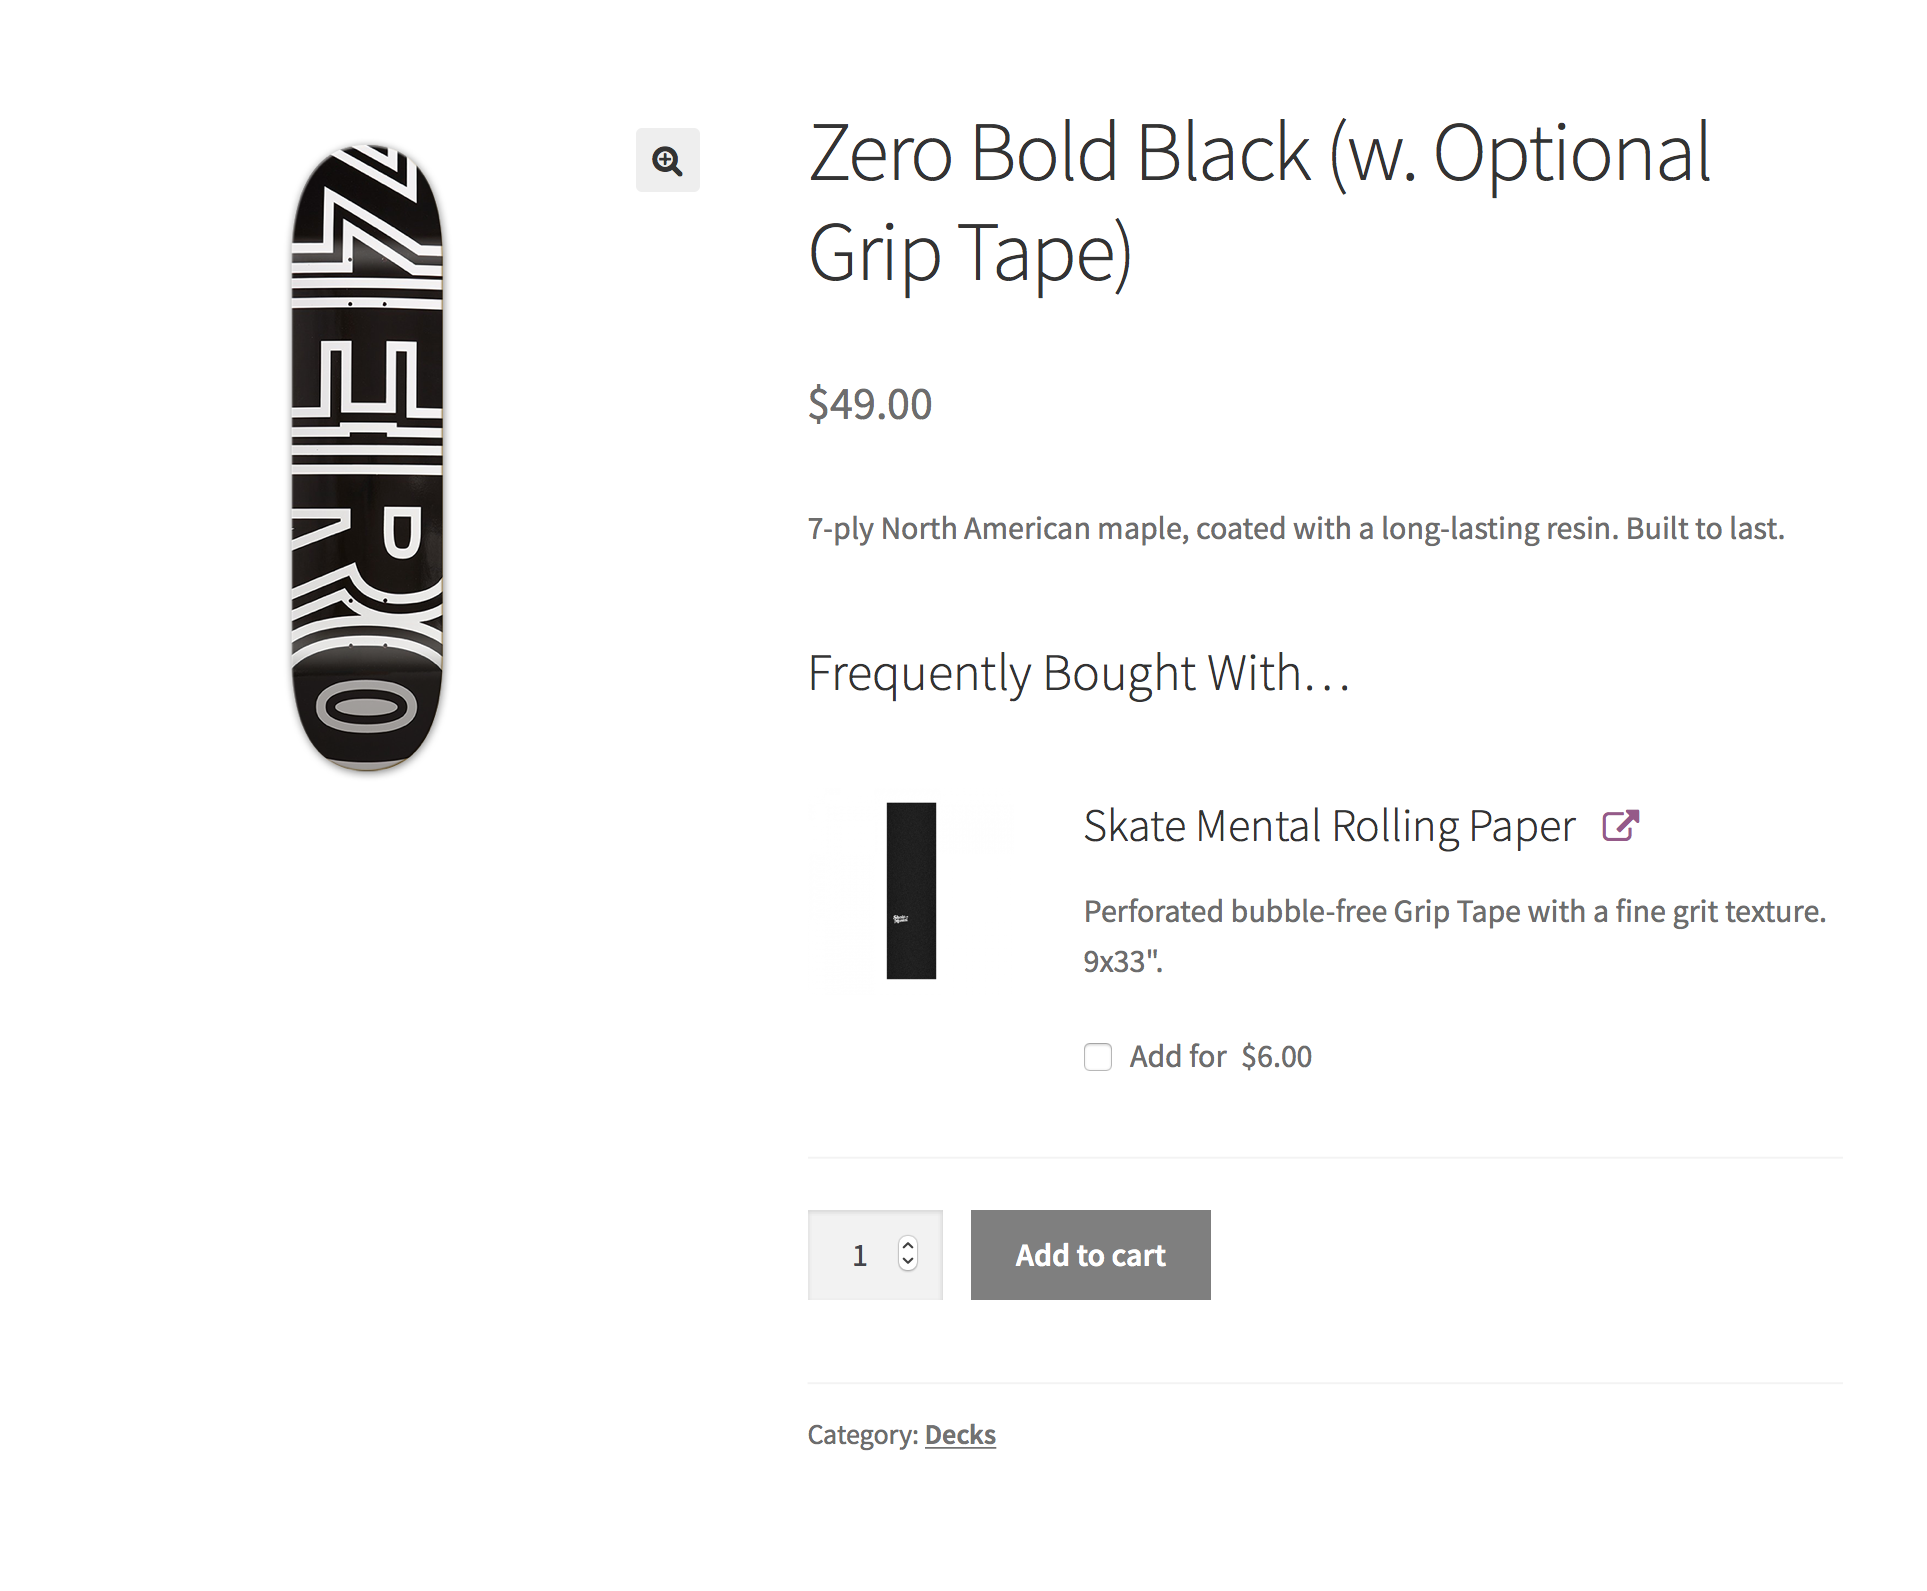
Compared to cross-sells, bundle-sells are easier to discover and convert immediately. This makes them ideal for recommending optional items that are:
- frequently bought (and tightly coupled) with the viewed product;
- lower in cost; and
- usually high in margin.
Product Bundles lets you add bundle-sells to any existing product:
- Go to the Products admin page.
- Edit a product that you consider a good candidate for offering bundle-sells.
- Go to Product Data > Linked Products and locate the Bundle-sells field.
- Search for an optional product to recommend and add it.
- Repeat, if needed.
- Enter a Bundle-sells title below, e.g. “Frequently Bought With…”.
- Optionally, to provide an extra incentive, enter a Bundle-sells discount.
- Remember to Update the product to save your changes.
Only Simple and Simple Subscription products can be offered as Bundle-sells.
Need to offer a Variable product as a Bundle-sell of a Simple product? There is a workaround:
- Convert the Simple product to a Product Bundle.
- Go to Product Data > Bundled Products.
- Add the Variable product.
- Tick the Optional, Priced Individually and Shipped Individually boxes.

Managing Inventory
↑ Back to topIf you are using WooCommerce to manage inventory, you will notice that every time you sell a product bundle, the stock quantity of its contents is reduced as well. This process is seamlessly handled by WooCommerce, as Product Bundles creates a standalone cart/order line item for every product that is purchased within a bundle.
When viewing product bundles that contain inventory-managed products, you will also notice that the plugin adjusts their availability status based on the stock status, and stock quantity of their contents:
- Bundles that contain products with insufficient stock are listed in your catalog with an Insufficient Stock status, and cannot be purchased until you restock their contents:
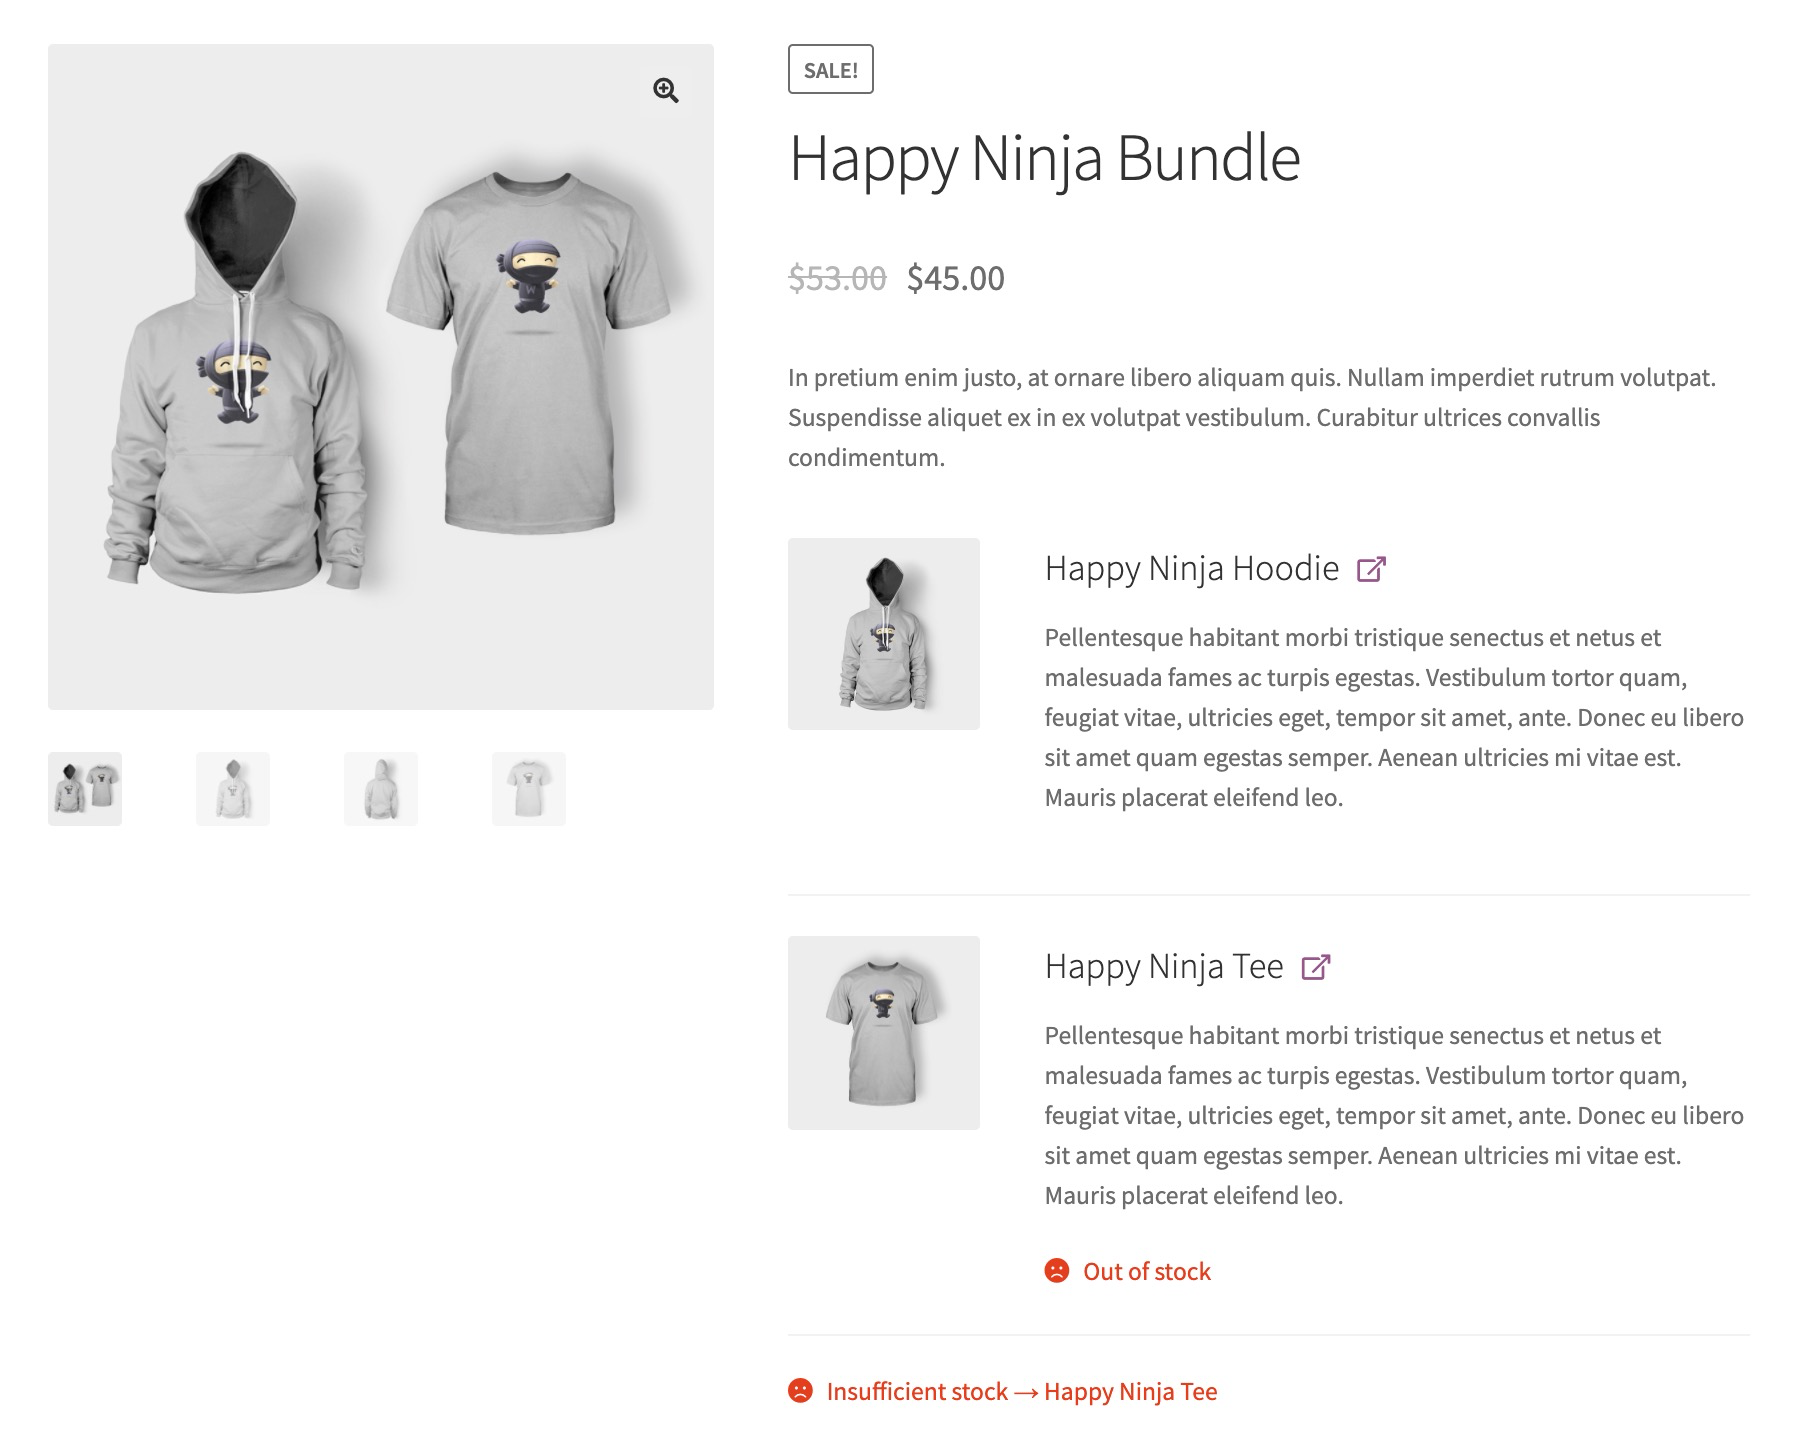
- If you have configured WooCommerce to display the remaining stock quantity of your products to your customers, you will notice that this information is carried over to your bundles, even if you are not managing stock at the bundle level. For example, if you set a minimum number for a particular flavor in your fruit pop bundle, such as “Minimum of 4 Blackberry”, but you only have 2 Blackberry in stock, the bundle will be Out of Stock.

Important: The extension does not allow you to reserve part of a product’s stock for use in product bundles.
Note: by default “In Stock” will only be displayed if a product’s Track stock quantity option is enabled under the Inventory tab. The snippet in this section of the docs can be used to force the display of “In Stock” for products that are in stock, even if the quantity is not tracked.
Managing Stock at Bundle Level
↑ Back to topAt the same time, the plugin allows you to assign a dedicated SKU to each bundle, and manage inventory for it independently from its contents. This is useful if a limited resource — other than the products you have included in a bundle — prevents you from assembling or fulfilling an unlimited quantity of it within a given period. Here’s an example:
Alpha Estate is a family-run winery that uses WooCommerce to sell its wine online. In addition to selling wine by the bottle, the winery is using Product Bundles to sell bottles of wine in hand-made wooden cases. Currently, the winery has at least a few thousands bottles of its red wine in stock; however, its fulfillment team cannot assemble and ship more than 20 wooden cases per day.
To deal with challenges like this, you can enable stock management at bundle level:
- Edit the Product Bundle whose stock quantity you’d like to limit.
- Navigate to the Product Data > Inventory tab.
- Tick the Manage stock? box.
- Set its Stock Quantity to the desired value.
Note that you can set the Stock Status and Stock Quantity of a bundle independently from the stock status/quantity of its contents. Although this may seem counter-intuitive, it allows Product Bundles to be used in scenarios with intricate inventory management requirements — like the example we saw earlier.


Identifying Bundles with Insufficient Stock
↑ Back to topOne implication of this approach is that you cannot rely on the Stock Status and Stock Quantity properties alone to identify bundles with Insufficient Stock. The plugin provides a dedicated report to assist with this. To view it:
- Navigate to WooCommerce > Analytics > Bundles.
- Click on View > Stock.
Stock Notifications
↑ Back to topThe sale of an inventory-managed product affects the stock status and quantity of all bundles that contain it. To help you keep your bundles sufficiently stocked, the extension:
- calculates the remaining stock quantity of your bundles store-wide; and
- sends you no/low notifications for all affected bundles, even when you don’t manage their stock at bundle level.
To receive stock notifications from Product Bundles, make sure that stock notifications are enabled under WooCommerce > Settings > Products > Inventory.
Notes on External Inventory Management Services
↑ Back to topExternal inventory management services utilize proprietary methods to support bundle/kit SKUs. If you are using an external inventory management service that automatically breaks up bundle/kit SKUs into a number of component SKUs, please be aware that some additional integration work might be needed to export bundle data in a format supported by your service provider.
Product Bundles provides an API that allows developers to generate dynamic kit SKUs when exporting order data to external systems.
Notes on stock status syncing
↑ Back to topBy default, the stock status of each Product Bundle is automatically synced via a background process, when a customer visits the Bundle’s product page.
To sync the stock status of all Bundles programmatically, it is possible to use the following WP CLI command:
wp wc pb sync-stockIf you prefer to prevent background processes from syncing Bundles stock status and instead run stock status sync tasks exclusively on demand via the WP CLI, you could use the following snippet:
add_filter( 'woocommerce_pb_sync_stock_via_cli', '__return_true' );Hint: This is especially useful for high traffic sites.
Alternatively, if you prefer stock status syncing to be handled by the Action Scheduler instead of background processes, you may use the following snippet:
add_filter('woocommerce_pb_sync_parent_stock_use_action_scheduler', '__return_true');Hint: This is also a useful alternative for high traffic sites.
Viewing Analytics
↑ Back to topProduct Bundles creates a dedicated Bundles section under Woocommerce > Analytics. From here, you can:
- View in-depth revenue analytics for bundles purchased in your store.
- Identify bundles with Insufficient Stock and re-stock their contents.
Important: These reporting features require WooCommerce 4.8+. Note that the WooCommerce Analytics menu item may not be available on some managed hosting platforms.
Viewing Revenue Analytics
↑ Back to topThe Revenue report under Analytics > Bundles offers detailed insights into the sales performance of your bundles.
The report generates the following metrics for any chosen period:
- Bundles Sold.
- Bundled Items Sold.
- Net Sales value.
- Orders containing bundles.
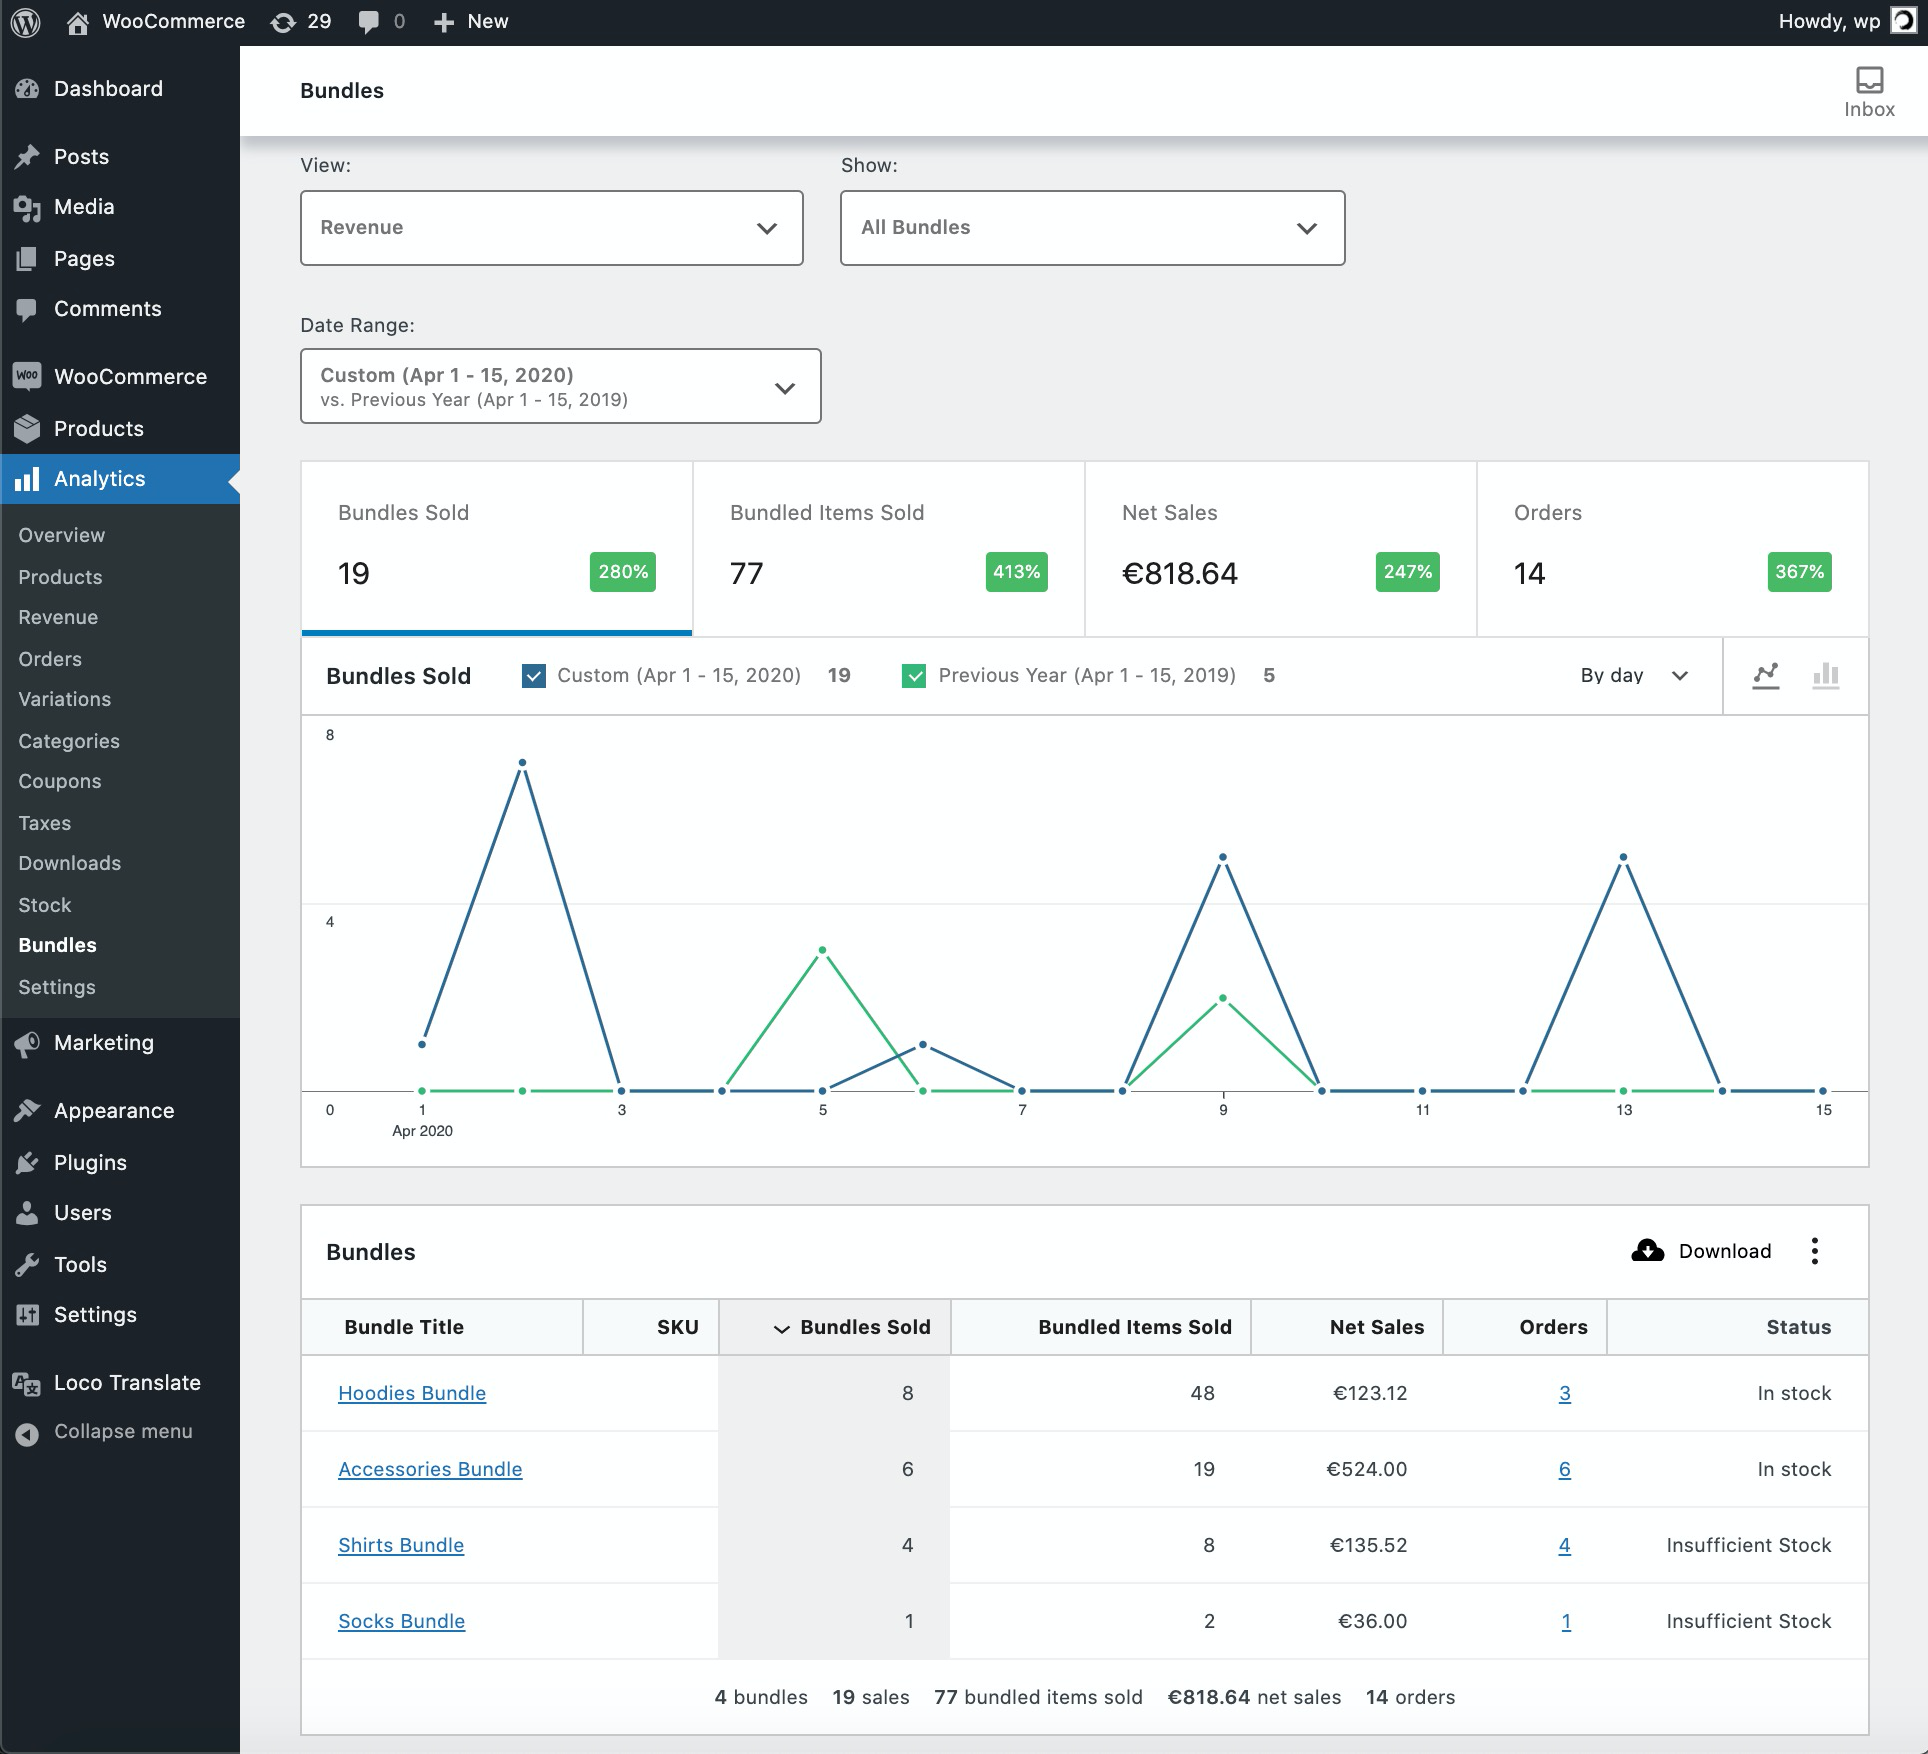
Note that the calculated Net Sales figure includes revenue originating from:
- the base price of your bundles; and
- the price of any bundled items that were Priced Individually at the time of purchase.
In contrast, when you navigate to Woocommerce Analytics > Products and search for a specific bundle, the reported Net Sales figure includes only revenue originating from its base price.
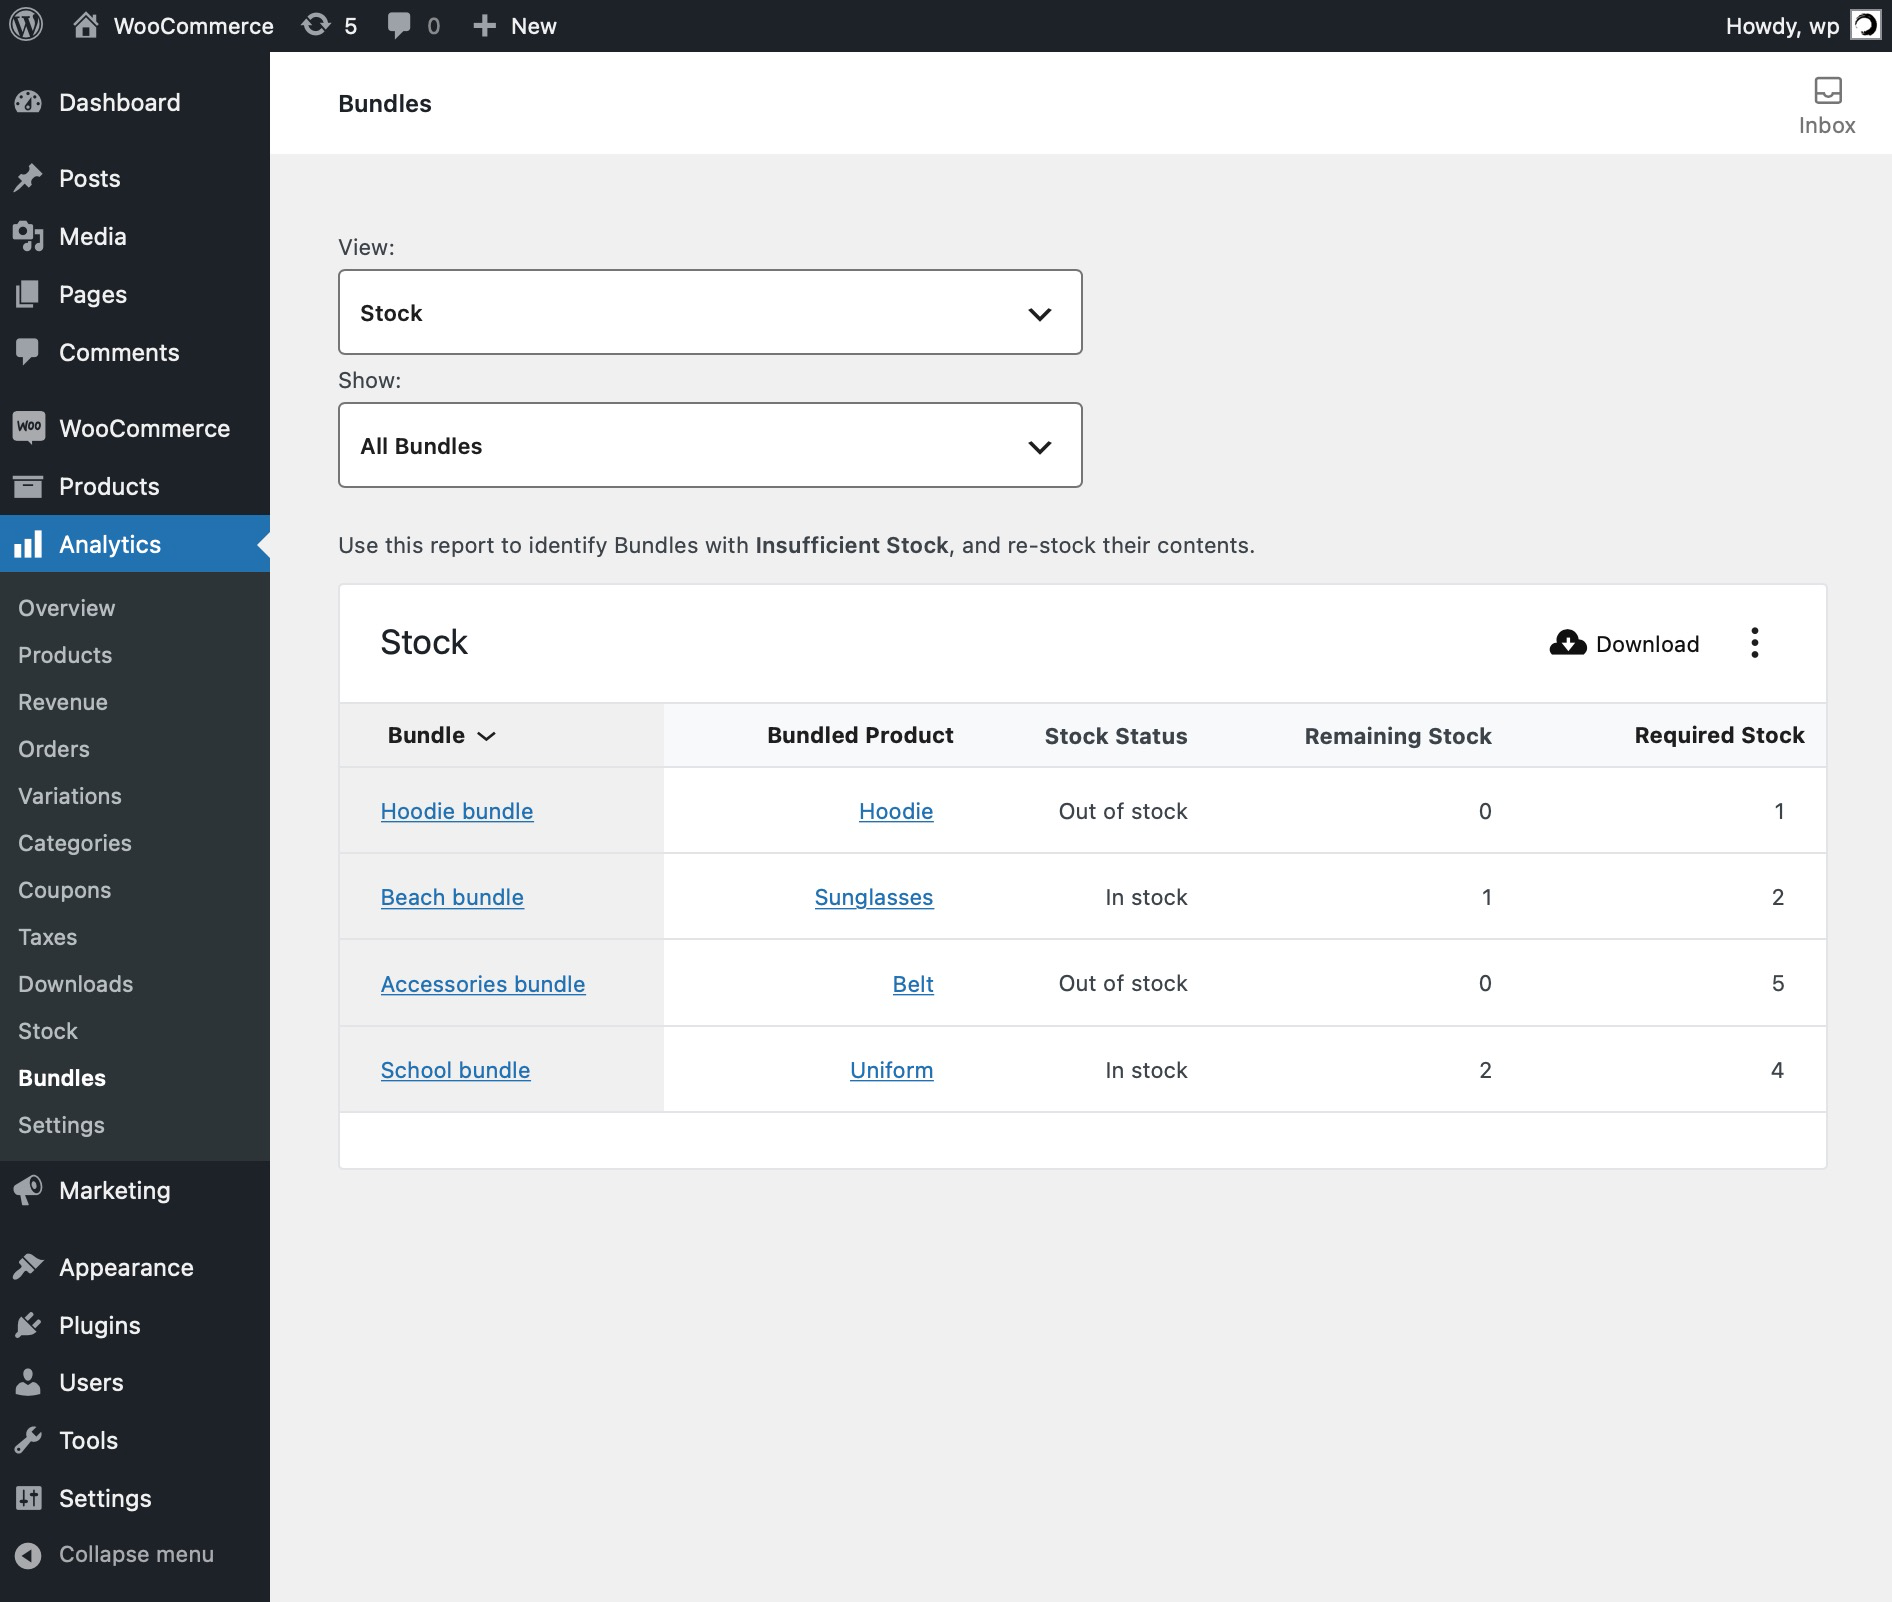
Viewing Stock Analytics
↑ Back to topThe Analytics > Bundles page also includes a Stock report, which allows you to identify and restock bundles with insufficient stock. To access it, choose View > Stock.
In addition to helping you determine which bundles are out of stock, the Stock report suggests which products need to be restocked in every listed bundle.
Use Cases
↑ Back to topWe are unable to provide assistance with customizations/integrations under our Support Policy. For WordPress/WooCommerce customizations and custom integrations, we highly recommend Codeable, or a Certified WooExpert.
The following use cases will help you develop a better understanding of what’s possible with Product Bundles:
- Creating Simple Product Kits – The Happy Ninja bundle.
- Creating Pick and Mix Bundles – The 4/40 Deck Pack bundle.
- Selling Products in Bulk – The Bulk Discount Deck Pack bundle.
- Creating Downloadable Item Packages – The Woo Music bundle.
- Creating Assembled Products – The Complete Skateboard scenario.
- Offering Up-Sells – The Skateboard Decks scenario.
- Offering Bundle-Sells – Add Frequently Bought Together recommendations to any product.
- Offering Subscription Boxes – Use WooCommerce Subscriptions, All Products for WooCommerce Subscriptions and Product Bundles to build a feature-rich Subscription Box store.
Questions & Support
↑ Back to topHave a question before you buy? Please fill out this pre-sales form.
Already purchased and need assistance? Get in touch with us via the Help Desk!