Installation Guide
↑ Back to top- Log in to your WordPress Admin Panel.
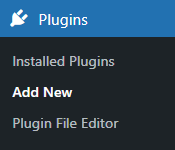
- Navigate to the WordPress Admin Dashboard → Plugins → Add New.
- Click the Upload Plugin button on the top left corner of your screen.
- Next, click the Choose File button in the box that appears below.
- Select the zip file that you have downloaded and upload it.
- Click on the Activate Plugin button.
Getting Started
↑ Back to topTable Design – Customization
↑ Back to topThe Table Design feature of a Product Table is an innovative and user-friendly way to display product information on a website. With this feature, users can customize the appearance of their product tables to suit their brand and style. The Table Design feature provides a variety of customization options, including the ability to choose table colors, fonts, and size
Design
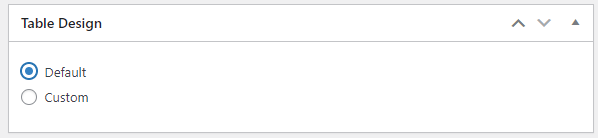
↑ Back to top- There are two sub options available in the Design option.
Default
↑ Back to top- When the Default sub option is selected as a Design, the following options will be locked.
Custom
↑ Back to topWhen the Custom sub option is selected as a Design, the following options will be unlocked, and the Administrator can customize all the elements and how they will appear on the Front-End.
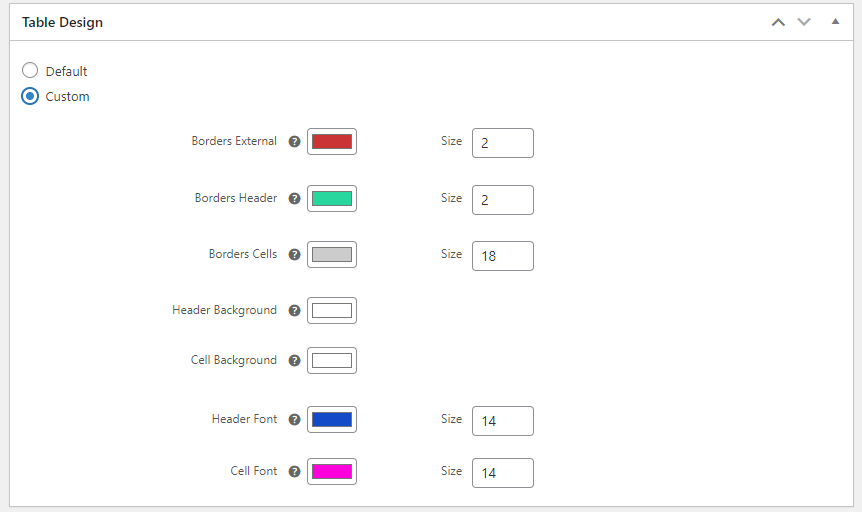
NOTE: The following options will be unlocked if the Custom sub option is selected in the Design option.
Borders External
↑ Back to top- We can set the color and the size of Borders External for the product table.
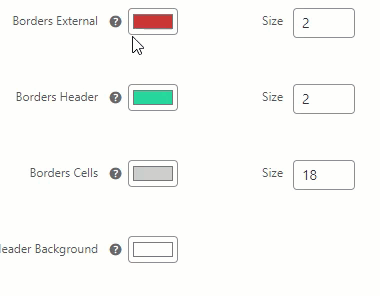
Border Header
- Set the color and the size of the Border Header of the product table.
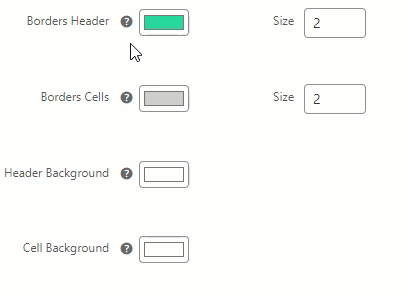
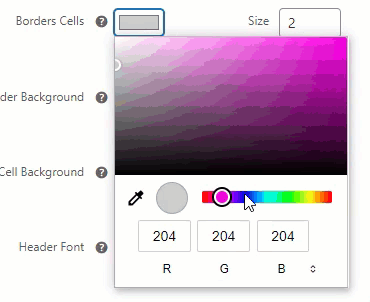
Border Cell
- Set the color and the size of the Border Cell of the product table.
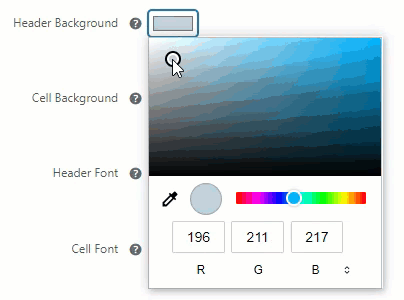
Header Background
↑ Back to top- Select the color for the Background of the Header.
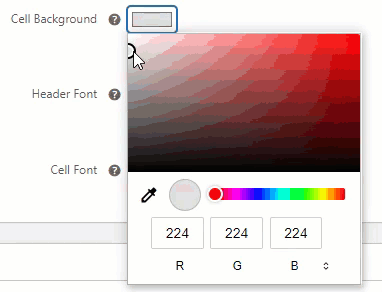
Cell Background
↑ Back to top- Select the color for the Background of the Cell.
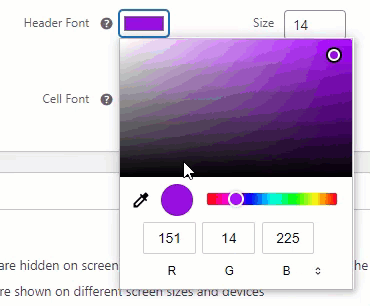
Header Font
↑ Back to top- Set the color and the size of the Font in the Header. The size and color set in this option will cover all the Header columns.
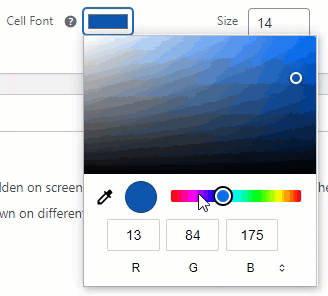
Cell Font
↑ Back to top- Set the color and the size of the Font in the Cell. The size and color set in this option will cover all the Cell columns.
Front-End Impact:
Before
After
Quick View
↑ Back to top- Navigate to the Product Table and then add the Add to Cart element.
- Once done, click on it.
- A popup will appear.
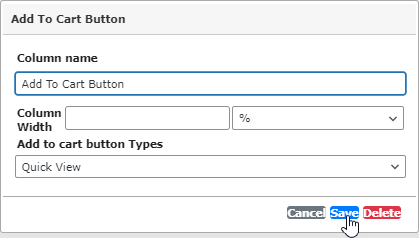
- Go to the Add to cart button Types option.
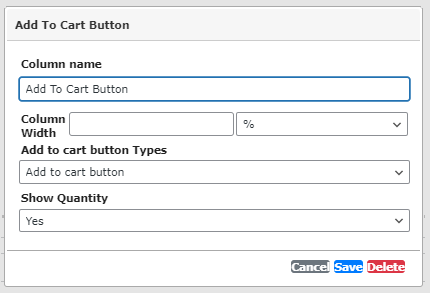
- Click on the Add to cart button Types option, and a dropdown menu will appear.
- Select Quick View from the dropdown menu.

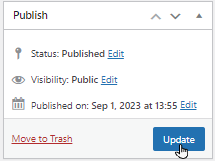
- Once done, click on the Save button.
- Now, click on the Publish/ Update button.
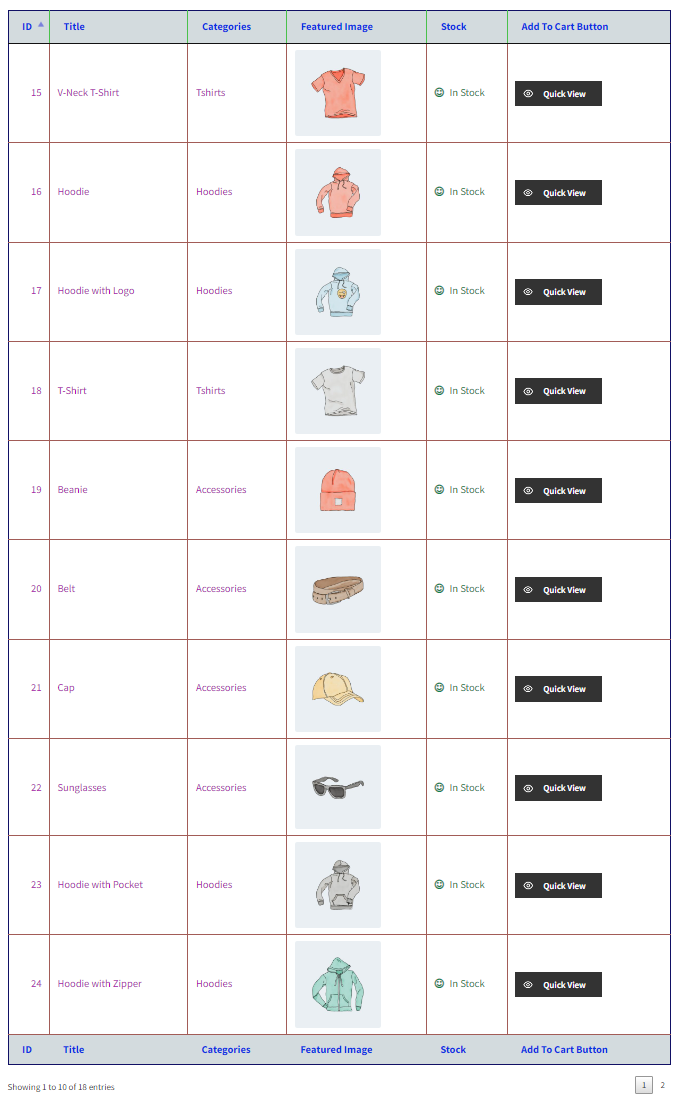
Front-End Impact:
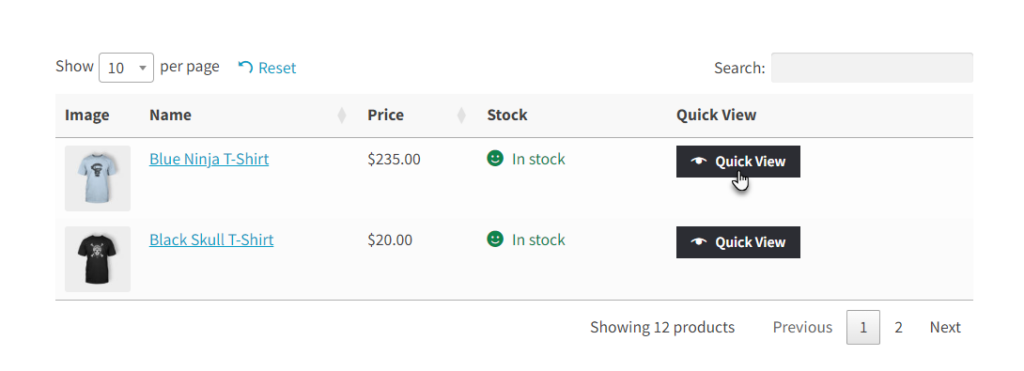
- On the website, navigate to the Product Table page.
- A Quick View column will appear.
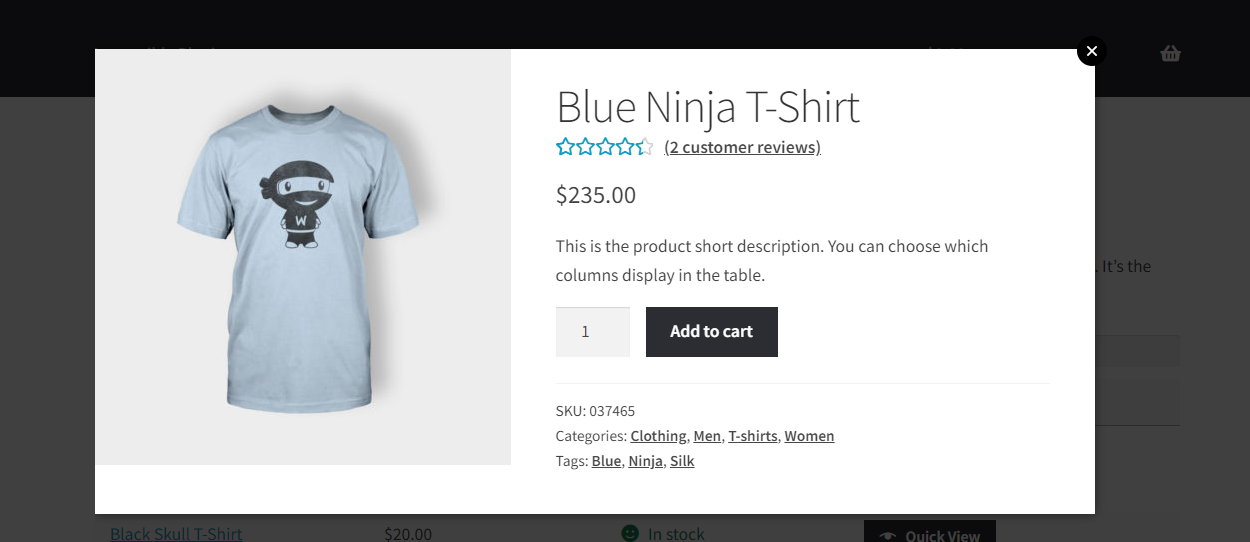
- Click on the Quick View button against any product according to your requirements.
- A popup will appear and the Single Product page of that respective product will appear.
- Click on the Add to Cart button to add this product in your cart.
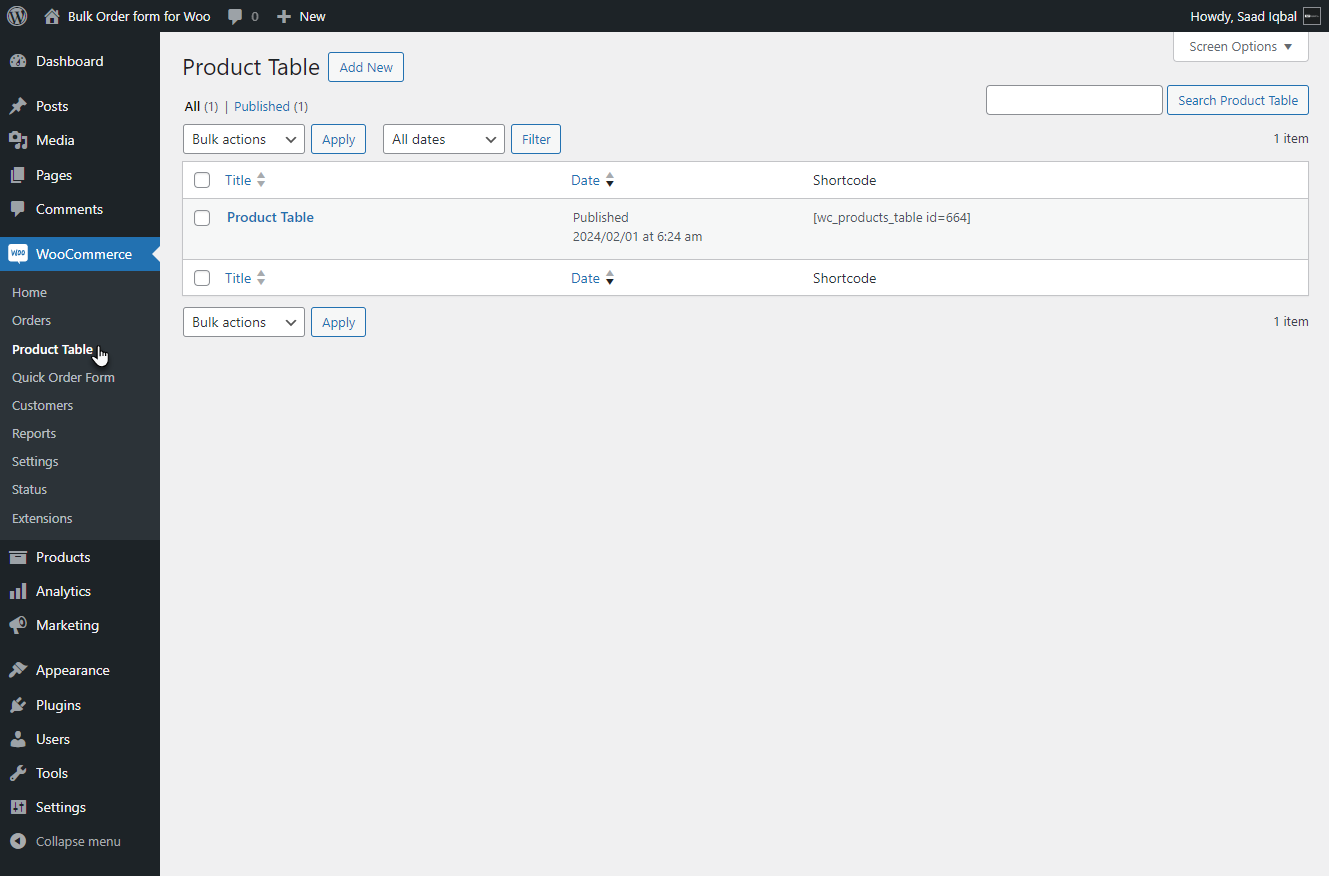
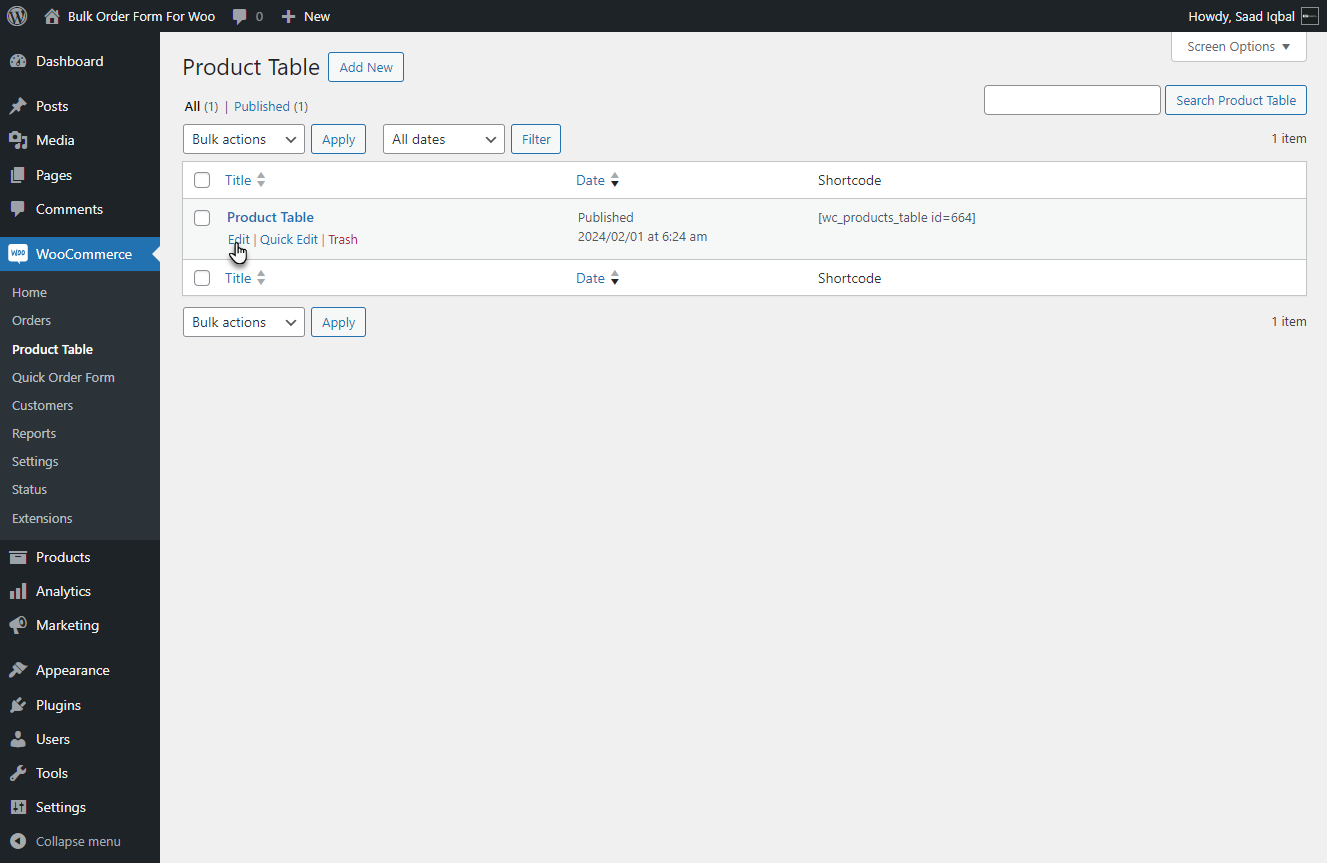
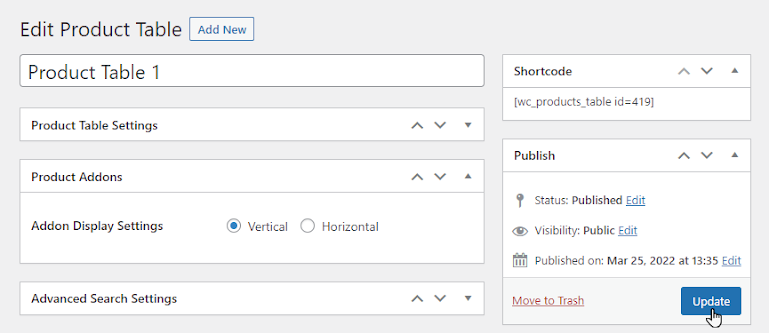
Product Table Settings
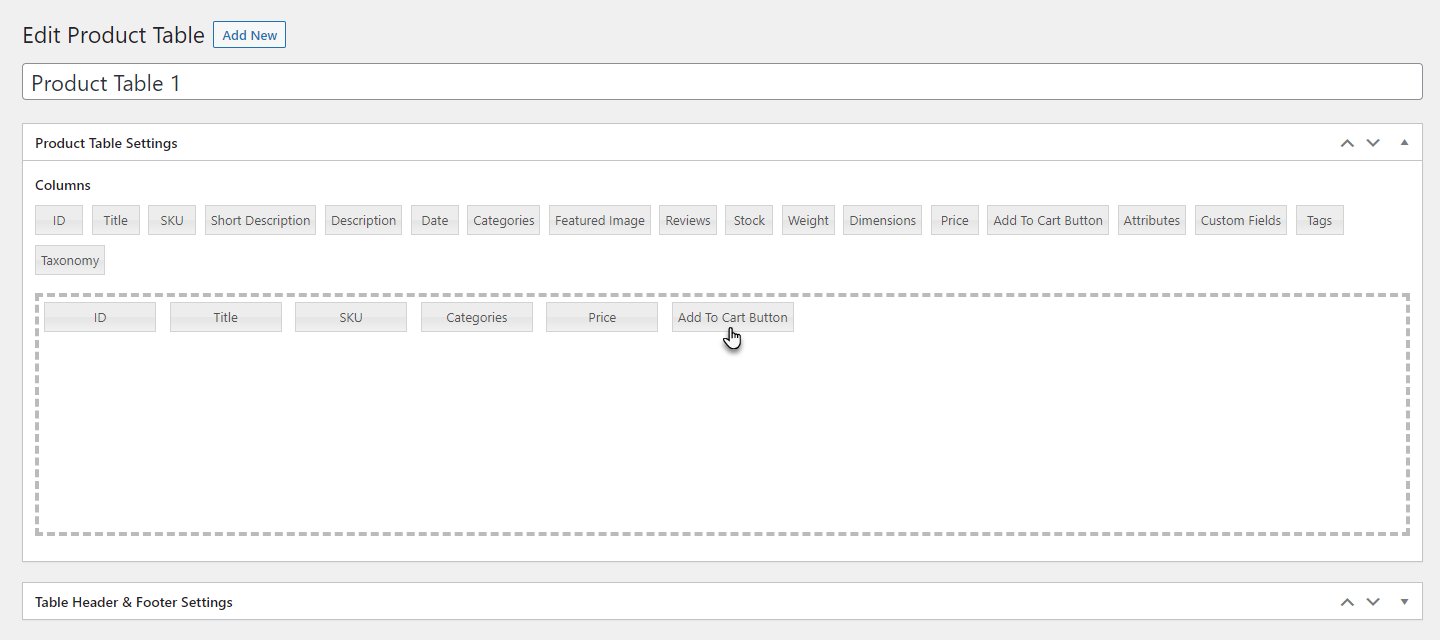
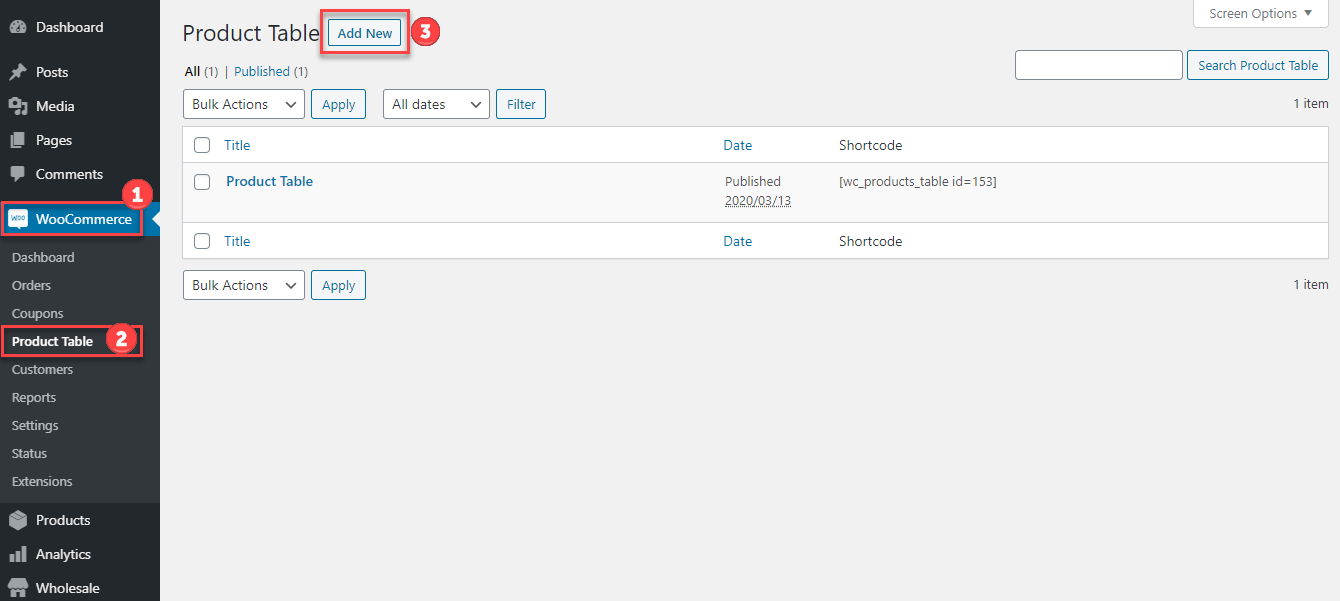
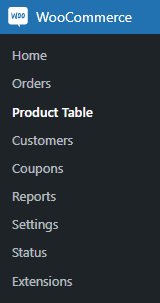
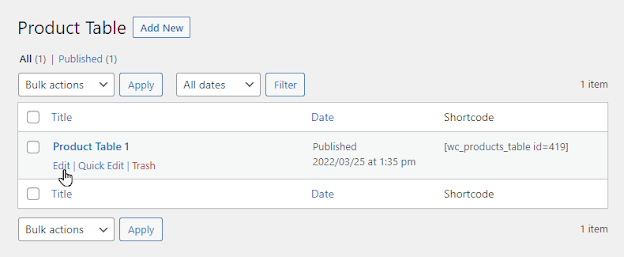
↑ Back to top- Go to WooCommerce -> Product Table.
- Click Add New.
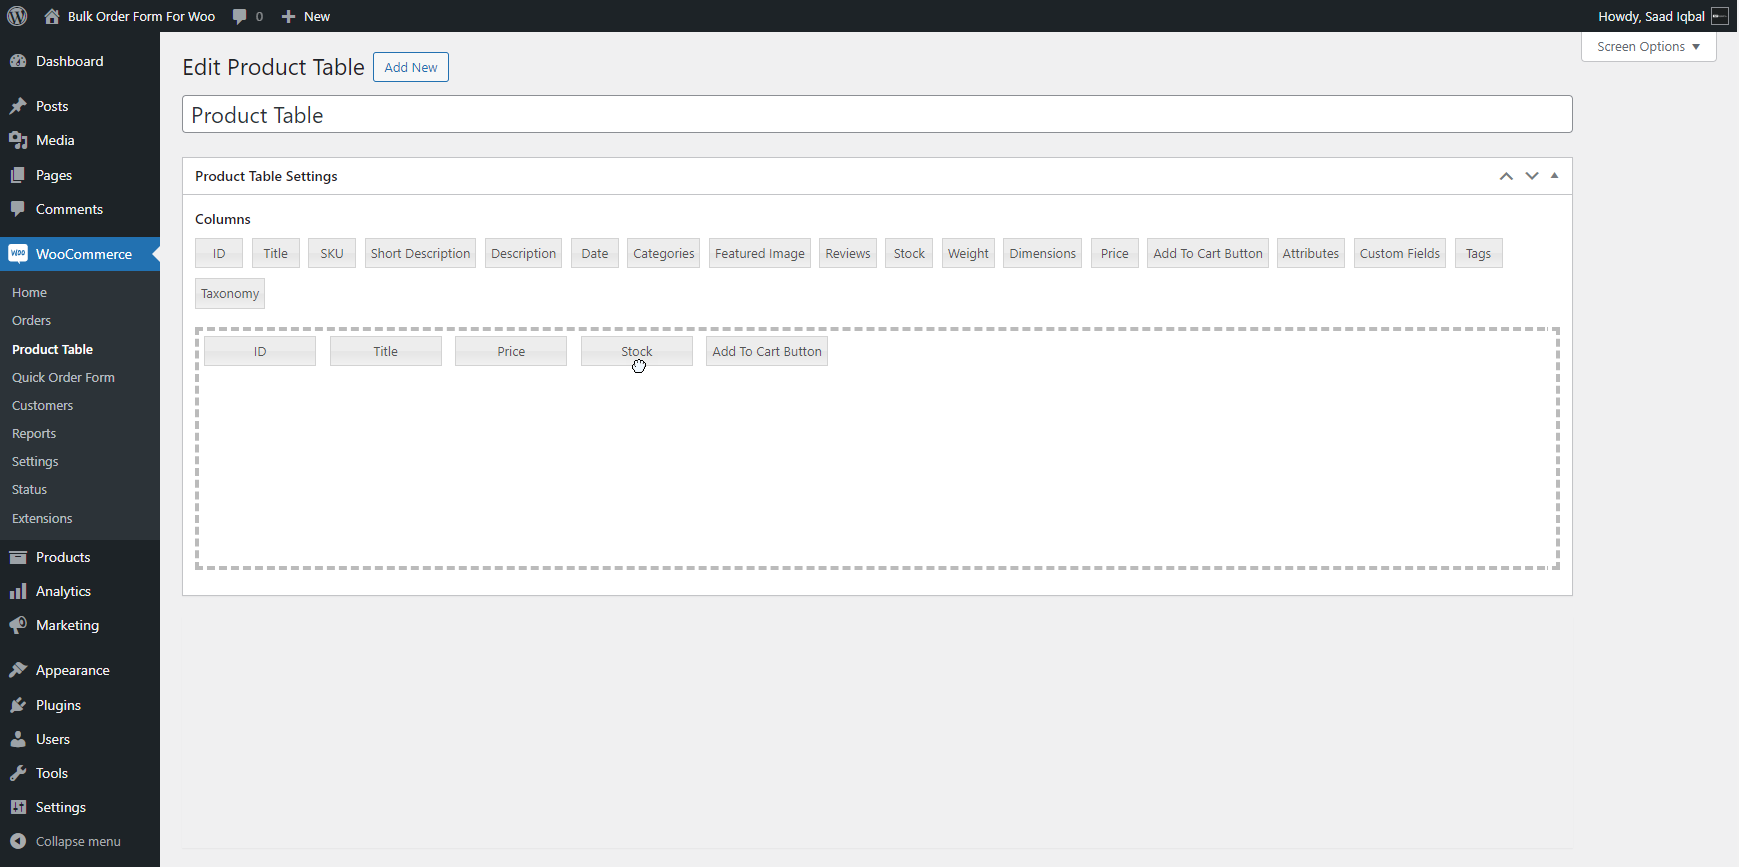
- Enter Table Title.
- Drag & Drop the Columns into the Dotted Box.
The product table will be consisting of these columns which are dropped into the dotted area and will be displayed at the front end.
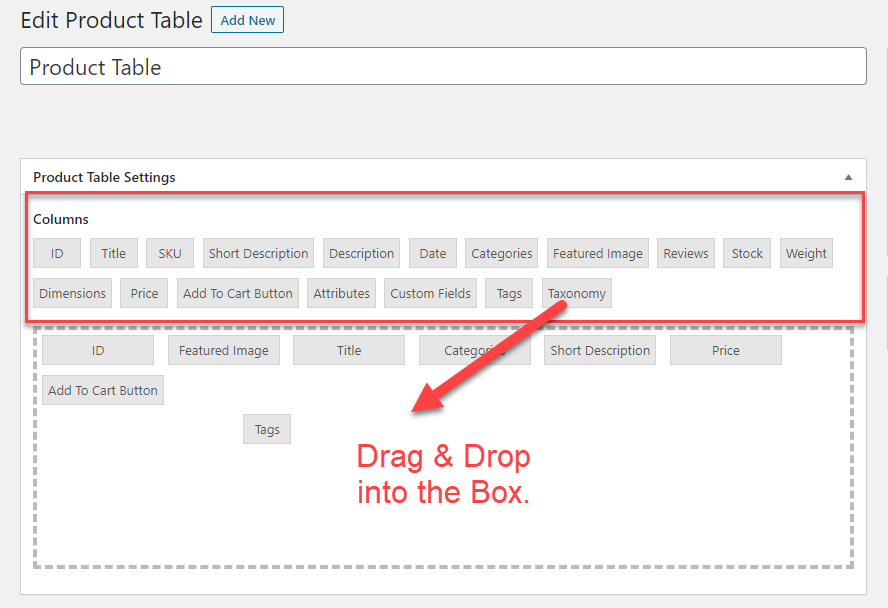
- Click on the Columns to edit.
Only the columns tags present in the dotted area are editable. Columns tags which are outside the dotted are not editable.
Columns types
↑ Back to topWooCommerce Product ID
↑ Back to top- Enter column name and width (in percentage or in pixels). It is not necessary to enter column width.
- Save Changes.

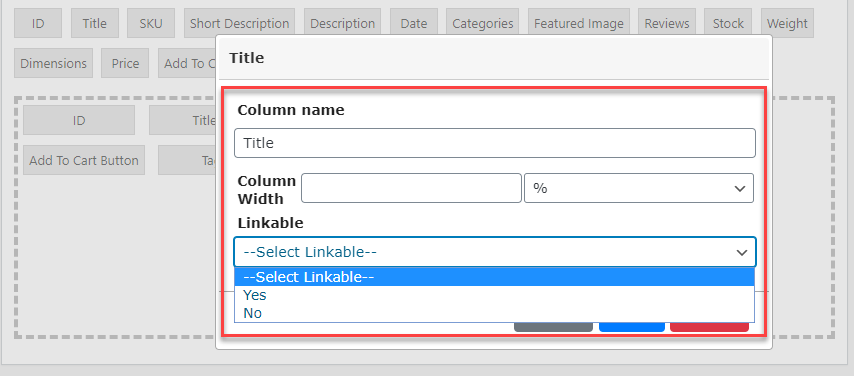
WooCommerce Product Title
↑ Back to top- Enter column name and width (in percentage or in pixels). It is not necessary to enter column width.
- Select whether to link the product title to the product single page or not.
- Save changes.
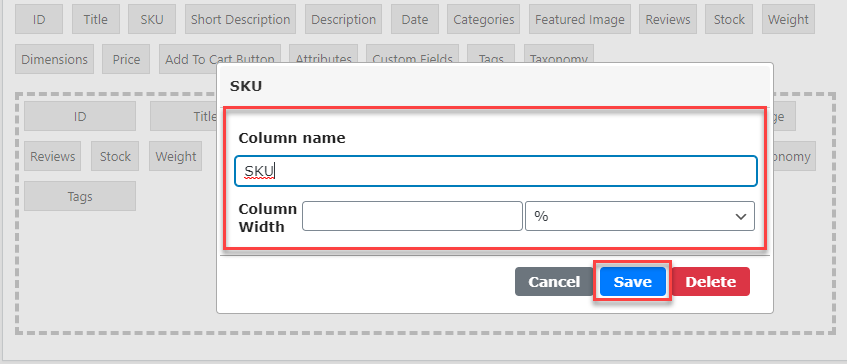
WooCommerce Product SKU
↑ Back to top- Enter column name and width (in percentage or in pixels). It is not necessary to enter column width.
- Save Changes.
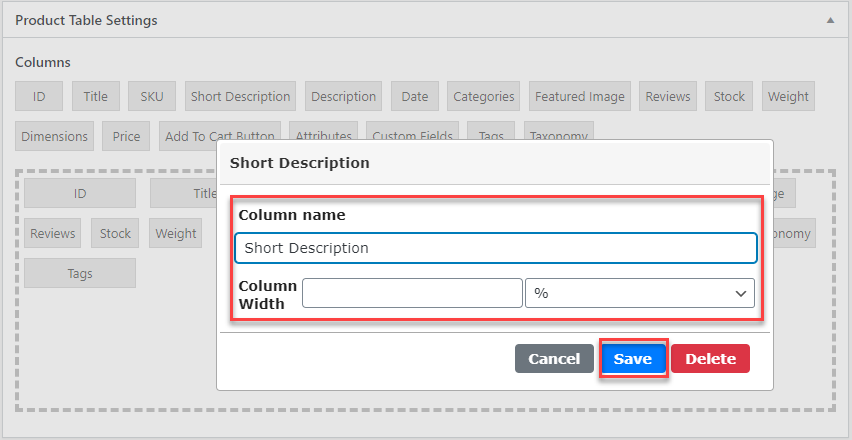
Short Description
↑ Back to top- Enter column name and width (in percentage or in pixels). It is not necessary to enter column width.
- Save Changes.
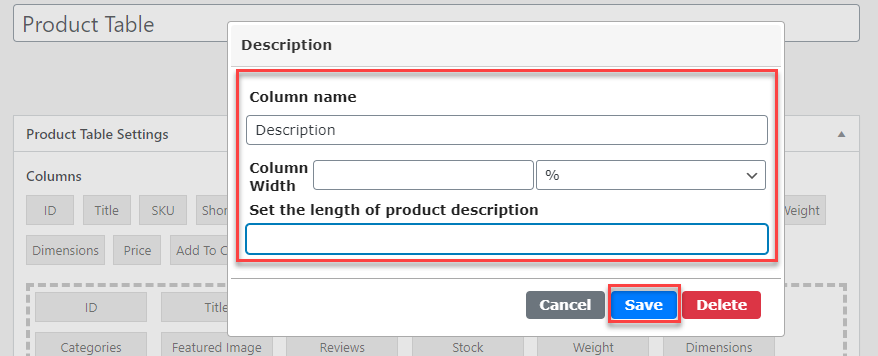
Product Description
↑ Back to top- Enter column name and width (in percentage or in pixels). It is not necessary to enter column width.
- Enter Description character length in numeric for e.g (10).
- Save Changes.
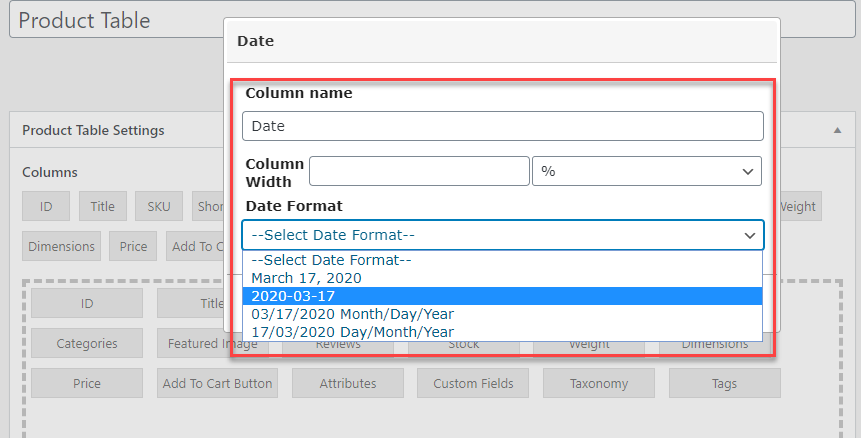
Product Published Date
↑ Back to top- Enter column name and width (in percentage or in pixels). It is not necessary to enter column width.
- Select Date Format to display.
- Save Changes.
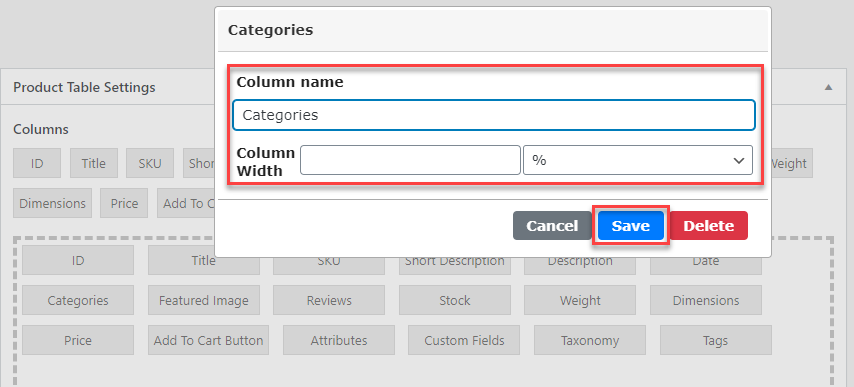
Product Category
↑ Back to top- Enter column name and width (in percentage or in pixels). It is not necessary to enter column width.
- Save Changes.
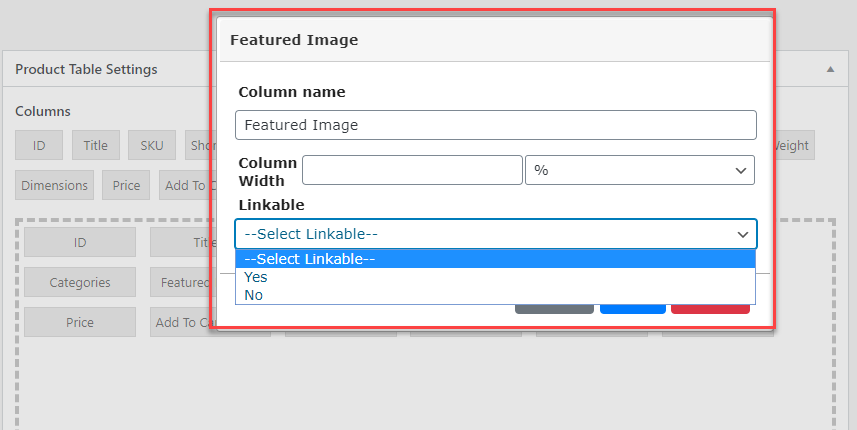
Featured Image
↑ Back to top- Enter column name and width (in percentage or in pixels). It is not necessary to enter column width.
- Select whether to link product title to the product single page or not.
- Save changes.
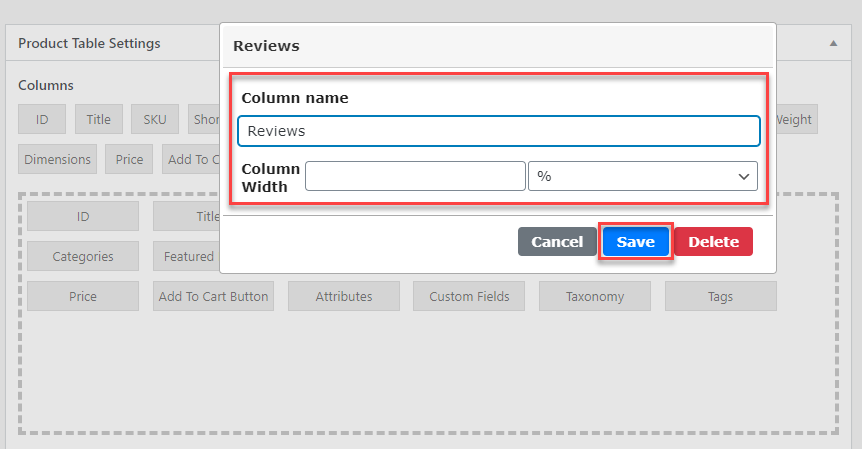
Product Reviews
↑ Back to top- Enter column name and width (in percentage or in pixels). It is not necessary to enter column width.
- Save Changes.
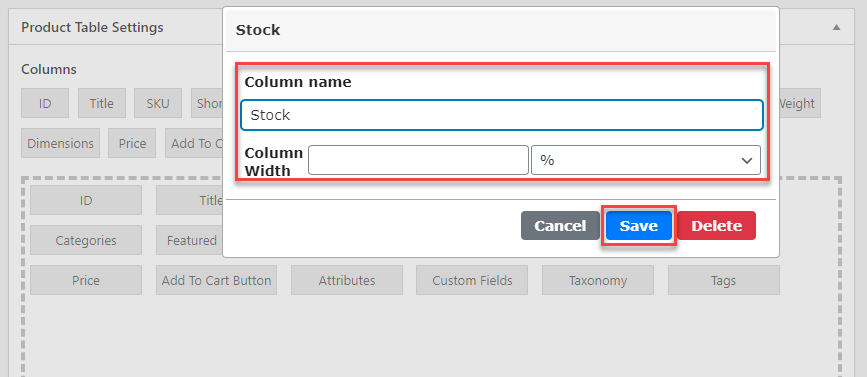
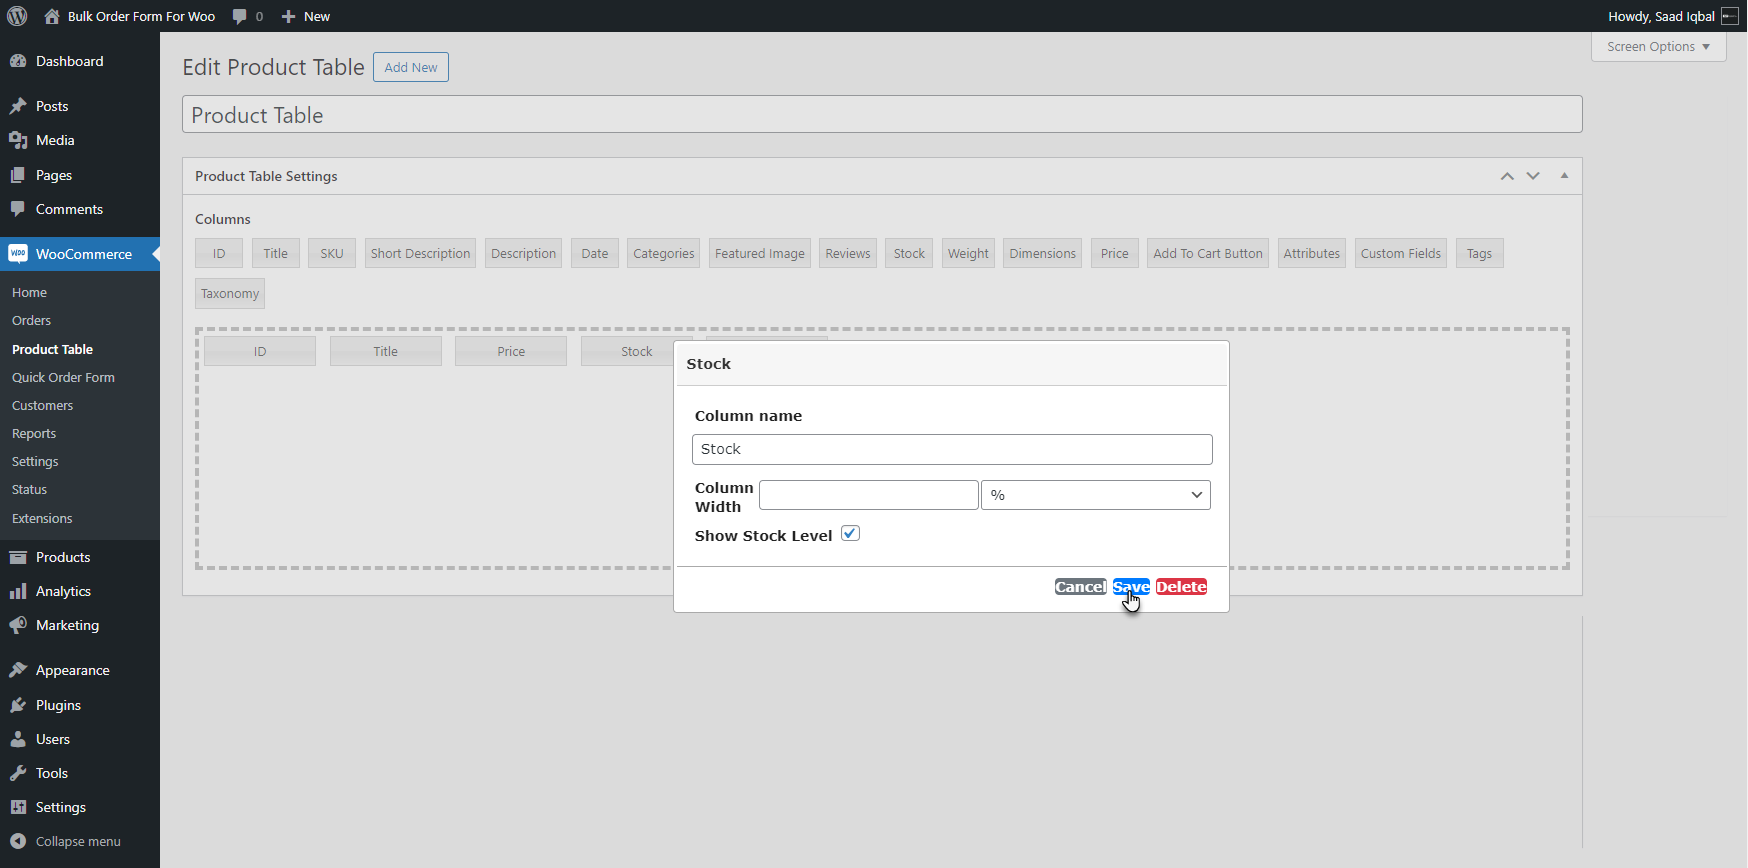
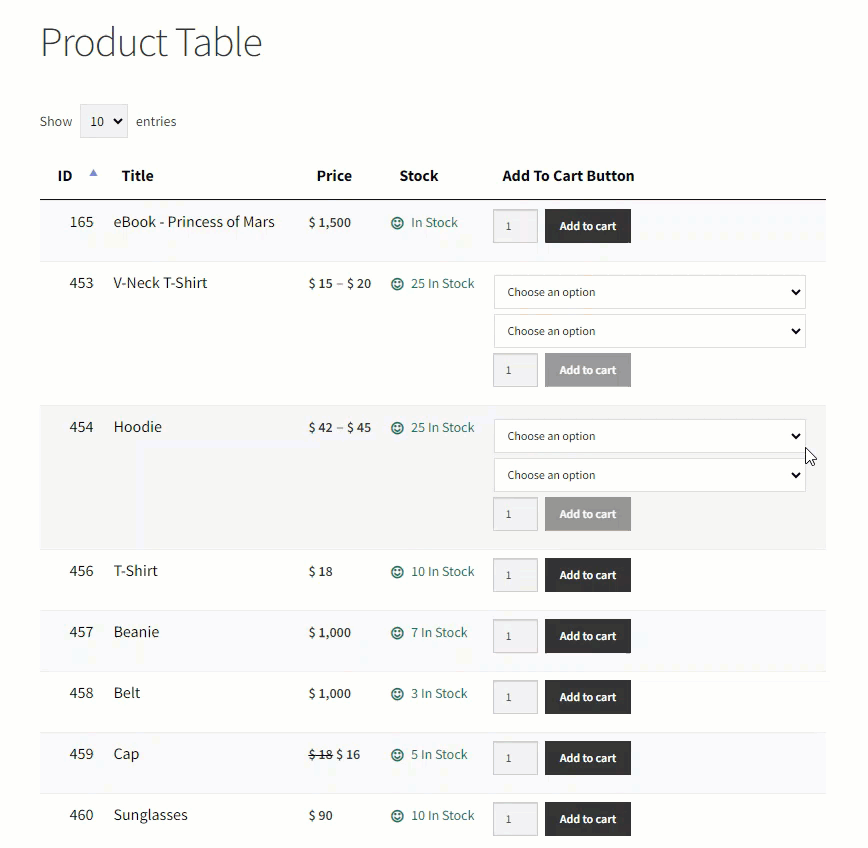
Stock Status
↑ Back to top- Enter column name and width (in percentage or in pixels). It is not necessary to enter column width.
- Save Changes.
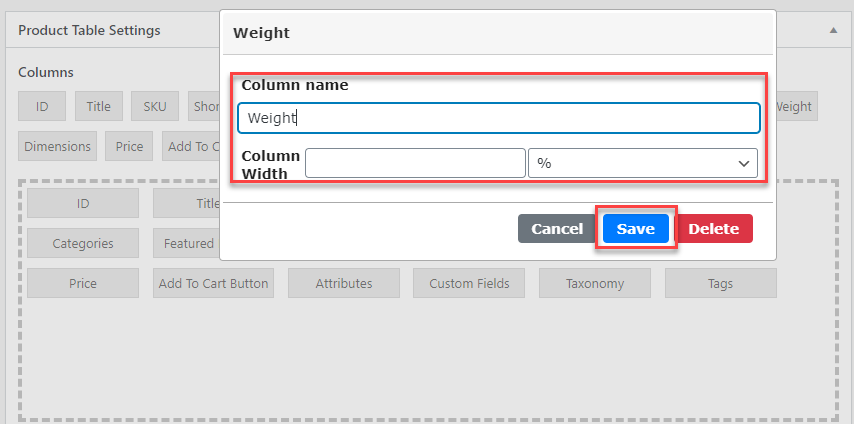
Product Weight
↑ Back to top- Enter column name and width (in percentage or in pixels). It is not necessary to enter column width.
- Save Changes.
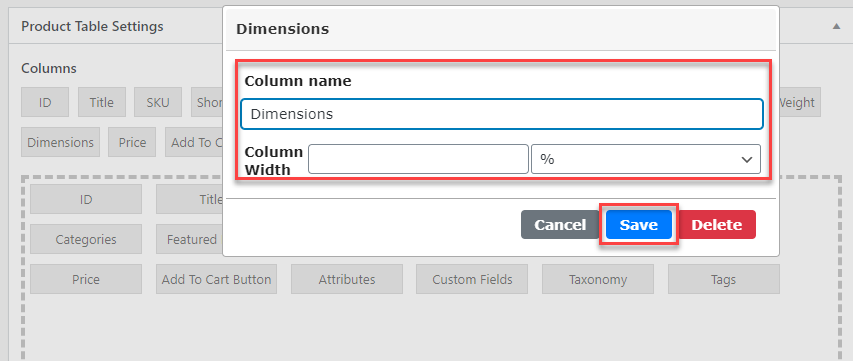
Product Dimensions
↑ Back to top- Enter column name and width (in percentage or in pixels). It is not necessary to enter column width.
- Save Changes.
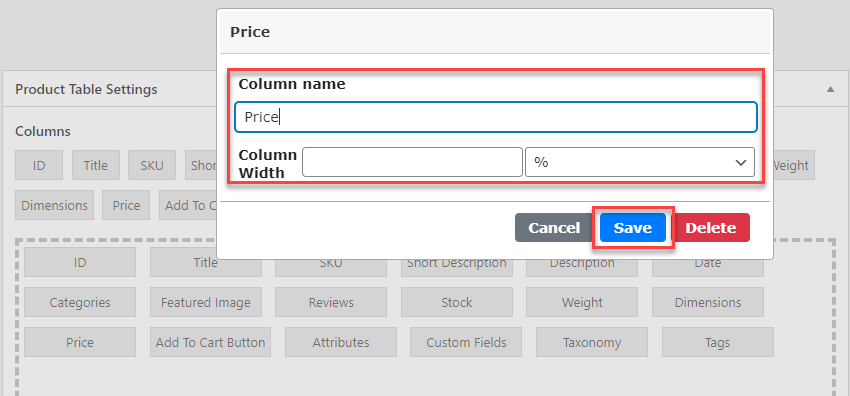
Product Pricing
↑ Back to top- Enter column name and width (in percentage or in pixels). It is not necessary to enter column width.
- Save Changes.
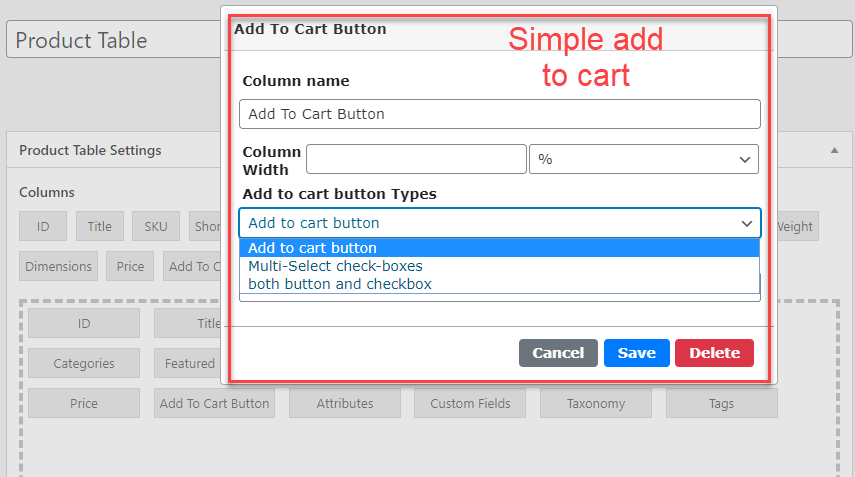
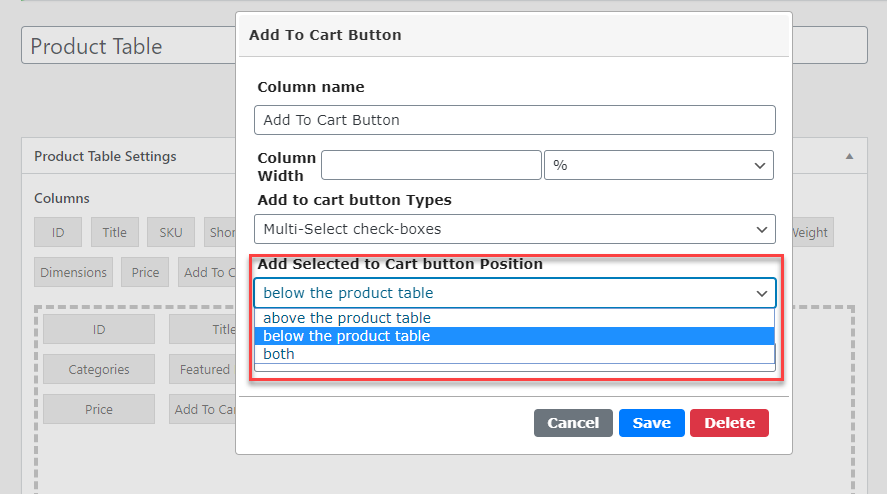
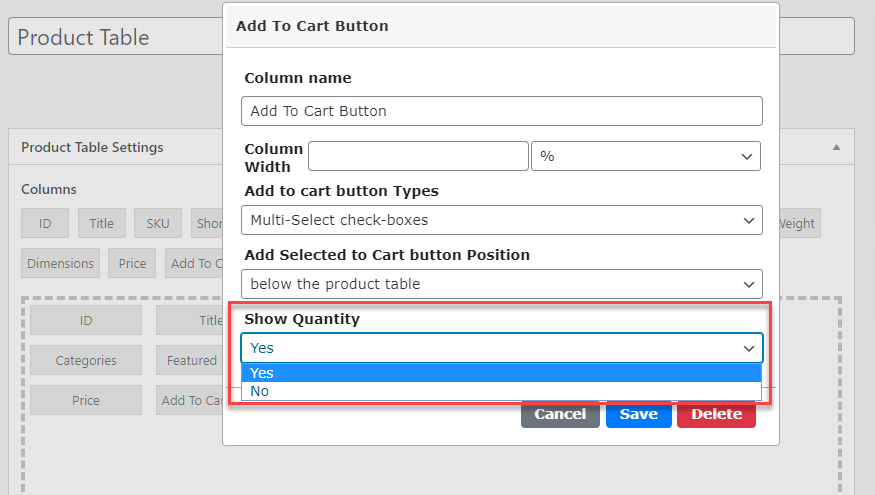
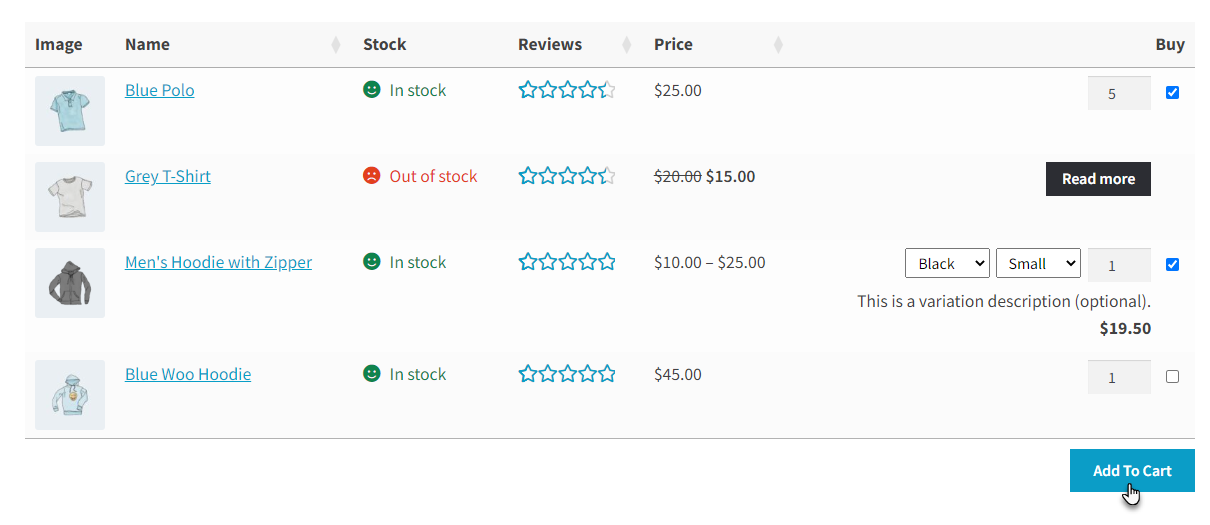
Display Add-to-cart Button
↑ Back to top- Enter column name and width (in percentage or in pixels). It is not necessary to enter column width.
- Select Add to cart button types (Simple add to cart button, Multiple select checkbox & both options).
- Select add to cart button position with multi checkbox option.
- Select to show/hide quantity field. It is recommended to show quantity field.
- Save Changes
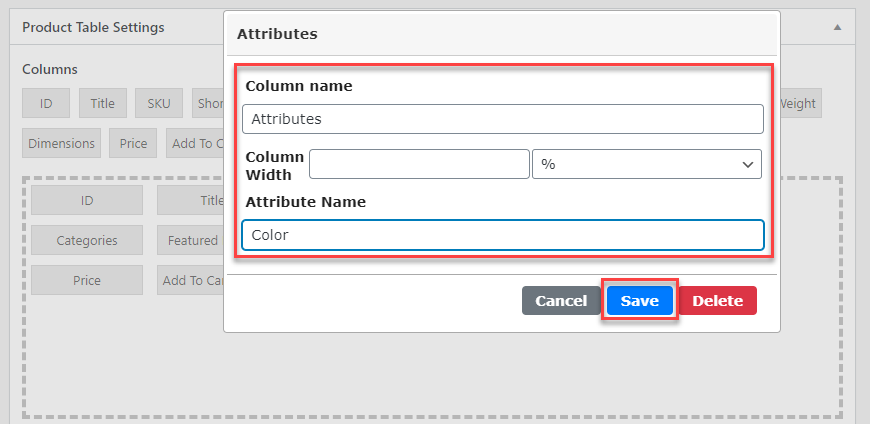
Product Attributes
↑ Back to top- Enter column name and width (in percentage or in pixels). It is not necessary to enter column width.
- Save Changes.
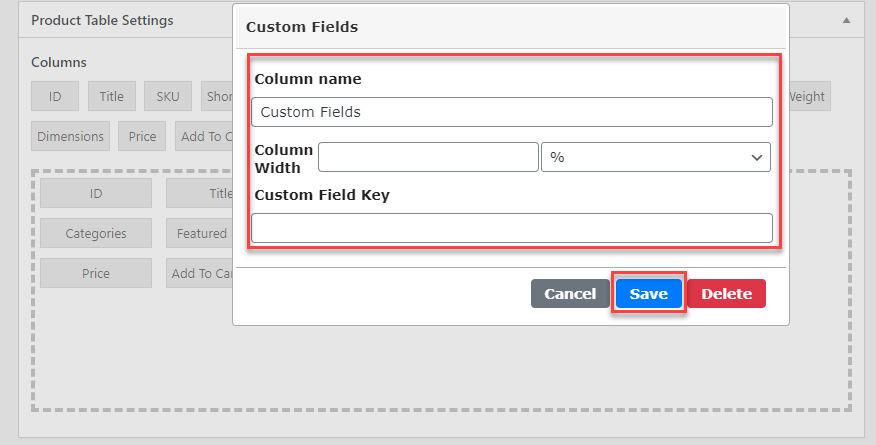
- Enter column name and width (in percentage or in pixels). It is not necessary to enter column width.
- Enter the Custom Field key if you have custom fields in WooCommerce Product.
- Save Changes.
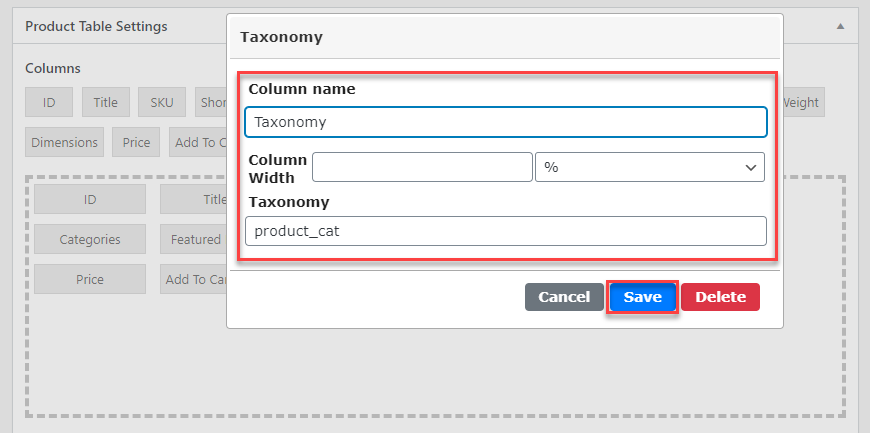
Product Taxonomy
↑ Back to top- Enter column name and width (in percentage or in pixels). It is not necessary to enter column width.
- Enter the Taxonomy ID.
- Save Changes.
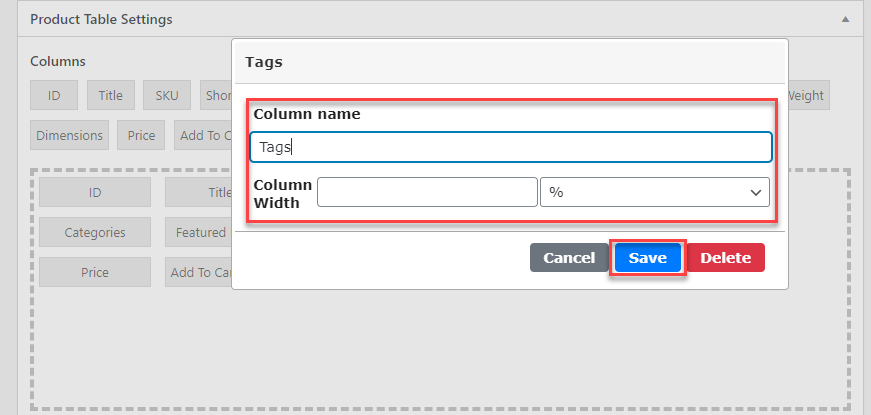
Product Tags
↑ Back to top- Enter column name and width (in percentage or in pixels). It is not necessary to enter column width.
- Save Changes.
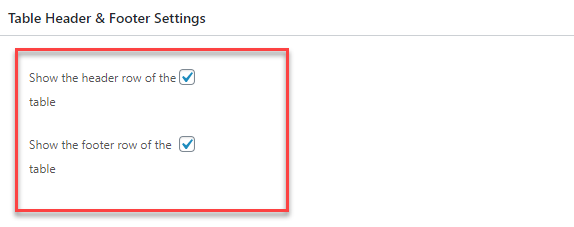
Header & Footer Settings
↑ Back to top- Enable/Disable the header & footer row of the product table.
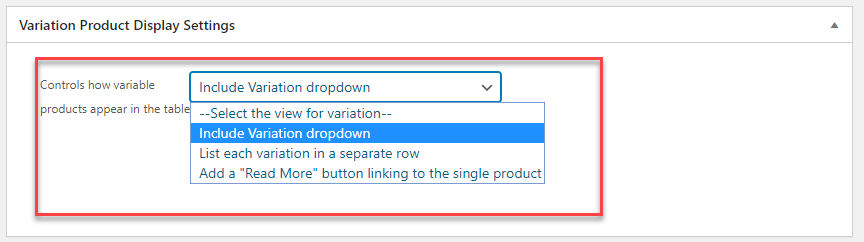
Variation Product Settings
↑ Back to top- Dropdown: Display variable product variations in a dropdown.
- Separate Product: Display variations of products separately on another row.
- Read more: Add a read more button which will be redirected to a single product page.
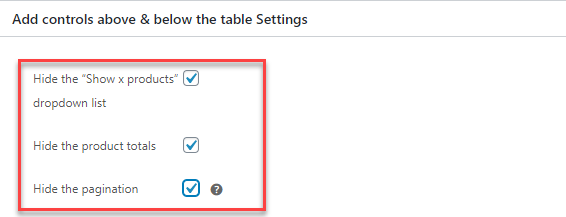
Product Table Controls
↑ Back to top- Enable/disable the number of product dropdown lists.
- Show or hide the total number of products counted.
- Show/hide pagination for multiple pages. Restrict users to a single page.
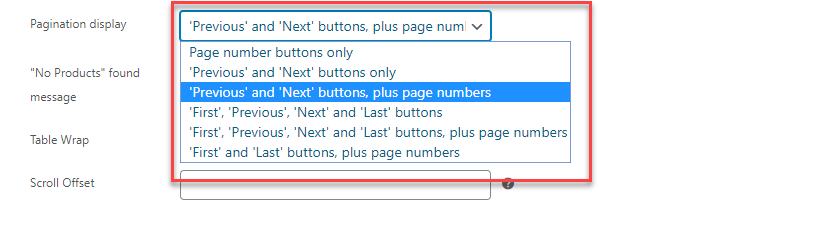
- Select how to display the pagination option in the product table if you have multiple pages:
- Page number only: Only numbers will be displayed for pagination like (1,2,3,4,5).
- Previous & Next Button: – Two buttons will be displayed below the product table there will be no page numbers.
- Previous and Next buttons, plus page numbers: Display buttons along with page numbers below the product table.
- First, Previous, Next and Last buttons: Display four buttons first will take users to the very first page and last will take users to the last page of product table.
- First, Previous, Next and Last buttons, plus page numbers: Display all four buttons along with page numbers.
- ‘First’ and ‘Last’ buttons, plus page numbers: Display first and last page buttons with page number options.
- Enter message text for no product found when searched.
- Enable/display table content wrap option.
- Adjust the scroll height of the product table when navigating between pages.
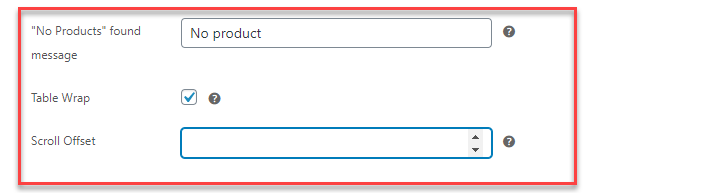
Table Content Settings
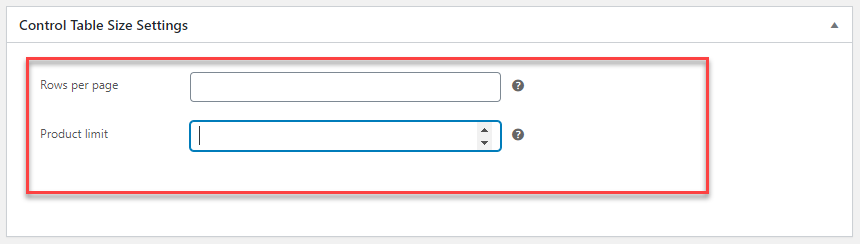
↑ Back to top- Set the limit to the number of products to be appeared in product page on per page.
- Set the limit to show maximum number of product in the table.
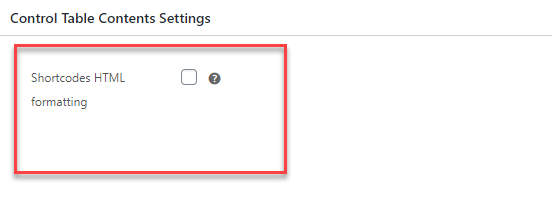
- Enable/disable to display content generated by other shortcodes in the product table.
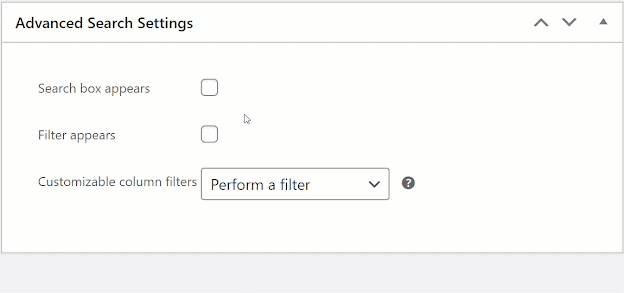
Advanced Search Options
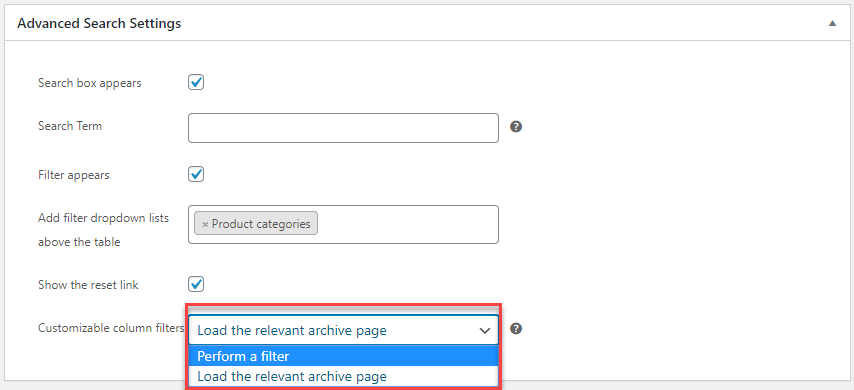
↑ Back to top- Show/hide the search box field.
- Set filtration on table load with the filter search term.
- Show/hide filters.
- Add filter dropdown list according to categories, tags, color, and size.
- Show option to reset filter.
- Custom column filter:
- Perform a filter: a filter will be performed on the table when clicked on a certain column.
- Load the archive page: when performing filter, it will redirect the user to relevant Pages
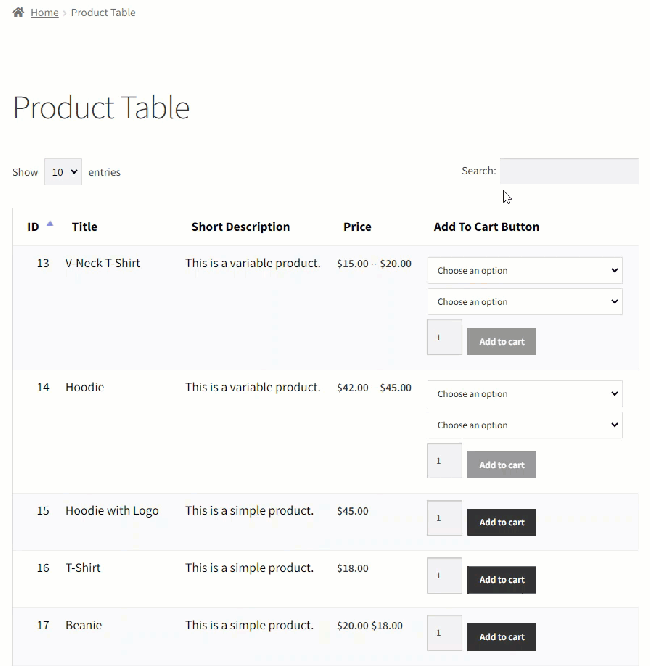
Enhanced Search Functionality
↑ Back to top- Checkmark the checkbox to enable the Search Box to appear on the Product Table page on the Front-End.
Front-End Impact
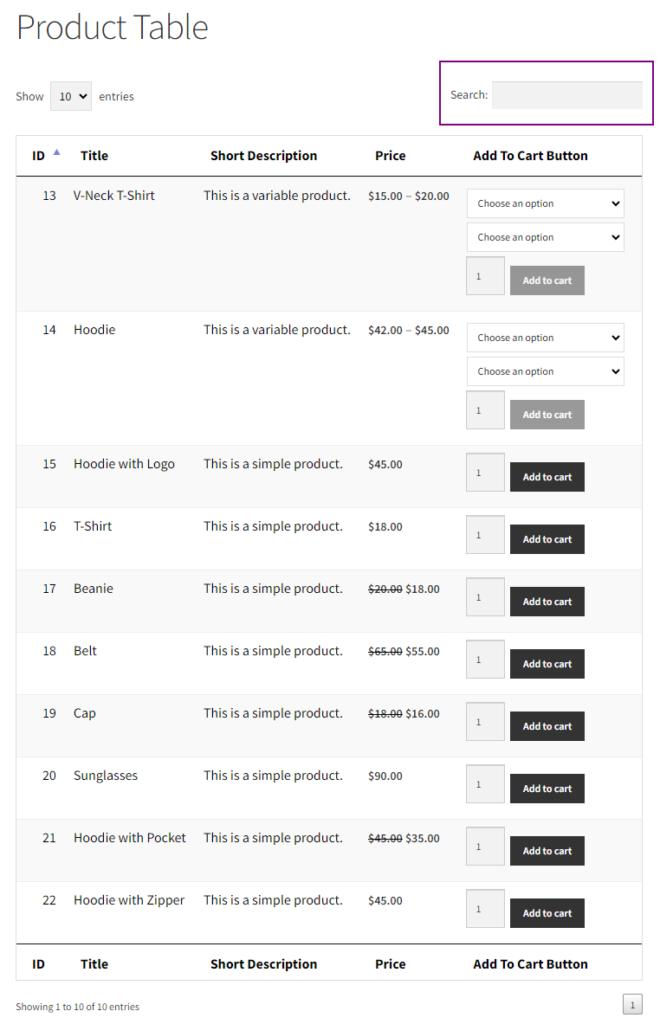
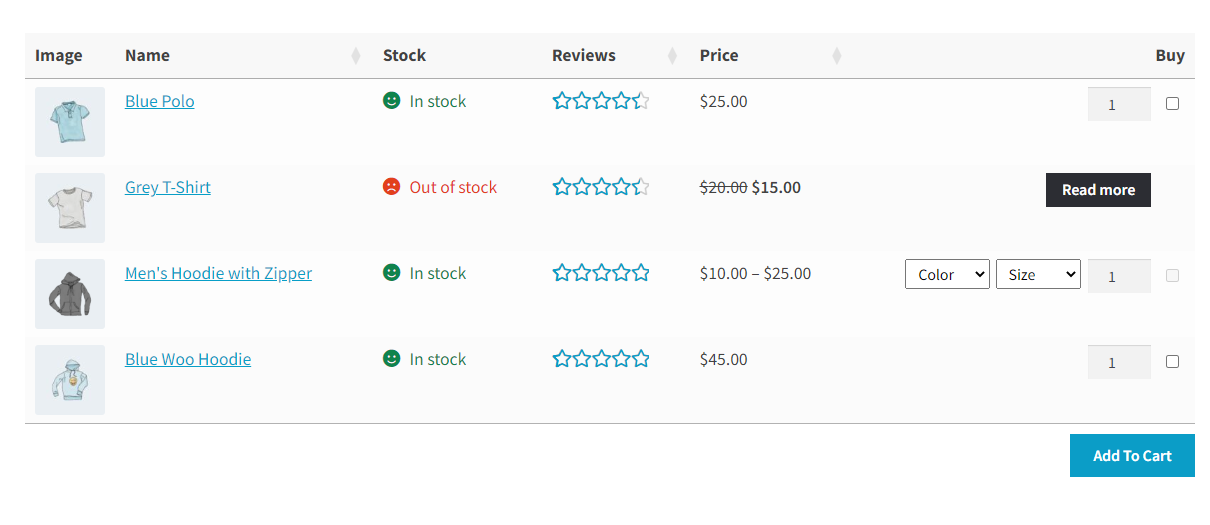
- You can search any item by searching the customizable fields used in the Product Table, such as SKU, Title, and Stock.
SKU – Search Functionality
Title – Search Functionality
Stock – Search Functionality
In-stock – Search Functionality
Out of stock – Search Functionality
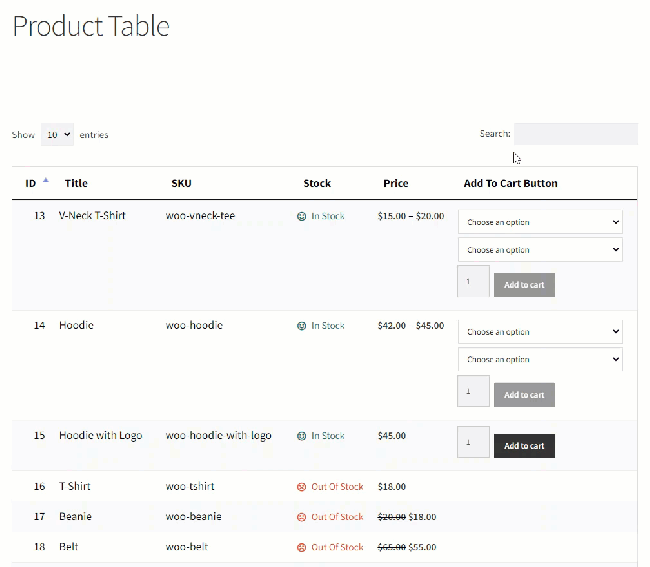
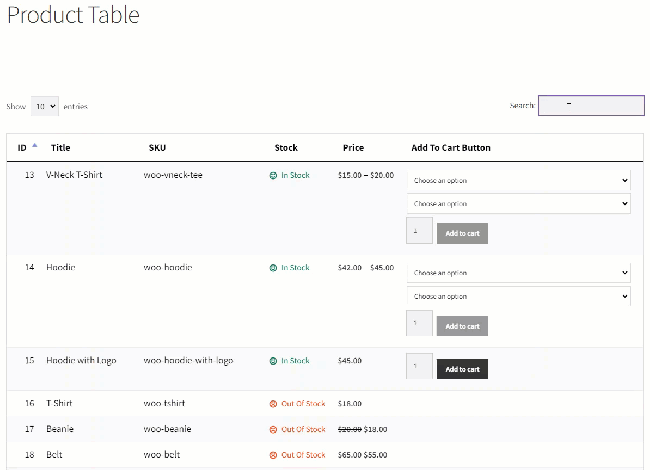
Product Sort Settings
↑ Back to top- Enable sorting through columns. Add fields to enable sorting options on that fields.
- Setup the default sorting option by field.
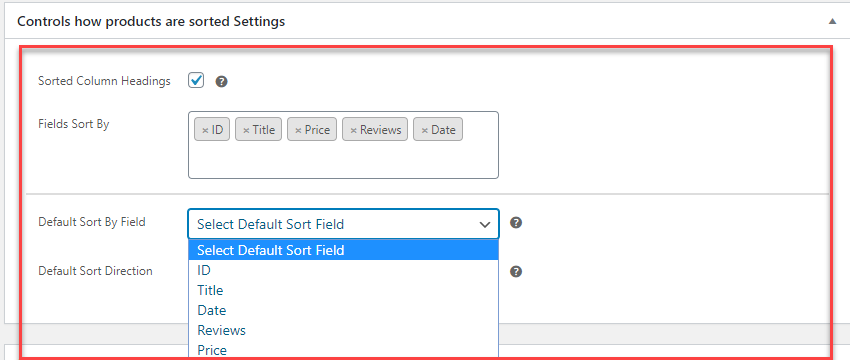
- Select the sorting direction either ascending or descending.
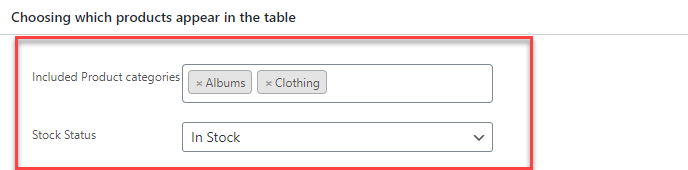
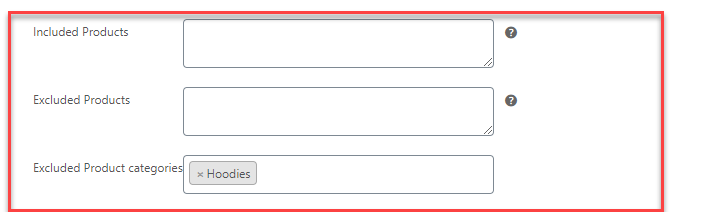
Product Visibility settings
↑ Back to top- Included Product Categories: Enter product category to display in product table.
- Stock Status: Choose stock status to display products of only that status.
- Included Products: Enter products to include in product table.
- Excluded Products: Enter products to exclude from the product table.
- Exclude Product Category: Select categories to exclude from the product table. Product belong to these categories will not be displayed.
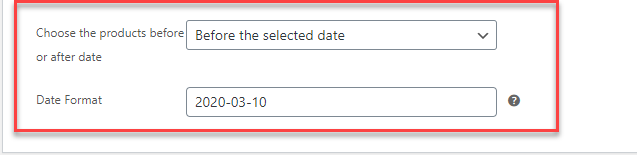
- Product Date: Select option to display products according to the selected date it can be before or after the selected date.
- Date format: Choose the date to display products accordingly. For E.g (if you select before selected date option and select a date (3/10/2020). Products that are published before the above date will be displayed only).
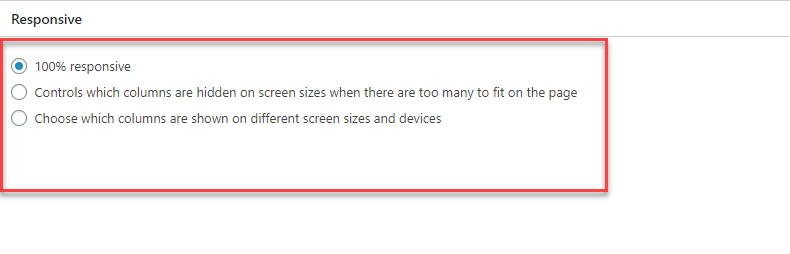
Responsive Settings
↑ Back to top- Choose responsive settings you can set on 100% responsive. Or show/hide some column on specific screen resolutions.
After completing all the settings, Publish the Product Table.
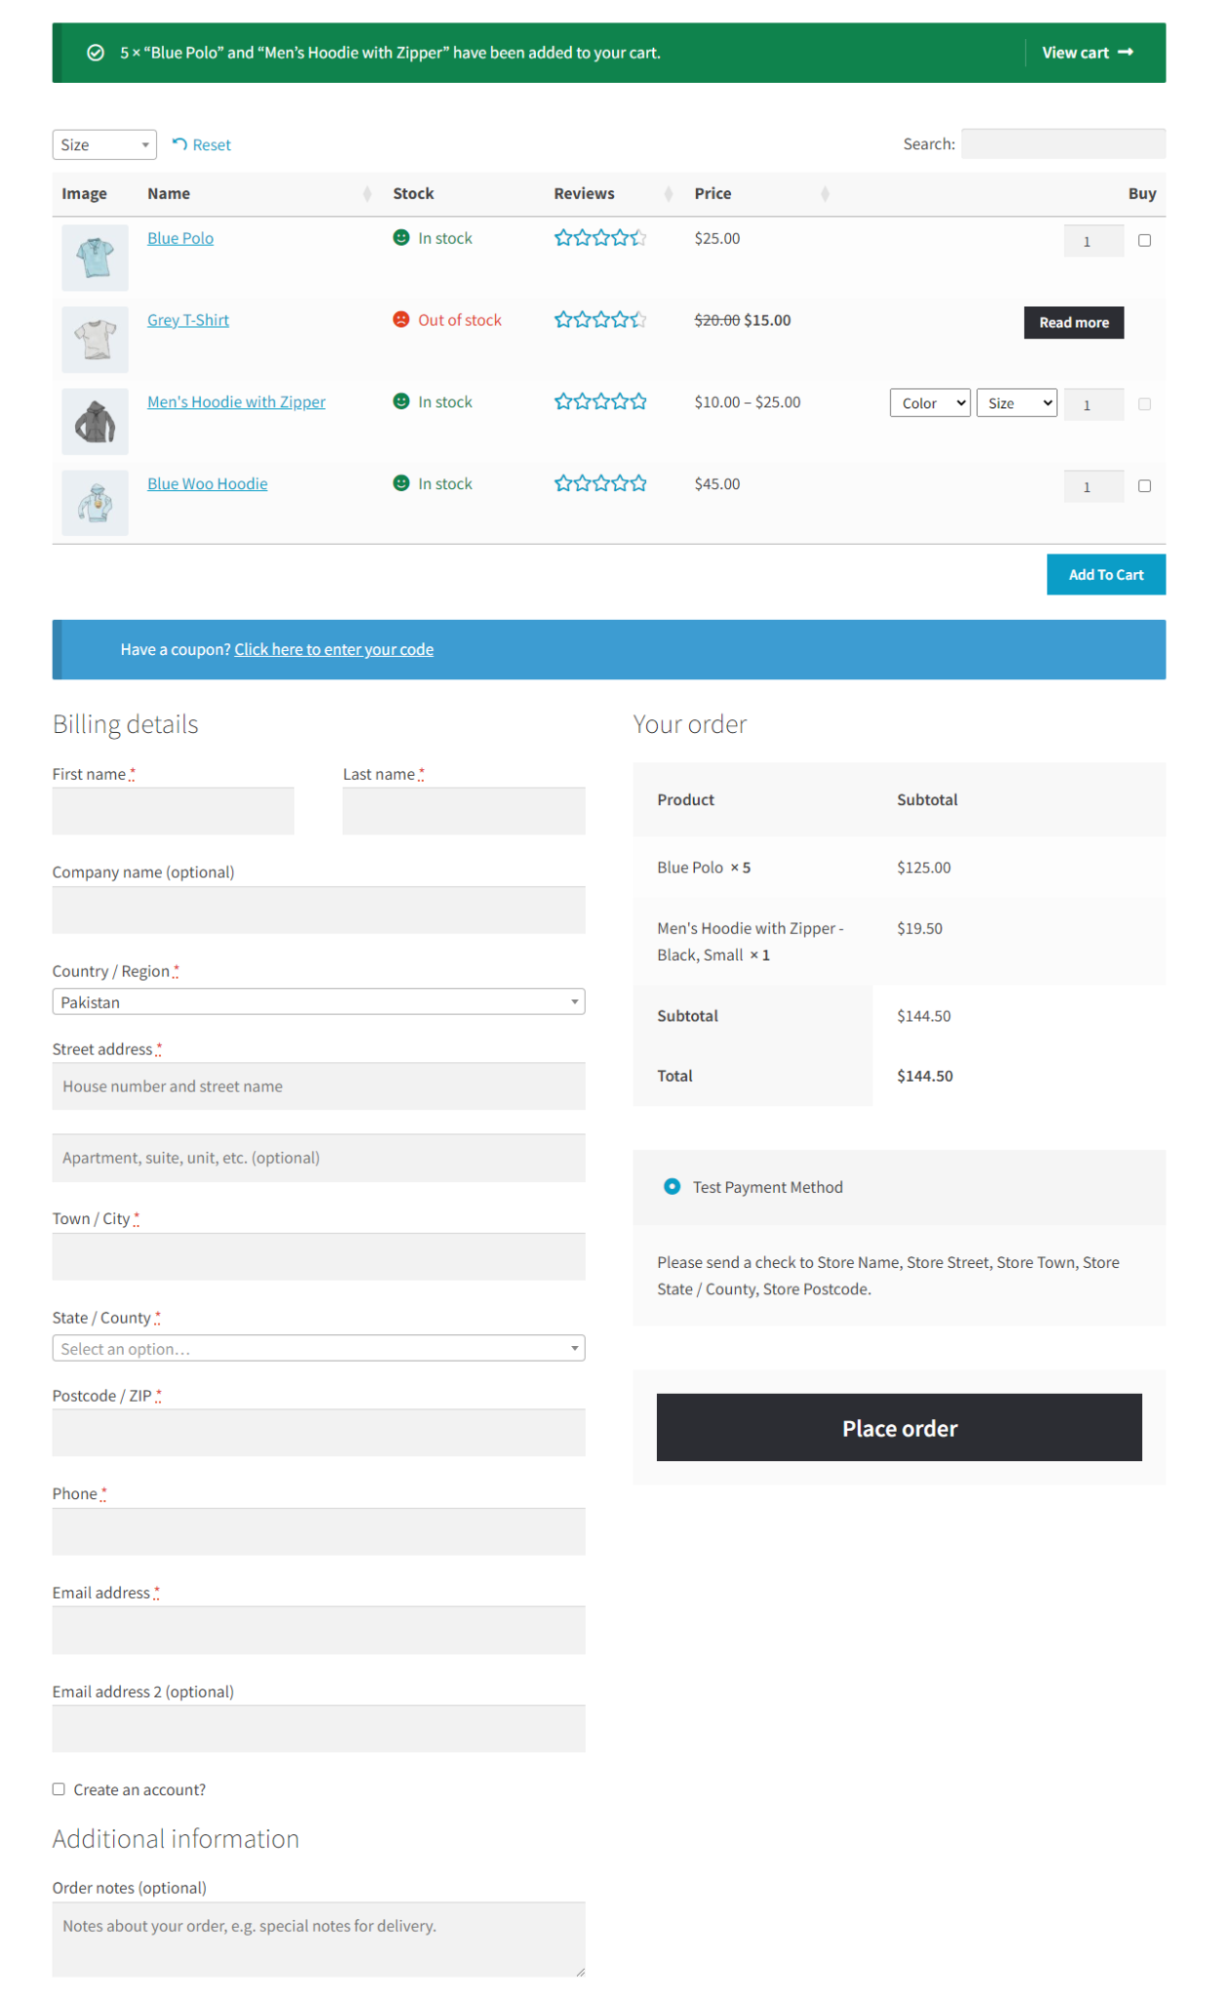
One-Page Checkout
↑ Back to topCustomers can select their desired products on a single page and complete their purchases. To experience the one-page checkout, begin by adding items to your cart. Then, scroll down to locate the standard WooCommerce checkout located below the product table.
- Navigate to the Product Table.
- Checkmark the Enable One-Page Checkout checkbox in the One-Page Checkout section.
- Once done, click on the Publish/ Update button.

Front-End Impact:
- On the website, navigate to the Product Table page.
- Select items according to your requirements and then click on the Add to Cart button.
- The page will reload, and the Checkout Page will appear at the bottom of the Product Table.
NOTE: The Checkout Page will appear whenever the Add To Cart button is clicked regardless of its position on the Product Table page, which means the Add To Cart button is present against each item on the Product Table, or the Add To Cart button is present below the Product Table.
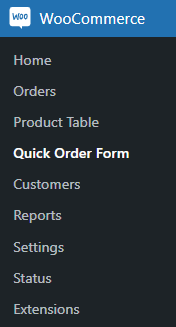
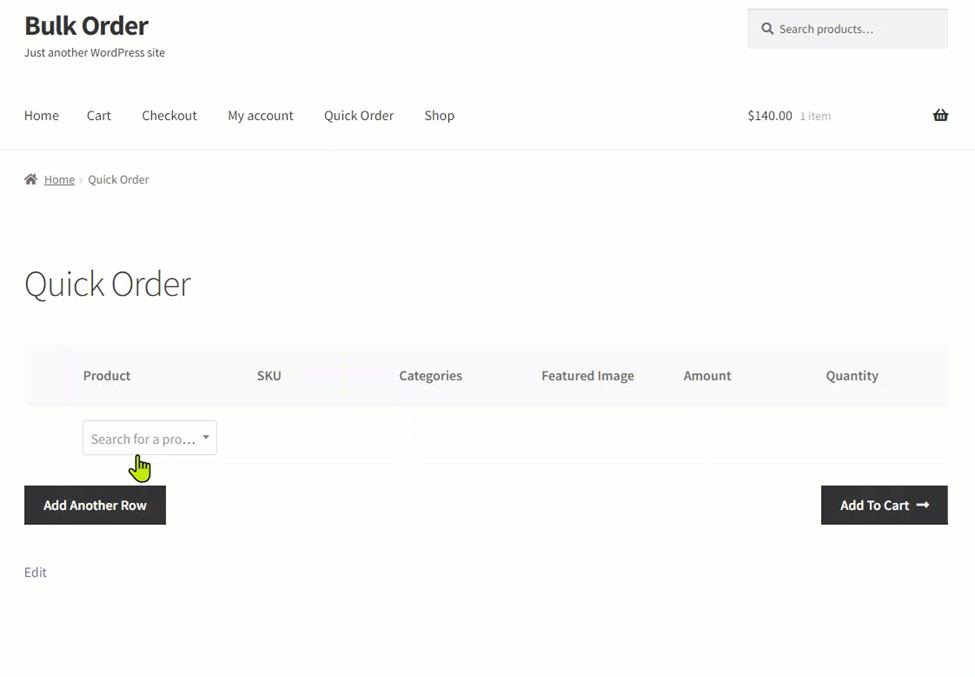
Quick Order Form
↑ Back to top- The admin must have set up the WooCommerce store in order to use the Bulk Order Form
- After setting up the store and installing the bulk order form extension, navigate to WordPress Admin Dashboard → WooCommerce → Quick Order Form
- A new page will appear where the admin can see the list of Order forms.
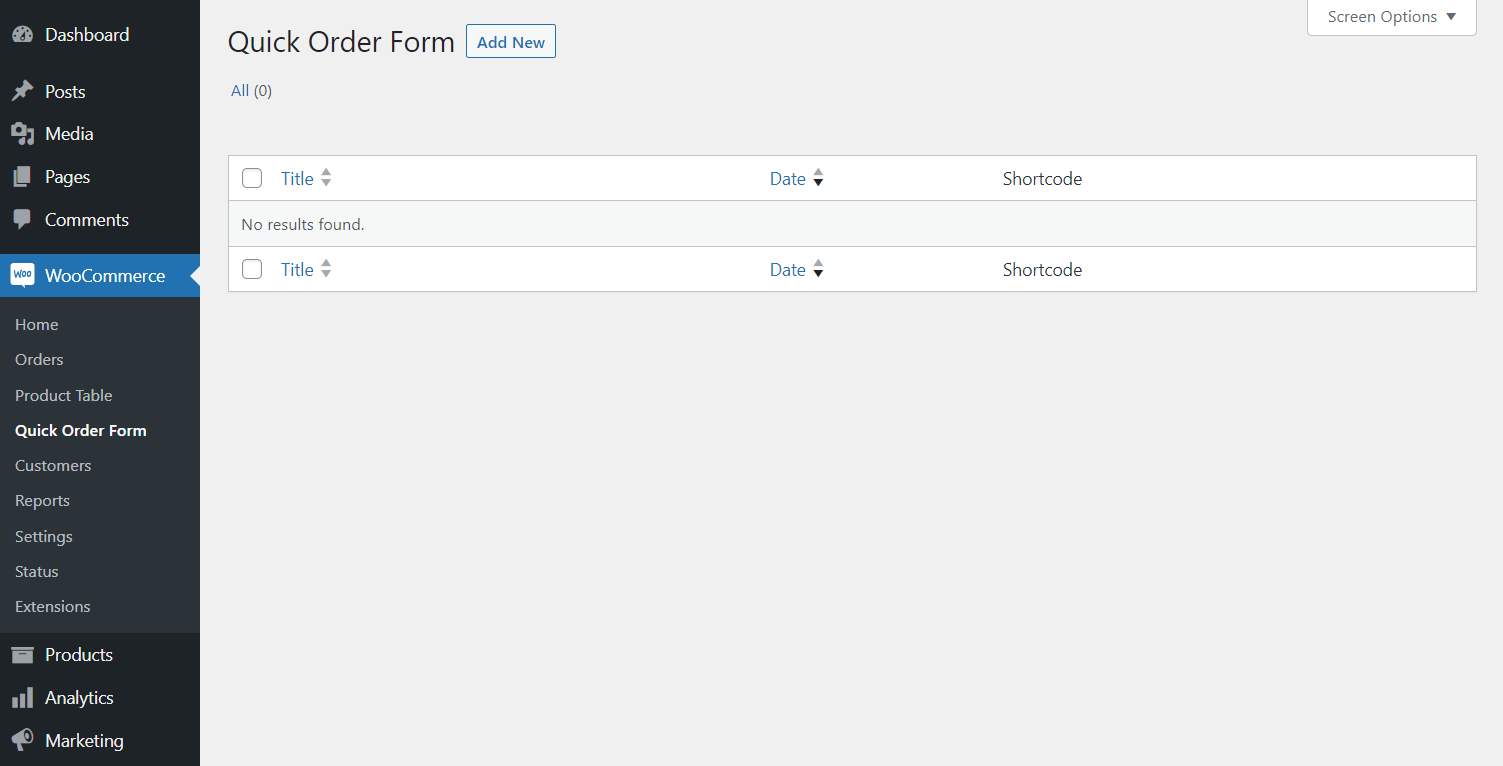
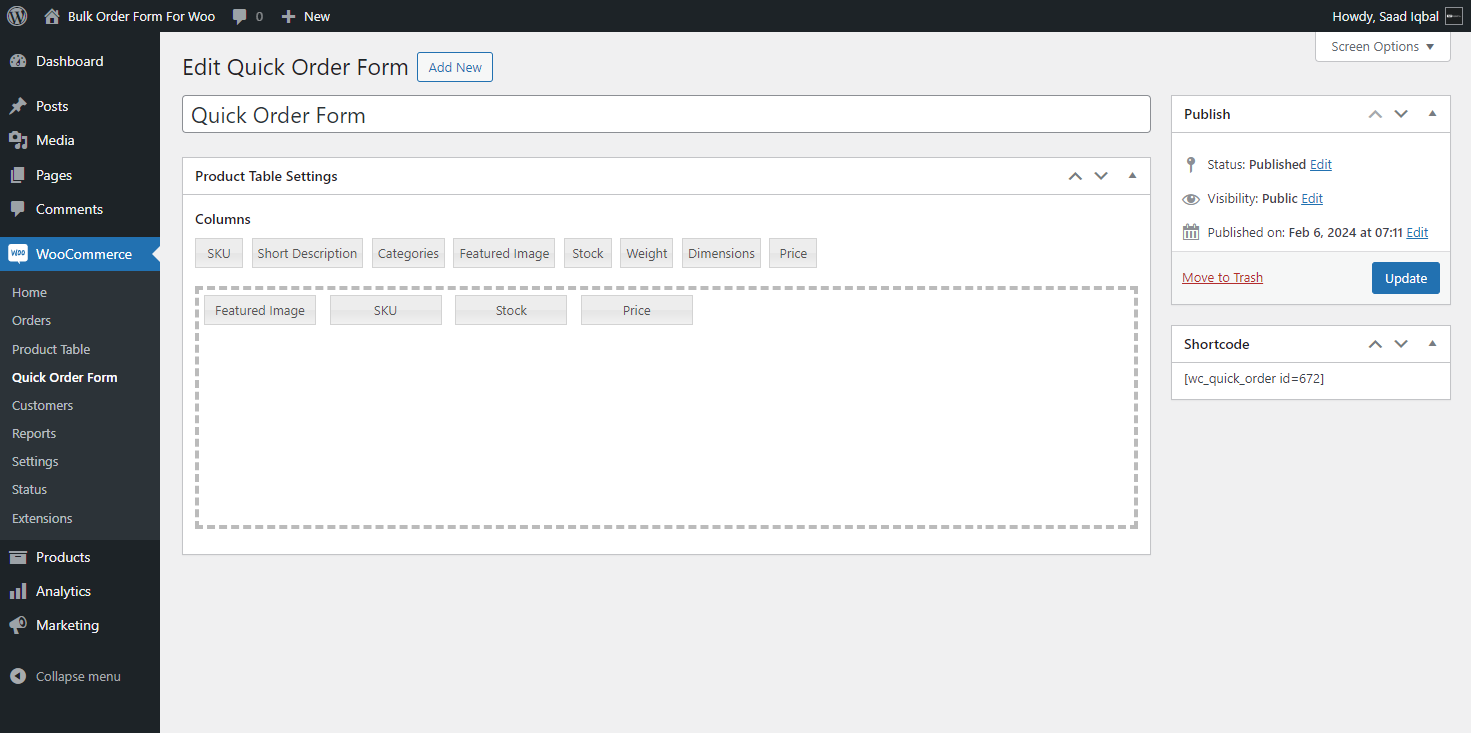
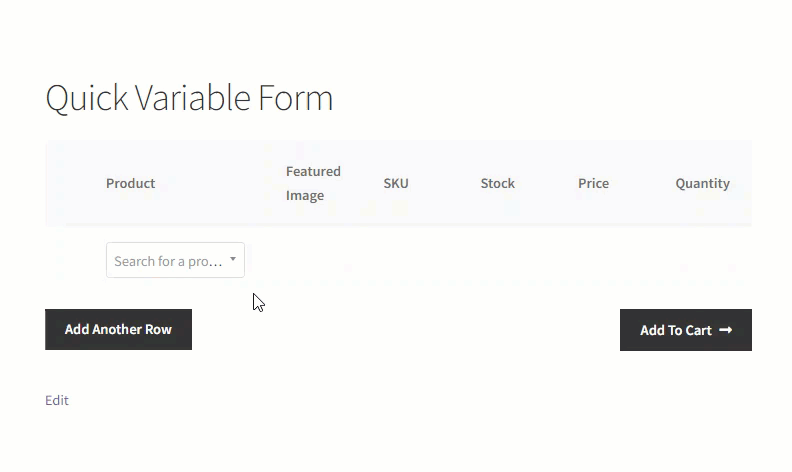
Creating a Quick Order Form
- To create a Quick Order Form, click on WooCommerce → Quick Order Form → Add New

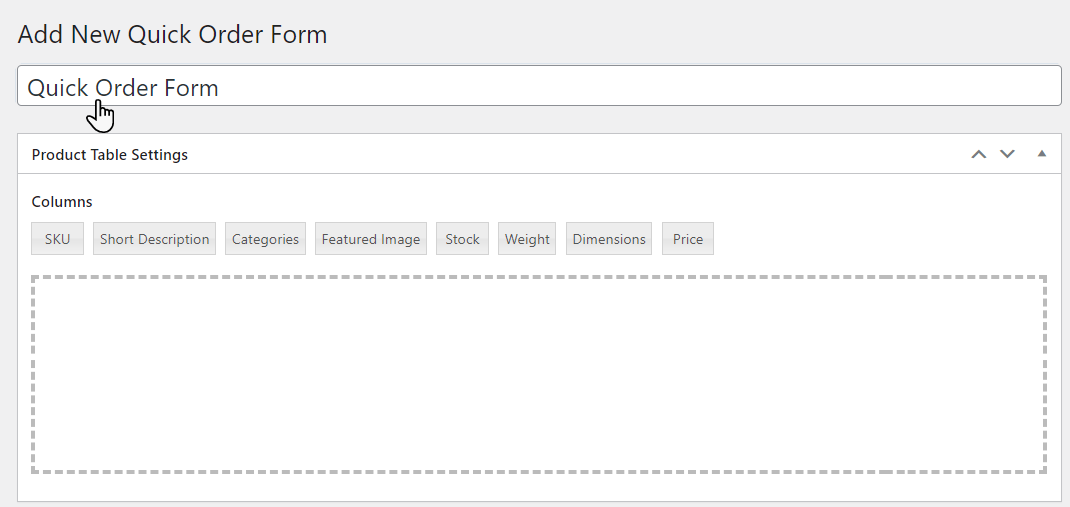
- A new page will appear where the admin can add the details of the form.
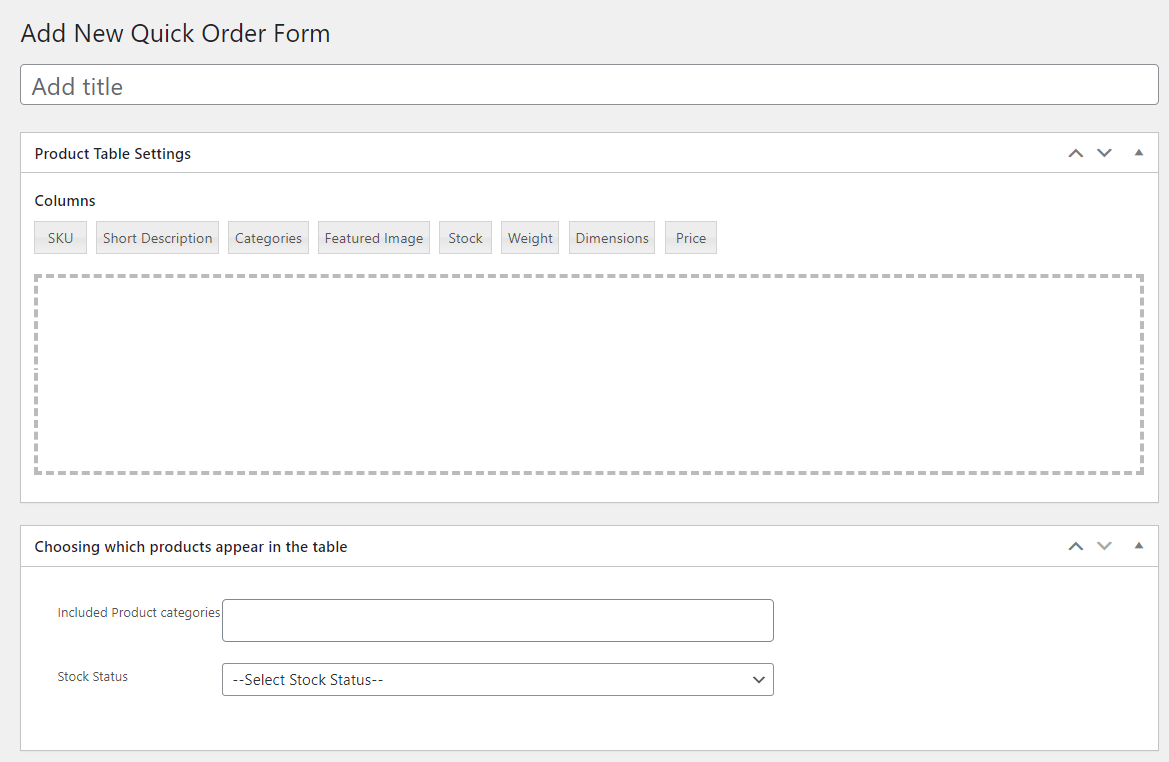
- Admin can add the title of the Quick Order Form under the Add title field.
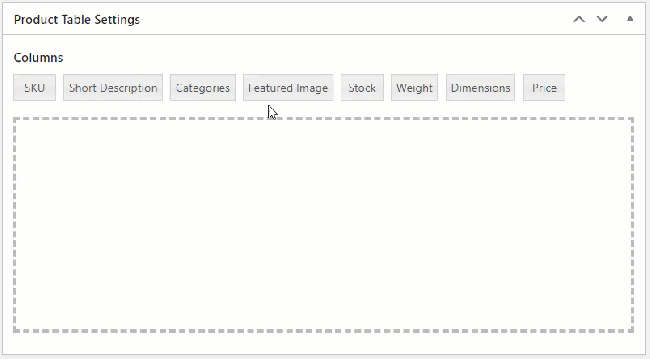
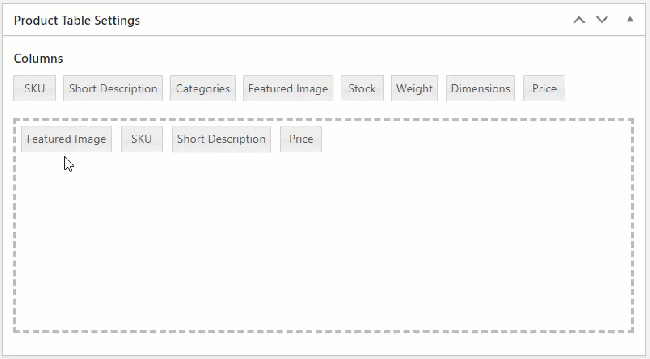
- In order to add the Product Table column drag and drop the Columns in the field under the Product Table Settings.
- Fields can be Renamed and deleted as per requirement.
- In order to Rename click on any field, and the pop-up will appear, under the Column name add the desired column name.
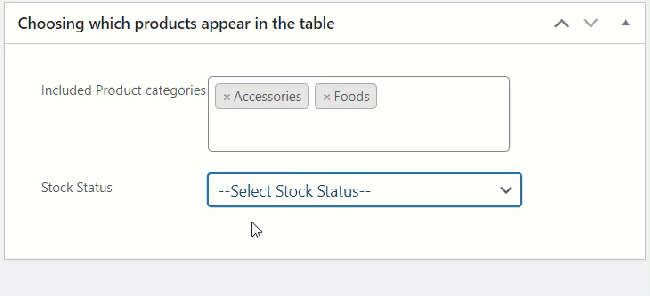
- Once done, select the Product categories under the header Choosing which product appears in the table.

NOTE: Any product other than the selected category can not be searched from the front end
- Admin can set stock status by clicking the dropdown beside the Stock Status label, which will show either In stock or Out of Stock products.
NOTE: If the Stock Status is unselected it will show all In stock and Out of stock products
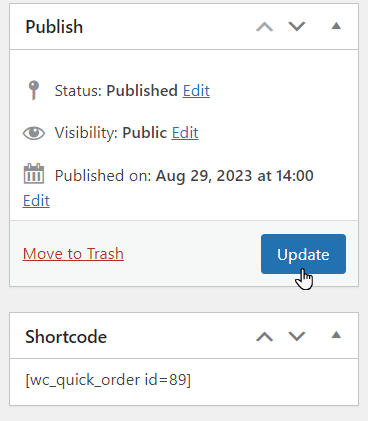
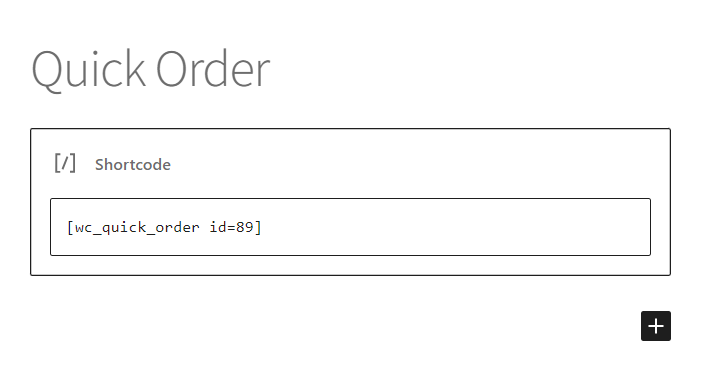
- Now, after Setting all the fields, copy the shortcode, which will be pasted on the page later to display Quick Order Form.
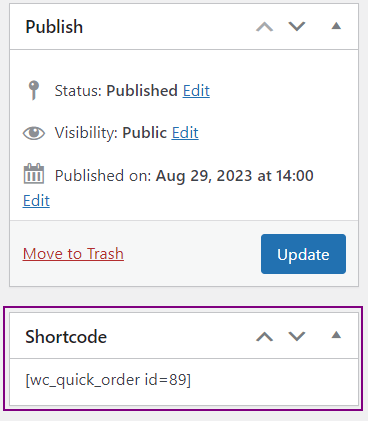
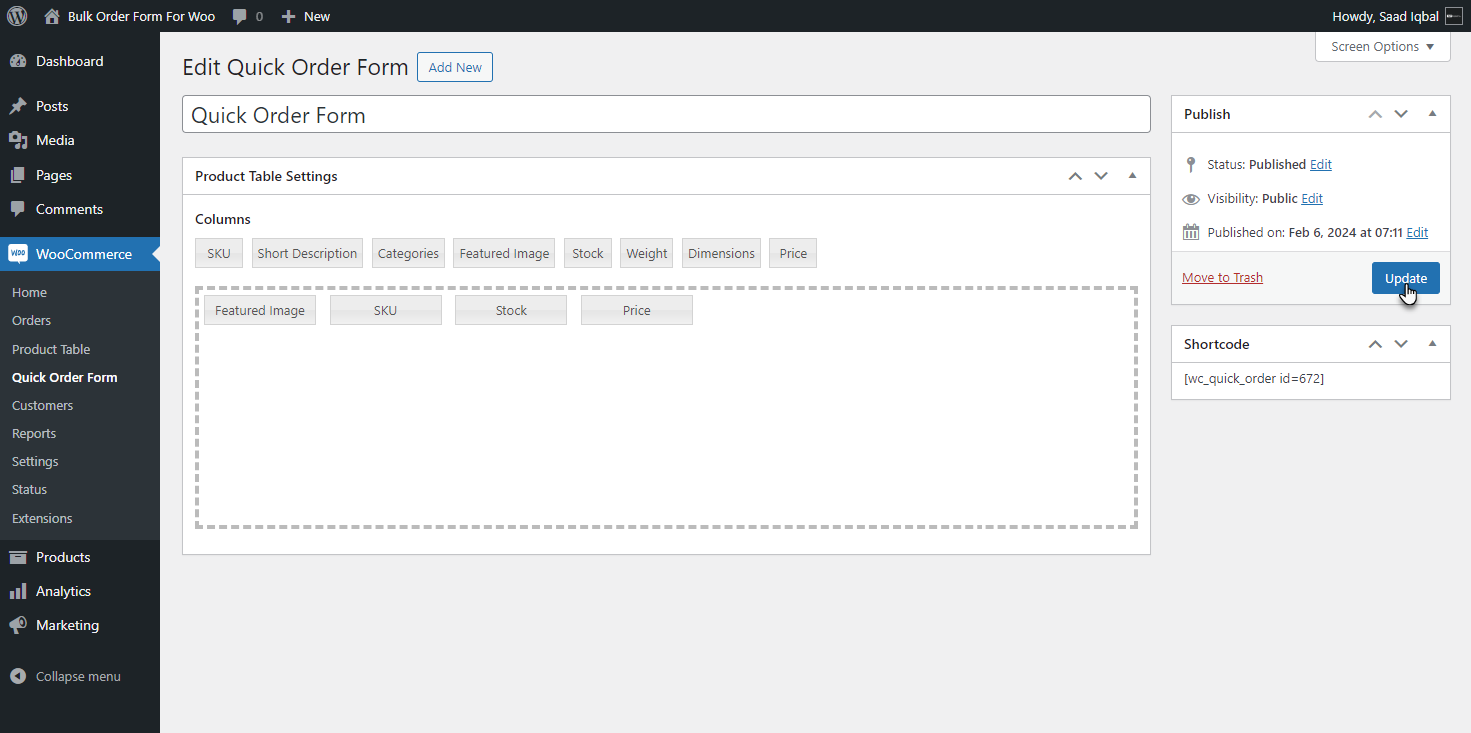
- After that select the Publish or Update button.
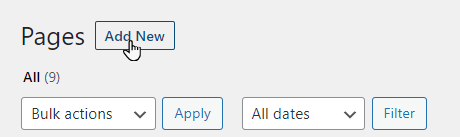
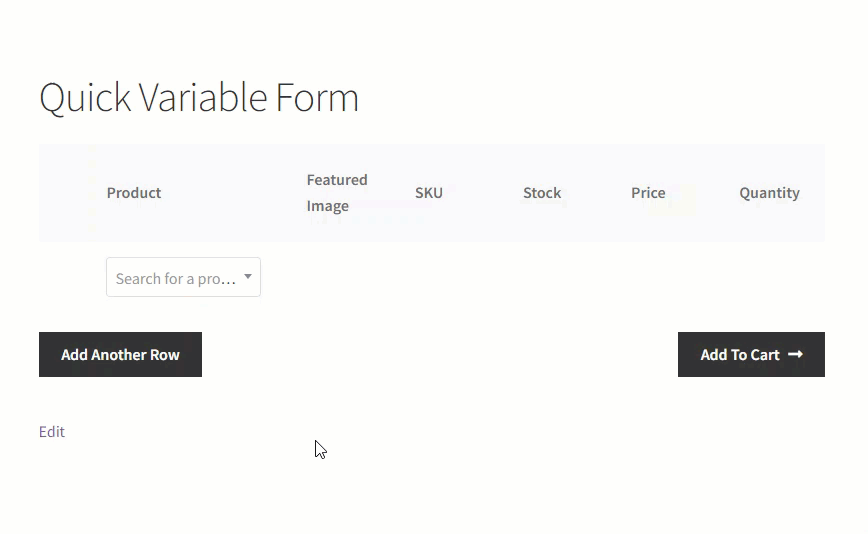
- In order to show the table on the front end create a page and navigate to the WordPress admin Dashboard → Pages.
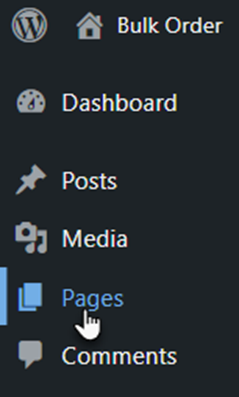
- Click Add New and create a new page.
- On the page select + and add the shortcode widget
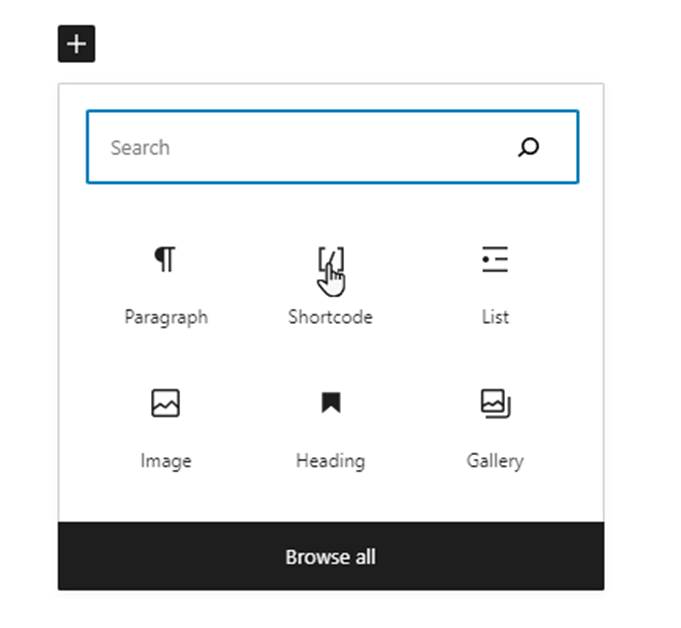
- Paste the copied shortcode in the field under the Shortcode label and click Publish button.
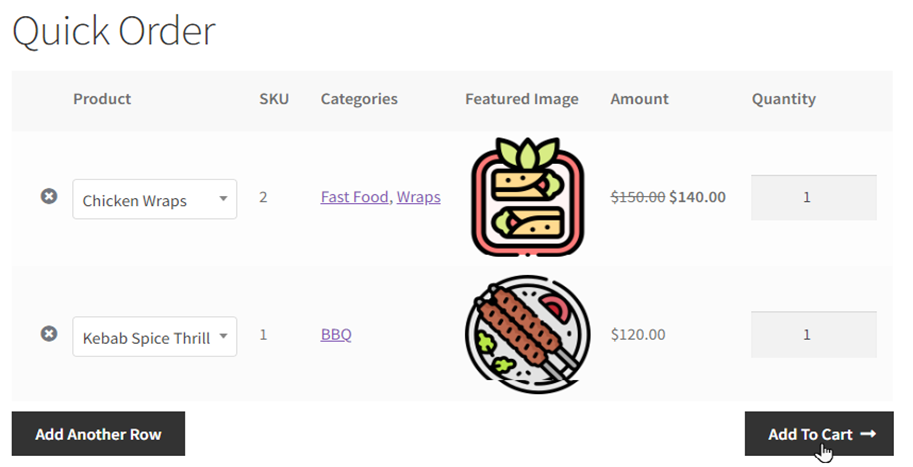
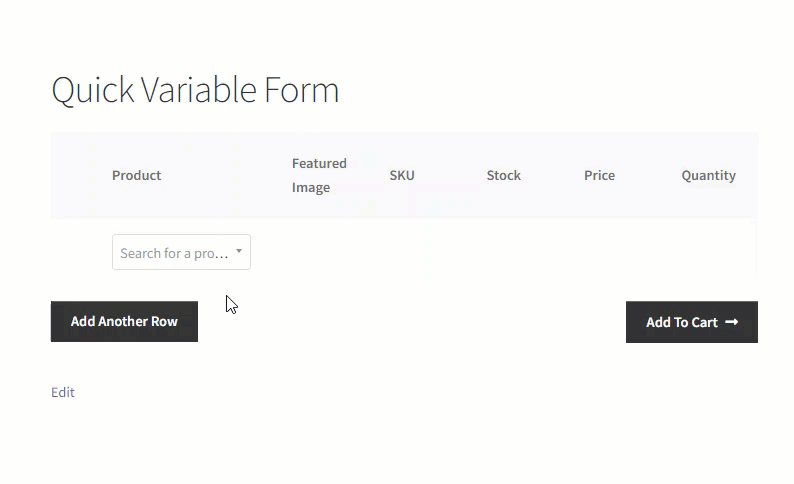
Front End Impact
- Quick Order Form will be shown on the front end according to the fields set from the back end.
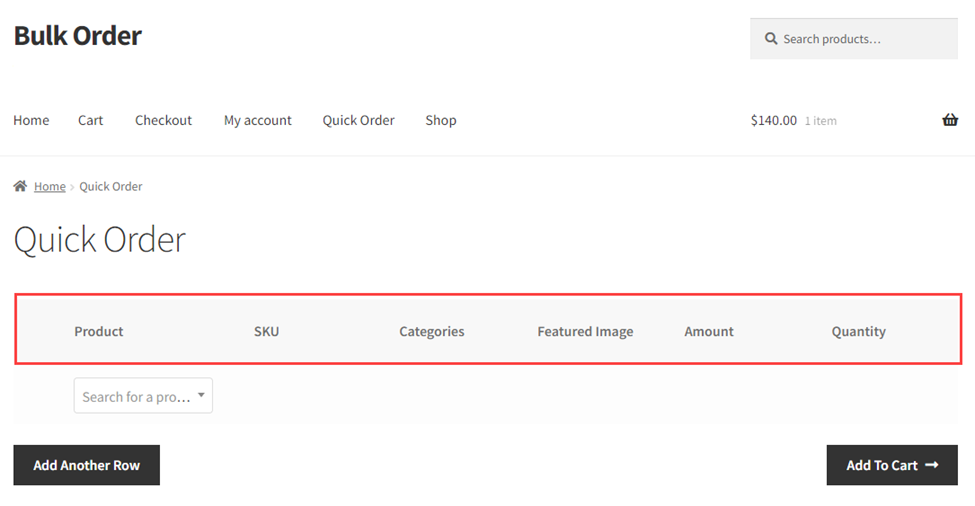
- Products can be searched from the search field. Product details will appear according to the fields set in the form. Product quantity can also be set which will be added to the cart.
- User can add multiple rows by clicking Add Another Row button.
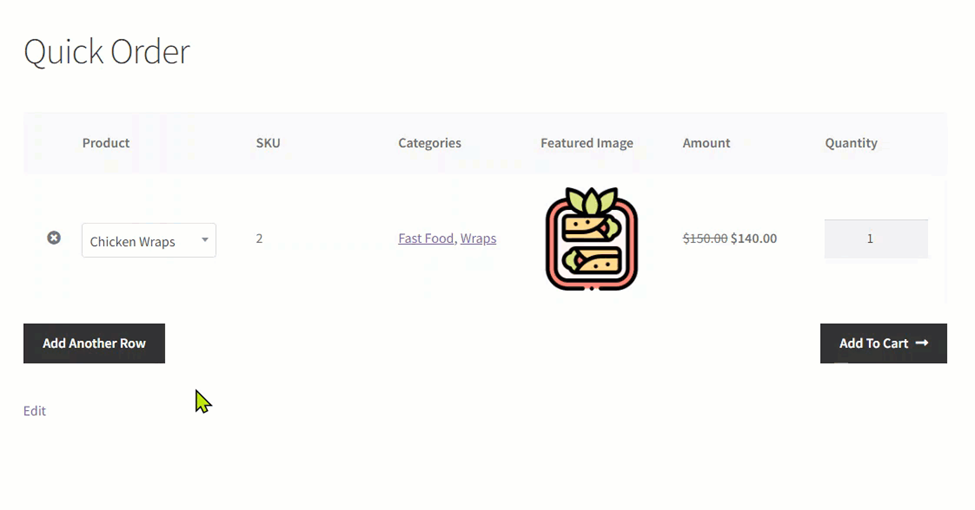
- To change the quantity from the quantity column.
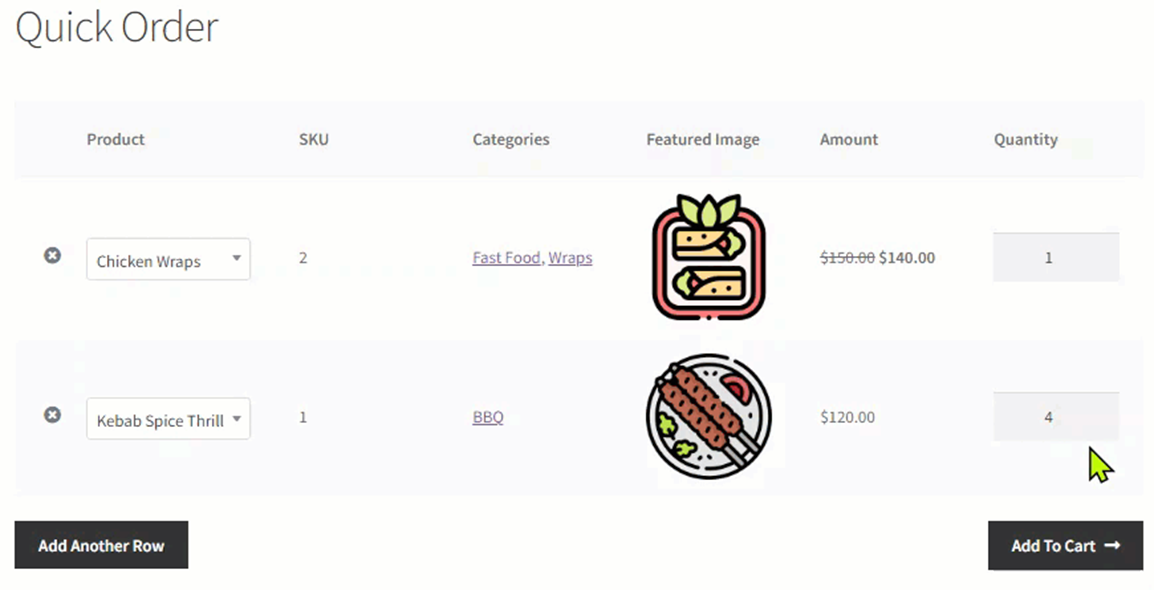
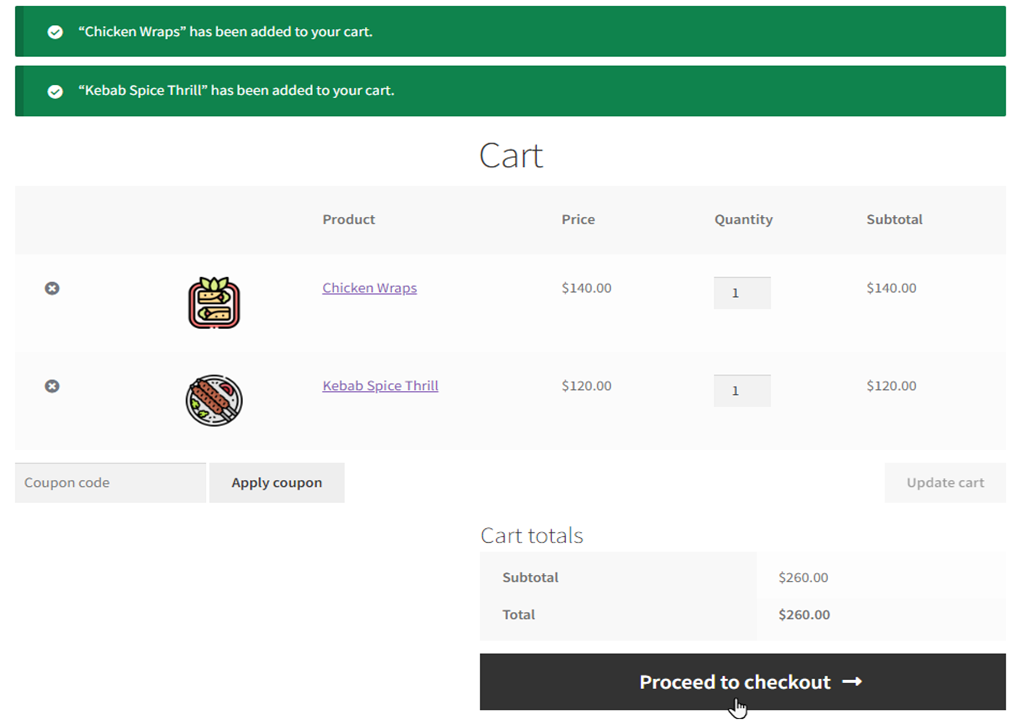
- After adding products click Add To Cart button.
NOTE: Products must be In stock or else the out of stock product will be discarded.
- After that click Proceed to checkout button
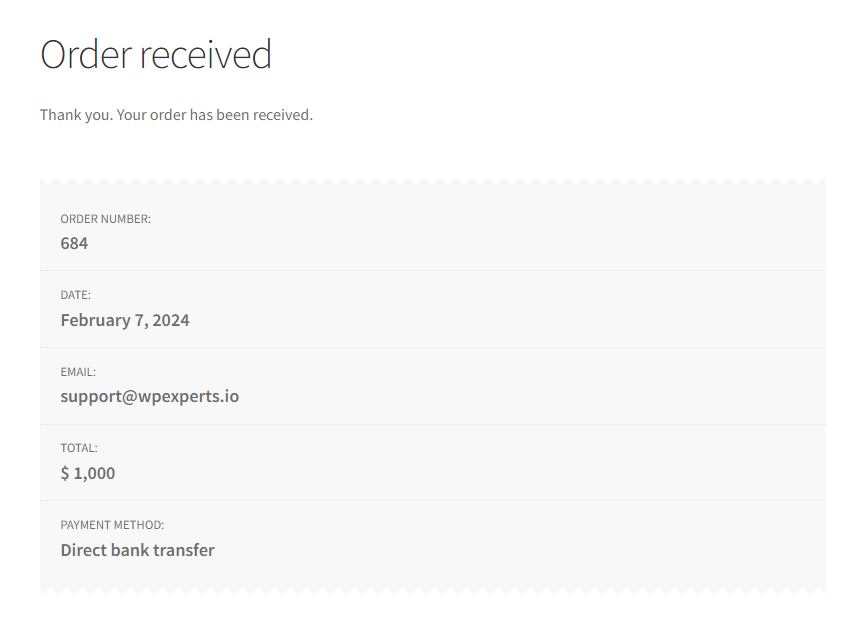
- Enter the details, select the desired payment mode, and click on the Place order button.
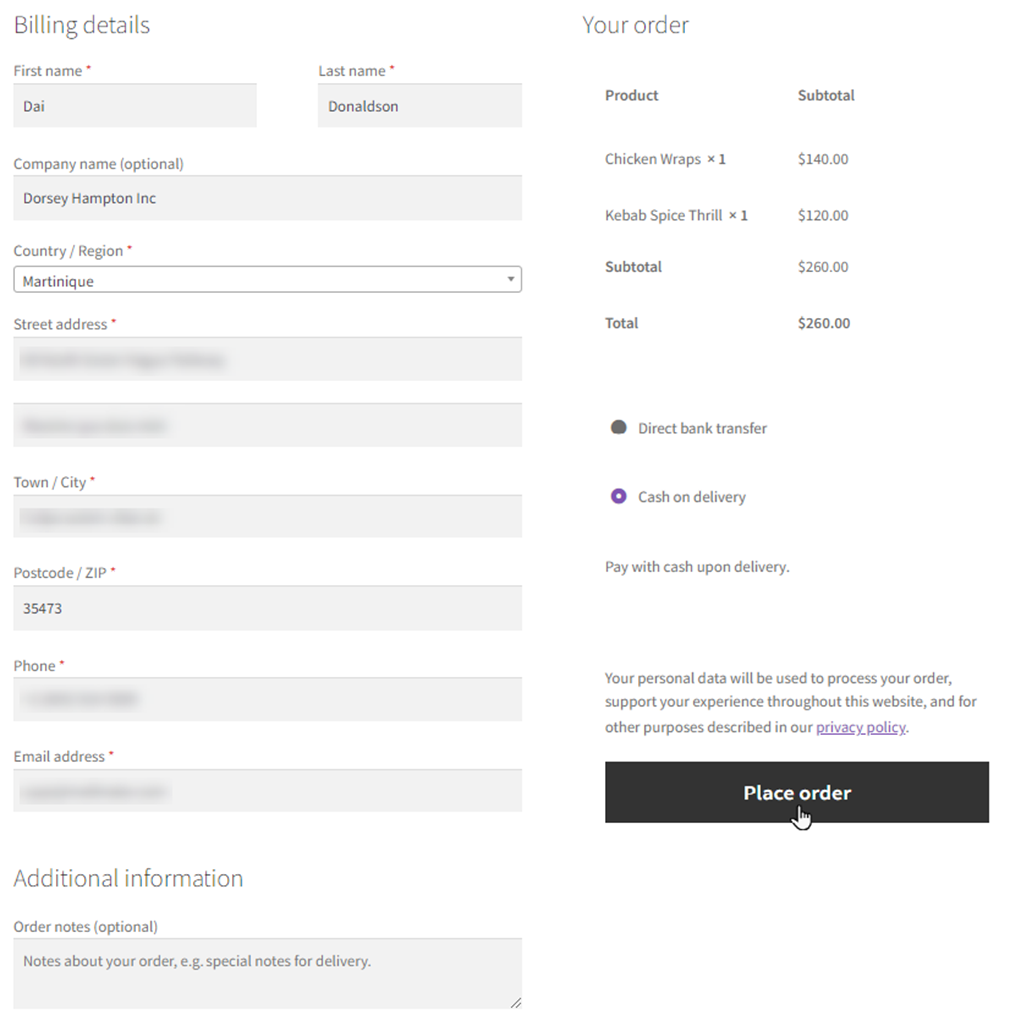
- A new page will appear with the order and personal details for the order to be received.

Bulk Variable Form on Single Product Page
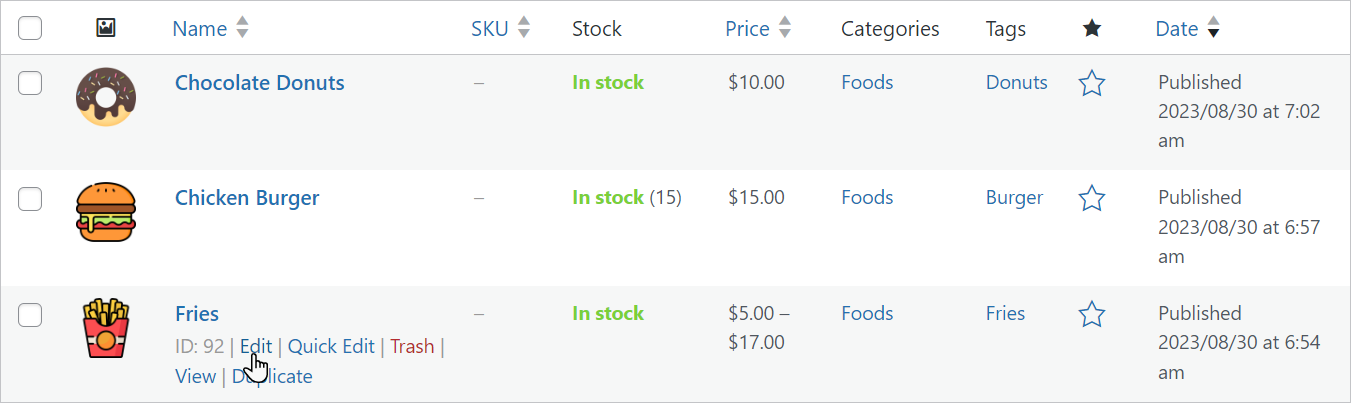
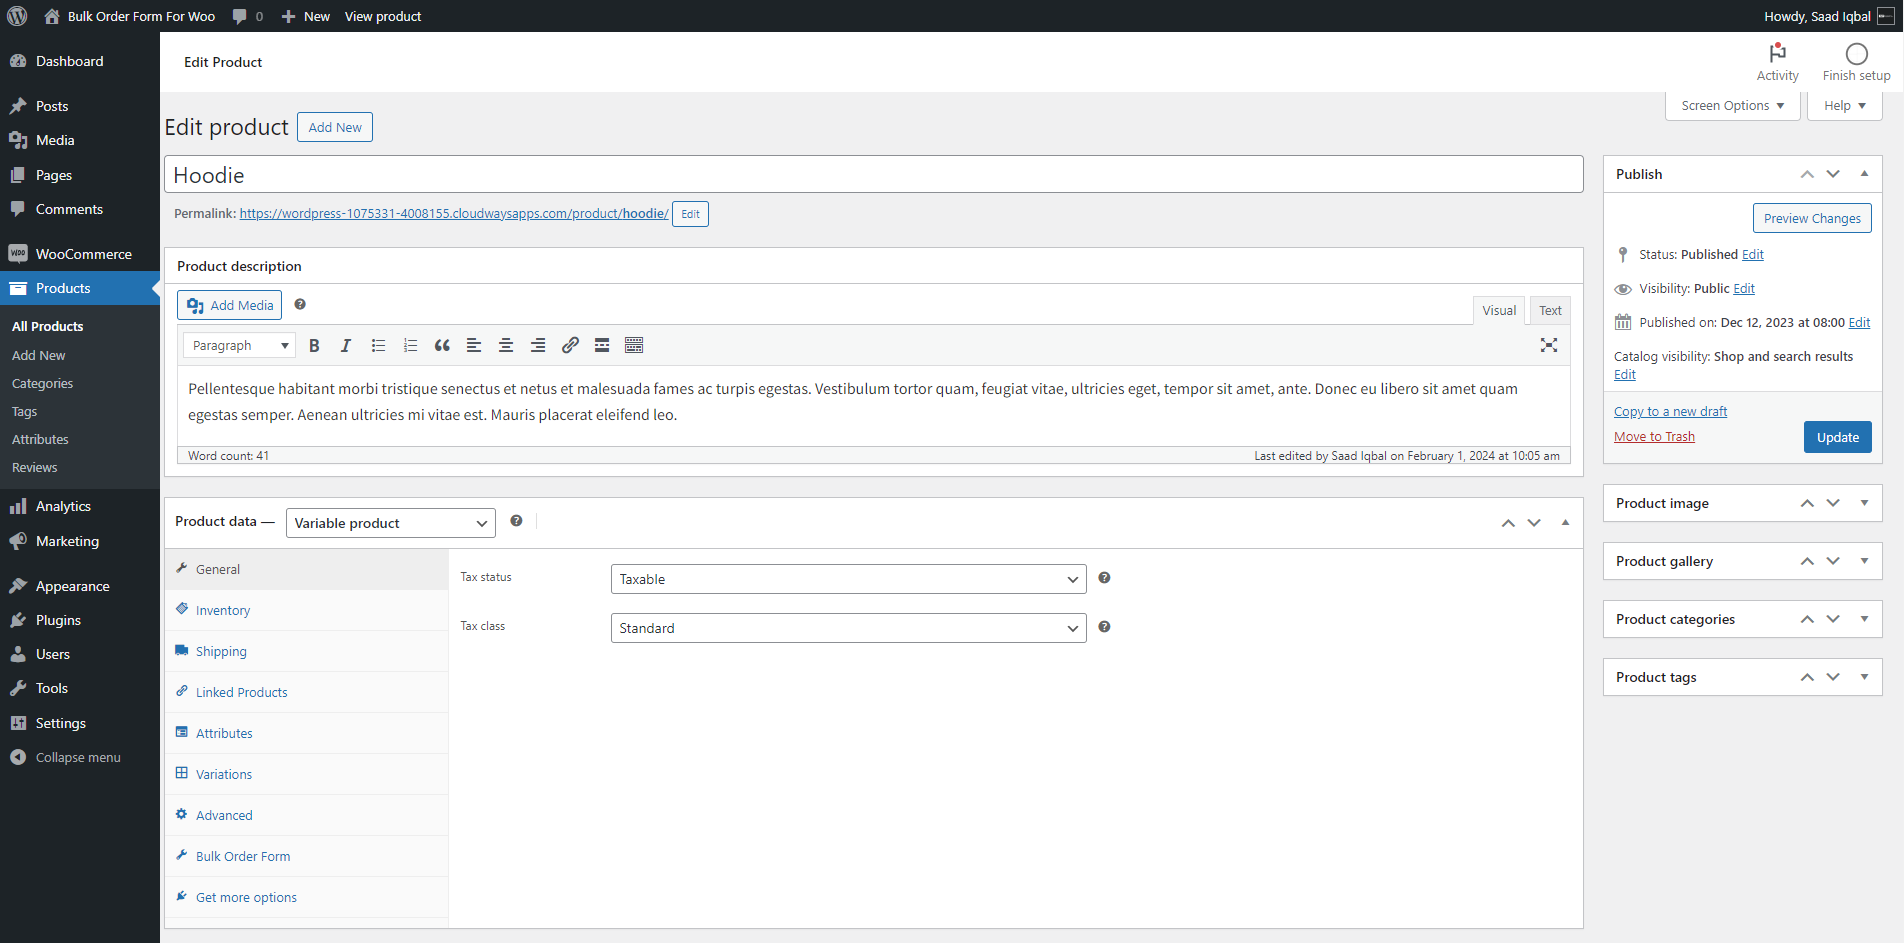
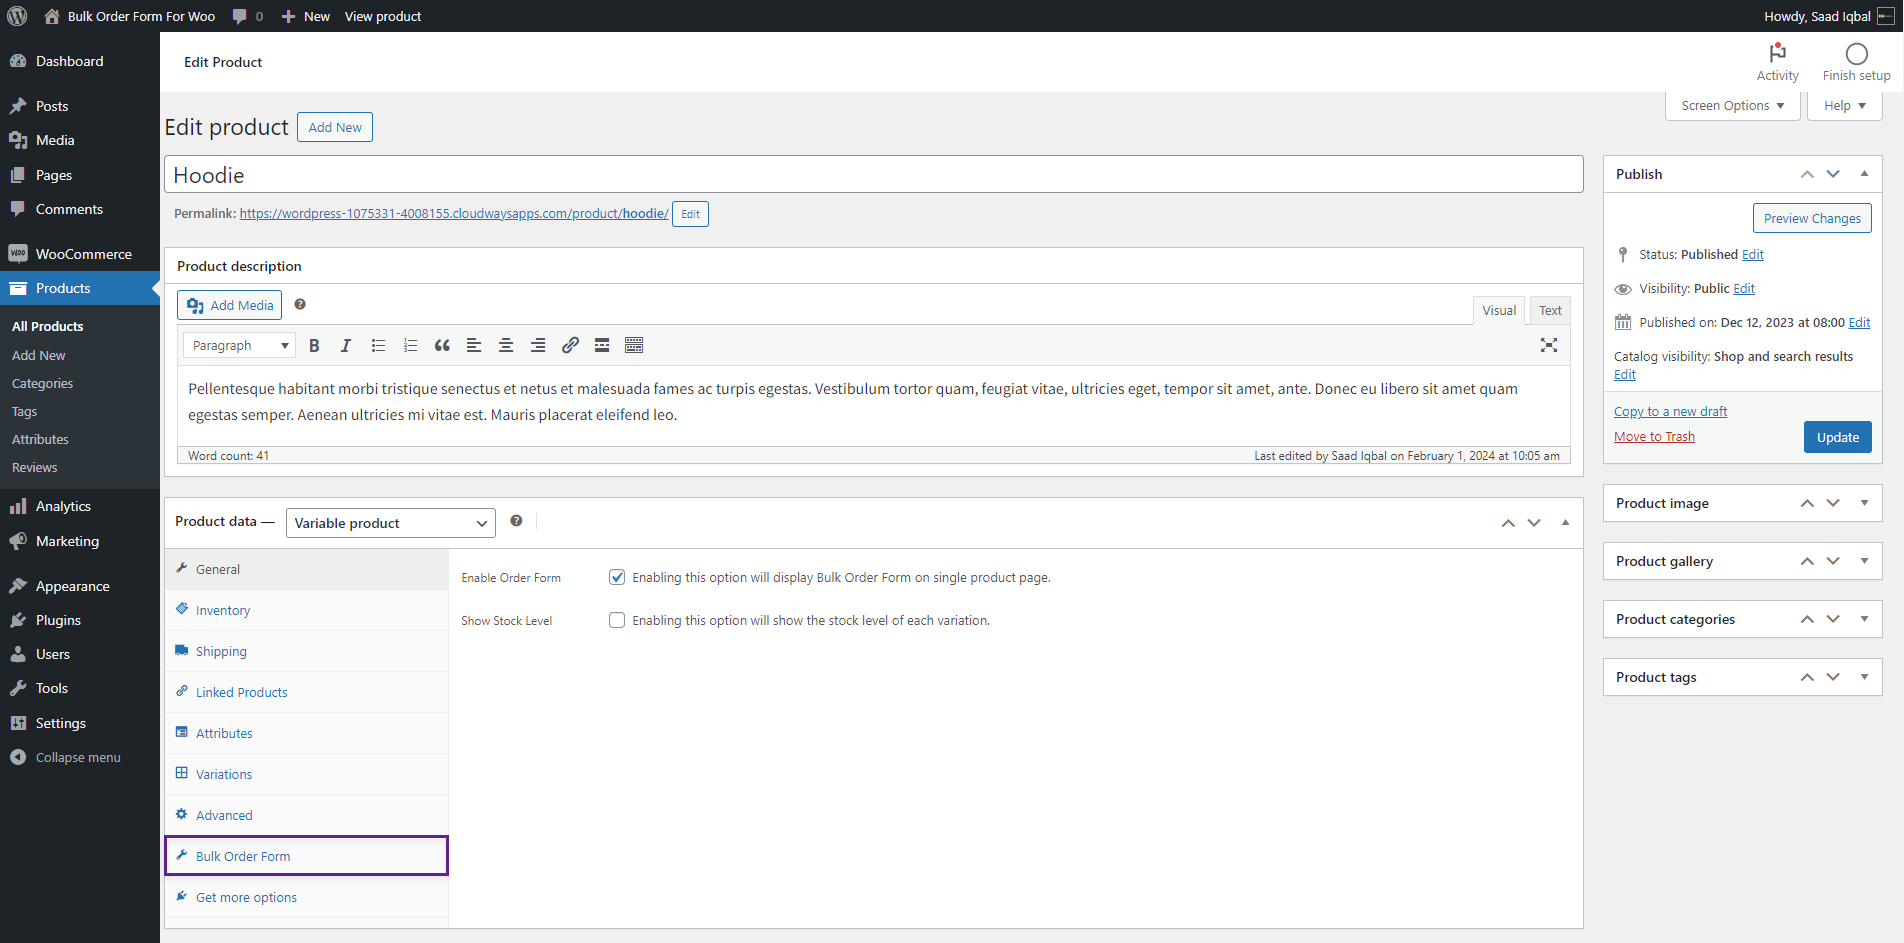
↑ Back to top- Navigate to Admin Dashboard → Products → All Products.

- Hover over any Variable Product to view suboptions.
- Click on the Edit suboptions.
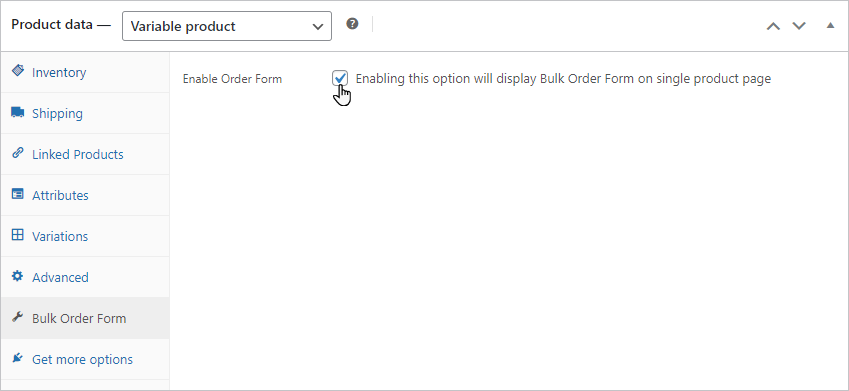
- Go to the Bulk Order Form tab in the Product data section.
- Checkmark the Enable Order Form checkbox.
Front-End Impact
- Go to your shop and click on any Variable Product to view the Single Product Page.
Before
- Front-End view of the Variable Product before enabling Enable Order Form option in the Bulk Order Form section.
After
- Front-End view of the Variable Product after enabling Enable Order Form option in the Bulk Order Form section.

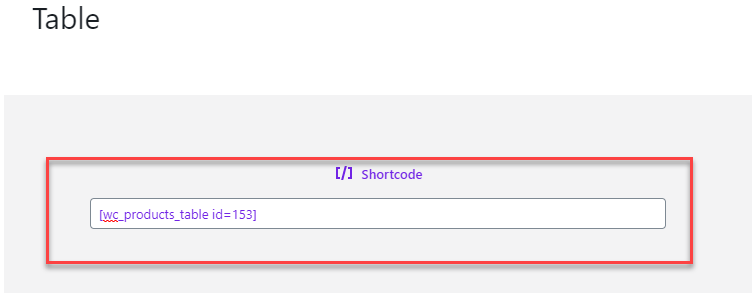
Product Table Shortcode
↑ Back to top- Copy the shortcode from the edit screen.
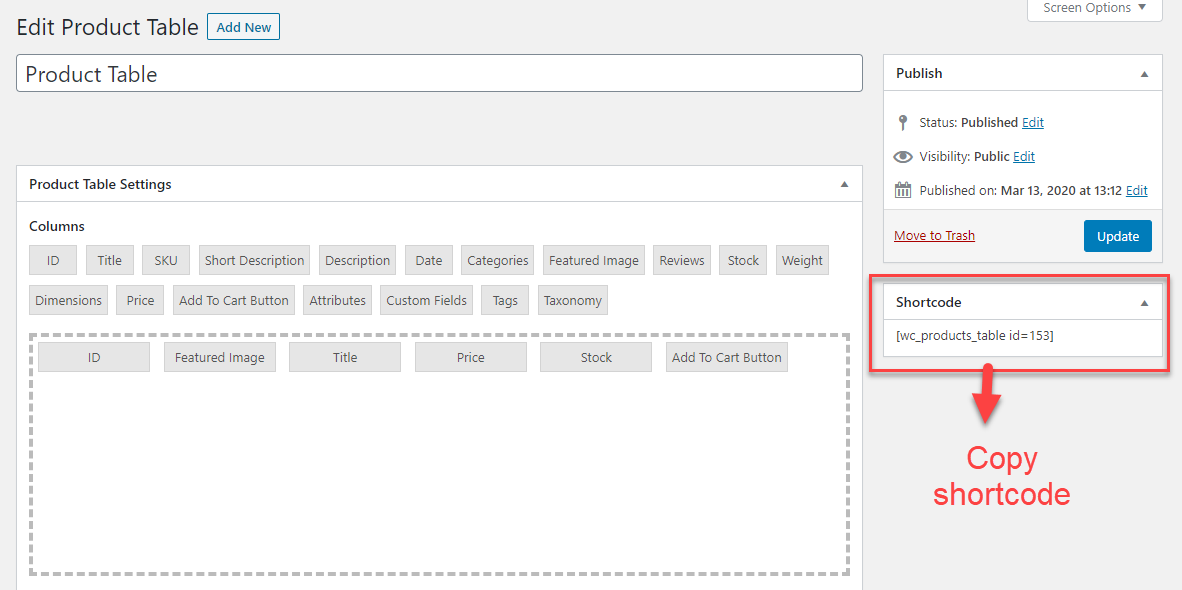
- Place it on any page/post to display.
- Click Publish/Update
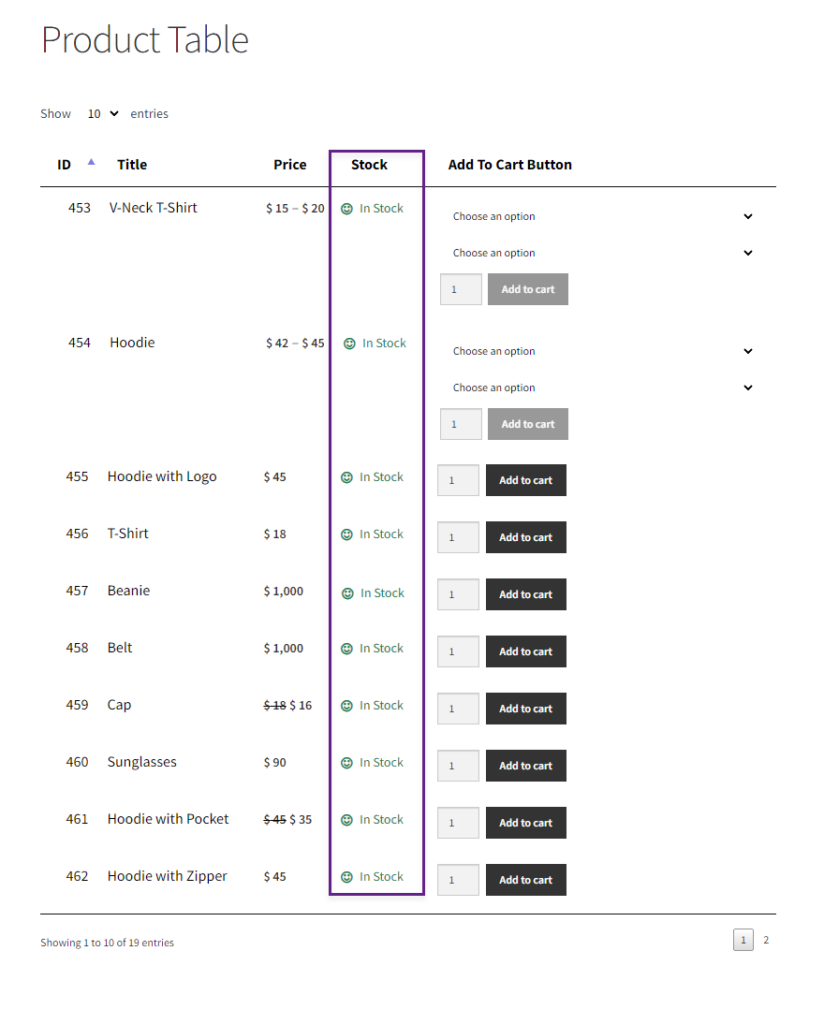
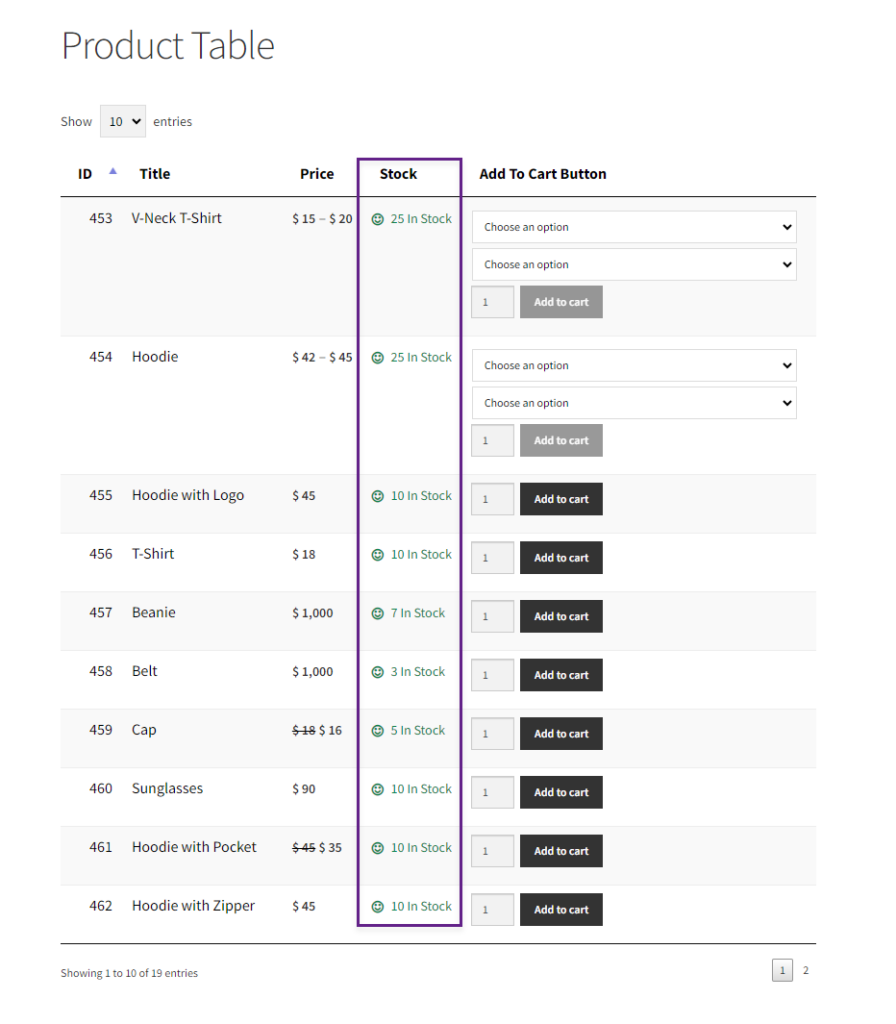
Stock Levels in Product Table
↑ Back to top- Go to WordPress Admin Dashboard > WooCommerce > Product table.
- Click on the edit button to edit your Product Table.
- Click on the Stock Column to edit.
- Stock column settings will appear.
- Check mark the Show Stock Level radio button.

PLEASE NOTE: The stock will be displayed when the user checks this Show Stock Level, and the Stock management and Product stocks are added to the product edit page settings
- Click on the Save button to save changes.
Front End Impact:
↑ Back to top- Go to the Product Table page.
- Product Table will appear with all the products.
Before
After
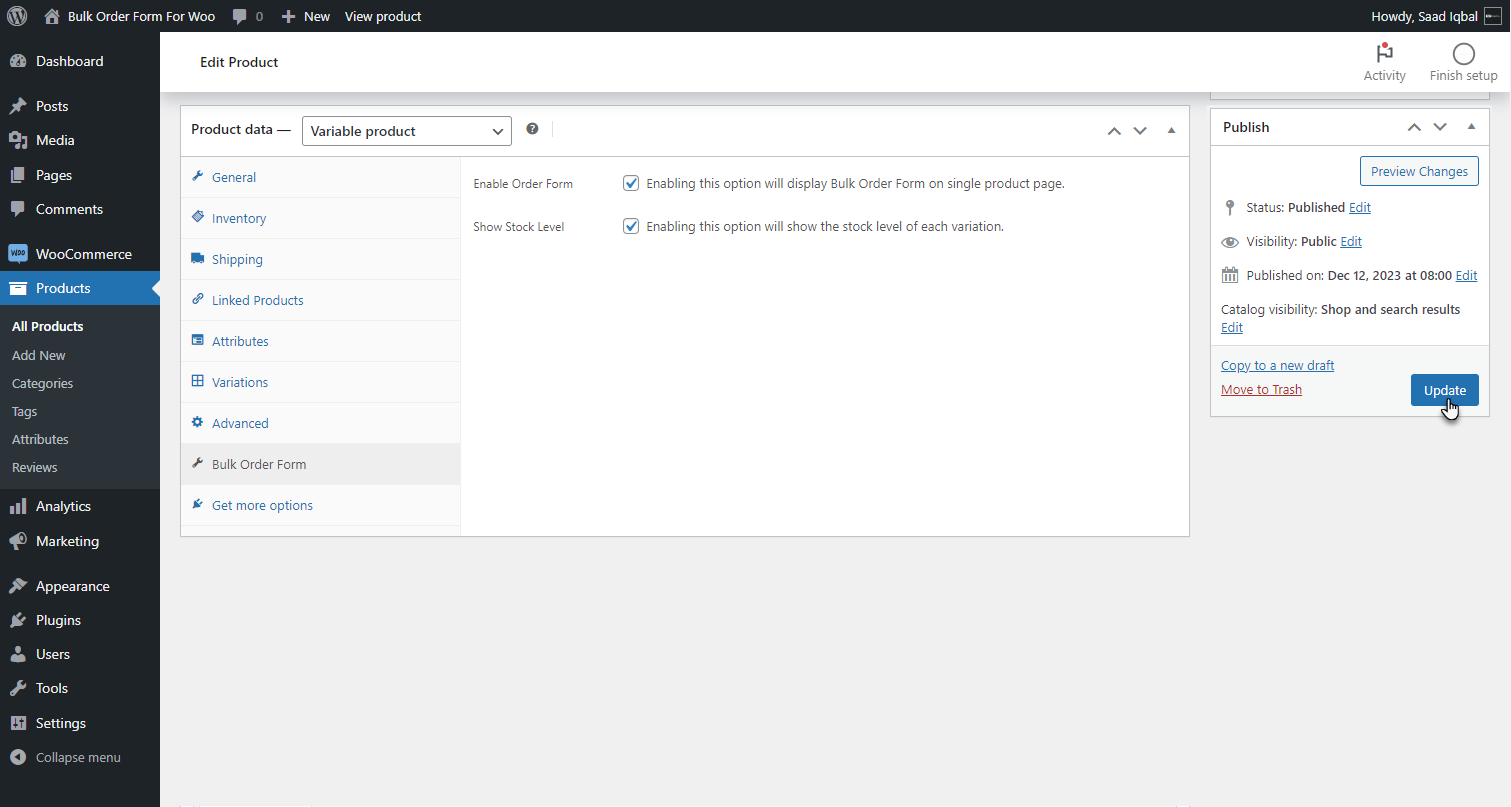
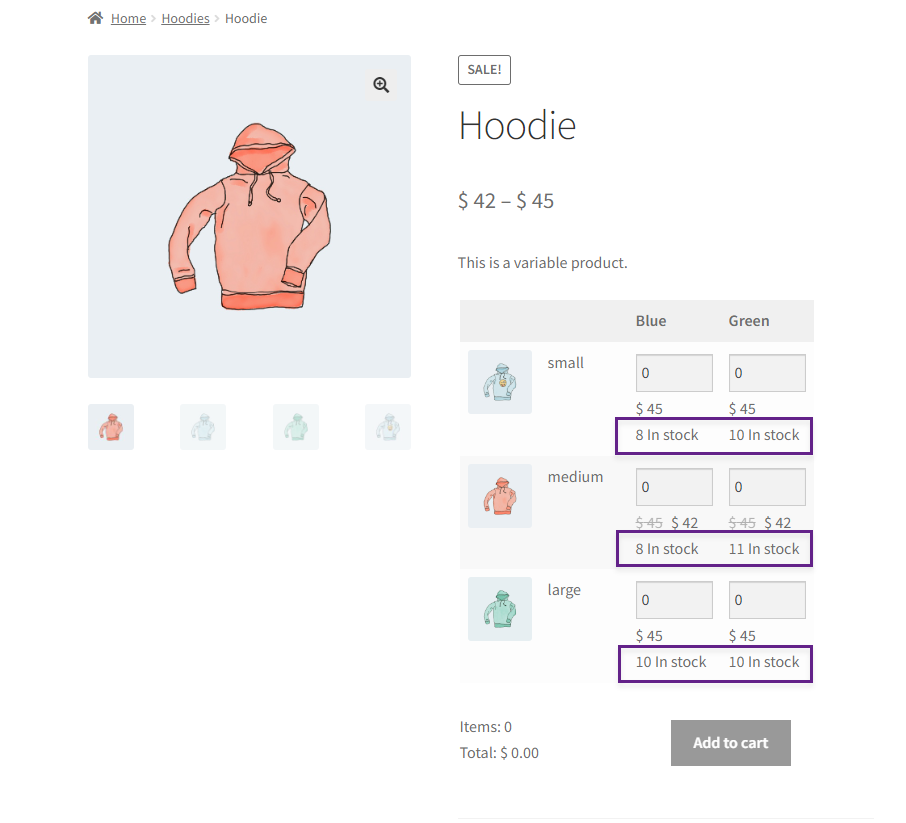
Stock Levels in Variable Product Bulk Order Form
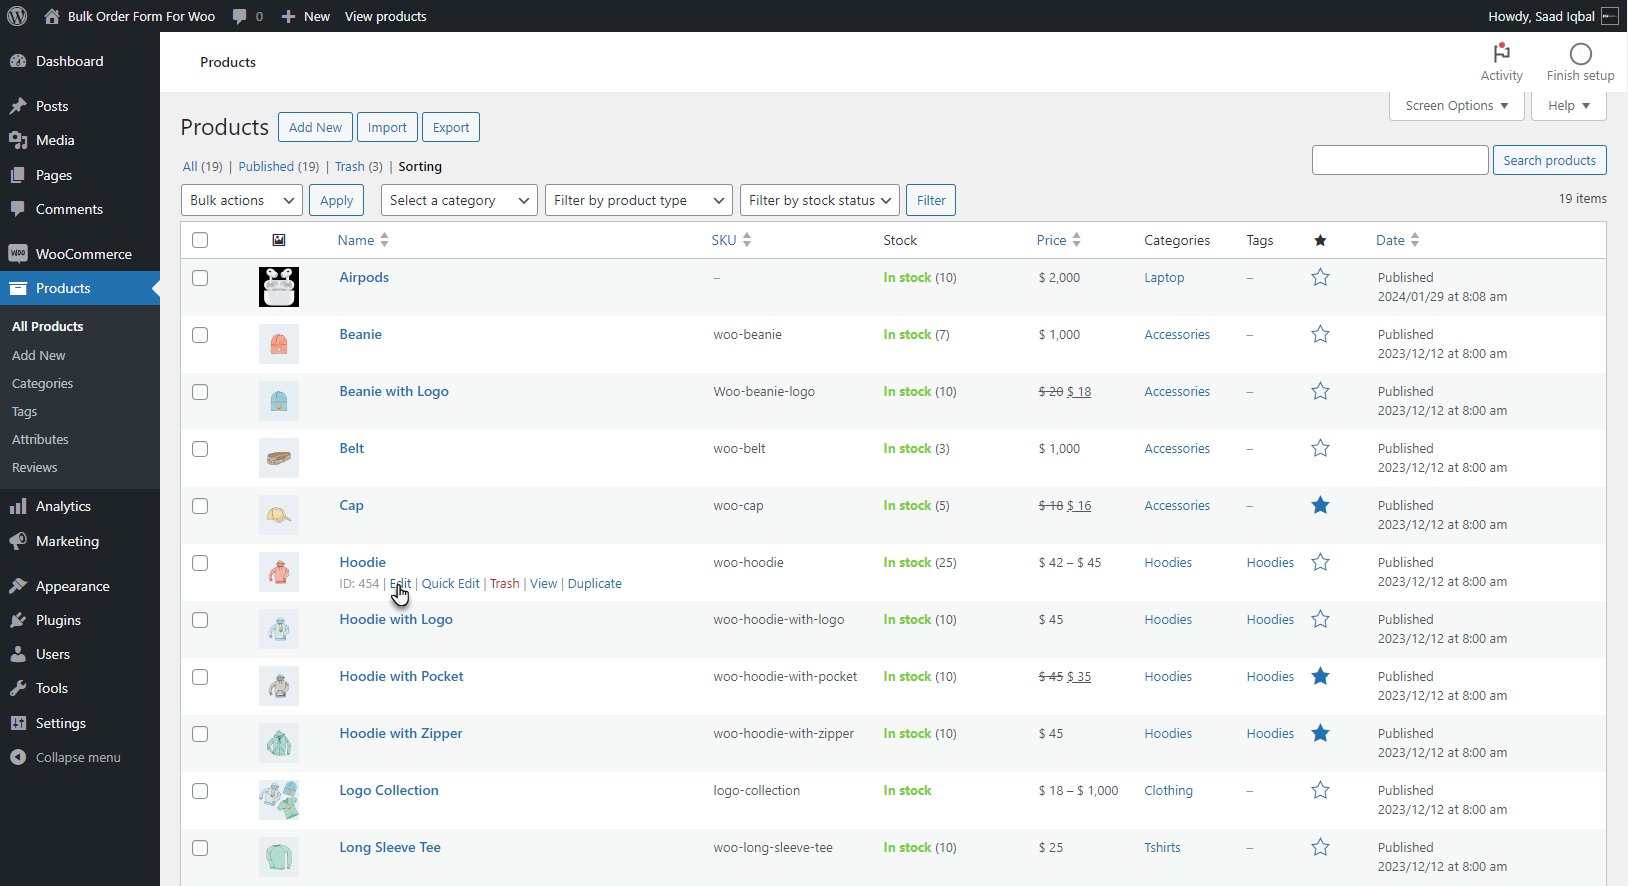
↑ Back to top- Go to WordPress Admin Dashboard > Products > All Products.
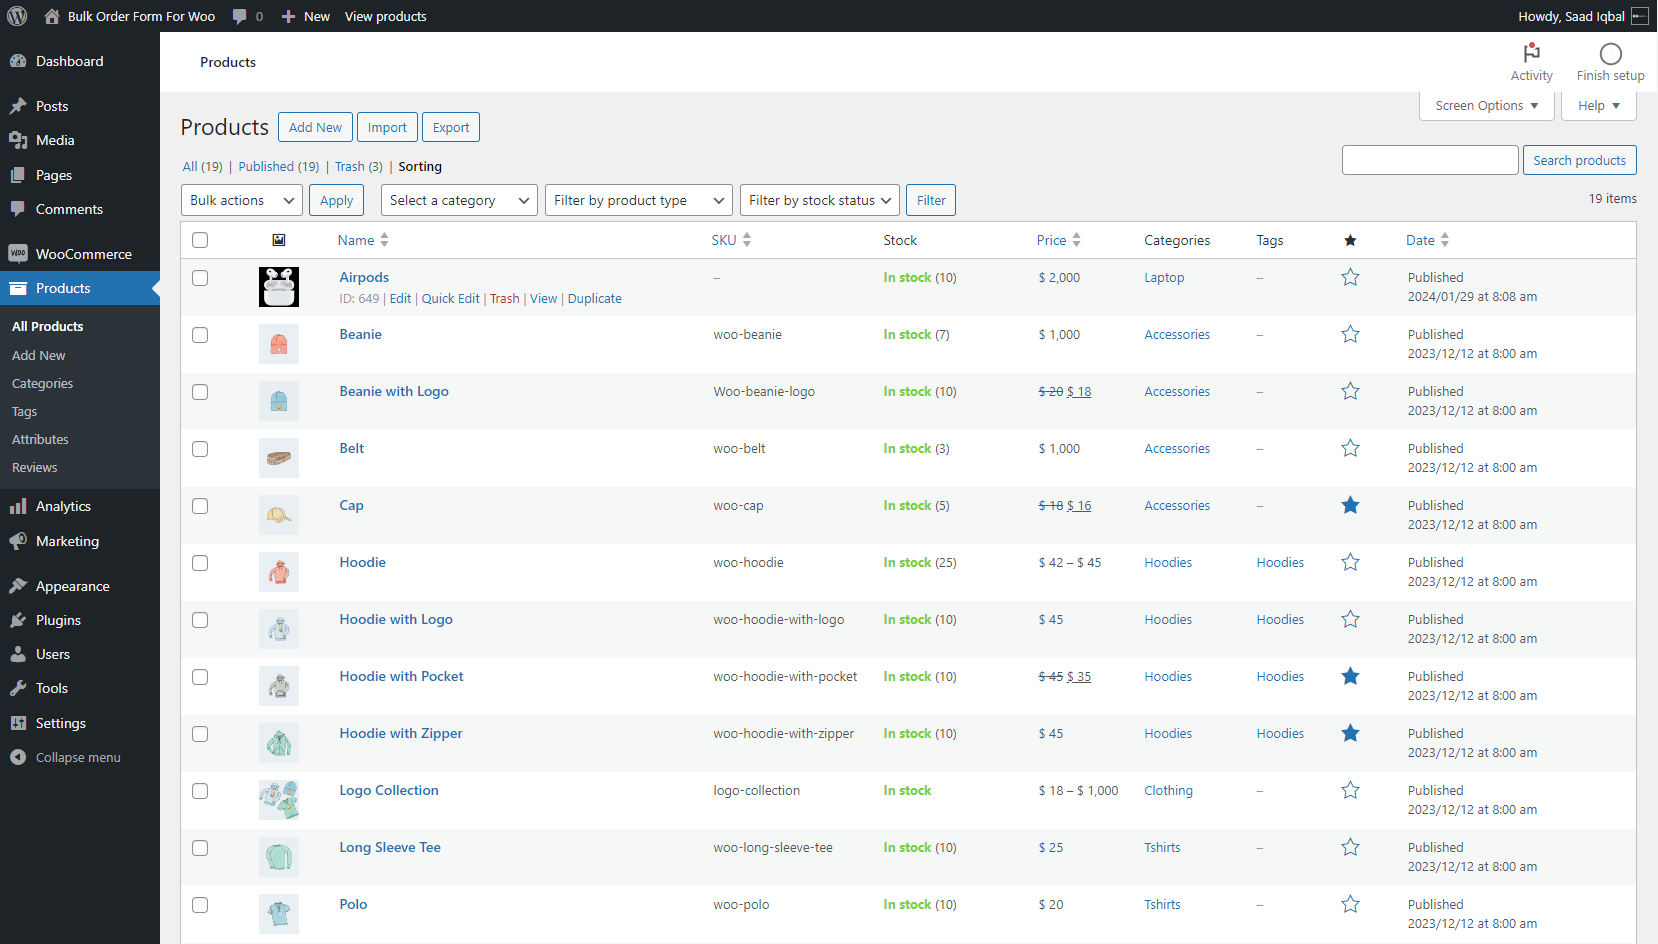
- Select Variable Product.
- Click on the edit option.
- A variable product edit screen will appear.
- Scroll Down to the Bulk Order Form option.
- Select the Show Stock Level radio button option provided in the Bulk Order Form.

- Click on the Update button to save changes.
Front End Impact:
↑ Back to top- Go to the Shop page.
- Select Variable Product.
- Navigate to the Product page of Variable Produc
Before
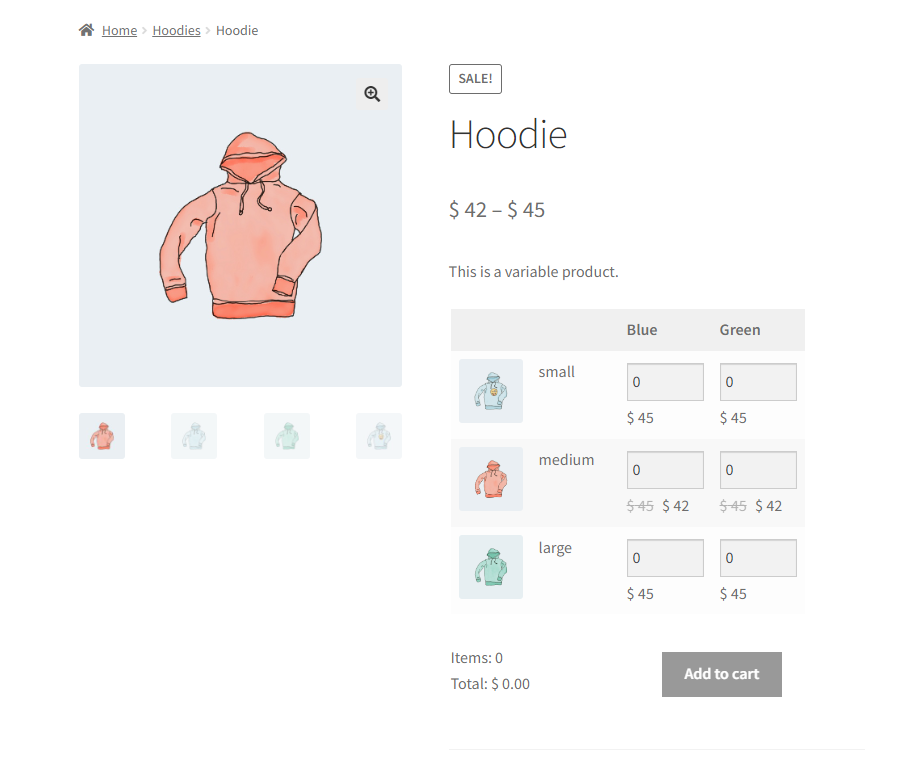
After
Compatibility
↑ Back to topSmart Product Bundle – Product Table
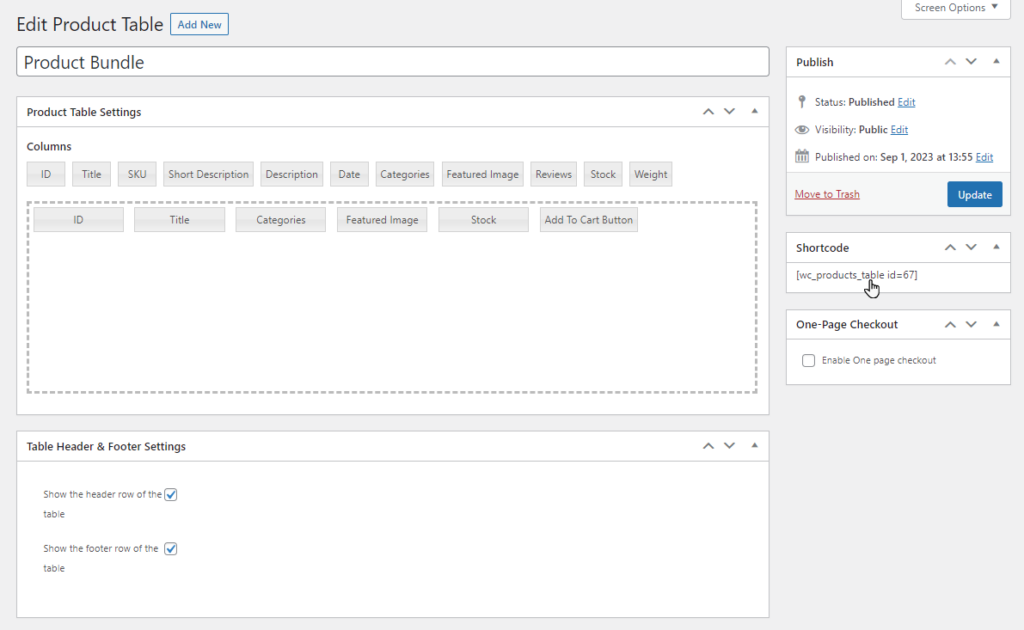
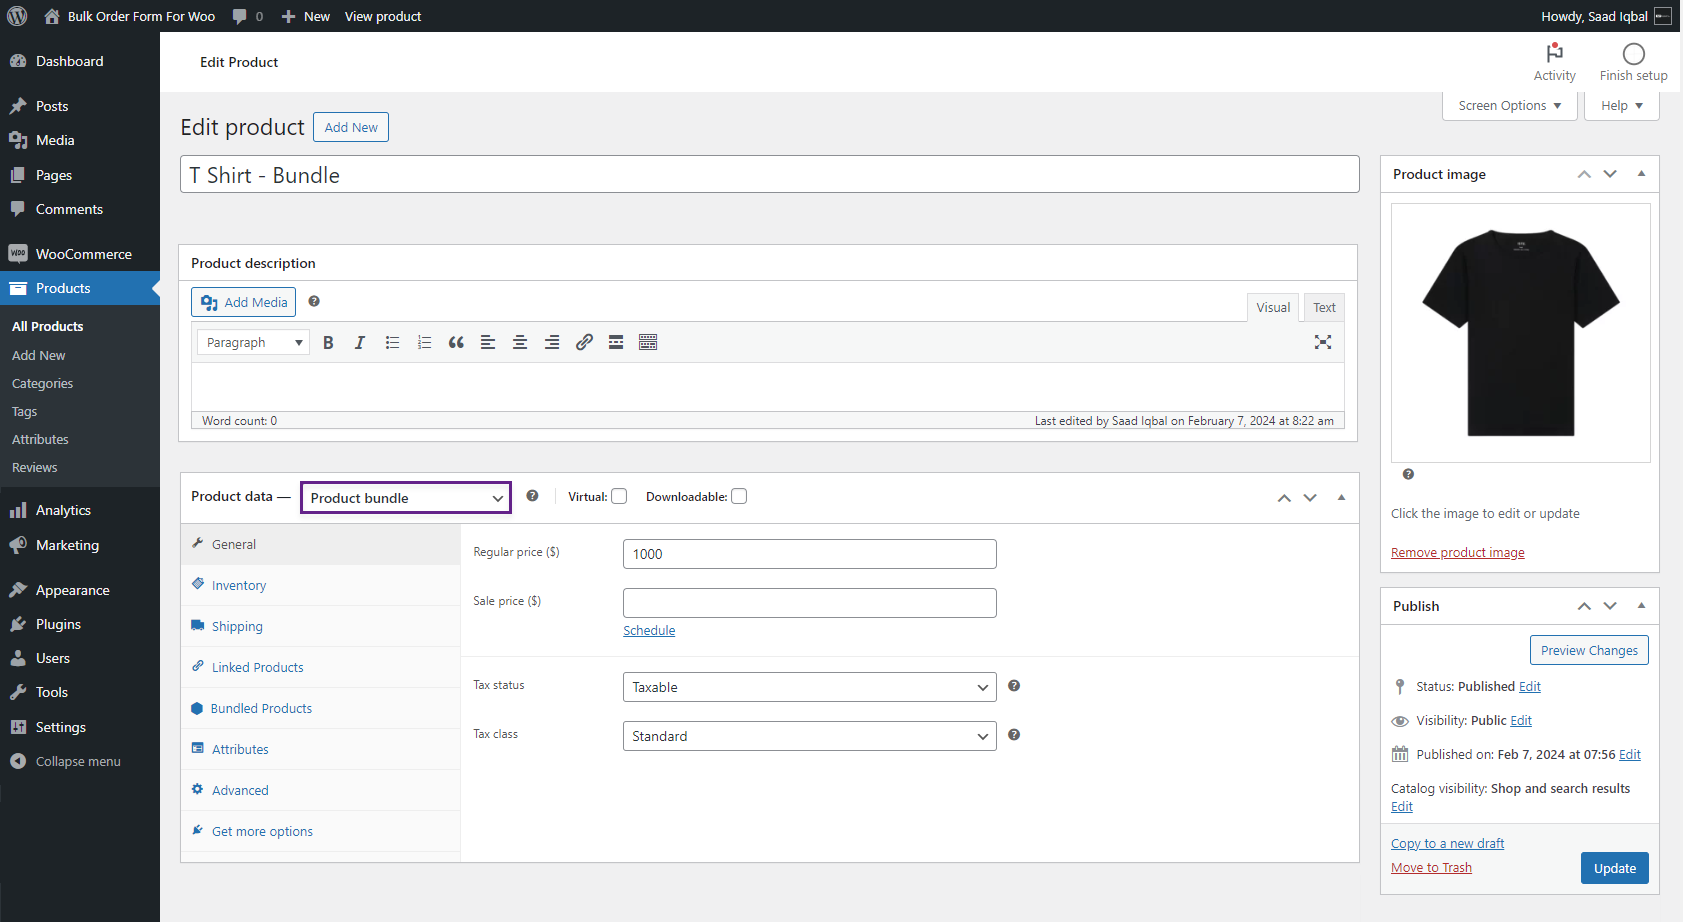
↑ Back to top- Navigate to the WordPress Admin Dashboard → Products
- Create or edit the Product.
- Under the product data, select bundle product.
- Select the Bundle Product from the Side Bar.
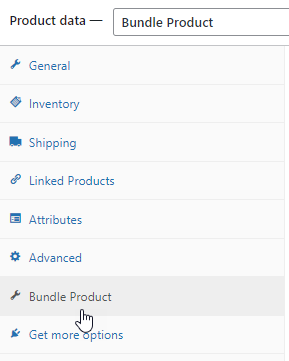
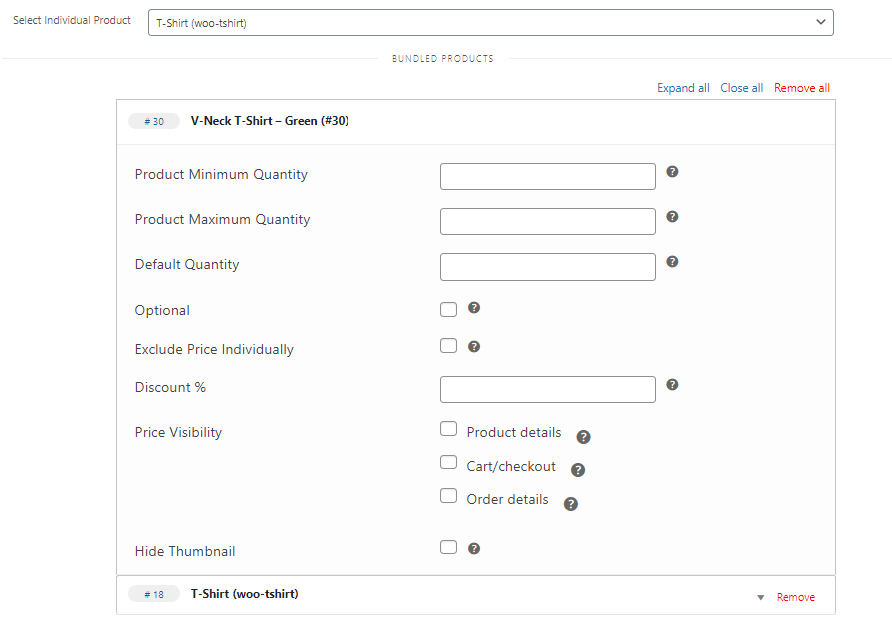
- Select the Individual Product from the dropdown to create a Bundle Product.
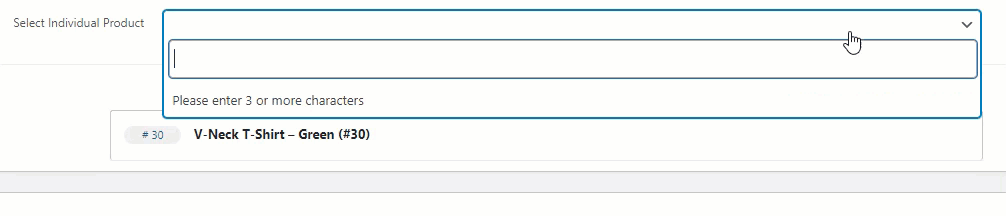
- Once a Product is selected, the admin can view the product and can edit the product’s details by clicking on specific products.
- Once done, click on the Publish/ Update button.
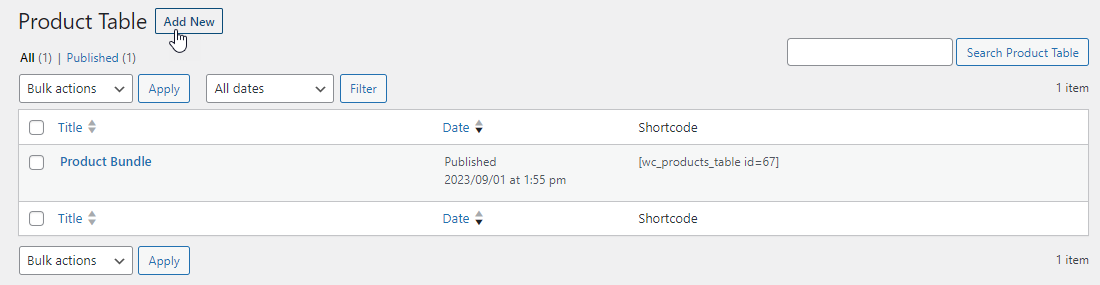
- Navigate to WordPress Admin Dashboard → WooCommerce → Product Table.
- Click Add New
- Edit or create a Product Table
- Copy the Shortcode.
- Navigate to WordPress Admin Dashboard → Pages → Add New.
- A new page would open.
- Add the Title of the page.
- Click on the sign ➕ to add blocks.
- Select the Shortcode element.

- Once done, we can paste the shortcode.
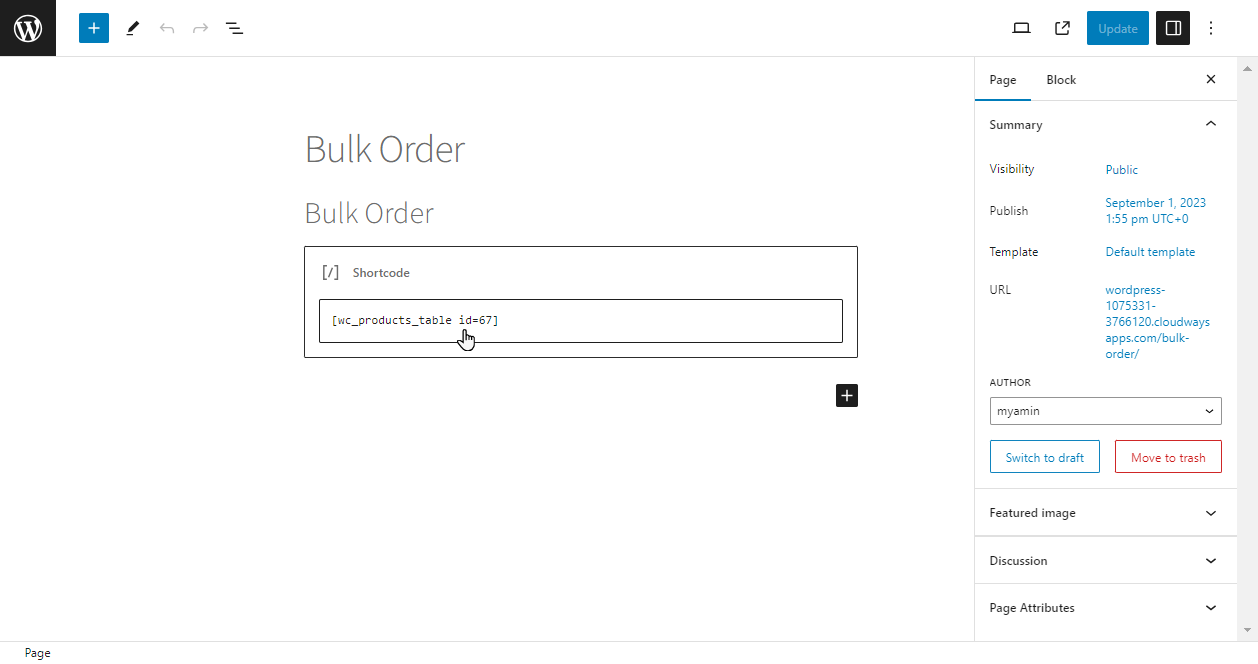
- Now Publish or Update the page.
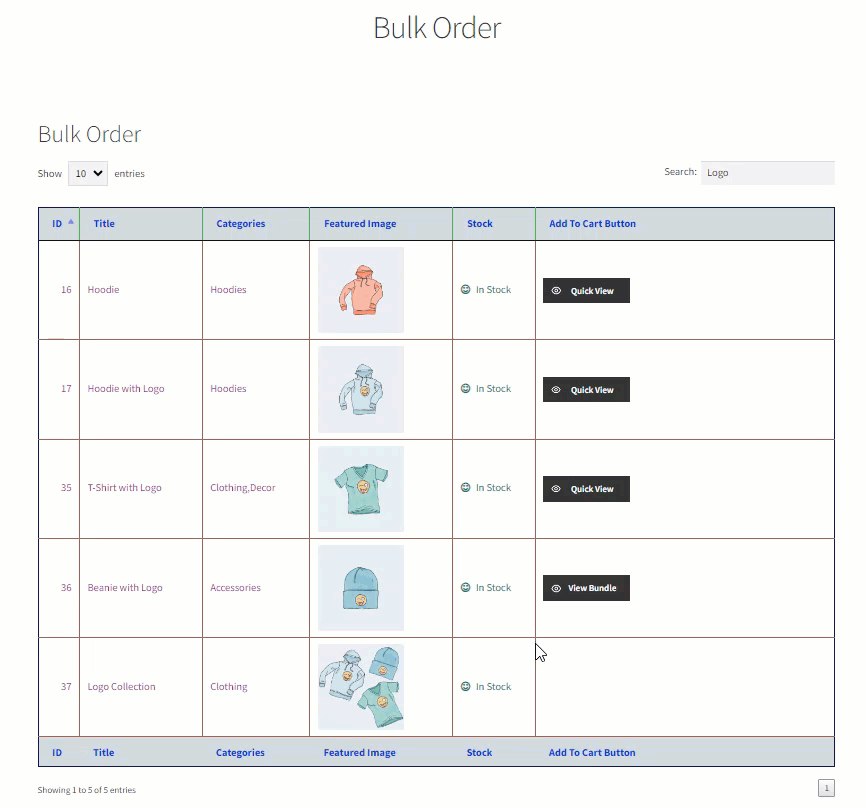
Front-End Impact:
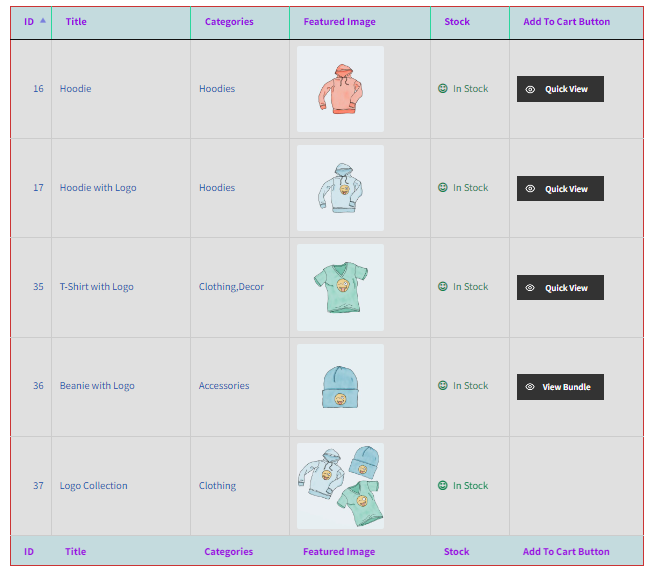
- Navigate to the specific page.
- Here, the user can buy a Smart Bundle Product through the Product Table by clicking the View Bundle button.
Wholesale for WooCommerce extension
↑ Back to top- Once the Wholesale for WooCommerce plugin is installed, navigate to the Admin Dashboard → WooCommerce → Product Table.

- Now you’re on the Product Table page.
- Hover over the Product Table to view the suboptions.
- Click on the Edit suboption.

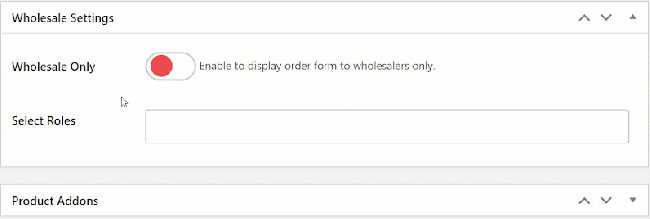
- On the Edit Product Table page, go to the Wholesale Settings section.
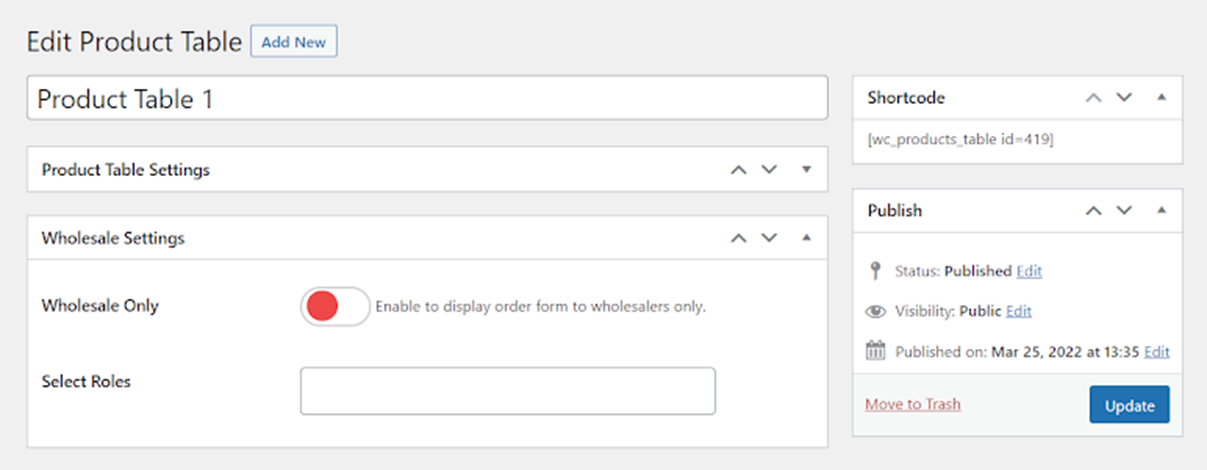
- We have two options in the Wholesale Settings section.
- Wholesale Only
- Toggle the button to display the product table only to the selected wholesale user roles.
- Selected Roles
- Select the wholesale user roles.
- The product table will only be visible to the user roles selected in this option.
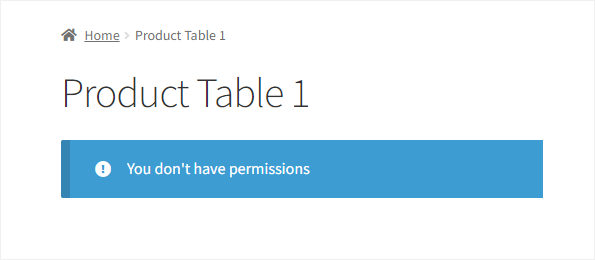
Front-End Impact
- For Guest Users:
- The Product Table will not appear.
- A message will appear when any Guest User or other Wholesale User Roles are not selected in the Select Role option in the Wholesale Settings section.
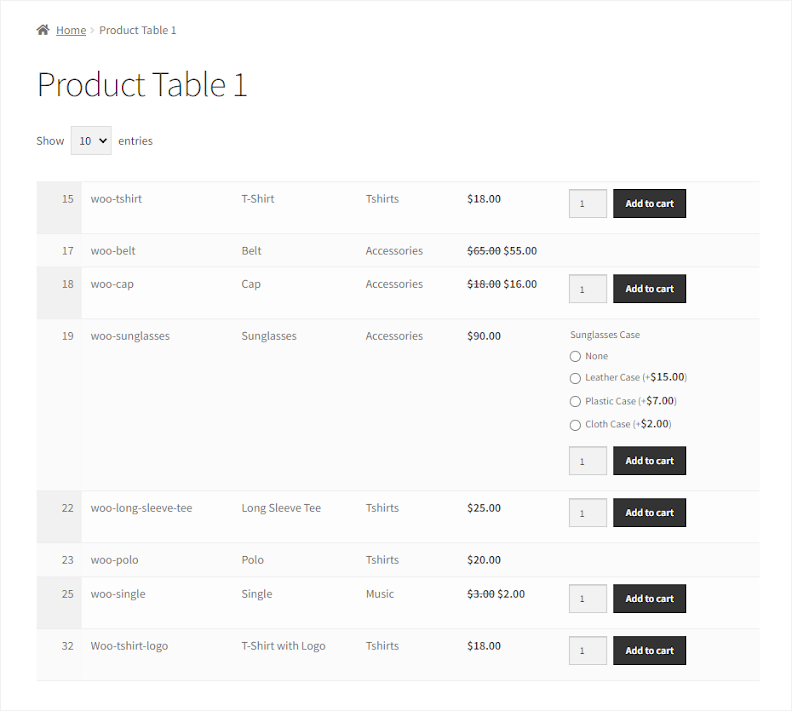
- For the selected Wholesaler User Role:
- The Product Table will appear for the Wholesale User Roles, selected in the Select Role option in the Wholesale Settings section.
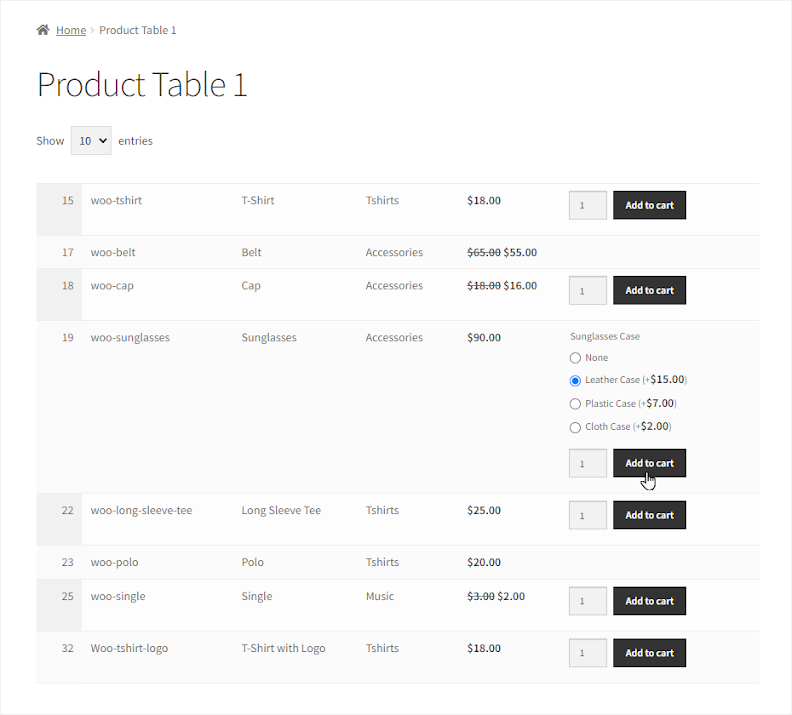
Product Addons plugin
↑ Back to top- Navigate to Admin Dashboard → Products → All Products.
- Hover over any product to view suboptions.
- Click on the Edit suboptions.
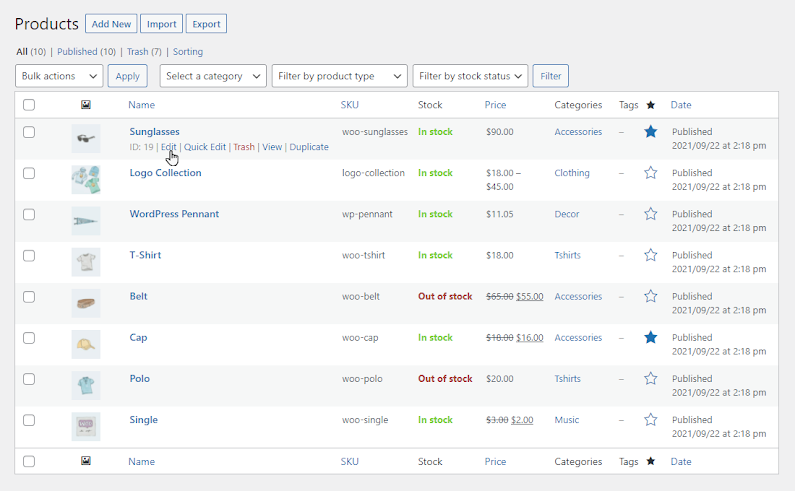
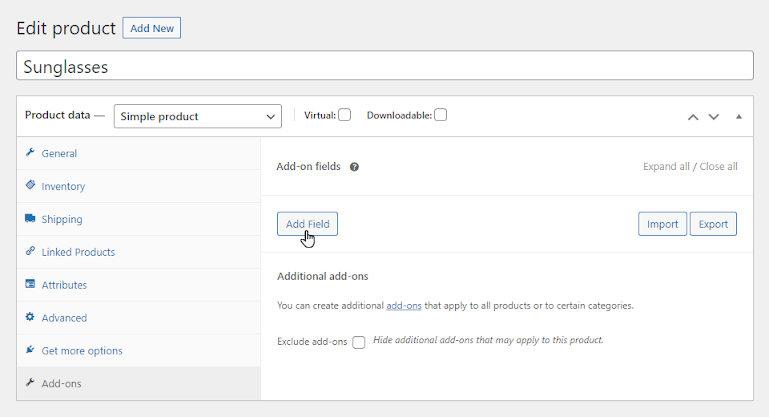
- Go to the Add-ons tab in the Product Data section.
- Click on the Add Field button to create your Add-on for the product.
- Add the title of your Add-on and create options for it.
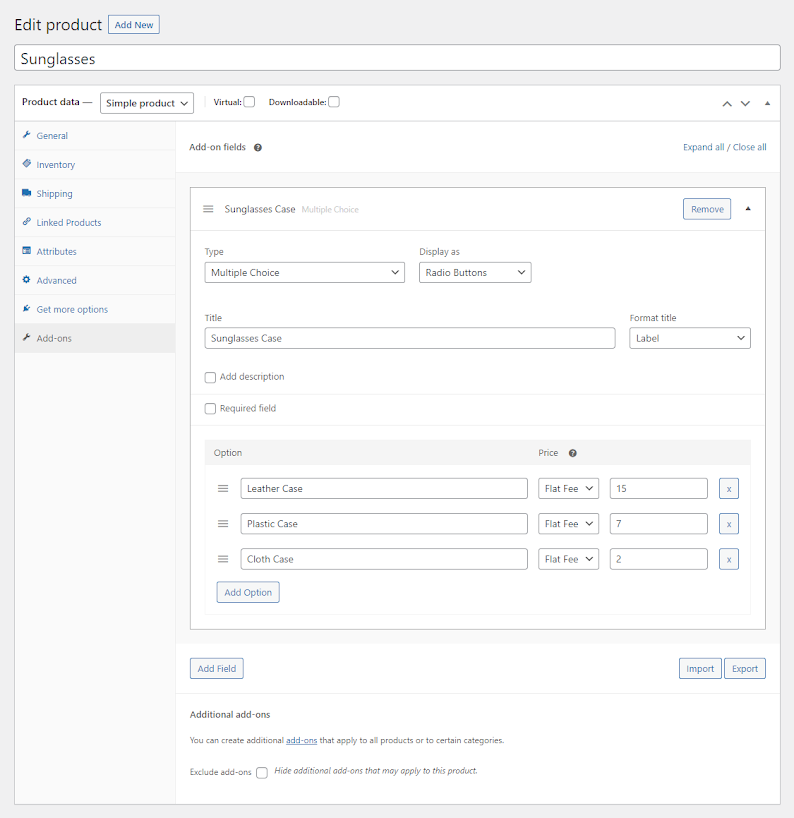
- Once done, click on the Update button.
- Now navigate to Admin Dashboard → WooCommerce → Product Table.
- Now you’re on the Product Table page.
- Hover over the Product Table to view the suboptions.
- Click on the Edit suboption.
- On the Edit Product Table page, go to the Product Addons section.
- We have an Addon Display Settings option having two display types:
Vertical
- Select the Vertical display type in the Addon Display Settings option and click the Update button.
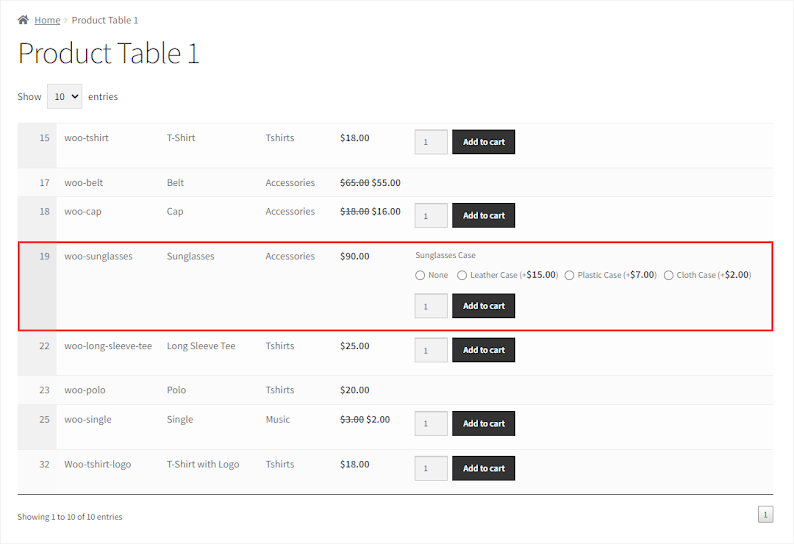
Front-End Impact
- The Addons created will appear against the product in Vertical form.
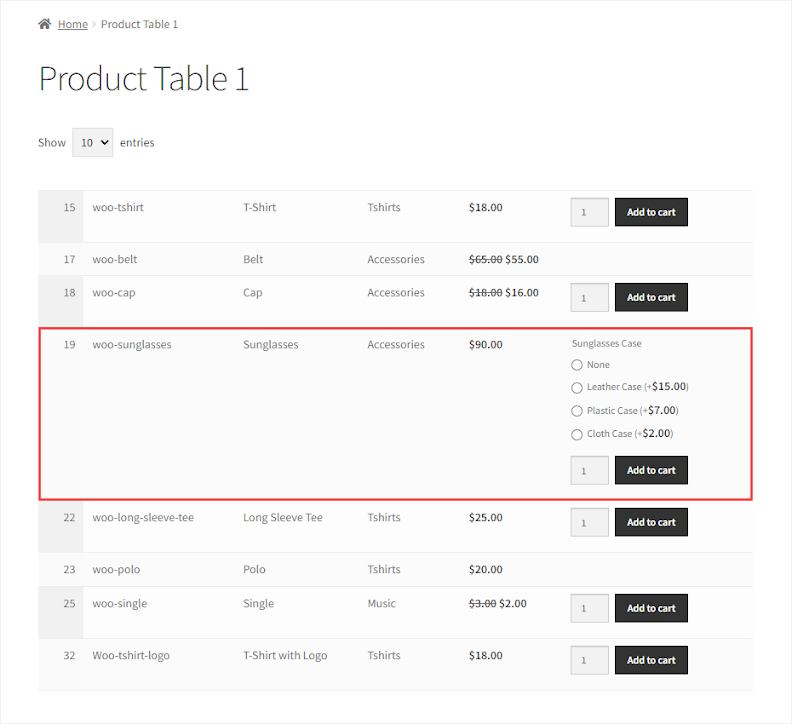
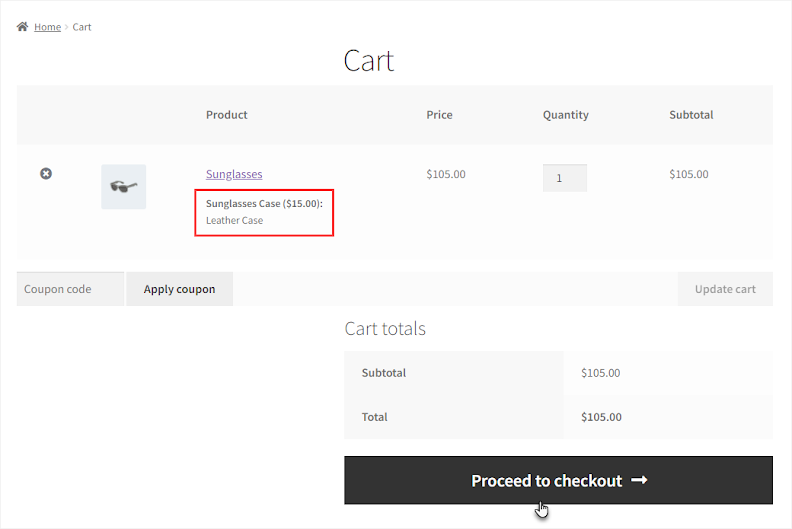
- Select any Addon and click on the Add to Cart button.
- Once done, navigate to the Cart Page.
- On the Cart page, we can see that the Addon is successfully added, and the amount is added in the Subtotal section.
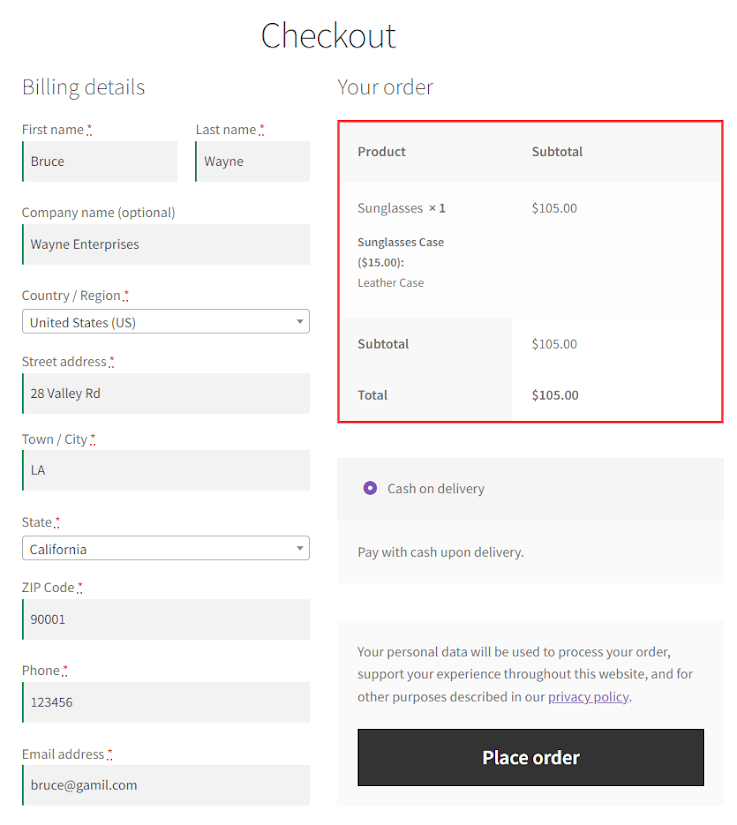
- Click on the Proceed to checkout button.
- We can see that the Addon is successfully added in the Your Order section on the Checkout page.
- Click on the Place Order button.
- Your order has been successfully placed.
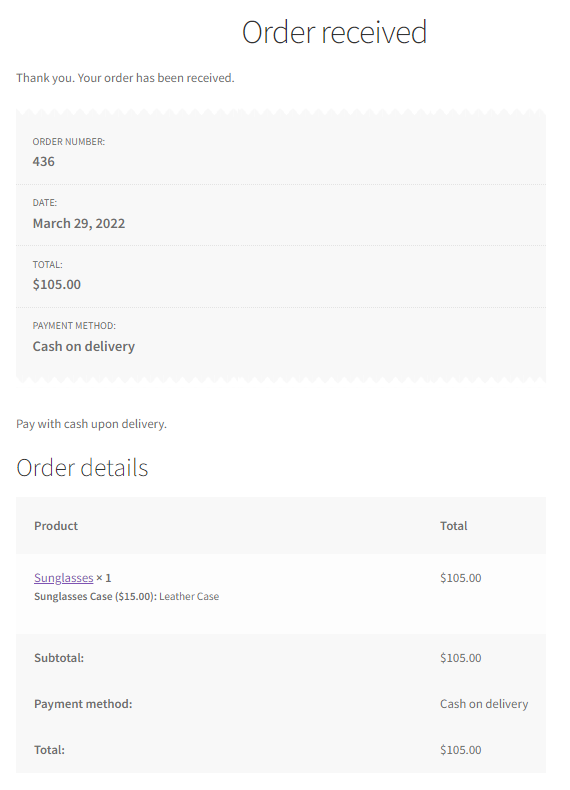
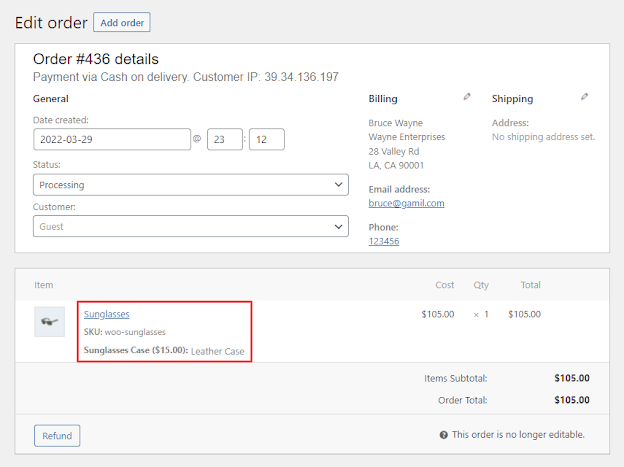
- Navigate to Admin Dashboard → WooCommerce → Orders.
- Click on the Order to view its details.
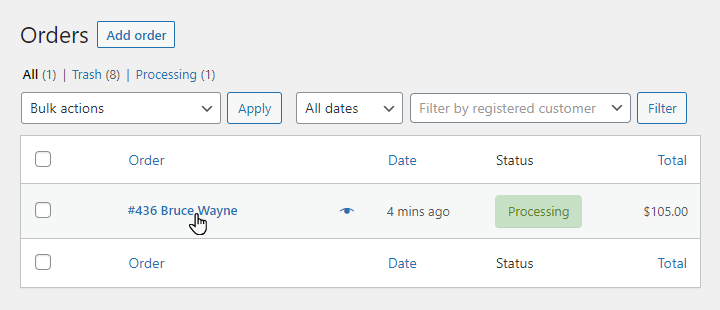
- Click on the order to open the Edit Order page.
- We can see that the Addon is also mentioned in the Order details.
Horizontal
- Select the Horizontal display type in the Addon Display Settings option and click the Update button.

- Front-End Impact:
- The Addons created will appear against the product in Vertical form.
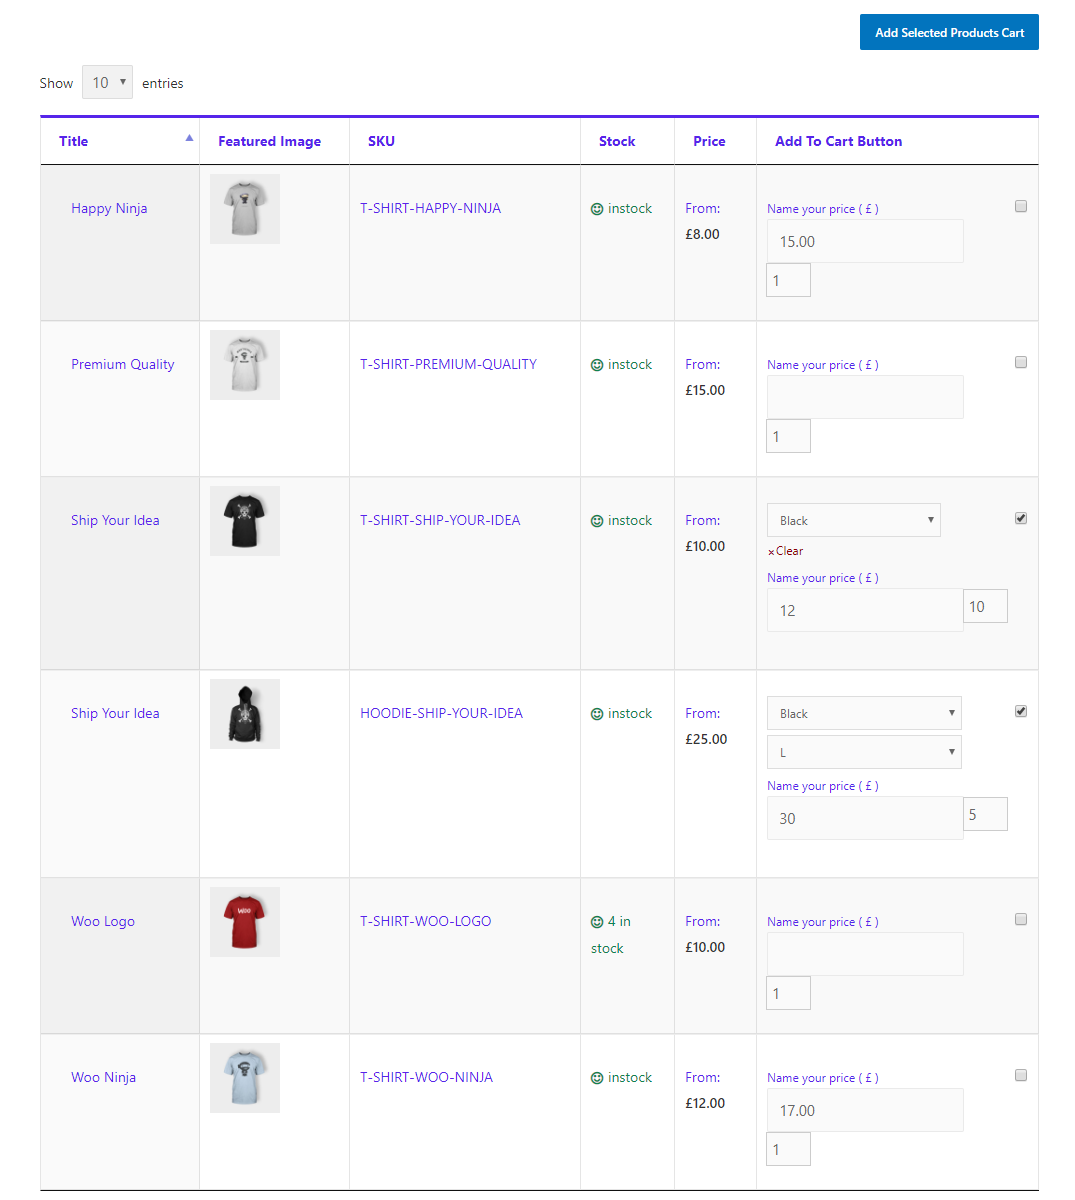
Name Your Price Extension
↑ Back to topThe Name Your Price extension for WooCommerce lets your customers pay what they want and allows you to be flexible in what price you are willing to accept for selected products. You can suggest a price to your customers and optionally enforce a minimum acceptable price, or leave it entirely in the hands of the customer.
- Collect data on what price customers are willing to pay.
- Collect donations for multiple campaigns from a single table
- Allow customers to set a price on all of a product’s variations or just one.
- Make a profit on products you’d otherwise give away.
Invoice Payment Gateway for WooCommerce
↑ Back to topBulk Order Form for WooCommerce is fully compatible with Invoice Payment Gateway for WooCommerce Customers who sent products to check out from Bulk Order Form’s product tables will be able to see invoice payment gateway as their preferred payment option.
WPML Plugin
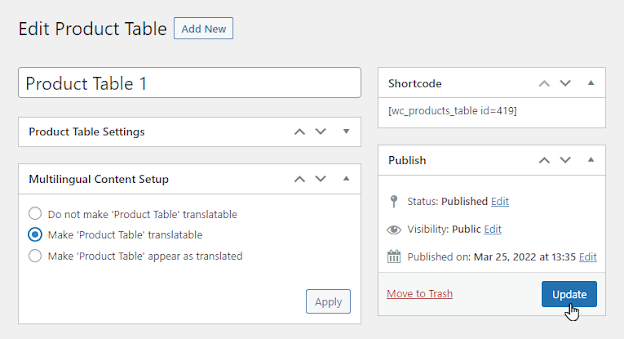
↑ Back to top- Once the WPML plugin is installed and configured, now navigate to the Admin Dashboard → WooCommerce → Product Table.

- Now you’re on the Product Table page.
- Hover over the Product Table to view the suboptions.
- Click on the Edit suboption.
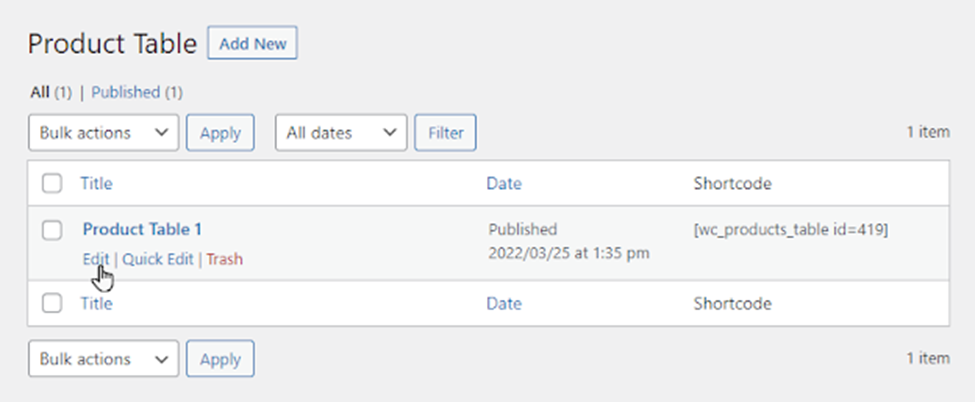
- On the Edit Product Table page, go to the Multilingual Content Setup section.
- Select the Make ‘Product Table’ translatable option and click on the Apply button.
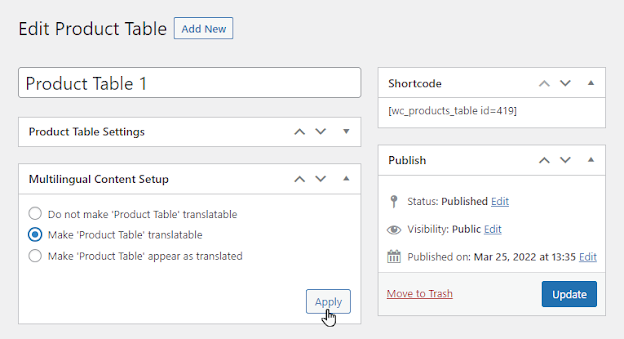
- Once done, click on the Update option.
Front-End Impact
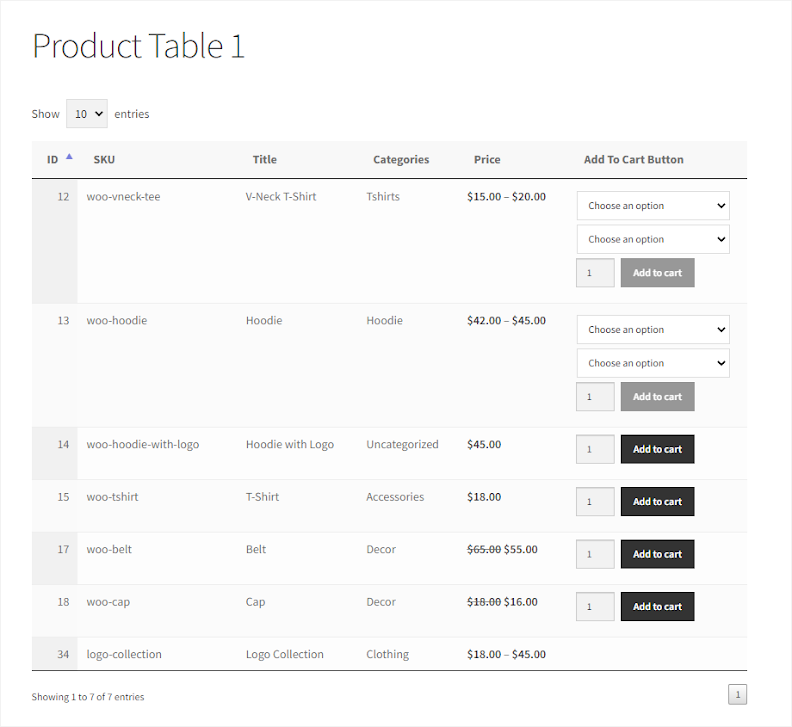
English (Default Language of Website):
- German:
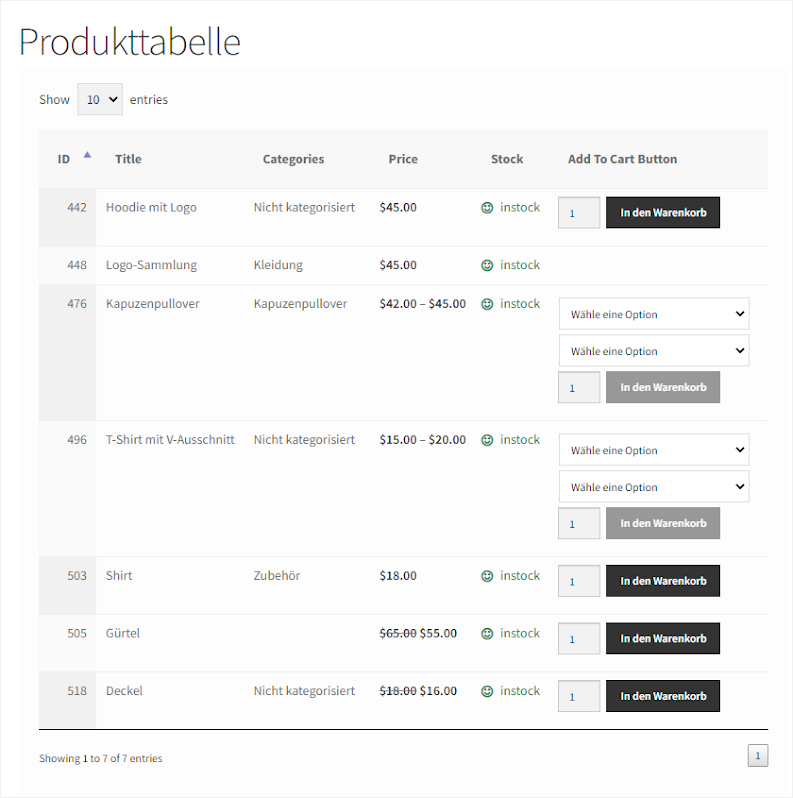
NOTE: Numeric fields will not be translated.
Min/Max Quantity by WooCommerce
↑ Back to topVariable Bulk Order Form
- Download and Install the Min/Max Quantity by WooCommerce plugin.
- Follow the Min/Max Quantity by WooCommerce plugin documentation to set up and configure the plugin.
- Once done, Navigate to WordPress Admin Dashboard > All Products > Variable Product.
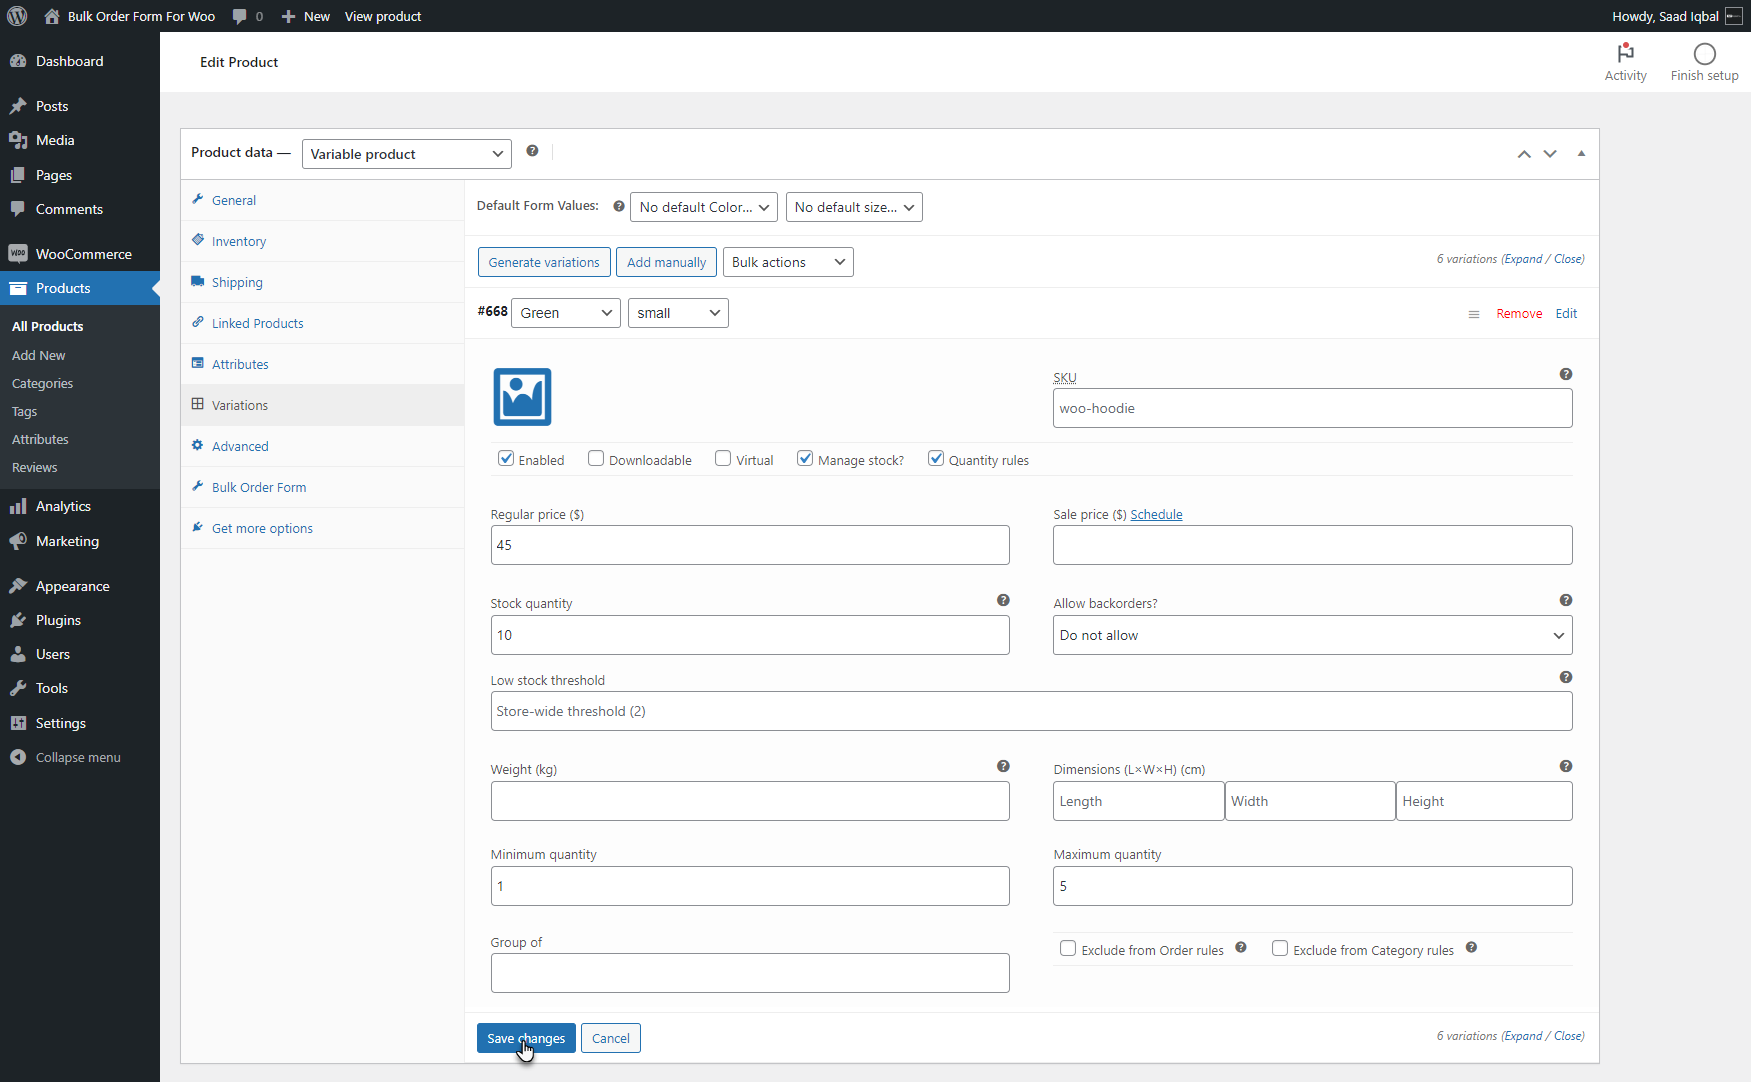
- Edit the Product.
- Navigate to the Product Data > Variations.
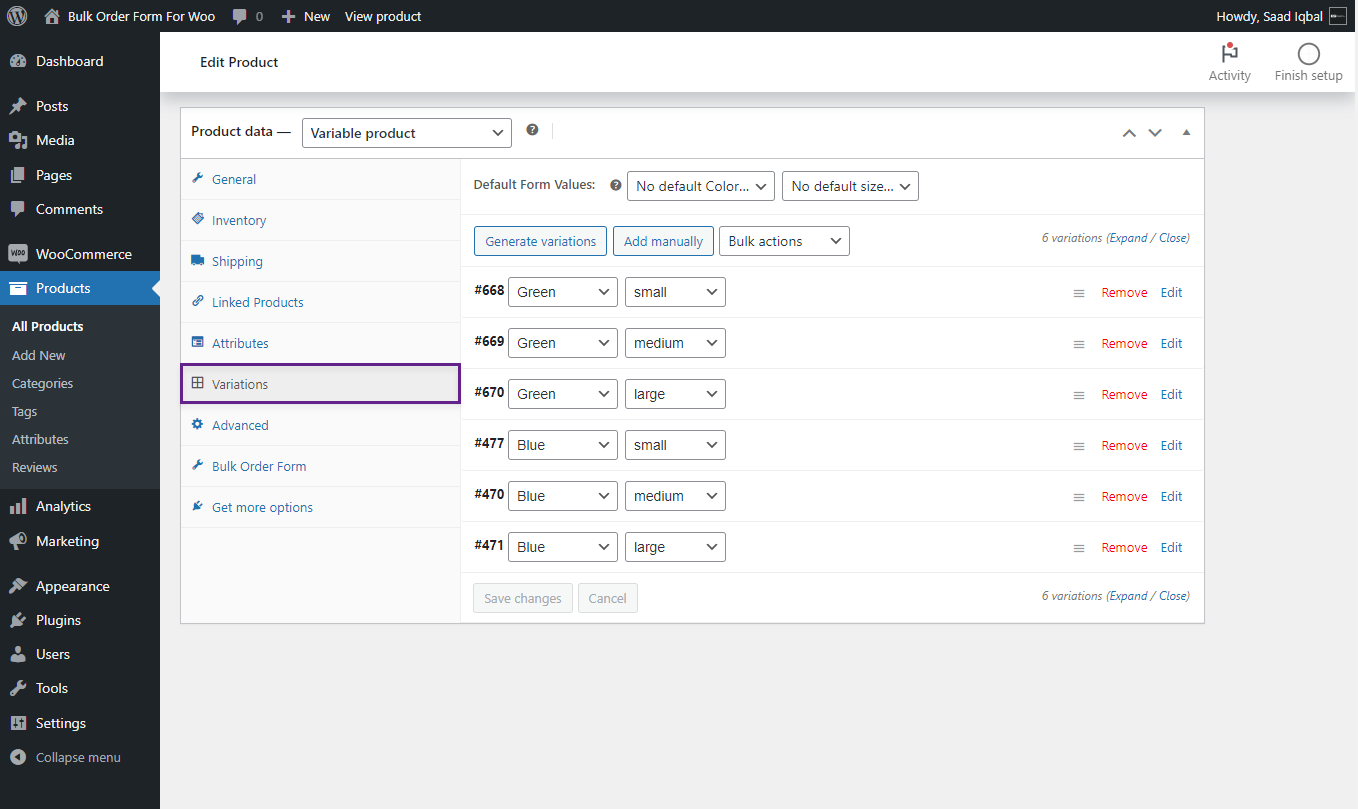
- Edit the Variation by clicking on the edit option.
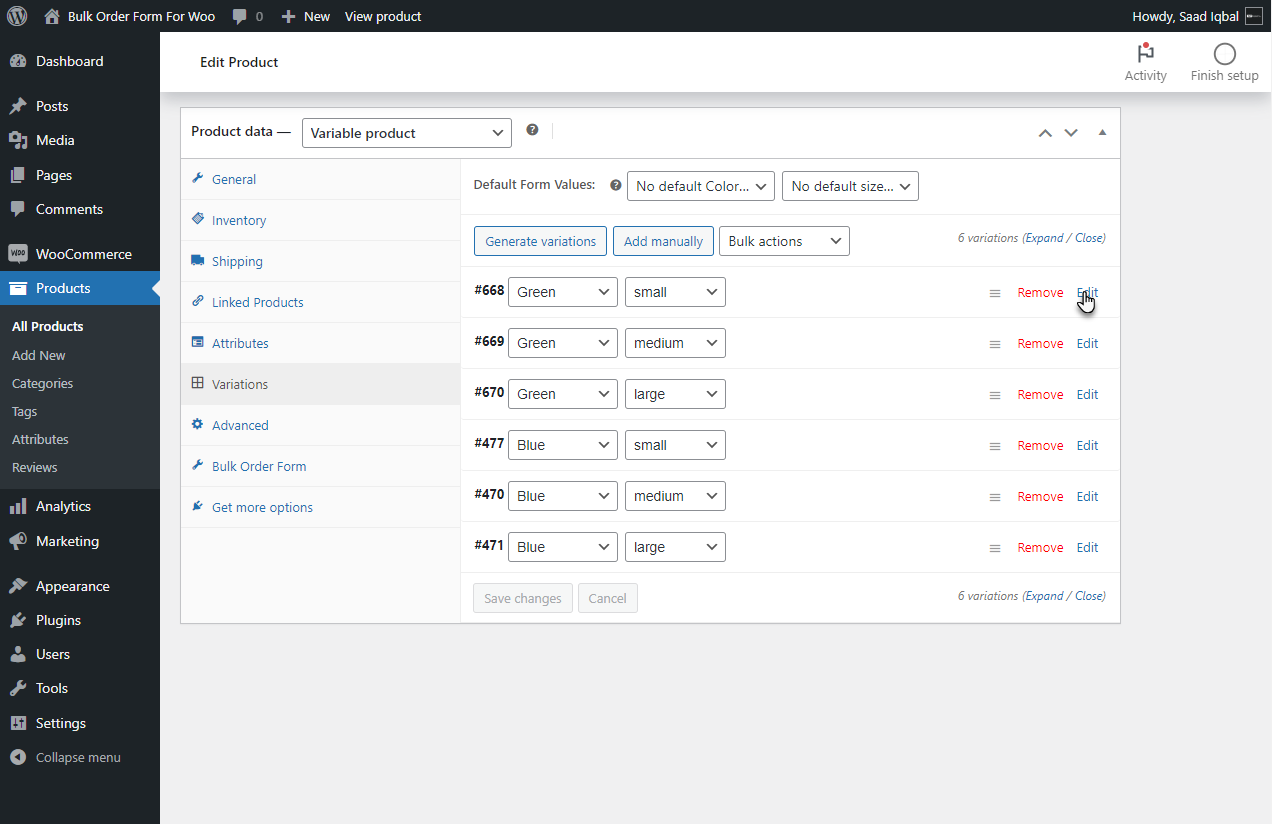
- Select the Quantity Rules radio button.
- After enabling Quantity Rules, two options will be available where you can set Minimum and Maximum Quantity for the particular Product variation.

- Set the Minimum and Maximum Quantity value for the Variation.
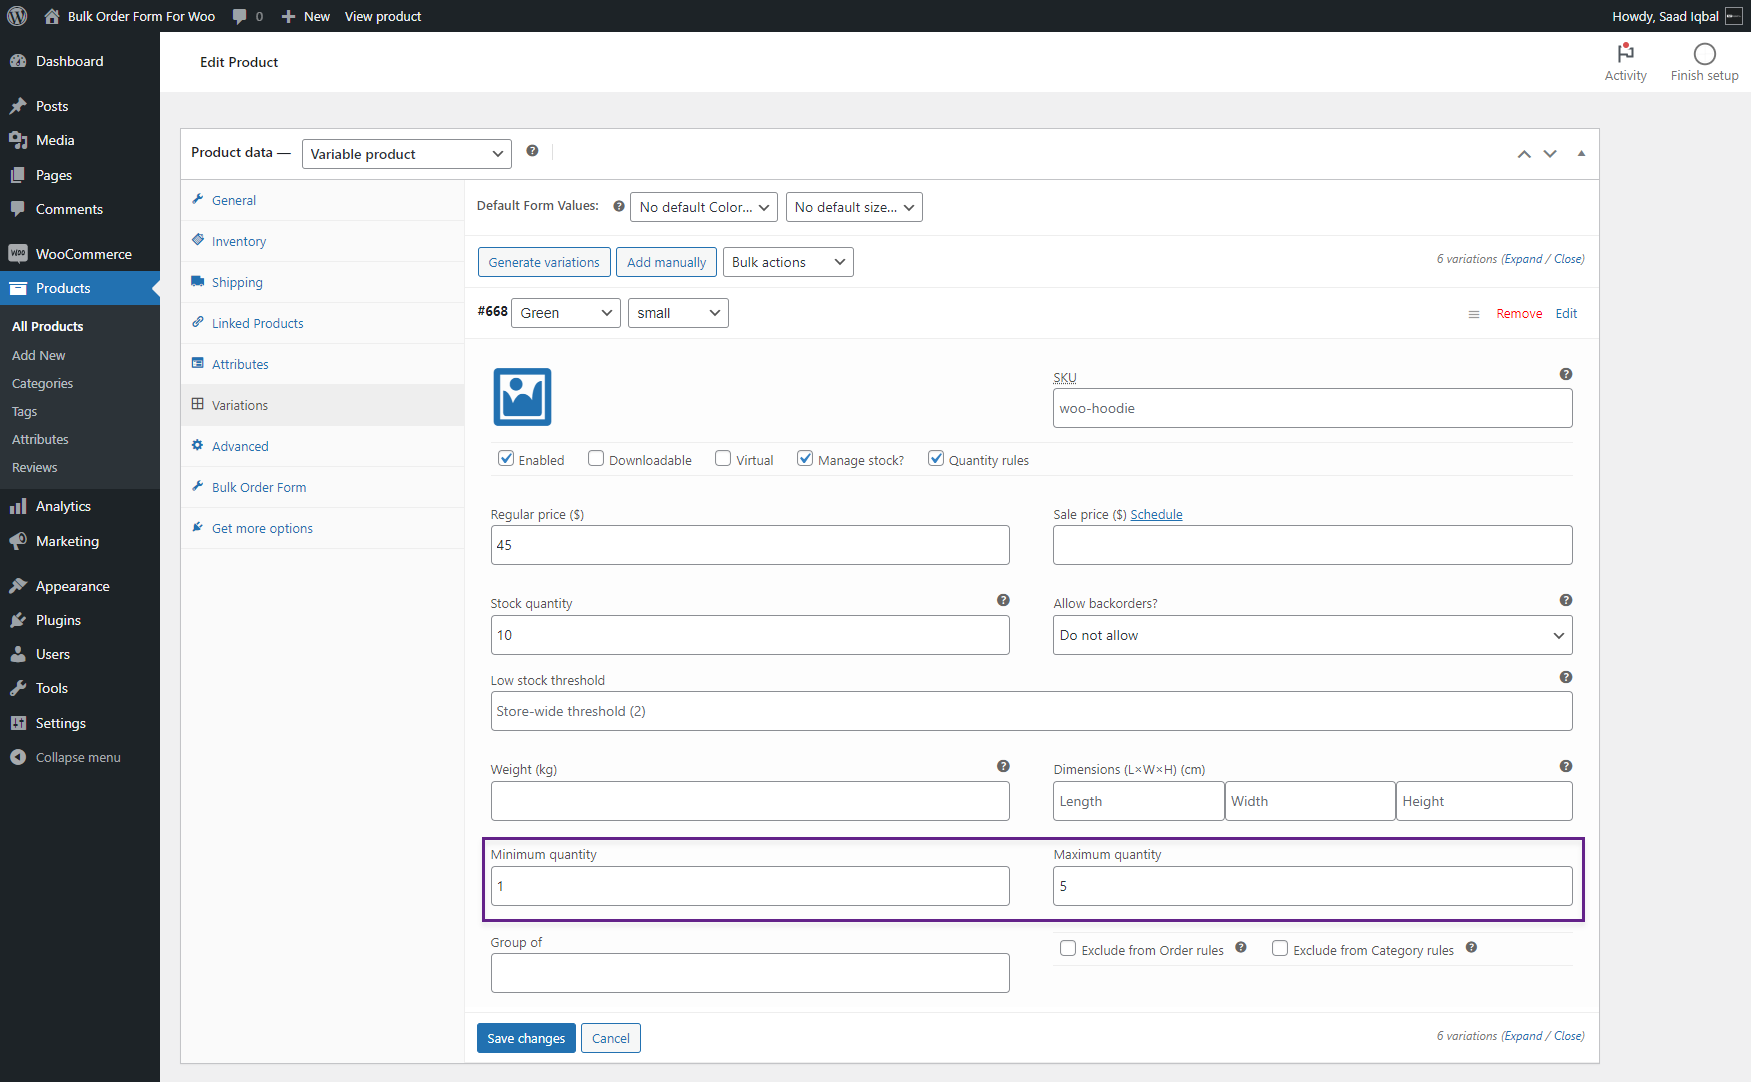
- Click on Save Changes to implement the change.
PLEASE NOTE: Min/Max Quantity can be added to other variations by the same process.
Front End Impact:
- Go to the Shop page.
- Select Variable Product.
- Navigate to the Product page of Variable Product.
Before
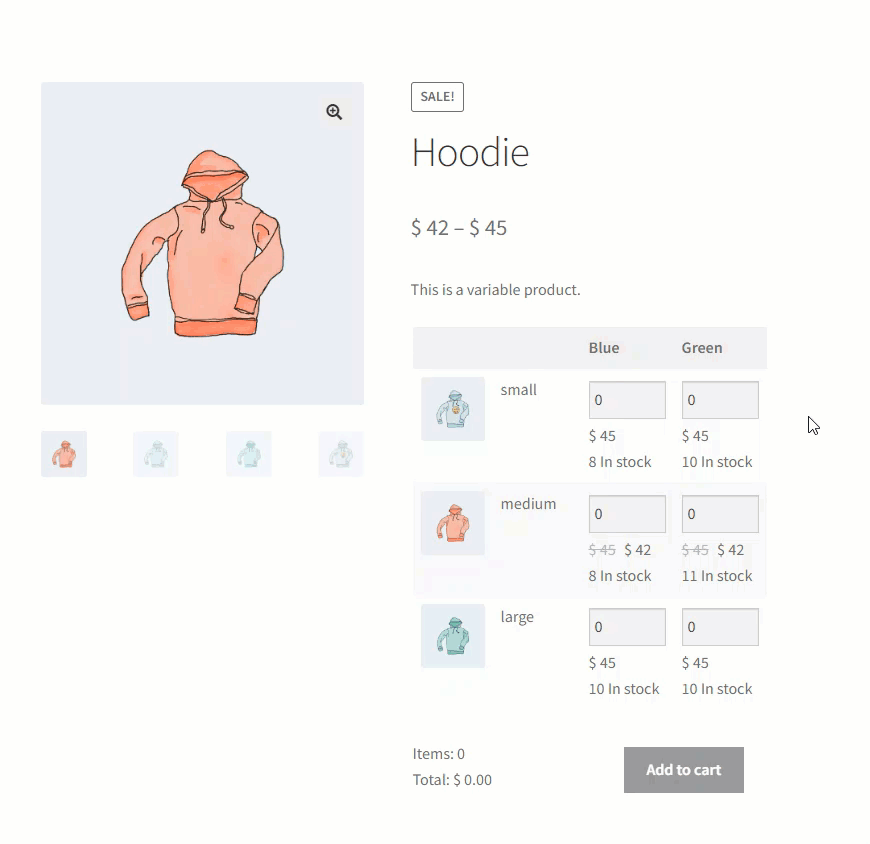
After
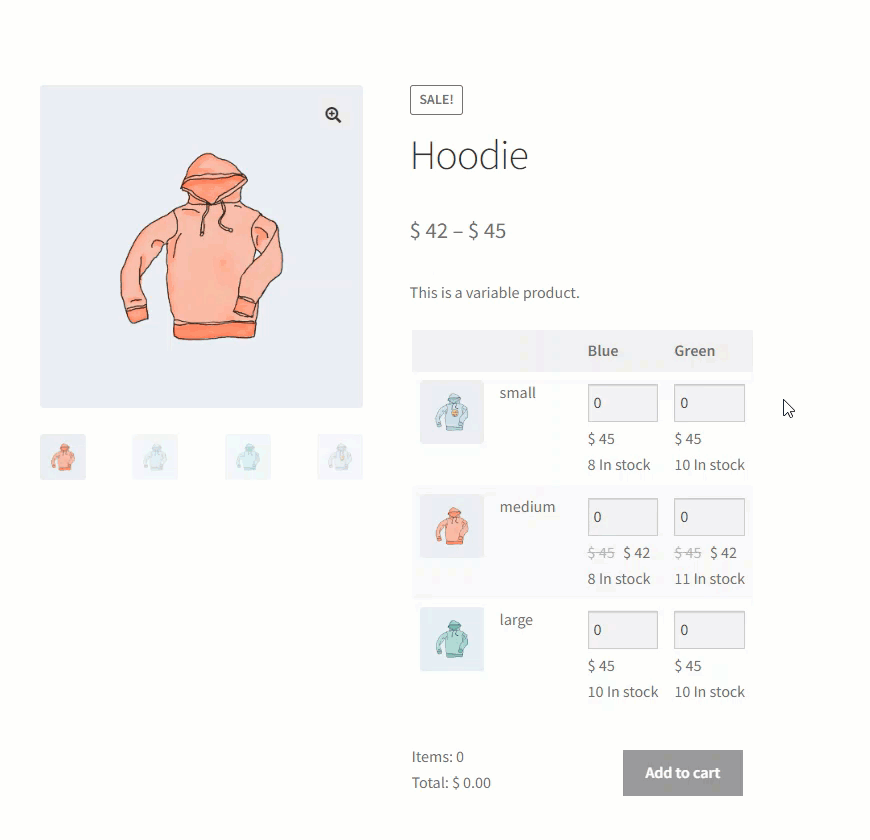
Variable Product Table
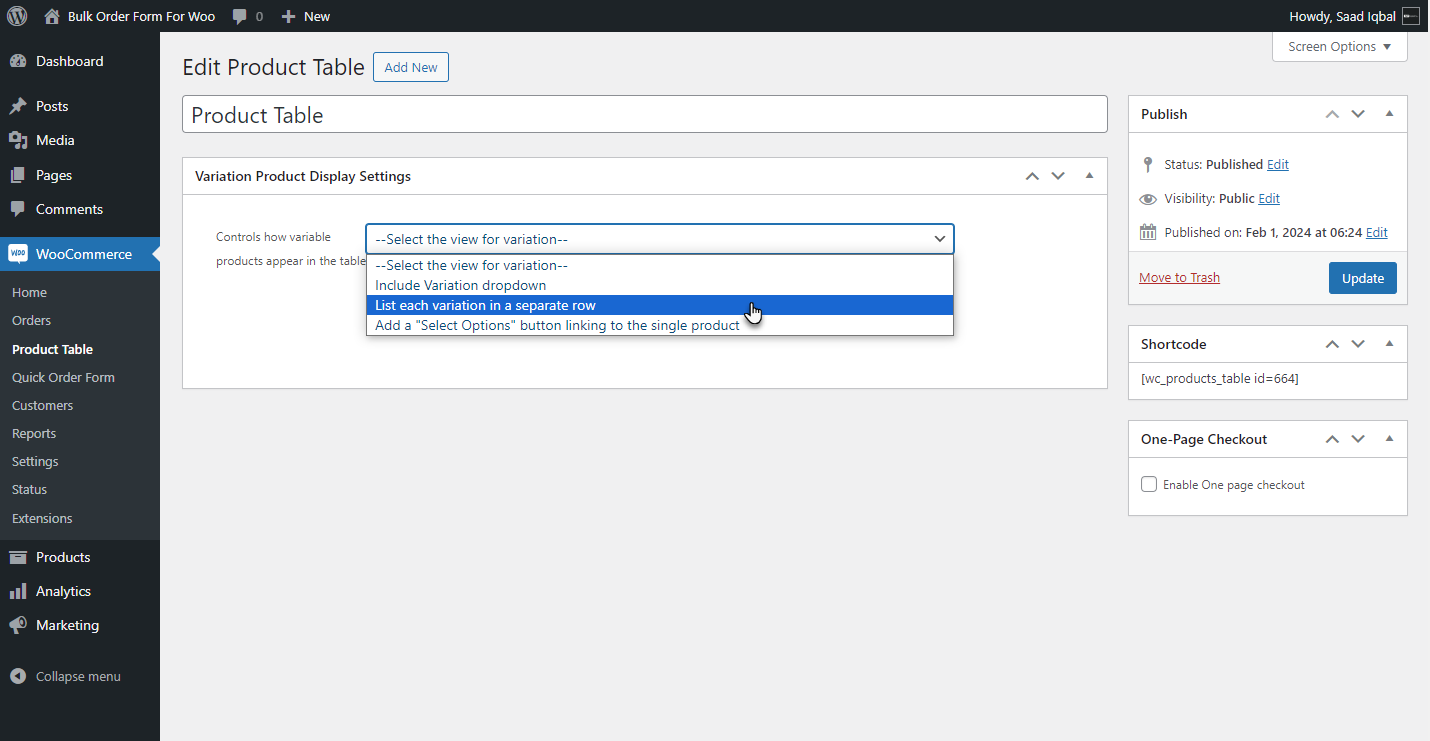
↑ Back to top- Go to WordPress Admin Dashboard > WooCommerce > Product table.
- Edit the Product Table. Scroll down to Variation Product Display Settings.

- Select List each variation in a separate row option from the drop-down list.
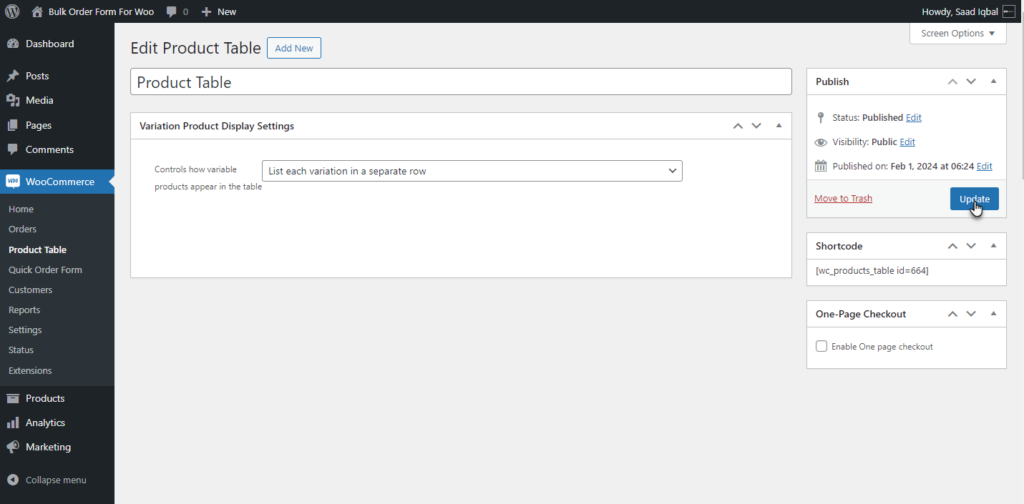
- Click on the Update button to publish changes.
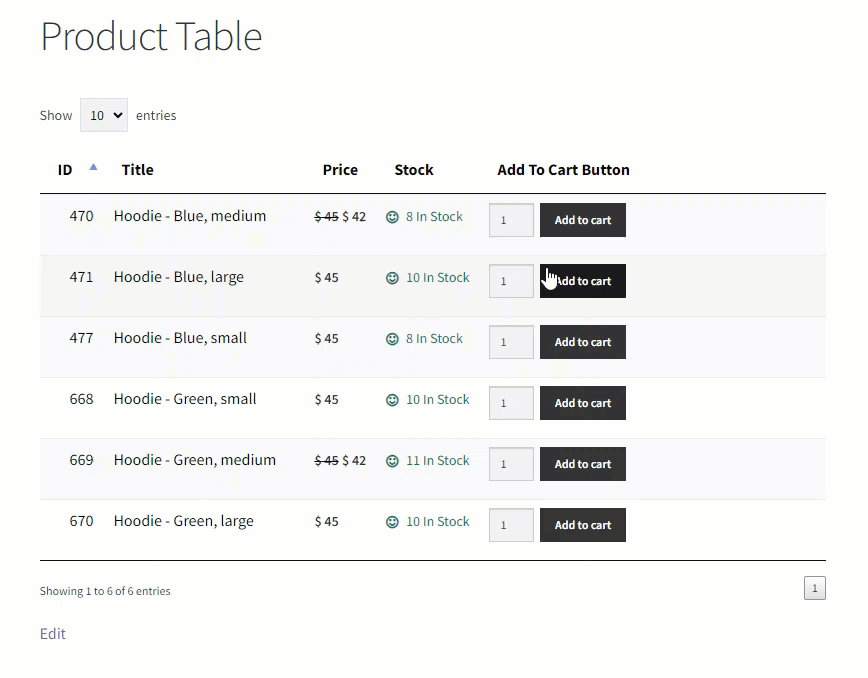
Front End Impact:
- Go to the Product Table page.
- The Product Table will appear with all the products.
Before

After
Variable Quick Order Form
↑ Back to top- Navigate to WordPress Admin Dashboard > WooCommerce > Quick Order Form.
- Add a new Quick Order Form.
- Drop columns in the Quick Order Form as per your needs.
- Click on the Update button to save changes.
Front End Impact:
- Go to the Quick Order Form page.
- Add variable product to Quick Order Form.
Before
After
Manual Quantity Input
Product Table Page
- Once you have set Minimum and Maximum Quantity for the variable products.
- Go to the Product Table page.
- Select the variation of the variable product.
- Manually enter the Quantity you want to buy.
- Validation will allow you to stay within the set Quantity for the product.
Quick Order Form Page
- Once you have set Minimum and Maximum Quantity for the variable products.
- Go to the Product Table page.
- Select the variation of the variable product.
- Manually enter the Quantity you want to buy within the defined Minimum and Maximum Quantity.
Product Bundle by WooCommerce
↑ Back to top- Download and Install the Product Bundle by WooCommerce plugin.
- Follow the Product Bundle by WooCommerce plugin documentation to set up and configure the plugin.
- Create a Product bundle as guided in the Product Bundle by WooCommerce plugin documentation.
- Once done, Navigate to the Product Table Page.
- Click on the View Bundle Button on the Product Table to open Bundle Product.
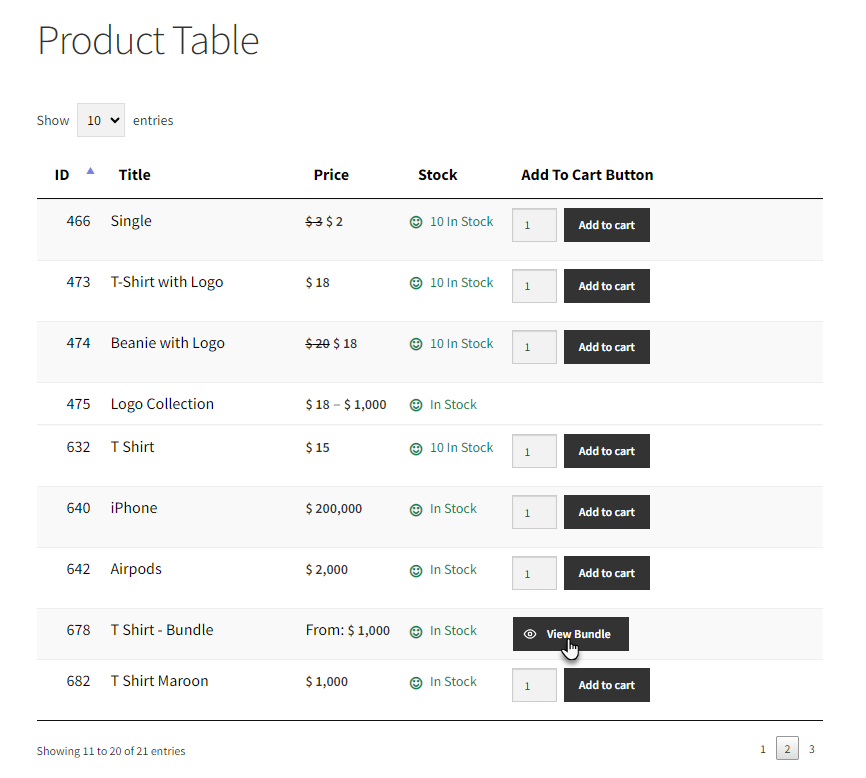
- A popup will appear next to you.
- All products associated with the Product Bundle will be listed in a popup.
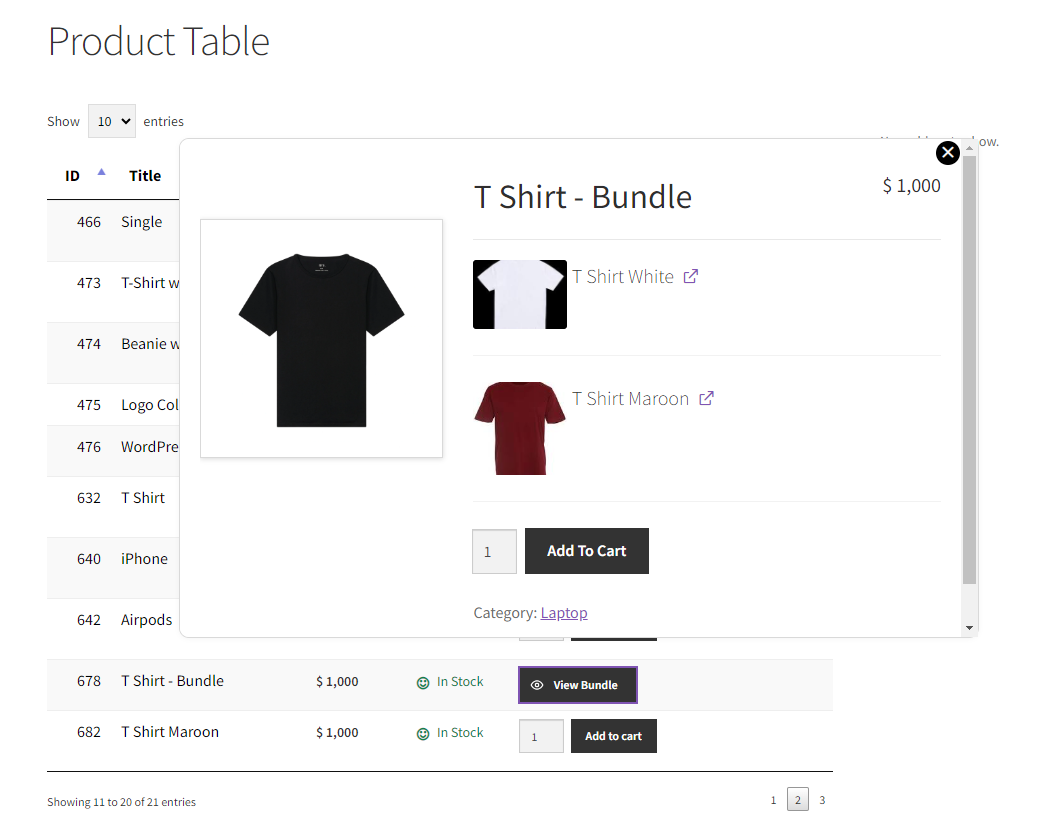
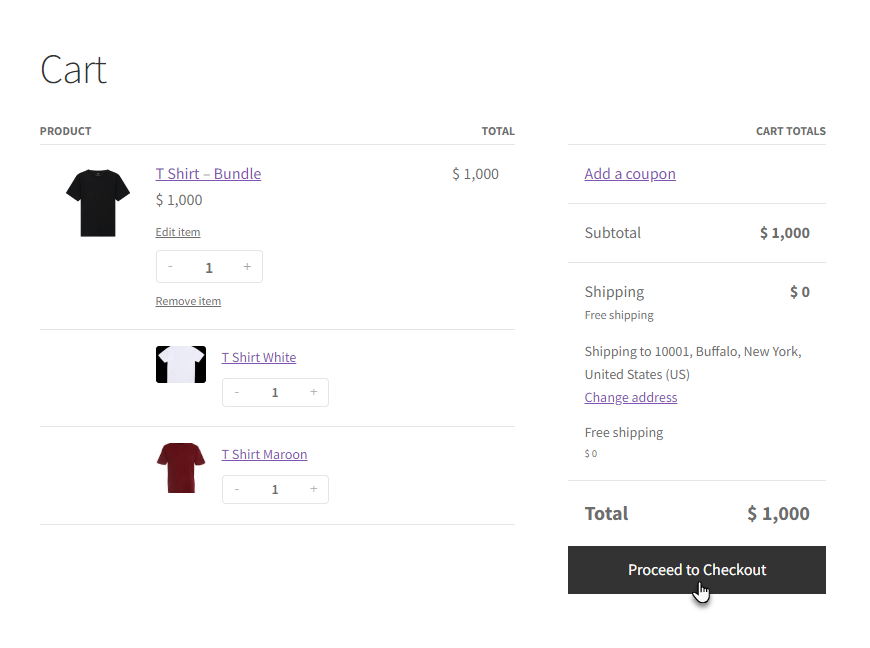
- Click on Add to Cart to add the bundle to the cart.

- Go to the Cart page.
- Navigate to the Proceed to Checkout page by clicking on the Proceed to Checkout button.
- Click on Place Order on the Checkout page to confirm your order.
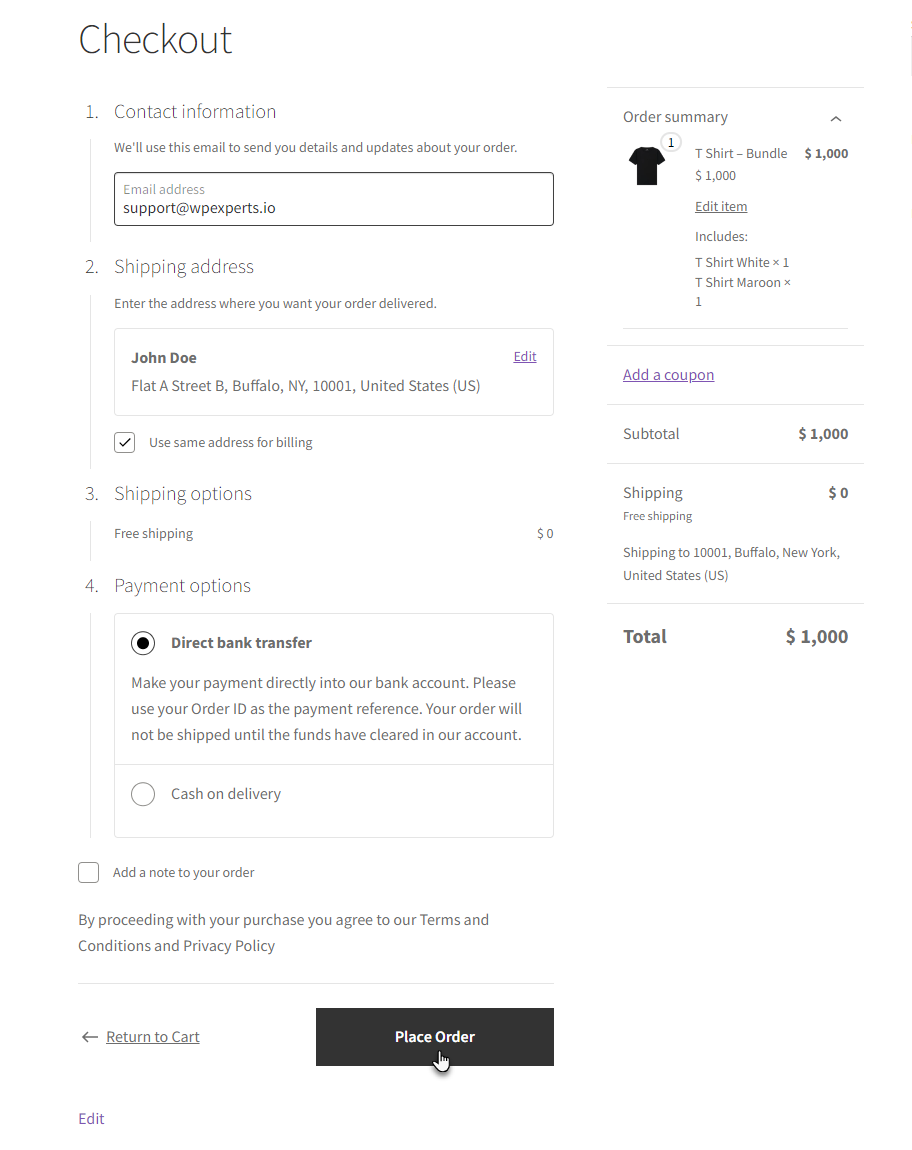
- Your Product Bundle order has been placed.