Bulk Category Editor enables you to add, update and delete categories in bulk. Set, add and remove categories on products. Use the included product filters such as categories, attributes and search.
Installation
↑ Back to top- Download the .zip file from your WooCommerce account.
- Go to: WordPress Admin > Plugins > Add New and Upload Plugin > Choose File (for the file that was downloaded).
- Activate the extension.
More information at: Installing and Managing Plugins.
External documentation from developer is found here..
Setup and Configuration
↑ Back to topBulk Category Editor Settings
Settings are under WooCommerce > Settings > Bulk Category Editor and includes two sections, General and Products.
General settings allows you to configure the following options for Categories:
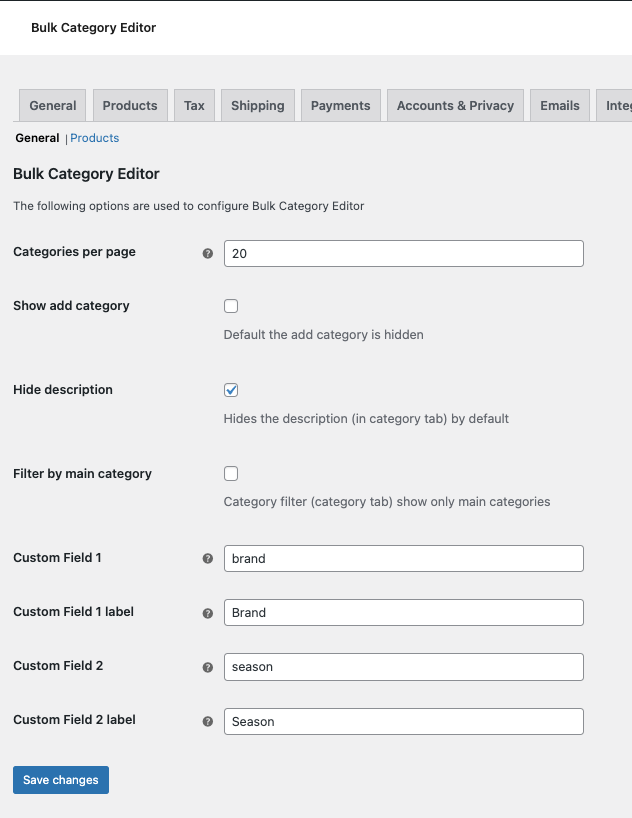
- Categories per page: Set the amount of categories to display in the table (subcategories are excluded).
- Show add category: Select the checkbox if for example, you have to add many categories at once. If this is not enabled, you will need to click the + Add button to add a new category.
- Hide description: This option will default hide category description, click in name or slug to show description or uncheck Hide description on category page to show all.
- Filter by main category: Default the category filter shows all categories, if you have many categories this option make it more easy to use the filter.
- Custom Field 1: Enter a custom meta field (e.g. brand) – if it do not exist it will be created and be used on your categories.
- Custom Field 1 label: Enter a label for the field, this will be used as column heading on the category table.
- Custom Field 2: Enter a custom meta field (e.g. brand) – if it do not exist it will be created and be used on your categories.
- Custom Field 2 label: Enter a label for the field, this will be used as column heading on the category table.
- Note: Custom fields is included in filters(search) and in bulk edit (regex functions) on the categories tab.
Products settings apply to the Move products tab:
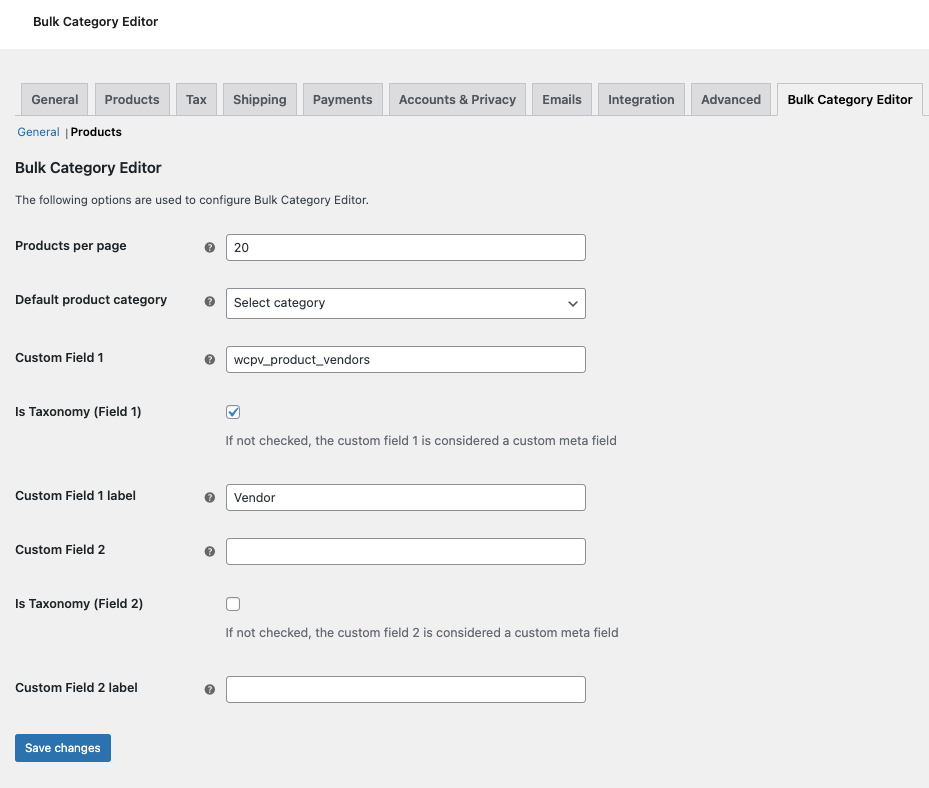
- Products per page: Set the amount of products per page in the Move products tab
- Default product category: Set a default category. If you do not set a category, the default product category will be used (Uncategorized is common). Category is used when moving default products.
- Custom Field 1: Add a custom product field (meta or taxonomy) if you like to see e.g. Vendor in the product table.
- Is Taxonomy (Field 1): Check this if this is an integration field like e.g. Vendor (if you are not sure, try first with this uncheked)
- Custom Field 1 label: Use this to set a label / column heading for the custom field (so you know what it is in the product table)
- Custom Field 2: Add a custom product field (meta or taxonomy) if you like to see e.g. Vendor in the product table.
- Is Taxonomy (Field 2): Check this if this is an integration field like e.g. Vendor (if you are not sure, try first with this uncheked)
- Custom Field 2 label: Use this to set a label / column heading for the custom field (so you know what it is in the product table)
Example integration: In the example we have added an integration for WooCommerce Vendor (sold on WooCommerce.com marketplace). The custom field here is a taxonomy named: wcpv_product_vendors – so just add this and check the Is Taxonomy field + e.g. set Vendor as label and you have this integration done.
To start using Bulk Category Editor, go to: WooCommerce > Bulk Category Editor.
Bulk Category Editor
↑ Back to top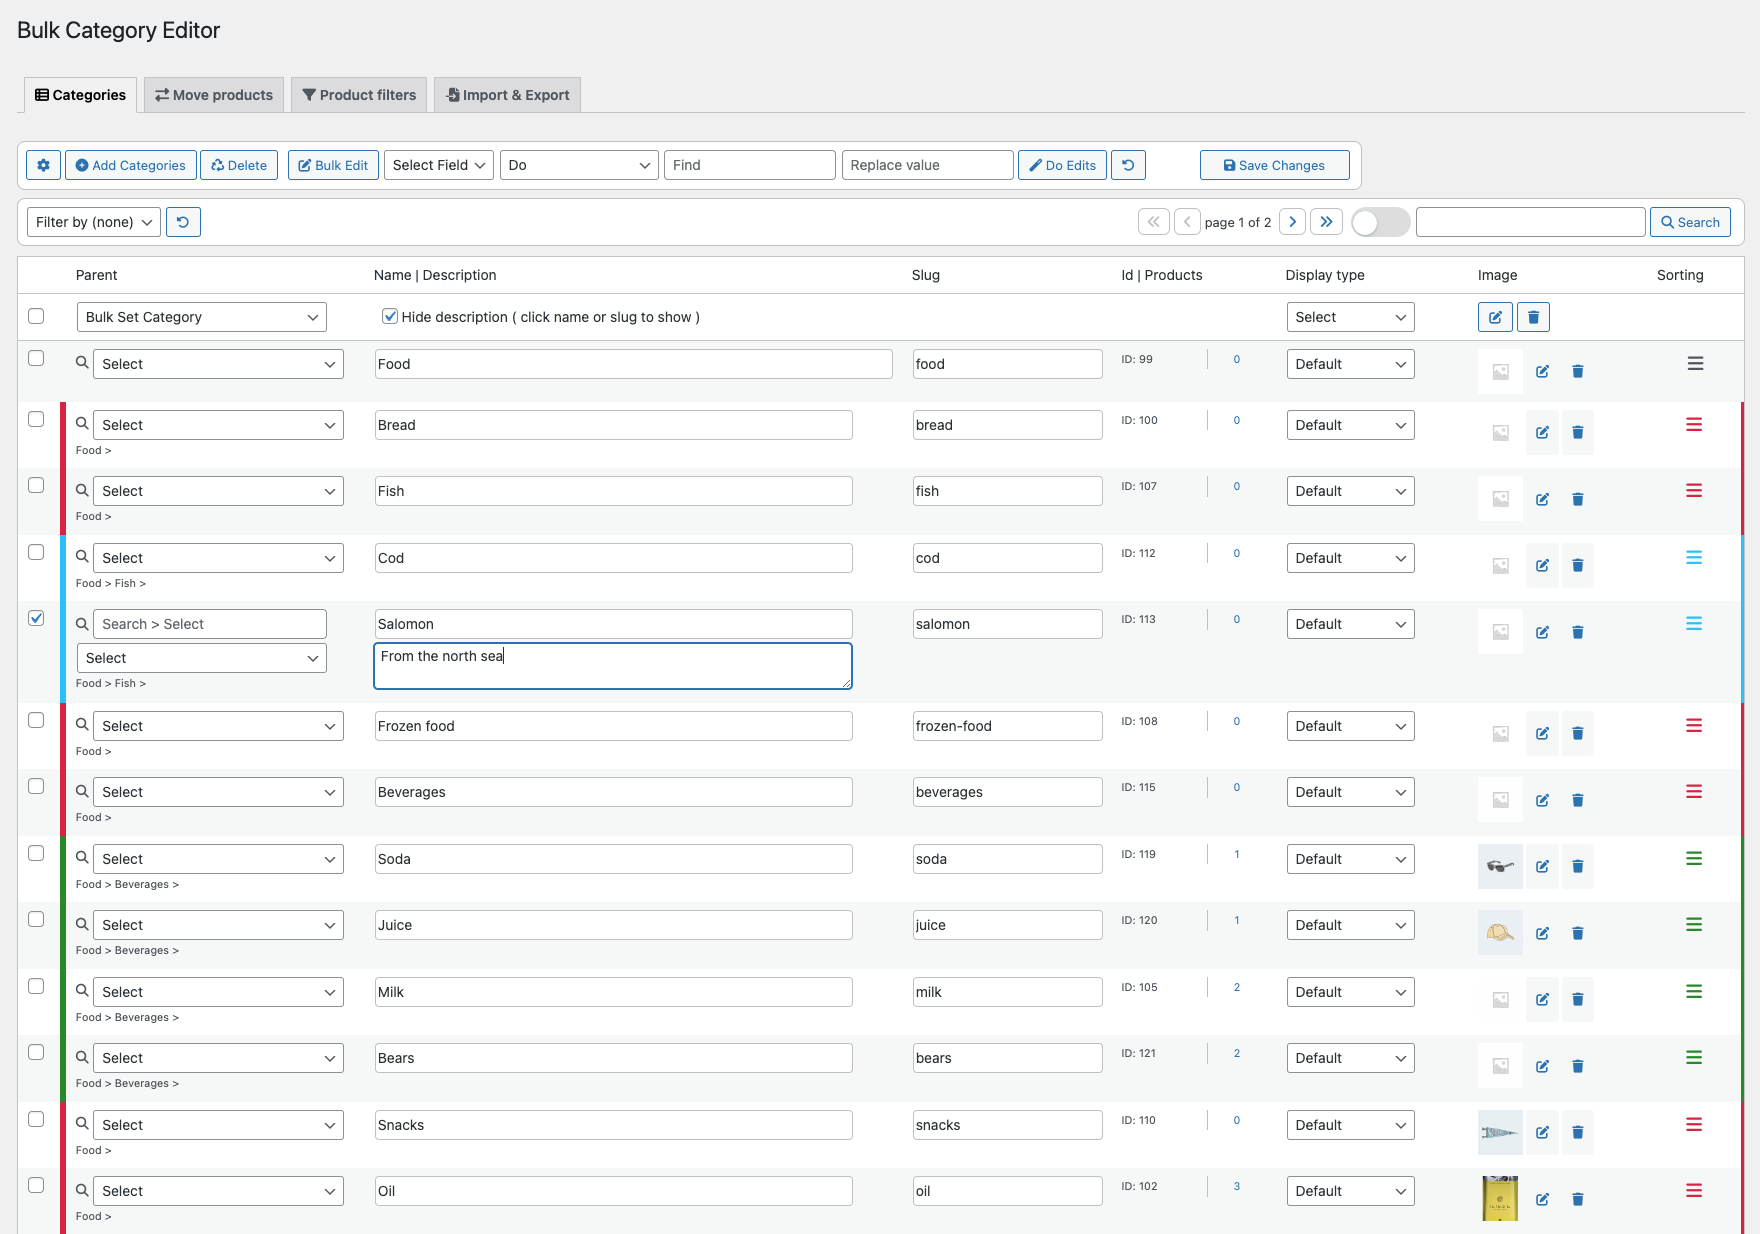
The editor has tabs for: Categories, Move products and Product filters. The following options are available within the Categories tab:
- Cogs button takes you to Bulk Category Editor Settings (WooCommerce > Settings > Bulk Category Editor).
- Show / hide add button opens a table form to add or bulk add new categories.
- Delete button deletes selected categories individually or in bulk.
The Bulk edit and Function buttons allow you to edit categories using Search and replace, Add text before and Add text after functions.
Add categories
↑ Back to top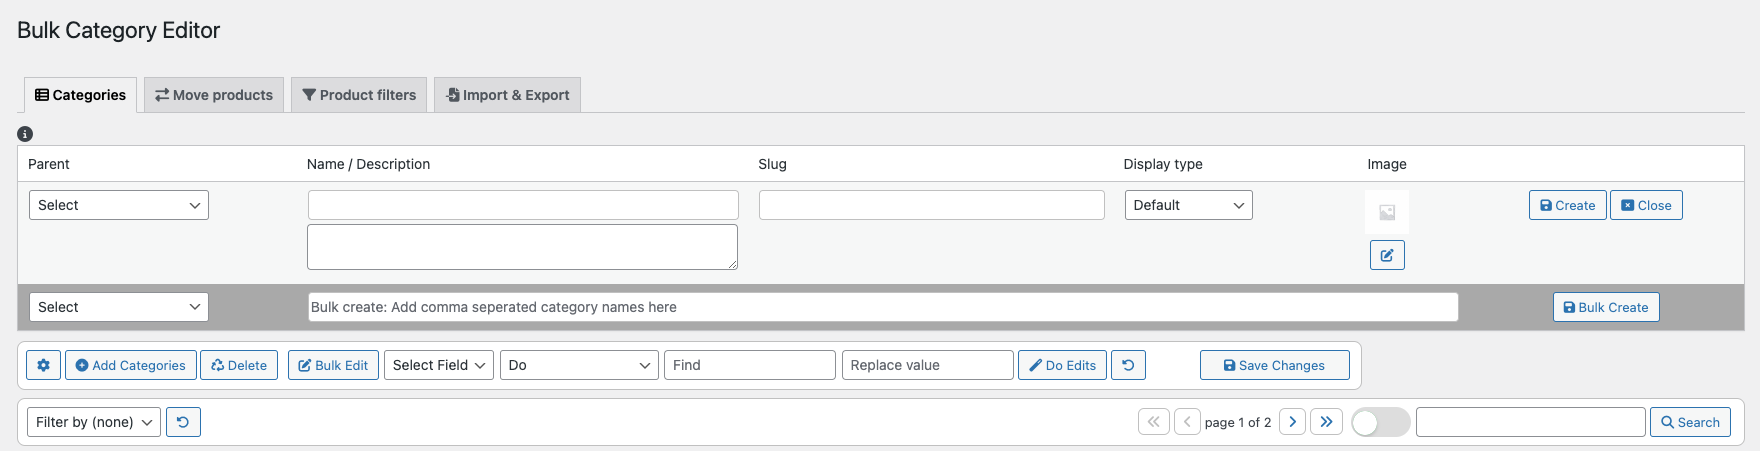
- To add a category, click the ‘Show / hide add’ button and the Add Category table will display.
- To create a parent category, enter the category name and save, the slug will be automatically created for you. (Note: The description field has the option to be resized.)
- To set an image for the newly created category, click the Image edit button and upload an image or select from your Media Library.
- After saving, the Add Category table editor closes automatically, but if you would like to have this visible, you can set this by going to WooCommerce > Settings > Bulk Category Editor and select Show add category.
Delete categories
↑ Back to top- To delete categories, select the checkbox for the rows of the categories you are deleting.
- Click Delete. An alert will display confirming that you wish to delete, click OK and the categories will be deleted.
Please note: Bulk Category Editor will not delete your default category. By default, the category will be Uncategorized (unless you have set it to something else).
Bulk edit categories
↑ Back to top
Bulk edit has several options – first, select the field you want to bulk edit. Select name, description or slug. Then, select one of the functions:
- Search and replace: Enter a text phrase you want to replace using the Find input field. The table will automatically filter based on your text phrase. Next, enter the value you want to replace the text phrase with in the Replace value field. Select the Do button to replace and Select undo button if you wish to undo the changes. Then click Save.
- Add text before: Enter a text phrase that you want to add text before in the Find input field. Then, enter the text phrase you want to add in the Replace value field. Click Do > Save.
- Add text after: Enter a text phrase that you want to add text after in the Find input field. Next, enter the text phrase you want to add in the Replace value function. Click Do > Save.
These functions will let you easily make changes to several categories. Filtering by categories allows you to quickly make bulk updates to categories.
Paging
↑ Back to topPaging for categories will show up if you have many categories. In settings, you can set the number of categories to display on each page.
Filter categories
↑ Back to topAs you perform your search and begin typing in the field, filtering occurs automatically and filters by category (and parent), name, description and slug. For example, if you are searching by all shoes, and start by typing ‘shoe’ and then ‘women’, only those results will display. Use spaces between phrases. Please note: the filter only filters the current page (table). If paging is enabled, you may need to do the same on several pages.
Bulk updates from table heading
↑ Back to topWithin the table heading:
- Check or uncheck all rows (categories) to apply bulk edits.
- Parent dropdown applies parent categories in bulk for your categories.
- Display type dropdown applies display type in bulk for your categories.
Table editor
↑ Back to top
The table editor allows inline editing of your categories. If you make changes in any field, the checkbox for the row will be checked. When you save, all changes in all selected categories will be updated.
- Parent: Categories that have no parent category will have a dropdown with no subcategories. Subcategories will have dropdown with the whole category tree. This enables you to move a category to another parent category (including subcategories).
- Name / description: Change name and description (below name). The description input field can be resized for easy editing.
- Slug: Change slug name. Note that the slug name must be of lowercase letters and strung together with hyphens similar to this, silk-t-shirts.
- Display type: Set display type using the following options: Default, Products, Subcategories and Both. This can also be changed in bulk in the table header.
- Image: Set or delete the category image using the edit or delete buttons (can be done in bulk – the first buttons below the label Image). The edit button opens your Media Library where you can select or upload an image for your category. Remember to click the Save changes button after you are done.
- Sort: Drag and drop categories to where you like – make sure to drop a subcategory in the same subcategory group.
Move products
↑ Back to top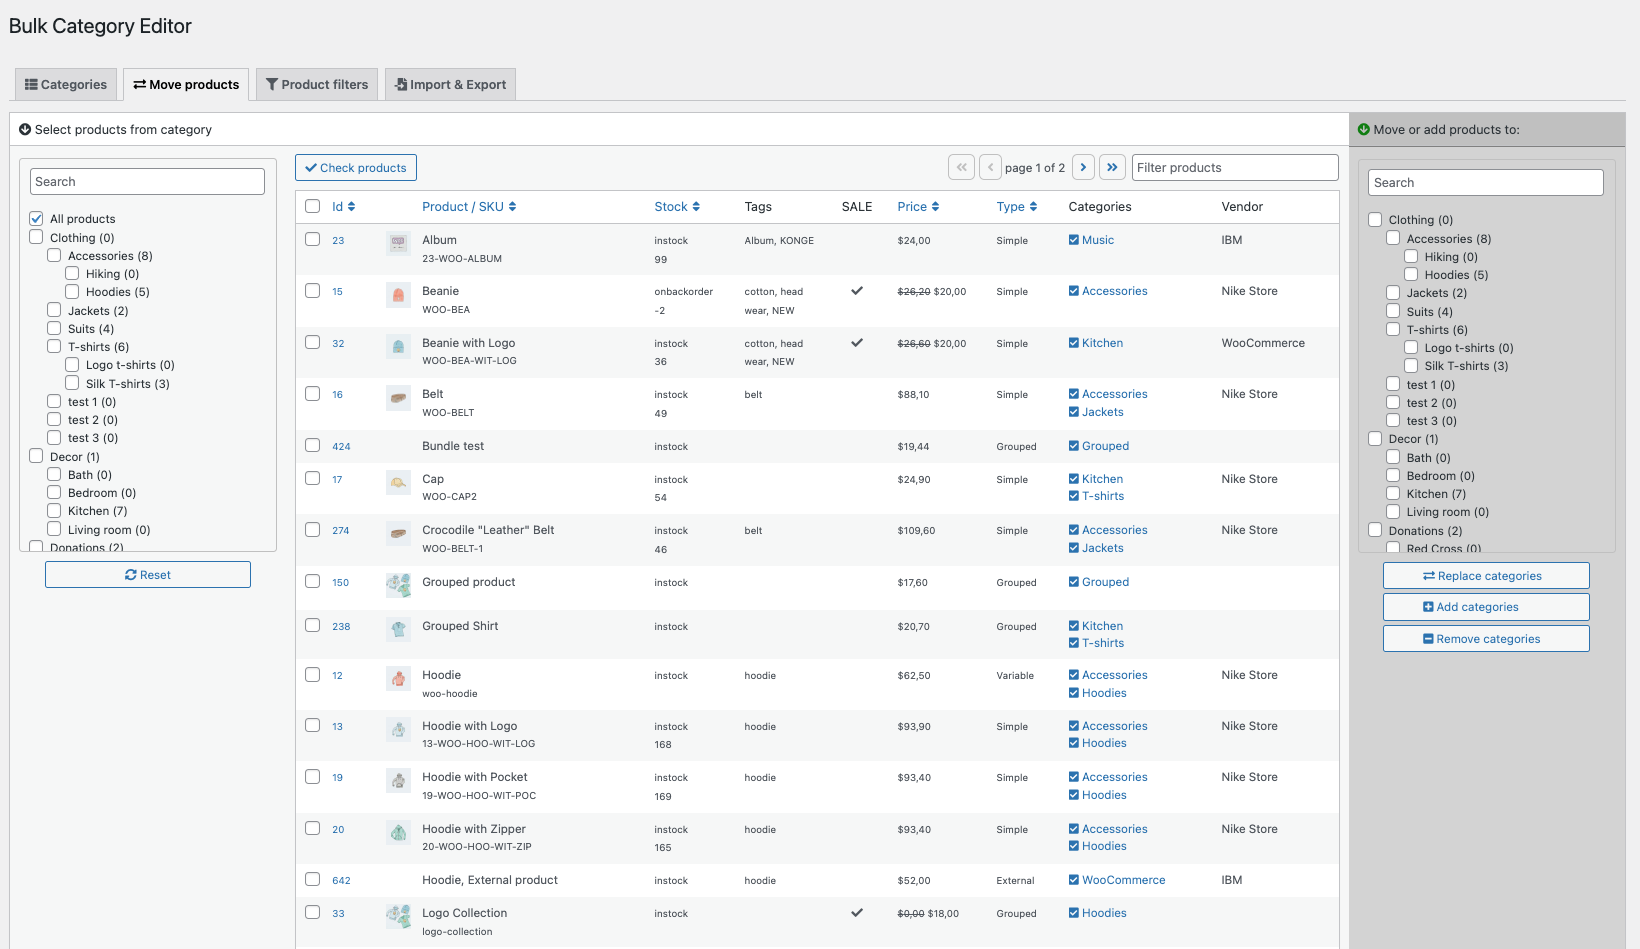
The Move products tab includes the following options, Get Products from, Products and Move or add products to.
Get products from
Here, you can filter categories in the search field, check categories and get selected products. Default products will be fetched from the default product category (usually Uncategorized). To reset your product query, click the reset button.
Products
By default, this table shows products from the default category (usually Uncategorized). If you have selected product categories in Get Products From, they will show up here. The table contains a filter where you can filter out products by name, SKU and tags. To filter, either select all products (by checking the box in the first header column in the table) or manually select the products you want to move or add categories for.
Move or add products to
In this section, you can filter categories or simply select the category or categories to move or add products to.
- Select the applicable products by checking the checkbox in the row.
- Select category or categories.
- To replace the categories with the ones you have selected, click the Replace categories button to remove the existing categories and add the new categories that you have selected.
- To add new categories to your products, click the Add categories button and this will add the selected categories to the products.
- A progress bar will display until the products have been updated.
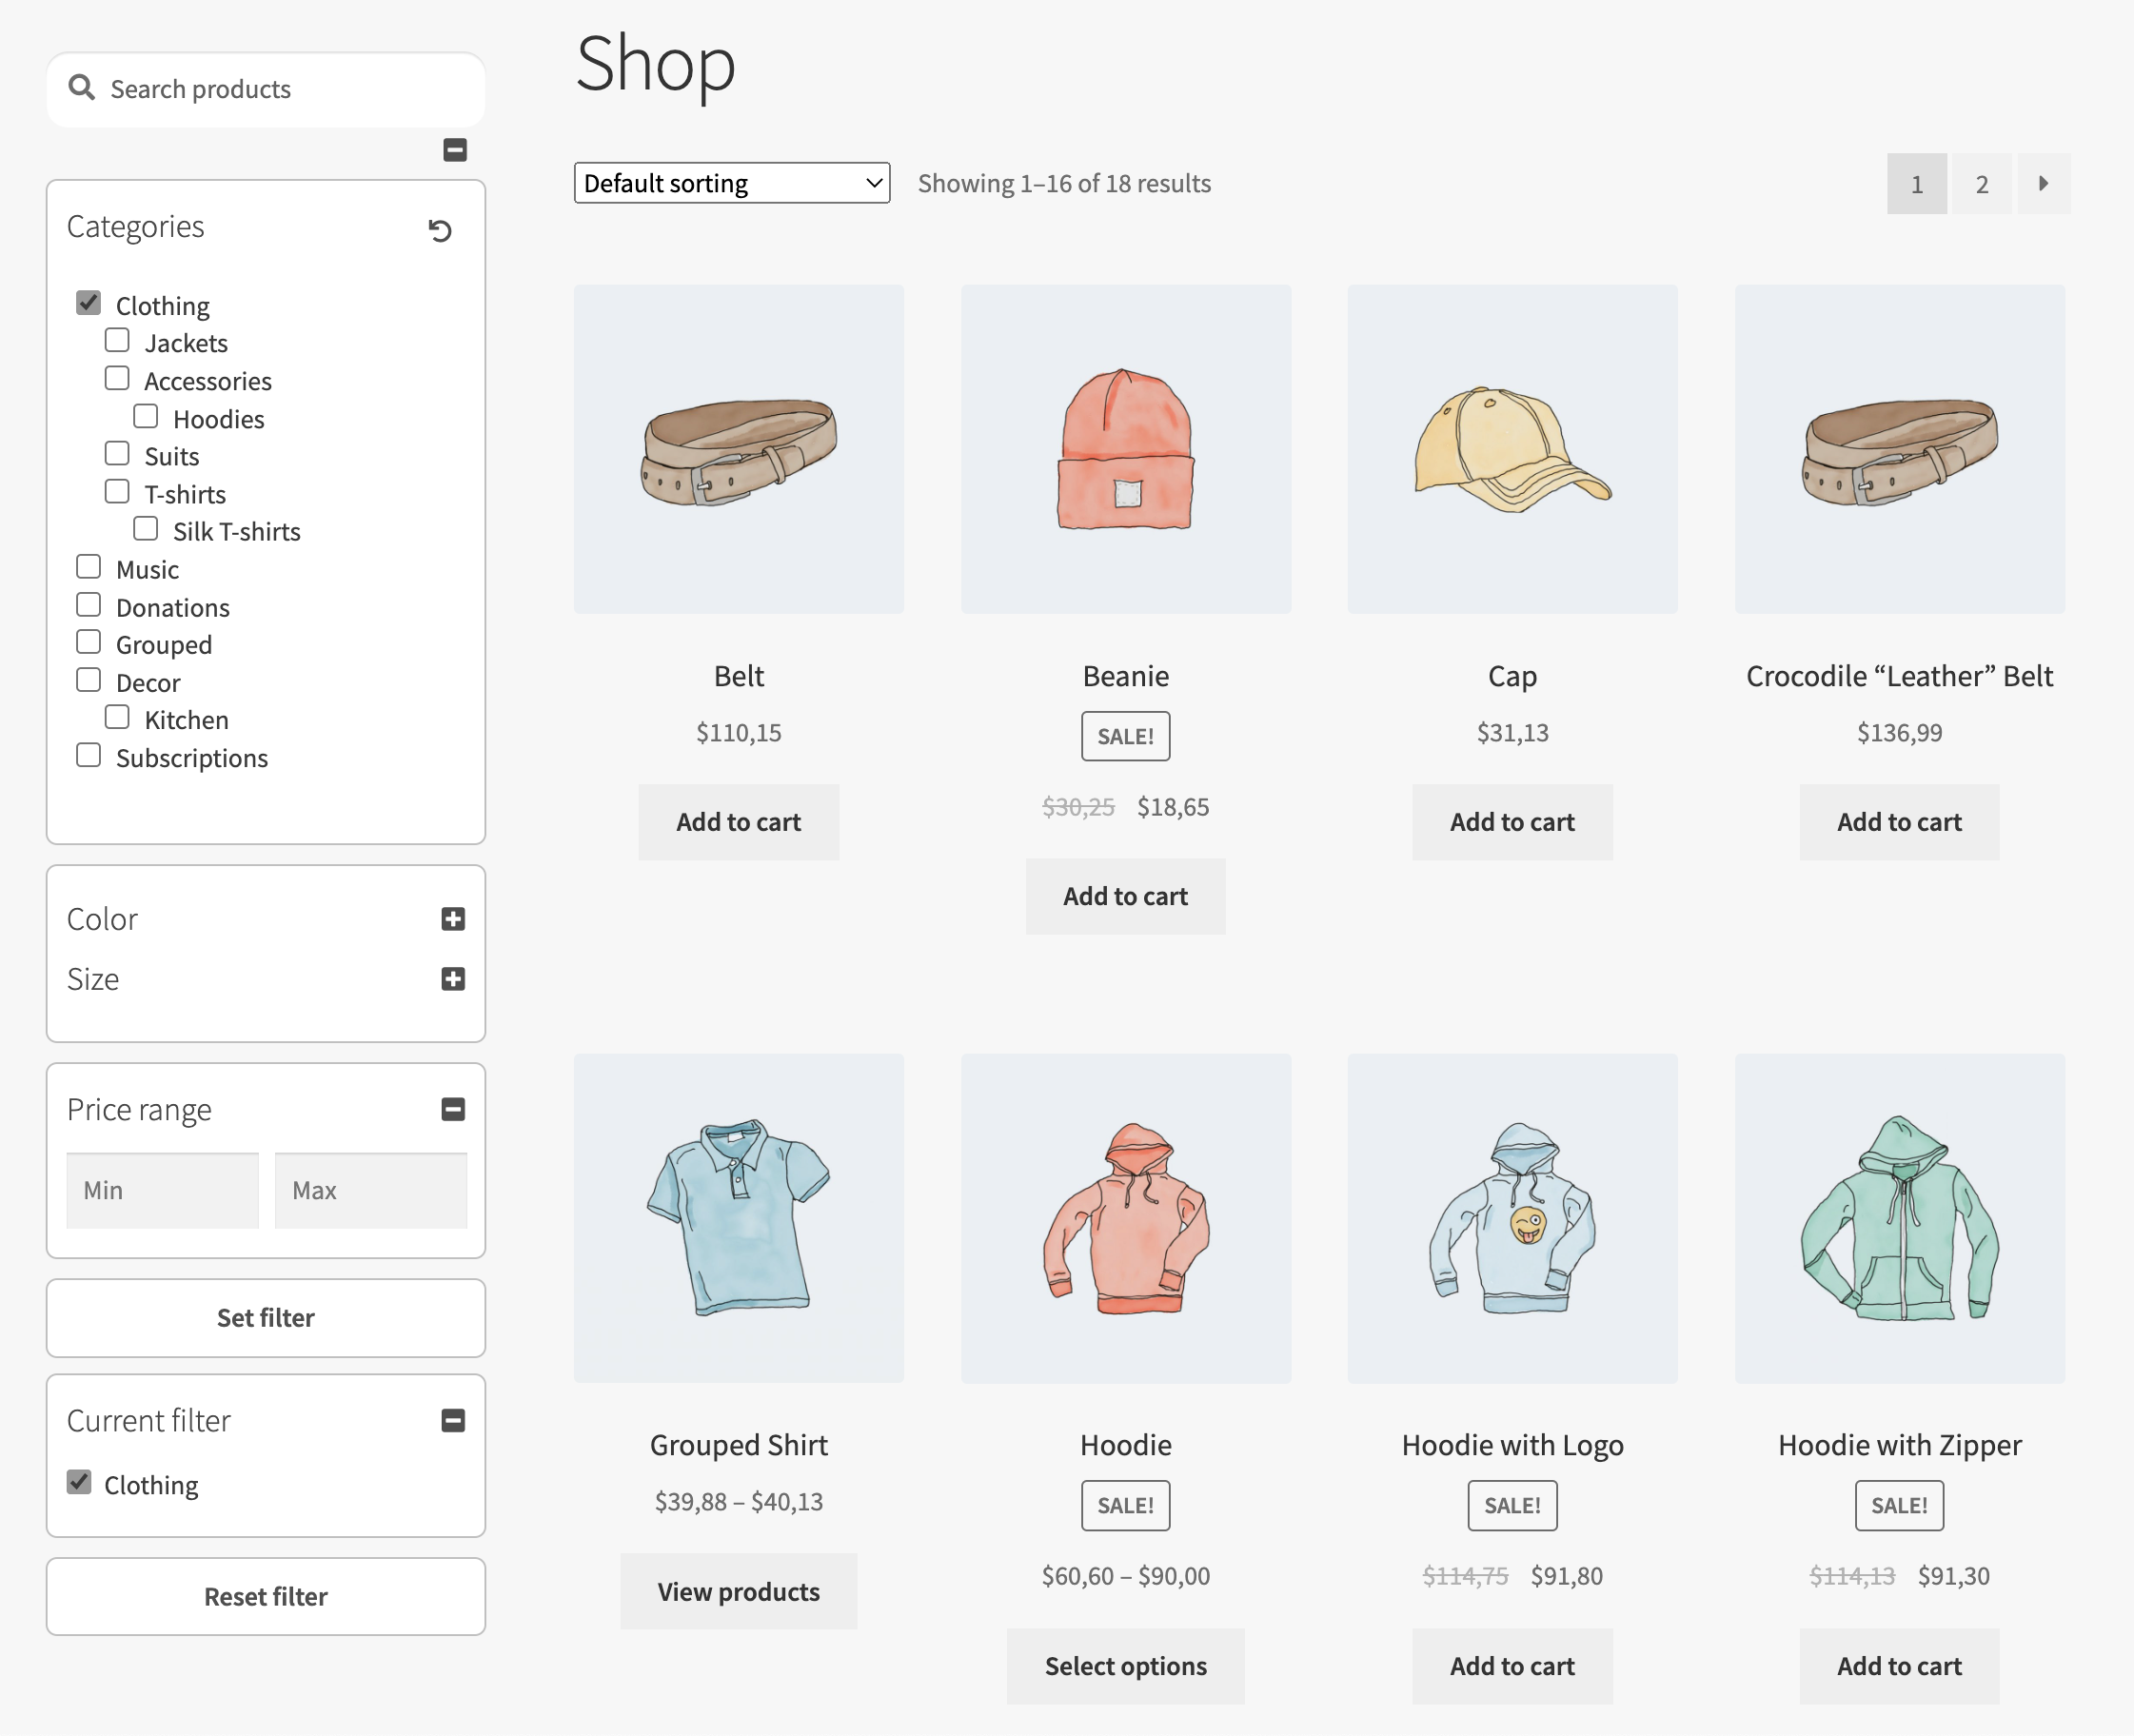
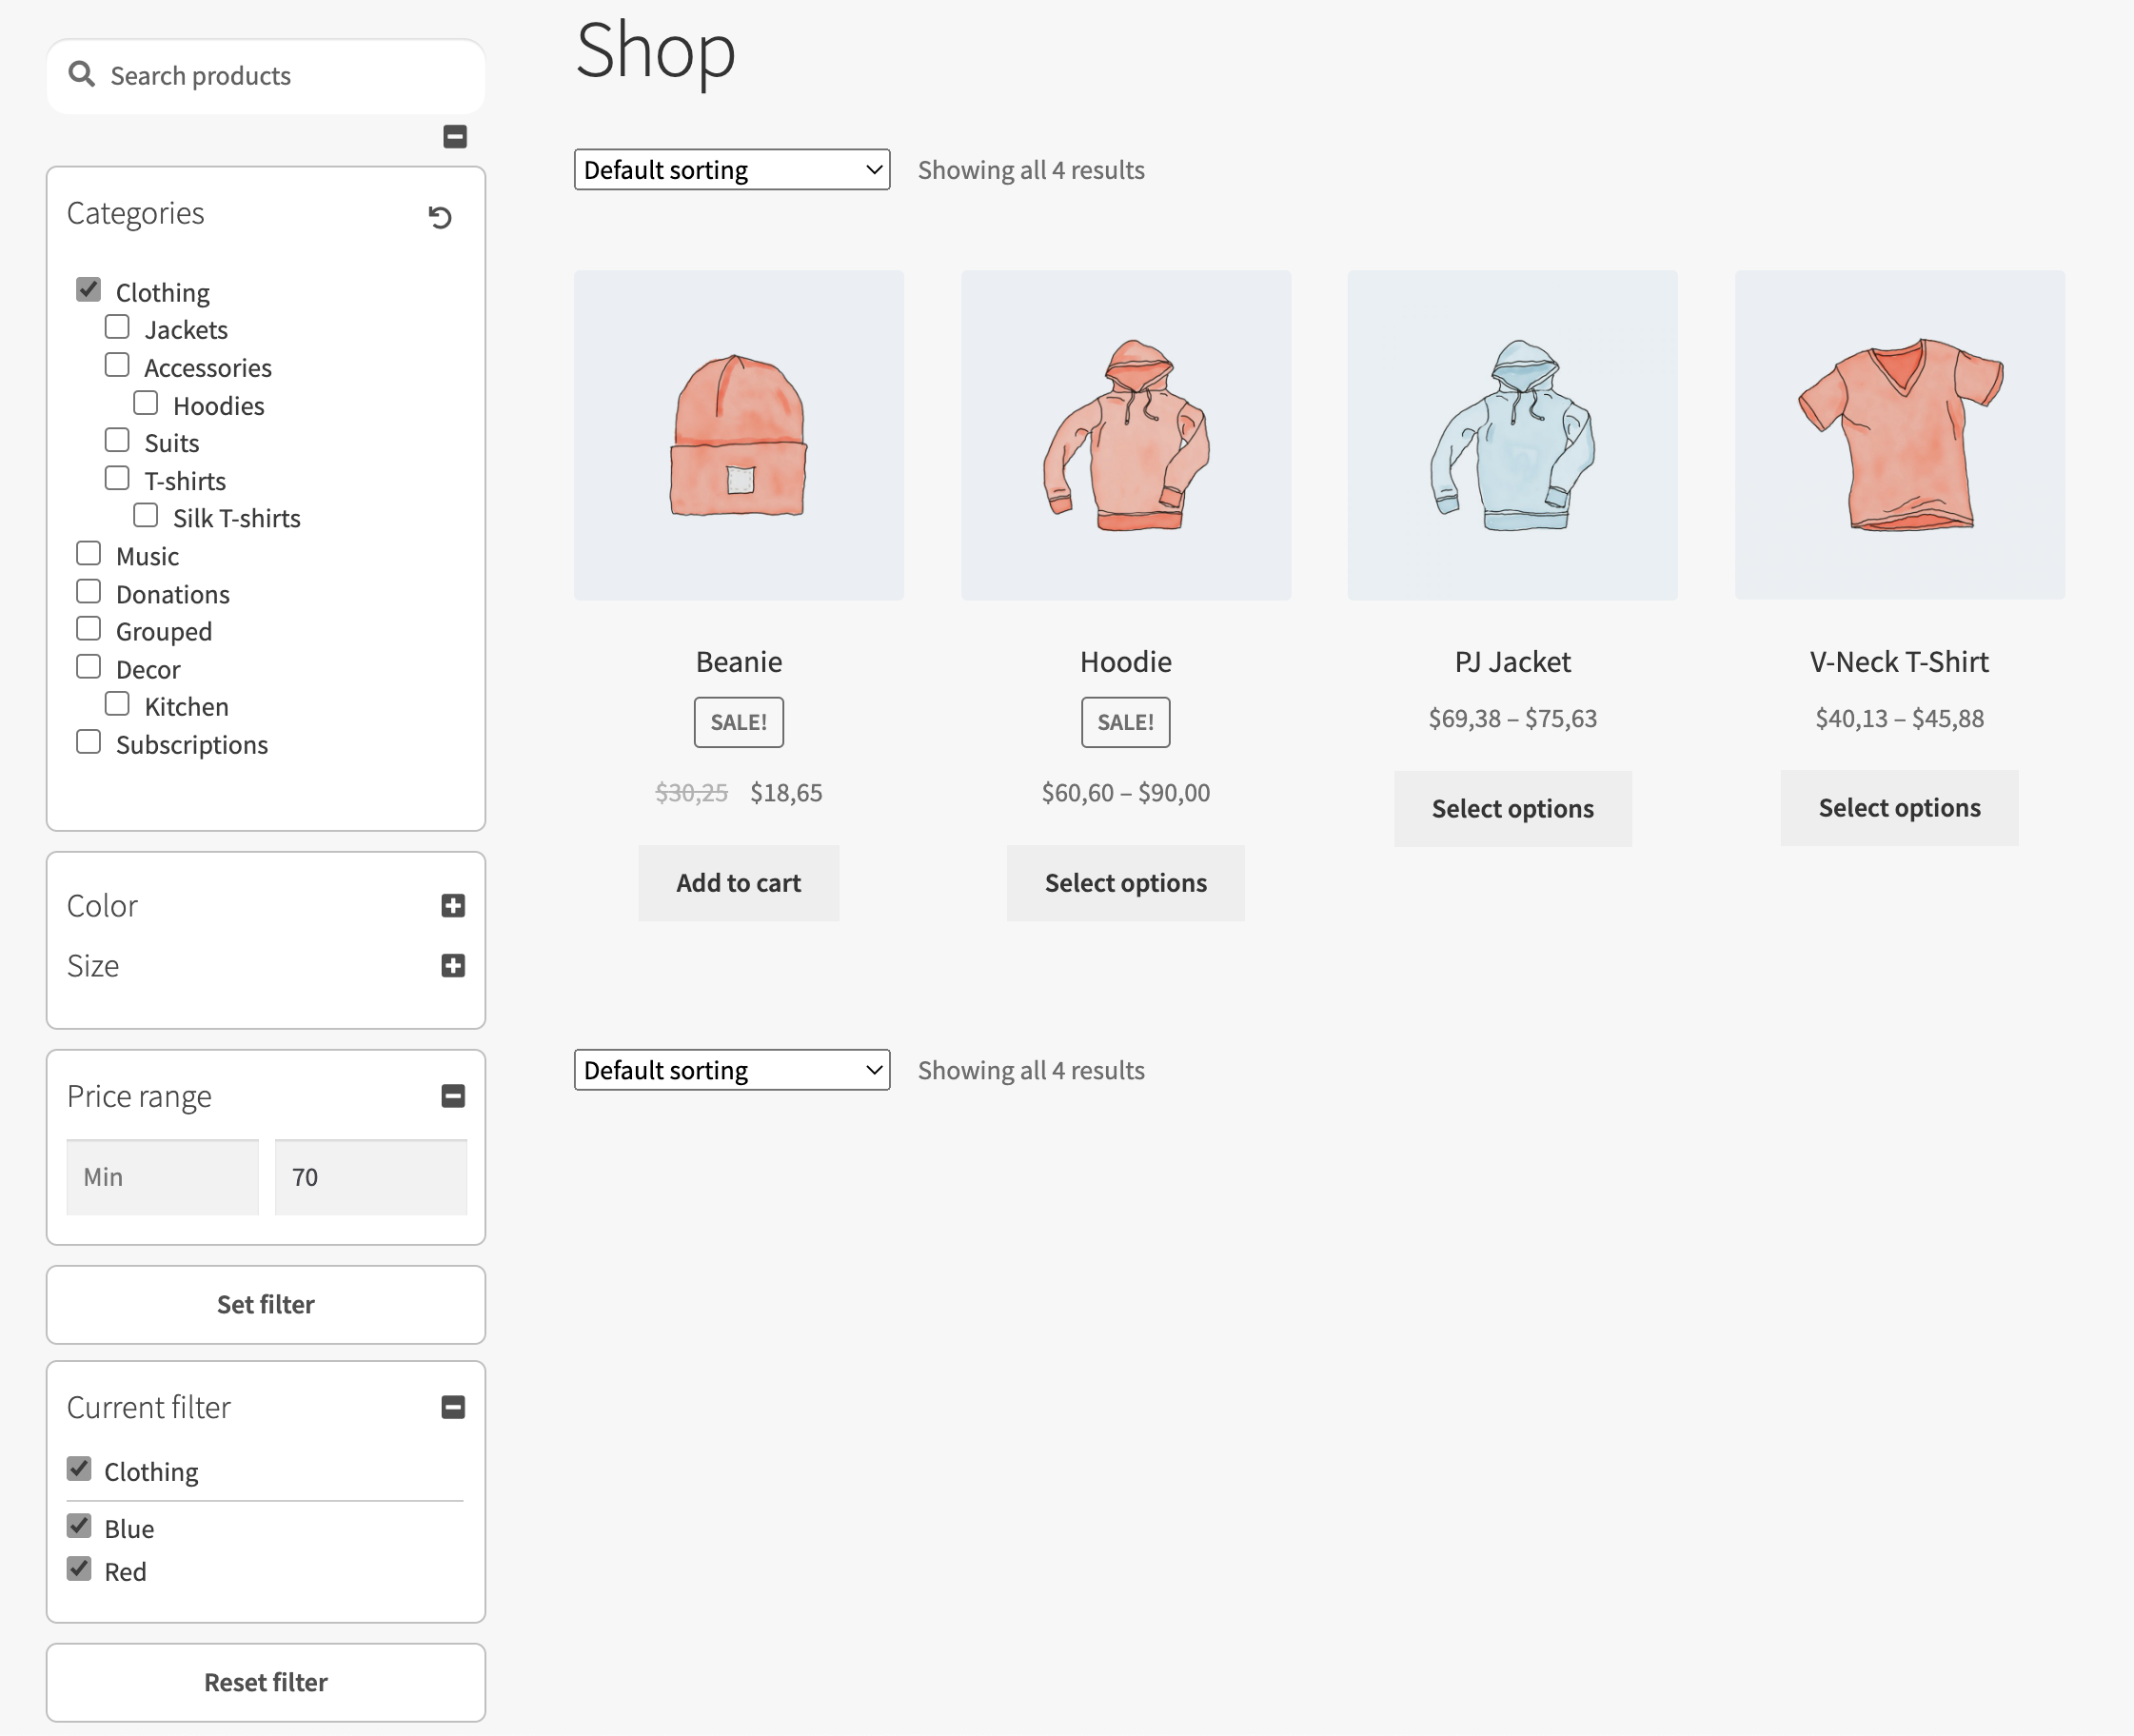
Product filters (frontend)
↑ Back to topFrom vs 1.2.1 you are able to make product filters using search, categories and attributes. Let us have a look at how this looks and works.
Creating and update filters
↑ Back to topIn Bulk Category Editor find the tab: Product filters
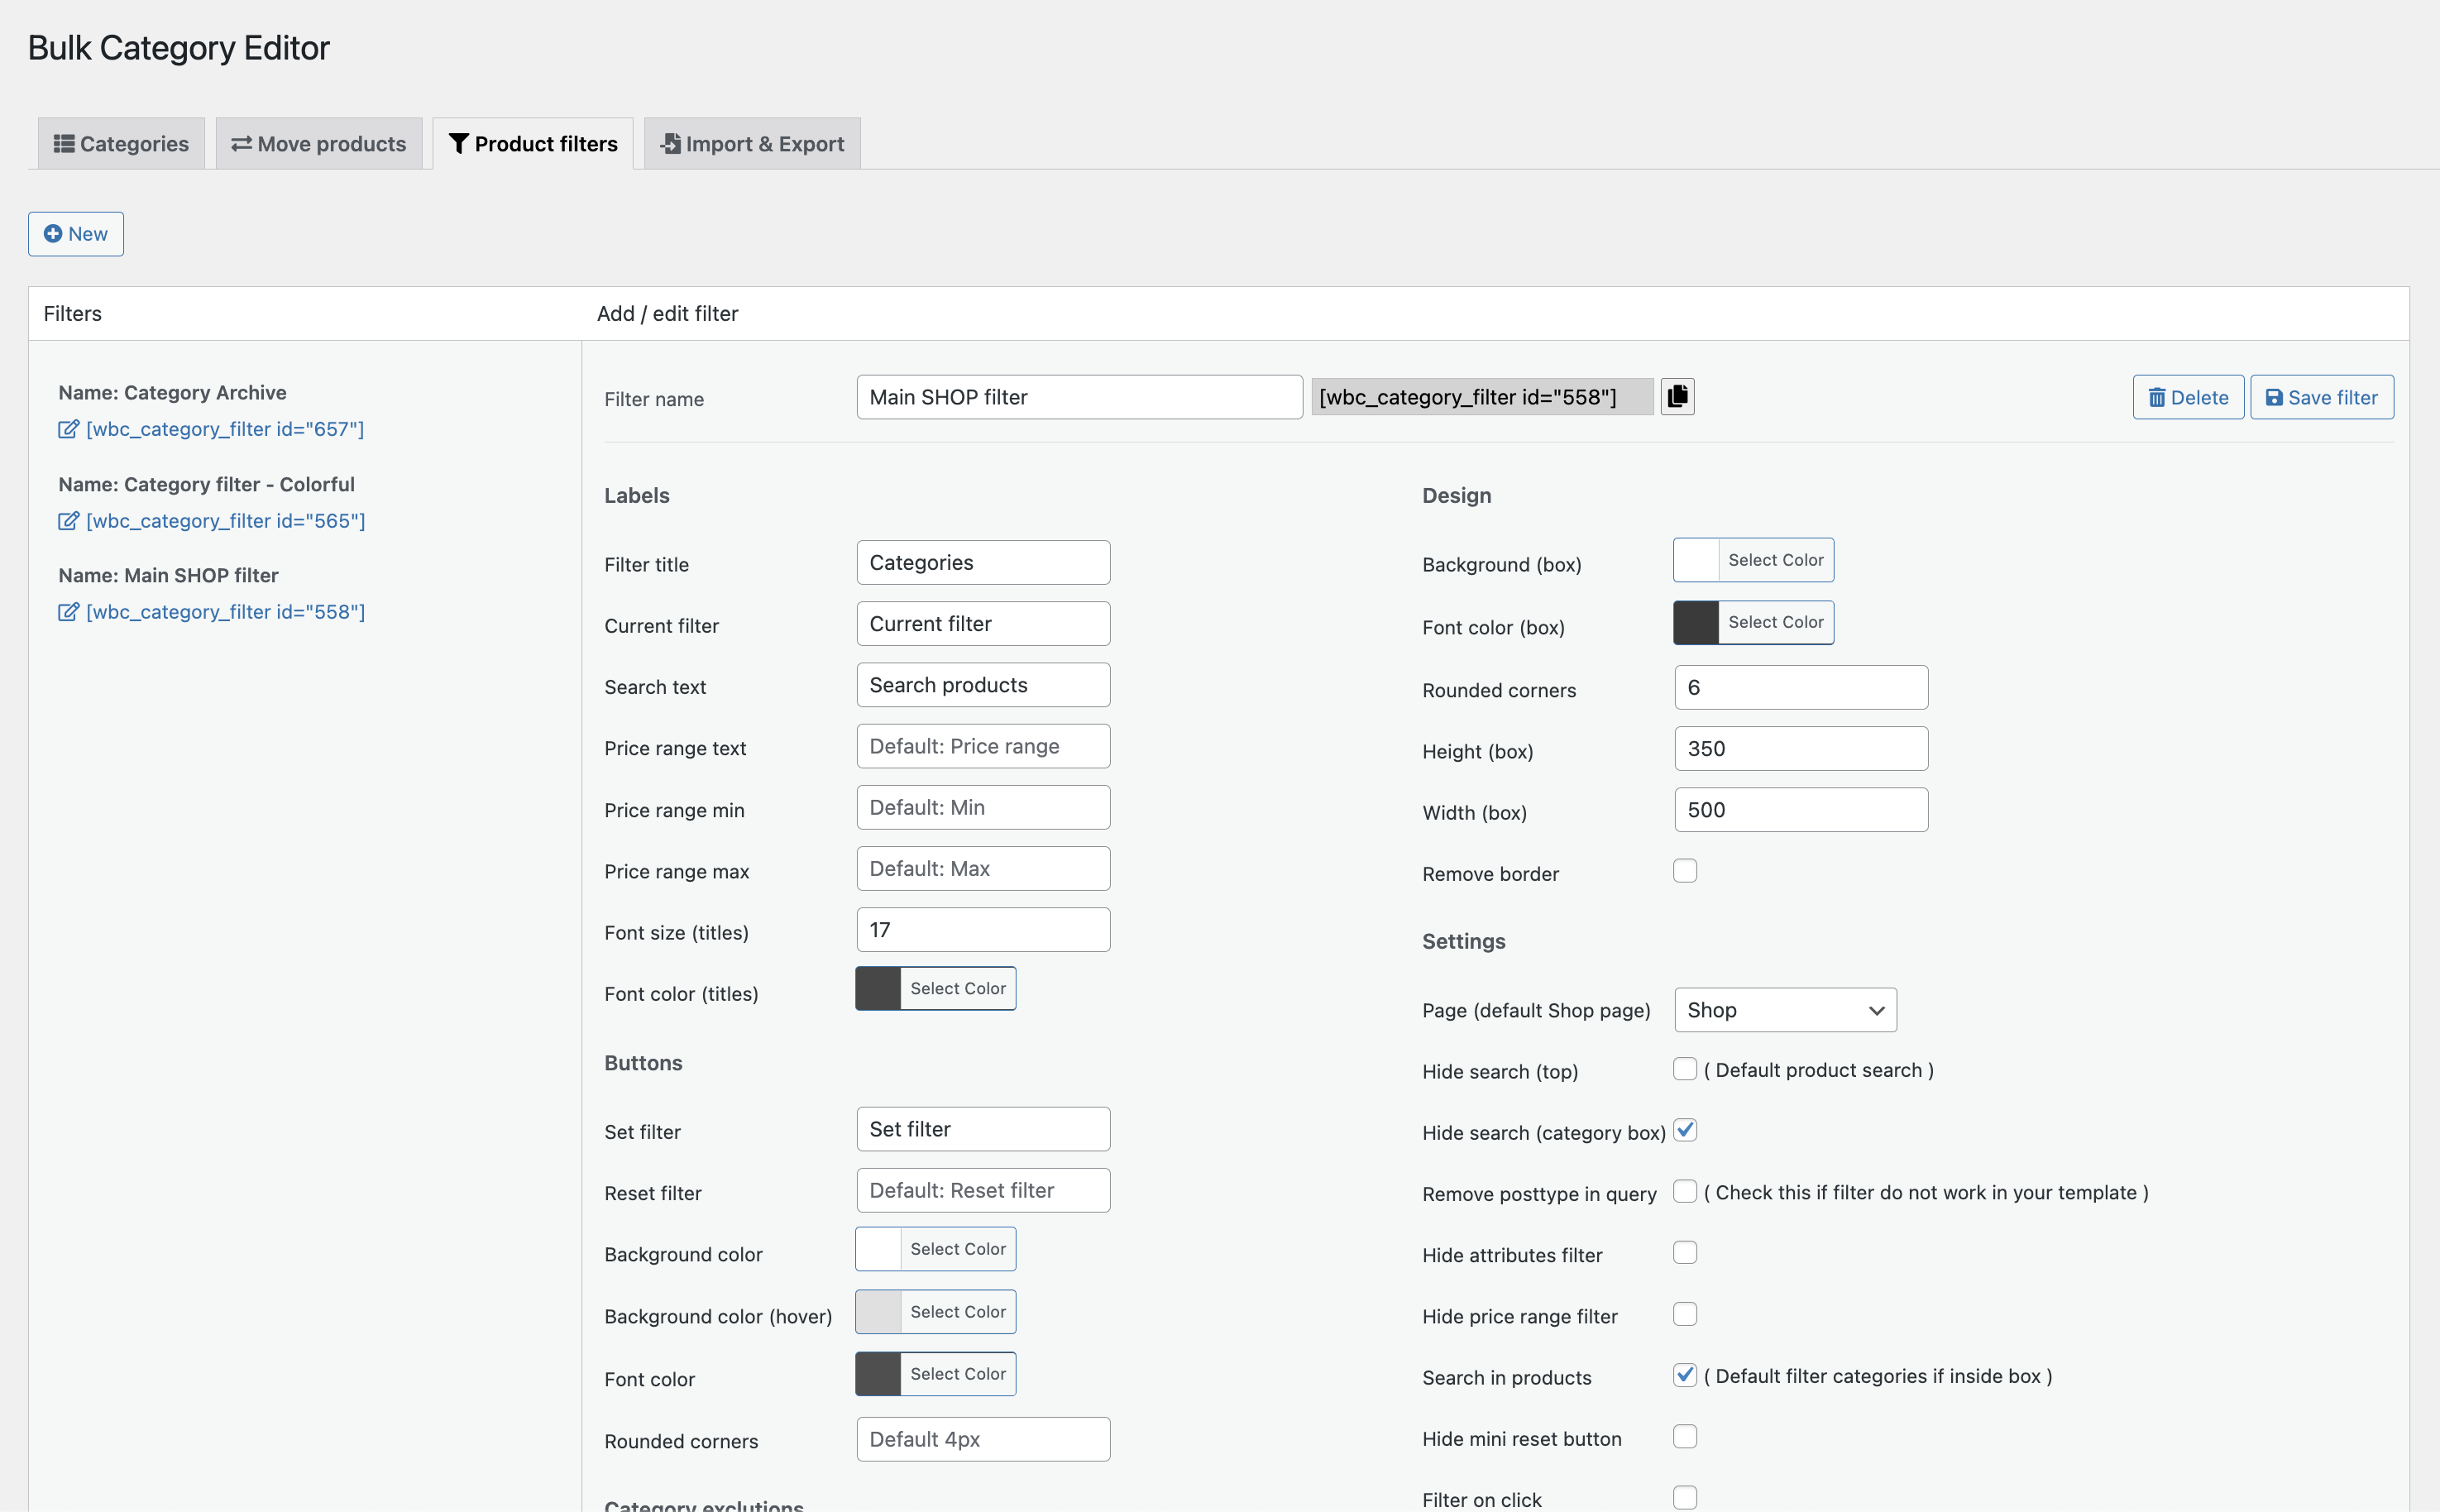
In the section you find a button to add filters (New) and a table that list your filters and a section to edit them. Note: fonts, height and width uses pixels (px). Let us start by creating a new filter.
Create a category filter
↑ Back to topYou can create a default filter just by clicking the Save filter button (this way you can test it before you make your custom changes). Here is how you use the options:
You can create a default filter just by clicking the Save filter button (this way you can test it before you make your custom changes). Here is how you use the options:
- Enter a filter name, i.e Category filter (optional)
- Labels
- Set your labels for filter title, current filter, search text and price range (or use the default)
- Change the font size (default 20px) – set a numeric value
- Change the font colour for the titles using the colour selector
- Buttons
- Set label for set and reset filter (or use default: Set filter and Reset filter)
- Change background colour
- Set the on mouse over (hover) colour if you do not want to use the default.
- Change font colour (this colour will also be used for the plus/minus icons)
- If you like to round the buttons corners set the value here or set 0
- Note: If you check the filter on click, the Set filter button will not show (when filter is set when the user clicks on a category)
- Category Exclusions (hide categories)
- Check categories to hide (exclude) categories in the list. In addition to hide categories from the list, this function adds these categories to your WooCommerce category query and hides these categories in the shop.
- Note: In B2B (role-based) solutions where a role can hide categories you will need to test how it work together before using this function.
- Design (look and feel for the category filter box)
- Set a background colour if you like
- Set font colour on list elements in the box (the list of categories and attributes)
- If you like to round the corners of the boxes, set a value here i.e 6 (uses pixels)
- Set height and width (max width) on the filter box (or use the defaults) – numeric values
- Note: This box scrolls automatically if the list of categories becomes larger than the height of the box.
- Check the remove border if you do not want the boxes with border (includes the buttons)
- Note: Most of the filter boxes / buttons have a CSS class so if you like to make it even more fancy, it is possible using some CSS. (Add extra CSS in the theme custom CSS).
- Settings
- Page (default shop page): This will ensure that you get back to the right page when filtering, default the filter finds the page you defined as your shop page and redirects the filter to this page.
- Hide search (top), if you do not want a search bar above the filters (searches in products and stays on the same page)
- Check hide search (in category box) if you do not want the search in the box. Search filter your categories or search in products (if product search you need to check the search in products – described below)
- Remove post type in query: By default this is product and will work good when the shop is on the frontpage (home) of your site. Sometimes when used in a template you need to check this to make the filter work as supposed. (Tip: try first and see if the filtered result is OK before checking this)
- Hide attributes filter: Default (not checked) the attributes filter (i.e Colour and Size) will be listed in the filter. If you check this all attributes (filter) will not be shown.
- Hide price range filter, check this if you do not want to enable this option for your customers.
- Search in products is for the search box inside the category filter, if you check this the search box searches in products else it filter your categories as you type.
- Hide mini reset button, hides the mini button to the right of filter title
- Filter on click: Sets filters every time you click a category. If this option is set (on) the button: Set filter will not show (due to it will never be in use)
- Show empty categories: If you like to show all your categories, use this option
- No hierarchy: Check this if you want a flat structure of your categories
- Show thumbnail: If you check this (on) categories will be listed with the category thumbnail first.
- Product count: If you like to show how many product every category contains check this. Shows like this: Shirt (25)
- Shop page only: If you check this (on) the filter will only be showed on the Shop page (defined in WooCommerce settings). Note: This setting will not remove any sidebars.
- Save filter
- Click the Save filter button to save the filter. Use this button every time you change the filters.
Use the filters in your shop
↑ Back to topUsing the created filters is easy, you just click the shortcode i.e [wbc_category_filter id=”565″] – this copies the shortcode for you. Now you can use this in your shop pages, example:
- Paste it in Appearance > Widgets > Sidebar (just add a shortcode section first)
- If you use a template designer i.e Elementor, add a shortcode section and paste your shortcode
When you have done this, go to your shop and see how it looks. Do changes in Bulk Category Editor as described above.
Import and Export
↑ Back to top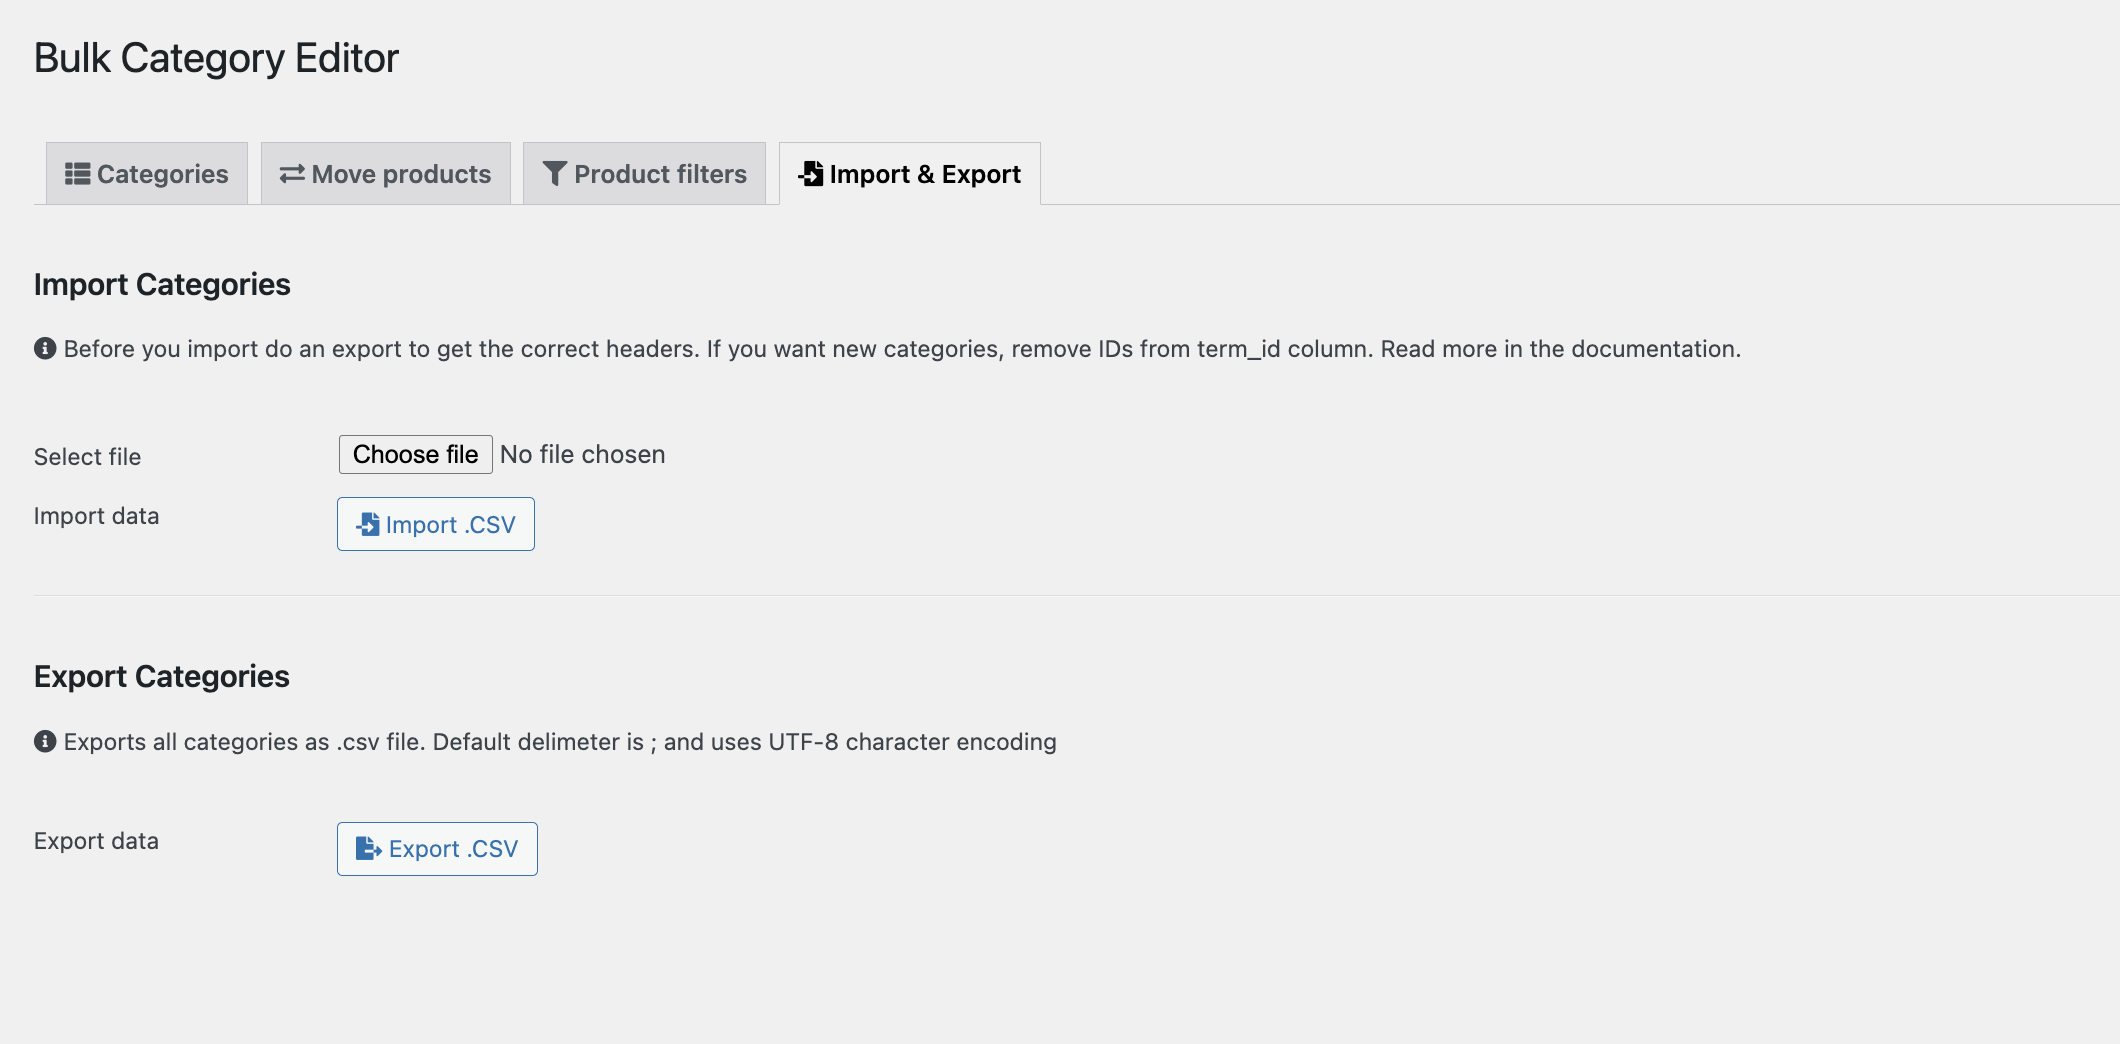
Import
↑ Back to topIf you like to import product categories to WooCommerce start by first exporting (use the Export .csv button), when you have done this you have a .csv file that can be opened in e.g. MS Excel or Apple Numbers or other spreadsheet editor.
- Decide if you want to update the categories or want to add new
- New categories
- Remove term_id values
- Remove the rows (not header and every column needs to be present)
- Remove: parent, parent slug and term_taxonomy_id values
- If you have many categories and subcategories we suggest you import a set of your main categories (parent categories) first, this way you will create id’s to use for your subcategories. (then export again)
- When importing subcategories, set parent id values based on the term_id of the parent category, remember to not have any term_id values (first column) for your new subcategories
- Update categories
- Do your changes in your spreadsheet editor (do not edit the term_id’s)
- New categories
- Next you need to export the file as .CSV with these parameters:
- Delimeter ;
- Encoding: UTF-8
- In Bulk Category Editor, go to the tab Import & Export, select the file and click the import button
Export
↑ Back to topThe export will include all your categories and subcategories. Just use the export button and you get a .CSV file.
FAQ’s
↑ Back to topHow does admin search and filter work?
↑ Back to topWhen you use filter or search, the editor automatically filters in the table as you type. Use spaces for several phrases to narrow your search/filter.
Can I translate the extension to my language?
↑ Back to topYes, all our extensions have an included POT file that enable you to do this. Our tip is to use the Loko translate plugin.
How to set the CSS in Elementor site builder?
↑ Back to topYour theme has a set of CSS (Style sheets), sometimes your selected theme / WooCommerce CSS can override the CSS in the Product filter. Here is an example on how to fix the CSS (Theme: Hello / Elementor) when the Product filer is used to build the shop page. The CSS code:
.wbc-filter-input-search{
	width: calc(100% - 7px) !important;
}
.wbc-filter-cat-ul, .wbc-filter-cat-ul-hidden {
    margin-top: 15px !important;
    margin-left: -30px !important;
}
.wbc-filter-button-icon{
	background-color:#dde6eb !important;
	color:black !important;
}
.wbc-filter-button-icon:hover{
	background-color:#2e336a !important;
	color:white !important;
}
.wbc-filter-div-header-toggle{
    margin-top: -1px !important;
}
Use this in your theme extra CSS (WP Admin > Appearance > Customize ) add this and change hex (web colors i.e #dde6eb or named colours like black, red, orange, tomato…) colours. Tip when you do this have the shop page visible.